ボット 管理モジュール

ボット 管理コンソールの[ ボット 管理] モジュールでは、自社の開発者が開発した ボット を、Kore.ai ボット ビルダー ツールからデプロイできます。開発者が開発した ボット は、ボット 管理セクションから ボット 管理者による承認とデプロイのために公開できます。このセクションでは、

  • デプロイの承認のために送信されたカスタム ボット を承認または拒否できます。
  • ボット に定義されたタスクの一部またはすべてをデプロイできます。
  • ボット がエンタープライズ向けのために定義されている場合は従業員に対して、またはボット がコンシューマー向けのために定義されている場合は、会社の顧客に対して、デプロイした ボット を会社のユーザーまたはユーザー グループに割り当てます。

ボット のデプロイ

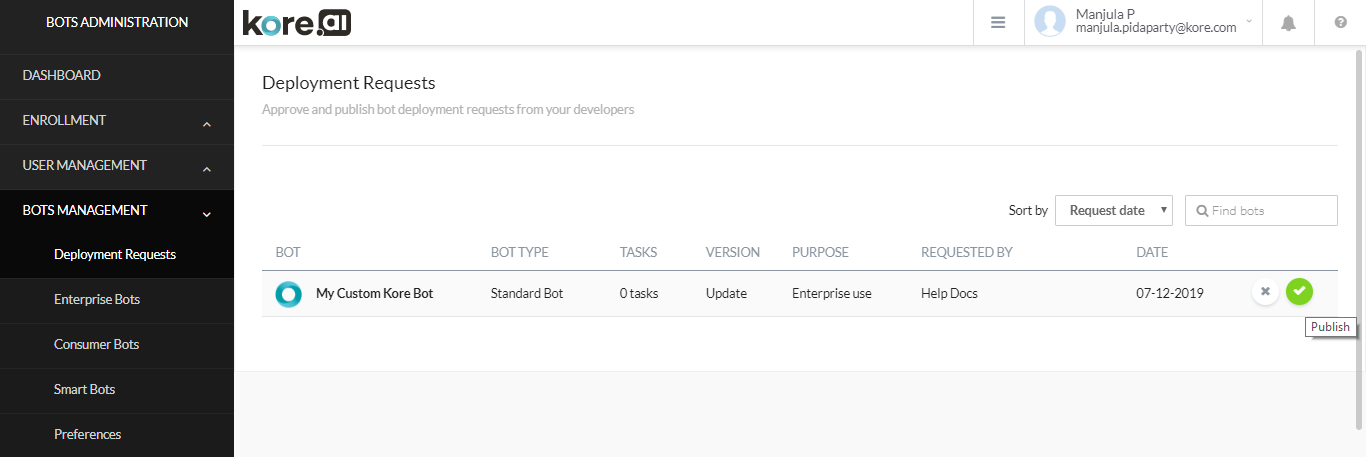
ボット管理者は ボット の許可と使用を管理できます。開発者が Kore.ai ボット ビルダー ツールから Kore.ai Store の [エンタープライズ] ページにカスタム ボット を公開すると、ボット が [デプロイ リクエスト] ページに表示されます。ボット を承認するまで、社内のどのユーザーも ボット を使用できません。その後、ボット を 1 人以上のユーザーまたは会社の顧客に割り当てます。これは、エンタープライズ向けまたはコンシューマー向けとして定義された ボット のデプロイのタイプに応じて異なります。 ボット が[ ボット 管理] モジュールの [設定] ページで ボット 管理者によって自動承認されるように設定されている場合、開発者によって ボット が公開されると、これらの ボット はすぐに承認およびデプロイされ、[デプロイ リクエスト] ページには表示されません。詳細については、ボット 管理設定を参照してください。
デプロイ ページの管理

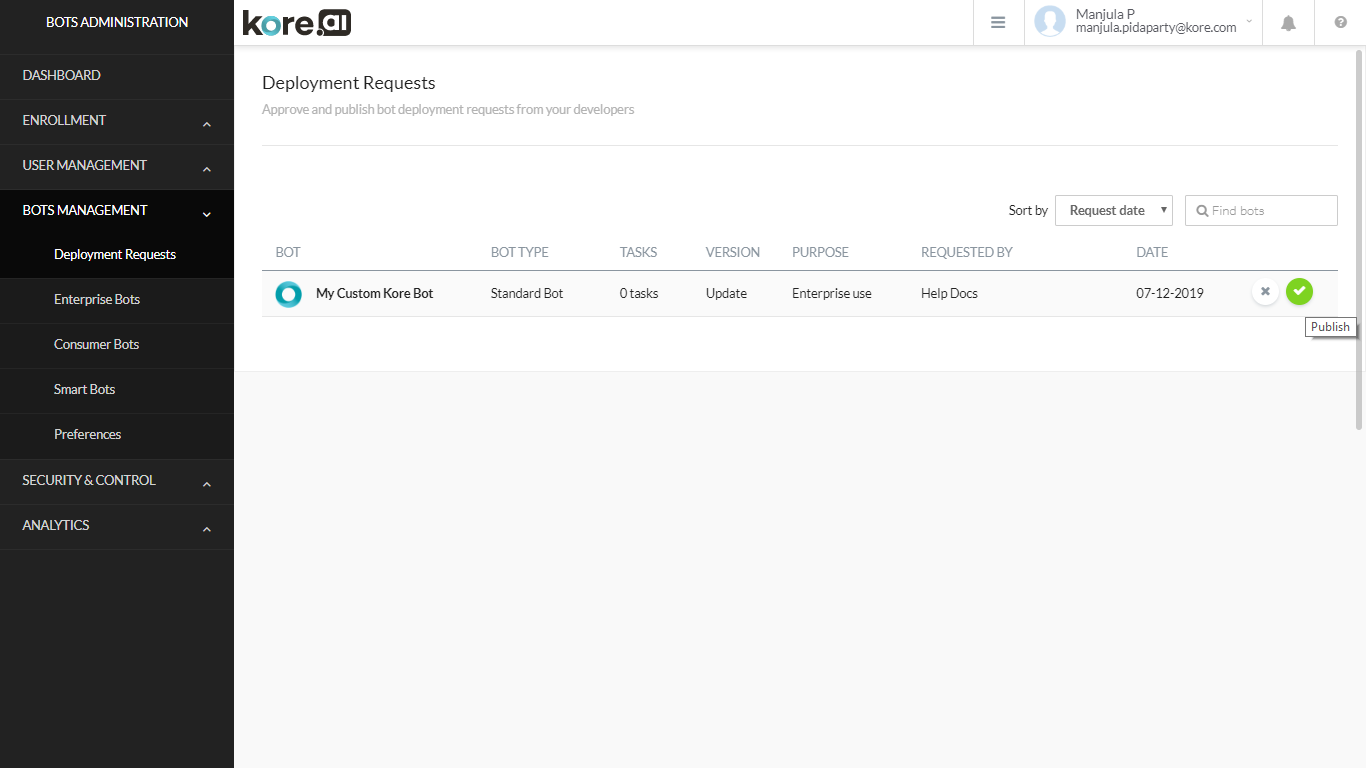
[デプロイ リクエスト] ページに表示される ボット ごとに、次の情報と管理が表示されます。

  • ボット アイコンStore で ボット を識別するために顧客のエンドユーザーに表示されるアイコン。
  • ボット 名 – ボット の名前。
  • ボット タイプ – ボット のタイプ – 標準、ユニバーサルなど。
  • タスク – ボット 内のタスク数
  • バージョン – デプロイする ボット のタイプ。以下のいずれかです。
    • 新規 – 導入されたことのない新しい Bot。
    • アップグレード – アップグレードされ、デプロイの準備が整った、以前にデプロイされた Bot。
  • 目的 – ボット の対象ユーザー。以下のいずれかです。
    • コンシューマー向け – エンタープライズの顧客およびコンシューマー向け。
    • エンタープライズ向け – エンタープライズの特定の管理対象ユーザー向け。
  • リクエスト者 – 承認を得るために ボット を送信する開発者の名前。
  • リクエスト日 – 承認を得るために 開発者がボット を送信した日付。
  • 行にカーソルを合わせると表示される[拒否 / 公開] アイコン。

ボット を許可する場合

  1. [ボット 管理] モジュールの [デプロイ リクエスト] ページで、承認する ボット の上にカーソルを置き、[OK]をクリックします。
  2. 必要に応じて、[Bot]をクリックし、存在する場合は、ボット の承認待ちのタスクを確認します。
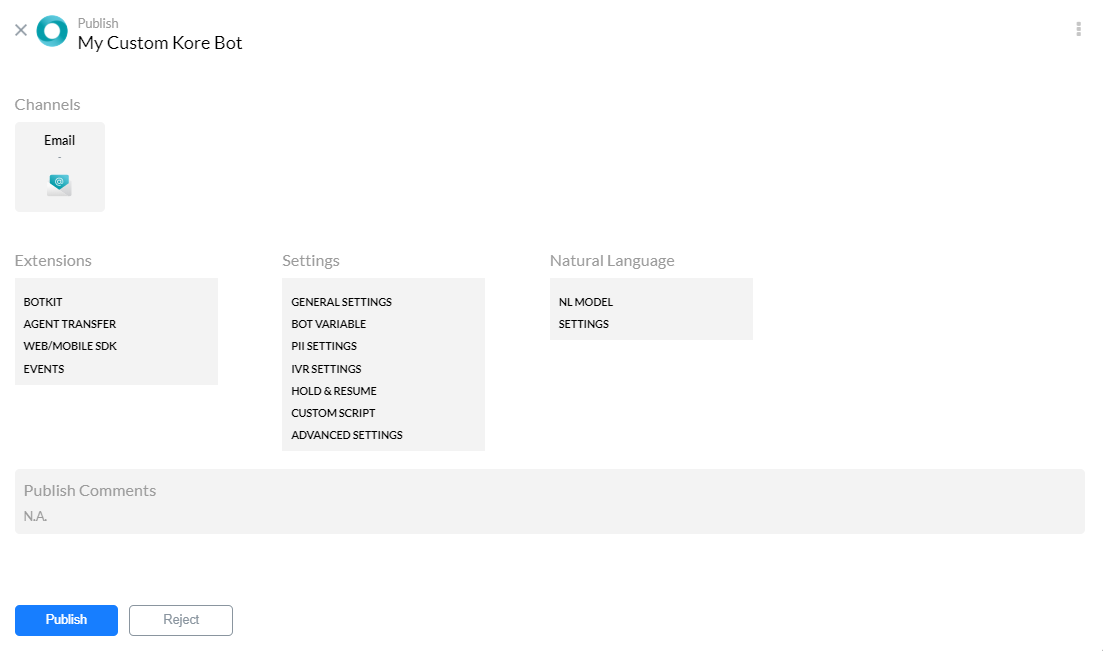
  3. ボット を選ぶと、[ボット の公開] ページが表示され、次の追加情報が表示されます。
    • ダイアログ タスクの詳細 – 名前、サポートされている言語、バージョン
    • 自然言語設定
    • 公開が許可されているチャネル
    • 存在する場合は、設定されている API 拡張機能
    • 設定
    • 開発者が入力したコメントを公開
  4. 確認して [次へ] ボタンをクリックします。更新の承認を待っている ボット の場合、[次へ] の代わりに [公開] ボタンが表示されます。
  5. プラン選択ダイアログが表示されます。エンタープライズプランのお客様の場合、このダイアログは表示されず、ボット は直接公開されます。注意: このフロー内容は、本製品のバージョン 7.0 で導入されています。
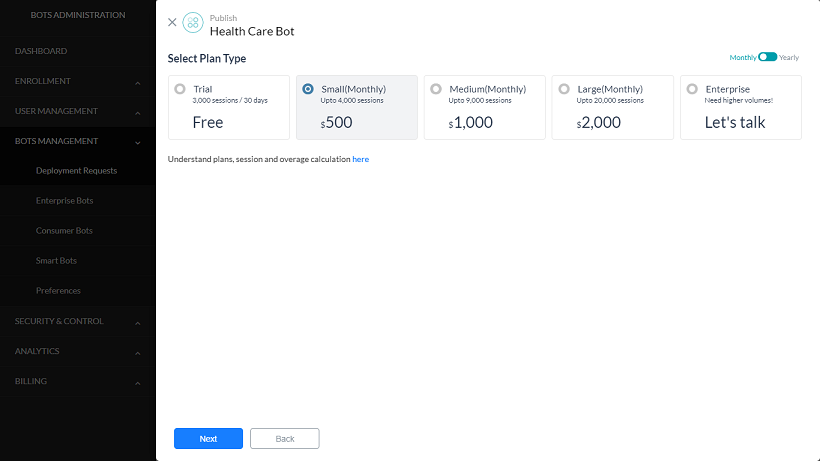
  6. ボット のニーズに合わせてプランを選びます。
  7. [次へ] ボタンをクリックすると、選択したプランの支払いを行うことができるサードパーティの支払いダイアログが表示されます。
  8. 支払いが成功すると、ボット 承認: 成功ダイアログが表示されます。
  9. [続行]をクリックします。承認された ボット に指定されたデプロイ モデルタイプに応じて、[エンタープライズ ボット ]または [コンシューマー ボット ] ページが表示されます。

タスクが承認されてデプロイされると、顧客はデプロイモデルがコンシューマー使用に設定された ボット に対して ボット を使用できるようになります。ただし、ボット 管理者が ボット 管理コンソールの [ボット 管理] モジュールにある [エンタープライズ Bot] ページでユーザーまたはグループにタスクを割り当てるまで、エンタープライズ ユーザーはタスクを利用できません。詳しくは、デプロイされたエンタープライズ ボット の管理またはデプロイされたコンシューマー ボット の管理をご覧ください。

ボット を拒否する場合

企業の従業員または顧客による ボット の使用を承認しないこともできます。更新のために ボット を開発者に戻す場合、理由を述べて ボット を拒否できます。ボット を拒否すると、その ボット は [デプロイ リクエスト] ページから削除され、ボット ビルダー ツールで、タスクのステータスが公開済みから設定済みに変更されます。その後、開発者は修正を加えて ボット を再公開し、承認を得ることができます。

  1. [ボット 管理] モジュールの [デプロイ リクエスト] ページで、拒否する ボット の上にカーソルを置くと、[拒否 / 公開] アイコンが表示されます。
  2. 必要に応じて、[ボット の詳細]をクリックして ボット の詳細を表示し、[拒否] ボタンをクリックします。
  3. ボット 拒否ダイアログが表示されます。
  4. 拒否したいタスクを選択またはクリアして、理由を入力欄にタスクを拒否する理由を入力します。
  5. [拒否]をクリックします。

ページ上部に「ボット の拒否に成功しました」のメッセージが表示され、[デプロイ リクエスト] ページから ボット が削除されます。

エンタープライズ ボット の管理

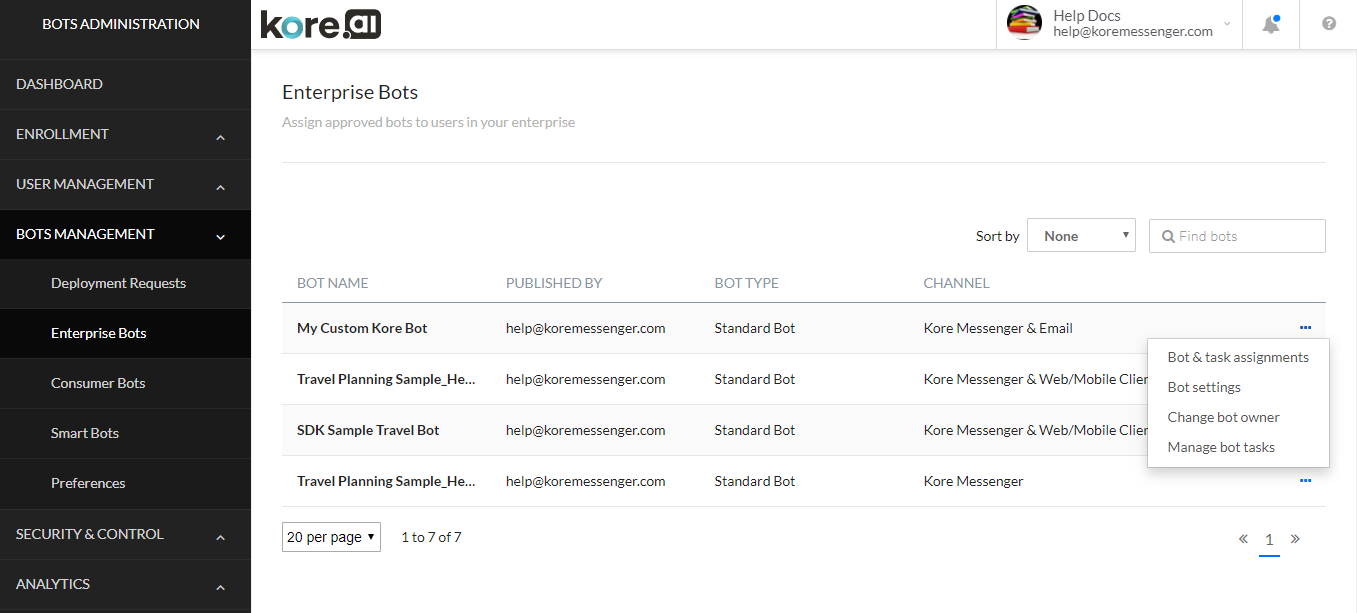
ボット 管理コンソールの[ボット 管理] モジュールにある [エンタープライズ Bot] ページでは、デプロイされた ボット や、ボット 管理が[デプロイ リクエスト] ページで承認した ボット タスクを管理できます。デプロイ モデルがエンタープライズに設定されている承認済みの ボット のみが [エンタープライズ Bot] ページに表示されます。次の図は、[ボット 管理] モジュールの [エンタープライズ Bot] ページの例です。
エンタープライズ ボット 列

以下のリストでは、各エンタープライズ ボット に表示される列について説明しています。

説明
ボット 名 ユーザーが作成した ボット の名前を表示します。
公開者 ボット を公開した開発者の名前を表示します。
ボット タイプ ボット の種類を表示します。標準、ユニバーサルなどを表示します。
チャネル ボット がアクセス可能なチャネルを表示します。

アクション バーについて

ここでは、アクション バーで使用できるコマンドについて説明します。

並べ替えの使用

企業は、数多くのタスクを自動化するために、大量の ボット を利用できます。ボット リストは、ボット 名で簡単に並べ替えできます。デフォルトでは、最後に作成された ボット が上位に表示されます。ボット を並べ替えるには、並べ替えドロップダウンリストで[ ボット 名]を選択すると、ボット のリストが名前のアルファベット順に表示されます。並べ替えを解除するには、並べ替えドロップダウンリストでなしを選びます。

検索フィールドの使用

管理者コンソール テーブルのエントリのリストは、たとえばユーザーのリストやスペースなど、会社の規模によっては非常に大きくなる場合があります。特定のユーザー、グループ、またはスペースを検索するには、[検索] フィールドに 3 文字以上を入力して入力中に検索を開始するか、[戻る] キーを押して検索を開始します。たとえば、raと入力すると、次の図のようにraの文字を含む項目が表示されます。

注意: 検索クエリ内の検索語数は無制限ですが、各検索語の最初の 20 文字を越えるものを使用すると、検索結果は返されません。

すべてのエントリを表示するには、[検索] フィールドをクリアしてから、[Enter] キーを押します。

ユーザーの割り当て

デプロイされた ボット にユーザーがアクセスできるようにするには、 ボット 管理者が ボット にユーザーを割り当てる必要があります。ボット を作成し、定義した開発者が、デプロイ モデルをエンタープライズに設定してデプロイした ボット にユーザーを割り当てるには、以下の手順を実行します。

  1. [ボット 管理] モジュールの [エンタープライズ Bot] ページで、ユーザーに割り当てる ボット の [省略記号] アイコンをクリックします。そして、[ボット とタスクの割り当て]をクリックします。次の図に示すように、ボット とタスクの割り当てダイアログが表示されます。 BotsAdminEnterpriseBotTaskAssign
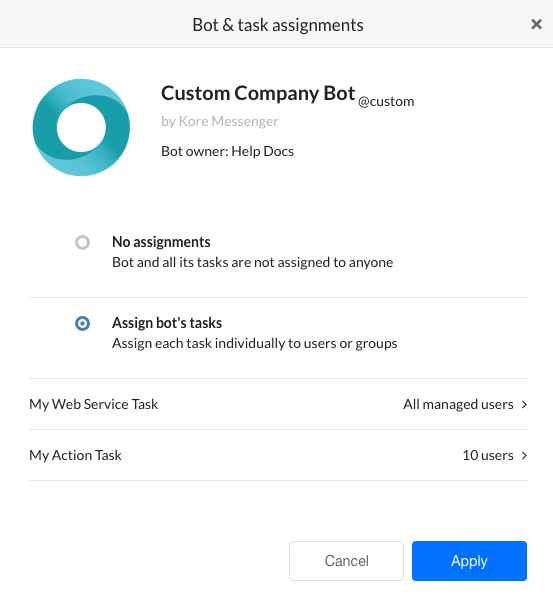
  2. すべてのユーザーに対して ボット を無効にする場合は、[割り当てなし]をクリックします。それ以外の場合は、[ボット のタスクを割り当て]をクリックします。ボット の承認済みタスクが表示されます。デフォルトでは、タスクはどのユーザーにも割り当てられていません。
  3. タスクを割り当てるには、ユーザーに割り当てるタスクの [展開BotsAdminExpandRight] アイコンをクリックします。<タスク名>ダイアログが表示されます。以下のいずれかを選びます。
    • エンタープライズ内のすべてのユーザー – 現在のすべてのユーザー、および将来追加されるユーザーは、この ボット のこのタスクにアクセスできます。
    • ユーザー グループの割り当て – クリックして、グループへの割り当てダイアログを開きます。グループ名列で追加するグループを選択し、[完了]をクリックします。詳細情報について、以下をご覧ください。
    • 個別ユーザーの割り当て – クリックして、ユーザーへの割り当てダイアログを開きます。名前列で追加するユーザーを選択し、[完了]をクリックします。
  4. [完了]をクリックします。
  5. <タスク名>ダイアログで、[完了]をクリックします。
  6. ボット 割り当て成功の確認ダイアログで、[適用]をクリックします。

ボット 設定

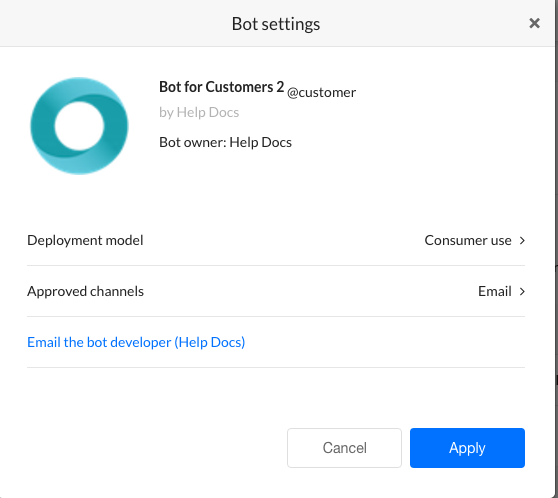
ボット 管理者として、顧客にデプロイされた ボット を管理する必要があります。ボット 設定を行って、デプロイモデルタイプを表示したり、顧客が ボット にアクセスするために使用できるチャネルを追加または削除したり、ボット のデプロイに関するメール通知を送信します。必要に応じて、承認のために ボット を公開した開発者にメールを送信することができます。たとえば、 ボット への変更をリクエストする場合などです。[ボット 管理] モジュールの [エンタープライズ Bot] ページで、ボット 設定を変更したいボット の [省略記号] アイコンをクリックします。そして、[ボット 設定]をクリックします。次の図に示すように、ボット 設定ダイアログが表示されます。BotsAdminBotEnterprisePageBotSettingsDialog ボット 設定を管理する場合
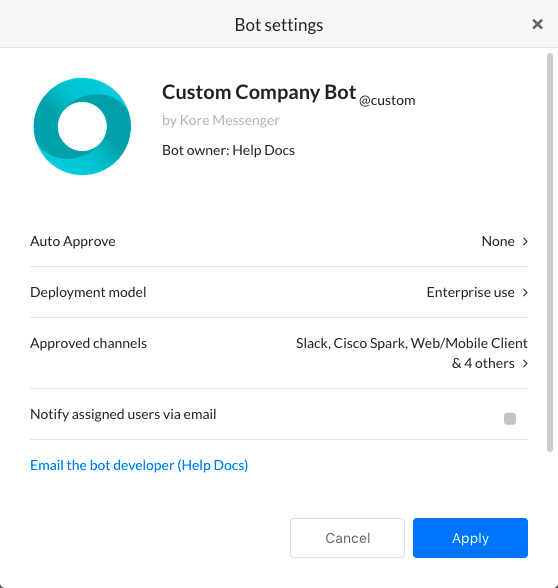
  1. 自動承認設定 – 自動承認ダイアログが表示されます。次の3 つの設定から選択できます。
    • この ボット の公開リクエストを承認しないでください – この ボット からの今後のすべての公開には、管理者による承認が必要です
    • このボットのすべての公開リクエストを自動承認する – 今後、このBotからの公開は自動的に承認されます
    • 公開リクエストに他のすべてのリクエストの次のコンポーネントのみが含まれている場合は自動承認 – 管理者が承認する必要があります
      • 新規チャネル – 追加するチャネルの ボット を自動的に承認します。
      • 新規タスク – 新しいタスクが公開されたときに ボット を自動的に承認します。
      • チャネル アップグレード – 既存の承認済みチャネルがアップグレードされると、ボット が自動的に承認されます。
      • タスク アップグレード – 既存のタスクがアップグレードされると、ボット が自動的に承認されます。
  2. デプロイ モデル – 読み取り専用のデプロイ タイプ、エンタープライズ向け、または詳しい情報については、エンタープライズ向けをご覧ください。
  3. 承認済みチャネル承認済みチャネルダイアログが表示されます。このBotに定義されている1つまたは複数のチャネルをユーザーが利用できるように選択またはクリアして、[完了]をクリックします。少なくとも1つのチャネルが有効になっている必要があります。
  4. ボット の変更を通知するメールを ボット ユーザーに送信する場合は、[割り当てられたユーザーにメールで通知]を選択します。
  5. [ボット 開発者にメールを送信 (<開発者名>)]をクリックして、デフォルトのメール アプリケーションを開き、ボット 開発者にメッセージをメールで送信します。
  6. [適用]をクリックして変更内容を保存します。

ボット オーナーの変更

ボット の所有権を変更できます。変更する場合は、

  1. 現在のオーナーに新しい役割を割り当て、
  2. 開発者のリストから新しいオーナーを選択します。

ボット タスクの管理

開発者によってアカウントで公開された ボット を承認してデプロイした後、タスクを一時停止することを決定できます。

一時停止したタスク

ボット 管理コンソールでタスクを一時停止すると、エンドユーザーは ボット からそのタスクにアクセスできなくなります。ボット は通知を送信せず、アクション リクエストに応答にしません。また、タスクに設定されているすべてのユーザーに、タスクが一時的に中断されたことを示すアラートが送信されます。タスクが有効に戻されると、すべてのユーザーにもアラートが送信されます。タスクが中断されている間、開発者は引き続き ボット ビルダー のタスクにアクセスしてアップグレードを作成したり、公開したりできますが、ボット タスクは、ボット 管理者が明示的にステータスを有効に戻すまで中断されたままとなります。承認された ボット のタスクをデプロイまたは一時停止するには、次の手順を完了します。

  1. [ボット 管理] モジュールの [エンタープライズ Bot] ページで、デプロイされたタスクをを変更したいボットの [省略記号] アイコンをクリックします。そして、[ボット とタスクの管理]をクリックします。次の図に示すように、ボット タスクの管理ダイアログが表示されます。 BotsAdminBotEnterprisePageManageBotTasksDialog
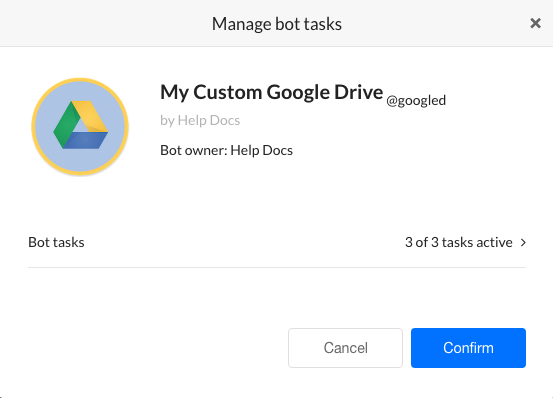
  2. [ボット タスク] フィールドで、[展開] アイコンをクリックして、利用可能なデプロイ済みのタスクを表示します。次の例に示すように、ボット タスク ダイアログが表示されます。 BotsAdminBotEnterprisePageManageBotTasks2Dialog
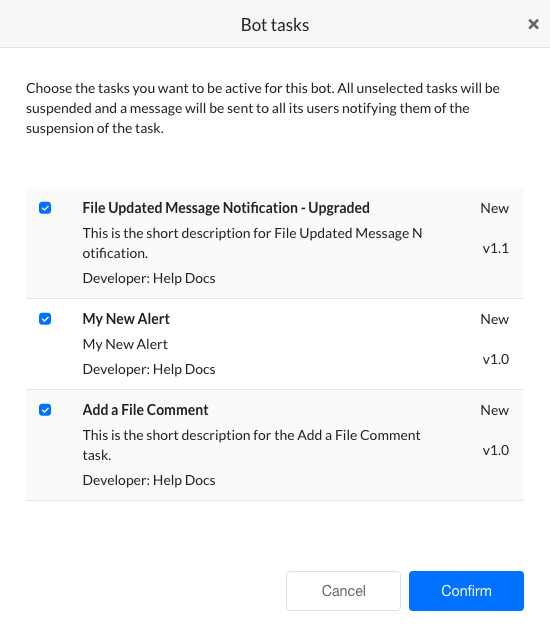
  3. タスクをデプロイまたは一時停止するには、タスクのチェックボックスを選択またはクリアにして、[確認]をクリックします。
  4. ボット タスクの管理ダイアログで、[確認]をクリックします。

ボット のステータスが正常に変更されましたというメッセージがページの上部に表示されます。

コンシューマー ボット の管理

ボット 管理コンソールの[ ボット 管理] モジュールにある [コンシューマー Bot] ページでは、デプロイされた ボット や、ボット 管理が [デプロイ リクエスト] ページで承認した ボット タスクを管理できます。デプロイ モデルがコンシューマーに設定されている承認済みの ボット のみが [コンシューマー Bot] ページに表示されます。デプロイ モデルがエンタープライズに設定されている承認済みの ボット を管理するには、エンタープライズ ボット の管理を参照します。次の図は、[ボット 管理] モジュールの [コンシューマー Bot] ページの例です。 [コンシューマー Bot] ページでは、チャネルやメール設定などの ボット 設定を確認および変更したり、ボット の承認済みタスクを管理したりできます。
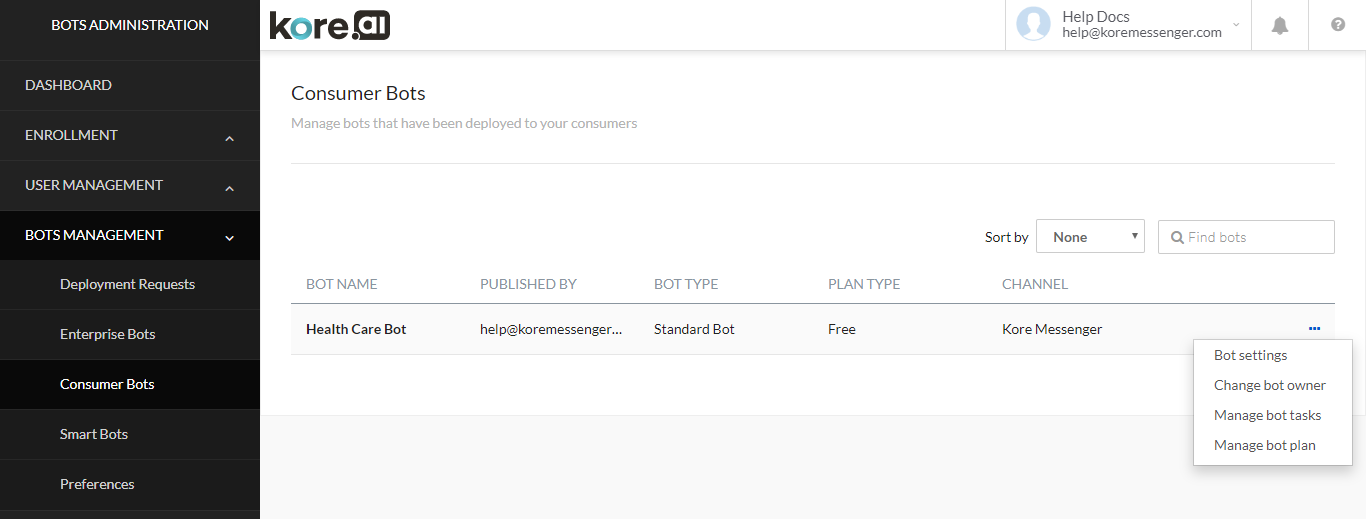
コンシューマー ボット 列

以下のリストでは、コンシューマー ボット 用に表示される列について説明しています。

説明
ボット 名 ユーザーが作成した ボット の名前を表示します。
公開者 この ボット を作成または所有する開発者の名前が表示されます。
ボット タイプ ボット のタイプを表示します。標準、ユニバーサルなどを表示します。
チャネル ユーザーが ボット にアクセスできるためのチャネルを表示します。
プラン タイプ ボット が公開されたプラン。

アクション バーについて

ここでは、アクション バーで使用できるコマンドについて説明します。

並べ替えの使用

企業は、数多くのタスクを自動化するために、大量のコンシューマー ボット を利用できます。ボット リストは、ボット 名で簡単に並べ替えできます。デフォルトでは、ボット は作成日の降順で並べ替えられます。ボット を並べ替える場合、[並べ替え] ドロップダウンリストで ボット 名のオプションを選択すると、リストがアルファベット順に表示されます。並べ替えを解除するには、並べ替えドロップダウンリストでなしを選びます。

検索フィールドの使用

管理者コンソール テーブルのエントリのリストは、たとえばユーザーのリストやスペースなど、会社の規模によっては非常に大きくなる場合があります。特定のユーザー、グループ、またはスペースを検索するには、[検索] フィールドに 3 文字以上を入力して入力中に検索を開始するか、[戻る] キーを押して検索を開始します。

注意: 検索クエリ内の検索語数は無制限ですが、各検索語の最初の 20 文字を越えるものを使用すると、検索結果は返されません。

すべてのエントリを表示するには、[検索] フィールドをクリアしてから、[Enter] キーを押します。

ボット 設定

ボット 管理者として、顧客にデプロイされた ボット を管理する必要があります。ボット 設定から、デプロイ モデル タイプを表示し、顧客が ボット にアクセスするために使用できるチャネルを追加または削除します。必要に応じて、承認のために ボット を公開した開発者にメールを送信することができます。たとえば ボット の変更をリクエストする場合などです。

  1. [ボット 管理] モジュールの [コンシューマボット ] ページで、ボット 設定を変更したいボット の [省略記号] アイコンをクリックします。そして、[ボット 設定]をクリックします。
  2. 次の図に示すように、ボット 設定ダイアログが表示されます。 BotsAdminBotConsumerPageBotSettingsDialog
  3. 自動承認設定 – 自動承認ダイアログが表示されます。次の3 つの設定から選択できます。
    • この ボット の公開リクエストを承認しないでください – この ボット からの今後のすべての公開には、管理者による承認が必要です
    • このボットのすべての公開リクエストを自動承認する – 今後、このBotからの公開は自動的に承認されます
    • 公開リクエストに他のすべてのリクエストの次のコンポーネントのみが含まれている場合は自動承認 – 管理者が承認する必要があります
      • 新規チャネル – 追加するチャネルの ボット を自動的に承認します。
      • 新規タスク – 新しいタスクが公開されたときに ボット を自動的に承認します。
      • チャネル アップグレード – 既存の承認済みチャネルがアップグレードされると、ボット が自動的に承認されます。
      • タスク アップグレード – 既存のタスクがアップグレードされると、ボット が自動的に承認されます。
  4. [デプロイ モデル] フィールドで、読み取り専用のデプロイ タイプのコンシューマー向けを表示できます。詳しくは [コンシューマー向け] をご覧ください。
  5. [承認されたチャネル] フィールドで、利用可能なチャネルまたはデプロイされたチャネルを表示および変更できます。[展開BotsAdminExpandRight] アイコンをクリックして、承認済みチャネルダイアログを表示します。このBotに定義されている1つまたは複数のチャネルをユーザーが利用できるように選択またはクリアして、[完了]をクリックします。少なくとも1つのチャネルが有効になっている必要があります。
  6. [ボット 開発者にメールを送信 (<開発者名>)]をクリックして、デフォルトのメール アプリケーションを開き、ボット 開発者にメッセージをメールで送信します。
  7. [適用]をクリックして変更内容を保存します。

ボット オーナーの変更

ボット の所有権を変更できます。変更する場合は、

  1. 現在のオーナーに新しい役割を割り当て、
  2. 開発者のリストから新しいオーナーを選択します。

ボット タスクの管理

開発者によってアカウントに公開された ボット を承認してデプロイした後、タスクを一時停止するか、一時停止されたタスクを再デプロイするか、開発者によって公開された無効なタスクを有効化できます。

一時停止したタスク

ボット 管理コンソールでタスクを一時停止すると、エンドユーザーは ボット のタスクにアクセスできなくなります。 ボット は通知を送信せず、アクション リクエストに応答にしません。また、タスクに設定されているすべてのユーザーに、タスクが一時的に中断されたことを示すアラートが送信されます。タスクが有効に戻されると、すべてのユーザーにもアラートが送信されます。タスクが中断されている間、開発者は引き続き ボット ビルダー のタスクにアクセスしてアップグレードを作成したり、公開したりできますが、ボット タスクは、ボット 管理者が明示的にステータスを有効に戻すまで中断したままとなります。承認された ボット のタスクをデプロイまたは一時停止するには、次の手順を完了します。

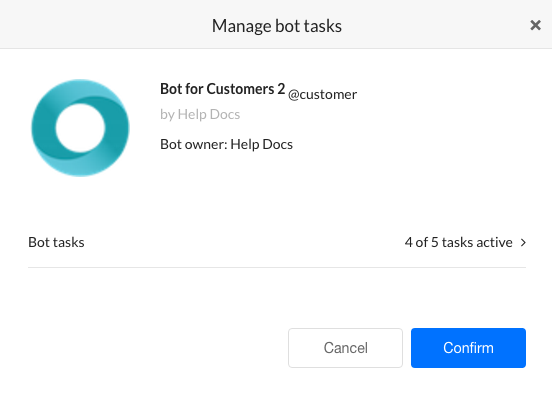
  1. [ボット 管理] モジュールの [コンシューマボット ] ページで、デプロイされたタスクを変更したいボット の [省略記号] アイコンをクリックします。そして、[ボット タスクの管理]をクリックします。次の図に示すように、ボット タスクの管理ダイアログが表示されます。 BotsAdminBotConsumerPageBotManageBotTasksDialog
  2. [ボット タスク] フィールドで、[展開BotsAdminExpandRight] アイコンをクリックして、利用可能なデプロイ済みのタスクを表示します。次の例に示すように、ボット タスク ダイアログが表示されます。 BotsAdminBotConsumerPageBotTasksDialog
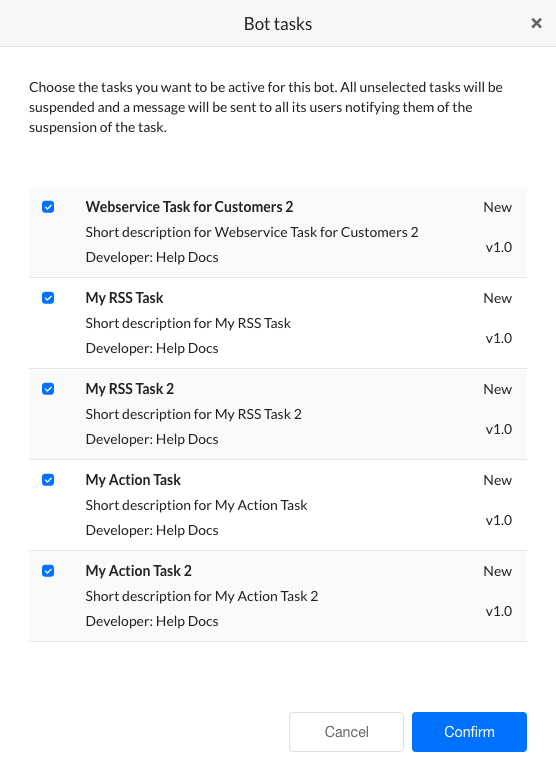
  3. タスクのチェックボックスを選択またはクリアにして、タスクを一時停止またはデプロイします。そして、[確認]をクリックします。
  4. ボット タスクの管理ダイアログで、[確認]をクリックします。

ボット のステータスが正常に変更されましたというメッセージがページの上部に表示されます。

ボット プラン

サブスクライブしたプランを表示し、必要に応じて変更できます。詳しくはこちらをご覧ください

スマート ボット の管理

ボット 管理コンソールの[ ボット 管理] モジュールにある [スマート ボット ] ページでは、デプロイされた ボット や、ボット 管理が [デプロイ リクエスト] ページで承認した ボット タスクを管理できます。承認されたスマート ボット のみが [スマート ボット ] ページに表示されます。次の図は、[ボット 管理] モジュールの [スマート Bot] ページの例です。 [スマート Bot] ページでは、チャネルやメール設定などの ボット 設定を確認および変更したり、 ボット の承認済みタスクを管理したりできます。
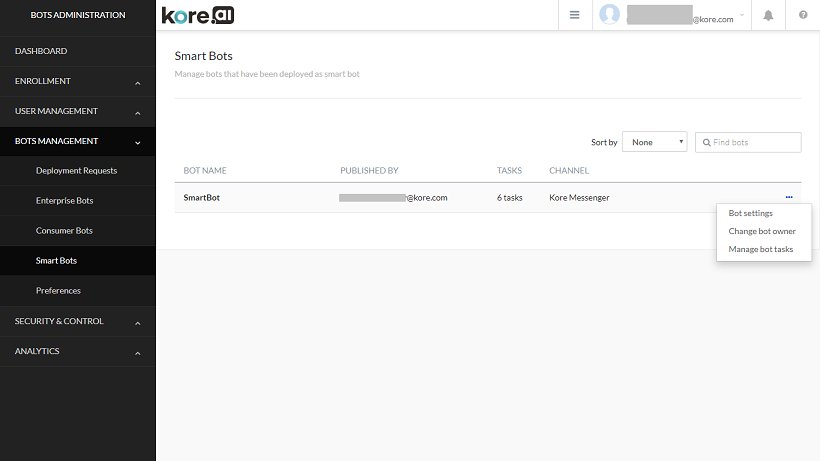
スマート ボット 列

以下のリストでは、各スマート ボット 用に表示される列について説明しています。

説明
ボット 名 ユーザーが作成した ボット の名前を表示します。
公開者 この ボット を作成した開発者の名前を表示します。
タスク ボット 内のタスク数。
チャネル ボット にアクセスするためのチャネルを表示します。

アクション バーについて

ここでは、アクション バーで使用できるコマンドについて説明します。

並べ替えの使用

企業は、数多くのタスクを自動化するために、大量のスマート ボット を利用できます。ボット リストは、ボット 名で簡単に並べ替えできます。デフォルトでは、ボット は作成日の降順に並べ替えられます。ボット を並べ替える場合、[並べ替え] ドロップダウンリストで ボット 名のオプションを選択すると、リストがアルファベット順に表示されます。並べ替えを解除するには、並べ替えドロップダウンリストでなしを選びます。

検索フィールドの使用

管理者コンソール テーブルのエントリのリストは、たとえばユーザーのリストやスペースなど、会社の規模によっては非常に大きくなる場合があります。特定のユーザー、グループ、またはスペースを検索するには、[検索] フィールドに 3 文字以上を入力して入力中に検索を開始するか、[戻る] キーを押して検索を開始します。

注意: 検索クエリ内の検索語数は無制限ですが、各検索語の最初の 20 文字を越えるものを使用すると、検索結果は返されません。

すべてのエントリを表示するには、[検索] フィールドをクリアしてから、[Enter] キーを押します。

ボット 設定

ボット 管理者として、顧客にデプロイされた ボット を管理する必要があります。ボット 設定では、顧客が ボット へのアクセスに使用するできるチャネルを追加または削除できます。また、必要に応じて、ボット への変更をリクエストするためなど、開発者にメールを送信できます。

  1. [ボット 管理] モジュールの [スマート ボット ] ページで、ボット 設定を変更したいボット の [省略記号] アイコンをクリックします。そして、[ボット 設定]をクリックします。ボット 設定ダイアログが表示されます。
  2. [自動承認] フィールドで、自動承認設定を行うことができます。次の3 つの設定から選択できます。
    • この ボット ように公開リクエストを承認しないでください – この ボット からの今後のすべての公開には、管理者による承認が必要です
    • このボットのすべての公開リクエストを自動承認する – 今後、このBotからの公開は自動的に承認されます
    • 公開リクエストに他のすべてのリクエストの次のコンポーネントのみが含まれている場合は自動承認 – 管理者が承認する必要があります
      • 新規チャネル – 追加チャネルのBotが自動的に承認されます。
      • 新規タスク – 新しいタスクが公開されたときに ボット を自動的に承認します。
      • チャネル アップグレード – 既存の承認済みチャネルがアップグレードされると、 ボット が自動的に承認されます。
      • タスク アップグレード – 既存のタスクがアップグレードされたときにボット が自動的に承認されます。
  3. [承認されたチャネル] フィールドで、利用可能なチャネルまたはデプロイされたチャネルを表示および変更できます。[展開BotsAdminExpandRight] アイコンをクリックして、承認済みチャネルダイアログを表示します。このBotに定義されている1つまたは複数のチャネルをユーザーが利用できるように選択またはクリアして、[完了]をクリックします。ボット を承認するには、少なくとも 1 つのチャネルを有効にする必要があります。
  4. [ボット 開発者にメールを送信 (<開発者名>)]をクリックして、デフォルトのメール アプリケーションを開き、ボット 開発者にメッセージをメールで送信します。
  5. [適用]をクリックして変更内容を保存します。

ボット オーナーの変更

ボット の所有権を変更できます。変更する場合は、

  1. 現在のオーナーに新しい役割を割り当て、
  2. 開発者のリストから新しいオーナーを選択します。

ボット タスクの管理

開発者によってアカウントに公開された ボット を承認してデプロイした後、タスクを一時停止するか、一時停止されたタスクを再びデプロイするか、開発者によって公開された無効なタスクを有効化できます。

一時停止したタスク

ボット 管理コンソールでタスクを一時停止すると、エンドユーザーは ボット のタスクにアクセスできなくなります。ボット は通知を送信せず、アクション リクエストに応答しません。また、タスクに設定されているすべてのユーザーに、タスクが一時的に中断されたことを示すアラートが送信されます。タスクが有効に戻されると、すべてのユーザーにもアラートが送信されます。タスクが中断されている間、開発者は引き続き ボット ビルダー のタスクにアクセスしてアップグレードを作成したり、公開したりできますが、ボット タスクは、ボット 管理者が明示的にステータスを有効に戻すまで中断したままとなります。承認された ボット のタスクをデプロイまたは一時停止するには、次の手順を完了します。

  1. [ボット 管理] モジュールの [スマート ボット ] ページで、デプロイされたタスクを変更したいボット の [省略記号] アイコンをクリックします。そして、[ ボット タスクの管理]をクリックします。
  2. ボット タスクの管理ダイアログが表示されます。
  3. [ボット タスク] フィールドで、[展開BotsAdminExpandRight] アイコンをクリックして、利用可能なデプロイ済みのタスクを表示します。次の例に示すように、ボット タスク ダイアログが表示されます。
  4. タスクのチェックボックスを選択またはクリアにして、タスクを一時停止またはデプロイします。そして、[確認]をクリックします。
  5. ボット タスク ダイアログで、[確認]をクリックします。

ボット のステータスが正常に変更されましたというメッセージがページの上部に表示されます。

ボット プラン

サブスクライブしたプランを表示し、必要に応じて変更できます。詳しくはこちらをご覧ください

設定

ボット 管理コンソールの[ ボット 管理] モジュールの [設定] ページで、管理者の承認プロセスを管理して ボット をデプロイし、エンタープライズ内の管理対象ユーザーに ボット タスクを割り当てることができます。エンタープライズ開発者が ボット または ボット タスクを公開した後、ボット を承認し、その ボット を管理対象ユーザーに割り当てる必要があります。このページでは、エンタープライズ レベルですべての ボット の承認と ボット タスクの割り当てプロセスを自動化できます。ボット レベルで自動承認設定を定義することもできます。次の図は、[ボット 管理] モジュールの [設定] ページの例です。ボット 管理設定ページ デフォルトでは、ボット 管理者は、エンタープライズ開発者によって公開された ボット を承認して割り当てる必要があります。デプロイ リクエストを自動化する場合:
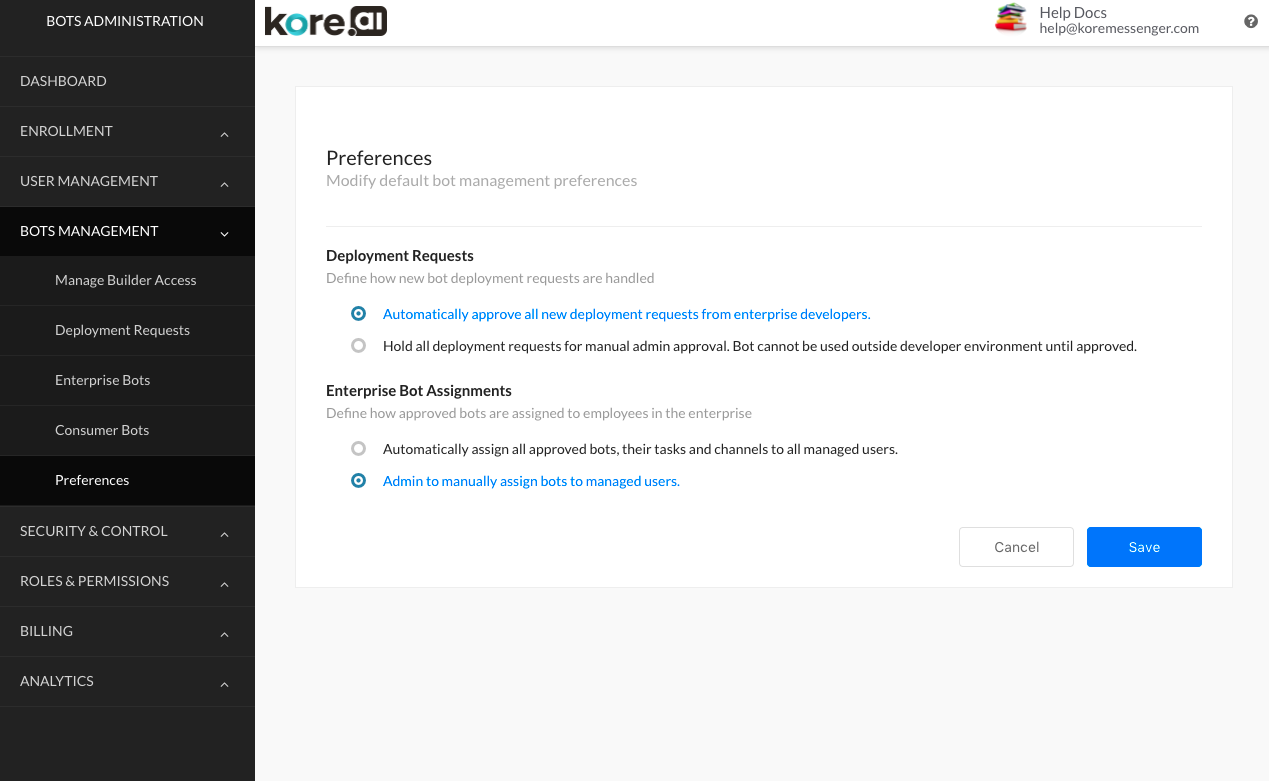
  1. [デプロイ リクエスト] セクションで、[すべての新しいデプロイ リクエストを自動的に承認]をクリックします。デプロイ リクエストが自動的に承認されると、[エンタープライズ ボット の割り当て] セクションが使用可能になります。
  2. [保存]をクリックします。

ボット の割り当てを自動化する場合

注意: デプロイ リクエストが自動化に設定されていない限り、ボット の割り当てを設定することはできません。

  1. [エンタープライズ ボット の割り当て] セクションで、[承認されたすべての Bot、タスク、チャネルを自動的に割り当てる]をクリックします。
  2. [保存]をクリックします。

デプロイ リクエストと ボット 割り当てが自動である場合、エンタープライズ開発者が ボット または ボット タスクを公開した直後に、管理対象ユーザーに新しい ボット と ボット タスクが割り当てられます。
Bots Management Module

In the Bots Management module of the Bots Admin Console, you can deploy the bots developed by your company developers from the Kore.ai Bot Builder tool. When the developer develops a bot, it can be published for approval and deployment by the Bots Admin from the Bots Management section.

From this section, you can

  • approve or reject custom bots sent for deployment approval,
  • deploy some or all of the tasks defined for a bot,
  • assign the deployed bot to users, or groups of users in your company for employees when the bot is defined for Enterprise Use, or for customers of your company when the bot is defined for Consumer Use.

Deploying Bots

As the Bots Admin, you can manage the bots permission and consumption.

After a developer publishes a custom bot from the Kore.ai Bot Builder tool to the Enterprise page at the Kore.ai Bot Store, the bot is displayed on the Deployment Requests page. Bots are not available to any users in your company until you approve the bot, and then assign that bot to one or more users, or customers for your company, depending on the bot deployment type defined as either for Enterprise use or Consumer use.

If Bots are set to be auto-approved by the Bots Admin in the Bots Management module Preferences page, when published by the developer, these Bots are immediately approved and deployed and are not displayed on the Deployment Requests page. For more information, see Bot Management Preferences.

Deployment Page Controls

For each Bot displayed on the Deployment Requests page, the following information and controls are displayed:

  • Bot Icon – The icon displayed to the end-user in the client to identify the bot in the Bot Store.
  • Bot Name – The name of the bot.
  • Bot Type – The type of the bot – standard, universal etc..
  • Tasks – number of tasks within the Bot
  • Version – The type of bot for deployment. One of:
    • New – A new bot that has never been deployed.
    • Upgrade – A previously deployed bot that was upgraded and ready to be deployed.
  • Purpose – The intended audience for the bot. One of:
    • Consumer Use – For enterprise customers and consumers.
    • Enterprise Use – For specified managed users of your enterprise.
  • Requested by – The name of the developer submitting the bot for approval.
  • Requested on – The date the developer submitted the bot for approval.
  • Reject/Publish icons which will be visible on the hover over the row.

To approve a bot

  1. On the Deployment Requests page in the Bots Management module, hover over the Bot you want to approve and click the ok icon.
  2. Optionally, click Bot to review tasks pending for approval for this bot, if any.
  3. On selecting the Bot the Bot Publish page is displayed with the following additional information
    • Dialog Task details – names, language supported and version
    • Natural Language configuration
    • Channels enabled for publishing
    • API Extensions configured if any
    • Settings
    • Publish Comments entered by the developer
  4. Review and click the NEXT button.
    For Bots awaiting approval for Update, you will see the Publish button instead of Next.
  5. The Plan Selection dialog is displayed.
    For customers on Enterprise plan, this dialog will not be displayed and the bot will be directly published.
    NOTE: This flow has been introduced in ver 7.0 of the product.
  6. Select the plan as per your Bot needs.
  7. Clicking the Next button will direct you to the 3rd party payment dialog where you can make payments for the selected plan
  8. On successful payment, the Bot Approval: Success dialog is displayed.
  9. Click Continue. The Enterprise Bots or the Consumer Bots page is displayed, depending on the Deployment model type specified for the approved  Bot.

After a task is approved and deployed, the Bot is available to customers for Bots with deployment model set to Consumer use. However, the task is still not available to enterprise users until the Bots Admin assigns the task to users or groups on the Enterprise Bots page in the Bot Management module in the Bots Admin Console. For more information, see Managing Deployed Enterprise Bots or Managing Deployed Consumer Bots.

To reject a bot

You may decide not to approve a Bot for use by employees or customers of the company. To return the Bot to the developer for an update, you can reject the Bot mentioning a reason. When you reject a bot, it is removed from the Deployments Request page, and in the Bot Builder tool, the status of the task is changed from Published to Configured. The developer can then make changes and re-publish the Bot for your approval.

  1. On the Deployment Requests page in the Bots Management module, hover over the Bot you want to reject to view the reject and publish icons.
  2. Optionally, click Bot Details to view the Bot details and click the Reject button.
  3. The Reject bot dialog is displayed.
  4. Select or clear the tasks that you want to reject, and then in the Provide a reason text field, enter the reason that you are rejecting the tasks.
  5. Click Reject.

The Bot rejected successfully message is displayed at the top of the page, and the Bot is removed from the Deployment Requests page.

Managing Enterprise Bots

On the Enterprise Bots page in the Bots Management module of the Bots Admin Console, you can manage deployed Bots and Bot tasks that are approved by the Bots Admin on the Deployment Requests page. Only approved Bots with the deployment model set to Enterprise are displayed on the Enterprise Bots page.

The following illustration is an example of the Enterprise Bots page in the Bots Management module.

Enterprise Bots Columns

The following list describes the columns displayed for each enterprise bot.

COLUMN DESCRIPTION
Bot Name Displays the name of the bot, created by the user.
Published By Displays the name of the developer that published this Bot.
Bot Type Displays the type of bot. One of Standard, Universal etc..
Channels Displays the channels from which the Bot will be accessible.

About the Action Bar

This section describes the commands available on the Action bar.

Using Sort By

A company can have a large number of bots to automate the numerous tasks. You can easily sort the bot list by Bot Name. By default, the last created bot is viewed at the top.
To sort the bots, in the Sort by drop-down list, select Bot Name to view the list of Bots in alphabetical order by name.
To remove the sorting, in the Sort by drop-down list, select None.

Using the Search Field

The list of entries in an admin console table can be very large depending on the size of your company, for example, a list of users or spaces. To find one or more specific users, groups, or spaces, in the Search field, enter at least three characters to begin find-as-you-type, or press return to start the search. For example, enter ra and any entries containing the letters ra are displayed as shown in the following illustration.

Note: The number of search terms in a search query is unlimited, however, no more than the first 20 characters of each search term is used to return search results.

To view all entries, clear the search field, and then press the Enter key.

Assigning Users

To enable users to access deployed Bots, the Bots Admin must assign users to the Bot. Complete the steps in the following procedure to assign users to a deployed Bot with the deployment model set to Enterprise by the developer that created and defined the bot.

  1. On the Enterprise Bots page in the Bots Management module, click the Ellipses icon for the Bot that you want to assign users to, and then click Bot & Task Assignments. The Bot & task assignments dialog is displayed as shown in the following illustration.
    BotsAdminEnterpriseBotTaskAssign
  2. To disable the Bot for all users, click No assignments, otherwise, click Assign Bot’s Tasks. Approved tasks for the Bot are displayed. By default, tasks are not assigned to any users.
  3. To assing tasks, click the Expand BotsAdminExpandRight icon for the task that you want to assign users to. The < Task Name > dialog is displayed. Select one of:
    • All users in your enterprise – All current users, and future users added will have access to this task for this Bot.
    • Assign user groups – Click to open the Assign to groups dialog. Select the groups you want to add in the Group Name column, and then click Done. For more information, see.
    • Assign individual users – Click to open the Assign to users dialog. Select the users you want to add in the Name column, and then click Done.
  4. Click Done.
  5. In the < Task Name > dialog, click Done.
  6. In the Bot assignment successful confirmation dialog, click Apply.

Bot Settings

As the Bots Admin, you need to manage your deployed bots to your customers.

From Bot Settings, you can view the deployment model type, add or remove channels that your customers can use to access your Bot, send email notifications for bot deployments, and if needed, send an email to the developer that published the Bot for approval, for example, to request a change to the Bot.

On the Enterprise Bots page in the Bots Management module, click the Ellipses  icon for the Bot that you want to modify Bot Settings for, and then click Bot settings. The Bot settings dialog is displayed as shown in the following illustration.
BotsAdminBotEnterprisePageBotSettingsDialog

To manage Bot Settings

  1. Auto Approve Settings – The Auto Approve dialog is displayed. There are three settings to choose from:
    • Do not approve any publish requests for this Bot – all future publish from this Bot need approvals by the Admin
    • Auto approve all publish requests for this bot – any future publish from this Bot will be approved automatically
    • Auto approve if publish requests include only following components for all other requests Admin needs to approve it:
      • New Channels – Automatically approve the Bot for channels are added.
      • New Tasks – Automatically approve the Bot when new tasks are published.
      • Channel Upgrades – Automatically approve the Bot when existing approved channels are upgraded.
      • Task Upgrades – Automatically approve the Bot when existing tasks are upgraded.
  2. Deployment model – read-only deployment type, Enterprise use or for more information, click Enterprise use.
  3. Approved channels – The Approved Channels dialog is displayed. Select or clear one or more channels defined for this bot to be available to the users, and then click Done. At least one channel must be enabled.
  4. Select Notify assigned users via email if you want an email sent to each Bot user with a notification of any changes to the Bot.
  5. Click Email the bot developer ( < Developer Name > ) to open your default mail application to email a message to the Bot developer.
  6. Click Apply to save the changes.

Change Bot Owner

You can change the ownership of the Bot. For that you need to

  1. assign a new role to the current owner and
  2. select the new Owner from the list of developers.

Managing Bot Tasks

After you approve and deploy your Bots published in your account by a developer, you may decide to suspend a task.

About Suspended Tasks

When you suspend a task in the Bots Admin console, end-user cannot access that task from he Bot. The bot will not send alerts nor respond to action requests, and an alert is sent to all users configured for the task that the task is temporarily suspended. When the task is set back to Active, then an alert is sent to all users as well.
While a task is suspended, a developer can still access the task in Bot Builder and create and publish an upgrade, but the Bot task remains suspended until the Bots Admin explicitly changes the status back to Active.

Complete the steps in the following procedure to deploy or suspend tasks for an approved Bot.

  1. On the Enterprise Bots page in the Bots Management module, click the Ellipses icon for the Bot that you want to modify deployed tasks for, and then click Manage Bot tasks. The Manage Bot tasks dialog is displayed as shown in the following illustration.
    BotsAdminBotEnterprisePageManageBotTasksDialog
  2. In the Bot tasks field, click the Expand  icon to display the available and deployed tasks. The Bot tasks dialog is displayed as shown in the following example.
    BotsAdminBotEnterprisePageManageBotTasks2Dialog
  3. Select or clear the checkbox for the task to deploy or suspend the task, and then click Confirm.
  4. In the Manage bots tasks dialog, click Confirm.

The Bot status changed successfully message is displayed at the top of the page.

Managing Consumer Bots

On the Consumer Bots page in the Bots Management module of the Bots Admin Console, you can manage deployed Bots and Bot tasks that are approved by the Bots Admin on the Deployment Requests page. Only approved Bots with the deployment model set to Consumer are displayed on the Consumer Bots page. To manage approved Bots with the deployment model set Enterprise, see Managing Enterprise Bots.

The following illustration is an example of the Consumer Bots page in the Bots Management module.

On the Consumer Bots page, you can review and modify Bot settings such as channels and email settings, and manage approved tasks for the Bot.

Consumer Bots Columns

The following list describes the columns displayed for each consumer bot.

COLUMN DESCRIPTION
Bot Name Displays the name of the bot, created by the user.
Published By Displays the name of the developer that created or owns this Bot.
Bot Type Displays the type of bot. One of Standard, Universal, etc.
Channels Displays the channels where bot will be accessible for the Users.
Plan Type The plan under which the Bot was published.

About the Action Bar

This section describes the commands available on the Action bar.

Using Sort By

A company can have a large number of consumer bots to automate the numerous tasks. You can easily sort the bot list by Bot Name. By default, the bots are sorted by descending order of creation date.
To sort the bots, in the Sort by drop-down list, select an option for Bot Name and the list is viewed in alphabetical order.
To remove the sorting, in the Sort by drop-down list, select None.

Using the Search Field

The list of entries in an admin console table can be very large depending on the size of your company, for example, a list of users or spaces. To find one or more specific users, groups, or spaces, in the Search field, enter at least three characters to begin find-as-you-type, or press return to start the search.

Note: The number of search terms in a search query is unlimited, however, no more than the first 20 characters of each search term is used to return search results.

To view all entries, clear the search field, and then press the Enter key.

Bot Settings

As the Bots Admin, you need to manage your deployed bots to your customers. In Bot Settings, you can view the deployment model type, add or remove channels that your customers can use to access your Bot, and if needed, send an email to the developer that published the Bot for approval, for example, to request a change to the Bot.

  1. On the Consumer Bots page in the Bots Management module, click the Ellipses  icon for the Bot that you want to modify Bot Settings for, and then click Bot settings.
  2. The Bot settings dialog is displayed as shown in the following illustration.
    BotsAdminBotConsumerPageBotSettingsDialog
  3. Auto Approve Settings – The Auto Approve dialog is displayed. There are three settings to choose from:
    • Do not approve any publish requests for this Bot – all future publish from this Bot need approvals by the Admin
    • Auto approve all publish requests for this bot – any future publish from this Bot will be approved automatically
    • Auto approve if publish requests include only following components for all other requests Admin needs to approve it:
      • New Channels – Automatically approve the Bot for channels are added.
      • New Tasks – Automatically approve the Bot when new tasks are published.
      • Channel Upgrades – Automatically approve the Bot when existing approved channels are upgraded.
      • Task Upgrades – Automatically approve the Bot when existing tasks are upgraded.
  4. In the Deployment model field, you can view the read-only deployment type, Consumer use or for more information, click Consumer use.
  5. In the Approved channels field, you can view and modify the channels available or deployed. Click the Expand BotsAdminExpandRight icon to display the Approved channels dialog. Select or clear one or more channels defined for this bot to be available to the users, and then click Done. At least one channel must be enabled.
  6. Click Email the bot developer ( < Developer Name > ) to open your default mail application to email a message to the Bot developer.
  7. Click Apply to save the changes.

Change Bot Owner

You can change the ownership of the Bot. For that you need to

  1. assign a new role to the current owner and
  2. select the new Owner from the list of developers.

Manage Bot Tasks

After you approve and deploy your Bots published in your account by a developer, you may decide to suspend a task or redeploy a suspended task, or activate an inactive task published by the developer.

About Suspended Tasks

When you suspend a task in the Bots Admin console, end-user cannot access that task of the bot. The bot will not send alerts nor respond to action requests, and an alert is sent to all users configured for the task that the task is temporarily suspended. When the task is set back to Active, then an alert is sent to all users as well.
While a task is suspended, a developer can still access the task in Bot Builder and create and publish an upgrade, but the Bot task remains suspended until the Bots Admin explicitly changes the status back to Active.

Complete the steps in the following procedure to deploy or suspend tasks for an approved Bot.

  1. On the Consumer Bots page in the Bots Management module, click the Ellipses  icon for the Bot that you want to modify deployed tasks for, and then click Manage Bot tasks. The Manage Bot tasks dialog is displayed as shown in the following illustration.
    BotsAdminBotConsumerPageBotManageBotTasksDialog
  2. In the Bot tasks field, click the Expand BotsAdminExpandRight icon to display the available and deployed tasks. The Bot tasks dialog is displayed as shown in the following example.
    BotsAdminBotConsumerPageBotTasksDialog
  3. Select or clear the checkbox for the task to suspend a task or deploy a task, and then click Confirm.
  4. In the Manage bots tasks dialog, click Confirm.

The Bot status changed successfully message is displayed at the top of the page.

Bot Plan

You can view and if needed change the subscribed plan. See here for details.

Managing Smart Bots

On the Smart Bots page in the Bots Management module of the Bots Admin Console, you can manage deployed Bots and Bot tasks that are approved by the Bots Admin on the Deployment Requests page. Only approved Smart Bots are displayed on the Smart Bots page.

The following illustration is an example of the Smart Bots page in the Bots Management module.


On the Smart Bots page, you can review and modify Bot settings such as channels and email settings, and manage approved tasks for the Bot.

Smart Bots Columns

The following list describes the columns displayed for each Smart bot.

COLUMN DESCRIPTION
Bot Name Displays the name of the bot, created by the user.
Published by Displays the name of the developer who created this Bot.
Tasks Number of tasks in the Bot.
Channels Displays the channels where bot will be accessible.

About the Action Bar

This section describes the commands available on the Action bar.

Using Sort By

A company can have a large number of Smart bots to automate the numerous tasks. You can easily sort the bot list by Bot Name. By default, the Bots are sorted by the descending order of creation date.

To sort the bots, in the Sort by drop-down list, select an option for Bot Name and the list is viewed in alphabetical order.
To remove the sorting, in the Sort by drop-down list, select None.

Using the Search Field

The list of entries in an admin console table can be very large depending on the size of your company, for example, a list of users or spaces. To find one or more specific users, groups, or spaces, in the Search field, enter at least three characters to begin find-as-you-type, or press return to start the search.

Note: The number of search terms in a search query is unlimited, however, no more than the first 20 characters of each search term is used to return search results.

To view all entries, clear the search field, and then press the Enter key.

Bot Settings

As the Bots Admin, you need to manage your deployed bots to your customers. In Bot Settings, you can add or remove channels that your customers can use to access your Bot, and if needed, send an email to the developer, for example, to request a change to the Bot.

  1. On the Smart Bots page in the Bots Management module, click the Ellipses  icon for the Bot that you want to modify Bot Settings for, and then click Bot settings. The Bot settings dialog is displayed.
  2. In the Auto Approve field, you can set the auto approve settings. There are three settings to choose from:
    • Do not approve any publish requests for this Bot – all future publish from this Bot need approvals by the Admin
    • Auto approve all publish requests for this bot – any future publish from this Bot will be approved automatically
    • Auto approve if publish requests include only following components for all other requests Admin needs to approve it:
      • New Channels – Automatically approve the Bot for channels are added.
      • New Tasks – Automatically approve the Bot when new tasks are published.
      • Channel Upgrades – Automatically approve the Bot when existing approved channels are upgraded.
      • Task Upgrades – Automatically approve the Bot when existing tasks are upgraded.
  3. In the Approved channels field, you can view and modify the channels available or deployed. Click the Expand BotsAdminExpandRight icon to display the Approved channels dialog. Select or clear one or more channels defined for this bot to be available to the users, and then click Done. At least one channel must be enabled to approve the bot.
  4. Click Email the bot developer ( < Developer Name > ) to open your default mail application to email a message to the Bot developer.
  5. Click Apply to save the changes.

Change Bot Owner

You can change the ownership of the Bot. For that you need to

  1. assign a new role to the current owner and
  2. select the new Owner from the list of developers.

Manage Bot Tasks

After you approve and deploy your Bots published in your account by a developer, you may decide to suspend a task or redeploy a suspended task or activate an inactive task published by the developer.

About Suspended Tasks

When you suspend a task in the Bots Admin console, end-user cannot access that task from the bot. The bot will not send alerts nor respond to action requests, and an alert is sent to all users configured for the task that the task is temporarily suspended. When the task is set back to Active, then an alert is sent to all users as well.

While a task is suspended, a developer can still access the task in Bot Builder and create and publish an upgrade, but the Bot task remains suspended until the Bots Admin explicitly changes the status back to Active.

Complete the steps in the following procedure to deploy or suspend tasks for an approved Bot.

  1. On the Smart Bots page in the Bots Management module, click the Ellipses  icon for the Bot that you want to modify deployed tasks for, and then click Manage Bot tasks.
  2. The Manage Bot tasks dialog is displayed.
  3. In the Bot tasks field, click the Expand BotsAdminExpandRight icon to display the available and deployed tasks. The Bot tasks dialog is displayed as shown in the following example.
  4. Select or clear the checkbox for the task to suspend a task or deploy a task, and then click Confirm.
  5. In the Bots tasks dialog, click Confirm.

The Bot status changed successfully message is displayed at the top of the page.

Bot Plan

You can view and if needed change the subscribed plan. See here for details.

Preferences

On the Preferences page in the Bots Management module of the Bots Admin Console, you can manage the admin approval process to deploy Bots and assign Bot tasks to managed users in your enterprise.

After an enterprise developer publishes a Bot or Bot task, you must approve the Bot, and then assign that Bot to a managed user. On this page, you can automate the approval and Bot task assignment process for all Bots at the enterprise level. You can also define auto-approve settings at the Bot level.

The following illustration is an example of the Preferences page in the Bots Management module.

Bots Management Preferences Page

By default, the Bots admin must approve and assign Bots published by enterprise developers.

To automate deployment requests:

  1. In the Deployment Requests section, click Automatically approve all new deployment requests. When deployment requests are automatically approved, the Enterprise Bot Assignments section is available.
  2. Click Save.

To automate Bot assignments

Note: Bot assignments cannot be configured unless deployment requests are set to automate.

  1. In the Enterprise Bots Assignments section, click Automatically assign all approved bots, their tasks, and channels.
  2. Click Save.

When deployment requests and Bot assignments are automatic, managed users are assigned new Bots and Bot Task immediately after the enterprise developer publishes the Bot or Bot task.