OVERVIEW
Virtual Assistants
Kore.ai Platform
Key Concepts
Natural Language Processing (NLP)
Accessing Platform
VIRTUAL ASSISTANTS
Virtual Assistant Builder
Virtual Assistant Types
Getting Started
Create a Simple Bot
SKILLS
Storyboard
Dialog Tasks
Introduction
Dialog Builder (New)
Dialog Builder (Legacy)
User Intent Node
Dialog Node
Entity Node
Supported Entity Types
Composite Entities
Supported Colors
Supported Company Names
Form Node
Logic Node
Message Nodes
Confirmation Nodes
Bot Action Node
Service Node
Custom Authentication
2-way SSL for Service nodes
Script Node
Agent Transfer Node
WebHook Node
Grouping Nodes
Connections & Transitions
Manage Dialogs
User Prompts
Knowledge Graph
Terminology
Building
Generation
Importing and Exporting
Analysis
Knowledge Extraction
Train
Build
Alert Tasks
Introduction
Ignore Words and Field Memory
How to Schedule a Smart Alert
Small Talk
Digital Views
Introduction
How to Configure Digital Views
Digital Forms
Overview
How to Configure Digital Forms
NATURAL LANGUAGE
Overview
Machine Learning
Introduction
Model Validation
Fundamental Meaning
Introduction
NLP Guidelines
Knowledge Graph
Traits
Introduction
How to Use Traits
Ranking and Resolver
Advanced NLP Configurations
INTELLIGENCE
Overview
Context Management
Overview
Session and Context Variables
Context Object
How to Manage Context Switching
Manage Interruptions
Dialog Management
Sub Intents & Follow-up Intents
Amend Entity
Multi-Intent Detection
Sentiment Management
Tone Analysis
Sentiment Management
Event Based Bot Actions
Default Conversations
Default Standard Responses
TEST & DEBUG
Talk to Bot
Utterance Testing
Batch Testing
Record Conversations
Conversation Testing
CHANNELS
PUBLISH
ANALYZE
Overview
Dashboard
Custom Dashboard
Overview
How to Create Custom Dashboard
Conversation Flows
NLP Metrics
ADVANCED TOPICS
Universal Bots
Overview
Defining
Creating
Training
Customizing
Enabling Languages
Store
Smart Bots
Defining
koreUtil Libraries
SETTINGS
Authorization
Language Management
PII Settings
Variables
Functions
IVR Integration
General Settings
Management
Import & Export
Delete
Bot Versioning
Collaborative Development
Plan Management
API GUIDE
API Overview
API List
API Collection
SDKs
SDK Overview
SDK Security
SDK App Registration
Web SDK Tutorial
Message Formatting and Templates
Mobile SDK Push Notification
Widget SDK Tutorial
Widget SDK – Message Formatting and Templates
Web Socket Connect & RTM
Using the BotKit SDK
Installing
Configuring
Events
Functions
BotKit SDK Tutorial – Agent Transfer
BotKit SDK Tutorial – Flight Search Sample Bot
Using an External NLP Engine
ADMINISTRATION
HOW TOs
Create a Simple Bot
Create a Banking Bot
Transfer Funds Task
Update Balance Task
Context Switching
Using Traits
Schedule a Smart Alert
Configure UI Forms
Add Form Data into Data Tables
Configuring Digital Views
Add Data to Data Tables
Update Data in Data Tables
Custom Dashboard
Custom Tags to filter Bot Metrics
Patterns for Intents & Entities
Build Knowledge Graph
Global Variables
Content Variables
Using Bot Functions
Configure Agent Transfer
RELEASE NOTES

スマートボットの定義

リリース8.1.0以降、スマートボット機能のサポートを終了しました。既存のスマートボットは引き続きご使用いただけますが、新しいスマートボットを作成することはできなくなります。この機能は今後のリリース以降廃止されます。

Kore.aiのスマートボットにより、エンタープライズが一元的にボットを構築し、エンタープライズ内の様々なチームがボットの設定を再利用したり、要件に合わせて拡張したりすることができるようになります。スマートボットは、あらかじめ定義されたボットの設定やタスクを新しいボットに継承させることで、ボット構築のプロセスを迅速化します。

詳しい概要はこちらをクリックしてください

このドキュメントでは、独自のスマートボットを作成し、エンタープライズアカウント内で使用する方法について説明します。

スマートボットの作成は、標準ボットの作成とよく似ており、以下の手順が含まれています。

  • ボットの作成
  • ボットタスクの定義
  • ボットのテスト
  • チャネルの設定
  • ボット設定の定義
  • 公開

上記のステップのうち、スマートボットの場合は特に注意が必要なものがあり、それについてはこのドキュメント内でご説明します。

スマートボットの作成

  1. ボットビルダーを開きます。
  2. +新規ボットをクリックします。
  3. 新しいボットを作成ウィンドウで、名前を入力し、デフォルトのボット言語を設定します。ボットタイプのドロップダウンリストからスマートボットを選択します。
  4. スマートボットのボットタスクウィンドウを開きます。
  5. タスク、フロー、テスト、改善を追加することで、標準ボットと同じようにボットを定義します。

ボットを設定する

このセクションでは、スマートボット用に特別に設定する必要のあるボットの設定についていくつかご説明します。

ボット変数の設定オプション

ボット変数は、変数を一元的に定義し、ボット定義間で再利用することができます。例えば、ボットを構築する際、開発者は通常、テスト用のステージングエンドポイントを使用します。それらのエンドポイントを変数として設定することができます。ボットをエクスポートまたは公開する際に、これらの変数値をプロダクションエンドポイントに置き換えることができます。ボット変数の定義は標準ボットと同じです。ボット変数の設定方法はこちらを参照してください

スマートボットのグローバル変数には、継承時に変数の可視性や使用方法を定義するオプションが追加されます。

  • 事前入力:このオプションを使用して、子ボットの開発者が、ボットを継承する際に変数を設定タブで変数の値を確認および編集できるようにします。
  • 非表示: ボットを継承する際に、子ボットの開発者が変数の値を確認または編集できないようにする場合に、このオプションを使用します。ただし、子ボットの開発者は、継承後に「ボットの変数」ページで変数名と値を確認することができます。
  • インストール時に要求:このオプションを使用して、ボットを継承する際に、子ボットの開発者からボット変数の値を取得します。継承されるボットの開発者は、スマートボットで設定された変数の値を確認することができず、値を入力しないとボットの継承を完了することができません。

スマートボットの設定

スマートボットを継承するために必要な環境設定は、ボット設定のスマートボットの設定タブから行えます。これらの設定は、スマートボットの検出プレビューインストールの助けとなります。

以下は、それらを設定する手順です。

  • ボットのサイドナビゲーションパネルにカーソルを合わせ、設定 > スマートボットの設定をクリックします。
  • 以下の設定を行います。
    • ユーザーがマーケットプレイスでボットをテストできるようにする:このオプションは、インストールする前に、ユーザーがマーケットプレイスからスマートボットを試すことができます。
      • はい。開発者権限での試用を許可します:このオプションを使用してこのボットの試行オプションを許可することで、お客様のアカウントのマーケットプレイスにログインして、開発者がこのボットとチャットできるようになります。
      • いいえ。試行機能を有効にしません:このオプションを使用して、お客様のアカウントのマーケットプレイスでこのボットの試行オプションを無効にします。
    • スマートボットの説明:スマートボットの説明を入力して、アカウントのマーケットプレイスに表示します。
    • 設定手順:スマートボットを使用して、開発者にインストールの指示を出すことができます。これには、利用可能なタスク一覧とその目的、入力の必要があるボット変数などの詳細が含まれます。この手順書の目的は、このボットを受け継いだ開発者が最大限にボットを活用できるようにすることです。開発者は、ボットを継承する際に、この手順書を確認すことができます。手順書を含むPDFファイルをアップロードするか、プレーンテキスト形式で入力することができます。
    • 設定手順のURL:さらに、設定方法の詳細を示すURLがある場合は、それを指定することもできます。
  • 設定を保存します。

スマートボットの継承

ボット開発者は、自分のアカウント内で公開されているスマートボットを閲覧およびインストールすることができます。

注意: 作成したスマートボットを開発者に確認及び継承してもらうためには、ボットを公開する必要があります。ボットの公開の詳細については、こちらを参照してください

スマートボットの継承ステップ

  1. ボットビルダーを開きます。
  2. ランディングページの右上にある新規ボットをクリックします。
  3. スマートボットをインストールオプションを選択します。スマートボットを選択ウィンドウが開きます。
  4. スマートボットを選択ウィンドウで、継承したいボットを検索またはスクロールします。スマートボットの名前にカーソルを合わせ、インストールをクリックします。 スマートボットを設定ウィンドウが開きます。
  5. ボット名フィールドには、スマートボットの名前に付加された拡張子が自動で入力されます。ご希望の名前に置き換えます。
  6. ボットのカスタムアイコンを追加したい場合は、アイコンフィールドでカスタムアイコンを選択して、ファイルをアップロードします。
  7. 子ボットでどのように親ボットの更新を処理するかを決める更新の優先順位を設定することができます。親ボットに変更があった場合、子ボットに対する更新は、子ボットの公開バージョンまたは開発中のバージョンに対して行われます。
    1. 利用可能な場合は、ボット定義の更新を公開されているバージョンに直接追加するのがデフォルト設定であり、すべての更新が子ボットの公開バージョンに継承されます。公開バージョンが利用できない場合は、更新は開発中のバージョンに適用されます。
      この設定は、管理コンソールの「管理者の明示的な承認がある場合のみ、すべてのデプロイリクエストおよび公開を保留する」というボットの設定よりも優先されることにご注意ください。
    2. ボット定義の更新を常に開発中のバージョンに追加するは、子ボットの開発中のバージョンに変更を適用します。開発中のバージョンが利用できない場合は、ロックされた継承状態で作成されます。開発中のバージョンでタスクやノードのロックが解除された場合は、公開済みのバージョンにも同じことが適用されることにご注意ください。
      注意:この設定は、後で子ボットの詳細設定から変更することができます。
  8. 次に、変数を設定タブをクリックします。事前入力またはインストール時に要求で設定されている変数の一覧が表示されます。インストール時に要求の変数の値を入力します。事前入力された変数があれば、任意でそれを編集します。
  9. インストールの設定ファイルが開きます。説明をよく読んでから、次へをクリックします。
  10. 子ボットが作成され、そのボットのボットタスクページが開きます。

子ボットは、スマートボットをそのまま使用すること、タスクやナレッジクエリを追加して継承された機能を拡張すること、あるいは変数を使用して関連するパラメータをローカライズすることができます。以下の継承のシナリオでは、子ボットに継承される要素一覧と、継承の継続や上書きの条件を示しています。

継承のシナリオ

子ボットでは、以下の方法で継承が適用されます。

  • 非継承:一部の要素が子ボットに継承されません。
  • 1回限りの継承:継承は1回限りで、親ボットの要素を変更しても、子ボットには継承されません。
  • 継続的な継承親ボットの要素の変更が子ボットにも引き継がれます。ボットのインストール時、またはそれ以降に詳細設定タブから設定された更新の優先順位の設定により、どのバージョンの子ボット(公開済みまたは開発中)を更新するかが決定されます。

継承を無効化: ボットレベルでの継承は、子ボットの詳細設定からスマートボットの継承オプションを使用して無効にすることができます。このオプションは、親のスマートボットから子ボットを永久にリンク解除するため、使用の際には注意します。

以下のセクションでは、継承なし、1回限りの継承、継続的な継承のボット要素一覧と、継承を解除するアクションについてご紹介します。

継承されないボット要素

  • 設定済みのチャネル
  • BotKitまたはウェブSDKに接続するためにスマートボットで作成されたアプリ

1回限りの継承のボット要素

  • エンティティの同義語
  • ボットの設定
  • 認証プロファイル
  • デフォルトダイアログ

注意: 既存のボットタスクのエンティティの同義語は一度だけ継承されますが、親ボットで作成された新しいタスクのNLPエントリは子ボットに継承されます。

継続的な継承のボット要素

子ボットに継承されるボットタスクは、継続的に継承されます。これは、親ボットのボットタスクに公開された変更は、子ボットにも自動的に反映されることを意味します。ボット要素の特定の部分を編集することで、継続的な継承を「ロック解除」することができます。以下の表は、継続的な継承を獲得するボット要素の一覧と、継承を解除するための手順を示したものです。

機能名 継承のロック解除
ダイアログタスク ダイアログタスクのページで、タスク名の横にあるロックアイコンをクリックして、ロック解除をクリックします。

ロックが解除されると、以下のダイアログコンポーネントは更新を受け取らなくなるため、子ボットの開発者が管理する必要があります。

  • ダイアログの設定と一時停止の設定
  • ノード接続の順序
  • ノードの削除
  • 新規ノードの追加

注意: ダイアログタスクのロックを解除した場合、すべてのダイアログノードは個別に解除するまでロックされたままです。ロックされたノードは、親ボットからの更新を継続して受け取ります。

ダイアログノード 同義語とパターンを除くすべてのダイアログノードの定義は、親ボットとの継続的な継承が行われます。ノードの継承をロック解除する方法は以下の通りです。

  1. ノードを使用してすべてのダイアログタスクの継承をロック解除します。
  2. ノードを開き、ノードウィンドウの右上にあるロックアイコンをクリックします。
  3. メッセージの確認ウィンドウの確認をクリックして、ノードのロックを解除します。


注意: 複数のタスクで使用されているノードでは、すべてのタスクではなく特定のタスクに対して継承をロック解除したい場合があります。

知識グラフ 子ボットは、すべての用語、FAQ、パスの同義語、用語の使用プロパティ、子用語、およびその同義語を継続的に継承します。ナレッジグラフの継承は、第1レベルのどのノードでも解除することができます。第一レベルのノードのロックアイコンをクリックしてロック解除を確認すると、その用語とその子用語すべての継承が解除されます。

ロック解除された場合、以下のコンポーネントの更新の受信が停止します。

  • ロック解除された用語およびそのすべての子用語の同義語、クラスの関連付け、およびその他の用語固有の設定
  • 用語またはその子用語に追加された質問および回答すべて
  • 子用語や質問の追加および管理が可能
  • 継承されたクラスは常に編集不可能な状態

関連する第1レベルの用語がロック状態にある場合、その用語を編集してトレーニングすることで、回答のロックを解除することができます。回答がロック解除された場合:

  • パスと質問は引き続き継承されます。
  • 回答だけでは更新することはできません。

注意:

  • ロック解除後でも、継承されたクラスを変更することはできません。ただし、クラス定義を再作成することで複製し、適切なクラスに適用することができます。
言語管理 親ボットで有効になっている言語は、子ボットにも継承されます。以下のシナリオは、子ボットでの継承をロック解除します。

  • 子ボットの言語管理は、選択された言語の継承をロック解除します。
  • 子ボットの言語の有効化は、その言語の将来の継承のロックを解除します。つまり、親ボットが同じ言語を有効にしている場合、子ボットには継承されません。
OVERVIEW
Virtual Assistants
Kore.ai Platform
Key Concepts
Natural Language Processing (NLP)
Accessing Platform
VIRTUAL ASSISTANTS
Virtual Assistant Builder
Virtual Assistant Types
Getting Started
Create a Simple Bot
SKILLS
Storyboard
Dialog Tasks
Introduction
Dialog Builder (New)
Dialog Builder (Legacy)
User Intent Node
Dialog Node
Entity Node
Supported Entity Types
Composite Entities
Supported Colors
Supported Company Names
Form Node
Logic Node
Message Nodes
Confirmation Nodes
Bot Action Node
Service Node
Custom Authentication
2-way SSL for Service nodes
Script Node
Agent Transfer Node
WebHook Node
Grouping Nodes
Connections & Transitions
Manage Dialogs
User Prompts
Knowledge Graph
Terminology
Building
Generation
Importing and Exporting
Analysis
Knowledge Extraction
Train
Build
Alert Tasks
Introduction
Ignore Words and Field Memory
How to Schedule a Smart Alert
Small Talk
Digital Views
Introduction
How to Configure Digital Views
Digital Forms
Overview
How to Configure Digital Forms
NATURAL LANGUAGE
Overview
Machine Learning
Introduction
Model Validation
Fundamental Meaning
Introduction
NLP Guidelines
Knowledge Graph
Traits
Introduction
How to Use Traits
Ranking and Resolver
Advanced NLP Configurations
INTELLIGENCE
Overview
Context Management
Overview
Session and Context Variables
Context Object
How to Manage Context Switching
Manage Interruptions
Dialog Management
Sub Intents & Follow-up Intents
Amend Entity
Multi-Intent Detection
Sentiment Management
Tone Analysis
Sentiment Management
Event Based Bot Actions
Default Conversations
Default Standard Responses
TEST & DEBUG
Talk to Bot
Utterance Testing
Batch Testing
Record Conversations
Conversation Testing
CHANNELS
PUBLISH
ANALYZE
Overview
Dashboard
Custom Dashboard
Overview
How to Create Custom Dashboard
Conversation Flows
NLP Metrics
ADVANCED TOPICS
Universal Bots
Overview
Defining
Creating
Training
Customizing
Enabling Languages
Store
Smart Bots
Defining
koreUtil Libraries
SETTINGS
Authorization
Language Management
PII Settings
Variables
Functions
IVR Integration
General Settings
Management
Import & Export
Delete
Bot Versioning
Collaborative Development
Plan Management
API GUIDE
API Overview
API List
API Collection
SDKs
SDK Overview
SDK Security
SDK App Registration
Web SDK Tutorial
Message Formatting and Templates
Mobile SDK Push Notification
Widget SDK Tutorial
Widget SDK – Message Formatting and Templates
Web Socket Connect & RTM
Using the BotKit SDK
Installing
Configuring
Events
Functions
BotKit SDK Tutorial – Agent Transfer
BotKit SDK Tutorial – Flight Search Sample Bot
Using an External NLP Engine
ADMINISTRATION
HOW TOs
Create a Simple Bot
Create a Banking Bot
Transfer Funds Task
Update Balance Task
Context Switching
Using Traits
Schedule a Smart Alert
Configure UI Forms
Add Form Data into Data Tables
Configuring Digital Views
Add Data to Data Tables
Update Data in Data Tables
Custom Dashboard
Custom Tags to filter Bot Metrics
Patterns for Intents & Entities
Build Knowledge Graph
Global Variables
Content Variables
Using Bot Functions
Configure Agent Transfer
RELEASE NOTES

Defining a Smart Bot

Starting Release 8.1.0, the support for the Smart Bots functionality is deprecated. You may continue to use the existing Smart Bots but you will no longer be able to create new Smart Bots. This feature will be discontinued in the upcoming releases.

Kore.ai’s Smart Bots allow enterprises to build Bots centrally and allow various teams within the enterprise to reuse and extend the Bot configurations to suit their requirements. Smart Bots expedite the bot building process by allowing new bots to inherit the configuration and tasks of pre-defined bots.

For a detailed overview, click here.

This document deals with how you can create your own Smart Bots and use it within your enterprise account.

Creating a Smart Bot is similar to very similar to Creating a Standard bot and involves the following steps:

  • Creating bot,
  • Defining bot tasks,
  • Testing the bot,
  • Configuring channels,
  • Defining bot settings, and
  • Publishing.

Few of the above steps need special mention in the context of Smart Bots and are discussed in this document.

Creating a Smart Bot

  1. Open the Bot Builder.
  2. Click New Bot and select the Start from Scratch option
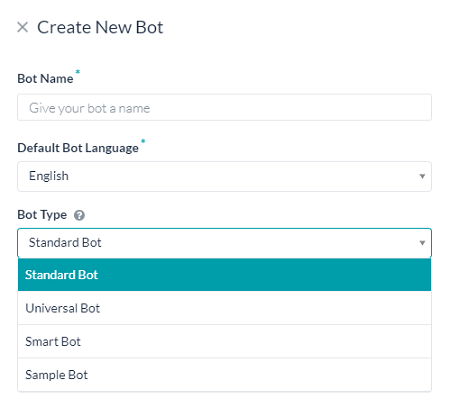
  3. On the Create New Bot window, enter a name, and set the default bot language.
  4. From the Bot Type drop-down list, select Smart Bot.
  5. It opens the Bot Tasks window of the smart bot.
  6. Define your Bot as you would any Standard Bot by adding tasks, flows, testing, and deploying.

Configure Bot Settings

Some Bot Settings that need to be configured specially for a Smart Bot are mentioned in this section.

Setup Options for Bot Variables

Bot Variables allow you to define variables centrally and reuse them across bot definition. For example, during bot building, developers typically use staging endpoints for testing. You can set those endpoints as variables. When you export or publish the bot, you can replace such variable values with the production endpoints. Defining Bot Variables remains the same as Standard Bots. Refer here to learn how to configure the Bot Variables.

Global Variables of Smart Bots will have an additional option to define the visibility or usage of variables during inheritance:

  • Pre-Populated: Use this option to allow the child bot developers to see and edit the variable value in the Setup Variables tab while inheriting the bot.
  • Hidden: Use this option when you do not want to allow the child bot developers to see or edit the variable value while inheriting the bot. They can, however, view the name and value of the variable on the Bot Variables page after inheriting.
  • Ask on Install: Use this option to get the value of the bot variable from the child bot developer while inheriting the bot. Developers of the inherited bot cannot see the variable’s value set up in the smart bot and they cannot complete inheriting the bot without entering a value.

Smart Bot Settings

Configuration settings required to inherit the smart bot can be set from the Smart Bot Settings tab in the Bot Settings. These settings serve as an aid in the discovery, preview, and installation of the Smart Bot.

Following are the steps to configure them:

  • Hover over the side navigation panel of the bot and click Settings > Smart Bot Settings.
  • Configure the following settings:
    • Allow User to Test the Bot in Marketplace: This option allows the user to try the smart bot from the marketplace before installing it.
      • Yes, allow users to try using developer authorization: Use this option to allow the Try option for this bot, so your developers can chat with this bot by logging into your account’s marketplace.
      • No, do not enable try capability: Use this option to disallow the Try options for this bot in your account’s marketplace.
    • Smart Bot Description: Enter a description for the Smart Bot to show it in your account’s marketplace.
    • Configuration Instructions: Instructions can be given to the developers using the Smart Bot for installing the same. This should include details like the list of tasks available and their purpose, bot variables that need to be populated, and so forth. The purpose of these instructions is to ensure that the developers inheriting this bot can put it to maximum use. Developers can see these instructions while inheriting the bot. You can either upload a PDF file containing the instructions or enter it in a plain text format.
    • Configuration Instructions URL: Additionally, you can provide a URL, if any, for the configuration instructions details.
  • Save the settings.

Inheriting a Smart Bot

Bot developers can view and install a Smart Bot published within their account.

NOTE: In order for the developers to see and inherit your smart bot, you need to publish it. Refer here for details on Publishing the Bot.

Steps to  Inherit a Smart Bot

  1. Open the Bot Builder.
  2. On the top-right side of the landing page, click New Bot.
  3. Select the Install Smart Bot option. The Select Smart Bot window opens.
  4. On the Select Smart Bot window, search or scroll to the bot you want to inherit. Hover over the Smart Bot’s name and click Install.  The Configure Smart Bot window opens.
  5. The Bot Name field is auto-filled with a suffix added to the Smart Bot name. Replace it with a name of your choice.
  6. If you want to add a custom icon for the bot, select Custom Icon in the icon field and upload the file.
  7. Update Preference can be set, which decides how the updates to the parent bot are to be handled by the child bot. When there are changes to the parent bot, the updates to the child bot can be made to the published version or the in-development version of the child bot.
    1. Add bot definition updates directly to published version when available is the default setting whereby all the updates get inherited by the published version of the child bot. In case the published version is not available, then the updates are applied to the in-development version  
      Note that this setting overrides the bot setting of ‘hold all deployment requests and publishing only on explicit approval from admin’ from the Admin Console.
    2. Always add bot definition updates to the in-development version will apply the changes to the in-development version of the child bot. If the in-development version is not available it is created in the locked inheritance state. Note that if any tasks or nodes are unlocked in the in-development version the same will be applied to the published version. 
      Note: This setting can be modified later from the Advanced Settings of the child bot.
  8. Next, click the Setup Variables tab. It shows the list of variables that are configured with Pre-Populated or Ask on Install settings. Enter the values for Ask on Install variables. Optionally, make edits to Pre-Populated variables if any.
  9. The Configuration Installation file opens. Read the instructions carefully and then click Next.
  10. The child bot gets created, and the Bot Tasks page of the bot opens.

The child bots can use the Smart Bot as is or extend the inherited functionality by adding tasks and knowledge queries, as well as localize relevant parameters using variables. The Inheritance Scenarios section below provides the list of elements that get inherited by the child bot and the conditions under which the inheritance continues or gets overridden.

Inheritance Scenarios

In a child bot, the inheritance applies in the following ways:

  • No inheritance where some elements do not get inherited by the child bot;
  • One-time inheritance wherein inheritance is a one-time process and any further changes to some bot elements in the parent smart bot will not be inherited by the child bot; and
  • Continued inheritance where changes to some bot elements in the parent smart bot will be inherited by the child bot. Update Preference settings configured at the time of bot installation or later from the Advanced Settings tab will decide which version of the child bot – published or in-development – will get the updates.

Disable Inheritance: Inheritance can be disabled at the bot level, from the Advanced Settings of the child bot using the Smart Bot Inheritance option. This option will permanently delink the child bot from the parent smart bot and should be used with caution.

The following sections show the list of bot elements with no, one-time and continuous inheritance and the actions that unlock the inheritance.

Bot Elements that are not Inherited

  • Any Configured Channels
  • Any apps created in the Smart Bot for connecting to BotKit or Web SDK

Bot Elements with One-Time Inheritance

  • Entity Synonyms
  • Bot Settings
  • Auth Profiles
  • Default Dialog

Note: While the Entity Synonyms of existing bot tasks have a one-time inheritance, the NLP entries of any new task created in the parent bot will get inherited by the child bots.

Bot Elements with Continued Inheritance

Bot Tasks inherited by the child bot have a continued inheritance which means that any published changes to the bot tasks in the parent automatically reflect in the child bot. You can override or “unlock” the continued inheritance of bot elements by editing a certain portion of them. The following table shows the list of bot elements that acquire a continued inheritance and provides the steps to unlock the inheritance.

Feature Name Unlocking of Inheritance
Dialog Tasks On the Dialog tasks page, click the lock icon against the task name, and then click Unlock.

Once unlocked, the following dialog components will stop receiving updates and should be managed by the child bot developer:

  • Dialog Settings and Interruption Settings
  • Order of node connections
  • Deletion of Nodes
  • Addition of New nodes

Note: When you unlock a Dialog Task, all the Dialog Nodes are still locked until you unlock them individually. The locked nodes continue to receive updates from the parent bot.

Dialog Nodes All Dialog node definitions except Synonyms and Patterns remain in the continued inheritance with the parent bot. To unlock the inheritance of the node:

  1. Unlock the inheritance of all the Dialog tasks using the node.
  2. Open the node and click the lock icon on the top-right corner of the node window.
  3. Click Confirm on the Confirmation Message window to unlock the node.
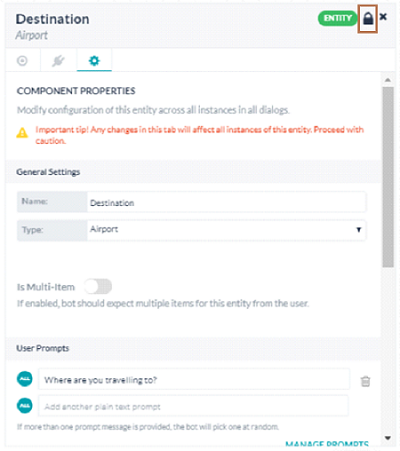

Note: For a node that is used by multiple tasks, you might want to unlock the inheritance for a specific task and not all tasks.

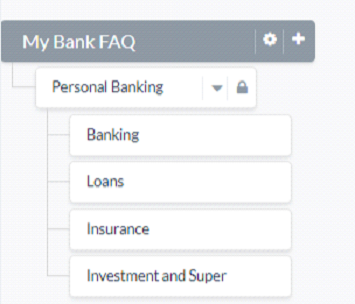
Knowledge Graph Child bots get continued inheritance of all terms, FAQs, path synonyms, term usage property, child terms, and their synonyms. You can unlock the inheritance of a Knowledge Graph at any of the first-level nodes. When you click the lock icon of a first-level node and confirm unlocking it, the inheritance of the term and all its child terms becomes unlocked.

When unlocked, the following components will stop receiving updates:

  • Synonyms, class association, and other term specific settings of the unlocked term and all its child terms
  • All questions and answers added either to the term or its child terms
  • Additional child terms, additional questions can be added and managed
  • Inherited classes are always in a non-editable state

Answers can be unlocked when the associated first-level term is in a locked state by editing and training the same. When an answer is unlocked:

  • Path and the question will continue to get the inheritance
  • Answers, alone,  will not get updates

Note:

  • You cannot modify inherited classes even after unlocking. However, you can duplicate the class definition by re-creating it and apply it to appropriate classes.
Language Management Any Languages Enabled by the parent bot are inherited by the child bot. Following scenarios unlock the inheritance in the child bot:

  • Manage Language from the child bot will unlock the inheritance for the selected language.
  • Enable Language from the child bot will unlock any future inheritance for that language i.e if the parent bot enables the same language it will not be inherited by the child bot.