OVERVIEW
Virtual Assistants
Kore.ai Platform
Key Concepts
Natural Language Processing (NLP)
Accessing Platform
VIRTUAL ASSISTANTS
Virtual Assistant Builder
Virtual Assistant Types
Getting Started
Create a Simple Bot
SKILLS
Storyboard
Dialog Tasks
Introduction
Dialog Builder (New)
Dialog Builder (Legacy)
User Intent Node
Dialog Node
Entity Node
Supported Entity Types
Composite Entities
Supported Colors
Supported Company Names
Form Node
Logic Node
Message Nodes
Confirmation Nodes
Bot Action Node
Service Node
Custom Authentication
2-way SSL for Service nodes
Script Node
Agent Transfer Node
WebHook Node
Grouping Nodes
Connections & Transitions
Manage Dialogs
User Prompts
Knowledge Graph
Terminology
Building
Generation
Importing and Exporting
Analysis
Knowledge Extraction
Train
Build
Alert Tasks
Introduction
Ignore Words and Field Memory
How to Schedule a Smart Alert
Small Talk
Digital Views
Introduction
How to Configure Digital Views
Digital Forms
Overview
How to Configure Digital Forms
NATURAL LANGUAGE
Overview
Machine Learning
Introduction
Model Validation
Fundamental Meaning
Introduction
NLP Guidelines
Knowledge Graph
Traits
Introduction
How to Use Traits
Ranking and Resolver
Advanced NLP Configurations
INTELLIGENCE
Overview
Context Management
Overview
Session and Context Variables
Context Object
How to Manage Context Switching
Manage Interruptions
Dialog Management
Sub Intents & Follow-up Intents
Amend Entity
Multi-Intent Detection
Sentiment Management
Tone Analysis
Sentiment Management
Event Based Bot Actions
Default Conversations
Default Standard Responses
TEST & DEBUG
Talk to Bot
Utterance Testing
Batch Testing
Record Conversations
Conversation Testing
CHANNELS
PUBLISH
ANALYZE
Overview
Dashboard
Custom Dashboard
Overview
How to Create Custom Dashboard
Conversation Flows
NLP Metrics
ADVANCED TOPICS
Universal Bots
Overview
Defining
Creating
Training
Customizing
Enabling Languages
Store
Smart Bots
Defining
koreUtil Libraries
SETTINGS
Authorization
Language Management
PII Settings
Variables
Functions
IVR Integration
General Settings
Management
Import & Export
Delete
Bot Versioning
Collaborative Development
Plan Management
API GUIDE
API Overview
API List
API Collection
SDKs
SDK Overview
SDK Security
SDK App Registration
Web SDK Tutorial
Message Formatting and Templates
Mobile SDK Push Notification
Widget SDK Tutorial
Widget SDK – Message Formatting and Templates
Web Socket Connect & RTM
Using the BotKit SDK
Installing
Configuring
Events
Functions
BotKit SDK Tutorial – Agent Transfer
BotKit SDK Tutorial – Flight Search Sample Bot
Using an External NLP Engine
ADMINISTRATION
HOW TOs
Create a Simple Bot
Create a Banking Bot
Transfer Funds Task
Update Balance Task
Context Switching
Using Traits
Schedule a Smart Alert
Configure UI Forms
Add Form Data into Data Tables
Configuring Digital Views
Add Data to Data Tables
Update Data in Data Tables
Custom Dashboard
Custom Tags to filter Bot Metrics
Patterns for Intents & Entities
Build Knowledge Graph
Global Variables
Content Variables
Using Bot Functions
Configure Agent Transfer
RELEASE NOTES

OAuth v2を使用した認証の設定

OAuth v2は新規のWeb、モバイル、デスクトップアプリケーションから簡単に標準的な方法で安全認証を可能にするオープンプロトコルです。oAuth v2の使用で認証メカニズムの設定を設定するためには、そのアプリケーションのログイン認証クレデンシャルが必要になるため、まずはウェブアプリケーションにアカウントをログインする必要があります。

oAuth v2の仕組み

  1. Kore.ai アプリケーションはユーザーをウェブアプリケーションのロクインダイアログへ導き直します。
  2. ユーザーは認証します。
  3. ウェブアプリケーションはアクセストークンでユーザーをKore.ai アプリケーションへ導き直します。
  4. Kore.ai アプリケーションはアクセストークンを検証します。
  5. アクセストークンはKore.aiアプリケーションをユーザーの身分として、提供元の保護済のリソースへアクセスことを可能にします。

oAuth v2の定義

ボットに認証を定義するには、以下の手順に従います。

  1. 認証プロファイルを設定するボットを開きます。
  2. 左側のナビゲーションパネルにカーソルを合わせ、設定 > 設定するから認証プロファイルを選択します。
  3. 追加をクリックします。新しい認証メカニズムダイアログが開きます。
  4. 認証タイプドロップダウンリストでauth v2を選択します。
  5. 名前フィールドに認証の名前を入力します。

以下の図は、ボットの基本認証を有効にするために定義する必要がある、oAuth v2フィールドの例です。
oAuth v2の調整は、下記のテーブルの説明の通りにフィルドを定義してください。

フィールド名 説明
認証タイプ OAuth v1 に設定します。
ボットのコールバックリンク エンドユーザーの認証が完了した後、エンドユーザーを導き直しするためにウェブアプリケーションまたはウェブサービスが使用するURLです。oAuth v2の設定を定義すると、Kore.ai アプリケーションがhttps://idp.kore.ai/workflows/callback/をリードオンリー値として提供します。
身分の提供元の名前 ウェブアプリケーションやウェブサービスの名前、例えば、アサナ。このフィールドは必須です。
クライアント ID Kore.ai クライアントの IDです。
クライアントシックレットキー Kore.aiアプリケーションがクライアント IDに基づきウェブアプリケーションへの認証として提供される値。
認証 URL This is the URL used to obtain end-user authorization for the Kore.ai application to access the web application or web service using the access token.このフィールドは必須です。ダイナミックフィールド、パスパラメータフィールド、クエリフィールドなどを使用して、認証URLを定義することができます。(例:https://kore.someCompany.com/sap/opu/odata/sap/{{authfield1}}/?$format=json またはhttps://{tenant}.service-now.com/api/now/v1/table/incident)詳細については、タスクのセッション変数とコンテキスト変数を使用を参照してください。
コネクタを使用してアクセス はいを選択してKore.ai ConnectorエージェントでKore.ai ボットにアクセスできるようにします。このオプションは、Kore.ai コネクタ エージェントが企業の社内ネットワークで構成、有効化されている場合に表示されます。詳細については、Kore.ai Connectorの使用をご覧ください。
トークンリクエストURL Kore.ai アプリケーションが未認証のリクエストトークンを取得するために使用するURLです。リクエストトークンとはKore.aiアプリケーションがアクセストークンを取得ためのエンドユーザーからの認証を取得ための値。エンドユーザーの認証の後、Kore.aiアプリケーションからアクセストークンを要求することができます。このフィールドは必須です。
スコープ ボットのウェブサービスが認証のために追加の値を必要とする場合、1つ以上のキー/値の組み合わせを追加します。例えば、一部のボットのウェブサービスは、読み取り専用書き込み、またはその両方を値とするスコープキーの使用をサポートしています。

テナントを定義する

テナントを定義するWeb アプリケーションやユーザー インターフェイスがベース URL にテナント名を使用する場合は、必要に応じて [サブドメイン] セクションで [はい] を選択します。例えば、koreは、www.kore.someCompany.comとしてテナントを使用したウェブサービスのテナント組織です。下記の設定の例では、テンナンシーURLは{tenant}組織のプレースホルダが含まれます。
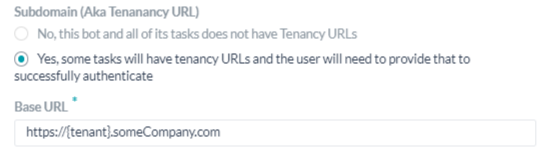
フィールドの追加

追加をクリックして追加のフィールドダイアログを開き、追加の認証入力フィールドを表す1つ以上のキー/値の組み合わせを入力します。デフォルトのユーザー名とパスワードのフィールドが承認入力のニーズを満たしていない場合は、 追加フィールド を追加することで、エンドユーザーに表示されるキーと値のペアとしてカスタムフィールドを追加できます。これらのフィールドは、たとえば、ユーザー名フィールドとパスワードフィールドに加えて、認証プロセスでPINコードが必要な場合に使用することができます。下図のように、追加のフィールドが追加されます。
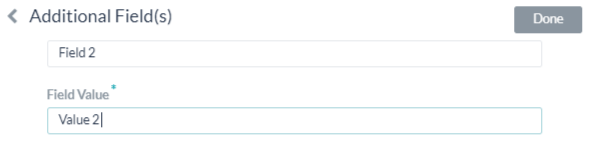
 以下のフィルドを指定 してください:

  • フィールド キー – 認証に指定するカスタム フィールド名です。
  • – カスタム フィールドの認証に指定する値です。

追加をクリックして追加のフィールドを保存します。追加のフィールドを追加する場合、認証フィールドセクションの追加をクリックしてください。

認証フィールドの追加

デフォルトでは、ボットリクエストメッセージのヘッダーの一部として、認証フィールドは設定されていません。ボットリクエストに認証フィールドが必要、または想定される認証がヘッダーの一部ではない場合(例:ソーシャルセキュリティ番号やPINなど)、認証フィールド追加をクリックして下図の通りにフィールドを定義します。

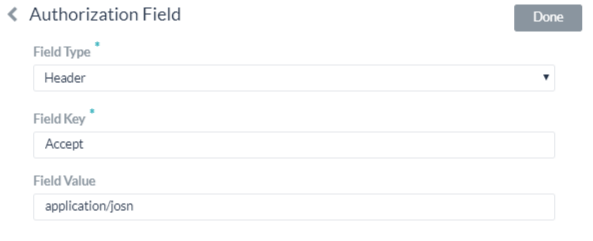
  1. フィールドタイプフィルドに、以下のうちの一つを選択することができます: 必須のボットリクエストメッセージの位置および認証フィルドのタイプの次第です。
    • ヘッダー – ボットは認証フィールドをリクエストのヘッダーの一部として求めます。
    • ペイロード – ボットは認証フィールドをリクエスト本体のコンテンツの一部として求めます。
    • クエリー文字列―ボットは認証フィールドをリクエストのボディにあるクエリー として予想します。
    • パースパラメータ(PathParam)―認証フィールドをURLパースリクエストの一部として予想されるボット。
  2. フィールドキーフィールドに、選択済のフィールドタイプフィールド名を入力してください。
  3. フィールド値フィールドに、フィールドキーの指定された値を入力してください。
  4. 追加をクリックします。新規の認証フィールドは認証フィールドのセクションに追加されました。

認証フィールドを追加する場合、認証フィールドセクションの追加をクリックしてください。
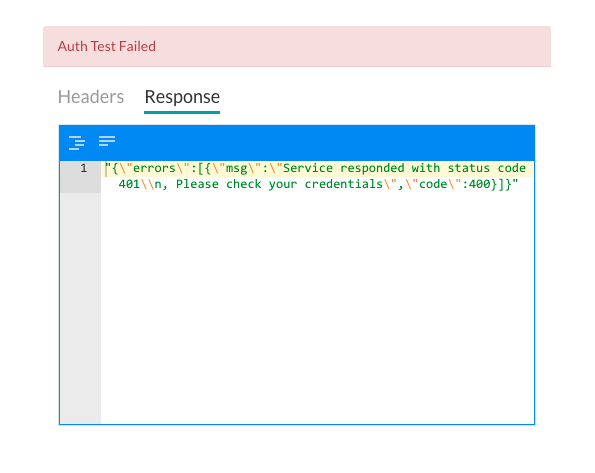
認証テスト

認証を保存した後、タスクの残りのステップの開発を続ける前に、認証ページでテストをクリックして、認証定義をテストすることができます。テストをクリックすると、認証トークンのURLとクライアントIDおよびクライアントシックレットキーを使用してテストが実行されます。テンナンシーが定義済みの場合、テスト認証ダイアログが表示されます。テストをクリックすると認証テストを開始します。認証の検証が完了すると、次の図のようにテスト認証のダイアログが閉じられ、成功または失敗の検証結果がテスト認証ボタンの右横に表示されます。認証失敗の場合、下記の図の通りに、認証テスト失敗のメッセージはヘッダーおよび応答のタブとともに表示します。 テスト認証失敗のダイアログ

OVERVIEW
Virtual Assistants
Kore.ai Platform
Key Concepts
Natural Language Processing (NLP)
Accessing Platform
VIRTUAL ASSISTANTS
Virtual Assistant Builder
Virtual Assistant Types
Getting Started
Create a Simple Bot
SKILLS
Storyboard
Dialog Tasks
Introduction
Dialog Builder (New)
Dialog Builder (Legacy)
User Intent Node
Dialog Node
Entity Node
Supported Entity Types
Composite Entities
Supported Colors
Supported Company Names
Form Node
Logic Node
Message Nodes
Confirmation Nodes
Bot Action Node
Service Node
Custom Authentication
2-way SSL for Service nodes
Script Node
Agent Transfer Node
WebHook Node
Grouping Nodes
Connections & Transitions
Manage Dialogs
User Prompts
Knowledge Graph
Terminology
Building
Generation
Importing and Exporting
Analysis
Knowledge Extraction
Train
Build
Alert Tasks
Introduction
Ignore Words and Field Memory
How to Schedule a Smart Alert
Small Talk
Digital Views
Introduction
How to Configure Digital Views
Digital Forms
Overview
How to Configure Digital Forms
NATURAL LANGUAGE
Overview
Machine Learning
Introduction
Model Validation
Fundamental Meaning
Introduction
NLP Guidelines
Knowledge Graph
Traits
Introduction
How to Use Traits
Ranking and Resolver
Advanced NLP Configurations
INTELLIGENCE
Overview
Context Management
Overview
Session and Context Variables
Context Object
How to Manage Context Switching
Manage Interruptions
Dialog Management
Sub Intents & Follow-up Intents
Amend Entity
Multi-Intent Detection
Sentiment Management
Tone Analysis
Sentiment Management
Event Based Bot Actions
Default Conversations
Default Standard Responses
TEST & DEBUG
Talk to Bot
Utterance Testing
Batch Testing
Record Conversations
Conversation Testing
CHANNELS
PUBLISH
ANALYZE
Overview
Dashboard
Custom Dashboard
Overview
How to Create Custom Dashboard
Conversation Flows
NLP Metrics
ADVANCED TOPICS
Universal Bots
Overview
Defining
Creating
Training
Customizing
Enabling Languages
Store
Smart Bots
Defining
koreUtil Libraries
SETTINGS
Authorization
Language Management
PII Settings
Variables
Functions
IVR Integration
General Settings
Management
Import & Export
Delete
Bot Versioning
Collaborative Development
Plan Management
API GUIDE
API Overview
API List
API Collection
SDKs
SDK Overview
SDK Security
SDK App Registration
Web SDK Tutorial
Message Formatting and Templates
Mobile SDK Push Notification
Widget SDK Tutorial
Widget SDK – Message Formatting and Templates
Web Socket Connect & RTM
Using the BotKit SDK
Installing
Configuring
Events
Functions
BotKit SDK Tutorial – Agent Transfer
BotKit SDK Tutorial – Flight Search Sample Bot
Using an External NLP Engine
ADMINISTRATION
HOW TOs
Create a Simple Bot
Create a Banking Bot
Transfer Funds Task
Update Balance Task
Context Switching
Using Traits
Schedule a Smart Alert
Configure UI Forms
Add Form Data into Data Tables
Configuring Digital Views
Add Data to Data Tables
Update Data in Data Tables
Custom Dashboard
Custom Tags to filter Bot Metrics
Patterns for Intents & Entities
Build Knowledge Graph
Global Variables
Content Variables
Using Bot Functions
Configure Agent Transfer
RELEASE NOTES

Setting Up Authorization using OAuth v2

OAuth v2 is the new version of the open protocol to allow secure authorization in a simple and standard method from web, mobile, and desktop applications.

To use oAuth v2, you must first register an account with the web application as you will need the sign in credentials for that application to configure the settings for the Authorization Mechanism.

How oAuth v2 Works

  1. The Kore.ai application redirects the user to a login dialog at the web application.
  2. The user authenticates.
  3. The web application redirects the user back to the Kore.ai application with an access token.
  4. The Kore.ai application validates the access token.
  5. The access token allows the Kore.ai application to access a protected resource at the provider, on behalf of the user.

Defining oAuth v2

To define Authorization for your bot, follow these steps:

  1. Open the bot for which you want to configure an Authorization profile.
  2. Select the Build tab from the top menu.
  3. From the left menus, click Configurations -> Authorization Profile
  4. Click Add. The New Authorization Mechanism dialog opens.
  5. In the Authorization Type drop-down list, select auth v2.
  6. In the Name field, enter the name for your authorization.

The following illustration is an example of the oAuth v2 fields that you must define to enable basic authorization for your Bot.

To configure oAuth v2, define the fields described in the following table.

FIELD NAME DESCRIPTION
Authorization Type Set to oAuth v2.
Bots Callback Link The URL used by the web application or web service to redirect the end-user after end-user authorization is complete. This value, https://idp.kore.ai/workflows/callback/ is provided as a read-only value by the Kore.ai application when you define oAuth v2 settings.
Identity Provider Name The name of the web application or web service, for example, Asana. This field is required.
Client ID The ID of the Kore.ai client.
Client Secret Key The value provided as the Kore.ai application authentication based on the Client ID to the web application.
Authorization URL This is the URL used to obtain end-user authorization for the Kore.ai application to access the web application or web service using the access token. This field is required. You can use dynamic fields, path parameter fields, query fields, and so forth, to define the Authorization URL, for example,
     https://kore.someCompany.com/sap/opu/odata/sap/{{authfield1}}/?$format=json
or
     https://{tenant}.service-now.com/api/now/v1/table/incident
For more information, see Using Session and Context Variables in Tasks.
Access Using a Connector Select Yes to enable access for Kore.ai Bots using the Kore.ai Connector agent. This option is only visible if a Kore.ai Connector agent is configured and enabled in your enterprise on-premises network. For more information, see Using the Kore.ai Connector.
Token Request URL The URL used by the Kore.ai application to obtain an unauthorized request token. A request token is a value used by the Kore.ai application to obtain authorization from the end-user to obtain an access token. After end-user authorization, an access token can be requested by the Kore.ai application. This field is required.
Scope If the Bot web service requires additional values for authorization, add one or more Key/Value pairs. For example, some Bot web services support using a scope key using read-only, write, or both as the value.

Defining Tenancy

If required, in the Subdomain section, select Yes if the base URL for a web application or user interface that uses a tenant name in the URL. For example, kore is the tenant organization for a web service using tenants at www.kore.someCompany.com.

In the following example configuration, the tenancy URL contains the {tenant} organization placeholder.

Adding Additional Fields

Click Add to open the Additional Fields dialog and then enter one or more key/value pairs that represent additional authorization input fields.

If the default username and password fields do not meet your needs for authorization input, you can add custom fields as key/value pairs that are displayed to the end-user by adding Additional Fields. You can use these fields, for example, if a PIN code is required in the authorization process, in addition to the Username and Password fields.

Additional Fields are added as shown in the following illustration.


Specify the following fields:

  • Field Key – The name of the custom field to specify for authorization.
  • Value – The value of the custom field to specify for the authorization.

Click Add to save the Additional Field.
To add more Additional Fields, click Add in the Additional Fields section.

Adding Authorization Fields

By default, no authorization fields are configured as part of the header of the Bot request message. If your Bot request requires authorization fields or the expected authorization is not part of the header, for example, social security number or PIN, click Add in the Authorization Fields section and then define the fields as shown in the following illustration.

  1. In the Field Type field, you can select one of the following depending on where in the Bot request message and the type of authorization fields that are required.
    • Header – The Bot expects the authorization fields as part of the header of the request.
    • Payload – The Bot expects the authorization fields as part of the content of the body of the request.
    • Query String – The Bot expects the authorization fields as a query in the body of the request.
    • Path Param – The Bot expects the authorization fields as part of the URL path for the request.
  2. In the Field Key field, enter the name of the field for the selected Field Type.
  3. In the Field Value field, enter the value for the Field Key specified.
  4. Click Add. The new authorization field is added in the Authorization Fields section.

To add additional authorization fields, click Add in the Authorization Fields section.

Testing the Authorization

After you save the authentication, you can test your authorization definition on the Authentication page when you click Test before continuing to develop the remain steps of your task. When you click Test, the test is executed using the authentication token URLs and the Client ID and Client Secret Key. If tenancy was defined, the Test Authorization dialog is displayed.

Click Test to begin the authorization test. When the validation of authentication is complete, the Test Authorization dialog is closed and the results of the validation, either success or failure, is displayed to the immediate right of the Test Authorization button. If the authorization fails, the Auth Test Failed message is displayed along with the Headers and Response tabs as shown in the following illustration.
Test Authorization Failure Dialog