OVERVIEW
Virtual Assistants
Kore.ai Platform
Key Concepts
Natural Language Processing (NLP)
Accessing Platform
VIRTUAL ASSISTANTS
Virtual Assistant Builder
Virtual Assistant Types
Getting Started
Create a Simple Bot
SKILLS
Storyboard
Dialog Tasks
Introduction
Dialog Builder (New)
Dialog Builder (Legacy)
User Intent Node
Dialog Node
Entity Node
Supported Entity Types
Composite Entities
Supported Colors
Supported Company Names
Form Node
Logic Node
Message Nodes
Confirmation Nodes
Bot Action Node
Service Node
Custom Authentication
2-way SSL for Service nodes
Script Node
Agent Transfer Node
WebHook Node
Grouping Nodes
Connections & Transitions
Manage Dialogs
User Prompts
Knowledge Graph
Terminology
Building
Generation
Importing and Exporting
Analysis
Knowledge Extraction
Train
Build
Alert Tasks
Introduction
Ignore Words and Field Memory
How to Schedule a Smart Alert
Small Talk
Digital Views
Introduction
How to Configure Digital Views
Digital Forms
Overview
How to Configure Digital Forms
NATURAL LANGUAGE
Overview
Machine Learning
Introduction
Model Validation
Fundamental Meaning
Introduction
NLP Guidelines
Knowledge Graph
Traits
Introduction
How to Use Traits
Ranking and Resolver
Advanced NLP Configurations
INTELLIGENCE
Overview
Context Management
Overview
Session and Context Variables
Context Object
How to Manage Context Switching
Manage Interruptions
Dialog Management
Sub Intents & Follow-up Intents
Amend Entity
Multi-Intent Detection
Sentiment Management
Tone Analysis
Sentiment Management
Event Based Bot Actions
Default Conversations
Default Standard Responses
TEST & DEBUG
Talk to Bot
Utterance Testing
Batch Testing
Record Conversations
Conversation Testing
CHANNELS
PUBLISH
ANALYZE
Overview
Dashboard
Custom Dashboard
Overview
How to Create Custom Dashboard
Conversation Flows
NLP Metrics
ADVANCED TOPICS
Universal Bots
Overview
Defining
Creating
Training
Customizing
Enabling Languages
Store
Smart Bots
Defining
koreUtil Libraries
SETTINGS
Authorization
Language Management
PII Settings
Variables
Functions
IVR Integration
General Settings
Management
Import & Export
Delete
Bot Versioning
Collaborative Development
Plan Management
API GUIDE
API Overview
API List
API Collection
SDKs
SDK Overview
SDK Security
SDK App Registration
Web SDK Tutorial
Message Formatting and Templates
Mobile SDK Push Notification
Widget SDK Tutorial
Widget SDK – Message Formatting and Templates
Web Socket Connect & RTM
Using the BotKit SDK
Installing
Configuring
Events
Functions
BotKit SDK Tutorial – Agent Transfer
BotKit SDK Tutorial – Flight Search Sample Bot
Using an External NLP Engine
ADMINISTRATION
HOW TOs
Create a Simple Bot
Create a Banking Bot
Transfer Funds Task
Update Balance Task
Context Switching
Using Traits
Schedule a Smart Alert
Configure UI Forms
Add Form Data into Data Tables
Configuring Digital Views
Add Data to Data Tables
Update Data in Data Tables
Custom Dashboard
Custom Tags to filter Bot Metrics
Patterns for Intents & Entities
Build Knowledge Graph
Global Variables
Content Variables
Using Bot Functions
Configure Agent Transfer
RELEASE NOTES

BotKit SDK の使用

Kore.ai BotKit SDK は、Kore.ai ボット プラットフォーム上で構築したボットに対して、ユーザーとの対話を正確に制御するためのライブラリ セットです。ボットビルダーのダイアログ エディタを使用してダイアログ タスクを構築する際、イベント ハンドラを追加してメッセージと Webhook イベントをサブスクライブし、SDK を使用してメッセージと Webhook イベントを制御することができます。このトピックでは、BotKit SDK が Bot プラットフォーム、使用できる SDK イベント、および BotKit SDK のダウンロードとインストールと、どのように統合されているかについて説明します。ボットはユーザーの質問に答えるために、また、ユーザーのトランザクションを実行するために構築できますが、場合によっては、ユーザーが目的を達成できるように、ボットとの対話から人間のエージェントに切り替える必要があります。例:

  • ユーザーが質問をするか、またはボットが回答するように設計されていないというレスポンスを返す場合。
  • ユーザーが、ボットではなくライブ エージェントとのチャットを希望する場合。
  • ボットの開発者は、特定の条件に基づいたダイアログ フローを基に、ライブ エージェント転送を設計します。たとえば、特定のユーザータイプやユーザーのトーン分析に基づいて、ダイアログ フローをライブ エージェントに転送したい場合などです。

仕組み

ボット プラットフォームで以下のイベント タイプをキャプチャすると、BotKit SDK を使用したイベント処理をダイアログ タスクに統合できます。

メッセージ

Kore.ai ボット プラットフォームでは、ユーザーはボットに定義されているチャネルのいずれか 1 つで、自分のボットと対話します。以下の図では、Kore.ai ボット プラットフォーム、BotKit SDK、および自然言語処理エンジンを介したユーザー メッセージ フローを確認することができます。 ユーザーとボットのレスポンスのすべてのメッセージが、メッセージ イベントとして BotKit SDK に送信されます。
Webhook

BotKit SDKは、自然言語プロセッサが ボットビルダー ダイアログのタスク フローで SDKWebhook ノードを入力するたびに、Webhook イベントを受け取ります。次のシーケンス図では、ユーザーがボットのチャネル経由でメッセージを送信してからユーザーのレスポンスが表示されるまでのフローを示しています。 Webhook イベントに関しては、サーバー サイドでの検証やビジネス ロジックの実行が必要な場合、またはバックエンド サーバーの呼び出しが必要な場合に、ダイアログ タスク フローに Webhook ノードを追加する必要があります。ビジネス ロジックとレスポンスは、同じ on_webhook イベントで送信されます。レスポンスは、HTTP ステータス コードの 202 となります。SDK からボット プラットフォームにレスポンス データを送信するには、 sdk.sendWebhookResponse() イベントを呼び出します。Webhook イベントは、Kore.ai NL エンジンがダイアログ タスク フローで Webhook ノードを処理する際に、SDK によって受信されます。Kore.ai NLP エンジンは各ノードを処理し、定義された条件に基づいて次のノードに移行します。Webhook ノードが処理されると、Webhook の呼び出しが実行され、ボット プラットフォームは on_webhook イベントを SDK に送信します。以下のシーケンス図は、Webhook を使用したメッセージ フローを示しています。
エージェント転送

以下のシーケンス図では、エージェント転送条件に一致するまで、ボット プラットフォームがユーザーの入力に直接応答します。一致すると、ボット プラットフォームは BotKit SDK 実装に接続し、現在の会話を取得するなどして、チャットを初期化します。BotKit SDK は、ライブ エージェントのセッションが終了するまで、ユーザーとエージェントの会話を統合します。ライブ エージェントに切り替えると、現在のダイアログ タスクが終了します。 ダイアログの会話フローでエージェント転送を設定するには、以下が必要です。
  1. Kore.ai ボット ビルダーの [設定し] タブ > [SDK 設定] セクションでアプリを作成し、コールバック URL を定義し、クライアント IDクライアント シークレットを生成して、OnAgentTransferNode を有効にする。
  2. エージェントに転送するために必要なステップを特定し、移行条件を定義する。
  3. 以下の図のように、ダイアログ フローにエージェント転送ノードを追加する。

詳しくは、BotKit SDK チュートリアル — エージェント転送」をご覧ください。

OVERVIEW
Virtual Assistants
Kore.ai Platform
Key Concepts
Natural Language Processing (NLP)
Accessing Platform
VIRTUAL ASSISTANTS
Virtual Assistant Builder
Virtual Assistant Types
Getting Started
Create a Simple Bot
SKILLS
Storyboard
Dialog Tasks
Introduction
Dialog Builder (New)
Dialog Builder (Legacy)
User Intent Node
Dialog Node
Entity Node
Supported Entity Types
Composite Entities
Supported Colors
Supported Company Names
Form Node
Logic Node
Message Nodes
Confirmation Nodes
Bot Action Node
Service Node
Custom Authentication
2-way SSL for Service nodes
Script Node
Agent Transfer Node
WebHook Node
Grouping Nodes
Connections & Transitions
Manage Dialogs
User Prompts
Knowledge Graph
Terminology
Building
Generation
Importing and Exporting
Analysis
Knowledge Extraction
Train
Build
Alert Tasks
Introduction
Ignore Words and Field Memory
How to Schedule a Smart Alert
Small Talk
Digital Views
Introduction
How to Configure Digital Views
Digital Forms
Overview
How to Configure Digital Forms
NATURAL LANGUAGE
Overview
Machine Learning
Introduction
Model Validation
Fundamental Meaning
Introduction
NLP Guidelines
Knowledge Graph
Traits
Introduction
How to Use Traits
Ranking and Resolver
Advanced NLP Configurations
INTELLIGENCE
Overview
Context Management
Overview
Session and Context Variables
Context Object
How to Manage Context Switching
Manage Interruptions
Dialog Management
Sub Intents & Follow-up Intents
Amend Entity
Multi-Intent Detection
Sentiment Management
Tone Analysis
Sentiment Management
Event Based Bot Actions
Default Conversations
Default Standard Responses
TEST & DEBUG
Talk to Bot
Utterance Testing
Batch Testing
Record Conversations
Conversation Testing
CHANNELS
PUBLISH
ANALYZE
Overview
Dashboard
Custom Dashboard
Overview
How to Create Custom Dashboard
Conversation Flows
NLP Metrics
ADVANCED TOPICS
Universal Bots
Overview
Defining
Creating
Training
Customizing
Enabling Languages
Store
Smart Bots
Defining
koreUtil Libraries
SETTINGS
Authorization
Language Management
PII Settings
Variables
Functions
IVR Integration
General Settings
Management
Import & Export
Delete
Bot Versioning
Collaborative Development
Plan Management
API GUIDE
API Overview
API List
API Collection
SDKs
SDK Overview
SDK Security
SDK App Registration
Web SDK Tutorial
Message Formatting and Templates
Mobile SDK Push Notification
Widget SDK Tutorial
Widget SDK – Message Formatting and Templates
Web Socket Connect & RTM
Using the BotKit SDK
Installing
Configuring
Events
Functions
BotKit SDK Tutorial – Agent Transfer
BotKit SDK Tutorial – Flight Search Sample Bot
Using an External NLP Engine
ADMINISTRATION
HOW TOs
Create a Simple Bot
Create a Banking Bot
Transfer Funds Task
Update Balance Task
Context Switching
Using Traits
Schedule a Smart Alert
Configure UI Forms
Add Form Data into Data Tables
Configuring Digital Views
Add Data to Data Tables
Update Data in Data Tables
Custom Dashboard
Custom Tags to filter Bot Metrics
Patterns for Intents & Entities
Build Knowledge Graph
Global Variables
Content Variables
Using Bot Functions
Configure Agent Transfer
RELEASE NOTES

Using the BotKit SDK

The Kore.ai BotKit SDK is a set of libraries that provide you with precision control for bot interaction with users for the bots you build on Kore.ai Bots Platform.

When you build a dialog task using Dialog Editor in Bot Builder, you can subscribe message and webhook events by adding event handlers and controlling the messages and webhook events using the SDK.

This topic describes how the BotKit SDK is integrated with the Bots Platform, the SDK events you can use, and download and installation instructions for the BotKit SDK.

While bots can be built to help answer user queries and to perform a transaction for a user, in some cases, we may still need to switch from a bot interaction to a human agent to help the user complete the intent.

For example:

  • A user asks a question or provides a response that the bot is not designed to answer.
  • A user directly requests to chat with Live Agent rather than that bot itself.
  • As a bot developer, you design a Live Agent transfer based on the dialog flow based on a specific condition. For example, a specific user type, or based on tone analysis of the user, you want the dialog flow to transfer to a Live Agent.

How it Works

You can integrate event handling using the BotKit SDK in your Dialog task by capturing the following event types on the Bots Platform.

Messaging

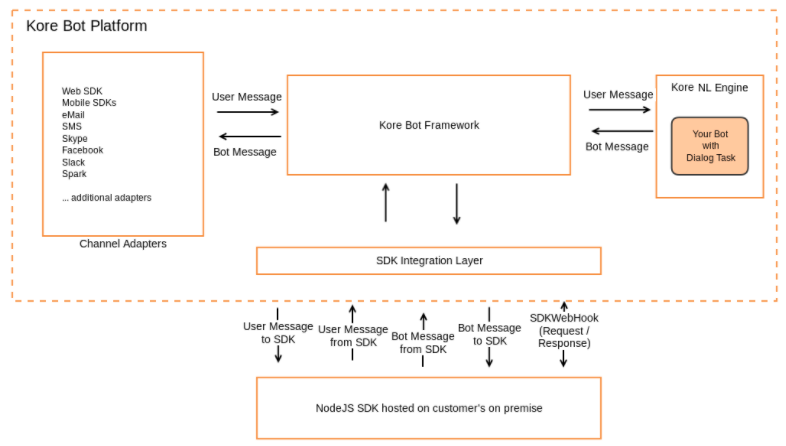
On the Kore.ai Bots Platform, a user interacts with your bot on one of the channels defined for the Bot. In the following diagram, you can see the user message flow through the Kore.ai Bots Platform, the BotKit SDK, and our natural language processing engine.

All messages, both user and Bot responses are sent to the BotKit SDK as message events.

Webhooks

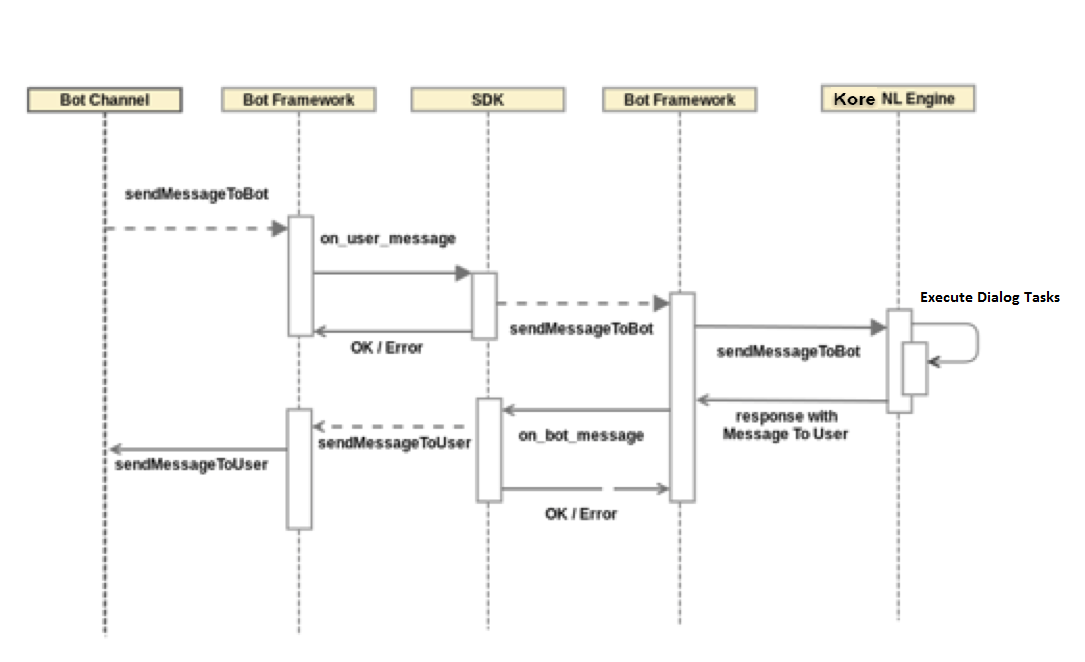
Your BotKit SDK receives webhook events whenever the natural language processor enters the SDKWebhook node in a Bot Builder dialog task flow. In the following sequence diagram, flow for a user sending a message via a bot channel until the user response is shown.

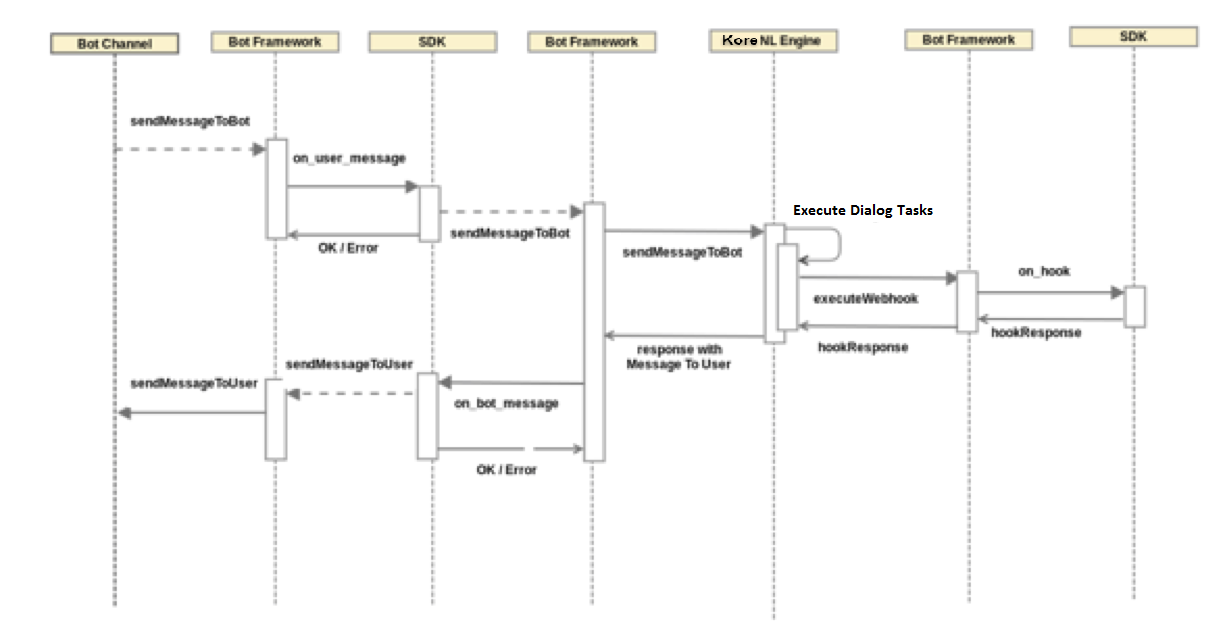
For webhook events, you should add a Webhook node in the dialog task flow whenever there is a need for server-side validation, execution of business logic, or a backend server call is required. Business logic and the response is sent on the same on_webhook event. The response is an HTTP status code 202. To send response data to the Bots Platform from the SDK, call the sdk.sendWebhookResponse() event.
Webhook events are received by the SDK when the Kore.ai NL Engine processes a Webhook node in a dialog task flow. The Kore.ai NLP engine processes each node, and then transitions to the next node based on the conditions defined. When a Webhook node is processed, a webhook call is executed and the Bots Platform sends the on_webhook event to the SDK. The following sequence diagram shows the message flow with a webhook.

Agent Transfer

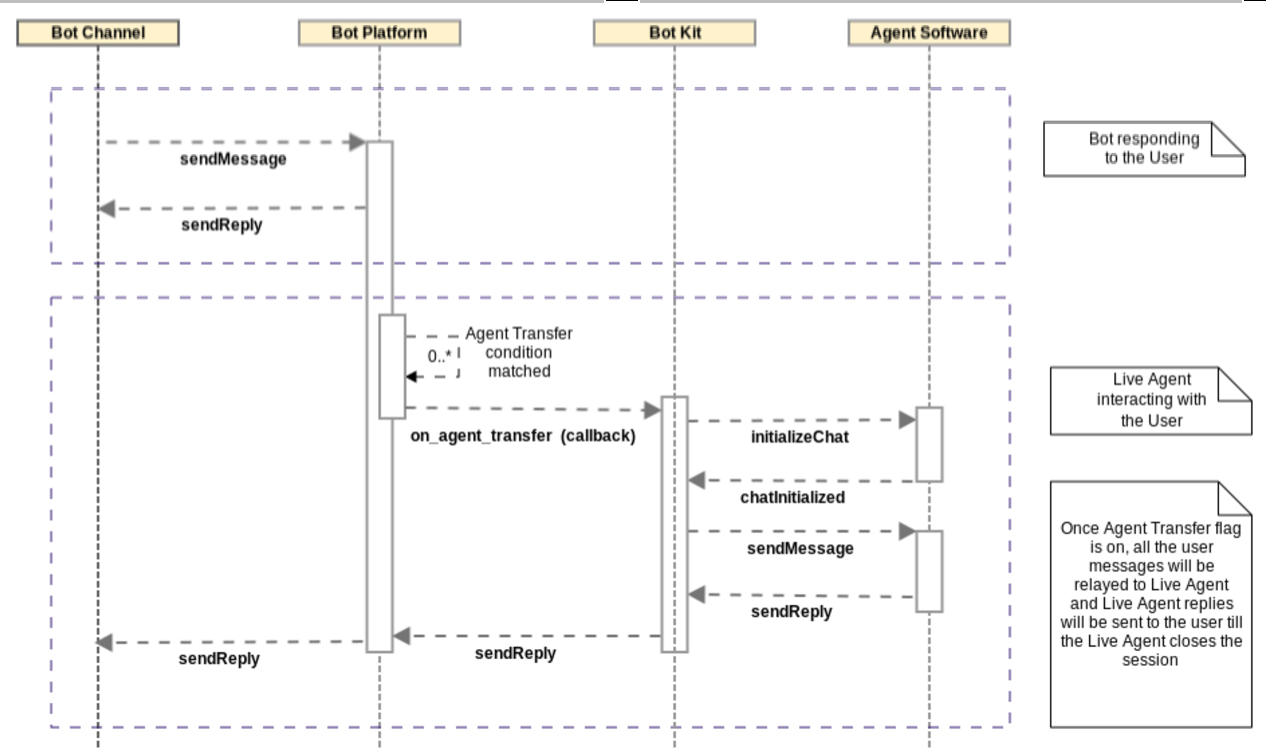
In the following sequence diagram, the Bots Platform responds to user input directly, until the Agent Transfer condition is matched. When matched, the Bots Platform connects to your BotKit SDK implementation, and then initializes the chat, for example, getting the current conversation. The BotKit SDK integrates the user and agent conversation until the Live Agent session is closed. When switching to a Live Agent, the current dialog task ends.

To set up an Agent Transfer in your dialog conversation flow, you will need to:

  1. Create an app in Kore.ai Bot Builder on the Settings tab > SDK Configurations section, define the Callback URL and generate Client ID and Client Secret, and enable OnAgentTransferNode.
  2. Identify the steps and define the transition conditions to meet to transfer to an agent.
  3. Add the Agent Transfer node in the dialog flow as shown in the following illustration

For more information, see BotKit SDK Tutorial – Agent Transfer.