OVERVIEW
Virtual Assistants
Kore.ai Platform
Key Concepts
Natural Language Processing (NLP)
Accessing Platform
VIRTUAL ASSISTANTS
Virtual Assistant Builder
Virtual Assistant Types
Getting Started
Create a Simple Bot
SKILLS
Storyboard
Dialog Tasks
Introduction
Dialog Builder (New)
Dialog Builder (Legacy)
User Intent Node
Dialog Node
Entity Node
Supported Entity Types
Composite Entities
Supported Colors
Supported Company Names
Form Node
Logic Node
Message Nodes
Confirmation Nodes
Bot Action Node
Service Node
Custom Authentication
2-way SSL for Service nodes
Script Node
Agent Transfer Node
WebHook Node
Grouping Nodes
Connections & Transitions
Manage Dialogs
User Prompts
Knowledge Graph
Terminology
Building
Generation
Importing and Exporting
Analysis
Knowledge Extraction
Train
Build
Alert Tasks
Introduction
Ignore Words and Field Memory
How to Schedule a Smart Alert
Small Talk
Digital Views
Introduction
How to Configure Digital Views
Digital Forms
Overview
How to Configure Digital Forms
NATURAL LANGUAGE
Overview
Machine Learning
Introduction
Model Validation
Fundamental Meaning
Introduction
NLP Guidelines
Knowledge Graph
Traits
Introduction
How to Use Traits
Ranking and Resolver
Advanced NLP Configurations
INTELLIGENCE
Overview
Context Management
Overview
Session and Context Variables
Context Object
How to Manage Context Switching
Manage Interruptions
Dialog Management
Sub Intents & Follow-up Intents
Amend Entity
Multi-Intent Detection
Sentiment Management
Tone Analysis
Sentiment Management
Event Based Bot Actions
Default Conversations
Default Standard Responses
TEST & DEBUG
Talk to Bot
Utterance Testing
Batch Testing
Record Conversations
Conversation Testing
CHANNELS
PUBLISH
ANALYZE
Overview
Dashboard
Custom Dashboard
Overview
How to Create Custom Dashboard
Conversation Flows
NLP Metrics
ADVANCED TOPICS
Universal Bots
Overview
Defining
Creating
Training
Customizing
Enabling Languages
Store
Smart Bots
Defining
koreUtil Libraries
SETTINGS
Authorization
Language Management
PII Settings
Variables
Functions
IVR Integration
General Settings
Management
Import & Export
Delete
Bot Versioning
Collaborative Development
Plan Management
API GUIDE
API Overview
API List
API Collection
SDKs
SDK Overview
SDK Security
SDK App Registration
Web SDK Tutorial
Message Formatting and Templates
Mobile SDK Push Notification
Widget SDK Tutorial
Widget SDK – Message Formatting and Templates
Web Socket Connect & RTM
Using the BotKit SDK
Installing
Configuring
Events
Functions
BotKit SDK Tutorial – Agent Transfer
BotKit SDK Tutorial – Flight Search Sample Bot
Using an External NLP Engine
ADMINISTRATION
HOW TOs
Create a Simple Bot
Create a Banking Bot
Transfer Funds Task
Update Balance Task
Context Switching
Using Traits
Schedule a Smart Alert
Configure UI Forms
Add Form Data into Data Tables
Configuring Digital Views
Add Data to Data Tables
Update Data in Data Tables
Custom Dashboard
Custom Tags to filter Bot Metrics
Patterns for Intents & Entities
Build Knowledge Graph
Global Variables
Content Variables
Using Bot Functions
Configure Agent Transfer
RELEASE NOTES

Alert Task – SOAP API Request

こちらで、Kore.aiのバーチャルアシスタントプラットフォームでの通知タスクの設定方法について確認しました。このセクションでは、SOAPサービスのAPIリクエストを設定する方法について説明します。

ウェブサービスとして指定された接続タイプおよびSOAPに設定された接続モードには、以下を定義する必要があります。

  • 認証 – 基本認証、OAuth や API キーを使用するときなど通知タスクが必要な場合、前のセクションで言及されているように、API にアクセスするために認証を定義する必要があります。
  • WSDL URL – WSDL データを含む URL を定義します。URLを取得した場合、WSDLに基づいてAvailable Operationsの一覧から選択し、ユーザー入力フィールドをカスタマイズすることができます。詳細については、以下をご確認ください
  • コネクタでアクセス―Botプラットフォームがオンプレミスにインストールされており、Kore.ai Connectorのエージェントを使用したい場合に指定します。詳細については、以下をご確認ください
  • 応答 サンプル – タスクのペイロードで受け取ることが求められるキー/値のペアを定義します。ご提供のキーは、エンドユーザーに表示するデータを処理するためのドロップダウンの選択肢として利用できます。詳細については、以下後ご確認ください
  • 投稿でウェブサイトのリンクコンテンツをプレビュー―タスク注意メッセージにあるウェブサイトのプレビューコンテンツを表示します。詳細は以下をご確認ください

保存をクリックしてAPIリクエストの設定を保存します。

WSDL URLの定義

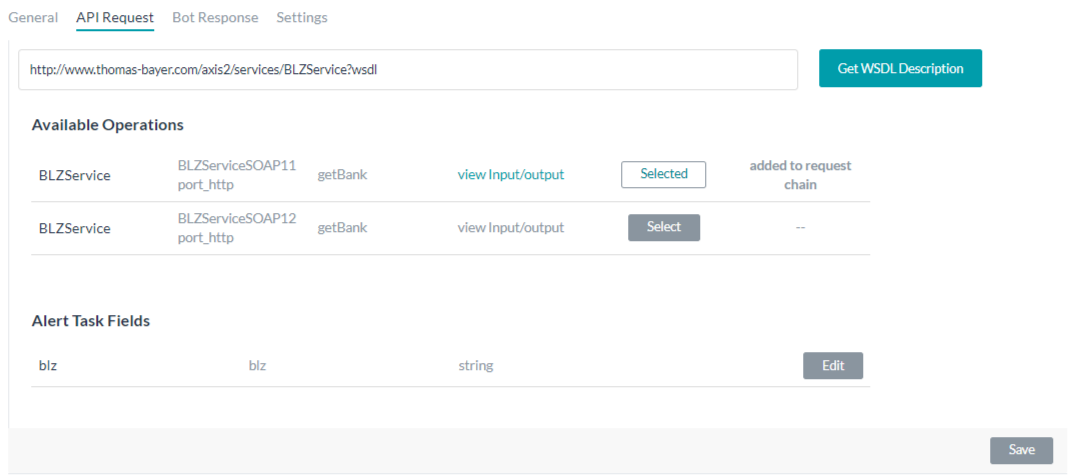
  1. [API リクエスト] タブの、[WSDL URL] セクションを開きます。
  2. SOAP リクエストのリクエスト タスク設定を開始するには、[WSDL URL] フィールドに SOAP WSDLの URL を入力します。
  3. [WSDL の説明を取得] をクリックします。WSDL で定義されている [使用可能な演算子] のリストが開きます。
  4. タスクに使用する SOAP リクエストの [選択] をクリックします。Kore.ai は、ユーザーの入力が必要な場合、1 つ以上の通知タスク フィールドを自動的に入力します。
SOAP通知タスクフィールドのカスタマイズ

WSDL から [使用可能な操作] を 1 つ以上選択した後に、Kore.ai に用意されているデフォルトの入力フィールドをカスタマイズすることができます。デフォルトの [通知タスク フィールド] をカスタマイズするには、カスタマイズする [通知タスク フィールド] [編集] をクリックします。下図のように通知タスクフィールドを設定ダイアログが表示されます。 
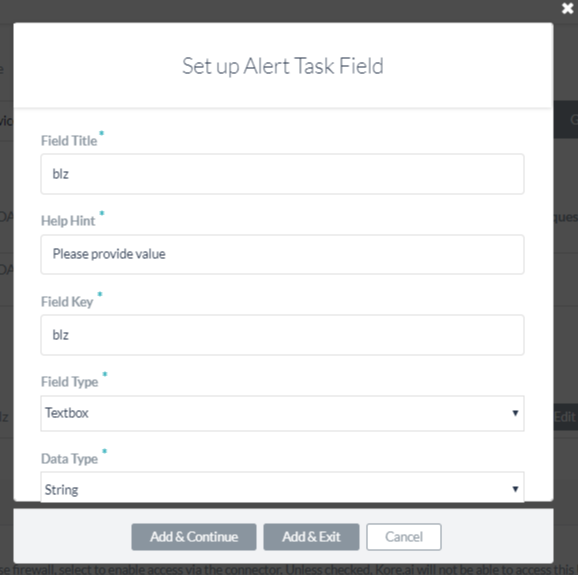
タスクのエンドユーザーフィールドを定義する場合、下記のテーブルの説明の通りに通知タスクフィールドの設定ダイアログにパラメータで値を指定してください。APIリクエストの通知タスクフィールドを保存して別の通知タスクフィールドを作成する場合は追加して続行を、APIリクエストの通知タスクフィールドを保存してダイアログを閉じる場合は追加して終了をクリックします。

フィールド名 説明
フィールド タイトル エンドユーザー インターフェースに表示される、タスク入力フィールドのタイトルです。例:国名
ヘルプのヒント タスク設定の下に表示されるヘルプテキストでは、天気を知りたい国を入力のようにタスクを説明するタイトルが表示されます。
フィールドキー 収集するエンドユーザーの入力値を表す、読み取り専用キーです。例:国.
フィールドタイプ 上級オプションが選択された場合、エンドユーザーインターフェイスに表示されるフィールドのタイプを指定して、リクエストオブジェクトへのユーザー入力の割り当てキー値として収集します。デフォルト設定はテキストボックスですが、以下のうちの一つにカスタムすることは可能です :

  • 日付[フォーマット] フィールドを表示します。ここでは、エンドユーザーが自分のアカウントにタスクが設定されている場合に定義する日付フォーマットの構文を選択できます。[日付フォーマット選択] のドロップダウン リストから、次のうちの 1 つを選択します。
    • dd-MM-YYYY – 例:16-05-1999
    • MM-dd-YYYY – 例:05-16-1999
    • dd-MM-YY – 例:16-05-99
    • YYYY-MM-dd – 例:1999-05-16
  • URL – 正しい URL 構文のためのフィールド検証を含む、エンドユーザーによる URL 入力用のテキスト ボックスを表示します。[プレースホルダー] フィールドには、テキストボックスに表示されるヘルプヒントを入力します。たとえば、「こちらにウェブサイトのURLを入力してください」のようなものです。
  • テキストボックス―エンドユーザーにタスクの入力フィールドとして文字入力のためのテキストボックスを表示します(通常は数語程度)。[プレースホルダー] フィールドには、テキストフィールドに表示されるヘルプヒントを入力します。たとえば、「追加する名前を入力してください」のようなものです。
  • 静的ドロップダウン – エンドユーザーに選択肢のドロップダウン リストを表示します。オプションの追加をクリックして以下のパラメータでエンドユーザーに表示する項目リストの追加を始まります:
    • オプション名 – エンドユーザーに表示されるオプションの名前です。
    • オプション値―アプリケーションに返すオプション名という値と示します。
    • デフォルト値 – 1 点以上のオプションが定義されている場合、オプションのデフォルト値を選択します。
    • 検索可能―選択するとダイナミック検索、そしてこのフィールドにエンドユーザーが入力する文字の表示を可能にします、もし一致がない場合、フリーフォームのエントリが可能です。

    [保存] をクリックします。項目を追加する場合、オプションを追加をもう一度クリックします。動作コラムのオプション編集または削除します。

  • ダイナミックドロップダウン―BotのURLからの応答に基づいて、実行時に動的に生成されるドロップダウンリストを表示します(例:JIRA タスク通知用のプロジェクト一覧)。以下のダイナミックに配置されるドロップダウンへのプロパティを定義します。
    • エンドポイント URL – BotのエンドポイントのURLです。例:https://app.asana.com/api/1.0/workspaces
    • エンドポイントのコンテンツタイプ―指定されたエンドポイントURLから予想されるコンテンツタイプ。以下のうちの一つ:JSON、RSS、XML、URL エンコードされた JSON、CCV、文字、や Twitter エンコードされた JSON。
    • エンドポイント メソッド – 次のうちの 1 つになります。
      • GET– タスクフィールドのHTTPリクエストのGETメソッドを指定します。
      • POST– タスク フィールドの HTTP リクエストの POST メソッドを指定します。
    • 応答パース―希望するドロップダウンリストの値を含む応答内のパスです(例:データ)
    • ラベルキー – ドロップダウンオプションのラベルのキーです(例:名前)
    • オプション値キー – ドロップダウンオプションの値のキーです(例:ID)
    • idペイロード フィールドの追加 – 先行入力フィールドのオプションとして、 応答ペイロードから 1 つ以上のフィールドをクリックして追加します。各ペイロードフィルドについて、ペイロードフィールドのキーペイロードフィールドの値を入力し、保存をクリックします。動作列でペイロードフィールドを編集または削除します。
    • 検索可能―選択するとダイナミック検索、そしてこのフィールドにエンドユーザーが入力する文字の表示を可能にします、もし一致がない場合、フリーフォームのエントリが可能です。
  • テキストエリア―エンドユーザーがタスク入力としていくつのテキストを入力するためのテキストエリアを表示します。[プレースホルダー] フィールドに、テキスト ボックス内にエンドユーザーに対して表示するヘルプ ヒントを入力します。
  • 先行入力 – タスクに定義されたURLからの応答に基づく検索結果に一致する文字をユーザーが 3 文字以上入力すると、動的に入力されたドロップダウンリストの選択肢が実行時にエンドユーザーに表示されます。例えば、JIRAのタスク通知メッセージのプロジェクト一覧です。以下のダイナミックに配置されるドロップダウンへのプロパティを定義します。
    • エンドポイント URL – BotのエンドポイントのURLです。例:https://app.asana.com/api/1.0/workspaces
    • エンドポイントのコンテンツタイプ―指定されたエンドポイントURLから予想されるコンテンツタイプ。以下のうちの一つ:JSON、RSS、XML、URL エンコードされた JSON、CCV、テキスト、Twitter エンコードされた JSON、Multipart/Form-data または Multipart/Related。
    • エンドポイント メソッド – 次のうちの 1 つになります。
      • GET– タスクフィールドのHTTPリクエストのGETメソッドを指定します。
      • POST– タスク フィールドの HTTP リクエストの POST メソッドを指定します。
    • 応答パース―希望するドロップダウンリストの値を含む応答内のパスです(例:データ)
    • ラベルキー – ドロップダウンオプションのラベルのキーです(例:名前)
    • オプション値キー – ドロップダウンオプションの値のキーです(例:ID)
    • ペイロードフィールドの追加 先行入力フィールドのオプションとして、 応答ペイロードから 1 つ以上のフィールドをクリックして追加します。各先行入力のフィールドオプションについて、ペイロードフィールドのキーペイロードフィールドの値を入力し、保存をクリックします。動作列でペイロードフィールドを編集または削除します。
    • 編集可能―先行入力の検索結果が一致しない場合のオプションとして、エンドユーザーがフィールドに自由にテキストを入力できるようにします。
  • メール―エンドユーザーのメールアドレスを入力するためのテキストボックスを表示します。プレースホルダフィールドには、エンドユーザーに表示するのに役立つヒントをテキストボックス内に入力します。
  • 日付と時間―エンドユーザーの日付と時間を入力するためのテキストボックスを表示します。フォーマットフィールドに、エンドユーザーに表示される日付の文字枠に、予想の日付や時間のフォーマットを入力してください。日付フォーマットの選択ドロップダウンリストで、 時間付きの日付のフォーマットを選択してください。
  • タイムゾーン―操作システムの設定に基づくタイムゾーンのドロップダウンリストを表示します。
  • 位置―エンドユーザーが地理的位置を入力するための文字枠を表示します。例えば、Orlando, FLまたは32801
  • 入れ子フォーム – 親入力フィールドの下に、エンドユーザーの入力フィールドを入れ子形式で表示します。入力フィールドのネスト化済のフォームに以下のフィールドを指定してください:
    • 配列要素型 – 親の入力形式要素のデータ型を選択します。
    • 入れ子フォーム フィールドの追加 – 1 つ以上の入れ子のフォーム フィールドをクリックして追加します。
  • ファイル アップロード – アップロードするファイルの検索や選択ができるエンドユーザー コントロールを表示します。クリックして、[ファイル アップロード ペイロード キー] を入力します。ファイルアップロードペイロードキーが定義済の場合、ファイルアップロードペイロードフィールド値のドロップダウンリストで以下のうちの一つを選択してください:
    • ファイル名
    • ファイルサイズ
    • ファイルコンテンツタイプ
データタイプ ユーザー入力タイプのうちの 1 つを選択します。

  • 文字列 – ユーザーは任意の一連の数字、文字や特殊文字を入力することができます。
  • 数字 – ユーザーは数字を入力することができます。特殊文字は使用できません。
  • ブール値 – ユーザーは true または false のブール値を入力できます。
  • メール – ユーザーは有効なメール アドレスを入力できます。
  • オブジェクト – データは、JSON オブジェクトとしてボットから受信できます。 “location” : { “lat” : 17.4374614, “lng” : 78.4482878 }ここでは、リクエストチェインやタスクリクエストのプロパティをlocation.latlocation.lngとして参照することができます。
  • 配列 – ユーザーは、カンマで区切った値のリストをボットに渡すことができます。例えば、グーグルカレンダーでは、複数の参加者のデータのパスは: “attendees”: [“user1”, “user2”, “user3”] 選択した場合、エンドユーザーの入力の配列のタイプを以下のいずれかに指定します。
    • 文字列
    • 数字
    • ブール値
    • メール
    • 配列
    • 日付
  • 日付―ユーザーは完全な日付を入力するか、日付の選択肢から選択することができます。
プレースホルダ 入力テキストボックスの下に表示されるテキストは、ユーザーがフィールドを定義する際に役立ちます。このフィールドは [特定のフィールド タイプ] に表示されます。
可視性 タスク入力フィールドをエンドユーザーから見えるようにするあるいは隠すかどうかを指定します。可視性フィールドはカスタムフィールドに設定することもできます。ここでは、データはユーザーから取得されますが、クエリパラメータやペイロードフィールドとしては使用されません。例えば、JIRA Botの場合、以下のように@mentionタグを使用してチケットにコメントを投稿します。「@Mike、こちらの問題について調べてください」 JIRA APIでコメントを投稿するには1つのクエリフィールドおよび1つのペイロードフィールドが必須です:

  • IDの発行
  • コメント

可視性フィールドをカスタムに設定すると、JIRA APIを使用して@Mikeと呼ばれるユーザーのユーザー情報をキャプチャし、データを取得してcommentフィールドの値に追加することができますが、ペイロードフィールドやクエリフィールドとしては使用できません。可視性フィールドのデフォルト設定は表示です。

必須 エンドユーザーがこの設定を定義してタスクの設定を保存する必要があるかどうかを選択します。
キーの置き換え Kore.ai によるキーの転置を無効にするかどうかを選択します。デフォルト設定では、Kore.ai ははキー/値のペアを置換します。たとえば、"parameter":"value"は Kore.ai によって "parameter:{value:"actualValue"}に置換されます。このオプションを選択すると、キーは Kore.ai によって転置されず、受信した応答として渡されます。

コネクタを使用してアクセス

タスクのコネクタでアクセスを定義するには、以下のステップに従いましょう:

  • [API リクエスト] のタブから、[コネクタでアクセス] セクションを開きます。
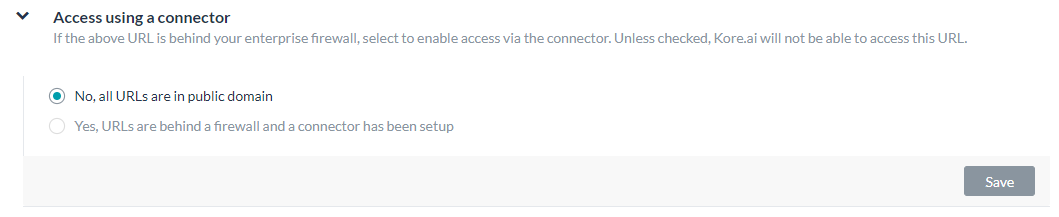
  • コネクタを使用してアクセスのフィールドで、はいを選択してKore.ai Connectorエージェントを使用してKore.ai Botへのアクセスを有効にします。このオプションは、Kore.ai コネクタ エージェントが企業の社内ネットワークで構成、有効化されている場合に表示されます。詳細については、Kore.ai Connectorの使用をご覧ください。

応答サンプルの追加

応答サンプルセクションでは、タスクのペイロードで受け取ることが期待されるキーと値のペアの例を入力または貼り付けることができます。応答サンプルを定義した場合、応答サンプルセクションで指定したキーが、出力データを処理するためのドロップダウンリストの選択肢として利用できるようになります。

  • [API リクエスト] タブで、[サンプル応答] セクションを展開します。
  • JSON応答のペイロードのキーと値の組み合わせを含む応答サンプルを入力してください。以下のうちの一つをしてください:
    • 応答の様式を字下げ可能のJSON構造として書式設定するには、下図の通りに書式設定済みアイコンをクリックします。
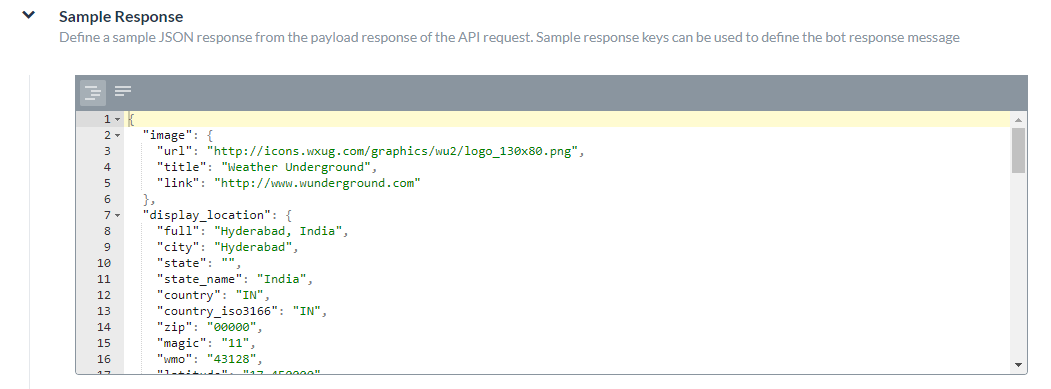
    • 応答の様式をシリアルナンバーが付けられたコンパクトな形式で書式設定するには、下図の通りに書式未設定アイコンをクリックします。

ウェブサイトのプレビューコンテンツ

あるウェブサービスはリンクを送りてペイロード応答の一部としてメディアをプレビューさせます。このセクションでは、プレビューリンクの有効や無効、そしてペイロードでパースからリンクの定義ができます。デフォルトでは、ウェブサイトプレビューリンクが無効されました。下図は、はいが選択された場合の投稿でウェブサイトのリンクコンテンツをプレビューの例です。API Request Tab - Preview Section
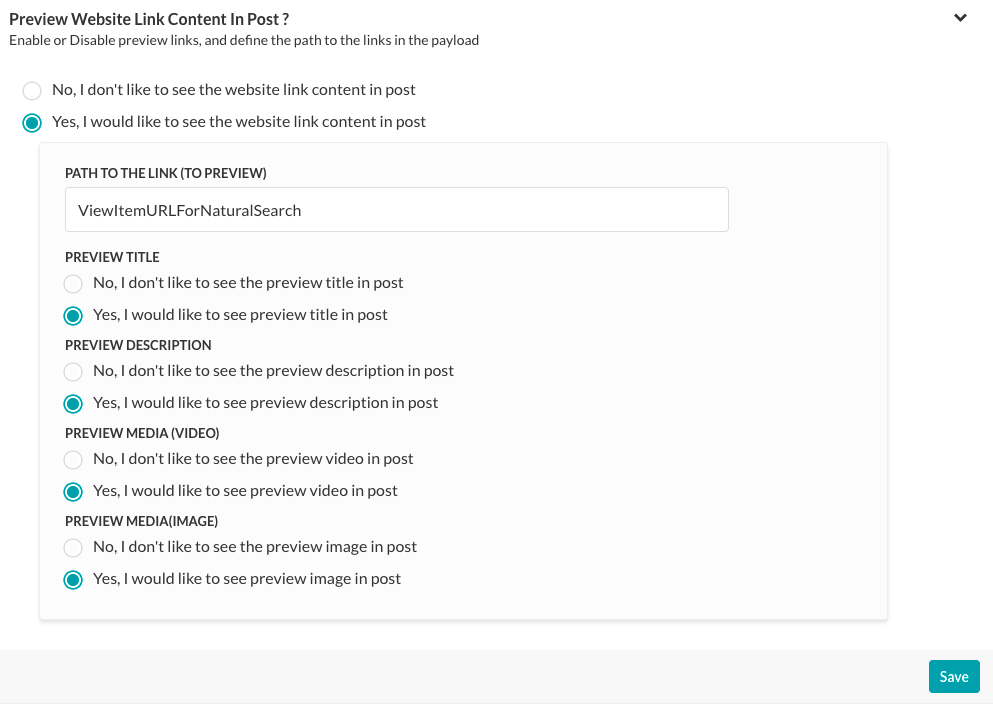
有効化すると、パスがペイロードのルーツに存在しない場合に、ペイロード内のリンクへのパス(toPreview)を定義します。例えば、下記のコードの例はRSSペイロード、パースからプレビューへとは”item”: [ { “title”: “U.S. to Boost Refugee Intake by 30,000 by 2017”, “guid”: { “-isPermaLink”: “false”, “#text”: “SB12418904751422433479504581245034032986752” }, “link”: “http://www.wsj.com/articles/john-kerry-says-u-s-to-admit-30-000-more-refugees-in-next-2-years-1442768498?mod=fox_australian”, …投稿でウェブサイトのリンクコンテンツをプレビューを有効化した場合、以下のようなプレビューオブジェクトを選択します。

  • タイトルのプレビュー – Web サイト コンテンツのタイトルを表示します。
  • 説明のプレビュー – Web サイト コンテンツ説明を表示します。
  • メディア (動画) のプレビュー – Web サイト コンテンツからの動画のリンクを表示できるようにします。
  • メディア (画像) のプレビュー – Web サイト コンテンツからの画像のリンクを表示できるようにします。
OVERVIEW
Virtual Assistants
Kore.ai Platform
Key Concepts
Natural Language Processing (NLP)
Accessing Platform
VIRTUAL ASSISTANTS
Virtual Assistant Builder
Virtual Assistant Types
Getting Started
Create a Simple Bot
SKILLS
Storyboard
Dialog Tasks
Introduction
Dialog Builder (New)
Dialog Builder (Legacy)
User Intent Node
Dialog Node
Entity Node
Supported Entity Types
Composite Entities
Supported Colors
Supported Company Names
Form Node
Logic Node
Message Nodes
Confirmation Nodes
Bot Action Node
Service Node
Custom Authentication
2-way SSL for Service nodes
Script Node
Agent Transfer Node
WebHook Node
Grouping Nodes
Connections & Transitions
Manage Dialogs
User Prompts
Knowledge Graph
Terminology
Building
Generation
Importing and Exporting
Analysis
Knowledge Extraction
Train
Build
Alert Tasks
Introduction
Ignore Words and Field Memory
How to Schedule a Smart Alert
Small Talk
Digital Views
Introduction
How to Configure Digital Views
Digital Forms
Overview
How to Configure Digital Forms
NATURAL LANGUAGE
Overview
Machine Learning
Introduction
Model Validation
Fundamental Meaning
Introduction
NLP Guidelines
Knowledge Graph
Traits
Introduction
How to Use Traits
Ranking and Resolver
Advanced NLP Configurations
INTELLIGENCE
Overview
Context Management
Overview
Session and Context Variables
Context Object
How to Manage Context Switching
Manage Interruptions
Dialog Management
Sub Intents & Follow-up Intents
Amend Entity
Multi-Intent Detection
Sentiment Management
Tone Analysis
Sentiment Management
Event Based Bot Actions
Default Conversations
Default Standard Responses
TEST & DEBUG
Talk to Bot
Utterance Testing
Batch Testing
Record Conversations
Conversation Testing
CHANNELS
PUBLISH
ANALYZE
Overview
Dashboard
Custom Dashboard
Overview
How to Create Custom Dashboard
Conversation Flows
NLP Metrics
ADVANCED TOPICS
Universal Bots
Overview
Defining
Creating
Training
Customizing
Enabling Languages
Store
Smart Bots
Defining
koreUtil Libraries
SETTINGS
Authorization
Language Management
PII Settings
Variables
Functions
IVR Integration
General Settings
Management
Import & Export
Delete
Bot Versioning
Collaborative Development
Plan Management
API GUIDE
API Overview
API List
API Collection
SDKs
SDK Overview
SDK Security
SDK App Registration
Web SDK Tutorial
Message Formatting and Templates
Mobile SDK Push Notification
Widget SDK Tutorial
Widget SDK – Message Formatting and Templates
Web Socket Connect & RTM
Using the BotKit SDK
Installing
Configuring
Events
Functions
BotKit SDK Tutorial – Agent Transfer
BotKit SDK Tutorial – Flight Search Sample Bot
Using an External NLP Engine
ADMINISTRATION
HOW TOs
Create a Simple Bot
Create a Banking Bot
Transfer Funds Task
Update Balance Task
Context Switching
Using Traits
Schedule a Smart Alert
Configure UI Forms
Add Form Data into Data Tables
Configuring Digital Views
Add Data to Data Tables
Update Data in Data Tables
Custom Dashboard
Custom Tags to filter Bot Metrics
Patterns for Intents & Entities
Build Knowledge Graph
Global Variables
Content Variables
Using Bot Functions
Configure Agent Transfer
RELEASE NOTES

Alert Task – SOAP API Request

We have seen how an Alert task can be set up in Kore.ai virtual assistant platform here. In this section, we will see how to configure an API Request for a SOAP service.

For a task with the Connection Type specified as Webservice and the Connection Mode set to SOAP you need to define:

  • Authentication – If required for your alert task, you will need to define the authentication to access the API, for example, using basic authorization, OAuth, or API Key as mentioned in the previous section.
  • WSDL URL – Define the URL that contains your WSDL data. When the URL is retrieved, you can choose from a list of Available Operations based on the WSDL, and then customize the user input fields, see below for details.
  • Access Using a connector – Specify if your Bots Platform is installed on-premises and you want to user the Kore.ai Connector agent, see below for details.
  • Response Sample – Define key/value pairs that you expect to receive in the task payload. The keys that you provide are available as drop-down choices for handling the data to display to the end-user, see below for details.
  • Preview Website Link Content in Post – The website preview content displayed in the task notification message, see below for details.

Click Save to save the API request settings.

Defining the WSDL URL

  1. On the API Request tab, expand the WSDL URL section
  2. To begin the request task configuration for a SOAP request, enter the URL for your SOAP WSDL in the WSDL URL field.
  3. Click Get WSDL Description. A list of available operators defined in the WSDL opens.
  4. Click Select for the SOAP request that you want to use for your task. Kore.ai will automatically populate one or more Alert Task Fields if necessary for user input.
Customize SOAP Alert Task Fields

You can customize the default input fields provided by Kore.ai after you select one or more of the Available Operations from your WSDL. To customize the default Alert Task Fields, click Edit for the Alert Task Field that you want to customize. The Set up Alert Task Field dialog is displayed as shown in the following illustration.

To define end-user fields for a task, specify the values for the parameters in the Set up Alert Task Field dialog as described in the following table.

Click Add & Continue to save the alert task field for the API request and create another alert task field, or click Add & Exit to save the alert task field for the API request and close the dialog.

Field Name Description
Field Title The title of the task input field displayed in the end-user interface, for example, Country.
Help Hint The help text displayed below the task setting the title to describe the task, for example, Enter the Country Name you want the Weather for.
Field Key A read-only key that represents the end-user input value that you want to collect, for example, country.
Field Type Specifies the type of task input field displayed in the end-user interface to collect user input for the request object to assign to the Key value. The default setting is Textbox, but can be customized to any one of the following:

  • Date – Displays the Format field where you can select the date format syntax for the end-user to define when the task is configured for their account. In the Select Date Format drop-down list, select one of the following:
    • dd-MM-YYYY – For example, 16-05-1999
    • MM-dd-YYYY – For example, 05-16-1999
    • dd-MM-YY – For example, 16-05-99
    • YYYY-MM-dd – For example, 1999-05-16
  • URL – Displays a text box for the end-user to enter a URL including field validation for a correct URL syntax. In the Placeholder field, enter the help hint displayed in the text box, for example, Enter the URL for the website here.
  • Textbox – Displays a text box for the end-user to enter text as the task input field, typically just a few words. In the Placeholder field, enter the help hint displayed in the text field, for example, Type in the name you want to embroider.
  • Static Dropdown – Displays a drop-down list of choices to the end-user. Click Add Option to begin adding the list of items to display to the end-user with the following parameters:
    • Option Name – The name of the option displayed to the end-user.
    • Option Value – The value the represents the Option Name returned to the application.
    • Default Value – Select the default value for the option when more than one option is defined.
    • Searchable – Select to enable dynamic search and display as the end-user enters text in this field, or if no matches, allow free-form entry.

    Click Save. To add additional items, click Add Option again. Edit or remove options in the Actions column for options.

  • Dynamic Dropdown – Displays a drop-down list dynamically populated at runtime based on the response from a URL for your Bot, for example, a list of projects for a JIRA task notification. Define the following properties for a dynamically populated dropdown.
    • Endpoint URL – The Bot endpoint URL, for example, https://app.asana.com/api/1.0/workspaces.
    • Endpoint Content Type – The content type expected from the specified endpoint URL. One of: JSON, RSS, XML, URL Encoded JSON, CCV, Text, or Twitter Encoded JSON.
    • Endpoint Method – One of:
      • GET – Specifies an HTTP Request GET method for the task field.
      • POST – Specifies an HTTP Request POST method for the task field.
    • Response Path – The path in the response that contains the desired drop-down list values, for example, data.
    • Label Key – The key for the label of the drop-down option, for example, name.
    • Option Value Key – The key for the value of the drop-down option, for example, id.
    • Add Payload Field – Click to add one or more fields from the response payload as options for the dynamic dropdown. For each payload field, enter the Payload field key and the Payload field value, and then click Save. Edit or delete payload fields in the Actions column.
    • Searchable – Select to enable dynamic search and display as the end-user enters text in this field, or if no matches, allow free-form entry.
  • Textarea – Displays a text area box for the end-user to enter text as the task input, typically for several sentences. In the Placeholder field, enter the help hint displayed inside the text area.
  • Type Ahead – Displays a dynamically populated drop-down list of choices to the end-user at runtime when the user enters three or more characters that match the search results based on the response from the URL defined for the task. For example, a list of projects for a JIRA task notification message. Define the following properties for a dynamically populated drop-down.
    • Endpoint URL – The Bot endpoint URL, for example, https://app.asana.com/api/1.0/workspaces.
    • Endpoint Content Type – The content type expected from the specified endpoint URL. One of: JSON, RSS, XML, URL Encoded JSON, CCV, Text, Twitter Encoded JSON, Multipart/Form-data, or Multipart/Related.
    • Endpoint Method – One of:
      • GET – Specifies an HTTP Request GET method for the task field.
      • POST – Specifies an HTTP Request POST method for the task field.
    • Response Path – The path in the response that contains the desired drop-down list values, for example, data.
    • Label Key – The key for the label of the drop-down option, for example, name.
    • Option Value Key – The key for the value of the drop-down option, for example, id.
    • Add Payload Field – Click to add one or more fields from the response payload as options for the type ahead field. For each type ahead field option, enter the Payload field key and the Payload field value, and then click Save. Edit or delete payload fields in the Actions column.
    • Editable – Enables the end-user to enter text free-from in the field as an option when type-ahead search results do not match.
  • Email – Displays a text box for the end-user to input an email address. In the Placeholder field, enter the helpful hint to display to the end-user inside the text box.
  • Date & Time – Displays a text box for the end-user to input a date with time. In the Format field, enter the expected date or time format to display to the end-user in the date text box. In the Select Date Format drop-down list, select the date with time format.
  • Time Zone – Displays a drop-down list of time zones based on the operating system settings.
  • Location – Displays a text box for the end-user to enter a geographical location, for example, Orlando, FL, or 32801.
  • Nested Form – Displays end-user input fields in a nested format below the parent input field. Specify the following fields for a nested form input field:
    • Array Element Type – Select the data type of the parent input form element.
    • Add Nested Form Field – Click to add one or more nested form fields.
  • File Upload – Displays end-user control to search for, and select a file to upload. When clicked, enter the File Upload Payload Key. When the File Upload Payload Key is defined, in the File Upload Payload Field Value drop-down list, select one of the following types:
    • File Name
    • File Size
    • File Content Type
Data Type Select one of these user input types:

  • String – Users can input any sequence of numbers, letters, or special characters.
  • Number – Users can input a number. No special characters are allowed.
  • Boolean – User can input a Boolean value of true or false.
  • Email – User can input a valid email address.
  • Object – Data from a Bot can be received as JSON objects, for example, as location details defined as:
     “location” : {
                   “lat” : 17.4374614,
                   “lng” : 78.4482878
                }
    where you can refer to the properties in a request chain or task request as location.lat, and location.lng.
  • Array – Users can pass a comma-separated list of values to the Bot. For example, in Google Calendar, multiple attendees with data can be passed as:
    “attendees”: [“user1”, “user2”, “user3”]
    When selected, specify the Type for the array of end-user input as one of:

    • String
    • Number
    • Boolean
    • Email
    • Array
    • Date
  • Date – Users can type a complete date or select it from a date picker.
Placeholder The text displayed below the input textbox to help the user define the field. This field is only displayed for some Field Types.
Visibility Specify if the task input field should be visible or hidden from the end-user.
The Visibility field can also be set to Custom field where data is captured from the user but not used as a query parameter or payload field. For example, with a JIRA bot, posting a comment on a ticket using an @mention tag as shown below:
“@Mike, please look into this issue”
The JIRA API to Post a comment requires one query field and one payload field as:

  • Issue ID
  • Comment

With the Visibility field set to Custom, you can capture the user information for the user mentioned as @Mike using the JIRA API to fetch data to append to the comment field value, but not to use as payload field or query field.
The default Visibility field setting is Visible.

Mandatory Select if the end-user must define this setting to save the task settings configuration.
Untranspose the Key Select to disable key transposition by Kore.ai. By default, Kore.ai transposes a key/value pair, for example, "parameter":"value" is transposed by Kore.ai to "parameter:{value:"actualValue"}. When selected, keys are not transposed by Kore.ai and passed in the response as received.

Access Using a Connector

To get started with defining access using a connector for a task, follow these steps:

  • On the API Request tab, expand the Access using a connector section.
  • In the Access Using A Connector field, select Yes to enable access for Kore.ai Bots using the Kore.ai Connector agent. This option is only visible if a Kore.ai Connector agent is configured and enabled in your enterprise on-premises network. For more information, see Using the Kore.ai Connector.

Adding the Response Sample

In the Response Sample section, you can enter or paste examples of the key-value pairs that you expect to receive in the task payload. When you define the response sample, the keys specified in the Response Sample section are available as drop-down choices for handling the output data.Add the Sample Response

  • On the API Request tab, Expand the Sample Response section.
  • Enter your Response Sample that contains the key-value pairs from your JSON response payload. Do one of the following:
    • To format the view of the response as a JSON structure with indentation as shown in the following illustration, click the Formatted  icon.
    • To format the view of the response in serialized compact form as shown in the following illustration, click the Unformatted  icon.

Website Preview Content

Some web services send links to preview media as part of the payload response. In this section, you can enable or disable preview links, and define the path to the links in the payload. By default, website preview links are disabled. The following illustration is an example of the Preview Website Link Content in Post section, when Yes is selected.API Request Tab - Preview SectionWhen enabled, define the path to the preview links in the payload in the Path to the Link(toPreview) field, if the path is not in the root of the payload. For example, in the following code example from an RSS payload, the path to the preview is… “item”: [ { “title”: “U.S. to Boost Refugee Intake by 30,000 by 2017”, “guid”: { “-isPermaLink”: “false”, “#text”: “SB12418904751422433479504581245034032986752” }, “link”: “http://www.wsj.com/articles/john-kerry-says-u-s-to-admit-30-000-more-refugees-in-next-2-years-1442768498?mod=fox_australian”, …When Preview website link content in Post is enabled, select preview objects such as:

  • Preview Title – Displays the title of the website content.
  • Preview Description – Displays the description of the website content.
  • Preview Media(Video) – Enables display of video links from the website content.
  • Preview Media(Image) – Enables display of image links from the website content.