OVERVIEW
Virtual Assistants
Kore.ai Platform
Key Concepts
Natural Language Processing (NLP)
Accessing Platform
VIRTUAL ASSISTANTS
Virtual Assistant Builder
Virtual Assistant Types
Getting Started
Create a Simple Bot
SKILLS
Storyboard
Dialog Tasks
Introduction
Dialog Builder (New)
Dialog Builder (Legacy)
User Intent Node
Dialog Node
Entity Node
Supported Entity Types
Composite Entities
Supported Colors
Supported Company Names
Form Node
Logic Node
Message Nodes
Confirmation Nodes
Bot Action Node
Service Node
Custom Authentication
2-way SSL for Service nodes
Script Node
Agent Transfer Node
WebHook Node
Grouping Nodes
Connections & Transitions
Manage Dialogs
User Prompts
Knowledge Graph
Terminology
Building
Generation
Importing and Exporting
Analysis
Knowledge Extraction
Train
Build
Alert Tasks
Introduction
Ignore Words and Field Memory
How to Schedule a Smart Alert
Small Talk
Digital Views
Introduction
How to Configure Digital Views
Digital Forms
Overview
How to Configure Digital Forms
NATURAL LANGUAGE
Overview
Machine Learning
Introduction
Model Validation
Fundamental Meaning
Introduction
NLP Guidelines
Knowledge Graph
Traits
Introduction
How to Use Traits
Ranking and Resolver
Advanced NLP Configurations
INTELLIGENCE
Overview
Context Management
Overview
Session and Context Variables
Context Object
How to Manage Context Switching
Manage Interruptions
Dialog Management
Sub Intents & Follow-up Intents
Amend Entity
Multi-Intent Detection
Sentiment Management
Tone Analysis
Sentiment Management
Event Based Bot Actions
Default Conversations
Default Standard Responses
TEST & DEBUG
Talk to Bot
Utterance Testing
Batch Testing
Record Conversations
Conversation Testing
CHANNELS
PUBLISH
ANALYZE
Overview
Dashboard
Custom Dashboard
Overview
How to Create Custom Dashboard
Conversation Flows
NLP Metrics
ADVANCED TOPICS
Universal Bots
Overview
Defining
Creating
Training
Customizing
Enabling Languages
Store
Smart Bots
Defining
koreUtil Libraries
SETTINGS
Authorization
Language Management
PII Settings
Variables
Functions
IVR Integration
General Settings
Management
Import & Export
Delete
Bot Versioning
Collaborative Development
Plan Management
API GUIDE
API Overview
API List
API Collection
SDKs
SDK Overview
SDK Security
SDK App Registration
Web SDK Tutorial
Message Formatting and Templates
Mobile SDK Push Notification
Widget SDK Tutorial
Widget SDK – Message Formatting and Templates
Web Socket Connect & RTM
Using the BotKit SDK
Installing
Configuring
Events
Functions
BotKit SDK Tutorial – Agent Transfer
BotKit SDK Tutorial – Flight Search Sample Bot
Using an External NLP Engine
ADMINISTRATION
HOW TOs
Create a Simple Bot
Create a Banking Bot
Transfer Funds Task
Update Balance Task
Context Switching
Using Traits
Schedule a Smart Alert
Configure UI Forms
Add Form Data into Data Tables
Configuring Digital Views
Add Data to Data Tables
Update Data in Data Tables
Custom Dashboard
Custom Tags to filter Bot Metrics
Patterns for Intents & Entities
Build Knowledge Graph
Global Variables
Content Variables
Using Bot Functions
Configure Agent Transfer
RELEASE NOTES

Multi-Lingual Bots

消費者の希望の言語でコミュニケーションが取れるボットは、消費者の関心を引くことができます。Kore.aiのボットプラットフォームは、ボットの定義を再構築することなく、ボットの複数言語化をサポートしています。

希望の言語でボットを構築し、サポートされている言語を1つ以上有効にすることができます。言語の有効化の一部として、プラットフォームはすべての標準応答を自動的に翻訳します。お客様はその後、その他のさまざまなボットの要素を新しい言語で翻訳することができます。

サポートされている言語

ボットプラットフォームは、現在以下の言語に対応しています。ほとんどの機能はすべての言語に対応していますが、一部例外もありますので、詳細はこちらをご覧ください

  • アラビア語
  • 中国語簡体字
  • 中国語繁体字
  • オランダ語
  • 英語
  • フランス語
  • ドイツ語
  • インドネシア語
  • イタリア語
  • 日本語
  • 韓国語
  • ポルトガル語(ブラジル)
  • スペイン語
  • フィンランド語(v6.4リリース後)
  • ロシア語(v7.0リリース後)
  • ポーランド語(v7.0リリース後)
  • ウクライナ語(v7.0リリース後)
  • スウェーデン語(v7.1リリース後)
  • カザフ語(v7.2リリース後)
  • ノルウェー語(v8.1リリース後)
  • ヒンディー語(v8.1リリース後)

言語をデフォルトする

ボットプラットフォームは、現在以下の言語に対応しています。ボットは、ユーザーの言語が特定されるまでの間、デフォルトの言語でユーザーとやり取りを行います。ボットがユーザーの言語をサポートしている場合、ボットの言語設定に応じて、現在のユーザーセッションまたは以降のすべてのユーザーセッションでその言語に切り替わります。

言語の設定/有効化

サポートされている言語をボットに有効にするには、以下の手順に従います。

ステップ 1: 新しい言語を設定する

ボットの新しい言語を有効にするには、以下の手順に従います。

  1. 他の言語を有効にしたいボットを開きます。
  2. サイドナビゲーションパネルにカーソルを合わせて設定 > 環境設定を選択し、言語管理をクリックします。
  3. サポートされている言語一覧から、有効にしたい言語の横にある設定をクリックします。
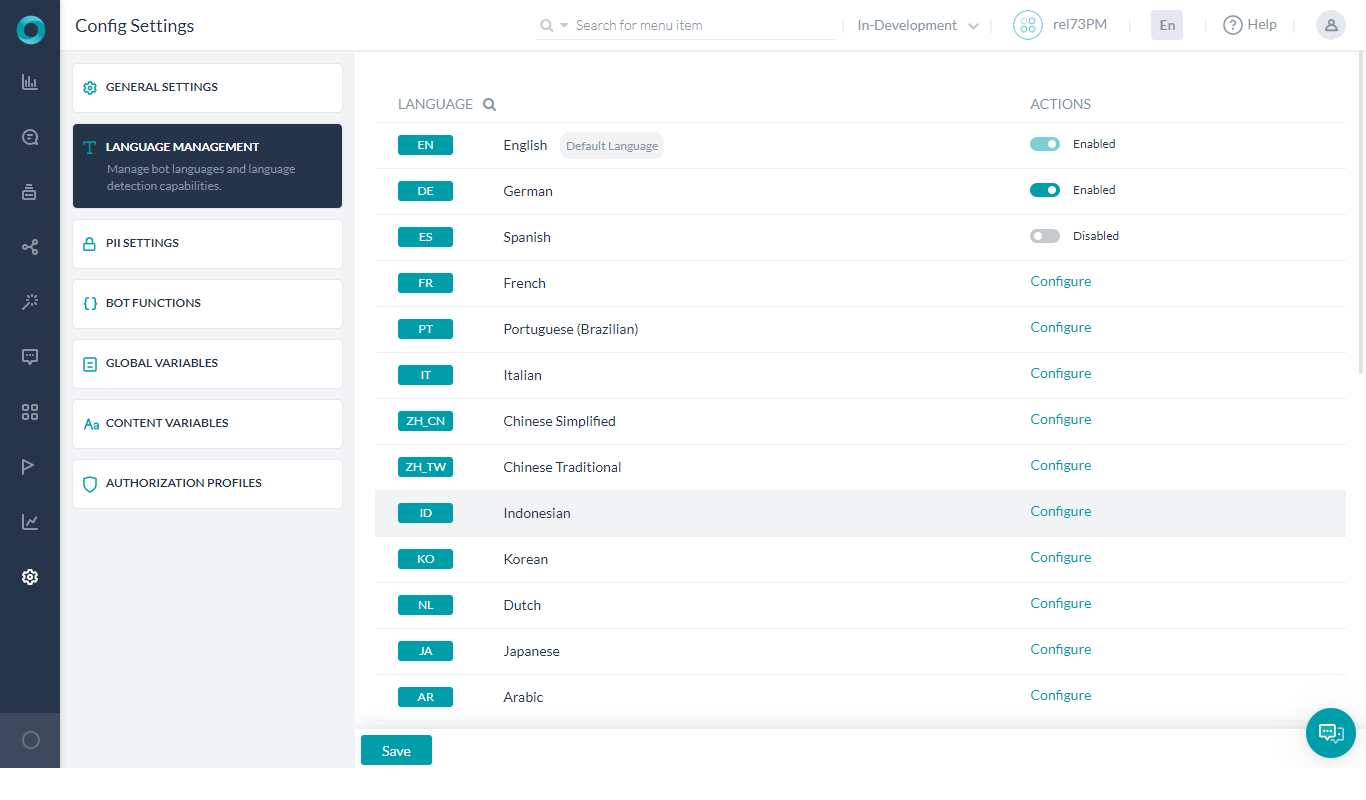
  4. 設定をクリックすると、言語を有効化 – <Language Name>ダイアログが開きます。このダイアログでは、以下のステップ2の通り、既存の言語パックを複製するか新しい言語パックを作成する、選択した言語をボットで有効にする2つのオプションがあります。

ステップ2: ボットの言語別バージョンを作成する

ボットに新しい言語を設定するには、以下の2つの方法があります。

オプション1: デフォルトの言語を複製する

ボットの新しい言語を素早く設定し、ボットの要素を段階的に翻訳したい場合は、まず、新しい言語用にデフォルト言語の設定をコピーします。これにより設定済みの言語のボット定義が複製されますが、すべてのボット要素は引き続きデフォルト言語で表示され、アプリケーションのUIから翻訳することができます。

デフォルトの言語設定をコピーして新しいボットのバージョンを作成するには、以下の手順に従います。

  1. 言語を有効化 – <Language name>ウィンドウで、デフォルトの言語をコピーを選択します。
  2. ウィンドウの右上の有効化をクリックします。インポートが成功すると、新しい言語のボットが有効になったことを知らせるプロンプトが表示されます。
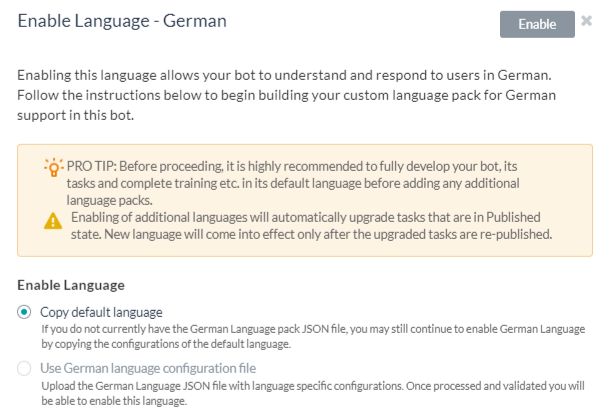
  3. 前述のステップの完了後、新しく有効になった言語のボット定義が作成されますが、ボット要素はデフォルトの言語のままです。ボット要素をUIから翻訳する必要があります。
  4. 翻訳を追加できるボット要素の一覧は、翻訳可能なボットのコンポーネントセクションを参照してください。
オプション2:新しい言語パックを作成する

有効化された言語のJSON言語パックを作成することで、言語の専門家の助けを借りて、ボット要素の翻訳バージョンを直接作成することができます。
すでに有効化されている言語のJSON言語パックをボットからダウンロードして、JSONファイルで翻訳を追加することができます。
新しく有効化された言語のJSON言語パックを作成するには、以下の手順に従います。

  1. 言語を有効化 – <Language name>ウィンドウで、の言語設定ファイルオプションを選択します。
  2. 基本言語パックのドロップダウンから言語を選択し、その言語パックをダウンロードします。
  3. JSONをダウンロードをクリックします。
  4. ダウンロードしたJSONファイルは、翻訳を提供する必要のある様々なボット要素で構成されています。これらのボット要素の詳細については、翻訳可能なボットのコンポーネントセクションを参照してください。
  5. JSONファイルのボット要素に翻訳を入力するには、対応するテキストを翻訳済みのテキストで置き換えます。
  6. ダウンロード済みのJSONファイルを新しい言語用にカスタマイズした後、言語パックを有効化フィールドでファイルを選択をクリックし、新しい言語パックをアップロードします。
  7. ウィンドウの右上の有効化をクリックします。インポートが成功すると、インポートの完了ウィンドウが表示され、インポート結果が表示されます。
  8. OKをクリックします。画面右上に完了のプロンプトが表示されます。
注意:
  • 新しい言語の設定後、変更されたすべての公開タスクのステータスが有効になります。新しい言語をボットで動作させるには、ボットを再公開する必要があります。それまでは、ボットは以前に公開した言語で機能し続けます。
  • 同義語のサポートは、英語、フランス語、スペイン語、ドイツ語に限定されています。自然言語とエンティティノードのそれぞれのセクションは、他の言語では無効な状態になります。
検証

ボットが複数の言語をサポートしている場合、ボットのウィンドウの右上にデフォルトのボット言語が表示され、その後にサポートされている他の言語を表示するドロップダウンが表示されます。有効化された言語が一覧に表示されているか確認します。

ステップ3: 翻訳を追加または編集する

ボットで新しい言語を有効にした後、継続的に翻訳を追加または編集する必要がある場合があります。これらの編集は、アプリケーションのUIから行うことができます。これは、デフォルトのボット設定をコピーしてボットのバージョンを作成した場合に特に役立ちます。 また、UIからの編集は細かい編集をしたい場合にも役立ちます。
注意:言語パックに大きな変更を加える必要がある場合は、言語パックのオフラインコピーで変更を行ってから、ボットにアップロードすることをお勧めします。方法については、言語パックの編集および再アップロードを参照してください。

UIからボット要素に翻訳を追加または編集するには、以下の手順に従います。

  1. ボットウィンドウの右上で、現在のボットの言語をクリックします。
  2. ドロップダウンリストから、変更を加えるボット言語を選択します。
  3. 選択したボット要素の言語固有のテキストを、デフォルトの言語の場合と同じように入力します。
    例えば、新しい言語でボットの同義語を追加したい場合は、以下の手順に従います。

    1. ボットのサイドナビゲーションパネルにカーソルを合わせて自然言語 > 同義語をクリックします。
    2. キーワードと同義語の一覧から、同義語を追加するキーワードをクリックします。
    3. 同義語ボックスに同義語(有効化された言語で)を入力し、Enterキーを押します。
注意:翻訳の追加または編集が可能なボット要素の一覧は、翻訳可能なボットのコンポーネントセクションを参照してください。
言語パックの編集と再アップロード

言語パックに大きな変更を加える必要がある場合は、言語パックのオフラインコピーに変更を加え、ボットに再アップロードすることをお勧めします。

注意:言語パックを外部で管理している場合にのみ、言語パックの完全な置き換えを行います。新しく更新されたものは、既存の言語パックを更新するだけではなく、それを置き換えます。全体を置き換える必要のない小さな変更を行う場合は、アプリケーションのUIから直接変更します。

ボットに言語パックを再アップロードするには、以下の手順に従います。

  1. ボットウィンドウの右上で、現在のボットの言語をクリックします。
  2. ドロップダウンリストから、変更を加えるボット言語を選択します。
  3. サイドナビゲーションパネルにカーソルを合わせて設定 > 環境設定 > 言語管理をクリックします。
  4. 言語管理ウィンドウが開き、各言語に対する無効化/有効化/設定のアクションが表示されます。
  5. 有効化された/無効化された言語をクリックして、言語を管理ウィンドウを開きます。
  6. 言語を管理ウィンドウからファイルを選択をクリックし、更新済みの言語パックをアップロードします。
  7. 更新をクリックして言語パックを更新します。

言語の無効化/有効化

言語を設定して有効にすると、以下のことができるようになります。

  • ボットで有効になっている言語を無効にします。言語を有効にする際に追加された実際の言語固有のデータは、言語を無効にした後もボット内に存在し続けます。無効にした場合、ユーザーはその言語を使用してボットと話すことができなくなります(ボットのエクスポートのコピーで確認可能)。
  • 言語を無効にしても、もう一度有効にすることができます。データは保存されているため、すべての詳細を入力する必要はありません。
  • デフォルトの言語(ボット作成時に選択された言語)には変更を加えることができません。

注意:言語設定を変更した場合、公開済みのボットに反映させるにはそれらを公開する必要があります。

言語の検出と選択

多言語ボットは、ユーザーの発話に基づいて言語を自動検出し、切り替えます。このルールの例外は、ユーザーがあるエンティティに対して値を入力することを求められ、そのユーザー入力がエンティティの基準を満たす場合です。

言語の検出

ボットがユーザーの発話に基づいて言語を検出する方法は3つあります。

  • デフォルト:Kore.aiのボットプラットフォームは、独自の言語検出アルゴリズムを用いて、ユーザーの発話から言語を検出します。これはデフォルトの設定で、エンドユーザーの言語はプラットフォームによって検出されます。
  • オンプレミスでのインストールの場合、上記のデフォルト設定であるKore.aiの自社言語検出アルゴリズムを使用するか、GoogleのAPIを使用して言語検出を行うことができます。これはKore Configファイルで設定することができます。
  • BotKit SDKを使用している場合は、BotKitから以下のチートコマンドをプラットフォームに送信することもできます。
    チート言語<言語名またはコード>

ボットは、同じ言語でユーザーとコミュニケーションを取り続けます。後になってユーザーが別の有効な言語に切り替えた場合、ボットは自動的に新しい言語に変更されます。
ボットがユーザーの言語を十分な信頼性を持って検出できなかった場合は、有効なオプション一覧から希望の言語を選択するようユーザーに要求します。

ボットユーザーの言語選択ロジック

  1. ボットは、すべての発話からユーザーの言語を識別します。変更が検出された場合、切り替えに関してユーザーに確認し、ユーザーの応答に従って続行します。これらの標準の応答は、getCurrentOptionsユーティリティを使用してカスタマイズすることができます。詳細はこちらをご覧ください。ユーザーが言語を切り替えたい場合、現在行っている会話は破棄されることにご注意ください
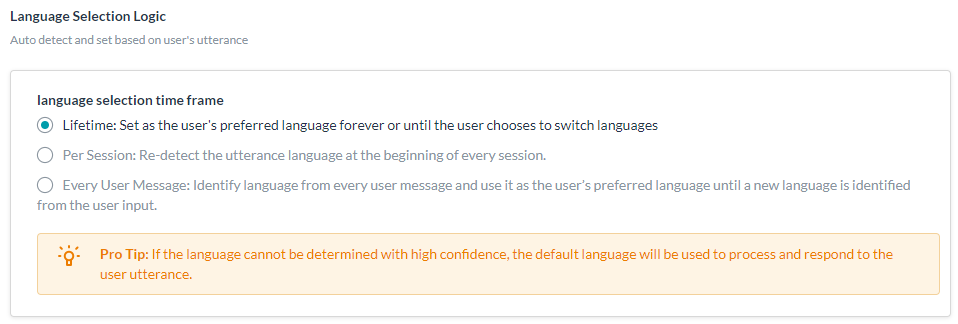
  2. 言語選択の設定 – 言語選択のオプションを設定することもできます。ボットメニューで設定 > 環境設定 > 言語管理をクリックします。言語選択ロジック(オプションは下にスクロール)の言語選択期限で、以下のいずれかに設定します。
    • ライフタイム: 自動検出された言語は、ユーザーの優先言語として設定され、その後ユーザーが別の有効な言語を使用して対話するまで、すべてのやり取りに使用されます。ユーザーが別の有効な言語を使用して話し始めた場合、ボットはその言語に変更します。
    • セッションごと: すべてのセッションの開始時にユーザーの言語を検出し、それに応じて応答します。
    • すべてのユーザーメッセージ: すべての発話からユーザーの言語を識別します。変更が検出された場合、切り替えに関してユーザーに確認し、ユーザーの応答に従って続行します。ユーザーが言語を切り替えたい場合、現在行っている会話は破棄されることにご注意ください。この機能はリリース7.2で導入されたもので、多言語対応ボットのデフォルト設定です。

  3. テストやデバッグのために、チャットセッション中にチートコマンドを使用して言語選択の設定を上書きすることができます。
    言語名またはコードを次の値のいずれかに置き換えます。

    • 英語:英語またはEN
    • ドイツ語:ドイツ語またはDE
    • フランス語:フランス語またはFR
    • スペイン語:スペイン語またはES

翻訳可能なコンポーネント

このセクションでは、翻訳を提供できるボット要素を、そのJSONプロパティとともに一覧で示します。これらの要素は、アプリケーションのUIから翻訳することもできます。記事中に追加されているヘルプリンクを参照して、関連するトピック領域の概要をご確認ください。

注意: 言語を有効にするとプラットフォームが自動的に翻訳してくれるため、標準の応答は翻訳する必要はありません。

ボットのメタデータ

以下の翻訳可能な要素で構成されるJSONオブジェクト

フィールド名 タイプ 説明
ボット名 文字列 ボットの名前
ボットの名前 文字列 ボットの説明
ボットの同義語 オブジェクト タスク名に含まれる重要な単語と、それに対応する同義語の配列。単語の翻訳とその同義語を入力します。ボットの同義語の詳細については、同義語の管理を参照してください。
ボットのエラーコード オブジェクト エラーコードとそれに対応するメッセージの配列です。エラーメッセージの翻訳を入力します。エラーメッセージの詳細については、エラーメッセージのカスタマイズを参照してください。

ダイアログタスク

ボットのダイアログタスクの以下の翻訳可能なコンポーネントからなるJSONオブジェクト。

フィールド名 タイプ 説明
ダイアログタスク名 文字列 ダイアログタスクの名前
ダイアログタスクの説明 文字列 ダイアログタスクの説明
ダイアログタスクのアップグレードメッセージ 文字列 アップグレードされたタスクの履歴ページで開発者に表示されるメッセージ

ダイアログコンポーネント

ダイアログタスクのNLP設定に関連する以下の翻訳可能なコンポーネントで構成されるJSONオブジェクト。

フィールド名 タイプ 説明
ダイアログコンポーネントのインテント 文字列 ユーザーインテントノードの名前
ダイアログコンポーネントの説明 文字列 ユーザーインテントノードの説明
ダイアログコンポーネントの同義語 オブジェクト エンティティノード名に含まれる単語の同義語。詳細については、同義語の管理を参照してください。
ダイアログコンポーネントのパターン オブジェクト ダイアログタスクのユーザーインテントおよびエンティティノードのパターン。詳細については、パターンの管理を参照してください。

メッセージテンプレート

メッセージテンプレートIDとメッセージテンプレートテキストの値の配列を含むJSONオブジェクト。これらは、メッセージノードのユーザーの応答フィールドと、ダイアログタスクのエンティティノードボットプロンプトおよびエラープロンプトフィールドに対応しています。

フィールド名 タイプ 説明
メッセージテンプレートのテキスト 文字列 ダイアログタスクのメッセージノードまたはエンティティノードのユーザー応答、ボットプロンプト、またはエラープロンプトフィールドに入力されたテキスト。

アクションタスク

ボットのアクションタスクの以下の翻訳可能なコンポーネントからなるJSONオブジェクト。

フィールド名 タイプ 説明
アクション名 文字列 アクションタスクの名前
アクションの短い説明 文字列 アクションタスクの説明
アクションのキーワード 配列 アクションタスクで入力した検索キーワード
アクションパターン 配列 アクションタスクの名前に関連するパターンの配列。パターンテキストを翻訳済みのテキストに置き換えます。詳細については、パターンの管理を参照してください。
アクションフィールドの同義語 オブジェクト 各タスクフィールドの同義語の配列。フィールド名と同義語を翻訳済みのテキストに置き換えます。詳細については、同義語の管理を参照してください。
アクションフィールドパターン オブジェクト 各タスクフィールドのパターンから成る配列。パターンテキストを翻訳済みのテキストに置き換えます。詳細については、パターンの管理を参照してください。
アクションの除外ワード 配列 アクションタスクに関連する除外ワードの配列。単語を翻訳済みのテキストに置き換えます。詳細については、除外ワードおよびフィールドメモリの管理を参照してください。
アクションアップグレードのショートメッセージ 文字列 アクションタスクに関するアップグレードのショートメッセージ
アクションアップグレードのロングメッセージ 文字列 アクションタスクに関するアップグレードのロングメッセージ
アクションクエリフィールド オブジェクト アクションフィールドヘルプとアクションフィールドタイトルのキーの値の組み合わせ。テキストを翻訳済みのテキストに置き換えます。
アクションペイロードフィールド オブジェクト 通知ペイロードフィールドのキーと値の組み合わせ。テキストを翻訳済みのテキストに置き換えます。

アラートタスク

ボットの通知タスクの以下の翻訳可能なコンポーネントからなるJSONオブジェクト。

フィールド名 タイプ 説明
通知名 文字列 通知タスクの名前
通知の短い説明 文字列 通知タスクの説明
通知のキーワード 配列 通知タスクで入力した検索キーワード
通知パターン 配列 通知タスクの名前に関連するパターンの配列。パターンテキストを翻訳済みのテキストに置き換えます。詳細については、パターンの管理を参照してください。
通知フィールドの同義語 オブジェクト 各タスクフィールドの同義語から成る配列。フィールド名と同義語を翻訳済みのテキストに置き換えます。詳細については、同義語の管理を参照してください。
通知フィールドパターン オブジェクト 各タスクフィールドのパターンから成る配列。パターンテキストを翻訳済みのテキストに置き換えます。詳細については、パターンの管理を参照してください。
通知の除外ワード 配列 通知タスクに関連する除外ワードの配列。単語を翻訳済みのテキストに置き換えます。詳細については、除外ワードおよびフィールドメモリの管理を参照してください。
通知アップグレードのショートメッセージ 文字列 通知タスクに関するアップグレードのショートメッセージ
通知アップグレードのロングメッセージ 文字列 通知タスクに関するアップグレードのロングメッセージ
通知クエリフィールド オブジェクト 通知フィールドヘルプと通知フィールドタイトルのキーの値の組み合わせから成る配列。テキストを翻訳済みのテキストに置き換えます。
通知ペイロードフィールド オブジェクト 通知ペイロードフィールドのキーと値の組み合わせから成る配列。テキストを翻訳済みのテキストに置き換えます。

アクションフィールド

アクションタスクのAPIリクエストタブにある以下の翻訳可能なコンポーネントで構成されるJSONオブジェクト。

フィールド名 タイプ 説明
アクションフィールドのタイトル 文字列 アクションタスクに関連するユーザー入力フィールドのタイトル(例:アカウントを選択
アクションフィールドのヘルプ 文字列 フィールドタイトルの下に表示されるヘルプテキストは、タスクを説明するためのものです(例:どの口座の残高を取得しますか?)。
アクションフィールドのプレースホルダ 配列 フィールド内に表示されるプレースホルダテキスト

アラートフィールド

通知タスクのAPIリクエストタブにある以下の翻訳可能なコンポーネントで構成されるJSONオブジェクト。

フィールド名 タイプ 説明
通知フィールドのタイトル 文字列 通知タスクに関連するユーザー入力フィールドのタイトル(例:都市を選択
通知フィールドのヘルプ 文字列 Tフィールドタイトルの下に表示されるヘルプテキストは、タスクを説明するためのものです(例:どの都市の天気予報を取得しますか?)。
通知フィールドのプレースホルダ 文字列 フィールド内に表示されるプレースホルダテキスト。

ボットのフィルター

ボットのフィルターに関連する以下の翻訳可能なコンポーネントから成るJSONオブジェクト

フィールド名 タイプ 説明
フィルター名 文字列 タスクフィルターの名前

IDP設定フォームフィールド

IDP設定フォームに関連する以下の翻訳可能なコンポーネントから成るJSONオブジェクト

フィールド名 タイプ 説明
IDPフォームフィールの追加 文字列 認証ダイアログでエンドユーザーに表示されるIDPフォームフィールドの名称
OVERVIEW
Virtual Assistants
Kore.ai Platform
Key Concepts
Natural Language Processing (NLP)
Accessing Platform
VIRTUAL ASSISTANTS
Virtual Assistant Builder
Virtual Assistant Types
Getting Started
Create a Simple Bot
SKILLS
Storyboard
Dialog Tasks
Introduction
Dialog Builder (New)
Dialog Builder (Legacy)
User Intent Node
Dialog Node
Entity Node
Supported Entity Types
Composite Entities
Supported Colors
Supported Company Names
Form Node
Logic Node
Message Nodes
Confirmation Nodes
Bot Action Node
Service Node
Custom Authentication
2-way SSL for Service nodes
Script Node
Agent Transfer Node
WebHook Node
Grouping Nodes
Connections & Transitions
Manage Dialogs
User Prompts
Knowledge Graph
Terminology
Building
Generation
Importing and Exporting
Analysis
Knowledge Extraction
Train
Build
Alert Tasks
Introduction
Ignore Words and Field Memory
How to Schedule a Smart Alert
Small Talk
Digital Views
Introduction
How to Configure Digital Views
Digital Forms
Overview
How to Configure Digital Forms
NATURAL LANGUAGE
Overview
Machine Learning
Introduction
Model Validation
Fundamental Meaning
Introduction
NLP Guidelines
Knowledge Graph
Traits
Introduction
How to Use Traits
Ranking and Resolver
Advanced NLP Configurations
INTELLIGENCE
Overview
Context Management
Overview
Session and Context Variables
Context Object
How to Manage Context Switching
Manage Interruptions
Dialog Management
Sub Intents & Follow-up Intents
Amend Entity
Multi-Intent Detection
Sentiment Management
Tone Analysis
Sentiment Management
Event Based Bot Actions
Default Conversations
Default Standard Responses
TEST & DEBUG
Talk to Bot
Utterance Testing
Batch Testing
Record Conversations
Conversation Testing
CHANNELS
PUBLISH
ANALYZE
Overview
Dashboard
Custom Dashboard
Overview
How to Create Custom Dashboard
Conversation Flows
NLP Metrics
ADVANCED TOPICS
Universal Bots
Overview
Defining
Creating
Training
Customizing
Enabling Languages
Store
Smart Bots
Defining
koreUtil Libraries
SETTINGS
Authorization
Language Management
PII Settings
Variables
Functions
IVR Integration
General Settings
Management
Import & Export
Delete
Bot Versioning
Collaborative Development
Plan Management
API GUIDE
API Overview
API List
API Collection
SDKs
SDK Overview
SDK Security
SDK App Registration
Web SDK Tutorial
Message Formatting and Templates
Mobile SDK Push Notification
Widget SDK Tutorial
Widget SDK – Message Formatting and Templates
Web Socket Connect & RTM
Using the BotKit SDK
Installing
Configuring
Events
Functions
BotKit SDK Tutorial – Agent Transfer
BotKit SDK Tutorial – Flight Search Sample Bot
Using an External NLP Engine
ADMINISTRATION
HOW TOs
Create a Simple Bot
Create a Banking Bot
Transfer Funds Task
Update Balance Task
Context Switching
Using Traits
Schedule a Smart Alert
Configure UI Forms
Add Form Data into Data Tables
Configuring Digital Views
Add Data to Data Tables
Update Data in Data Tables
Custom Dashboard
Custom Tags to filter Bot Metrics
Patterns for Intents & Entities
Build Knowledge Graph
Global Variables
Content Variables
Using Bot Functions
Configure Agent Transfer
RELEASE NOTES

Multi-Lingual Bots

Consumers are more likely to engage with your bot if it can communicate in their preferred language. Kore.ai Bots Platform supports enabling multiple languages for a bot without having to rebuild the bot definitions.

You can build the bot in your preferred language and then enable one or more supported languages. As part of enabling the language, the platform automatically translates all Standard Responses and you can then translate various other bot elements in the new language.

Supported Languages

Bots Platform currently supports the following languages. While most of the features are supported in all languages, there are some exceptions, see here for more details.

  • Arabic
  • Chinese Simplified
  • Chinese Traditional
  • Dutch
  • English
  • French
  • German
  • Indonesian
  • Italian
  • Japanese
  • Korean
  • Portuguese (Brazilian)
  • Spanish
  • Finnish (post v6.4 release)
  • Russian (post v7.0 release)
  • Polish (post v7.0 release)
  • Ukranian (post v7.0 release)
  • Swedish (post v7.1 release)
  • Kazakh (post v7.2 release)
  • Norwegian (post v8.1 release)
  • Hindi (post v8.1 release)
  • Telugu (post v9.0 release)
  • Tamil (post v9.0 release)
  • Marathi (post v9.0 release)
  • Catalan (post v9.0 release)

Default Language

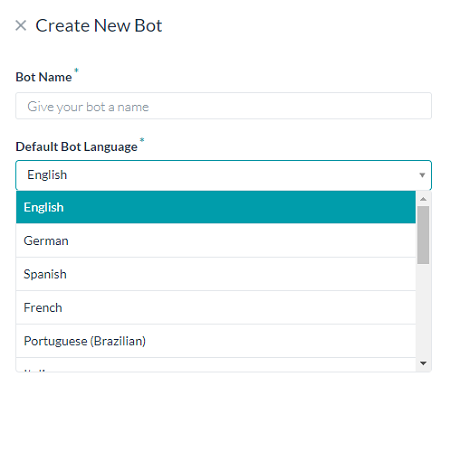
You can choose a default language for the bot while creating it (see image below). Bot communicates with the user in the default language until the user’s language is identified. If the bot supports the user’s language, it switches to that language for the current or all of the following user sessions, depending on Bot’s Language settings.

Configuring/Enabling Languages

Enabling a supported language to a bot involves the following steps:

Step 1: Configure a new language

Follow these steps to enable a new language for the bot:

  1. Open the bot for which you want to enable other languages.
  2. Select the Build tab from the top menu.
  3. From the left navigation menu select Configurations -> Languages.
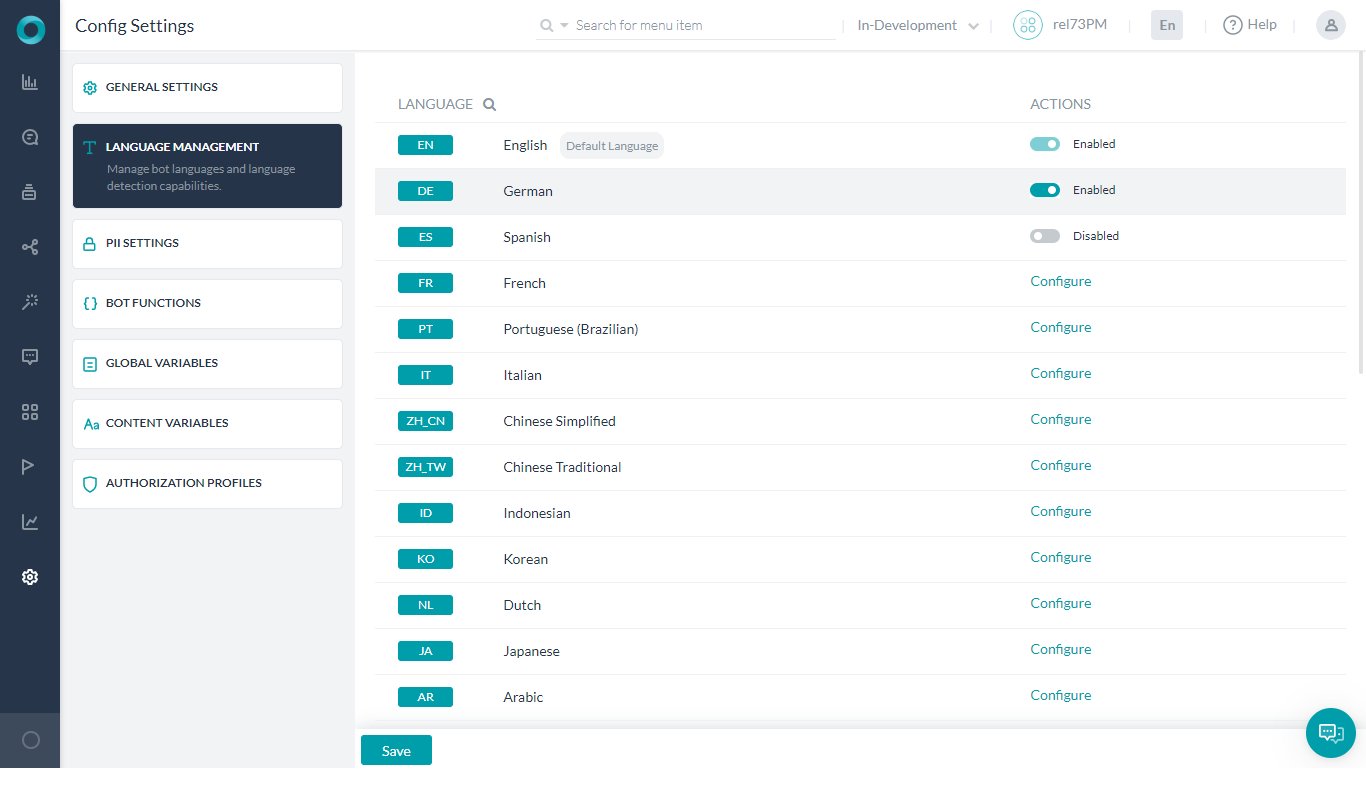
  4. From the Language Management page, click Add Language.
  5. From the list of Supported Languages, next to the language you want to enable, click Configure.
  6. Clicking Configure opens the Enable Language – <Language Name> dialog where you have two options to enable the selected language for the bot – duplicate an existing language pack or creating a new language pack, as explained in Step 2 below.

Step 2: Create a language-specific version of the bot

You can configure a new language for the bot in the following two ways:

Option 1: Duplicate the default language

If you want to configure the new language for the bot quickly and translate the bot elements incrementally, you can begin by copying the configuration of the default language for the new language. It replicates the bot definition for the configured language but continues to have all the bot elements in the default language, which you can translate from the application UI.

Follow these steps to create a new bot version by copying over the default language configurations:

  1. On the Enable Language – <Language name> window, select Copy default language.
  2. Click Enable at the bottom of the page. After a successful import, a prompt appears notifying that the new language bot is enabled.
  3. After completing the previous steps, the bot definition gets created for the newly enabled language but the bot elements remain in the default language. You need to translate the bot elements from the UI.
  4. Refer to the Translatable Bot Components section to view the complete list of bot elements for which you can add translations.
Option 2: Create a new language pack

You can create a translated version of the bot elements directly, perhaps with help from a language expert, by creating a JSON language pack for the enabled language.

You can download a JSON language pack of any of the already-enabled languages from the bot and then add translations in the JSON file.

Follow these steps to create a JSON language pack for the new enabled language:

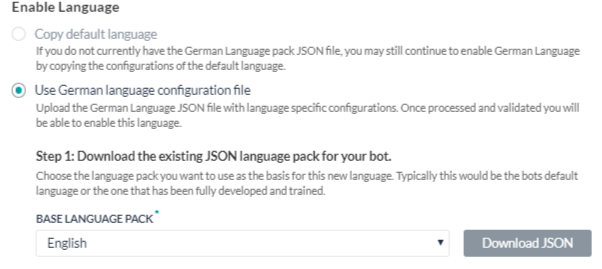
  1. On the Enable Language – <Language name> window, select Use <language-name> language configuration file option
  2. From the Base Language Pack drop-down, select a language to download its language pack.
  3. Click Download JSON.
  4. The downloaded JSON file consists of various bot elements for which you should provide the translations. Refer to the Translatable Bot Components section to learn more about these bot elements.
  5. To enter a translation for a bot element in the JSON file, replace the corresponding text with the translated text.
  6. After customizing the downloaded JSON file for the new language, in the Enabling language pack field, click Choose File and upload the new language pack.
  7. On the top-right corner of the window, click Enable. Upon successful import, the Import Successful window appears with the import results.
  8. Click OK. Success prompt appears on the top-right corner of your screen.
Notes:
  • After you configured a new language, the status of all the published tasks that are modified to Enabled. To make the new language work in the bot, you must re-publish the bot. Until then, the bot continues to function with the previously published languages.
  • Support for Synonyms is restricted to English, French, Spanish and German languages. The respective sections in Natural Language and Entity Node will be in a disabled state for other languages.
Verification

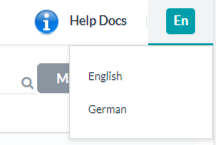
When the bot supports multiple languages, the top right corner of the bot window shows the default bot language followed by a drop-down to view the other supported languages. Check if the enabled language appears in the list.

Step 3: Add or edit translations

After enabling a new language for the bot, you might need to add or edit translations on an ongoing basis. You can make these edits from the application UI, which is particularly helpful if you have created the bot version by copying over the default bot configurations. Editing from the UI also helps when you want to make minor edits.
Note: If you need to make significant changes to the language pack, we recommend you to make the changes in the offline copy of the language pack and then upload it to the bot. Refer to Editing and Re-uploading a language pack to learn how to do it.

To add or edit translations to a bot element from the UI, follow these steps:

  1. On the top right corner of the bot window, click the current bot language.
  2. From the drop-down list, select the bot language in which you want to make the changes.
  3. Enter the language-specific text for the selected bot elements, just as you did for the default language.
    For example, if you want to add a bot synonym in the new language, follow these steps:

    1. From the left navigation under the Build tab, click Natural Language > Training > Bot Synonyms.
    2. From the list of keywords and synonyms, click the keyword for which you want to add the synonym.
    3. In the synonyms box, type the synonym (in the enabled language) and press enter.
Note: Refer to the Translatable Bot Components article for the complete list of bot elements to which you can add or edit translations.
Editing and Re-uploading a language pack

If you need to make major changes to the language pack, the recommended practice is to make the changes in the offline copy of the language pack and re-upload it to the bot.

Note: Proceed with a full replacement of the language pack only if you are externally managing the language pack. The newly updated doesn’t just update the existing language pack but replaces it. If you are looking to make small changes that don’t warrant a full replacement, make them directly from the application UI.

To re-upload a language pack to a bot, follow these steps:

  1. On the top right corner of the bot window, click the current bot language.
  2. From the drop-down list, select the bot language in which you want to make the changes.
  3. From the left navigation menu under the Build tab and click Configurations -> Languages.
  4. The Language Management window opens displaying the disable/enable/configure actions against each language.
  5. Click on any enabled/disabled language to open the Manage Language window.
  6. From the Manage Language window click Choose File and upload the updated language pack.
  7. Click Update to update the language pack.

Disabling/Enabling Language

Once you have configured and enabled a language you can:

  • Disable or deactivate a language that is previously enabled for the bot. The actual language-specific data that has been added while enabling the language will continue to exist in the bot even after disabling the language. Disabling would prevent the users from talking  to the bot in that language (can be viewed in bot export copy)
  • If a language is disabled you can enable it again, since the data is preserved you need not enter all the details.
  • No changes can be made to the Default Language, ie the language selected while creating the bot.

NOTE: Any change in language settings, needs to be published before it can take effect in the published bot.

Language Detection and Selection

Multilingual bots auto-detect and switch language based on the user’s utterance. An exception to this rule is when the user is expected to enter a value against an entity and the user input satisfies that entity’s criteria.

Language Detection

There are three ways a bot can detect the language based upon the user utterance:

  • By Default: Kore.ai Bots platform uses its own language detection algorithm to detect language from the user utterance. This is the default setting and the end user’s language will be detected by the platform.
  • For on-prem installation, you can go with the above-mentioned default setting of Kore.ai’s in-house language detection algorithm or use Google APIs for language detections. You can set it in the Kore Config file.
  • If you are using BotKit SDK, you may also send the following cheat command from your BotKit to the platform:
    cheat language <language name or code>

The bot continues to communicate with the user in the same language. If the user switches to another enabled language anytime later, the bot changes to the new language automatically.

If the bot fails to detect a user’s language with high confidence, it requests the user to select a preferred language from the list of enabled options.

Language Selection Logic for Bot Users

  1. Bot identifies user language from every utterance. In case a change is detected, it will get a confirmation from the user regarding the switch and proceeds as per the user response.  These standard responses can be customized using the getCurrentOptions utility, see here for more. Note that the current conversation will be discarded in case the user wants to switch languages.
  2. Language selection settings – In addition, you may want to configure the language selection options. From the menu under the Build tab, click Configurations -> Languages. Under Language Selection Logic (scroll down for the option), for language selection time frame, set to one of the following:
    • Lifetime: The auto-detected language will be set as the user’s preferred language and used for all subsequent communications until the user interacts in another enabled language anytime later. If the user starts to talk in another enabled language, the bot changes to that language.
    • Per Session: Detects the user’s language at the beginning of every session and responds accordingly.
    • Every User Message: Identifies the user’s language from every utterance. In case a change is detected, will get a confirmation from the user regarding the switch and proceeds as per the user response. Note that the current conversation will be discarded in case the user wants to switch languages. This feature was introduced in release 7.2 and is the default setting for multi-lingual bots.

  3. For testing and debugging purposes, you can override the language selection settings by using the cheat command during a chat session:
    Replace the language name or code with one of these values:

    • English: English or EN
    • German: German or DE
    • French: French or FR
    • Spanish: Spanish or ES

Translatable Components

This section lists the bot elements for which you can provide translations, along with their JSON properties. You can also translate these elements from the application UI. Refer to the help links added across the article to get an overview of the relevant topic areas.

Note: You need not translate Standard Responses as the platform automatically translates them when you enable a language.

Bot Metadata

JSON object consisting of the following translatable elements

Field Name Type Description
Bot Name String Name of the bot
Bot Description String Description of the bot
Bot Synonyms Object Arrays of important words in the task names and their corresponding synonyms. Enter translation of the words as well as their synonyms. Refer to Managing Synonyms to learn more about bot synonyms.
Bot Error Codes Object Arrays of error codes and their corresponding messages. Enter translations of the error message. Refer to Customizing Error Messages to learn more about error messages.

Dialog Tasks

JSON object consisting of the following translatable components of your bot’s Dialog Tasks.

Field Name Type Description
Dialog Task Name String Name of the dialog task
Dialog Task Desc String Description of the dialog task
Dialog Task Upgrade Message String Message displayed to the developer on the History page for the upgraded task

Dialog Components

JSON object consisting of the following translatable components related to the NLP settings of a dialog task.

Field Name Type Description
Dialog Component Intent String Name of the User Intent node
Dialog Component Description String Description of the User Intent node
Dialog Component Synonyms Object Synonyms for the words in the entity node names. Refer to Managing Synonyms to learn more.
Dialog Component Patterns Object Patterns for the User Intent and Entity nodes in the dialog task. Refer to Managing Patterns to learn more.

Message Templates

JSON object with arrays of Message Template IDs and Message Template Text values. They correspond to the User Responses field in the Message node and the Bot Prompts and Error Prompts fields in the Entity node of the dialog tasks.

Field Name Type Description
Message Template Text String The text entered in User Responses, Bot Prompts, or Error Prompts fields in any Message or Entity node of a dialog task.

Action Task

JSON object consisting of the following translatable components of your bot’s Action Tasks.

Field Name Type Description
Action Name String Name of the action task
Action Short Desc String Description of the action task
Action Keywords Array The search keywords entered for the action task
Action Patterns Array Arrays of patterns related to the action task’s name. Replace the pattern text with the translated text. Refer to Managing Patterns to learn more.
Action Field Synonyms Object Arrays of synonyms for each task field. Replace the field name and the synonyms with the translated text. Refer to Managing Synonyms to learn more.
Action Field Patterns Object Array consisting of patterns for each task field. Replace the pattern text with the translated text. Refer to Managing Patterns to learn more.
Action Ignore Words Array Array of ignore words related to the action task. Replace the words with the translated text. Refer to Managing Ignore Words and Field Memory to learn more.
Action Upgrade Short Message String Upgrade Short Message related to the action task.
Action Upgrade Long Message String Upgrade Long Message related to the action task.
Action Query Fields Object Key-value pairs of Action Field Help and Action Field Title. Replace the text with the translated text.
Action Payload Fields Object Key-value pairs of Alert Payload fields. Replace the text with the translated text.

Alert Task

JSON object consisting of the following translatable components of your bot’s Alert Tasks.

Field Name Type Description
Alert Name String Name of the alert task
Alert Short Desc String Description of the alert task
Alert Keywords Array The search keywords entered for the alert task
Alert Patterns Array Array of patterns related to the alert task’s name. Replace the pattern text with the translated text. Refer to Managing Patterns to learn more.
Alert Field Synonyms Object Arrays consisting of synonyms for each task field. Replace the field name and the synonyms with the translated text. Refer to Managing Synonyms to learn more.
Alert Field Patterns Object Arrays consisting of patterns for each task field. Replace the pattern text with the translated text. Refer to Managing Patterns to learn more.
Alert Ignore Words Array Arrays of ignore words related to the alert task. Replace the words with the translated text. Refer to Managing Ignore Words and Field Memory to learn more.
Alert Upgrade Short Message String Upgrade short message related to the alert task.
Alert Upgrade Long Message String Upgrade long message related to the alert task.
Alert Query Fields Object Arrays consisting of key-value pairs of Alert Field Help and Alert Field Title. Replace the text with the translated text.
Alert Payload Fields Object Arrays consisting of key-value pairs of Alert Payload fields. Replace the text with the translated text.

Action Fields

JSON object consisting of the following translatable components in the API Request tab of the Action task.

Field Name Type Description
Action Field Title String The title of the user input field related to the action task, for example, Choose account
Action Field Help String The help text displayed below the field title to describe the task, for example, Which account would you like to get the balance for?
Action Field Placeholder Array The placeholder text displayed inside the field

Alert Fields

JSON object consisting of the following translatable components in the API Request tab of the Alert task.

Field Name Type Description
Alert Field Title String The title of the user input field related to the alert task, for example, Choose city
Alert Field Help String The help text displayed below the field title to describe the task, for example, Which city would you like to get weather alerts for?
Alert Field Placeholder String The placeholder text displayed inside the field.

Bot Filters

JSON object consisting of the following translatable components related to Bot filters

Field Name Type Description
Filter Name String Name of the task filter

IDP Config Form Fields

JSON object consisting of the following translatable components related to IDP configuration form

Field Name Type Description
IDP Form Field String Name of the IDP Form Field displayed to the end-user in the authentication dialog