Kore.ai Botプラットフォームへの登録が完了したら、次のステップはBotを作成することです。Botを作成する前に、こちらのリンクからBot作成の基本を学ぶことをお勧めします。
この文書に記載されているステップに従って、自分のペースでBotを作成することができます。または、ガイド付きヘルプを使用して、Botの作成プロセスをステップごとに行うことができます。
ガイド付きヘルプにアクセスするには、以下のステップに従ってください。
- Botアカウントにログインします。
- Botビルダーのランディングページで、右上のヘルプをクリックします。
- ページヘルプウィンドウで、ガイド付きヘルプで「Hello world」Botを構築するの隣にあるガイド付きヘルプをクリックします。
- ユースケースのリストが表示されます。開始をクリックして、ユースケースを進めます。
- この文書は、ダイアログタスクBot(フライト状況のBot)を使用する際に役立ちます。

Botの概要
このBotは、ユーザーの選択に応じて、ロサンゼルス国際空港のフライトの発着状況を表示します。
このBotは以下のことができます。
- 到着または出発について知りたいかどうかをユーザーに尋ねる。
- APIにサービスコールを行い、空港を出発または空港に到着するフライト情報を取得する。
- ユーザーによる到着または出発の選択に応じて便名を表示する。
- ユーザーにフライト番号の選択を要求する。
- 選択したフライトのステータスの詳細を表示する。
- エラーに対処する。
Botの構築
標準Botを作成することができます。作成するには、以下のステップに従ってください。
- Kore.ai Botプラットフォームのアカウントにログインします。
- Botのランディングページで、右上の+新しいBotをクリックします。
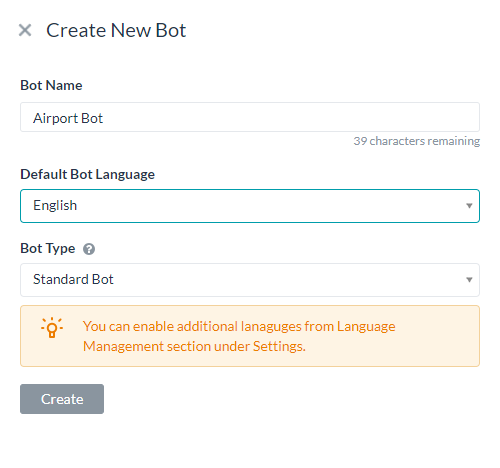
- 新しいBotの作成ウィンドウで、Botの詳細を入力します。
- Bot名 – Botに空港Botなどの名前をつけます。入力した名前がすでに使用されている場合は、他のものを試してみてください。
- デフォルトのBot言語ドロップダウンリストから英語を選択し、Botタイプドロップダウンリストから標準ボットを選択します。
- 作成をクリックします。
ダイアログタスクの作成
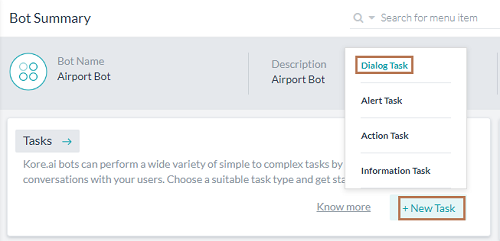
Botの作成後、Botのサマリーページに移動します。最初のステップは、インテントダイアログを追加することです。インテントダイアログは、ユーザーとBot間の会話フローの最初のステップです。
- タスクウィジェットで、+新しいタスクをクリックし、ダイアログタスクを選択します。

- Botタスクページで、以下の詳細を入力します。
- インテント名 – インテント名を入力します。これはダイアログのトリガーとなるフレーズです。インテント名は、フライト状況を取得するのように3~4語以内のシンプルなものにしてください。
- その他のオプションでは、説明やその他のダイアログ関連の詳細を追加することができます。ここではデフォルトの設定のままにしておきましょう。
- 作成して続行をクリックします。

- ユーザーインテントウィンドウでは、コンポーネントプロパティ タブがデフォルトで選択されています。デフォルトのプロパティのままにしておきましょう。
- ユーザーインテントウィンドウを閉じます。
ユーザー選択エンティティノードの作成
エンティティノードは通常、ユーザーから情報を収集するために使用されます。到着または出発の詳細についてのユーザーの選択を取得するために使用してみましょう。
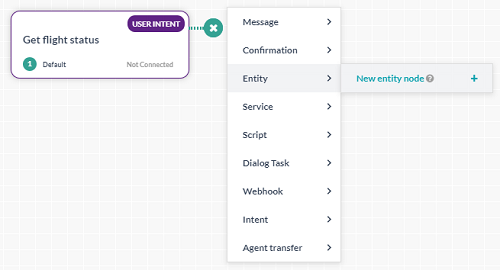
- ユーザーインテントノードの横にある+アイコンをクリックします。
- エンティティおよび新しいエンティティノード+を選択します。
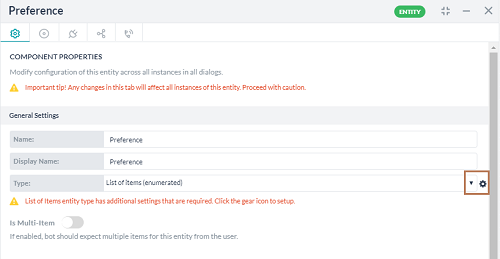
- エンティティウィンドウでは、コンポーネントプロパティタブがデフォルトで選択されています。
- 一般設定セクションで以下の詳細を入力します。
- 名前:選択
- 表示名:選択
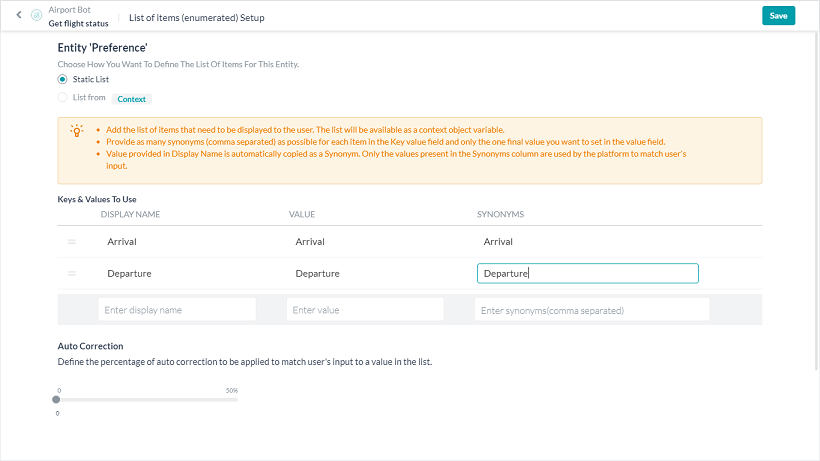
- タイプ: ドロップダウンリストから項目リスト(列挙)を選択します。お客様は、ユーザーが選択可能な値のリストを提供することができます。値のリストを追加するには、
-
- フィールドの横にある設定アイコンをクリックします。
- 静的リストオプションを選択します。
- 使用するキーと値セクションで、表示名を到着および出発として別々の行に入力します。値列と同義語列は自動挿入されるため、そのままにしておきます。
- 保存をクリックします。
- エンティティウィンドウに戻ります。
- フィールドの横にある設定アイコンをクリックします。
-
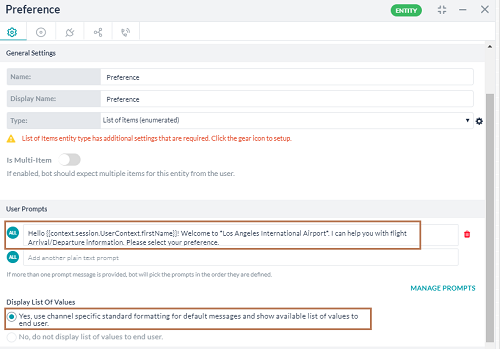
- ユーザープロンプトセクションで、以下のテキストを入力します。
こんにちは{{context.session.UserContext.firstName}}。*ロサンゼルス国際空港*へようこそ。フライトの発着情報を取得いただけます。ご希望のフライトを選択してください。
注:コンテキスト変数は、ユーザーの名字を取得します。また、空港名が太字で表示されるようにマークダウンを使用しています。 - 入力をクリックして保存します。
- 値のリストを表示セクションで、はい。デフォルトメッセージにチャネル固有の標準フォーマットを使用して、利用可能な値の一覧をエンドユーザーに表示しますオプションを選択します。これにより、サポートされているチャネルのボタンテンプレートとして値のリストが表示されます。
- エンティティウィンドウを閉じます。
サービスノードの作成
サービスノードを使用すると、バックエンドのAPIコールを行うことができます。ここでは、APIを呼び出し、ロサンゼルス国際空港の発着便のフライト情報を取得するためにサービスノードが使用されます。このチュートリアルでは、ダミーのAPI設定を使用します。
- 優先エンティティノードの横にある+アイコンをクリックします。
- サービス > 新しいサービスノード+を選択します。
- サービスノードは、バックエンドのAPIコールを行い、ロサンゼルス国際空港のフライトの出発および到着情報を取得するために使用されます。
- サービス]ウィンドウでは、コンポーネントプロパティタブがデフォルトで選択されています。
- 一般設定セクションで、以下の詳細を入力します。
- 名前:フライト情報の取得
- 表示名:フライト情報の取得
- サービスタイプ:カスタムサービス
- タイプ:ウェブサービス
- サブタイプ:REST
- リクエスト定義セクションで、リクエストの定義をクリックします。
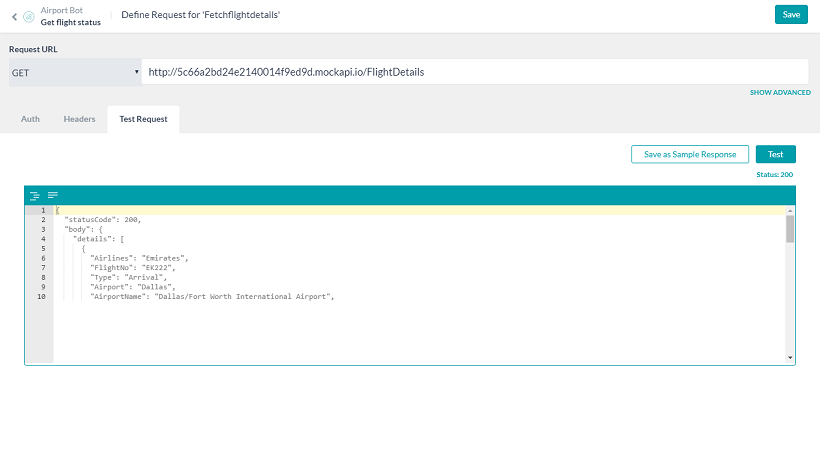
- リクエストの定義ページで、以下の詳細を入力します。
- リクエストタイプ – 取得
- リクエストURL –
http://5e85a56644467600161c6579.mockapi.io/FlightDetails
このAPIはAuthパラメータやHeaderパラメータを必要としません。 - リクエストのテストタブをクリックします。
- 右上のテストをクリックします。
- テストが完了するのを待って、ステータスコード200を取得します。
- サンプル応答として保存をクリックします。
- 保存をクリックします。
- サービスウィンドウを閉じます。
フライト選択エンティティノードの作成
このエンティティノードは、ユーザーが状況の詳細を知りたいフライト番号を取得するためのものです。
- フライト情報の取得サービスノードの横にある+アイコンをクリックします。
- エンティティ > 新しいノード+を選択します。
- エンティティノードは、ユーザーが選択したフライト番号を取得する必要があります。
- エンティティウィンドウでは、コンポーネントプロパティタブがデフォルトで選択されています。
- 一般設定セクション、以下の詳細を入力します。
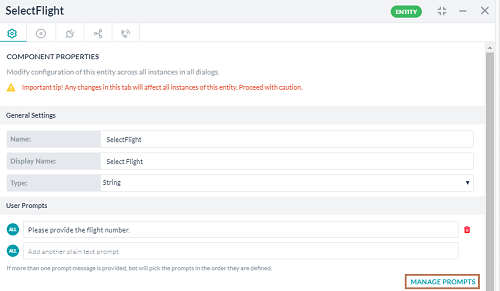
- 名前:フライトの選択
- 表示名:フライトの選択
- タイプ:文字列(ユーザーは、以下の手順でAPI文字列出力を値のリストに変換するカスタムスクリプトを作成することができます。これは使用するダミーAPIの要件です。)
- ユーザープロンプトセクションで、以下のテキストを入力します。
フライト番号を入力してください。- プロンプトの管理:ユーザーは、Web SDK チャネルの特定のプロンプトを定義することができます。
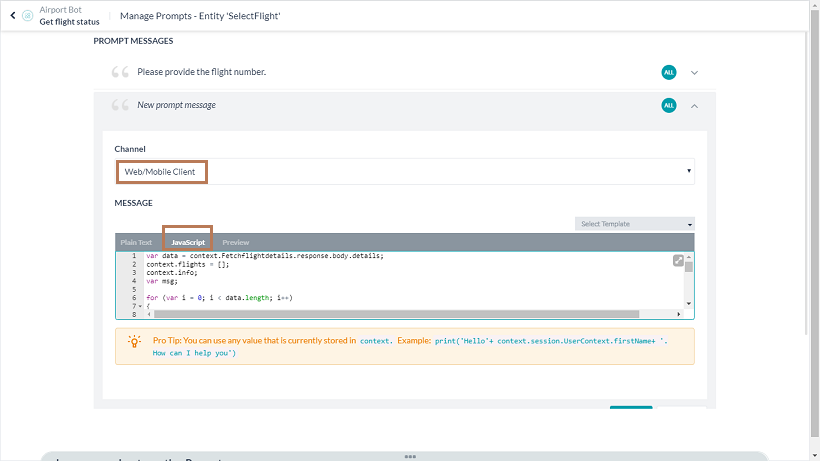
- プロンプトメッセージの管理をクリックします。
- プロンプトメッセージの追加をクリックします。
- 新しいプロンプトメッセージウィンドウで、チャネルドロップダウンリストからウェブ/モバイルクライアントを選択します。
- メッセージセクションで、JavaScriptタブをクリックします。
- 以下のJavaScriptを入力します。JavaScriptはAPIコールから出力された文字列からユーザーの選択と一致するフライト番号を抽出し、クイックリプライ形式で表示します。
var data = context.Fetchflightdetails.response.body.details;
context.flights = [];
context.info;
var msg;
for (var i = 0; i < data.length; i++)
{
    if (context.entities.Preference == data[i].Type)
    {
        var details = {
            "Airlines" : data[i].Airlines,
            "FlightNo" : data[i].FlightNo,
            "Airport" : data[i].Airport,
            "AirportName" : data[i].AirportName,
            "Time" : data[i].Time
        };
        context.flights.push(details);
    }
}
var message = {
    "type" : "template",
    "payload" : {
       "template_type" : "quick_replies",
       "text" : "こちらが" + context.entities.Preference + "本日のロサンゼルス国際空港のフライト情報です。フライト番号を選択して詳細をご確認ください。",
       "quick_replies" : []
    }
};
for (i=0; i < context.flights.length; i++)
{
   var replies = {
        "content_type":"text",
        "title" : context.flights[i].FlightNo,
        "payload" : context.flights[i].FlightNo
    };
message.payload.quick_replies.push(replies);
}
return JSON.stringify(message);
- 保存をクリックします。
- ダイアログビルダーに戻り、エンティティウィンドウを閉じます。
スクリプトノードの作成
スクリプトノードは、ダイアログタスクでカスタムJavaScriptを記述するために使用されます。ユーザーはスクリプトを使用して選択したフライト情報を抽出することができます。後日、ユーザーはこのスクリプトにその他の機能を追加することができます。
- フライトエンティティの選択ノードの横にある+アイコンをクリックします。
- スクリプト > 新しいスクリプトノード+を選択します。
- スクリプトウィンドウでは、コンポーネントプロパティタブがデフォルトで選択されています。
- 一般設定セクションで、以下の詳細を入力します。
- 名前:フライトの確認
- 表示名:フライトの確認
- スクリプトの定義セクションで、スクリプトを定義するをクリックします。
- スクリプトの追加ダイアログボックスで、以下のJavaScriptをコピーします。このコードは、選択したフライト番号の詳細を抽出します。
context.details; var x = context.flights.length; for (var l = 0; l < x; l++) { if (context.entities.SelectFlight == context.flights[l].FlightNo) { context.details = { "Airlines" : context.flights[l].Airlines, "FlightNo" : context.flights[l].FlightNo, "Airport" : context.flights[l].Airport, "AirportName" : context.flights[l].AirportName, "Time" :context.flights[l].Time }; break; } } - 保存をクリックします。
- スクリプトウィンドウを閉じます。
メッセージノードの作成
メッセージノードは、Botからユーザーへのメッセージを表示するために使用されます。ユーザはメッセージノードを使用して、好みに応じて適切なフライト情報を表示することができます。
- フライトスクリプトの確認ノードの横にある+アイコンをクリックします。
- メッセージ > 新しいメッセージノード+を選択します。
- メッセージウィンドウでは、コンポーネントプロパティタブがデフォルトで選択されています。
- 一般設定の項目で、以下の詳細を入力します。
- 名前:フライト情報
- 表示名:フライト情報
- ボットの応答セクションで、以下のテキストを入力します。
こちらがお客様のフライト情報です。 - 入力をクリックして保存します。
- プロンプトの管理:ユーザーは、Web SDKチャネルの特定のプロンプトを定義することができます。
- 応答の管理をクリックします。
- Botの応答の管理ページで、Botの応答を追加するをクリックします。
- チャネルドロップダウンリストからウェブ/モバイルクライアントを選択します。
- メッセージセクションでJavaScriptタブをクリックします。
- 以下のJavaScriptをコピーします。フライト情報を表形式で表示するためにJavaScriptを記述しています。
var message = {
 "type": "template",
 "payload": {
 "template_type": "mini_table",
 "layout": "horizontal",
 "text":"フライト" + context.entities.Preference + "の情報" ,
 "要素": [
 {
 "primary":[["Flight No"], [context.details.FlightNo, "right"]],
 "additional":[["Airlines", context.details.Airlines],["From",context.details.Airport],["Time",context.details.Time],["Remarks","On Time"]]
 }
 ]
}
};
print(JSON.stringify(message));
-
- 保存をクリックします。
- メッセージウィンドウに戻ります。
- メッセージウィンドウで接続タブをクリックします。
- ドロップダウンリストから、デフォルトの接続を接続なしからダイアログの終了に変更します。
- 保存をクリックします。
- メッセージウィンドウを閉じます。
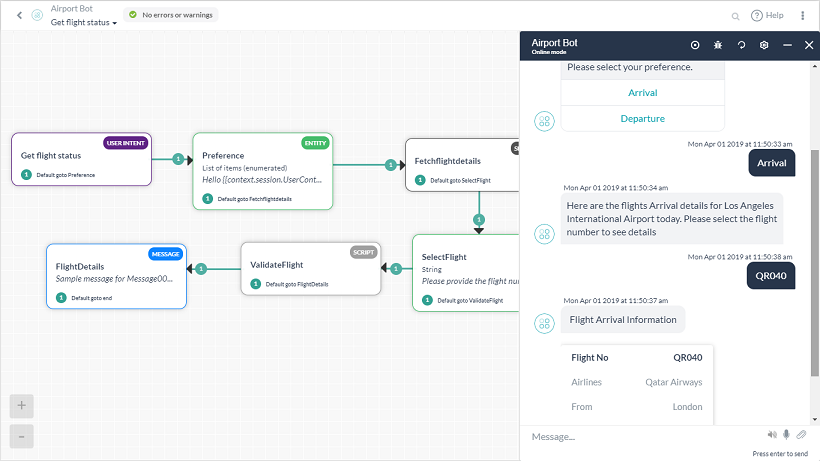
Botのテスト
ダイアログタスクのテストには、右下のBotと話すオプションを使用することができます。
- 「フライト状況を教えてください。」という発話(インテント名)を入力します。
- Botの指示に従います。
- 出発/到着を選択
- フライト番号を選択
- 表形式で表示されるフライト情報を確認
イベントの追加
現在、Botは会話の開始時にユーザー入力が行われるのを待っています。Botは会話の開始時にユーザーを誘導することもできます。このため、ウェブ/モバイルSDKから新しい接続が確立されるたびにこのタスクを開始するイベントハンドラを追加することができます。
- ダイアログビルダーを閉じ、Botのタスクページに移動します。
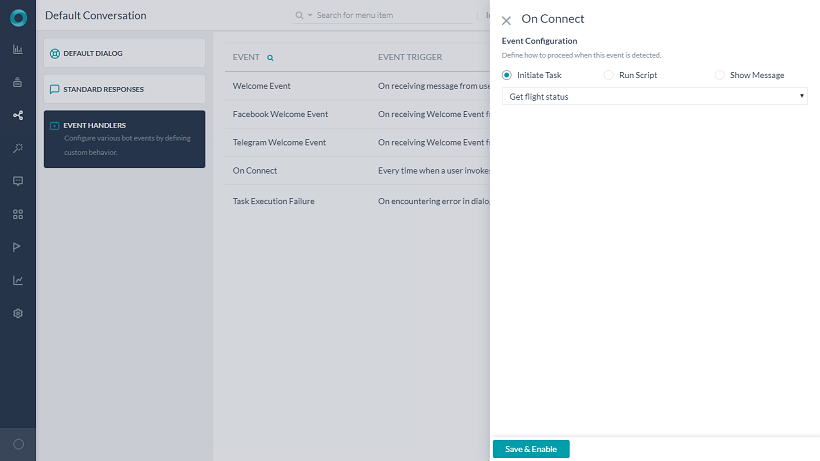
- 左ナビゲーションペインにカーソルを合わせ、自然言語 > デフォルトの会話 > イベントハンドラを選択します。
- イベントリストから、接続イベントに対して設定をクリックします。
- 接続ウィンドウでは、タスクを開始するオプションがデフォルトで選択されています。
- ドロップダウンリストから、フライト状況の取得タスクを選択します。
- 保存して有効にするをクリックします。
Botのテスト
ダイアログタスクをテストするには、右下のBotと話すオプションを使用することができます。接続イベントが設定されているため、ダイアログは自動的に開始されます。
Botの指示に従います。
- 出発/到着を選択する
- フライト番号を選択する代わりに、リストに存在しない番号を手動で入力する
- 「申し訳ありませんが、何らかのエラーが発生したためタスクを破棄しました。再試行してください。」のような一般的なメッセージが表示されます。
次のステップでは、これを修正する方法について説明しています。
スクリプトノードの修正
文字列タイプがフライトの選択エンティティで使用されているため、ユーザーがリストから選択せずに誤ったフライト番号を手動で入力してしまったというシナリオを処理することができます。これは、接続に基づいて適切なメッセージを表示することで対応できます。
このステップでは、先に保存したスクリプトを修正して、ユーザー入力の確認を追加します。
- ダイアログビルダーのページを開きます。これは以下のいずれかの方法により行えます。
- 左ナビゲーションペインから、Botタスクをクリックし、フライト状況の取得タスクを選択します。
- 左ナビゲーションペインから、ダッシュボード > Botサマリーをクリックし、フライト状況の取得タスクを選択します。
- フライトスクリプトの確認ノードを選択します。
- フライトスクリプトの確認ウィンドウのスクリプト定義セクションで、スクリプトの定義をクリックします。
- スクリプトの追加ダイアログボックスで、以下のJavaScriptをコピーし、既存のコードを置き換えます。ユーザーが入力したフライト番号がAPIサービスコールで返された入力と一致した場合に設定する有効なタグを追加することができます。
context.valid = false; context.details; var x = context.flights.length; for (var l = 0; l < x; l++) { if (context.entities.SelectFlight == context.flights[l].FlightNo) { context.valid = true; context.details = { "Airlines" : context.flights[l].Airlines, "FlightNo" : context.flights[l].FlightNo, "Airport" : context.flights[l].Airport, "AirportName" : context.flights[l].AirportName, "Time" :context.flights[l].Time }; break; } } if (context.valid === false) { delete context.entities.SelectFlight; } - フライトスクリプトの確認ウィンドウを閉じます。
条件付きフローの作成
以下は、フライトスクリプトの確認ノードから条件付きフローを追加するステップです。このスクリプトノードから新しいメッセージノードへの接続を確立します。これは、Botからユーザーにエラーメッセージを表示し、再度フライト番号を選択するようにリダイレクトするためです。
エラーメッセージの作成
- フライト スクリプトの確認ノードにカーソルを合わせます。
- ノード上にアイコンの配列が表示されます。
- +アイコンをクリックすると、新しい接続が作成されます。この新しい接続から、新しいBotメッセージノードを作成します。
- メッセージ > 新しいメッセージノード+を選択します。
- メッセージウィンドウでは、コンポーネントプロパティタブがデフォルトで選択されています。
- 一般設定の項目で、以下の詳細を入力します。
- 名前:エラーメッセージ
- 表示名:エラーメッセージ
- ボットの応答セクションで、以下のテキストを入力します。
入力されたフライト番号が間違っています。もう一度やり直してください。 - 入力をクリックして保存します。
- 接続タブをクリックします。
- ドロップダウンリストから、デフォルトの接続を接続なしからフライトの選択に変更します。
- 保存をクリックします。
- エラーメッセージウィンドウを閉じます。
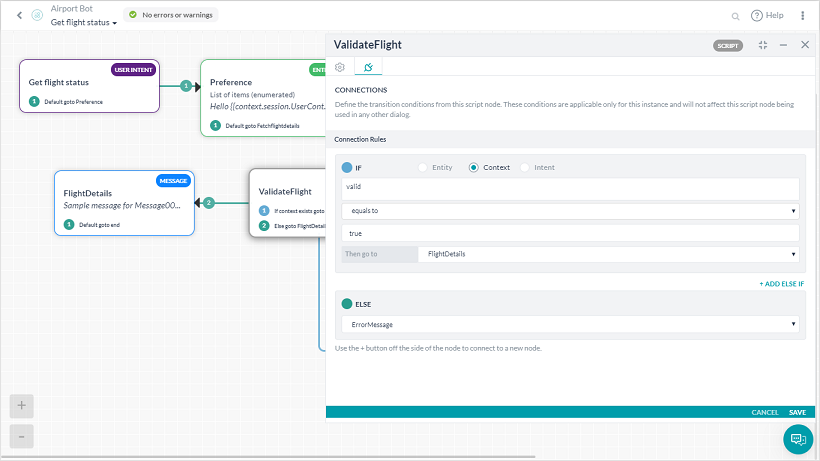
フライトの確認スクリプトの接続
- フライトの確認のスクリプトノードをクリックします。
- フライトスクリプトの確認ウィンドウで、接続タブをクリックします。
- +IFを追加をクリックします。
- IFセクションで、
- コンテキストを選択します。
- IF条件に、確認と入力します。
- Equalsとして演算子を選択します。
- Trueとして値を入力します。
- この条件が真の場合、ダイアログは フライト情報に移動します。
- ELSEセクションで、
- この条件が偽の場合、ダイアログは エラーメッセージに移動します。
- 保存をクリックします。
- フライトスクリプトの確認ウィンドウを閉じます。
Botのテスト
ダイアログタスクをテストするには、右下のBotと話すオプションを使用します。接続イベントが設定されているため、ダイアログが自動的に開始されます。別の方法として、「フライト状況を教えて下さい。」のような発話(インテント名)を入力しても構いません。
Botの指示に従います。
- 出発/到着を選択します。
- 無効なフライト名を入力します。
- 適切なエラーメッセージが表示され、再度フライト番号を入力するように促されます。
- フライト番号を選択します。
- フライト情報を表形式で確認することができます。
これでお客様の初めてのBotの作成およびテストは完了です。
次のステップは以下の通りです。
- 「フライト状況を知りたいのですが。」、「QR040の状態は?」のようなユーザーの様々な発話に応答できるようにBotをトレーニングします。
これはBotをトレーニングするから行うことができます。 - ユーザーがアクセスできるよう、チャネルを有効にしてBotを公開します。詳細はこちらを参照してください。


