会話ビルダーは、会話形式の要素を使用してダイアログタスクを設計および構築できる新しいダイアログタスクエディターです。ストーリーボードおよびフローベースのダイアログタスクビルダーの機能を活用しています。ストーリーボードはユーザーの会話を設計して可視化するのに役立ちますが、ボットはダイアログタスクビルダーにおいて開発する必要があります。これには、理解した上で、会話のコンポーネントをダイアログのコンポーネントに変換するという手作業が必要となります。翻訳では、多くのことが失われてしまいます。また、シーンに対するダイアログの検証には膨大な手作業が必要であり、実装スタイルが異なるため、会話デザイナー/BAと実装エンジニアの間のコラボはそれほどありません。また、シーンやダイアログの継続的な変更は、手動で同期させる必要があり、非常になる複雑になる場合があります。会話駆動型ダイアログビルダーは、ストーリーボードのシーンを自動的にダイアログタスクに変換します。デザイナーは、ダイアログを構築する前に、エンドユーザーの会話を可視化することに集中できます。会話フローが自動的に生成されるので、開発者は技術的な面に集中することができます。これにより、開発の作業が削減できるだけでなく、実際の設計により近いボットを作成することができます。
この機能はプラットフォームのv9.0でリリースされたもので、![]() (ベータ版)の状態にあります。
(ベータ版)の状態にあります。
機能
- 会話デザイナー(またはビジネスアナリスト)と開発者が共同でダイアログを構築するための連携アプローチ。
- 会話ビューでダイアログを定義する機能 – 会話デザイナーやBAは、このビューで、ボットを一連のボットメッセージとユーザーメッセージとして設計することができます。
- 構築ビューにおけるタスクの自動生成 – 開発者は、設定を微調整し、会話フローの上に展開して、完璧に機能するボットに向けて必要なロジックとフルフィルメントの要素を提供することができます。
- 操作性と直感性の改善
- ビュー間の自動同期、つまり、1つのビューに変更を加えるともう1つのビューも更新されます。
会話ビュー
BA/会話デザイナーは、会話ビューでダイアログを定義することができます。このビューは、一連のボットメッセージとユーザーメッセージとしての会話フローから構成されています。適切な場合には、BAはボット開発時中に設定されるアクションノードを追加することができます。構築->会話スキル->ストーリーボードでは、会話フローに切り替えできるオプション付きの排他的な会話ビューが得られます。また、新しいダイアログビルダーから左下のウィンドウでも表示できます。 メモ:この文書では、会話ビルダーでのみで利用できる機能をリストアップしています。これは、ストーリーボードで利用できる機能に加えて、ストーリーボードと会話ビルダーの両方に共通して利用できる機能です。共通の機能については、こちらをご参照ください。
構築ビュー
会話ビューは、必要なロジックやフルフィルメント要素を構築ビューに提供することにより、拡張できます。これは、必要なノードをドラッグアンドドロップするかもしくは追加するオプションを備えた新しいダイアログビルダーです。BA/会話デザイナーによって設計された会話に基づいて、エンティティ、メッセージ、その他のノード、および適切な接続が自動的に生成されます。開発者は、設定を変更し、適切なサービスコールなどを追加して、完璧に機能するボットにすることができます。このビューにアクセスするには、会話ビュー(上記参照)または構築->会話スキル->ダイアログタスクからダイアログの表示をクリックします。 
会話ビルダー
ここでは、会話ビルダーのさまざまな機能を使用して、シーンの作成を探りましょう。会話ビルダーには2つの方法でアクセスできます。
- 新規シーンを作成してストーリーボードから
- 新規ダイアログを作成してダイアログタスクから
シーンの作成
- 会話を設計するボットを開きます
- トップメニューから構築タブを選択します
- 左側のメニューから、会話スキル->ストーリーボードをクリックします。
- 新規シーンをクリックして、以下の詳細を入力します。
- シーン名
- 説明
- シーンのステータス
- ダイアログタスクの自動生成オプションを選択します。これにより、シーンを構築する際に、バックグラウンドで自動的にダイアログタスクが作成されます。

ダイアログの作成
会話駆動型ダイアログビルダーは、ダイアログフローの作成から始めることができます
- 会話を設計するボットを開きます
- トップメニューから構築タブを選択します
- 左側のメニューから会話スキル->ダイアログタスクをクリックします
- 新規シーンをクリックして、以下の詳細を入力します。
- インテント名
- 説明
- インテントトレーニング – このインテントをトリガーしようとする発話を入力します。
- 会話駆動型ダイアログビルダーの試行オプションを選択します。これにより、会話を設計すると同時に、対応するダイアログタスクを表示し、定義することができます。

基本機能
メモ:以下のセクションでは、会話ビルダーのさまざまな面を探ります。スクリーンショットはストーリーボードフローを表しますが、ダイアログタスクフローにも有効です。
インテントノード
- シーンやダイアログタスクを作成すると、デフォルトでプライマリインテント が作成されます。これが、このシーン/ダイアログのトリガーとなるユーザーの発話とされます。
- その他オプションをクリックし、設定プロパティを選択します。

- 必要に応じて表示名とノード名 を変更します
- 説明追加・変更します
- このインテントをトリガーする発話の追加を行います。複数の発話を追加することができます。これらは、プライマリインテント発話に加えられます。
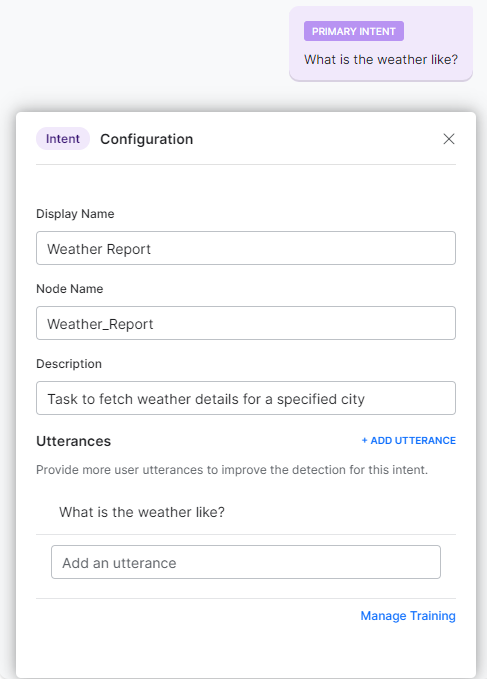
- 発話、パターン、ルールの追加でインテントをトレーニングできるようになるトレーニングの管理のオプションがあります。発話のトレーニングについての詳細はこちらをご参照ください 。
ボットメッセージ
会話の中で、まず始めたいのは、ボットからユーザーへのメッセージです。これは、会話フローで、ユーザーのガイドとして役立つことになリます。ボットメッセージは、以下の目的のうちの1つには役立ちます。
- ユーザーからの情報収集を目的とした質問を訊く です。これは、ダイアログタスクで エンティティノードに変換されます。
- さらに、文字列、番号、日付など、想定されるユーザー入力のタイプを指定できます。この入力は、ダイアログタスクでエンティティタイプに変換されます。
- 簡単なフォーマット化オプションを使用して、あるいはボットメッセージを表示するためのテンプレートを選択して、メッセージをフォーマット化することができます。
- 会話パスを決めるインテントで、確認の依頼を行います。これは、ダイアログタスクで確認ノードに変換されます。
- ヘルプメッセージやウェルカムメッセージ、あるいはユーザークエリへの応答として、ユーザーへの情報提供を行います。これらは、ダイアログタスクで 管理ノードに変換されます。
上記の各選択項目では、リストから選択して既存のノードを使用するか、あるいは新しいノードを作成することができます。 
ユーザーの応答
どのボットメッセージの後にも、ユーザー応答があるのが理想的です。ユーザー応答は、ユーザーの応答を想定して会話フローを定義するために使用できます。例として、ユーザーに入力の確認を求め、その応答に基づいて肯定と否定の2つのパスが存在します。メモ:指定されていない場合、プラットフォームは、会話フローの神聖さを維持するために、サンプルユーザー応答のプレースホルダーを追加します。

その他のノード
ボットメッセージやユーザーメッセージとは別に、次のことができます。
- サービスコール、スクリプト、ロジック、Webhook、処理などのボットアクションがフローを定義するために、プレースホルダーを追加したりすることができます。実際の機能は、ダイアログビルダーから追加する必要があります。このようなボットアクションノードの目的を詳しく説明する開発者に、コメントを残すことができます。例として、フライト予約タスクでは、実際の予約処理のためにバックエンドサーバーに接続したいとします。
- サブタスクや関連/フォローアップタスクのために、ダイアログタスク をトリガーします。例として、フライトを予約した後に、Webチェックインダイアログをトリガーしたい場合もあります。
- エージェントへの転送ノード(会話の最後にのみ)。例として、送金タスクでは、ライブエージェントを介してユーザー資格情報を認証したい場合があります。
- デジタルフォームを追加して、ユーザーの一連の入力をキャプチャします。例として、アカウント作成タスクでは、名前、住所、電話番号などのユーザー情報を入力するフォームを表示したい場合があります。

設定
会話を構築中では、ノードはデフォルトの設定で生成されます。これらの設定は、会話ビルダー自体からカスタマイズすることも、後でダイアログタスクから行うこともできます。次のセクションでは、追加された各ノードについて、会話ビルダーから利用可能なさまざまな設定を見ていきます。
エンティティノード
エンティティノードは、ボット->質問するが選択されるたびに作成されます。各質問に対して、以下のことができます。
- エンティティタイプを定義します – ドロップダウンリストから選択します。このリストには、Kore.aiプラットフォームがサポートするエンティティタイプ が含まれています。
- 太字、斜体などのフォーマット化オプション を適用します。
- ボタン、カルーセルなどのテンプレートを使用して、クエリを表示します。

追加した後は、プロパティの設定:を行うことができます。
- 表示名、
- ノード名、
- タイプ,
- ~は複数アイテム、
- ユーザープロンプト、および
- エラープロンプト。
確認ノード
確認ノードは、 ボット->確認を要求が選択されるたびに作成され、 「はい」、「いいえ」 、および他の2つのユーザー応答パスとともに表示されます。オプションを削除または追加することができます。各確認事項については、以下のとおりです。
- 太字、斜体などのフォーマット化オプション を適用します。
- ボタン、カルーセルなどのテンプレートを使用して、確認オプションを表示します。

- 以下のような 設定プロパティを設定することができます。
- 表示名
- ノード名
- ユーザープロンプト
- ディスプレイのオプション
- はい/いいえの同義語。確認ノードコンポーネントプロパティについては、こちらをご参照ください。
- 該当するユーザー応答のオプションを選択し、適切なパスで続行します。

高度な機能
線形的フローとは別に、例外的フローを会話に追加することができます。例として、フライト予約タスクの中で、ユーザーが目的地の都市の天気予報を依頼したり、残高の確認タスクの中で、ユーザーが間違った口座番号を3回連続して入力したりすることがあります。これらの例外的なケースは、会話ビルダーの一環として検討することができます。各ユーザー応答に対して、以下のように指定することができます。
- 別のユーザー応答が異なるフローをトリガーする場合があります。例として、天気予報タスクの 都市エンティティのプロンプトで、ユーザーが「今はしません」と答えた場合、会話は終了します。
- ユーザーエントリ超過の制限を超えたときのボット応答。
- 割り込みまたはサブインテントによるボットの動作は、他のインテントを要求で示されます。例として、フライト予約タスクの中で、ユーザーは特定のインテントを使用して目的地の天気予報を要求します。

代替ユーザー応答
このオプションでは、ユーザーが特定のしかし無関係な方法で応答した場合のボットの動作を定義することができます。

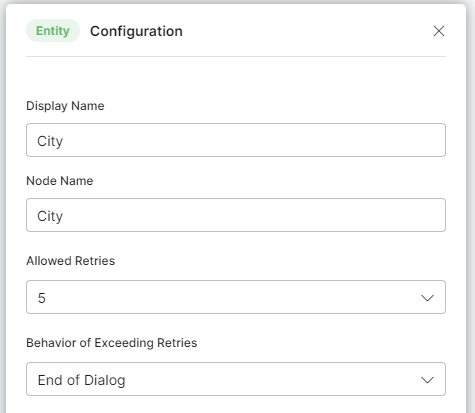
試行回数を超過
このオプションでは、設定された再試行回数をユーザーが超えた場合のボットの動作を定義できます。
- 標準レスポンスがデフォルトで設定されています。

- 設定プロパティを使用して、許可される再試行回数および再試行回数超過時の動作(ダイアログの終了)またはノードへの遷移などの設定を定義します。
もう 1 つのインテントを要求
このオプションでは、ユーザーの発話がタスクから逸脱した場合のボットの動作を定義することができます。
- 別のインテントを要求しそうなユーザー応答を入力します。
- 使用できるリストからインテントを選択するか、あるいは新しいインテントを作成することができます。
- 新しいインテントへの遷移を設定することができます。
- 割り込みによって、ユーザーは別のタスクに切り替えることができ、また追加の発話を設定することができます。割り込みの処理についての詳細は、こちらをご参照ください。
- サブインテントによって、ユーザーは関連するインテントにシームレスに分岐でき、また動作を見ることができます。サブインテントについての詳細は、こちらをご覧ください。

대화 빌더는 대화형 요소를 사용하여 대화 작업을 설계하고 구축할 수 있는 새로운 대화 작업 편집기입니다. 스토리보드 및 흐름 기반 대화 작업 빌더의 기능을 활용합니다. 스토리보드는 사용자 대화를 설계하고 시각화하는 데 도움이 되지만, 대화 작업 빌더에서 봇을 개발해야 합니다. 대화 구성 요소를 이해하고 대화 구성 요소로 변환하는 수작업이 수반됩니다. 변환에서 흔히 많은 부분이 누락됩니다. 장면과 대조한 대화의 유효성 검증에도 상당한 수작업이 필요하며 구현 스타일이 서로 다르기 때문에 대화 디자이너/BA와 구현 엔지니어 간의 협업 가능한 부분이 많지 않습니다. 또한, 장면이나 대화에서 진행 중인 변경 사항은 수동으로 동기화해야 하며 매우 복잡합니다. 대화 기반 작업 빌더는 자동으로 스토리보드 장면을 대화 작업으로 변환합니다. 디자이너는 대화를 구축하기 전에 최종 사용자 대화를 시각화하는 데 주력할 수 있습니다. 대화 흐름이 자동으로 생성되므로, 개발자는 더 기술적인 측면에 주력할 수 있습니다. 이에 따라 개발 노력을 줄여줄 뿐만 아니라 봇이 실제 설계에 더 근접하도록 보장합니다.
이 기능은 플랫폼 v9.0에서 릴리스되었으며 ![]() (베타) 상태입니다.
(베타) 상태입니다.
기능
- 대화 디자이너(또는 비즈니스 분석가) 및 개발자가 공동으로 대화를 구축할 수 있는 통합적인 접근 방법입니다.
- 대화 뷰에서 대화 정의 기능 – 대화 디자이너 또는 BA는 이 뷰에서 봇을 일련의 봇 메시지와 사용자 메시지로 설계할 수 있습니다.
- 빌드 뷰에서 작업 자동 생성 – 개발자는 설정을 미세 조정하고 대화 흐름을 상세히 하여 필요한 논리와 이행 요소를 제공함으로써 완전한 기능의 봇을 만들 수 있습니다.
- 사용성과 직관성이 개선되었습니다.
- 뷰 간에 자동으로 동기화합니다(뷰의 변경 사항이 다른 뷰로 업데이트됨).
대화 뷰
BA/대화 디자이너는 대화 뷰에서 대화를 정의할 수 있습니다. 이 뷰는 일련의 봇 메시지와 사용자 메시지로 대화 흐름을 구성합니다. 비즈니스 분석가는 봇 개발 중에 설정되는 조치 노드를 적절한 경우 추가할 수 있습니다. 빌드 -> 대화 스킬 -> 스토리보드에서는 대화 흐름으로 전환할 수 있는 옵션이 있는 전용 대화 뷰를 제공합니다. 새 대화 빌더의 왼쪽 하단 창에서도 볼 수 있습니다.
참고 사항: 이 문서에는 대화 빌더에서만 사용할 수 있는 기능이 나열되어 있습니다. 스토리보드 및 대화 빌더 모두에 공통적인 스토리보드에서 사용할 수 있는 기능을 포함합니다. 일반적인 기능은 여기를 참조하세요.
빌드 뷰
대화 뷰는 빌드 뷰에서 필요한 논리와 이행 요소를 제공하여 확장할 수 있습니다. 필요한 노드를 끌어서 놓거나 추가할 수 있는 옵션이 포함된 새로운 대화 빌더입니다. 적절한 연결과 함께 엔티티, 메시지, 기타 노드는 BA/대화 디자이너가 설계한 대화를 기반으로 자동으로 생성됩니다. 개발자는 설정 변경 사항을 적용하고 적절한 서비스 호출을 추가하여 완전한 기능의 봇을 만들 수 있습니다. 이 뷰는 대화 뷰 (위 그림 참조)에서 뷰 대화를 클릭하거나 빌드 -> 대화 스킬 -> 대화 작업에서 접근할 수 있습니다.
대화 빌더
이제 장면을 생성하고 대화 빌더에서 사용 가능한 다양한 기능을 사용하는 방법을 살펴보겠습니다. 대화 빌더는 두 가지 방법으로 접근할 수 있습니다.
- 스토리보드에서 새 장면 생성
- 대화 작업에서 새 대화 생성
장면 생성
- 대화를 설계하려는 봇을 엽니다
- 상단 메뉴에서 빌드 탭을 선택합니다
- 왼쪽 메뉴에서 대화형 스킬 -> 스토리보드를 클릭합니다
- 새 장면을 클릭하고 다음 세부 정보를 입력합니다
- 장면 이름
- 설명
- 장면의 상태
- 대화 작업 자동 생성 옵션을 선택합니다. 이를 통해 장면을 빌드할 때 대화 작업이 백그라운드에서 자동으로 생성됩니다.
대화 생성
대화 흐름 생성에서 대화 기반 대화 빌더를 시작할 수 있습니다
- 대화를 설계하려는 봇을 엽니다
- 상단 메뉴에서 빌드 탭을 선택합니다
- 왼쪽 메뉴에서 대화 스킬 -> 대화 작업을 클릭합니다
- 대화 생성을 클릭하고 다음 세부 정보를 입력합니다
- 의도 이름
- 설명
- 의도 학습 – 이 의도를 실행하려는 발화를 입력합니다
- 대화 기반 대화 빌더 체험 옵션을 선택합니다. 이를 통해 대화를 설계하고 해당 대화 작업을 보면서 동시에 정의할 수 있습니다.
기본 기능
참고 사항: 다음 섹션에서는, 대화 빌더의 다양한 측면을 살펴보겠습니다. 스크린샷은 스토리보드 흐름을 나타내지만, 대화 작업 흐름에도 유효합니다.
의도 노드
- 장면이나 대화 작업을 생성하면, 기본적으로 주요 의도가 생성됩니다. 이것은 장면/대화를 실행하는 사용자 발화로 간주됩니다.
- 추가 옵션을 클릭하고 설정 속성을 선택합니다
- 필요한 경우 표시 이름 및 노드 이름을 변경합니다
- 설명을 추가/변경합니다
- 이 의도를 실행하는 발화를 추가합니다. 여러 발화를 추가할 수 있습니다. 이 발화는 주요 의도 발화에 추가됩니다.
- 발화, 패턴, 규칙을 추가하여 의도를 학습시킬 수 있는 학습 관리 옵션이 있습니다. 발화 학습에 대한 자세한 내용은 여기를 참조하세요.
봇 메시지
대화에서 가장 먼저 해야 할 부분은, 봇이 사용자에게 메시지를 보내는 것입니다. 이것은 대화 흐름에서 사용자에게 안내 역할을 합니다. 봇 메시지는 다음 목적 중 하나를 수행할 수 있습니다.
- 사용자로부터 정보를 수집하기 위해 질문을 합니다. 이것은 대화 작업에서 엔티티 노드로 변환됩니다.
- 문자열, 숫자, 날짜 등과 같이 예상되는 사용자 입력 유형을 추가로 지정할 수 있으며 대화 작업에서 엔티티 유형으로 변환됩니다.
- 간단한 형식 지정 옵션을 사용하거나 봇 메시지를 표시하기 위한 템플릿을 선택하여 메시지 형식을 지정할 수 있습니다
- 대화의 경로를 결정하기 위해 확인을 요청합니다. 이것은 대화 작업에서 확인 노드로 변환됩니다.
- 도움말 메시지, 환영 메시지 또는 사용자 질의에 대한 응답으로 사용자에게 알립니다. 이것은 대화 작업에서 메시지 노드로 변환됩니다.
위의 각 선택 항목의 경우, 목록에서 선택하여 기존 노드를 사용하거나 새 노드를 생성할 수 있습니다.
사용자 응답
이상적으로는 모든 봇 메시지 다음에 사용자 응답이 옵니다. 사용자 응답은 사용자 응답을 예측하여 대화 흐름을 정의하는 데 사용할 수 있습니다. 예를 들어, 봇이 사용자에게 입력 확인을 요청한 경우 응답에 따라 긍정과 부정의 두 가지 경로가 있을 것입니다. 참고 사항: 지정되지 않은 경우, 플랫폼은 샘플 사용자 응답 플레이스 홀더를 추가하여 대화 흐름의 신성함을 유지합니다.
기타 노드
봇 메시지와 사용자 메시지 외에도 다음을 수행할 수 있습니다
- 서비스 호출, 스크립트, 논리, webhook, 흐름 정의를 위한 프로세스 등과 같은 봇 조치의 플레이스 홀더 추가. 실제 기능은 대화 빌더에서 추가해야 합니다. 이러한 봇 조치 노드의 용도를 상세히 설명하는 의견을 개발자를 위해 남길 수 있습니다. 예를 들어, 항공편 예약 작업의 경우 실제 예약 프로세스를 위해 백엔드 서버에 연결해야 합니다.
- 하위 작업 또는 관련/후속 작업의 대화 작업을 실행합니다. 예를 들어, 항공편을 예약한 후 웹 체크인 대화를 실행해야 합니다.
- 상담사 전환 노드(대화의 종료 시에만). 예를 들어, 송금 작업의 경우 라이브 상담사를 통해 사용자 자격 증명을 인증해야 합니다.
- 일련의 사용자 입력을 캡처하는 디지털 양식을 추가합니다. 예를 들어, 계정 생성 작업의 경우 이름, 주소, 전화번호 등과 같은 사용자 상세 정보를 캡처하는 양식을 표시해야 합니다.
설정
대화를 빌드하는 동안, 노드는 기본 설정으로 생성됩니다. 대화 빌더 자체에서 이 설정을 사용자 정의하거나 이후에 대화 작업에서 수행할 수 있습니다. 다음 섹션에서는, 추가된 각 노드에 대해 대화 빌더에서 사용 가능한 다양한 설정을 확인할 수 있습니다.
엔티티 노드
엔티티 노드는 봇 -> 질문을 선택할 때마다 생성됩니다. 각 질문에 대해 다음을 수행할 수 있습니다.
- 엔티티 유형 정의 – 드롭다운 목록에서 선택합니다. 이 목록에는 Kore.ai 플랫폼에서 지원하는 엔티티 유형이 포함됩니다.
- 굵게, 기울임꼴등과 같은 형식 지정 옵션을 적용합니다.
- 질의 표시를 위해 버튼, 캐러셀 등과 같은 템플릿을 사용합니다
추가된 후에는 다음과 같은 속성을 설정할 수 있습니다.
- 표시 이름
- 노드 이름
- 유형,
- 다중 항목 여부
- 사용자 프롬프트 및
- 오류 프롬프트.
확인 노드
확인 노드는 예, 아니요 및 두 개의 다른 사용자 응답 경로와 함께 봇 -> 확인 요청이 선택될 때마다 생성됩니다. 옵션을 삭제하거나 더 추가할 수 있습니다. 각 확인에 대해 다음을 수행할 수 있습니다.
- 굵게, 기울임꼴등과 같은 형식 지정 옵션을 적용합니다.
- 확인 옵션 표시를 위해 버튼, 캐러셀 등과 같은 템플릿을 사용합니다
- 다음과 같은 설정 속성을 설정할 수 있습니다
- 표시 이름
- 노드 이름
- 사용자 프롬프트
- 표시 옵션 및
- 예/아니요의 동의어. 확인 노드 구성 요소 속성에 대한 내용은 여기를 참조하세요.
- 관련 사용자 응답 옵션을 선택하여 적절한 경로를 계속합니다
고급 기능
선형 흐름 외에도, 대화에 예외적인 흐름을 추가할 수 있습니다. 예를 들어, 항공편 예약 작업에서 사용자가 목적지 도시의 날씨 보고서를 요청할 수도 있지만, 잔액 확인 작업에서 사용자가 계좌번호를 세 번 연속 잘못 입력할 수도 있습니다. 이러한 예외적인 사례들은 대화 빌더의 일부로 고려될 수 있습니다. 각 사용자 응답에 대해 다음을 지정할 수 있습니다.
- 대체 사용자 응답은 다른 흐름을 실행할 수 있습니다. 예를 들어, 날씨 보고서 작업을 위한 도시 엔티티의 프롬프트에서 사용자가 "지금은 아닙니다"라고 말하면 대화가 종료되어야 합니다.
- 사용자 재시도 초과 제한 도달 시 봇 응답.
- 중단 또는 하위 의도가 있는 봇 동작은 다른 의도 요청으로 표시됩니다. 예를 들어, 항공편 예약 작업에서, 사용자는 특정 의도를 사용하여 목적지 도시의 날씨 보고서를 요청합니다.
대체 사용자 응답
이 옵션을 사용하면 구체적이지만 관련이 없는 방식으로 응답할 때 봇 동작을 정의할 수 있습니다.
재시도 초과
이 옵션을 사용하면 사용자가 설정된 재시도 횟수를 초과할 때 봇 동작을 정의할 수 있습니다.
- 기본적으로 표준 응답이 설정됩니다
- 속성 설정을 사용하여 허용되는 재시도 수 및 재시도 초과에 대한 동작을 정의합니다 – 대화의 끝 또는 노드로 전환
다른 의도 요청
이 옵션을 사용하면 사용자 발화가 현재 작업을 벗어날 때 봇 동작을 정의할 수 있습니다.
- 다른 의도를 요청할 가능성이 있는 사용자 응답을 입력합니다.
- 사용 가능한 목록에서 의도를 선택하거나 새 의도를 생성할 수 있습니다
- 다음과 같이 새 의도의 전환을 설정할 수 있습니다.
Leave a Reply
Conversation Builder is a new dialog task editor which allows you to design and build a dialog task using conversational elements. It leverages the features of Storyboard and the Flow-based Dialog Task Builder.
While the Storyboard helps in designing and visualizing the user conversations, the bot needs to be developed in the Dialog Task Builder. This involves a manual effort in understanding and converting the conversation components into dialog components. Oftentimes, a lot gets missed in the translation. Validation of a Dialog against a Scene also requires significant manual effort and there is not much collaboration between a conversation designer/BA and the implementation engineers due to the different implementation styles. Also, the ongoing changes in the Scene or in the Dialog need to be manually synchronized and can get very complicated
Conversation-driven Dialog builder automatically converts the storyboard scenes into a Dialog Task. Designers can focus on visualizing the end-user conversation before building the dialog. Since the conversation flow is automatically generated, developers can focus on the more technical aspects. This not only reduces the development effort but also ensures that the bot is closer to the actual design.
This feature was released with v9.0 of the platform and is in ![]() (beta) state.
(beta) state.
Features
- An integrated approach for conversation designers (or business analysts) and developers to collaboratively build a dialog.
- Ability to define a dialog in a conversation view – conversation designers or BAs can design the bot in this view as a series of bot messages and user messages.
- Auto-generation of tasks in the build view – the developers can fine-tune the configurations and expand on top of the conversation flow to provide the necessary logic and fulfillment elements leading to a fully functional bot.
- Improved usability and intuitiveness.
- Automatic sync between the views i.e changes to one view updates the other.
Conversation View
BAs/Conversation Designers can define a dialog in conversation view. This view consists of a conversation flow as a series of bot messages and user messages. Where appropriate, BAs can add Action nodes that would be configured during the bot development.
The Build -> Conversation Skills -> Storyboard gives you an exclusive conversation view with an option to switch to the conversation flow. It can also be viewed at the left bottom window from the new Dialog Builder.
NOTE: This document lists the features available exclusively in the conversation builder. This is in addition to the features available on Storyboard that are common to both storyboard and conversation builder. For the common features refer here.
Build View
The conversation view can be expanded by providing the necessary logic and fulfillment elements in the Build View. This is the new dialog builder with the options to drag and drop or add the necessary nodes. The entity, message, and other nodes along with the appropriate connections are generated automatically based on the conversation designed by the BA/conversation designer. Developer can make configuration changes and add appropriate service calls etc. to make it a fully functional bot.
You can access this view either by clicking View Dialog from the Conversation view (as seen above) or from Build -> Conversation Skills -> Dialog Tasks.
Conversation Builder
Let us now look into creating a scene and using the various features available in a conversation builder.
Conversation builder can be accessed in two ways:
- From storyboard by creating a new scene
- From dialog task by creating a new dialog
Create Scene
- Open the bot you want to design the conversation
- Select the Build tab from the top menu
- From the left menu, click Conversation Skills -> Storyboard
- Click New Scene and enter the following details
- Scene Name
- Description
- Status of the scene
- Select Auto-generate a Dialog Task option. This will ensure that a dialog task is automatically created in the background as you build the scene.
Create Dialog
You can initiate Conversation Driven Dialog Builder from the Create Dialog flow
- Open the bot you want to design the conversation
- Select the Build tab from the top menu
- From the left menu, click Conversation Skills -> Dialog Task
- Click Create Dialog and enter the following details
- Intent Name
- Description
- Intent Training – enter utterances that would trigger this intent
- Select Try Conversation Driven Dialog Builder option. This will give you allow you to design a conversation and simultaneously view and define the corresponding dialog task.
Basic Features
NOTE: In the following sections, we will be looking into the different aspects of Conversation Builder. Though the screenshots represent the Storyboard flow they are valid for the Dialog task flow also.
Intent Node
- Once you create a scene or dialog task, a Primary Intent is created by default. This is taken as the User Utterance that triggers this scene/dialog.
- Click the more option and select Configuration Properties
- change Display Name and Node Name if needed
- add/change Description
- Add utterance that would trigger this intent. You can add multiple utterances. These would be in addition to the primary intent utterance.
- You have the option to Manage Training which will enable you to train the intent by adding Utterances, Patterns, and Rules. Refer here for more on utterance training.
Bot Message
The first thing you want to start with, in the conversation, is a message from the bot to the user. This would serve as a guide to the user on the conversation flow.
Bot Messages can serve one of the following purposes:
- Ask a Question with the intention of gathering information from the user. This gets converted to an Entity node in the dialog task.
- You can further specify the type of user input expected like string, number, date, etc. It gets translated to an entity type in the dialog task
- You can format the message using simple formatting options or by selecting a template for presenting the bot message
- Ask Confirmation with the intention to decide the path of the conversation. This gets converted to a Confirmation node in the dialog task.
- Inform the User like a help message, welcome message, or as a response to the user query. These get converted to a Message node in the dialog task.
For each of the above selections, you can either use an existing node by selecting from the list or create a new node.
User Response
Every bot message is ideally followed by a user response. User Response can be used to define the conversation flow by predicting the user response. For example, the bot might have asked the user to confirm an input, then based on the response there would be two paths – one for affirmation and one for negation.
Note: If not specified, the platform adds a Sample User Response placeholder to maintain the sanctity of the conversational flow.
Other Nodes
Apart from Bot and User Messages, you can
- add placeholders for Bot Actions like service calls, scripts, logic, webhook and process to define the flow, and more. The actual functionality needs to be added from the dialog builder. You can leave comments for the developer elaborating the purpose of such a bot action node. For example, for the Book Flight task, you want to connect to your backend servers for the actual booking process.
- trigger Dialog Tasks for subtasks or related/follow-up tasks. For example, after booking a flight you might want to trigger the Web Checkin dialog.
- Agent Transfer nodes (only at the end of the conversation). For example, for a Money Transfer task, you might want to authenticate the user credentials via a live agent.
- add Digital Forms for capturing series of user inputs. For example, for a Create Account task, you might want to present a form to capture the user details like name, address, phone number, etc.
Configurations
While building the conversation, the nodes are generated with default settings. You can customize these configurations from the conversation builder itself or do it at a later time from the dialog task.
In the following section, we see the various configurations available from the conversation builder for each node added.
Entity Node
The entity node is created whenever Bot -> Ask Question is selected.
For each question you can:
- define Entity Type – select from the drop-down list. This list includes the entity types supported by the Kore.ai platform.
- apply Formatting Options like bold, italics, etc.
- use Templates like buttons, carousel, etc to present the query
Once added you can configure properties:
- Display name,
- Node name,
- Type,
- Is Multi-Item,
- User Prompts, and
- Error Prompts.
Confirmation Node
The confirmation node is created whenever Bot -> Ask Confirmation is selected, along with a Yes, No, and two other user response paths. You can delete or add more options.
For each confirmation you can:
- apply Formatting Options like bold, italics, etc.
- use Templates like buttons, carousel, etc to present the confirmation options
- You can set configuration properties like
- Display name,
- Node name,
- User prompts,
- Display options, and
- Synonyms for yes/no.
Refer here for confirmation node component properties.
- Select the concerned user response options to continue with the appropriate path
Advanced Features
Apart from the linear flow, you can add exceptional flows to the conversation. For example, while in the Book Flight task user might request the Weather Report at the destination city, or while in the Check Balance task, the user might have entered the wrong account number three times in a row. These exceptional cases can be taken into consideration as a part of the conversation builder.
For each user response you can specify:
- Alternative User Response can trigger a different flow. For example, at the prompt for City entity for the Weather Report task, the user says “Not now” then the conversation should end.
- Bot response when User Exceeds Retries limit.
- Bot behavior with an interruption or a sub-intent is indicated with Ask Another Intent. For example, within the Book Flight task, the user asks for the Weather Report at the destination city using the specific intent.
Alternative User Response
This option lets you define the bot behavior when a user responds in a specific but unrelated manner.
Exceeds Retries
This option lets you define the bot behavior when a user exceeds the set number of retries.
- A standard response is set by default
- Use Configure Properties to define the settings like number of Allowed Retries and the Behavior on exceeding retries – end of dialog or transition to a node
Ask Another Intent
This option lets you define the bot behavior when a user utterance deviates from the task at hand.
- Enter the user response that is likely to ask for another intent.
- You can choose the intent from the available list or create a new one
- You can set the transition to the new intent:
- as Interruption to allow the user can switch to another task, you can configure additional utterances, refer here for more on interruption handling, or
- as Sub-intent to allow the user to seamlessly branch into related intents, view the behavior, see here for more on sub-intent