1단계: 생성
봇 빌더를 열고 봇의 이름, 기본 언어 등과 같은 기존 봇 세부 정보를 설정하여 범용 봇을 생성하기 시작합니다.
- 봇 빌더를 엽니다.
- 봇 목록 페이지의 오른쪽 상단 쪽에서 새 봇을 클릭하고 처음부터 시작 옵션을 선택합니다.

- 봇 이름 필드에서 봇 이름을 입력합니다.
- 기본 봇 언어를 설정합니다.
- 봇 유형을 범용 봇으로 설정합니다.

범용 봇 버전
(플랫폼의 ver7.3 릴리즈 이후)
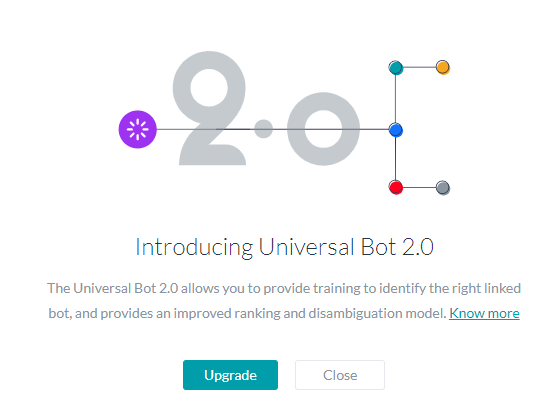
- 범용 봇 2.0으로 즉시 업그레이드하게 되며, 이 버전은 범용 봇에 대한 훈련 기능을 제공합니다.
- 업그레이드를 선택하거나 이전 버전으로 계속할 수 있습니다. 이전 버전은 플랫폼에서 곧 사용할 수 없게 된다는 점에 유의하세요.
- 이전 버전으로 작업하고자 하는 경우 추후 지시 사항을 위해 여기를 참조하세요.
- 이 현재 문서는 범용 봇의 업그레이드된 버전을 위한 지시 사항을 참조합니다.
2단계: 연결된 봇 추가
범용 봇을 생성한 후, 하나 이상의 기존 봇에 이를 연결합니다. 범용 봇은 다른 봇들로 구성되기 때문에 적어도 하나의 표준 봇을 미리 생성해야 합니다. 중요 사항:
- 표준 봇을 연결하는 것은 소유자나 개발자에게 연결된 봇의 작업과 기능에 액세스 권한을 주지 않습니다.
- 범용 봇은 연결된 봇의 작업을 복제하지 않지만 연결된 봇을 통해 작업을 수행합니다. 따라서, 연결된 봇에 취해진 어떤 변경 사항이든 범용 벗 기능에 반영됩니다.
이러한 단계를 따라 범용 봇에 연결된 봇을 추가합니다.
- 다른 봇에 연결하고자 하는 범용 봇을 엽니다.
- 상단 메뉴에서 구축 탭을 선택합니다.
- 왼쪽 메뉴에서 대화형 스킬 ->링크된 봇을 클릭하거나 봇 요약 페이지의 링크된 봇 카드에서 +봇 링크를 사용합니다(봇을 열 때 랜딩 페이지).

- 봇 연결 링크를 클릭하여 봇 대화 선택을 엽니다. 참고: 봇 대화 선택에서 사용자가 소유하거나 공동 개발자인 봇만 볼 수 있습니다. 이 창에서 봇을 볼 수 없으면 소유자가 이 봇을 귀하와 공유했는지 확인하세요.
- 봇에 마우스를 이동하여 봇 링크 버튼에 액세스하고, 클릭하여 링크합니다.

- 링크되면 같은 것을 언급하는 메시지를 보게 됩니다.
- 호출 이름과 훈련 발화와 같은 세부 정보를 보기 위해 봇 이름을 확장할 수 있습니다. 3단계에 설명된 대로 여기에서 또는 추후에 같은 것을 추가할 수 있습니다. 범용 봇 훈련.
- 봇에 연결하고자 하는 봇을 선택하고 대화창을 종료합니다.
- 범용 봇에 연결된 봇이 있으면 연결된 봇 페이지가 모든 연결된 봇을 나열합니다. 봇 링크 버튼을 사용하여 다른 봇에 링크할 수 있습니다.
- 폴백 봇이나 포괄적 봇으로 같은 봇을 표시할 수 있습니다.
- 토글스위치를 사용해 주어진 봇에 대해 폴백으로 사용 옵션을 활성화하거나 비활성화할 수 있습니다. 이렇게 표시된 봇은 다른 훈련 옵션에서 식별된 다른 봇이 없을 때 의도를 감지하는 데 사용됩니다. 최대 15개의 봇이 폴백 봇으로 표시될 수 있습니다.
- 토글스위치를 사용해 주어진 봇에 대해 포괄적으로 사용 옵션을 활성화하거나 비활성화할 수 있습니다. 이러한 봇은 봇 범위 설정 과정에 참여하기 위한 샘플 발화로 훈련할 필요가 없습니다. 이러한 봇은 '호출 구문' 또는 '트리거 문구'를 사용하여 사용자가 연결된 봇을 호출할 때를 제외하고 사용자 발화를 평가하는 어느 때나 의도 감지를 위해 고려될 수 있습니다. 최대 3개의 연결된 봇이 포괄적 봇으로 표시될 수 있습니다.
봇 연결 해제
연결된 봇의 연결을 해제하고 싶다면 다음 단계를 따릅니다.
- 연결된 봇 페이지에서 연결을 해제하고자 하는 봇으로 마우스를 이동하여 연결 해제 아이콘을 봅니다.
- 연결 해제를 클릭합니다.
변경 사항이 게시된 봇에 반영되도록 봇을 게시하는 것을 기억하세요.
3단계: 교육
범용 봇 기능은 봇 훈련을 활성화합니다. 이 섹션에서는 봇 훈련에 대해 상세히 다루고, 훈련에 관한 더 자세한 내용은 여기를 참조하세요.
- 훈련하고자 하는 범용 봇을 엽니다. 이 봇에 연결된 봇이 있어야 합니다.
- 상단 메뉴에서 구축 탭을 선택합니다.
- 왼쪽 메뉴에서 자연어 -> 연결된 봇 훈련을 선택합니다.
- 링크된 봇 훈련 섹션을 선택하고 훈련하고자 하는 봇을 선택합니다.
- 포괄적 봇은 훈련할 필요가 없고, 봇 범위 지정에 훈련은 사용되지 않는다는 점에 유의합니다. 같은 것을 훈련하기로 선택했다면 이 훈련은 포괄적 봇으로서 연결된 봇이 선택 취소되면 나중에 사용됩니다.
- 호출 이름 섹션을 확장하여 같은 것을 추가합니다. 이는 링크된 봇 이름에 대해 정의된 특별한 일련의 동의어로서 다뤄집니다. 자세한 내용은 여기를 참조하세요.
- 봇의 이름은 기본적으로 호출 이름으로 기본적으로 추가되며, 필요 없으면 삭제할 수 있습니다.
- 필요에 따라 추가 호출 이름을 입력합니다.

- 발화 섹션을 확장하여 발화를 추가합니다. 이것은 링크된 봇에서 의도를 요청할 것으로 예상되는 사용자의 일반적인 방식을 나타냅니다. 자세한 내용은 여기를 참조하세요.
- 필요에 따라 발화를 추가합니다.

- 연결된 봇에서 복사 옵션을 사용하여 연결된 봇에서 발화를 추가할 수도 있습니다.
- 이 옵션을 선택하면 훈련 중인 링크된 봇에 대한 봇에서 복사 페이지가 열립니다.
- 작업 선택 드롭다운에서 관련된 작업을 선택합니다.
- 해당 작업에 대한 모든 발화가 나열되며 목록에서 선택할 수 있습니다. 다중 선택이 허용됩니다.
- 마침을 클릭하여 발화를 추가합니다.

- 필요에 따라 발화를 추가합니다.
- 봇을 훈련하여 이러한 위의 변경 사항을 활성화합니다.
4단계: 채널 설정
범용 봇은 기저를 이루는 연결된 봇에서 분리된 채널 설정이 필요하기 때문에 채널은 다시 설정되거나 활성화되어야 합니다. 범용 봇에 대한 채널을 연결된 봇 채널과 관계없이 설정할 수 있으며 연결된 봇의 게시된 작업이 범용 봇 채널에서 실행됩니다. 시작하기 전에 이 항목은 사용자가 Kore.ai에서의 채널 설정의 기초를 이해하고 있으므로 표준 봇에 구성 관련된 설정 측면에 초점을 맞추고 있는 것으로 가정합니다. 봇 빌더 내 채널 구성 기초의 경우, 봇에 채널 추가하기를 참조하세요. 중요 사항:
- 연결된 봇에 대한 활성화된 채널과 관계없이 범용 봇은 활성화된 채널에서만 사용할 수 있습니다.
- 사용자에게 전달된 메시지는 채널이 연결된 봇과 범용 봇 모두에 대해 설정되면 연결된 봇에 설정된 채널별 메시지와 형식을 따릅니다.
- 범용 봇에 대해 활성화된 채널이 연결된 봇에 활성화되지 않았다면 범용 봇은 연결된 봇의 기능에 정의된 기본 메시지로 응답합니다.
- 범용이나 연결된 봇의 설정에서 채널별 형식을 설정하지 않았다면 표준 형식인 기본 메시지로 적용됩니다.
- 범용 봇에서 설정된 알림은 범용 봇을 통해 전달됩니다.
채널 설정 단계
- 새 채널을 설정하고자 하는 범용 봇을 엽니다.
- 상단 메뉴에서 배포 탭을 선택합니다.
- 채널을 선택합니다.
- 채널 페이지의 지원되는 채널 목록에서 설정할 채널을 클릭합니다.
- 각 채널에 대한 구성 설정은 채널에 따라 다양합니다. 채널을 설정하기 위해 클릭하면 설정 지시 사항이 표시됩니다. 채널 구성을 위해 이를 따릅니다.
- 채널 설정을 설정하고 저장합니다.

5단계: 테스트
범용 봇이 많은 표준 봇과 함께 연결되어 있으므로, 자연어 처리 설정은 관련 봇과 의도를 정확히 식별하기 위해 여러 사용자 발화에 대해 최적화되어 있습니다. 범용 봇 테스트는 사용자 발화를 입력하고 결과를 분석하는 표준 봇 테스트와 유사합니다. 하지만, 범용 봇의 경우 발화에 대한 최종 목록에 오른 의도뿐만 아니라 해당 의도가 속한 봇도 볼 수 있습니다. 봇의 이름은 다음과 같은 구문으로 의도를 미리 수정합니다. 봇 이름: 작업 이름. 시작하기 전에 이 항목은 사용자가 Kore.ai에서의 봇 테스트 기초에 대해 이해하고 있으므로 테스트 측면에 초점을 맞추고 있는 것으로 가정합니다. 봇 빌더에서 봇 테스트 기초를 참조하려면, 봇 테스트하기를 읽으세요.
사용자 발화 테스트 단계
이러한 단계를 따라 범용 봇에 대한 사용자 발화를 테스트합니다.
- 사용자 발화를 테스트하려는 범용 봇을 실행하세요.
- 상단 메뉴에서 구축 탭을 선택합니다.
- 왼쪽 메뉴에서 테스트 -> 발화 테스트를 클릭합니다.
- 사용자 발화 입력 필드에서 테스트하고자 하는 발화를 입력합니다. 예: 날씨.
- 결과는 단일, 다중 또는 일치하지 않는 의도로 아래에 표시됩니다. 예를 들어, 아래는 날씨 발화에 대한 여러 일치하는 결과입니다.
- 범위 지정된 봇을 클릭하면 링크된 봇을 평가하는 데 있어 포함된 과정의 세부 사항을 얻을 수 있습니다. 자세한 내용은 여기를 참조하세요.

테스트 결과 이해하기
발화 테스트에 관한 결과는 이러한 세 가지 카테고리 중 하나로 나뉩니다.
- 단일 일치 의도: 연결된 봇 중 작업 한 가지 또는 사용자 의도가 입력과 일치합니다.
- 올바른 일치라면, 점수를 향상하기 위해 같은 봇의 같은 작업에 대한 추가 학습을 제공할 수 있거나 발화를 식별하기 위해 다른 봇에서 다른 작업을 학습할 수도 있습니다.
- 잘못된 일치라면, 일치하는 의도 옆의 잘못된 일치로 표시됨 링크를 클릭합니다. 링크를 클릭하면 같거나 다른 봇의 일치해야 하는 작업 또는 의도를 선택할 수 있습니다.
- 동일한 점수를 가진 다중 일치: 하나 이상의 같은 식별 점수를 가진 작업은 의도가 일치합니다. 이러한 작업은 하나 이상의 연결된 봇에 속할 수 있습니다. 발화에 대해 일치시키고자 하는 작업 옆의 라디오 버튼을 선택합니다.
- 미식별된 의도: 사용자 입력이 연결된 봇에 어떤 작업과도 일치하지 않습니다. 아래에 설명된 것과 같이 봇을 학습하여 올바른 봇과 연결된 작업에 일치시킵니다.
범용 봇 성능 개선
더욱더 효율적이고 정확한 기능을 위해 범용 봇을 훈련할 수 있습니다. 범용 봇 창에서 링크된 봇을 훈련했다 할지라도, 훈련은 바로 링크된 봇에 저장됩니다. 범용 봇에서 링크된 봇을 훈련하려면 다음과 같은 이러한 단계를 따르세요.
- 범용 봇에 대한 발화 테스트 창에서 의도를 선택합니다.
- 이를 통해 머신 러닝, 발화, 유의어, 패턴을 사용하는 작업을 학습할 수 있도록 하는 다음 필드를 엽니다.

- 자연어 -> 설정에서 임곗값도 설정할 수 있습니다. 자세한 내용은 여기를 참조하세요.

6단계: 게시
범용 봇에 대해 새 구성을 정의하고 학습하고 저장한 후 이것은 봇 빌더 홈페이지에서 보이게 됩니다. 이것은 봇 관리자가 게시하고 승인하기 전까지 개발자 외에 사용자는 봇에서 사용할 수 없습니다.
범용 봇 상태
다음은 범용 봇과 관련된 다양한 상황으로, 게시용으로 선택된 연결된 봇에 연결된 봇 페이지에 표시됩니다.
| 범용 봇 상태 | 설명 |
|---|---|
| 연결됨 | 봇 설정이 완료되고 표준 봇이 연결됩니다. |
| 승인 대기 중 | 엔터프라이즈 사용을 위해 봇이 게시되었지만, 봇 관리자가 승인하지 않았습니다. |
| 게시됨 | 범용 봇은 개인, 엔터프라이즈 또는 공공 사용을 위해 게시됩니다. |
| 거부됨 | 봇 관리자는 엔터프라이즈에 봇을 배포하지 않습니다. 봇 관리자로부터 코멘트와 함께 개발자에게 이메일이 전송됩니다. |
| 유예됨 | 봇 관리자는 배포된 봇을 사용하는 것을 유예했습니다. 이메일은 봇 관리자로부터 코멘트와 함께 개발자에게 전송되었습니다. |
봇 게시
범용 봇을 게시하려면 다음 단계를 따르세요.
- 게시하고자 하는 범용 봇을 엽니다.
- 상단 메뉴에서 배포 탭을 선택합니다.
- 왼쪽 메뉴에서 봇 관리 -> 게시 옵션을 선택합니다.
- 게시 페이지에서 게시하고자 하는 연결된 봇을 선택합니다. 이를 통해 다음을 수행할 수 있습니다.
- 새 링크된 봇 포함, 또는
- 이미 게시된 링크된 봇 업데이트, 또는
- 어떤 연결 해제된 봇이든 삭제
참고: 기본 대화는 자동으로 선택되며 게시를 위해 필수이고 선택 해제를 할 수 없습니다. - 다음 훈련 구성 요소를 따라 게시를 선택할 수 있습니다.
- 훈련 발화, 호출 이름, 동의어, 폴백 봇, NLP 설정 참고 사항: 범용 봇을 게시하는 첫 순간에 모든 NLP 설정은 게시를 위해 선택되어야 합니다.
- 활성화된 언어 목록에서 선택하여 봇을 게시한 다음 진행을 클릭합니다.

- 적합한 코멘트를 입력하고 게시를 클릭합니다.
ステップ 1:作成
ボットビルダーを開き、ボットの名前やデフォルトの言語など、ボットの基本情報を設定することで、ユニバーサルボットの作成を開始します。
- ボットビルダーを開きます。
- ボットリストページの右上にある新しいボットをクリックし、最初から開始オプションを選択します。
- ボット名フィールドにボットの名前を入力します。
- デフォルトのボット言語を設定します。
- ボットタイプにユニバーサルボットを選択します。
ユニバーサルボットのバージョン
(プラットフォームのバージョンバージョン7.3以降)
- ユニバーサルボット2.0へのアップグレードを促されます。このバージョンは、ユニバーサルボットにトレーニング機能を提供します。
- アップグレードするか、旧バージョンのまま継続するかを選択することができます。旧バージョンは、まもなくプラットフォーム上で非推奨になることにご注意ください。
- 旧バージョンで動作させたい場合は、してください。
- このドキュメントは、ユニバーサルボットのアップグレード版の手順を参照しています。
ステップ 2:リンクされたボットを追加する
ユニバーサルボットの作成後、1つ以上の既存のボットをリンクさせます。ユニバーサルボットは他のボットで構成されているため、少なくとも1つの標準ボットを作成しておく必要があります。重要な注意事項:
- 標準ボットをリンクしても、ユニバーサルボットの所有者または開発者は、リンクされたボットのタスクや機能にアクセスすることはできません。
- ユニバーサルボットは、リンクされたボットのタスクを複製するのではなく、リンクされたボットでタスクを実行します。そのため、リンクされたボットに変更を加えると、ユニバーサルボットの機能が反映されます。
リンクされたボットをユニバーサルボットに追加するには、以下の手順に従います。
- 他のボットにリンクしたいユニバーサルボットを開きます。
- トップメニューから構築タブを選択します。
- 左側のメニューから 会話スキルー>リックされたボットをクリックするか、ボットの概要ページ(ボットを開いたときのランディングページ)からのリンクリンクされたボットカードから+リンクボットリンクを使用します。
- ボットをリンクのリンクをクリックするとボットを選択ダイアログが表示されます。メモ: ボットを選択ダイアログでは、自分が所有者または共同開発者であるボットのみが表示されます。こちらのウィンドウにボットが表示されない場合は、そのボットが所有者に共有されていることをご確認ください。
- ボットにカーソルを合わせてボットをリンクボタンにアクセスし、クリックしてリンクします。
- リンクされると、同じ内容のメッセージが表示されます。
- ボット名を展開すると、呼び出し名やトレーニングの発話などの詳細を確認することができます。ステップ3で説明したように、同一のものをこちらで追加することも、後から追加することもできます。ユニバーサルボットのトレーニング。
- ボットにリンクさせたいボットを選択して、ダイアログを閉じます。
- ボットをユニバーサルボットにリンクさせると、リンクされたボットのページに、リンクされたボットすべての一覧が表示されます。ボットをリンクボタンを使用して、他のボットをリンクさせることができます。
- 一部のボットをフォールバックボットまたはインクルーシブボットとしてマークすることができます。
- トグルスイッチを使用して、指定されたボットのフォールバックとして使用オプションを有効または無効にします。このようにマークされたボットは、他のトレーニングオプションでどのボットも識別されなかった場合に、インテントを検出するために使用されます。フォールバックボットとしてマークできるボット数は最大15です。
- トグルスイッチを使用して、特定のボットの包括的に使用オプションを有効または無効にします。これらのボットは、ボットスコーププロセスに参加するためにサンプル発話でトレーニングする必要はありません。これらのボットは、ユーザーの発話を評価する際に、ユーザーが「呼び出しフレーズ」または「トリガーフレーズ」を使用してリンクされたボットを起動した場合を除いて、常にインテント検出の対象となります。インクルーシブボットとしてマークできるリンクされたボット数は最大3つです。
ボットのリンク解除
リンクされたボットのリンクを解除したい場合は、以下の手順に従います。
- リンクされたボットのページで、リンク解除アイコンを表示するためにリンクを解除したいボットの上にカーソルを合わせます。
- リンク解除をクリックします。
公開されたボットに変更を反映させるには、ボットを公開することを忘れないでください。
ステップ 3:トレーニング
ユニバーサルボット機能により、ボットのトレーニングが可能になります。このセクションでは、ボットのトレーニングステップについて詳しく説明します。トレーニングの詳細については、こちらを参照してください。
- トレーニングしたいユニバーサルボットを開きます。このボットには、ボットがリンクされているはずです。
- トップメニューから構築タブを選択します。
- 左のナゲーションメニューから、自然言語―>リンクされたボットのトレーニングを選択します。
- リンクされたボットのトレーニングセクションを選択し、トレーニングしたいボットを選択します。
- インクルーシブボットはトレーニングを必要とせず、トレーニングはボットのスコーピングには使用されないことにご注意ください。 同一トレーニングを選択した場合、リンクされたボットがインクルーシブボットとして選択解除された場合、このトレーニングは後で使用されます。
- 呼び出し名セクションを展開して、同じものを追加します。 これらは、リンクされたボット名に対して定義された、特別な同義語のセットとして扱われます。詳細はこちらを参照してください。
- ボットの名前は、デフォルトでは呼び出し名として追加されますが、必要でなければ削除することができます。
- 必要に応じて追加の呼び出し名を入力します。
- 発話セクションを展開して、発話を追加します。これらは、ユーザーがリンクされたボットにインテントを要求するための典型的な方法を指します。 詳細については、こちらを参照してください。
- 必要に応じて発話を追加します。
- リンクされたボットからコピーオプションを使用して、リンクされたボットの発話を追加することもできます。
- このオプションを選択すると、トレーニング中のリンクされたボットのコピーページが表示されます。
- リンクされたボットからの関連するタスクを、タスクを選択ドロップダウンから選択します。
- そのタスクのすべての発話が一覧表示され、リストから選択することができます。多重選択が可能です。
- 完了をクリックして、発話を追加します。
- 必要に応じて発話を追加します。
- 上記の変更を有効化するようボットをトレーニングします。
ステップ 4:チャネルを設定する
ユニバーサルボットは、リンクされているボットとは別のチャネル設定が必要なため、再度チャネルを設定または有効化する必要があります。リンクされたボットのチャネルに関係なく、ユニバーサルボットのチャネルを設定することができ、リンクされたボットの公開済みタスクは、ユニバーサルボットのチャネルから実行されます。はじめに この記事では、Kore.aiのチャネル設定の基礎について、お客様が理解していることを前提としていますので、ユニバーサルボットに特化して設定に焦点を当てています。ボットビルダーでチャネルを設定するための基礎については、ボットにチャネルを追加を参照してください。重要な注意事項:
- ユニバーサルボットは、リンクされたボットの有効なチャネルに関係なく、ユニバーサルボットに有効なチャネルでのみ利用可能です。
- リンクされたボットとユニバーサルボットの両方にチャネルが設定されている場合、ユーザーに配信されるメッセージは、リンクされたボットで設定されたチャネル固有のメッセージやフォーマットに従います。
- ユニバーサルボットに有効なチャネルがリンクされたボットで有効化されていない場合、ユニバーサルボットはリンクされたボットの機能に対して定義されたデフォルトメッセージで応答します。
- ユニバーサルボットまたはリンクされたボットの設定で、チャネル固有のフォーマットを設定していない場合は、標準フォーマットのデフォルトメッセージが適用されます。
- ユニバーサルボットで設定された通知は、ユニバーサルボットを介して配信されます。
チャネル設定の手順
- 新しいチャネルを設定したいユニバーサルボットを開きます。
- トップメニューからデプロイタブを選択します。
- チャネルをクリックします。
- チャネルページのサポートされているチャネル一覧から、チャネルをクリックして設定します。
- 各チャネルの設定内容は、チャネルによって異なります。チャネルを設定するためにチャネルをクリックすると、設定方法が表示されます。チャネルの設定は、そちらの表示に従います。
- チャネルの設定を行い、保存します。
ステップ 5:テスト
ユニバーサルボットは多くの標準ボットをリンクさせるので、関連するボットとインテントを正確に認識するためには、自然言語処理の設定を複数のユーザーの発話に対して最適化する必要がある可能性があります。ユニバーサルボットのテストは、ユーザーの発話を入力してその結果を分析する標準ボットのテストと同様です。ただし、ユニバーサルボットの場合は、発話に対して絞り込まれたインテントだけでなく、それが属するボットも表示されます。ボットの名前は、以下の構文でインテントの前に付けられます。ボット名:タスク名。はじめに この記事では、Kore.ai ボットプラットフォームのボットのテストの基礎について、お客様が理解していることを前提としていますので、ユニバーサルボットに特化してテストに焦点を当てています。ボットビルダーでのボットのテストの基本を参照するには、ボットのテストをお読みください。
ユーザー発話のテストの手順
ユニバーサルボットのユーザーの発話をテストするには、以下の手順に従います。
- ユーザーの発話をテストしたいユニバーサルボットを開きます。
- トップメニューから構築タブを選択します。
- 左側のメニューから、テスト―>発話テストをクリックします。
- ユーザーの発話を入力フィールドの中に、テストしたい発話を入力します。例:天気
- 結果は以下に表示されます(単一一致、複数一致、またはインテントの一致なし)。例えば、以下は天気の発話に対する複数一致の結果です。
- スコープされたボットをクリックすると、リンクされたボットの評価に関わるプロセスの詳細が表示されます。詳細はこちらを参照してください。
テスト結果の確認
テスト発話の結果は、以下3つのカテゴリのいずれかに分類されます。
- 単一の一致したインテント:リンクされているボットのタスクまたはユーザーインテントが入力と一致しました。
- 一致が正しい場合は、同一ボットの同一タスクをさらにトレーニングしてスコアを向上させたり、別のボットの別のタスクをトレーニングして発話を認識させたりすることができます。
- 一致が正しくない場合は、一致したインテントの横にある正しくない一致としてマークリンクをクリックします。リンクをクリックすることで、同一ボットまたは別のボットから一致するタスクやインテントを選択することができます。
- 同一スコアの複数一致:認識スコアが同じ1つ以上のタスクが、インテントに一致しました。これらのタスクは、複数のリンクされたボットに属することができます。発話に一致させたいタスクの横にあるラジオボタンを選択します。
- 未特定のインテント:ユーザー入力は、リンクされたボットのいずれのタスクとも一致しませんでした。適切なボットとリンクされたタスクを一致させるために、以下の説明に従ってボットをトレーニングします。
ユニバーサルボットのパフォーマンスの向上
より効率的で正確な機能を実現するために、ユニバーサルボットをトレーニングすることができます。ユニバーサルボットのウィンドウからリンクされたボットをトレーニングしても、そのトレーニングはリンクされたボットに直接保存されます。ユニバーサルボットでリンクされたボットのトレーニングを行うには、以下の手順に従います。
- ユニバーサルボットの発話のテストウィンドウで、インテントを選択します。
- 以下のフィールドが表示され、機械学習の発話、同義語、パターンを使用してタスクをトレーニングすることができます。
- 自然言語―>設定からしきい値を構成することもできます。詳細はこちらをご確認ください。
ステップ 6:公開
ユニバーサルボットの新しい設定を定義し、トレーニング、し、保存すると、ボットビルダーのホームページに表示されるようになります。ボットの管理者が公開および承認するまでは、ボットの開発者以外のユーザーは利用することができません。
ユニバーサルボットのステータス
ユニバーサルボットに関連する様々なステータスは以下の通りです。これらのステータスは、公開のために選択されたリンクされたボットに対して、リンクされたボットページに表示されます。
| ユニバーサルボットのステータス | 説明 |
|---|---|
| リンク済み | ボットの設定が完了し、標準ボットがリンクされます。 |
| 承認待ち | ボットはエンタープライズ向けに公開されていますが、ボットの管理者には承認されていません。 |
| 公開済み | ユニバーサルボットは、個人、エンタープライズ、または公共の場で使用するために公開されています。 |
| 拒否 | ボット管理者は、エンタープライズにボットを導入していません。ボット管理者からのコメントが、メールで開発者に送信されます。 |
| 一時停止 | ボット管理者は、導入されたボットの使用を一時停止しました。ボット管理者からのコメントが、メールで開発者に送信されます。 |
ボットを公開する
ユニバーサルボットを公開するには、以下の手順に従います。
- 公開したいユニバーサルボットを開きます。
- トップメニューからデプロイタブを選択します。
- 左側のメニューから、ボット管理―>公開オプションを選択します。
- 公開ページで、公開したいリンクされたボットを選択します。以下のような場合があります。
- 新しいリンクされたボットを含む
- すでに公開済みのリンクされたボットを更新する
- リンク解除されたボットを削除する
メモ:デフォルトダイアログは自動的に選択されます。これは公開することが必須であるため、選択を解除することはできません。 - 以下のトレーニングコンポーネントの公開を選択することができます。
- トレーニング発話、呼び出し名、同義語、フォールバックボット、NLP設定 注意:ユニバーサルボットを初めて公開する際には、すべてのNLP設定を選択して公開する必要があります。
- 有効な言語一覧から、ボットを公開する言語を選択して、続行をクリックします。
- 適切なコメントを入力し、公開をクリックします。
This post refers to the upgraded version of the Universal Bot offered since the ver7.3 of the platform, for the older version click here.
Creating a Universal Bot involves the following major steps:
- Create the Basic Universal Bot
- Add Linked Bots
- Train the Universal Bot
- Configure the Channels
- Test the Universal Bot
- Publish the Universal Bot
For an overall understanding of Universal Bots click here and to understand the differences with Standard bot click here.
Step 1: Creation
Open the Bot Builder and start creating the universal bot by setting the basic bot details such as its name, default language, etc.
- Open the Bot Builder.
- At the top right side of the bot listing page, click New Bot and select the Start from Scratch option.
- In the Bot Name field, enter a name for the bot.
- Set the Default Bot Language.
- Select the Bot Type as Universal Bot.
Universal Bot Version
(post ver7.3 release of the platform)
- You will be prompted to upgrade to the Universal Bot 2.0, this version provides training capability to the universal bot.
- You can choose to Upgrade or continue with the older version. Note that the older version will be deprecated soon in the platform.
- If you want to work with the older version, refer here for further instructions.
- This current document refers to the instructions for the upgraded version of universal bot.
Step 2: Add Linked Bots
After you create a universal bot, link one or more existing bots to it. Since a universal bot comprises of other bots, you must have already created at least one standard bot.
Important Notes:
- Linking a standard Bot does not give the owner or the developers of the universal Bot access to the linked Bot’s tasks and functions.
- The universal Bot does not clone the tasks in the linked Bots but performs them via the linked Bot. So, any changes made to the linked Bot reflect the universal Bot’s functionality.
Follow these steps to add linked bots to the Universal Bot:
- Open the universal bot to which you want to link other bots.
- Select the Build tab from the top menu.
- Click Conversational Skills -> Linked Bots from the left menu or use the +Link Bots link from the Bot Summary page (landing page when you open a Bot) Linked Bot card.
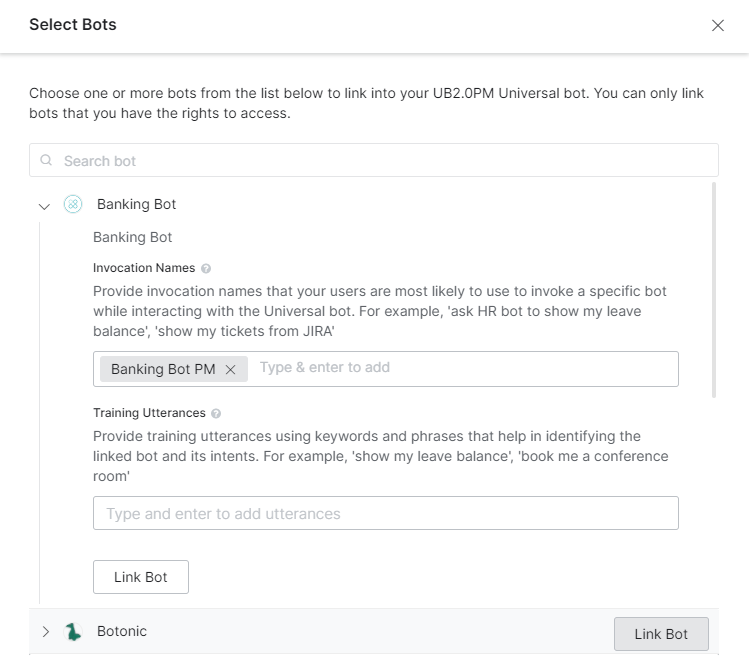
- Click the Link a Bot link to open the Select a Bot dialog.
Note: On the Select a Bot dialog, you can only see the bots for which you are either the owner or a co-developer. If you cannot see a bot in this window, make sure the bot is shared with you by its owner. - Hover over the Bot to access the Link Bot button, click to link.
- Once linked you will see a message stating the same.
- You can expand the Bot name to see details like Invocation Name and Training Utterances. You can add the same here or later as explained in Step 3: Training Universal Bot.
- Select the bots that you want to link to the bot and close the dialog.
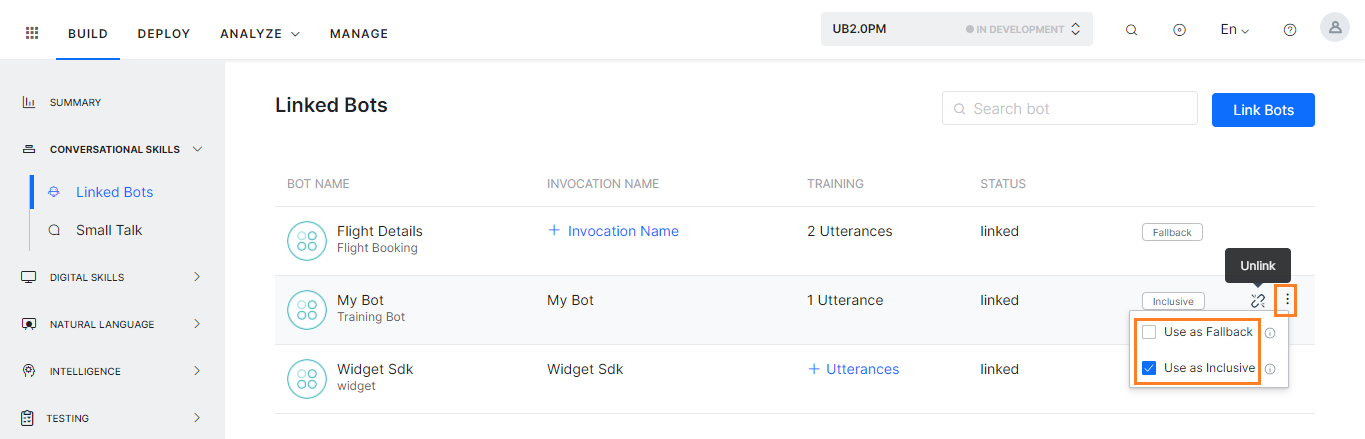
- Once you have linked Bots to the Universal Bot, the Linked Bots page will list all the Linked Bots. You can use the Link Bot button to link another Bot.
- You can mark some bots as fallback bots or inclusive bots:
- Use the toggle switch to enable or disable the Use as Fallback option for a given bot – the bots thus marked will be used for detecting intents when no other bots are identified from other training options. Up to 15 bots can be marked as fallback bots.
- Use the toggle switch to enable or disable the Use as Inclusive option for a given bot – these bots need not be trained with sample utterances to participate in the bot scoping process. These bots will always be considered for Intent Detection at the time of evaluating the user utterances, except when the user invokes a linked bot either using ‘Invocation Phrases’ or ‘Trigger Phrases’. Up to 3 linked bots can be marked as inclusive bots.
Unlink a Bot
If you want to unlink a linked bot, follow these steps:
- On the Linked Bots page, hover over the bot you want to unlink to view the Un-Link icon.
- Click Un-Link.
Remember to Publish the bot for the changes to be reflected in the published bot.
Step 3: Training
Universal Bot functionality enables training of the bot. This section details the steps in training the bot, for more details on training refer here.
- Open the universal bot that you want to train. This bot should be having bots linked to it.
- Select the Build tab from the top menu.
- From the left menu, select Natural Language -> Linked Bot Training.
- Select the Linked Bot Training section and Select Bot you want to train.
- Note that Inclusive bots do not need training, the training will not be used for bot scoping. If you choose to train the same, this training will be used later if the linked bot is deselected as an Inclusive Bot.
- Expand the Invocation Names section to add the same. These will be treated as a special set of synonyms defined against linked bot names. Refer here for more.
- The name of the Bot is by default added as an invocation name, you can delete it if not required.
- Enter additional Invocation Names as per your requirement.
- Expand the Utterances section to add utterances. These refer to the typical ways in which the users are expected to ask for intent from a linked bot. Refer here for more.
- Add utterances as per your requirement.
- You can also use the Copy from linked bot option to add the utterances from the linked bot.
- Selecting this option will open a copy from bot page for the linked bot under training.
- Select the relevant task from the linked bot from the Select Task dropdown.
- All the utterances for that task will be listed and you can select from the list. Multiselection is allowed.
- Click Done to add the utterances.
- Add utterances as per your requirement.
- Train the bot to activate these above changes.
Step 4: Configure the Channels
The universal Bot requires channel configurations separate from its underlying linked Bots, so the channels must be set up or enabled again. You can set up channels for the universal Bot regardless of the linked Bot channels and the published tasks of the linked Bots will execute from the universal Bot channels.
Before you Begin
This article assumes that you understand the fundamentals of configuring channels in Kore.ai and therefore focuses on the configuration aspects specific to the universal bots. For fundamentals of configuring channels in the Bot Builder, refer to Adding Channels to your Bot.
Important Notes:
- The Universal Bot is available only on the channels enabled for it, regardless of the enabled channels for the linked Bots.
- If a channel is configured for both linked and universal Bots, the message delivered to the user follows the channel-specific messages and formatting configured at the linked Bot.
- If a channel enabled for the universal Bot is not enabled for the linked Bot, the universal Bot responds with the default messages defined for the linked Bot’s functionality.
- If you do not set up any channel-specific formatting at either the universal or the linked Bot’s settings, the default message with standard formatting gets applied.
- Alerts configured from universal Bot will be delivered via the universal Bot.
Steps in Configuring a Channel
- Open the universal bot for which you want to configure new channels.
- Select the Deploy tab from the top menu.
- Click Channels.
- From the list of supported channels on the Channels page, click the channel to configure it.
- The configuration settings for each channel vary according to the channel. When you click a channel to configure it, the configuration instructions are displayed. Follow them for channel configuration.
- Configure and save the channel settings.
Step 5: Testing
Since the universal Bot links together many standard Bots, the natural language processing settings may have to be optimized for several user utterances to accurately recognize the relevant bot and intent.
Testing the universal bot is similar to testing a standard bot where you type a user utterance and analyze the results. However, in the case of the universal bots, you see not just the shortlisted intents for the utterance but also the bots to which they belong. The name of the bot is prefixed to the intent in the following syntax: Bot Name: Task Name.
Before you begin
This article assumes that you understand the fundamentals of testing bots in Kore.ai Bots platform and therefore focuses on the testing aspects specific to the universal bots. To refer to the fundamentals of testing bots in the Bots Builder, read Testing your bot.
Steps in Testing a User Utterance
Follow these steps to test user utterances for universal bots:
- Open the universal bot for which you want to test the user utterances.
- Select the Build tab from the top menu.
- From the left menu click Testing -> Utterance Testing.
- In the Type a user utterance field, enter the utterance that you want to test. For example weather.
- The results show up below with single, multiple, or no matching intents. For example, below is a multiple match result for the weather utterance.
- Clicking the bots scoped will give the details of the process involved in evaluating the linked bots. Refer here for more details.
Understanding the Test Results
The result for test utterances fall into one of these three categories:
- Single Matched Intent: A task or user intent of one of the linked bots matched the input.
- If it is a correct match, you can provide additional training for the same task in the same bot to enhance its score, or you can also train a different task from another bot to recognize the utterance.
- If it is an incorrect match, click the Mark as Incorrect Match link next to the matched intent. Clicking the link allows you to select the task or intent from the same or another bot that should match.
- Multiple Matches with Same Scores: More than one task with the same recognition score matched the intent. These tasks can belong to one or more linked bots. Select the radio button next to the task that you want to match for the utterance.
- Unidentified Intent: The user input did not match any task in any of the linked bots. Train the bot as explained below to match the right bot and linked task.
Improving the Universal Bot Performance
You can train the universal bot for more efficient and accurate functioning. Though you train the linked bot from the universal bot windows, the training is saved directly at the linked bot.
Follow these steps to train the linked bots in a universal bot:
- On the Utterance Testing window for the universal bot, select an intent.
- It opens the following fields that enable you to train the task using machine learning utterances, synonyms, and patterns.
- You can also configure the thresholds from the Natural Language -> Settings. See here for more.
Step 6: Publishing
After you have defined, trained, and saved a new configuration for a Universal Bot, it becomes visible on the Bot Builder home page. It is not available to users other than the developers of the bot until it is published and approved by the Bots Admin.
Universal Bot Statuses
The following are different statuses related to the universal bots, these will be displayed in the Linked Bots page against the linked Bots selected for publishing:
| Universal Bot Status | Description |
|---|---|
| Linked | Bot configuration is complete and the standard bots are linked. |
| Awaiting Approval | The Bot is published for enterprise use but has not been approved by the Bots Admin. |
| Published | The Universal Bot is published for personal, enterprise, or public use. |
| Rejected | The Bots Admin did not deploy the bot to the enterprise. An email is sent to the developer with comments from the Bots Admin. |
| Suspended | The Bots Admin suspended the use of a deployed bot. An email is sent to the developer with comments from the Bots Admin. |
Publish the Bot
Follow these steps to publish a universal bot:
- Open the universal bot that you want to publish.
- Select the Deploy tab from the top menu.
- From the left menu, select Bot Management -> Publish option.
- On the Publish page, select the linked bots you want to publish. This can be to:
- Include new linked bots, or
- Update already published linked bots, or
- Delete any unlinked bots
Note: Default dialog is automatically selected and as it is mandatory to publish it you cannot de-select it. - You can choose to Publish the following training components:
- Training Utterances, Invocation Names, Synonyms, Fallback Bots, NLP Settings
Note: The first time you are publishing a Universal Bot, all the NLP settings need to be selected for publishing
- Training Utterances, Invocation Names, Synonyms, Fallback Bots, NLP Settings
- Select from the list of enabled languages to publish the bot and then click Proceed.
- Enter appropriate Comments and click Publish