지금까지 살펴본 바와 같이 최종 사용자가 경고 작업의 결과를 필요한 결과로 제한할 수 있는 필터를 정의할 수 있습니다. 예: 이름, 계정 또는 비즈니스에 대한 필터를 정의할 수 있습니다. 최종 사용자가 알림을 설정하고, 필터가 적용되면, 필터 사양을 충족하는 경고 메시지만 최종 사용자에게 표시됩니다.

필터 정의하기

작업에 대한 필터 정의를 시작하려면, 설정 탭의 필터 섹션에 확장 아이콘을 클릭한 후 다음 그림과 같이 추가를 클릭합니다.
경고 작업 - 설정 탭 - 필터 섹션
추가를 클릭했을 때, 경고 작업 필터 대화 상자가 다음 그림과 같이 표시됩니다.
경고 작업 필터 대호 상자
이전 그림에 설명된 필터는 필터 라벨이 있는 소유자로 사용자에게 표시되며, 필드 유형은 동적 드롭다운으로 설정하여 최종 사용자는 응답 페이로드에서 정의된 동적으로 채워진 소유자 목록에서 이름을 선택할 수 있습니다. 다음 표에 설명된 필드를 정의하여 작업에 대한 새 필터를 생성합니다.

매개 변수 이름 설명
이름 작업을 설정할 때 필터 섹션에서 최종 사용자에게 표시되는 필터의 이름을 지정합니다. 예: 아래 사용자가 트윗할 때만 통보합니다.
필드 이름 작업을 필터링할 필드 이름을 입력하거나 필드 선택을 클릭하여 API 요청 탭에 정의된 응답 샘플에서 구문 분석된 필드 이름의 드롭다운 목록을 표시합니다.
필드 유형

사용자 입력을 수집할 입력 필드의 유형을 선택합니다.

  • 텍스트 상자 – 사용자에게 텍스트 상자를 표시합니다. 플레이스 홀더필드에서, 필드를 위한 설명을 입력합니다. 예: 꾸미려는 이름을 입력합니다.
  • 텍스트 영역 – 사용자에게 텍스트 영역 상자를 표시합니다. 일반적으로 여러 문장을 입력할 수 있습니다. 플레이스 홀더 필드에 텍스트 영역의 설명을 입력합니다.
  • 정적 드롭다운 – 드롭다운 선택 목록을 사용자에게 표시합니다. 옵션 추가를 클릭하여 다음 매개변수를 사용하여 항목 목록 추가를 시작합니다.
    • 옵션 이름 – 사용자에게 표시되는 옵션의 이름입니다.
    • 옵션값 – 옵션과 관련된 값입니다.
    • 기본값 – 하나 이상의 옵션이 정의된 경우 목록의 기본값을 선택합니다.
    • 검색 가능 – 사용자 입력과 일치하는 목록에서 자동 검색 제안을 사용하려면 선택합니다.

    저장을 클릭합니다. 추가 항목을 추가하려면, 옵션 추가를 다시 클릭합니다. 옵션의 조치 열에서 옵션을 편집하거나 삭제합니다.

  • 동적 드롭다운 – 봇의 URL 응답에 따라 실행 시 동적으로 채워진 드롭다운 목록을 표시합니다. 예: JIRA 작업 알림용 프로젝트 목록. 동적으로 채워진 드롭다운에 대해 다음 속성을 정의합니다.
    • 엔드포인트 URL – 봇 엔드포인트 URL입니다. 예: https://app.asana.com/api/1.0/workspaces.
    • 엔드포인트 콘텐츠 유형 – 지정된 엔드포인트 URL에서 예상되는 콘텐츠 유형 중 하나입니다. JSON, RSS, XML, Encoded JSON, CSV 또는 Text.
    • 엔드포인트 메소드 – 다음 중 하나를 선택합니다.
      • GET – 작업 필드의 HTTP 요청 GET 메소드를 지정합니다.
      • POST – 작업 필드의 HTTP 요청 POST 메소드를 지정합니다.
    • 응답 경로 – 원하는 드롭다운 목록 값이 포함된 응답의 경로입니다. 예: data.
    • 라벨 키 – 드롭다운 옵션의 라벨 키입니다. 예: name.
    • 옵션값 키 – 드롭다운 옵션 값의 키입니다. 예: id.
    • 페이로드 필드 추가 – 타입 어헤드 필드에 대한 옵션으로 응답 페이로드에서 하나 이상의 필드를 추가하려면 클릭합니다. 각 타입 어헤드 필드 옵션에서, 페이로드 필드 키페이로드 필드 값을 입력한 다음 저장을 클릭합니다. 조치 열에서 페이로드 필드를 편집하거나 삭제합니다.
  • 확인 상자 – 사용자가 하나 이상을 선택할 수 있는 선택 목록을 표시합니다. 옵션 추가를 클릭하여 다음 매개변수를 사용하여 표시하려는 항목 목록 추가를 시작합니다.
    • 옵션 이름 – 최종 사용자에게 표시되는 옵션의 이름입니다.
    • 옵션값 – 옵션 이름에 해당하는 값입니다.
  • 타입 어헤드 – 작업에 정의된 URL 응답에 따라 사용자가 검색 결과와 일치하는 3개 이상의 문자를 입력할 때 실행 시 동적으로 채워진 드롭다운 선택 목록을 사용자에게 표시합니다. 예: JIRA 작업 알림 메시지의 프로젝트 목록. 동적으로 채워진 드롭다운에 대해 다음 속성을 정의합니다.
    • 엔드포인트 URL – 봇 엔드포인트 URL입니다. 예: https://app.asana.com/api/1.0/workspaces.
    • 엔드포인트 콘텐츠 유형 – 지정된 엔드포인트 URL에서 예상되는 콘텐츠 유형입니다. 다음 중 하나입니다. JSON, RSS, XML, URL Encoded JSON, CCV, Text, Twitter Encoded JSON, Multipart/Form-data 또는 Multipart/Related.
    • 엔드포인트 메소드 – 다음 중 하나를 선택합니다.
      • GET – 작업 필드의 HTTP 요청 GET 메소드를 지정합니다.
      • POST – 작업 필드의 HTTP 요청 POST 메소드를 지정합니다.
    • 응답 경로 – 원하는 드롭다운 목록 값이 포함된 응답의 경로입니다. 예: data.
    • 라벨 키 – 드롭다운 옵션의 라벨 키입니다. 예: name.
    • 옵션값 키 – 드롭다운 옵션 값의 키입니다. 예: id.
    • 페이로드 필드 추가 – 타입 어헤드 필드에 대한 옵션으로 응답 페이로드에서 하나 이상의 필드를 추가하려면 클릭합니다. 각 타입 어헤드 필드 옵션에서, 페이로드 필드 키페이로드 필드 값을 입력한 다음 저장을 클릭합니다. 조치 열에서 페이로드 필드를 편집하거나 삭제합니다.
    • 편집 가능 – 타입 어헤드 검색 결과가 일치하지 않을 때 사용자가 필드에서 텍스트를 자유롭게 입력할 수 있습니다.
  • 동적 확인 상자 – 봇의 URL 응답에 따라 실행 시 동적으로 채워진 선택 목록을 표시하여 사용자는 하나 이상을 선택할 수 있습니다. 예: JIRA 작업 알림용 프로젝트 목록. 확인 상자로 동적으로 채워진 선택 목록에 대해 다음 속성을 정의합니다.
    • 엔드포인트 URL – 봇 엔드포인트 URL입니다. 예: https://app.asana.com/api/1.0/workspaces.
    • 엔드포인트 콘텐츠 유형 – 지정된 엔드포인트 URL에서 예상되는 콘텐츠 유형입니다. 다음 중 하나입니다. JSON, RSS, XML, Encoded JSON, CSV 또는 Text.
    • 엔드포인트 메소드 – 다음 중 하나를 선택합니다.
      • GET – 작업 필드의 HTTP 요청 GET 메소드를 지정합니다.
      • POST – 작업 필드의 HTTP 요청 POST 메소드를 지정합니다.
    • 응답 경로 – 원하는 드롭다운 목록 값이 포함된 응답의 경로입니다. 예: data.
    • 라벨 키 – 드롭다운 옵션의 라벨 키입니다. 예: name.
    • 상자값 키 – 드롭다운 옵션 값의 키입니다. 예: id.
데이터 유형

엔드포인트 URL에서 수신한 콘텐츠의 데이터 유형입니다. 다음 중 하나입니다.

  • 텍스트 – 이 필터에 대한 사용자 입력은 텍스트로 예상됩니다.
  • 숫자 – 이 필터에 대한 사용자 입력은 정수로 예상됩니다.
  • 날짜 – 이 필터에 대한 사용자 입력은 날짜입니다.
  • 목록 – 이 필터에 대한 사용자 입력은 쉼표로 구분된 목록입니다.
연산자

필터에 적용하기 위해 최종 사용자가 선택할 수 있는 하나 이상의 필터 작업을 선택합니다. 선택한 데이터 유형에 따라 최종 사용자에게 표시되는 선택 가능한 다음 옵션 중 하나 이상을 사용합니다.

  • 포함 – 응답 개체 필터링 된 텍스트에는 지정된 값이 모두 포함됩니다.
  • 포함 안 함 – 응답 개체 필터링 된 텍스트에는 지정된 값이 모두 포함되지 않습니다.
  • 정확히 일치 – 응답 개체 필터링 된 텍스트에는 지정된 값만 포함됩니다.
  • 정확히 일치하지 않음 – 응답 필터링 된 텍스트 개체에는 지정된 값이 포함되어 있지 않습니다.
  • 포함됨 – 응답 개체 필터링 된 텍스트에는 어떤 지정된 값이 포함됩니다.
  • 포함 안 됨 – 응답 개체 필터링 된 텍스트에는 어떠한 지정된 값도 포함되지 않습니다.
  • 시작됨 – 응답 개체 필터링 된 텍스트는 지정된 값으로 시작합니다.
  • 시작하지 않음 – 응답 개체 필터링 된 텍스트에는 지정된 값으로 시작하지 않습니다.
  • 다음으로 끝남 – 응답 개체 필터링 된 텍스트는 지정된 값으로 끝납니다.
  • 다음으로 끝나지 않음 – 응답 개체 필터링 된 텍스트는 지정된 값으로 끝나지 않습니다.
  • 같음 – 응답 개체 필터링 된 숫자 또는 날짜는 지정된 값과 같습니다.
  • 다음보다 큼 – 응답 개체 필터링 된 숫자 또는 날짜는 지정된 값보다 큽니다.
  • 다음보다 작음 – 응답 개체 필터링 된 숫자 또는 날짜는 지정된 값보다 작습니다.
  • 존재함 – 응답 개체 필터링 된 텍스트에는 지정된 값이 존재합니다.
  • 존재 안 함 – 응답 개체 필터링 된 텍스트에는 지정된 값이 존재하지 않습니다.

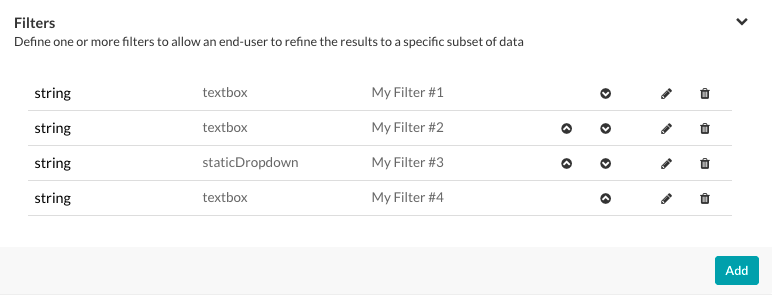
다중 필터의 경우, 다음 그림의 숫자 순서대로 최종 사용자가 예상하는 순서대로 필터 순서를 정할 수 있습니다.
경고 작업 - 설정 탭 - 필터 섹션
필터 섹션의 조치 컬럼에 위로 이동  아이콘 및 아래로 이동  아이콘을 사용하여 필요시 필터 순서를 변경합니다.
편집  아이콘을 클릭하여 기존 필터의 설정을 수정합니다.
삭제  아이콘을 클릭하여 기존 필터를 삭제합니다.
경고: 이 작업은 영구적이므로 취소할 수 없습니다.

Leave a Reply

Your email address will not be published. Required fields are marked *

Fill out this field
Fill out this field
Please enter a valid email address.
You need to agree with the terms to proceed

こちらでご覧いただいた通り、通知タスクの結果をエンドユーザーが必要とする結果に制限するよう、エンドユーザー用のフィルターを定義することができます。たとえば、名前やアカウント、ビジネスなどのフィルターを定義できます。エンド ユーザーごとに通知がセットアップされ、フィルターが適用されると、フィルターの条件を満たす通知メッセージのみがエンド ユーザーに表示されます。

フィルターの定義

タスクのフィルターの定義を開始するには、下図のように、設定タブでフィルターセクションの展開アイコンをクリックしてから追加をクリックします。通知タスク - タブの設定 - フィルターセクション 追加をクリックすると、下図のように通知タスクフィルターダイアログが表示されます。Alert Task Filter Dialog 前述の図で定義されたフィルターは、所有者というラベルのついたフィルターとしてエンドユーザーに表示されます。フィールドタイプダイナミックドロップダウンに設定され、エンドユーザーは応答のペイロードで定義された、動的に入力された所有者一覧から名前を選択することができます。下記のテーブルの説明の通りにタスクに新規のフィルターの作成フィールドを定義してください。

パラメータ名 説明
名前 タスクの設定時にフィルターセクションでエンドユーザーに表示されるフィルターの名前を指定します。例えば、「以下のユーザーがツイートしたときのみ通知する」などです。
フィールド名 タスクを絞り込むフィールド名を入力して、[フィールドを選択] をクリックすると、タスク内の [API リクエスト] タブに定義された [応答サンプル] から解析済みのフィールド名がドロップダウン リストに表示されます。
フィールドタイプ ユーザー入力を収集するために入力フィールド タイプを選択します。

  • テキスト ボックス – ユーザーにテキスト ボックスを表示します。[プレースホルダー] フィールドには、フィールドの説明を入力します。たとえば、「追加する名前を入力してください」のようなものです。
  • テキスト ボックス – 長い文章を入力できる、テキスト ボックスをユーザーに表示します。[プレースホルダー] フィールドに、テキスト 領域の説明を入力します。
  • 静的ドロップダウン – ユーザーに選択肢のドロップダウン リストを表示します。[オプションの追加] をクリックして、以下のパラメーターで項目リストの追加を始めます。
    • オプション名 – ユーザーに表示されるオプションの名称です。
    • オプション値 – オプションに関連付けられた値です。
    • デフォルト値 – オプションが 1 つ以上定義されている場合、リストのデフォルト値を選択します。
    • 検索可能 – 選択すると、ユーザーの入力に先行してリストから一致する候補を表示します。

    [保存] をクリックします。項目を追加する場合、オプションを追加をもう一度クリックします。動作コラムのオプション編集または削除します。

  • ダイナミックドロップダウン – BotのURLからの応答に基づいて、実行時に動的に生成されるドロップダウンリストを表示します(例:JIRAタスク通知用のプロジェクト一覧)。以下のダイナミックに配置されるドロップダウンへのプロパティを定義します。
    • エンドポイント URL – BotのエンドポイントのURLです。例:https://app.asana.com/api/1.0/workspaces
    • エンドポイントのコンテンツタイプ―指定されたエンドポイントURLから予想されるコンテンツタイプの一つ。JSON、RSS、XML、URL にエンコードされた JSON、CSV やテキスト。
    • エンドポイント メソッド – 次のうち 1 つを選択します。
      • GET– タスクフィールドのHTTPリクエストのGETメソッドを指定します。
      • POST– タスク フィールドの HTTP リクエストの POST メソッドを指定します。
    • 応答パス – 希望するドロップダウンリストの値を含む応答内のパスです(例:データ)。
    • ラベルキー – ドロップダウンオプションのラベルのキーです(例:名前)。
    • オプション値キー – ドロップダウン オプション値のキーです。例:id
    • ペイロードフィールドの追加 – 先行入力フィールドのオプションとして、 応答ペイロードから 1 つ以上のフィールドをクリックして追加します。各先行入力のフィールドオプションについて、ペイロードフィールドのキーペイロードフィールドの値を入力し、保存をクリックします。動作列でペイロードフィールドを編集または削除します。
  • チェック ボックス – ユーザーが選択できる 1 つ以上の選択肢のリストを表示します。[オプションを追加] をクリックして、以下のパラメーターで表示する項目リストの追加を始めます。
    • オプション名 – エンドユーザーに表示されるオプションの名前です。
    • オプション値 – オプション名に対応する値です。
  • 先行入力 – タスクに定義されたURLからの応答に基づく検索結果に一致する文字をユーザーが 3 文字以上入力すると、動的に入力されたドロップダウンリストの選択肢が実行時にユーザーに表示されます。
    例えば、JIRAのタスク通知メッセージのプロジェクト一覧です。以下のダイナミックに配置されるドロップダウンへのプロパティを定義します。

    • エンドポイント URL – BotのエンドポイントのURLです。例:https://app.asana.com/api/1.0/workspaces
    • エンドポイントのコンテンツタイプ―指定されたエンドポイントURLから予想されるコンテンツタイプ。以下のうちの一つ:JSON、RSS、XML、URL エンコードされた JSON、CCV、テキスト、Twitter エンコードされた JSON、Multipart/Form-data または Multipart/Related。
    • エンドポイント メソッド – 次のうち 1 つを選択します。
      • GET– タスクフィールドのHTTPリクエストのGETメソッドを指定します。
      • POST– タスク フィールドの HTTP リクエストの POST メソッドを指定します。
    • 応答パス – 希望するドロップダウンリストの値を含む応答内のパスです(例:データ)。
    • ラベルキー – ドロップダウンオプションのラベルのキーです(例:名前)。
    • オプション値キー – ドロップダウンオプションの値のキーです(例:ID)。
    • ペイロードフィールドの追加 – 先行入力フィールドのオプションとして、 応答ペイロードから 1 つ以上のフィールドをクリックして追加します。各先行入力のフィールドオプションについて、ペイロードフィールドのキーペイロードフィールドの値を入力し、保存をクリックします。動作列でペイロードフィールドを編集または削除します。
    • 編集可能―先行入力の検索結果が一致しない場合のオプションとして、エンドユーザーがフィールドに自由にテキストを入力できるようにします。
  • 動的チェック ボックス – ボットの URL からの応答に基づいて、実行時に動的に生成され、1 つ以上の選択ができる選択肢のリストです。たとえば、JIRA のタスク通知のプロジェクト リストのようなものです。以下のダイナミックに配置されるチェックボックスの選択のリストへのプロパティを定義します。
    • エンドポイント URL – BotのエンドポイントのURLです。例:https://app.asana.com/api/1.0/workspaces
    • エンドポイントのコンテンツタイプ―指定されたエンドポイントURLから予想されるコンテンツタイプ。以下のうちの一つ:JSON、RSS、XML、URL にエンコードされた JSON、CSV やテキスト。
    • エンドポイント メソッド – 次のうち 1 つを選択します。
      • GET– タスクフィールドのHTTPリクエストのGETメソッドを指定します。
      • POST– タスク フィールドの HTTP リクエストの POST メソッドを指定します。
    • 応答パス – 希望するドロップダウンリストの値を含む応答内のパスです(例:データ)。
    • ラベルキー – ドロップダウンオプションのラベルのキーです(例:名前)。
    • ボックス値キー – ドロップダウン オプション値のキーです。例:id
データタイプ エンドポイントURLから受信したコンテンツのデータタイプです。以下のうちの一つ:

  • テキスト – このフィルタのユーザー入力にはテキストが求められます。
  • 数字 – このフィルターのユーザー入力には整数が求められます。
  • 日付 – このフィルターのユーザー入力は日付です。
  • リスト – このフィルターのユーザー入力はコンマ区切りのリストです。
オペレーター エンドユーザーがフィルターに適用できる、 1 つ以上のフィルター操作を選択します。選択したデータ型によって、次のオプションのうち 1 つ以上をエンドユーザーに表示するよう選択することができます。

  • すべてを含む – 応答オブジェクトでフィルターをかけた文字は、指定された値をすべて含みます。
  • すべてを含まない – 応答オブジェクトでフィルターをかけた文字は、指定された値のすべてを含みません。
  • 完全一致 – 応答オブジェクトでフィルターをかけた文字は、指定された値のみを含みます。
  • 完全一致ではない – 応答 でフィルターをかけた文字オブジェクトは、指定された値を含みません。
  • 含む – 応答オブジェクトでフィルターをかけた文字は、指定された値を含みます。
  • 含まない – 応答オブジェクトでフィルターをかけた文字は、指定された値をどれも含みません。
  • から始まる – 応答オブジェクトでフィルターをかけた文字は、指定された値で始まります。
  • から始まらない – 応答オブジェクトでフィルターをかけた文字は、指定された値で始まりません。
  • で終わる – 応答オブジェクトでフィルターをかけた文字は、指定された値で終わります。
  • で終わらない応答オブジェクトでフィルターをかけた文字は、指定された値で終わりません。
  • 等しい – 応答オブジェクトでフィルターをかけた数字や日付は、指定された値と等しくなっています。
  • より大きい – 応答オブジェクトでフィルターをかけた数字や日付は、指定された値を超えています。
  • より小さい – 応答オブジェクトでフィルターをかけた数字や日付は、指定された値未満です。
  • 存在する – 応答オブジェクトでフィルターをかけたリストは、指定された値を含みます。
  • 存在しない – 応答オブジェクトでフィルターをかけたリストは、指定された値を含みません。

複数のフィルターには、フィルターをエンドユーザーの予想の順番と並び直すことができます、下記の図の数目順の通りに表示します。通知タスク - タブの設定 - フィルターセクション 必要に応じて、フィルターセクションの動作列にある上へ移動アイコンと下へ移動アイコンを使用して、フィルターの順序を変更します。編集アイコンをクリックして既存のフィルターの設定を変更します。削除アイコンをクリックして既存のフィルターを削除します。警告:この操作は永久的で、元に戻すことはできません。

Leave a Reply

Your email address will not be published. Required fields are marked *

Fill out this field
Fill out this field
Please enter a valid email address.
You need to agree with the terms to proceed

As we have seen here, you can define filters for end-users to limits the results of an alert task to the results an end-user needs. For example, you can define a filter for the name, or account, or business. When the alert is set up by the end-user, and the filter applied, only alert messages that meet the filter specifications are displayed to the end-user.

Defining Filters

To get started with defining filters for a task, on the Settings tab, click the Expand icon in the Filters section, and then click Add as shown in the following illustration.
Alert Task - Settings Tab - Filters Section
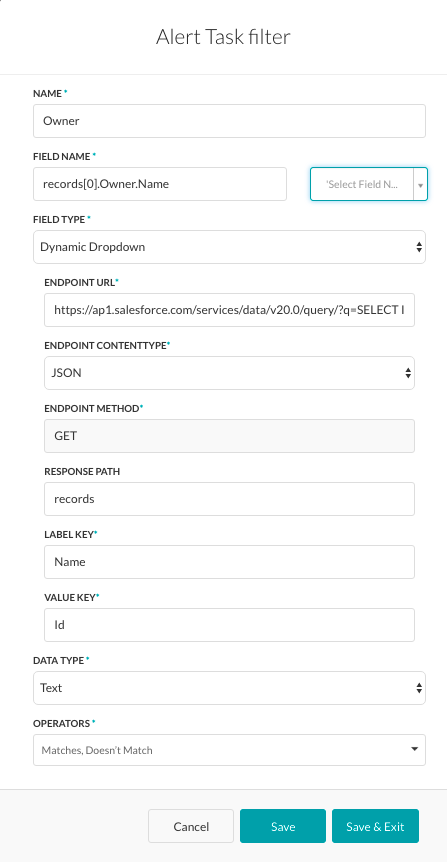
When you click Add, the Alert Task Filter dialog is displayed as shown in the following illustration.
Alert Task Filter Dialog
The Filter defined in the previous illustration is displayed to the end-user as a filter labeled Owner, with the Field Type set to Dynamic Dropdown to enable the end-user to select a name from a dynamically populated list of owners defined in the response payload.
Define the fields described in the following table to create a new filter for a task.

PARAMETER NAME DESCRIPTION
Name Specify the name of the Filter displayed to the end-user in the Filters section when configuring the task, for example, Notify me only when the below user tweets.
Field Name Enter the name of the field to filter the task on, or click Select Field to display a drop-down list of field names parsed from the Response Sample defined on the task API Request tab.
Field Type Select the type of input field to collect the user input.

  • Textbox – Displays a text box to the user. In the Placeholder field, enter a description for the field, for example, Type in the name you want to embroider.
  • Textarea – Displays a text area box to the user, typically allowing to enter several sentences. In the Placeholder field, enter a description for the text area.
  • Static Dropdown – Displays a drop-down list of choices to the user. Click Add Option to begin adding the list of items, with the following parameters:
    • Option Name – The name of the option displayed to the user.
    • Option Value – The value associated with the option.
    • Default Value – Select the default value for the list when more than one option is defined.
    • Searchable – Select to enable type-ahead suggestions from the list matching the user’s typing.

    Click Save. To add additional items, click Add Option again. Edit or remove options in the Actions column for options.

  • Dynamic Dropdown – Displays a drop-down list dynamically populated at runtime based on the response from a URL for your Bot, for example, a list of projects for a JIRA task notification. Define the following properties for a dynamically populated drop-down.
    • Endpoint URL – The Bot endpoint URL, for example, https://app.asana.com/api/1.0/workspaces.
    • Endpoint Content Type – One of these content types expected from the specified endpoint URL: JSON, RSS, XML, Encoded JSON, CSV, or Text.
    • Endpoint Method – Select one of the following:
      • GET – Specifies an HTTP Request GET method for the task field.
      • POST – Specifies an HTTP Request POST method for the task field.
    • Response Path – The path in the response that contains the desired drop-down list values, for example, data.
    • Label Key – The key for the label of the drop-down option, for example, name.
    • Optional Value Key – The key for the value of the drop-down option, for example, id.
    • Add Payload Field – Click to add one or more fields from the response payload as options for the type-ahead field. For each type ahead field option, enter the Payload field key and the Payload field value, and then click Save. Edit or delete payload fields in the Actions column.
  • Check Box – Displays a list of choices that the user can select from – one or more. Click Add Option to begin adding the list of items to display, with the following parameters:
    • Option Name – The name of the option displayed to the end-user.
    • Option Value – The corresponding value for the option name.
  • Type Ahead – Displays a dynamically populated drop-down list of choices to the user at runtime when the user enters three or more characters that match the search results based on the response from the URL defined for the task. For example, a list of projects for a JIRA task notification message. Define the following properties for a dynamically populated drop-down.
    • Endpoint URL – The Bot endpoint URL, for example, https://app.asana.com/api/1.0/workspaces.
    • Endpoint Content Type – The content type expected from the specified endpoint URL. One of: JSON, RSS, XML, URL Encoded JSON, CCV, Text, Twitter Encoded JSON, Multipart/Form-data, or Multipart/Related.
    • Endpoint Method – Select one of the following:
      • GET – Specifies an HTTP Request GET method for the task field.
      • POST – Specifies an HTTP Request POST method for the task field.
    • Response Path – The path in the response that contains the desired drop-down list values, for example, data.
    • Label Key – The key for the label of the drop-down option, for example, name.
    • Option Value Key – The key for the value of the drop-down option, for example, id.
    • Add Payload Field – Click to add one or more fields from the response payload as options for the type-ahead field. For each type ahead field option, enter the Payload field key and the Payload field value, and then click Save. Edit or delete payload fields in the Actions column.
    • Editable – Enables the end-user to enter text free-from in the field as an option when type-ahead search results do not match.
  • Dynamic Check Box – Displays a list of choices that the end-user can select one or more from, which are dynamically populated at runtime based on the response from a URL for your Bot, for example, a list of projects for a JIRA task notification. Define the following properties for a dynamically populated list of choices as checkboxes.
    • Endpoint URL – The Bot endpoint URL, for example, https://app.asana.com/api/1.0/workspaces.
    • Endpoint Content Type – The content type expected from the specified endpoint URL. One of: JSON, RSS, XML, Encoded JSON, CSV, or Text.
    • Endpoint Method – Select one of the following:
      • GET – Specifies an HTTP Request GET method for the task field.
      • POST – Specifies an HTTP Request POST method for the task field.
    • Response Path – The path in the response that contains the desired drop-down list values, for example, data.
    • Label Key – The key for the label of the drop-down option, for example, name.
    • Box Value Key – The key for the value of the drop-down option, for example, id.
Data Type The data type for the content received from the endpoint URL. One of:

  • Text – The user input for this filter is expected as text.
  • Number – The user input for this filter is expected as an integer.
  • Date – The user input for this filter is a date.
  • List – The user input for this filter is a comma-separated list.
Operators Select one or more filter operations that the end-user can select to apply to the filter. Depending on the Data Type selected, one or more of the following options are available to select to display to the end-user in the filter.

  • Contains – The response object filtered text contains all of the specified values.
  • Doesn’t Contain – The response object filtered text does not contain all of the specified values.
  • Exact Match – The response object filtered text only contains the specified values.
  • Not an exact match – The response filtered text object does not contain the specified value.
  • Included – The response object filtered text contains any of the specified values.
  • Not Included – The response object filtered text does not contain any of the specified values.
  • Starts with – The response object filtered text begins with the specified value.
  • Doesn’t start with – The response object filtered text does not begin with the specified value.
  • Ends with – The response object filtered text ends with the specified value.
  • Doesn’t end with – The response object filtered text does not end with the specified value.
  • Equal to – The response object filtered numbers or dates are equal to the specified value.
  • Greater than – The response object filtered numbers or dates are greater than the specified value.
  • Less than – The response object filtered numbers or dates are less than the specified value.
  • Exists – The response object filtered list contains the specified value.
  • Doesn’t exist – The response object filter list does not contain the specified value.

For multiple filters, you can order the filters in an order the end-user expects, shown in numerical order in the following illustration.
Alert Task - Settings Tab - Filters Section
Use the Move Up  icon and the Move Down  icon in the Actions column in the Filters section to reorder the filters if needed.
Click the Edit  icon to modify the settings for an existing filter.
Click the Delete  icon to delete an existing filter.
Warning: This operation is permanent and cannot be undone.

Leave a Reply

Your email address will not be published. Required fields are marked *

Fill out this field
Fill out this field
Please enter a valid email address.
You need to agree with the terms to proceed