Kore.ai 봇 SDK를 사용하려면, 봇을 호스팅하는 애플리케이션과 Kore.ai 봇 간의 통신을 위한 인증 정보를 받기 위해 앱을 우선 등록해야 합니다. Kore.ai 봇 SDK는 회사 애플리케이션에 채팅 위젯을 추가하여 자연어 입력을 이용한 애플리케이션으로 애플리케이션 사용자들이 자연어 입력을 이용하여 애플리케이션과 채팅하는 데 사용할 수 있습니다. Kore.ai 봇 플랫폼은 사용자 입력을 통역하고, 요청을 처리하고, 사용자에게 응답할 수 있습니다.

봇 플랫폼은 연결과 메시지 교환에 대해 인증받은 클라이언트의 요청만 수락합니다. 연결을 인증하려면 앱을 등록하고 클라이언트 인증 정보를 받아야 합니다. 인증 정보는 클라이언트 앱을 인증하고 사용자 어설션을 제공합니다.

이 항목은 애플리케이션 등록, 애플리케이션과 Kore.ai 봇 플랫폼 간의 메시지 교환에 필요한 클라이언트를 위한 인증 정보를 생성하는 방법, 봇에 웹/모바일 클라이언트 채널을 설정하고 추가하는 방법을 설명합니다. 봇에 웹/모바일 클라이언트를 추가하려면 우선 봇 빌더에 앱을 등록하거나 생성해야 합니다. 앱을 생성하는 경우, 애플리케이션에 인증 정보를 프로비저닝하여 Kore.ai 서버와 안전하게 통신합니다. 앱 생성 후, 설정에서 앱 등록을 사용하여 웹/모바일 클라이언트 채널을 봇에 추가할 수 있습니다.

웹/모바일 클라이언트 채널 추가

웹/모바일 클라이언트를 추가하려면 다음 단계를 따르세요.

  1. 웹/모바일 클라이언트 채널을 추가하고 싶은 봇을 엽니다.
  2. 봇 메뉴에서, Channel > Web/Mobile Client를 클릭합니다.
  3. Select App 드롭다운 목록에서, 기존 앱 등록을 선택하거나 Create App을클릭하여 새 앱을 생성합니다.
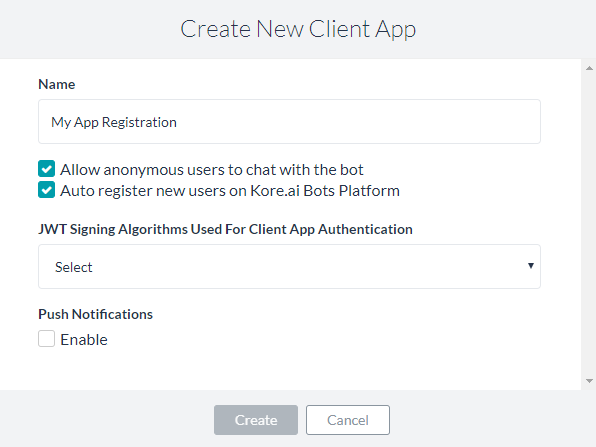
  4. Name 필드에서, 봇 빌더에서 사용한 앱 등록에 대한 이름을 입력합니다. (예: My App Registration)
  5. 앱에 대해 다음과 같은 범위 중 하나를 선택합니다.
    • 익명 사용자가 봇과 채팅할 수 있도록 허용: 익명 사용자가 봇과 채팅할 수 있도록 합니다.
    • Auto register new users on Kore.ai Bots Platform: 사용자 어설션을 알 수 없는 경우 Kore.ai에서 자동 유저 등록을 제어하려면 선택하세요.
  6. Algorithms Used For Client App Authentication 드롭다운 목록에서, 다음과 같은 보안 알고리즘 중 하나를 선택합니다.
    • RS256: Public Key 필드를 활성화하려면 선택합니다. Public Key는 Kore.ai 봇 플랫폼에서 클라이언트 애플리케이션을 인증하기 위해 사용됩니다.
    • HS256: Secret Key Client ID를 생성하려면 선택합니다. Client ID는 SDK 초기화를 위해 필요하며, Secret Key는 Kore.ai 플랫폼에서 클라이언트 애플리케이션을 인증하기 위해 사용됩니다.
  7. 선택적으로, Push Notifications 섹션에서, Enable을 클릭한 후 알림을 보낼 URL을 지정합니다.
  8. Create를 클릭합니다. 앱 등록 세부정보가 나타납니다.
  9. 애플리케이션의 클립보드에 앱 등록 세부정보를 복사하려면, Bot Name, Bot ID, Client ID에 대해 Copy를 클릭할 수 있습니다. Client Secret의 경우, View를 클릭한 후 Copy를 클릭합니다.
  10. Allow Alert Task Setup 섹션에서, Yes를 선택하여 애플리케이션 사용자가 웹 클라이언트를 이용하여 고유 알림 작업을 설정할 수 있도록 합니다. 기본값으로, 이 설정은 웹 클라이언트 사용자의 경우 불가능하지만 모바일 클라이언트 사용자는 언제나 고유 알림을 설정할 수 있습니다.
  11. Enable Channel 섹션에서, Yes를 선택하여 채널을 저장 후 즉시 사용합니다.
  12. Save를 클릭하여 설정을 저장하고 Web/Mobile Client Channel 페이지를 닫습니다.

Channel Information updated successfully 메시지가 페이지의 오른쪽 상단에 표시됩니다. 사용 가능으로 일단 설정되면 웹 애플리케이션으로 봇을 통합하기 위한 단계는 여기를 클릭하세요.

웹/모바일 채널 편집

웹/모바일 클라이언트 채널을 편집하려면 다음 단계를 따르세요.

  1. 수정하려면 채널로 마우스를 이동한 후 Settings 아이콘을 클릭하여 다음 일러스트에 표시된 명령 메뉴를 표시합니다.
    웹/모바일 클라이언트 채널 편집
    채널을 수정하려면 다음과 같은 명령 중 하나를 선택하세요.
  • Edit – 클릭하여 웹/모바일 클라이언트 채널 설정 페이지를 엽니다.
  • Disable/EnableDisable을 클릭하여 봇의 웹/모바일 클라이언트 채널 사용을 일시적으로 비활성화하세요 채널이 사용 안 함으로 설정된 경우, 웹/모바일 클라이언트 채널 사용을 활성화하려면, Enable을 클릭하세요.
  • DeleteDelete를 클릭한 후 Delete Confirmation 대화창의 OK를 클릭하여 봇 채널 설정을 영구적으로 삭제합니다.

경고: 이 작업은 영구적이므로, 취소할 수 없습니다.

To use any of the Kore.ai Bot SDKs, you must first register your app to get the authentication credentials to communicate between the Kore.ai bot and your application hosting the bot. The Kore.ai bot SDKs can be used to add a chat widget into your company application that enables your application users to chat with the application using natural language input. The Kore.ai bots platform interprets the user input, processes the request, and responds back to the user.

The bots Platform will only accept requests from authorized clients to connect to, and exchange messages. To authorize the connection, you must register your app and get required client credentials. The credentials authorize the client app and provide for user assertion.
This topic describes how to register your application and generate credentials for your clients that are required to exchange messages between your application and the Kore.ai bots Platform, and then configure and add the Web/Mobile Client Channel to your bot.

To add the Web/Mobile Client Channel to your bot, you must first register, or create an app in Bot Builder. When you create an app, you are provisioning credentials for you application to communicate securely with Kore.ai servers. After you create an app, you can use that app registration in the configuration to add the Web/Mobile Client Channel to your bot.

Add Web/Mobile Client Channel

To add a web/mobile client channel, follow the below steps:

  1. Open the bot on which you want to add the Web/Mobile Client channel.
  2. On the bots menu, click Channel > Web/Mobile Client.
  3. In the Select App drop-down list, select your existing app registration or click Create App to create a new app.
  4. In the Name field, enter the name for the app registration used in Bot Builder. For example, My App Registration.
  5. Select one of these scopes for the app:
    • Allow anonymous users to chat with the bot: Enables anonymous users to interact with the bot.
    • Auto register new users on Kore.ai Bots Platform: Select to control the auto-user registration in Kore.ai if the user assertion is unknown.
  6. In the JWT Signing Algorithms Used For Client App Authentication drop-down list, select one of the following security algorithms:
    • RS256: Select to enable the Public Key field. The Public Key is used by the Kore.ai bots platform to authenticate the client application.
    • HS256: Select to generate a Secret Key and a Client ID. The Client ID is required for SDK initialization, and the Secret Key used by the Kore.ai bots platform to authenticate the client application.
  7. Optionally, In the Push Notifications section, click Enable and then specify a URL to send the notifications.
  8. Click Create. The app registration details appear.
  9. To copy the app registration details to the clipboard for your application, you can click Copy for Bot Name, Bot ID, and Client ID. For Client Secret, click View, and then click Copy.
  10. In the Allow Alert Task Setup section, select Yes to enable your application users to set up their own alert tasks using the web client. By default, this setting is disabled for web client users, but mobile client users can always setup their own alerts.
  11. In the Enable Channel section, select Yes to enable the channel immediately after saving.
  12. Click Save to save the settings and close the Web/Mobile Client Channel page.

The Channel Information updated successfully message is displayed on the top-right of the page.
Once enabled click here for steps to integrate your bot into your web application.

Edit Web/Mobile Channel

To edit the Web/Mobile Client channel, follow the below steps:

  1. Hover over the channel to modify, and then click the Settings  icon displayed to show the command menu displayed in the following illustration.
    Editing the Web/Mobile Client Channel
    Select one of the following commands to modify the channel:
  • Edit – Click to open the Web/Mobile Client channel setup page.
  • Disable/Enable – Click Disable to temporarily disable the use of the Web/Mobile Client channel for your bot. When the channel is disabled, click Enable to enable the use of the Web/Mobile Client channel.
  • Delete – Click Delete, and then click OK in the Delete Confirmation dialog to permanently delete the bot channel configuration.

Warning: This operation is permanent, and cannot be undone.