봇 관리자 콘솔의 봇 관리 모듈에서는, Kore.ai 봇 빌더 도구에서 회사 개발자가 개발한 봇을 배포할 수 있습니다. 개발자가 봇을 개발하면, 봇 관리 섹션에서 봇 관리자가 승인 및 배포할 수 있도록 게시할 수 있습니다. 이 섹션에서는, 다음을 수행할 수 있습니다

  • 배포 승인을 위해 전송된 사용자 정의 봇 승인 또는 거부,
  • 봇에 대해 정의된 일부 또는 모든 작업 배포,
  • 봇이 엔터프라이즈용으로 정의된 경우 직원을 위해 또는 소비자용으로 정의된 경우 회사의 고객을 위해 배포된 봇을 회사의 사용자 또는 사용자 그룹에 할당.

봇 배포

봇 관리자는 봇 권한 및 소비를 관리할 수 있습니다. 개발자가 Kore.ai 봇 빌더 도구에서 사용자 정의 봇을 Kore.ai 봇 스토어의 엔터프라이즈 페이지로 게시한 후, 봇이 배포 요청 페이지에 표시됩니다. 엔터프라이즈용 또는 고객용으로 정의된 봇 배포 유형에 따라, 봇을 승인하고 한 명 이상의 사용자 또는 회사의 고객에게 봇을 할당할 때까지 회사의 어떤 사용자도 봇을 사용할 수 없습니다.
개발자가 봇을 게시한 후, 봇 관리 모듈 기본 설정 페이지에서 봇 관리자가 봇을 자동으로 승인하도록 설정한 경우, 봇은 즉시 승인되고 배포되며 배포 요청 페이지에 표시되지 않습니다. 자세한 내용은, 봇 관리 기본 설정을 참조하세요.

배포 페이지 컨트롤

배포 요청 페이지에 표시되는 각 봇에 대해, 다음 정보와 컨트롤이 표시됩니다.

  • 봇 아이콘봇 스토어에서 봇을 식별하기 위해 클라이언트의 최종 사용자에게 표시되는 아이콘입니다.
  • 봇 이름 – 봇 이름입니다.
  • 봇 유형 – 봇 유형(표준, 범용 등)입니다.
  • 작업 – 봇의 작업 수입니다.
  • 버전 – 배포용 봇 유형입니다. 다음 중 하나입니다.
    • 신규 – 배포된 적이 없는 신규 봇입니다.
    • 업그레이드 – 업그레이드되어 배포 준비가 된 이전에 배포된 봇입니다.
  • 용도 – 봇이 의도하는 사용 대상입니다. 다음 중 하나입니다.
    • 고객용 – 기업 고객 및 소비자용입니다.
    • 기업용 – 기업의 특정 관리된 사용자용입니다.
  • 요청자 – 승인을 위해 봇을 제출한 개발자 이름입니다.
  • 요청 날짜 – 승인을 위해 개발자가 봇을 제출한 날짜입니다.
  • 거부/게시 아이콘, 행 위에 마우스를 올리면 표시됩니다.

봇 승인 방법

  1. 봇 관리 모듈의 배포 요청 페이지에서, 승인하려는 봇 위에 마우스를 올리고 확인 아이콘을 클릭합니다.
  2. 선택적으로, 을 클릭하여 이 봇에 대해 승인 대기 중인 작업을 검토합니다(있는 경우).
  3. 봇을 선택하면, 봇 게시 페이지가 다음 추가 정보와 함께 표시됩니다
    • 대화 작업 세부 정보 – 이름, 지원되는 언어 및 버전
    • 자연어 설정
    • 채널(게시 활성화됨)
    • API 확장(있는 경우 설정됨)
    • 설정
    • 게시 의견(개발자가 입력함)
  4. 검토 후 다음 버튼을 클릭합니다. 업데이트 승인을 기다리는 봇의 경우, 다음 버튼 대신 게시 버튼이 표시됩니다.
  5. 플랜 선택 대화 상자가 표시됩니다. 엔터프라이즈 플랜 고객의 경우, 이 대화 상자가 표시되지 않고 봇이 바로 게시됩니다. 참고 사항: 이 흐름은 제품의 버전 7.0에서 도입되었습니다.
  6. 봇의 요구 사항에 따라 플랜을 선택합니다.
  7. 다음 버튼을 클릭하면 선택한 플랜에 대해 결제할 수 있는 타사 결제 대화 상자로 이동됩니다
  8. 결제에 성공하면, 봇 승인: 성공 대화 상자가 표시됩니다.
  9. 계속을 클릭합니다. 승인된 봇에 지정된 배포 모델 유형에 따라 엔터프라이즈 봇 또는 소비자 봇 페이지가 표시됩니다.

작업이 승인되고 배포된 후, 고객은 소비자용으로 설정된 배포 모델을 사용한 봇을 사용할 수 있습니다. 그러나, 봇 관리자가 봇 관리자 콘솔의 봇 관리 모듈에 있는 엔터프라이즈 봇 페이지에서 사용자 또는 그룹에 작업을 할당할 때까지 엔터프라이즈 사용자는 작업을 아직 사용할 수 없습니다. 자세한 내용은, 배포된 엔터프라이즈 봇 관리 또는 배포된 고객 봇 관리를 참조하세요.

봇 거부 방법

회사의 직원 또는 고객이 사용하는 봇을 승인하지 않기로 결정할 수 있습니다. 업데이트를 위해 봇을 개발자에게 반환하려면, 이유를 언급하며 봇을 거부할 수 있습니다. 봇을 거부하면, 배포 요청 페이지에서 제거되고, 봇 빌더 도구에서, 작업 상태가 게시됨에서 구성됨으로 변경됩니다. 그런 다음 개발자가 변경 사항을 적용하고 승인을 위해 봇을 다시 게시할 수 있습니다.

  1. 봇 관리 모듈의 배포 요청 페이지에서, 승인하려는 봇 위에 마우스를 올리고 거부 및 게시 아이콘을 확인합니다.
  2. 선택적으로, 봇 세부 정보를 클릭하여 봇 세부 정보를 확인하고 거부 버튼을 클릭합니다.
  3. 봇 거부 대화 상자가 표시됩니다.
  4. 거부하려는 작업을 선택하거나 선택 취소한 다음, 이유 제공 텍스트 필드에, 작업을 거부하는 이유를 입력합니다.
  5. 거부를 클릭합니다.

봇이 성공적으로 거부됨 메시지가 페이지 상단에 표시되고, 봇은 배포 요청 페이지에서 제거됩니다.

엔터프라이즈 봇 관리

봇 관리자 콘솔의 봇 관리 모듈에 있는 엔터프라이즈 봇 페이지에서는, 배포 요청 페이지에서 배포된 봇과 봇 관리자가 승인한 봇 작업을 관리할 수 있습니다. 배포 모델이 엔터프라이즈로 설정된 승인된 봇만 엔터프라이즈 봇 페이지에 표시됩니다. 다음 그림은 봇 관리 모듈의 엔터프라이즈 봇 페이지의 예입니다.

엔터프라이즈 봇 열

다음 목록은 각 엔터프라이즈 봇에 대해 표시되는 열을 설명합니다.

설명
봇 이름 사용자가 생성한 봇 이름을 표시합니다.
게시자 이 봇을 게시한 개발자 이름을 표시합니다.
봇 유형 봇 유형을 표시합니다. 표준, 범용 등 중 하나입니다.
채널 봇이 접근할 수 있는 채널을 표시합니다.

액션 바 정보

이 섹션에서는 액션 바에서 사용할 수 있는 명령을 설명합니다.

정렬 기준 사용

회사는 수많은 작업을 자동화하기 위해 많은 수의 봇을 보유할 수 있습니다. 봇 이름을 기준으로 봇 목록을 쉽게 정렬할 수 있습니다. 기본적으로, 마지막으로 생성된 봇이 상단에 표시됩니다. 봇을 정렬하려면, 정렬 기준 드롭다운 목록에서, 봇 이름을 선택하여 가나다순으로 봇 목록을 봅니다. 정렬을 제거하려면, 정렬 기준 드롭다운 목록에서, 없음을 선택합니다.

검색 필드 사용

관리자 콘솔 테이블의 항목 목록은 회사의 크기에 따라 매우 클 수 있습니다. 예: 사용자 또는 장소 목록. 검색 필드에서 하나 이상의 특정 사용자, 그룹 또는 장소를 찾으려면, 최소 세 개의 문자를 입력하여 원하는 형식으로 찾기를 시작하거나, 검색 시작으로 돌아갑니다. 예를 들어, ra를 입력하면 다음 그림과 같이 ra  문자가 포함된 모든 항목이 표시됩니다.

참고 사항: 검색 질의에서 검색어 수에는 제한이 없지만, 각 검색어의 첫 20자 이하가 검색 결과를 반환하는 데 사용됩니다.

모든 항목을 보려면, 검색 필드를 지운 다음, Enter 키를 누릅니다.

사용자 할당

사용자가 배포된 봇에 접근할 수 있도록 하려면, 봇 관리자가 사용자를 봇에 할당해야 합니다. 다음 절차의 단계를 완료하여 봇을 생성하고 정의한 개발자가 엔터프라이즈로 설정한 배포 모델을 사용하여 배포된 봇에 사용자를 할당합니다.

  1. 봇 관리 모듈의 엔터프라이즈 봇 페이지에서, 사용자를 할당하려는 봇의 줄임표 아이콘을 클릭한 다음, 봇 및 작업 할당을 클릭합니다. 봇 및 작업 할당 대화 상자가 다음 그림과 같이 표시됩니다.

    BotsAdminEnterpriseBotTaskAssign

  2. 모든 사용자에 대해 봇을 비활성화하려면, 할당 없음을 클릭하고, 그렇지 않으면, 봇 작업 할당을 클릭합니다. 봇에 대해 승인된 작업이 표시됩니다. 기본적으로, 작업은 사용자에게 할당되지 않습니다.
  3. 작업을 할당하려면, 사용자를 할당할 작업에 대해 확장 BotsAdminExpandRight 아이콘을 클릭합니다. <작업 이름> 대화 작업이 표시됩니다. 다음 중 하나를 선택합니다.
    • 엔터프라이즈의 모든 사용자 – 현재 모든 사용자 및 추가된 향후 사용자는 이 봇의 작업에 접근할 수 있습니다.
    • 사용자 그룹 할당 – 클릭하여 그룹에 할당 대화 상자를 엽니다. 그룹 이름 열에서 추가하려는 그룹을 선택한 다음, 완료를 클릭합니다. 자세한 내용은, 다음을 참조하세요.
    • 개별 사용자 할당 – 클릭하여 사용자에 할당 대화 상자를 엽니다. 이름 열에서 추가하려는 사용자를 선택한 다음, 완료를 클릭합니다.
  4. 완료를 클릭합니다.
  5. < 작업 이름 > 대화 상자에서, 완료를 클릭합니다.
  6. 봇 할당 성공 확인 대화 상자에서, 적용을 클릭합니다.

봇 설정

봇 관리자는 고객에게 배포된 봇을 관리해야 합니다. 봇 설정에서는, 배포 모델 유형을 확인하고, 고객이 봇에 접근하기 위해 사용할 수 있는 채널을 추가 또는 제거하고, 봇 배포에 대한 이메일 알림을 보내고, 필요한 경우, 봇 변경 요청 승인을 위해 봇을 게시한 개발자에게 이메일을 보낼 수 있습니다. 봇 관리 모듈의 엔터프라이즈 봇 페이지에서, 봇 설정을 수정하려는 봇의 줄임표 아이콘을 클릭한 다음, 봇 설정을 클릭합니다. 봇 설정 대화 상자가 다음 그림과 같이 표시됩니다.

BotsAdminBotEnterprisePageBotSettingsDialog

봇 설정 관리 방법

  1. 자동 승인 설정 – 자동 승인 대화 상자가 표시됩니다. 선택할 수 있는 세 가지 설정은 다음과 같습니다.
    • 이 봇에 대한 어떠한 게시 요청도 승인하지 않습니다 – 이 봇에서 향후 게시는 모두 관리자의 승인이 필요합니다
    • 이 봇에 대한 모든 게시 요청을 자동으로 승인합니다 – 이 봇에서 향후 게시는 모두 자동으로 승인됩니다
    • 게시 요청에 관리자의 승인이 필요한 다른 모든 요청에 대해 다음 구성 요소만 포함되는 경우 자동으로 승인합니다.
      • 새 채널 – 채널이 추가된 봇을 자동으로 승인합니다.
      • 새 작업 – 새 작업이 게시될 때 자동으로 봇을 승인합니다.
      • 채널 업그레이드 – 기존 승인된 채널이 업그레이드될 때 자동으로 봇을 승인합니다.
      • 작업 업그레이드 – 기존 작업이 업그레이드될 때 봇을 자동으로 승인합니다.
  2. 배포 모델 – 읽기 전용 배포 유형, 엔터프라이즈 사용 또는 자세한 내용을 보려면, 엔터프라이즈 사용을 클릭합니다.
  3. 승인된 채널승인된 채널 대화 상자가 표시됩니다. 사용자가 사용할 수 있는 봇에 대해 정의된 하나 이상의 채널을 선택하거나 선택 취소한 다음, 완료를 클릭합니다. 하나 이상의 채널이 활성화되어 있어야 합니다.
  4. 각 봇 사용자에게 봇의 변경 사항을 알리는 이메일을 보내려면 할당된 사용자에게 이메일을 통해 알림을 선택합니다.
  5. 봇 개발자( < 개발자 이름 > )에게 이메일 보내기를 클릭하여 기본 메일 애플리케이션을 열어 봇 개발자에게 이메일 메시지를 보냅니다.
  6. 적용을 클릭하여 변경 사항을 저장합니다.

봇 소유자 변경

봇 소유권을 변경할 수 있습니다. 이를 위해서는 다음을 수행해야 합니다.

  1. 현재 소유자에게 새 역할 할당 및
  2. 개발자 목록에서 새 소유자 선택.

봇 작업 관리

개발자가 계정에 게시된 봇을 승인하고 배포한 후, 작업을 일시 중지할 수 있습니다.

일시 중지된 작업 정보

봇 관리자 콘솔에서 작업을 일시 중지하면, 최종 사용자는 봇에서 해당 작업을 접근할 수 없습니다. 봇은 알림을 보내지 않고 조치 요청에도 응답하지 않으며, 작업에 설정된 모든 사용자에게 작업이 일시적으로 중지되었다는 알림을 보냅니다. 작업이 활성으로 다시 설정되면, 경고는 모든 사용자에게도 알림이 전송됩니다. 작업이 일시 중단된 동안, 개발자는 봇 빌더에서 여전히 작업에 접근할 수 있고 업그레이드를 생성하고 게시할 수 있지만, 봇 관리자가 상태를 명시적으로 다시 활성으로 변경할 때까지 봇 작업은 일시 중단된 상태로 유지됩니다. 승인된 봇에 대한 작업을 배포하거나 일시 중단하려면 다음 절차의 단계를 완료합니다.

  1. 봇 관리 모듈의 엔터프라이즈 봇 페이지에서, 배포된 작업을 수정하려는 봇의 줄임표 아이콘을 클릭한 다음, 봇 작업 관리를 클릭합니다. 봇 작업 관리 대화 상자가 다음 그림과 같이 표시됩니다.
    BotsAdminBotEnterprisePageManageBotTasksDialog
  2. 봇 작업 필드에서, 확장  아이콘을 클릭하여 사용 가능한 작업과 배포된 작업을 표시합니다. 봇 작업 대화 상자가 다음 예시에 보이는 대로 표시됩니다.
    BotsAdminBotEnterprisePageManageBotTasks2Dialog
  3. 작업을 배포하거나 일시 중단하려는 작업의 체크 박스를 선택하거나 선택 취소한 다음, 확인을 클릭합니다.
  4. 봇 작업 관리 대화 상자에서, 확인을 클릭합니다.

봇 상태가 성공적으로 변경됨 메시지가 페이지의 상단에 표시됩니다.

소비자 봇 관리

봇 관리자 콘솔의 봇 관리 모듈에 있는 소비자 봇 페이지에서는, 배포 요청 페이지에서 배포된 봇과 봇 관리자가 승인한 봇 작업을 관리할 수 있습니다. 배포 모델이 소비자로 설정된 승인된 봇만 소비자 봇 페이지에 표시됩니다. 배포 모델이 엔터프라이즈로 설정된 승인된 봇을 관리하려면, 엔터프라이즈 봇 관리를 참조하세요. 다음 그림은 봇 관리 모듈의 소비자 봇 페이지의 예입니다.

소비자 봇 페이지에서, 채널 및 이메일 설정과 같은 봇 설정을 검토 및 수정하고, 봇에 대해 승인된 작업을 관리할 수 있습니다.

소비자 봇 열

다음 목록은 각 소비자 봇에 대해 표시되는 열을 설명합니다.

설명
봇 이름 사용자가 생성한 봇 이름을 표시합니다.
게시자 이 봇을 생성했거나 소유한 개발자 이름을 표시합니다.
봇 유형 봇 유형을 표시합니다. 표준, 범용 등 중 하나입니다.
채널 사용자가 봇에 접근할 수 있는 채널을 표시합니다.
플랜 유형 봇이 게시되어 있는 플랜입니다.

액션 바 정보

이 섹션에서는 액션 바에서 사용할 수 있는 명령을 설명합니다.

정렬 기준 사용

회사는 수많은 작업을 자동화하기 위해 많은 수의 소비자 봇을 보유할 수 있습니다. 봇 이름을 기준으로 봇 목록을 쉽게 정렬할 수 있습니다. 기본적으로, 봇은 생성 날짜의 내림차순으로 정렬됩니다. 봇을 정렬하려면, 정렬 기준 드롭다운 목록에서, 봇 이름의 옵션을 선택하면 가나다순으로 목록이 표시됩니다. 정렬을 제거하려면, 정렬 기준 드롭다운 목록에서, 없음을 선택합니다.

검색 필드 사용

관리자 콘솔 테이블의 항목 목록은 회사의 크기에 따라 매우 클 수 있습니다. 예: 사용자 또는 장소 목록. 검색 필드에서 하나 이상의 특정 사용자, 그룹 또는 장소를 찾으려면, 최소 세 개의 문자를 입력하여 원하는 형식으로 찾기를 시작하거나, 검색 시작으로 돌아갑니다.

참고 사항: 검색 질의에서 검색어 수에는 제한이 없지만, 각 검색어의 첫 20자 이하가 검색 결과를 반환하는 데 사용됩니다.

모든 항목을 보려면, 검색 필드를 지운 다음, Enter 키를 누릅니다.

봇 설정

봇 관리자는 고객에게 배포된 봇을 관리해야 합니다. 봇 설정에서는, 배포 모델 유형을 확인하고, 고객이 봇에 접근하기 위해 사용할 수 있는 채널을 추가 또는 제거하고, 필요한 경우, 봇 변경 요청 승인을 위해 봇을 게시한 개발자에게 이메일을 보낼 수 있습니다.

  1. 봇 관리 모듈의 소비자 봇 페이지에서, 봇 설정을 수정하려는 봇의 줄임표 아이콘을 클릭한 다음, 봇 설정을 클릭합니다.
  2. 봇 설정 대화 상자가 다음 그림과 같이 표시됩니다.
    BotsAdminBotConsumerPageBotSettingsDialog
  3. 자동 승인 설정 – 자동 승인 대화 상자가 표시됩니다. 선택할 수 있는 세 가지 설정은 다음과 같습니다.
    • 이 봇에 대한 어떠한 게시 요청도 승인하지 않습니다 – 이 봇에서 향후 게시는 모두 관리자의 승인이 필요합니다
    • 이 봇에 대한 모든 게시 요청을 자동으로 승인합니다 – 이 봇에서 향후 게시는 모두 자동으로 승인됩니다
    • 게시 요청에 관리자의 승인이 필요한 다른 모든 요청에 대해 다음 구성 요소만 포함되는 경우 자동으로 승인합니다.
      • 새 채널 – 채널이 추가된 봇을 자동으로 승인합니다.
      • 새 작업 – 새 작업이 게시될 때 자동으로 봇을 승인합니다.
      • 채널 업그레이드 – 기존 승인된 채널이 업그레이드될 때 자동으로 봇을 승인합니다.
      • 작업 업그레이드 – 기존 작업이 업그레이드될 때 봇을 자동으로 승인합니다.
  4. 배포 모델 필드에서, 읽기 전용 배포 유형, 소비자용 또는 자세한 내용을 보려면, 소비자용을 클릭합니다.
  5. 승인된 채널 필드에서는, 사용 가능하거나 배포된 채널을 보고 수정할 수 있습니다. 확장 BotsAdminExpandRight 아이콘을 클릭하여 승인된 채널 대화 상자를 표시합니다. 사용자가 사용할 수 있는 봇에 대해 정의된 하나 이상의 채널을 선택하거나 선택 취소한 다음, 완료를 클릭합니다. 하나 이상의 채널이 활성화되어 있어야 합니다.
  6. 봇 개발자( < 개발자 이름 > )에게 이메일 보내기를 클릭하여 기본 메일 애플리케이션을 열어 봇 개발자에게 이메일 메시지를 보냅니다.
  7. 적용을 클릭하여 변경 사항을 저장합니다.

봇 소유자 변경

봇 소유권을 변경할 수 있습니다. 이를 위해서는 다음을 수행해야 합니다.

  1. 현재 소유자에게 새 역할 할당 및
  2. 개발자 목록에서 새 소유자 선택.

봇 작업 관리

개발자가 계정에 게시된 봇을 승인하고 배포한 후, 작업을 일시 중지하거나 일시 중지된 작업을 다시 배포하거나 개발자가 게시한 비활성 작업을 활성화할 수 있습니다.

일시 중지된 작업 정보

봇 관리자 콘솔에서 작업을 일시 중지하면, 최종 사용자는 봇의 작업에 접근할 수 없습니다. 봇을 알림을 보내지 않고 조치 요청에도 응답하지 않으며, 작업에 설정된 모든 사용자에게 작업이 일시적으로 중지되었다는 알림을 보냅니다. 작업이 활성으로 다시 설정되면, 경고는 모든 사용자에게도 알림이 전송됩니다. 작업이 일시 중단된 동안, 개발자는 봇 빌더에서 여전히 작업에 접근할 수 있고 업그레이드를 생성하고 게시할 수 있지만, 봇 관리자가 상태를 명시적으로 다시 활성으로 변경할 때까지 봇 작업은 일시 중단된 상태로 유지됩니다. 승인된 봇에 대한 작업을 배포하거나 일시 중단하려면 다음 절차의 단계를 완료합니다.

  1. 봇 관리 모듈의 소비자 봇 페이지에서, 배포된 작업을 수정하려는 봇의 줄임표 아이콘을 클릭한 다음, 봇 작업 관리를 클릭합니다. 봇 작업 관리 대화 상자가 다음 그림과 같이 표시됩니다.

    BotsAdminBotConsumerPageBotManageBotTasksDialog

  2. 봇 작업 필드에서, 확장 BotsAdminExpandRight 아이콘을 클릭하여 사용 가능한 작업과 배포된 작업을 표시합니다. 봇 작업 대화 상자가 다음 예시에 보이는 대로 표시됩니다.
    BotsAdminBotConsumerPageBotTasksDialog
  3. 작업을 일시 중단하거나 작업을 배포하려는 작업의 체크 박스를 선택하거나 선택 취소한 다음, 확인을 클릭합니다.
  4. 봇 작업 관리 대화 상자에서, 확인을 클릭합니다.

봇 상태가 성공적으로 변경됨 메시지가 페이지의 상단에 표시됩니다.

봇 플랜

구독된 플랜을 확인하고 필요한 경우 변경할 수 있습니다. 자세한 내용은 여기를 참조하세요.

스마트 봇 관리

봇 관리자 콘솔의 봇 관리 모듈에 있는 스마트 봇 페이지에서는, 배포 요청 페이지에서 배포된 봇과 봇 관리자가 승인한 봇 작업을 관리할 수 있습니다. 승인된 스마트 봇만 스마트 봇 페이지에 표시됩니다. 다음 그림은 봇 관리 모듈의 스마트 봇 페이지의 예입니다.


스마트 봇 페이지에서, 채널 및 이메일 설정과 같은 봇 설정을 검토 및 수정하고, 봇에 대해 승인된 작업을 관리할 수 있습니다.

스마트 봇 열

다음 목록은 각 스마트 봇에 대해 표시되는 열을 설명합니다.

설명
봇 이름 사용자가 생성한 봇 이름을 표시합니다.
게시자 이 봇을 생성한 개발자 이름을 표시합니다.
작업 봇의 작업 수입니다.
채널 봇에 접근할 수 있는 채널을 표시합니다.

액션 바 정보

이 섹션에서는 액션 바에서 사용할 수 있는 명령을 설명합니다.

정렬 기준 사용

회사는 수많은 작업을 자동화하기 위해 많은 수의 스마트 봇을 보유할 수 있습니다. 봇 이름을 기준으로 봇 목록을 쉽게 정렬할 수 있습니다. 기본적으로, 봇은 생성 날짜의 내림차순으로 정렬됩니다. 봇을 정렬하려면, 정렬 기준 드롭다운 목록에서, 봇 이름의 옵션을 선택하면 가나다순으로 목록이 표시됩니다. 정렬을 제거하려면, 정렬 기준 드롭다운 목록에서, 없음을 선택합니다.

검색 필드 사용

관리자 콘솔 테이블의 항목 목록은 회사의 크기에 따라 매우 클 수 있습니다. 예: 사용자 또는 장소 목록. 검색 필드에서 하나 이상의 특정 사용자, 그룹 또는 장소를 찾으려면, 최소 세 개의 문자를 입력하여 원하는 형식으로 찾기를 시작하거나, 검색 시작으로 돌아갑니다.

참고 사항: 검색 질의에서 검색어 수에는 제한이 없지만, 각 검색어의 첫 20자 이하가 검색 결과를 반환하는 데 사용됩니다.

모든 항목을 보려면, 검색 필드를 지운 다음, Enter 키를 누릅니다.

봇 설정

봇 관리자는 고객에게 배포된 봇을 관리해야 합니다. 봇 설정에서는, 고객이 봇에 접근하기 위해 사용할 수 있는 채널을 추가 또는 제거하고, 필요한 경우, 봇 변경 요청을 위해 개발자에게 이메일을 보낼 수 있습니다.

  1. 봇 관리 모듈의 스마트 봇 페이지에서, 봇 설정을 수정하려는 봇의 줄임표 아이콘을 클릭한 다음, 봇 설정을 클릭합니다. 봇 설정 대화 상자가 표시됩니다.
  2. 자동 승인 필드에서, 자동 승인 설정을 설정할 수 있습니다. 선택할 수 있는 세 가지 설정은 다음과 같습니다.
    • 이 봇에 대한 어떠한 게시 요청도 승인하지 않습니다 – 이 봇에서 향후 게시는 모두 관리자의 승인이 필요합니다
    • 이 봇에 대한 모든 게시 요청을 자동으로 승인합니다 – 이 봇에서 향후 게시는 모두 자동으로 승인됩니다
    • 게시 요청에 관리자의 승인이 필요한 다른 모든 요청에 대해 다음 구성 요소만 포함되는 경우 자동으로 승인합니다.
      • 새 채널 – 채널이 추가된 봇을 자동으로 승인합니다.
      • 새 작업 – 새 작업이 게시될 때 자동으로 봇을 승인합니다.
      • 채널 업그레이드 – 기존 승인된 채널이 업그레이드될 때 자동으로 봇을 승인합니다.
      • 작업 업그레이드 – 기존 작업이 업그레이드될 때 봇을 자동으로 승인합니다.
  3. 승인된 채널 필드에서는, 사용 가능하거나 배포된 채널을 보고 수정할 수 있습니다. 확장 BotsAdminExpandRight 아이콘을 클릭하여 승인된 채널 대화 상자를 표시합니다. 사용자가 사용할 수 있는 봇에 대해 정의된 하나 이상의 채널을 선택하거나 선택 취소한 다음, 완료를 클릭합니다. 봇을 승인하려면, 하나 이상의 채널이 활성화되어 있어야 합니다.
  4. 봇 개발자( < 개발자 이름 > )에게 이메일 보내기를 클릭하여 기본 메일 애플리케이션을 열어 봇 개발자에게 이메일 메시지를 보냅니다.
  5. 적용을 클릭하여 변경 사항을 저장합니다.

봇 소유자 변경

봇 소유권을 변경할 수 있습니다. 이를 위해서는 다음을 수행해야 합니다.

  1. 현재 소유자에게 새 역할 할당 및
  2. 개발자 목록에서 새 소유자 선택.

봇 작업 관리

개발자가 계정에 게시된 봇을 승인하고 배포한 후, 작업을 일시 중지하거나 일시 중지된 작업을 다시 배포하거나 개발자가 게시한 비활성 작업을 활성화할 수 있습니다.

일시 중지된 작업 정보

봇 관리자 콘솔에서 작업을 일시 중지하면, 최종 사용자는 봇의 작업에 접근할 수 없습니다. 봇을 알림을 보내지 않고 조치 요청에도 응답하지 않으며, 작업에 설정된 모든 사용자에게 작업이 일시적으로 중지되었다는 알림을 보냅니다. 작업이 활성으로 다시 설정되면, 경고는 모든 사용자에게도 알림이 전송됩니다. 작업이 일시 중단된 동안, 개발자는 봇 빌더에서 여전히 작업에 접근할 수 있고 업그레이드를 생성하고 게시할 수 있지만, 봇 관리자가 상태를 명시적으로 다시 활성으로 변경할 때까지 봇 작업은 일시 중단된 상태로 유지됩니다. 승인된 봇에 대한 작업을 배포하거나 일시 중단하려면 다음 절차의 단계를 완료합니다.

  1. 봇 관리 모듈의 스마트 봇 페이지에서, 배포된 작업을 수정하려는 봇의 줄임표 아이콘을 클릭한 다음, 봇 작업 관리를 클릭합니다.
  2. 봇 작업 관리 대화 상자가 표시됩니다.
  3. 봇 작업 필드에서, 확장 BotsAdminExpandRight 아이콘을 클릭하여 사용 가능한 작업과 배포된 작업을 표시합니다. 봇 작업 대화 상자가 다음 예시에 보이는 대로 표시됩니다.
  4. 작업을 일시 중단하거나 작업을 배포하려는 작업의 체크 박스를 선택하거나 선택 취소한 다음, 확인을 클릭합니다.
  5. 봇 작업 대화 상자에서, 확인을 클릭합니다.

봇 상태가 성공적으로 변경됨 메시지가 페이지의 상단에 표시됩니다.

봇 플랜

구독된 플랜을 확인하고 필요한 경우 변경할 수 있습니다. 자세한 내용은 여기를 참조하세요.

기본 설정

봇 관리자 콘솔의 봇 관리 모듈에 있는 기본 설정 페이지에서, 봇을 배포하고 엔터프라이즈에서 관리되는 사용자에게 봇 작업을 할당하는 관리자 승인 프로세스를 관리할 수 있습니다. 엔터프라이즈 개발자가 봇 또는 봇 작업을 게시한 후 봇을 승인한 다음, 관리되는 사용자에게 해당 봇을 할당해야 합니다. 이 페이지에서, 엔터프라이즈 수준에서 모든 봇에 대한 승인 및 봇 작업 할당 프로세스를 자동화할 수 있습니다. 봇 수준에서 자동 승인 설정을 정의할 수도 있습니다. 다음 그림은 봇 관리 모듈의 기본 설정 페이지의 예입니다.
봇 관리 기본 설정 페이지 기본적으로, 봇 관리자는 엔터프라이즈 개발자가 게시한 봇을 승인하고 할당해야 합니다. 배포 요청 자동화 방법:

  1. 배포 요청 섹션에서, 모든 새 배포 요청 자동 승인을 클릭합니다. 배포 요청이 자동으로 승인되면, 엔터프라이즈 봇 할당 섹션을 사용할 수 있습니다.
  2. 저장을 클릭합니다.

봇 할당 자동화 방법

참고 사항: 배포 요청이 자동화되도록 설정되지 않으면 봇 할당을 설정할 수 없습니다.

  1. 엔터프라이즈 봇 할당 섹션에서, 승인된 모든 봇, 작업 및 채널 자동으로 할당을 클릭합니다.
  2. 저장을 클릭합니다.

배포 요청 및 봇 할당이 자동화되면, 엔터프라이즈 개발자가 봇 또는 봇 작업을 게시한 후 바로 새 봇과 봇 작업이 관리된 사용자에게 할당됩니다.

ボット管理コンソールのボット管理モジュールでは、Kore.aiボットビルダーツールから会社の開発者が開発したボットをデプロイできます。開発者がボットを開発するとき、ボット管理セクションからボット管理者による承認と展開のための公開ができます。このセクションから、次のことができます

  • デプロイ承認のために送信されたカスタムボットを承認または拒否
  • ボット用に定義されたタスクの一部またはすべてをデプロイ
  • ボットがエンタープライズ用に定義されている場合は従業員用に、またはボットがコンシューマー用に定義されている場合は会社の顧客用に、デプロイされたボットをユーザーまたは社内のユーザーグループに割り当てます。

ボットのデプロイ

ボット管理者はボットの権限と消費を管理できます。開発者がKore.aiボットビルダーツールからKore.aiボットストアのエンタープライズページにカスタムボットを公開すると、ボットが展開リクエストページに表示されます。ボットを承認しエンタープライズ用またはコンシューマー用として定義されたボット展開タイプに応じて、そのボットを1人以上のユーザー、または会社の顧客に割り当てるまで、社内のユーザーはボットを使用できません。 ボットがボット管理モジュールの設定ページでボット管理者によって自動承認されるように設定されている場合、開発者によって公開されるとこれらのボットはすぐに承認および展開され、展開要求ページには表示されません。詳細はボットの設定管理をご確認ください。

デプロイページの制御

デプロイリクエストページに表示されるボットごとに、次の情報とコントロールが表示されます。

  • ボットアイコンボットストアでボットを識別するためにクライアントのエンドユーザーに表示されるアイコン。
  • ボット名―ボットの名前。
  • ボットタイプ―ボットのタイプ―標準、ユニバーサルなど。
  • タスク―ボット内のタスクの数
  • バージョン―デプロイするボットのタイプ。以下のうちの一つ:
    • 新規―これまでにデプロイされたことのない新しいボット。
    • アップグレード―以前にデプロイされ、アップグレードが終わりデプロイの準備ができたボット。
  • 目的―ボットの対象読者に応じ次のいずれかに該当します:
    • コンシューマー用―企業の顧客およびコンシューマー向け。
    • エンタープライズ用―エンタープライズの特定の管理対象ユーザー向け。
  • 要求者―承認のためにボットを送信する開発者の名前。
  • 要求日―開発者がボットを承認のために提出した日付。
  • 行にカーソルを合わせると表示されるアイコンを拒否または公開します。

ボットを承認する

  1. ボット管理モジュールのデプロイメントリクエストページで、承認するボットにカーソルを合わせ、OKアイコンをクリックします。
  2. 必要に応じて、ボットをクリックして、このボットに承認待ちのタスクがある場合はそれをレビューします。
  3. ボットを選択すると、ボットの公開ページが次の追加情報とともに表示されます
    • ダイアログタスクの詳細―名前、サポートされている言語、バージョン
    • 自然言語の構成
    • 公開可能なチャンネル
    • 構成されているAPI拡張機能(存在する場合)
    • 設定
    • 開発者が入力したコメントを公開する
  4. 次へボタンをレビューしてクリックします。更新の承認を待っているボットの場合、「次へ」ではなく公開ボタンが表示されます。
  5. プランの選択ダイアログが表示されます。エンタープライズプラン顧客の場合このダイアログは表示されず、ボットは直接公開されます。メモ:このフローは製品のバージョン7.0で導入されました。
  6. ボットのニーズに応じてプランを選択してください。
  7. 次へボタンをクリックすると、選択したプランの支払いを行うことができるサードパーティの支払いダイアログに移動します
  8. 支払いが成功すると、ボットの承認は次のようになります:成功ダイアログが表示されます。
  9. 続行をクリックします承認されたボットに指定されたデプロイメントモデルタイプに応じて、エンタープライズボットまたはコンシューマーボットページが表示されます。

タスクが承認されてデプロイされると、デプロイメントモデルがコンシューマー用に設定されたボットを、ボット顧客が利用できるようになります。ただし、ボット管理者がボット管理コンソールのボット管理モジュールエンタープライズボットページでユーザーまたはグループにタスクを割り当てるまで、エンタープライズユーザーはタスクを利用できません。詳細については、デプロイされたエンタープライズボットの管理またはデプロイされたコンシューマーボットの管理を参照してください。

ボットを拒否する

会社の従業員または顧客が使用するボットを承認しないと決めることができます。更新のためにボットを開発者に返します、理由を述べてボットを拒否することができます。ボットを拒否すると、そのボットはデプロイメントリクエストページから削除され、ボットビルダーツールでタスクのステータスが「公開済」みから「構成済」みに変更されます。その後、開発者は変更を加えて、承認のためにボットを再公開できます。

  1. ボット管理モジュールのデプロイメントリクエストページで、拒否するボットにカーソルを合わせると、拒否アイコンと公開アイコンが表示されます。
  2. 必要に応じて、ボットの詳細をクリックしてボットの詳細を表示し、拒否ボタンをクリックします。
  3. ボットを却下ダイアログが表示されます。
  4. 拒否するタスクを選択またはクリアしてから、理由の提供テキストフィールドに、タスクを拒否する理由を入力します。
  5. 拒否をクリックします。

ボットが正常に拒否されたというメッセージがページの上部に表示され、ボットがデプロイメントリクエストページから削除されます

エンタープライズボットを管理

ボット管理コンソールのボット管理モジュールのエンタープライズボットページでは、デプロイメントリクエストページでボット管理者によって承認された、展開されたボットとボットタスクを管理できます。エンタープライズボットページには、デプロイメントモデルがエンタープライズとして設定されている承認済みのボットのみが表示されます。次のイラストは、ボット管理モジュールのエンタープライズボットページの例です。

エンタープライズボット列

次のリストは、各エンタープライズボットに対して表示される列について説明しています。

説明
ボット名 ユーザーが作成したボットの名前を表示します。
発行元 このボットを公開した開発者の名前を表示します。
ボット タイプ ボットのタイプを表示します。スタンダード、ユニバーサルなどのいずれか。
チャネル ボットにアクセスできるチャネルを表示します。

アクションバーについて

このセクションでは、アクションバーで使用できるコマンドについて説明します。

並べ替えの使用

企業は、多くのタスクを自動化するために多数のボットを持つことができます。ボットリストはボット名で簡単に並べ替えることができます。デフォルトでは、最後に作成されたボットが上部に表示されます。ボットを並べ替えるには、並べ替えプルダウンリストでボット名を選択して、名前のアルファベット順にボットのリストを表示します。並べ替えを削除するには、並べ替えプルダウンリストでなしを選択します。

検索フィールドの使用

管理コンソールテーブルのエントリリストは、ユーザーやスペースのリストなど、会社の規模によっては非常に大きくなる場合があります。1つ以上の特定のユーザー、グループ、またはスペースを検索するには、検索フィールドに少なくとも3文字を入力して入力どおりに検索を開始するか、リターンキーを押して検索を開始します。たとえば、raと入力すると、次のイラストに示すように、ra という文字を含むエントリが表示されます。

メモ:検索クエリ内の検索語の数に制限はありませんが、検索結果を返すために使用されるのは、各検索語の最初の20文字以内です。

すべてのエントリを表示するには、検索フィールドをクリアしてから、エンターキーを押します。

ユーザーの割り当て

ユーザーがデプロイされたボットにアクセスできるようにするには、ボット管理者がユーザーをボットに割り当てる必要があります。次の手順のステップを実行して、ボットを作成および定義した開発者がユーザーをデプロイメントモデルをエンタープライズとして設定したデプロイ済みボットに割り当てます。

  1. ボット管理モジュールのエンタープライズボットページで、ユーザーを割り当てるボットの省略記号アイコンをクリックしてから、ボットとタスクの割り当てをクリックします。次のイラストのようにボットとタスクの割り当てダイアログが表示されます。
    BotsAdminEnterpriseBotTaskAssign
  2. すべてのユーザーに対してボットを無効にするには、割り当てなしをクリックします。それ以外の場合は、ボットのタスクの割り当てをクリックします。ボットの承認済みタスクが表示されます。デフォルトでは、タスクはどのユーザーにも割り当てられていません。
  3. タスクを割り当てるには、ユーザーを割り当てるタスクの展開BotsAdminExpandRightアイコンをクリックします。“タスク名”ダイアログが表示されます。次のいずれかを選択します:
    • エンタープライズ内のすべてのユーザー―現在のすべてのユーザー、および追加される将来のユーザーは、このボットのこのタスクにアクセスできます。
    • ユーザーグループの割り当て―クリックしてグループへの割り当てダイアログを開きます。グループ名列で追加するグループを選択し、完了をクリックします。詳細については、次を参照してください
    • 個々のユーザーの割り当て―クリックしてユーザーに割り当てダイアログを開きます。名前列で追加するユーザーを選択し、完了をクリックします。
  4. 完了をクリックします。
  5. タスク名”ダイアログで、完了をクリックします。
  6. ボット割り当ての成功確認ダイアログで、適用をクリックします。

ボットの設定

ボット管理者は顧客に対してデプロイされたボットを管理する必要があります。ボット設定から、展開モデルタイプを表示し、顧客がボットにアクセスするために使用できるチャネルを追加または削除し、ボット展開のメール通知を送信し、必要に応じて、承認のためにボットを公開した開発者にメールを送信できます。たとえば、ボットへの変更をリクエストします。ボット管理モジュールのエンタープライズボットページで、ボットの設定を修正したいボットの省略記号アイコンをクリックしてから、ボットの設定をクリックします。次のイラストのようにボットの設定ダイアログが表示されます。
BotsAdminBotEnterprisePageBotSettingsDialog

ボット設定を管理するには

  1. 自動承認設定自動承認ダイアログが表示されます。選択できる設定は3つあります:
    • このボットの公開リクエストを承認しない―このボットからの今後のすべての公開には、管理者による承認が必要です
    • このボットのすべての公開リクエストを自動承認―このボットからの今後の公開はすべて自動的に承認されます
    • 公開リクエストに、管理者が承認する必要のある他のすべてのリクエストに次のコンポーネントのみが含まれている場合は、自動承認します。
      • 新しいチャンネル―チャンネルのボットが追加されたことを自動的に承認します。
      • 新しいタスク―新しいタスクが公開されると、ボットを自動的に承認します。
      • チャネルのアップグレード―既存の承認済みチャネルがアップグレードされると、ボットが自動的に承認されます。
      • タスクのアップグレード―既存のタスクがアップグレードされると、ボットが自動的に承認されます。
  2. デプロイメントモデル―読み取り専用の展開タイプ、エンタープライズでの使用、または詳細については、「エンタープライズでの使用をクリックしてください。
  3. 承認済みチャネル承認済みチャネルダイアログが表示されます。このボットに定義されているいくつかのチャネルを選択またはクリアして、ユーザーが利用できるようにしてから、完了をクリックします。少なくとも1つのチャネルを有効にする必要があります。
  4. ボットへの変更を通知するメールを各ボットユーザーに送信する場合は、割り当てられたユーザーにメールで通知するを選択します。
  5. ボット開発者にメールを送信する(“開発者名”)をクリックして、デフォルトのメールアプリケーションを開き、ボット開発者にメッセージをメールで送信します。
  6. [適用] をクリックして変更を保存します。

ボットのオーナーを変更

ボットの所有権を変更できます。そのためには、現在の所有者に

  1. 新しい役割を割り当て、開発者のリストから
  2. 新しい所有者を選択する必要があります。

ボットのタスクを管理

開発者によってアカウントに公開されたボットを承認してデプロイした後、タスクを一時停止することができます。

一時停止されたタスクについて

ボット管理コンソールでタスクを一時停止すると、エンドユーザーはボットからそのタスクにアクセスできなくなります。ボットはアラートを送信したり、アクションリクエストにレスポンスしたりすることはなく、タスク用に構成されたすべてのユーザーに、タスクが一時的に中断されていることを示すアラートが送信されます。タスクがアクティブに戻されると、アラートがすべてのユーザーに再送信されます。タスクが一時停止されている間、開発者はボットビルダーでタスクにアクセスしてアップグレードを作成および公開できますが、ボット管理者がステータスを明示的にアクティブに戻すまで、ボットタスクは一時停止されたままになります。承認されたボットのタスクをデプロイまたは一時停止するには、次の手順のステップを実行します。

  1. ボット管理モジュールのエンタープライズボットページで、デプロイされたタスクを修正したいボットの省略記号アイコンをクリックしてから、ボットタスクの管理をクリックします。次のイラストのようにボットタスクの管理ダイアログが表示されます。
    BotsAdminBotEnterprisePageManageBotTasksDialog
  2. ボットタスクフィールドで、展開アイコンをクリックして、使用可能でデプロイされたタスクを表示します。次のイラストのようにボットのタスクダイアログが表示されます。
    BotsAdminBotEnterprisePageManageBotTasks2Dialog
  3. タスクを展開または一時停止するタスクのチェックボックスをオンまたはオフにして、確認をクリックします。
  4. ボットタスクの管理ダイアログで、確認をクリックします。

“ボットステータスが正常に変更されました”というメッセージがページの上部に表示されます。

コンシューマーボットの管理

ボット管理コンソールのボット管理モジュールのコンシューマーボットページでは、デプロイメントリクエストページでボット管理者によって承認された、展開されたボットとボットタスクを管理できます。コンシューマーボットページには、デプロイメントモデルがコンシューマーとして設定されている承認済みのボットのみが表示されます。デプロイメントモデルセットエンタープライズを使用して承認済みボットを管理するには、エンタープライズボットの管理を参照してください。次のイラストは、ボット管理モジュールのコンシューマーボットページの例です。
コンシューマーボットページでは、チャネルやメール設定などのボット設定をレビューおよび変更したり、ボットの承認済みタスクを管理したりできます。

コンシューマーボット列

次のリストは、各コンシューマーボットに対して表示される列について説明しています。

説明
ボット名 ユーザーが作成したボットの名前を表示します。
発行元 このボットを作成または所有している開発者名を表示します。
ボットタイプ ボットのタイプを表示します。スタンダード、ユニバーサルなどのいずれか。
チャネル ユーザーがボットにアクセスできるチャネルを表示します。
プランタイプ ボットが公開されたプラン。

アクションバーについて

このセクションでは、アクションバーで使用できるコマンドについて説明します。

並べ替えの使用

企業は、多くのタスクを自動化するために多数のコンシューマーボットを持つことができます。ボットリストはボット名で簡単に並べ替えることができます。デフォルトでは、ボットは作成日の降順で並べ替えられます。ボットを並べ替えるには、並べ替えドロップダウンリストでボット名のオプションを選択し、リストをアルファベット順に表示します。並べ替えを削除するには、並べ替えプルダウンリストでなしを選択します。

検索フィールドの使用

管理コンソールテーブルのエントリリストは、ユーザーやスペースのリストなど、会社の規模によっては非常に大きくなる場合があります。1つ以上の特定のユーザー、グループ、またはスペースを検索するには、検索フィールドに少なくとも3文字を入力して入力どおりに検索を開始するか、リターンキーを押して検索を開始します。

メモ:検索クエリ内の検索語の数に制限はありませんが、検索結果を返すために使用されるのは、各検索語の最初の20文字以内です。

すべてのエントリを表示するには、検索フィールドをクリアしてから、エンターキーを押します。

ボットの設定

ボット管理者は顧客に対してデプロイされたボットを管理する必要があります。ボット設定で、展開モデルタイプを表示し、顧客がボットにアクセスするために使用できるチャネルを追加または削除し、必要に応じて、承認のためにボットを公開した開発者にメールを送信できます。たとえば、ボットへの変更をリクエストします。

  1. ボット管理モジュールのコンシューマーボットページで、ボットの設定を修正したいボットの省略記号アイコンをクリックしてから、ボットの設定をクリックします。
  2. 次のイラストのようにボットの設定ダイアログが表示されます。
    BotsAdminBotConsumerPageBotSettingsDialog
  3. 自動承認設定自動承認ダイアログが表示されます。選択できる設定は3つあります:
    • このボットの公開リクエストを承認しない―このボットからの今後のすべての公開には、管理者による承認が必要です
    • このボットのすべての公開リクエストを自動承認―このボットからの今後の公開はすべて自動的に承認されます
    • 公開リクエストに、管理者が承認する必要のある他のすべてのリクエストに次のコンポーネントのみが含まれている場合は、自動承認します。
      • 新しいチャンネル―チャンネルのボットが追加されたことを自動的に承認します。
      • 新しいタスク―新しいタスクが公開されると、ボットを自動的に承認します。
      • チャネルのアップグレード―既存の承認済みチャネルがアップグレードされると、ボットが自動的に承認されます。
      • タスクのアップグレード―既存のタスクがアップグレードされると、ボットが自動的に承認されます。
  4. デプロイメント・モデルフィールドで、読み取り専用のデプロイメント・タイプ、コンシューマーの使用を見ることができます。詳細については、コンシューマーの使用をクリックしてください。
  5. 承認済みチャネルフィールドで、使用可能または展開されているチャネルを表示および変更できます。展開BotsAdminExpandRightアイコンをクリックして、承認されたチャネルダイアログを表示します。このボットに定義されているいくつかのチャネルを選択またはクリアして、ユーザーが利用できるようにしてから、完了をクリックします。少なくとも1つのチャネルを有効にする必要があります。
  6. ボット開発者にメールを送信する(“開発者名”)をクリックして、デフォルトのメールアプリケーションを開き、ボット開発者にメッセージをメールで送信します。
  7. [適用] をクリックして変更を保存します。

ボットのオーナーを変更

ボットの所有権を変更できます。そのためには、現在の所有者に

  1. 新しい役割を割り当て、開発者のリストから
  2. 新しい所有者を選択する必要があります。

ボットのタスクを管理

開発者によってアカウントに公開されたボットを承認してデプロイした後、タスクを一時停止するか、一時停止したタスクを再デプロイするか、開発者によって公開された非アクティブなタスクをアクティブ化するかを決定できます。

一時停止されたタスクについて

ボット管理コンソールでタスクを一時停止すると、エンドユーザーはボットのそのタスクにアクセスできなくなります。ボットはアラートを送信したり、アクションリクエストにレスポンスしたりすることはなく、タスクが一時的に中断されていることを示すアラートがタスク用に構成されたすべてのユーザーに送信されます。タスクがアクティブに戻されると、アラートがすべてのユーザーに再送信されます。タスクが一時停止されている間、開発者はボットビルダーでタスクにアクセスしてアップグレードを作成および公開できますが、ボット管理者がステータスを明示的にアクティブに戻すまで、ボットタスクは一時停止されたままになります。承認されたボットのタスクをデプロイまたは一時停止するには、次の手順のステップを実行します。

  1. ボット管理モジュールのコンシューマーボットページで、デプロイされたタスクを修正したいボットの省略記号アイコンをクリックしてから、ボットタスクの管理をクリックします。次のイラストのようにボットタスクの管理ダイアログが表示されます。
    BotsAdminBotConsumerPageBotManageBotTasksDialog
  2. ボットタスクフィールドで、展開BotsAdminExpandRightアイコンをクリックして、使用可能でデプロイされたタスクを表示します。次のイラストのようにボットのタスクダイアログが表示されます。
    BotsAdminBotConsumerPageBotTasksDialog
  3. タスクを一時停止またはデプロイするタスクのチェックボックスをオンまたはオフにして、確認をクリックします。
  4. ボットタスクの管理ダイアログで、確認をクリックします。

“ボットステータスが正常に変更されました”というメッセージがページの上部に表示されます。

ボットプラン

サブスクライブされたプランを表示し、必要に応じて変更できます。詳細はこちらをご確認ください

スマートボットの管理

ボット管理コンソールのボット管理モジュールのスマートボットページでは、デプロイメントリクエストページでボット管理者によって承認された、展開されたボットとボットタスクを管理できます。スマートボットページには、承認されたスマートボットのみが表示されます。次のイラストは、ボット管理モジュールのスマートボットページの例です。 スマートボットページでは、チャネルやメール設定などのボット設定をレビューおよび変更したり、ボットの承認済みタスクを管理したりできます。

スマートボット列

次のリストは、各スマートボットに対して表示される列について説明しています。

説明
ボット名 ユーザーが作成したボットの名前を表示します。
発行元 このボットを作成した開発者の名前を表示します。
タスク ボット内のタスクの数。
チャネル ボットにアクセスできるチャネルを表示します。

アクションバーについて

このセクションでは、アクションバーで使用できるコマンドについて説明します。

並べ替えの使用

企業は、多くのタスクを自動化するために多数のスマートボットを持つことができます。ボットリストはボット名で簡単に並べ替えることができます。デフォルトでは、ボットは作成日の降順で並べ替えられます。ボットを並べ替えるには、並べ替えドロップダウンリストでボット名のオプションを選択し、リストをアルファベット順に表示します。並べ替えを削除するには、並べ替えプルダウンリストでなしを選択します。

検索フィールドの使用

管理コンソールテーブルのエントリリストは、ユーザーやスペースのリストなど、会社の規模によっては非常に大きくなる場合があります。1つ以上の特定のユーザー、グループ、またはスペースを検索するには、検索フィールドに少なくとも3文字を入力して入力どおりに検索を開始するか、リターンキーを押して検索を開始します。

メモ:検索クエリ内の検索語の数に制限はありませんが、検索結果を返すために使用されるのは、各検索語の最初の20文字以内です。

すべてのエントリを表示するには、検索フィールドをクリアしてから、エンターキーを押します。

ボットの設定

ボット管理者は顧客に対してデプロイされたボットを管理する必要があります。ボット設定で、顧客がボットにアクセスするために使用できるチャネルを追加または削除し、必要に応じて開発者にメールを送信できます。たとえば、ボットへの変更をリクエストします。

  1. ボット管理モジュールのスマートボットページで、ボットの設定を修正したいボットの省略記号アイコンをクリックしてから、ボットの設定をクリックします。ボットの設定ダイアログが表示されます。
  2. 自動承認フィールドで、自動承認設定を設定できます選択できる設定は3つあります:
    • このボットの公開リクエストを承認しない―このボットからの今後のすべての公開には、管理者による承認が必要です
    • このボットのすべての公開リクエストを自動承認–このボットからの今後の公開はすべて自動的に承認されます
    • 公開リクエストに、管理者が承認する必要のある他のすべてのリクエストに次のコンポーネントのみが含まれている場合は、自動承認します。
      • 新しいチャンネル―チャンネルのボットが追加されたことを自動的に承認します。
      • 新しいタスク―新しいタスクが公開されると、ボットを自動的に承認します。
      • チャネルのアップグレード―既存の承認済みチャネルがアップグレードされると、ボットが自動的に承認されます。
      • タスクのアップグレード―既存のタスクがアップグレードされると、ボットが自動的に承認されます。
  3. 承認済みチャネルフィールドで、使用可能または展開されているチャネルを表示および変更できます。展開BotsAdminExpandRightアイコンをクリックして、承認されたチャネルダイアログを表示します。このボットに定義されているいくつかのチャネルを選択またはクリアして、ユーザーが利用できるようにしてから、完了をクリックします。ボットを承認するため、少なくとも1つのチャネルを有効にする必要があります。
  4. ボット開発者にメールを送信する(“開発者名”)をクリックして、デフォルトのメールアプリケーションを開き、ボット開発者にメッセージをメールで送信します。
  5. [適用] をクリックして変更を保存します。

ボットのオーナーを変更

ボットの所有権を変更できます。そのためには、現在の所有者に

  1. 新しい役割を割り当て、開発者のリストから
  2. 新しい所有者を選択する必要があります。

ボットのタスクを管理

開発者によってアカウントに公開されたボットを承認してデプロイした後、タスクを一時停止するか、一時停止したタスクを再デプロイするか、開発者によって公開された非アクティブなタスクをアクティブ化するかを決定できます。

一時停止されたタスクについて

ボット管理コンソールでタスクを一時停止すると、エンドユーザーはボットからのそのタスクにアクセスできなくなります。ボットはアラートを送信したり、アクションリクエストにレスポンスしたりすることはなく、タスクが一時的に中断されていることを示すアラートがタスク用に構成されたすべてのユーザーに送信されます。タスクがアクティブに戻されると、アラートがすべてのユーザーに再送信されます。タスクが一時停止されている間、開発者はボットビルダーでタスクにアクセスしてアップグレードを作成および公開できますが、ボット管理者がステータスを明示的にアクティブに戻すまで、ボットタスクは一時停止されたままになります。承認されたボットのタスクをデプロイまたは一時停止するには、次の手順のステップを実行します。

  1. ボット管理モジュールのスマートボットページで、デプロイされたタスクを修正したいボットの省略記号アイコンをクリックしてから、ボットタスクの管理をクリックします。
  2. ボットタスクの管理ダイアログが表示されます。
  3. ボットタスクフィールドで、展開BotsAdminExpandRightアイコンをクリックして、使用可能でデプロイされたタスクを表示します。次のイラストのようにボットのタスクダイアログが表示されます。
  4. タスクを一時停止またはデプロイするタスクのチェックボックスをオンまたはオフにして、確認をクリックします。
  5. ボットタスクのダイアログで、確認をクリックします。

“ボットステータスが正常に変更されました”というメッセージがページの上部に表示されます。

ボットプラン

サブスクライブされたプランを表示し、必要に応じて変更できます。詳細はこちらをご確認ください

設定

ボット管理コンソールのボット管理モジュールの設定ページで、管理者承認プロセスを管理してボットを展開し、エンタープライズ内の管理対象ユーザーにボットタスクを割り当てることができます。エンタープライズ開発者がボットまたはボットタスクを公開した後、ボットを承認してから、そのボットを管理対象ユーザーに割り当てる必要があります。このページでは、すべてのボットの承認とボットタスクの割り当てプロセスをエンタープライズレベルで自動化できます。自動承認設定をボットレベルで定義することもできます。次のイラストは、ボット管理モジュールの設定ページの例です。ボット管理設定ページ デフォルトでは、ボット管理者はエンタープライズ開発者によって公開されたボットを承認して割り当てる必要があります。

デプロイリクエストを自動化:

  1. デプロイメントリクエストセクションで、すべての新しいをデプロイメントリクエストを自動的に承認するをクリックします。デプロイメントリクエストが自動的に承認されると、エンタープライズボットの割り当てセクションが使用可能になります。
  2. 保存をクリックします。

ボットの割り当ての自動化

メモ:デプロイメント要求が自動化に設定されていない限り、ボットの割り当てを構成することはできません。

  1. エンタープライズボットの割り当てセクションで、承認されたすべてのボット、それらのタスク、およびチャネルを自動的に割り当てるをクリックします。
  2. 保存をクリックします。

デプロイメントリクエストとボットの割り当てが自動的に行われる場合、エンタープライズ開発者がボットまたはボットタスクを公開した直後に、管理対象ユーザーに新しいボットとボットタスクが割り当てられます。

In the Bots Management module of the Bots Admin Console, you can deploy the bots developed by your company developers from the Kore.ai Bot Builder tool. When the developer develops a bot, it can be published for approval and deployment by the Bots Admin from the Bots Management section.

From this section, you can

  • approve or reject custom bots sent for deployment approval,
  • deploy some or all of the tasks defined for a bot,
  • assign the deployed bot to users, or groups of users in your company for employees when the bot is defined for Enterprise Use, or for customers of your company when the bot is defined for Consumer Use.

Deploying Bots

As the Bots Admin, you can manage the bots permission and consumption.

After a developer publishes a custom bot from the Kore.ai Bot Builder tool to the Enterprise page at the Kore.ai Bot Store, the bot is displayed on the Deployment Requests page. Bots are not available to any users in your company until you approve the bot, and then assign that bot to one or more users, or customers for your company, depending on the bot deployment type defined as either for Enterprise use or Consumer use.

If Bots are set to be auto-approved by the Bots Admin in the Bots Management module Preferences page, when published by the developer, these Bots are immediately approved and deployed and are not displayed on the Deployment Requests page. For more information, see Bot Management Preferences.

Deployment Page Controls

For each Bot displayed on the Deployment Requests page, the following information and controls are displayed:

  • Bot Icon – The icon displayed to the end-user in the client to identify the bot in the Bot Store.
  • Bot Name – The name of the bot.
  • Bot Type – The type of the bot – standard, universal etc..
  • Tasks – number of tasks within the Bot
  • Version – The type of bot for deployment. One of:
    • New – A new bot that has never been deployed.
    • Upgrade – A previously deployed bot that was upgraded and ready to be deployed.
  • Purpose – The intended audience for the bot. One of:
    • Consumer Use – For enterprise customers and consumers.
    • Enterprise Use – For specified managed users of your enterprise.
  • Requested by – The name of the developer submitting the bot for approval.
  • Requested on – The date the developer submitted the bot for approval.
  • Reject/Publish icons which will be visible on the hover over the row.

To approve a bot

  1. On the Deployment Requests page in the Bots Management module, hover over the Bot you want to approve and click the ok icon.
  2. Optionally, click Bot to review tasks pending for approval for this bot, if any.
  3. On selecting the Bot the Bot Publish page is displayed with the following additional information
    • Dialog Task details – names, language supported and version
    • Natural Language configuration
    • Channels enabled for publishing
    • API Extensions configured if any
    • Settings
    • Publish Comments entered by the developer
  4. Review and click the NEXT button.
    For Bots awaiting approval for Update, you will see the Publish button instead of Next.
  5. The Plan Selection dialog is displayed.
    For customers on Enterprise plan, this dialog will not be displayed and the bot will be directly published.
    NOTE: This flow has been introduced in ver 7.0 of the product.
  6. Select the plan as per your Bot needs.
  7. Clicking the Next button will direct you to the 3rd party payment dialog where you can make payments for the selected plan
  8. On successful payment, the Bot Approval: Success dialog is displayed.
  9. Click Continue. The Enterprise Bots or the Consumer Bots page is displayed, depending on the Deployment model type specified for the approved  Bot.

After a task is approved and deployed, the Bot is available to customers for Bots with deployment model set to Consumer use. However, the task is still not available to enterprise users until the Bots Admin assigns the task to users or groups on the Enterprise Bots page in the Bot Management module in the Bots Admin Console. For more information, see Managing Deployed Enterprise Bots or Managing Deployed Consumer Bots.

To reject a bot

You may decide not to approve a Bot for use by employees or customers of the company. To return the Bot to the developer for an update, you can reject the Bot mentioning a reason. When you reject a bot, it is removed from the Deployments Request page, and in the Bot Builder tool, the status of the task is changed from Published to Configured. The developer can then make changes and re-publish the Bot for your approval.

  1. On the Deployment Requests page in the Bots Management module, hover over the Bot you want to reject to view the reject and publish icons.
  2. Optionally, click Bot Details to view the Bot details and click the Reject button.
  3. The Reject bot dialog is displayed.
  4. Select or clear the tasks that you want to reject, and then in the Provide a reason text field, enter the reason that you are rejecting the tasks.
  5. Click Reject.

The Bot rejected successfully message is displayed at the top of the page, and the Bot is removed from the Deployment Requests page.

Managing Enterprise Bots

On the Enterprise Bots page in the Bots Management module of the Bots Admin Console, you can manage deployed Bots and Bot tasks that are approved by the Bots Admin on the Deployment Requests page. Only approved Bots with the deployment model set to Enterprise are displayed on the Enterprise Bots page.

The following illustration is an example of the Enterprise Bots page in the Bots Management module.

Enterprise Bots Columns

The following list describes the columns displayed for each enterprise bot.

COLUMN DESCRIPTION
Bot Name Displays the name of the bot, created by the user.
Published By Displays the name of the developer that published this Bot.
Bot Type Displays the type of bot. One of Standard, Universal etc..
Channels Displays the channels from which the Bot will be accessible.

About the Action Bar

This section describes the commands available on the Action bar.

Using Sort By

A company can have a large number of bots to automate the numerous tasks. You can easily sort the bot list by Bot Name. By default, the last created bot is viewed at the top.
To sort the bots, in the Sort by drop-down list, select Bot Name to view the list of Bots in alphabetical order by name.
To remove the sorting, in the Sort by drop-down list, select None.

Using the Search Field

The list of entries in an admin console table can be very large depending on the size of your company, for example, a list of users or spaces. To find one or more specific users, groups, or spaces, in the Search field, enter at least three characters to begin find-as-you-type, or press return to start the search. For example, enter ra and any entries containing the letters ra are displayed as shown in the following illustration.

Note: The number of search terms in a search query is unlimited, however, no more than the first 20 characters of each search term is used to return search results.

To view all entries, clear the search field, and then press the Enter key.

Assigning Users

To enable users to access deployed Bots, the Bots Admin must assign users to the Bot. Complete the steps in the following procedure to assign users to a deployed Bot with the deployment model set to Enterprise by the developer that created and defined the bot.

  1. On the Enterprise Bots page in the Bots Management module, click the Ellipses icon for the Bot that you want to assign users to, and then click Bot & Task Assignments. The Bot & task assignments dialog is displayed as shown in the following illustration.
    BotsAdminEnterpriseBotTaskAssign
  2. To disable the Bot for all users, click No assignments, otherwise, click Assign Bot’s Tasks. Approved tasks for the Bot are displayed. By default, tasks are not assigned to any users.
  3. To assing tasks, click the Expand BotsAdminExpandRight icon for the task that you want to assign users to. The < Task Name > dialog is displayed. Select one of:
    • All users in your enterprise – All current users, and future users added will have access to this task for this Bot.
    • Assign user groups – Click to open the Assign to groups dialog. Select the groups you want to add in the Group Name column, and then click Done. For more information, see.
    • Assign individual users – Click to open the Assign to users dialog. Select the users you want to add in the Name column, and then click Done.
  4. Click Done.
  5. In the < Task Name > dialog, click Done.
  6. In the Bot assignment successful confirmation dialog, click Apply.

Bot Settings

As the Bots Admin, you need to manage your deployed bots to your customers.

From Bot Settings, you can view the deployment model type, add or remove channels that your customers can use to access your Bot, send email notifications for bot deployments, and if needed, send an email to the developer that published the Bot for approval, for example, to request a change to the Bot.

On the Enterprise Bots page in the Bots Management module, click the Ellipses  icon for the Bot that you want to modify Bot Settings for, and then click Bot settings. The Bot settings dialog is displayed as shown in the following illustration.
BotsAdminBotEnterprisePageBotSettingsDialog

To manage Bot Settings

  1. Auto Approve Settings – The Auto Approve dialog is displayed. There are three settings to choose from:
    • Do not approve any publish requests for this Bot – all future publish from this Bot need approvals by the Admin
    • Auto approve all publish requests for this bot – any future publish from this Bot will be approved automatically
    • Auto approve if publish requests include only following components for all other requests Admin needs to approve it:
      • New Channels – Automatically approve the Bot for channels are added.
      • New Tasks – Automatically approve the Bot when new tasks are published.
      • Channel Upgrades – Automatically approve the Bot when existing approved channels are upgraded.
      • Task Upgrades – Automatically approve the Bot when existing tasks are upgraded.
  2. Deployment model – read-only deployment type, Enterprise use or for more information, click Enterprise use.
  3. Approved channels – The Approved Channels dialog is displayed. Select or clear one or more channels defined for this bot to be available to the users, and then click Done. At least one channel must be enabled.
  4. Select Notify assigned users via email if you want an email sent to each Bot user with a notification of any changes to the Bot.
  5. Click Email the bot developer ( < Developer Name > ) to open your default mail application to email a message to the Bot developer.
  6. Click Apply to save the changes.

Change Bot Owner

You can change the ownership of the Bot. For that you need to

  1. assign a new role to the current owner and
  2. select the new Owner from the list of developers.

Managing Bot Tasks

After you approve and deploy your Bots published in your account by a developer, you may decide to suspend a task.

About Suspended Tasks

When you suspend a task in the Bots Admin console, end-user cannot access that task from he Bot. The bot will not send alerts nor respond to action requests, and an alert is sent to all users configured for the task that the task is temporarily suspended. When the task is set back to Active, then an alert is sent to all users as well.
While a task is suspended, a developer can still access the task in Bot Builder and create and publish an upgrade, but the Bot task remains suspended until the Bots Admin explicitly changes the status back to Active.

Complete the steps in the following procedure to deploy or suspend tasks for an approved Bot.

  1. On the Enterprise Bots page in the Bots Management module, click the Ellipses icon for the Bot that you want to modify deployed tasks for, and then click Manage Bot tasks. The Manage Bot tasks dialog is displayed as shown in the following illustration.
    BotsAdminBotEnterprisePageManageBotTasksDialog
  2. In the Bot tasks field, click the Expand  icon to display the available and deployed tasks. The Bot tasks dialog is displayed as shown in the following example.
    BotsAdminBotEnterprisePageManageBotTasks2Dialog
  3. Select or clear the checkbox for the task to deploy or suspend the task, and then click Confirm.
  4. In the Manage bots tasks dialog, click Confirm.

The Bot status changed successfully message is displayed at the top of the page.

Managing Consumer Bots

On the Consumer Bots page in the Bots Management module of the Bots Admin Console, you can manage deployed Bots and Bot tasks that are approved by the Bots Admin on the Deployment Requests page. Only approved Bots with the deployment model set to Consumer are displayed on the Consumer Bots page. To manage approved Bots with the deployment model set Enterprise, see Managing Enterprise Bots.

The following illustration is an example of the Consumer Bots page in the Bots Management module.

On the Consumer Bots page, you can review and modify Bot settings such as channels and email settings, and manage approved tasks for the Bot.

Consumer Bots Columns

The following list describes the columns displayed for each consumer bot.

COLUMN DESCRIPTION
Bot Name Displays the name of the bot, created by the user.
Published By Displays the name of the developer that created or owns this Bot.
Bot Type Displays the type of bot. One of Standard, Universal, etc.
Channels Displays the channels where bot will be accessible for the Users.
Plan Type The plan under which the Bot was published.

About the Action Bar

This section describes the commands available on the Action bar.

Using Sort By

A company can have a large number of consumer bots to automate the numerous tasks. You can easily sort the bot list by Bot Name. By default, the bots are sorted by descending order of creation date.
To sort the bots, in the Sort by drop-down list, select an option for Bot Name and the list is viewed in alphabetical order.
To remove the sorting, in the Sort by drop-down list, select None.

Using the Search Field

The list of entries in an admin console table can be very large depending on the size of your company, for example, a list of users or spaces. To find one or more specific users, groups, or spaces, in the Search field, enter at least three characters to begin find-as-you-type, or press return to start the search.

Note: The number of search terms in a search query is unlimited, however, no more than the first 20 characters of each search term is used to return search results.

To view all entries, clear the search field, and then press the Enter key.

Bot Settings

As the Bots Admin, you need to manage your deployed bots to your customers. In Bot Settings, you can view the deployment model type, add or remove channels that your customers can use to access your Bot, and if needed, send an email to the developer that published the Bot for approval, for example, to request a change to the Bot.

  1. On the Consumer Bots page in the Bots Management module, click the Ellipses  icon for the Bot that you want to modify Bot Settings for, and then click Bot settings.
  2. The Bot settings dialog is displayed as shown in the following illustration.
    BotsAdminBotConsumerPageBotSettingsDialog
  3. Auto Approve Settings – The Auto Approve dialog is displayed. There are three settings to choose from:
    • Do not approve any publish requests for this Bot – all future publish from this Bot need approvals by the Admin
    • Auto approve all publish requests for this bot – any future publish from this Bot will be approved automatically
    • Auto approve if publish requests include only following components for all other requests Admin needs to approve it:
      • New Channels – Automatically approve the Bot for channels are added.
      • New Tasks – Automatically approve the Bot when new tasks are published.
      • Channel Upgrades – Automatically approve the Bot when existing approved channels are upgraded.
      • Task Upgrades – Automatically approve the Bot when existing tasks are upgraded.
  4. In the Deployment model field, you can view the read-only deployment type, Consumer use or for more information, click Consumer use.
  5. In the Approved channels field, you can view and modify the channels available or deployed. Click the Expand BotsAdminExpandRight icon to display the Approved channels dialog. Select or clear one or more channels defined for this bot to be available to the users, and then click Done. At least one channel must be enabled.
  6. Click Email the bot developer ( < Developer Name > ) to open your default mail application to email a message to the Bot developer.
  7. Click Apply to save the changes.

Change Bot Owner

You can change the ownership of the Bot. For that you need to

  1. assign a new role to the current owner and
  2. select the new Owner from the list of developers.

Manage Bot Tasks

After you approve and deploy your Bots published in your account by a developer, you may decide to suspend a task or redeploy a suspended task, or activate an inactive task published by the developer.

About Suspended Tasks

When you suspend a task in the Bots Admin console, end-user cannot access that task of the bot. The bot will not send alerts nor respond to action requests, and an alert is sent to all users configured for the task that the task is temporarily suspended. When the task is set back to Active, then an alert is sent to all users as well.
While a task is suspended, a developer can still access the task in Bot Builder and create and publish an upgrade, but the Bot task remains suspended until the Bots Admin explicitly changes the status back to Active.

Complete the steps in the following procedure to deploy or suspend tasks for an approved Bot.

  1. On the Consumer Bots page in the Bots Management module, click the Ellipses  icon for the Bot that you want to modify deployed tasks for, and then click Manage Bot tasks. The Manage Bot tasks dialog is displayed as shown in the following illustration.
    BotsAdminBotConsumerPageBotManageBotTasksDialog
  2. In the Bot tasks field, click the Expand BotsAdminExpandRight icon to display the available and deployed tasks. The Bot tasks dialog is displayed as shown in the following example.
    BotsAdminBotConsumerPageBotTasksDialog
  3. Select or clear the checkbox for the task to suspend a task or deploy a task, and then click Confirm.
  4. In the Manage bots tasks dialog, click Confirm.

The Bot status changed successfully message is displayed at the top of the page.

Bot Plan

You can view and if needed change the subscribed plan. See here for details.

Managing Smart Bots

On the Smart Bots page in the Bots Management module of the Bots Admin Console, you can manage deployed Bots and Bot tasks that are approved by the Bots Admin on the Deployment Requests page. Only approved Smart Bots are displayed on the Smart Bots page.

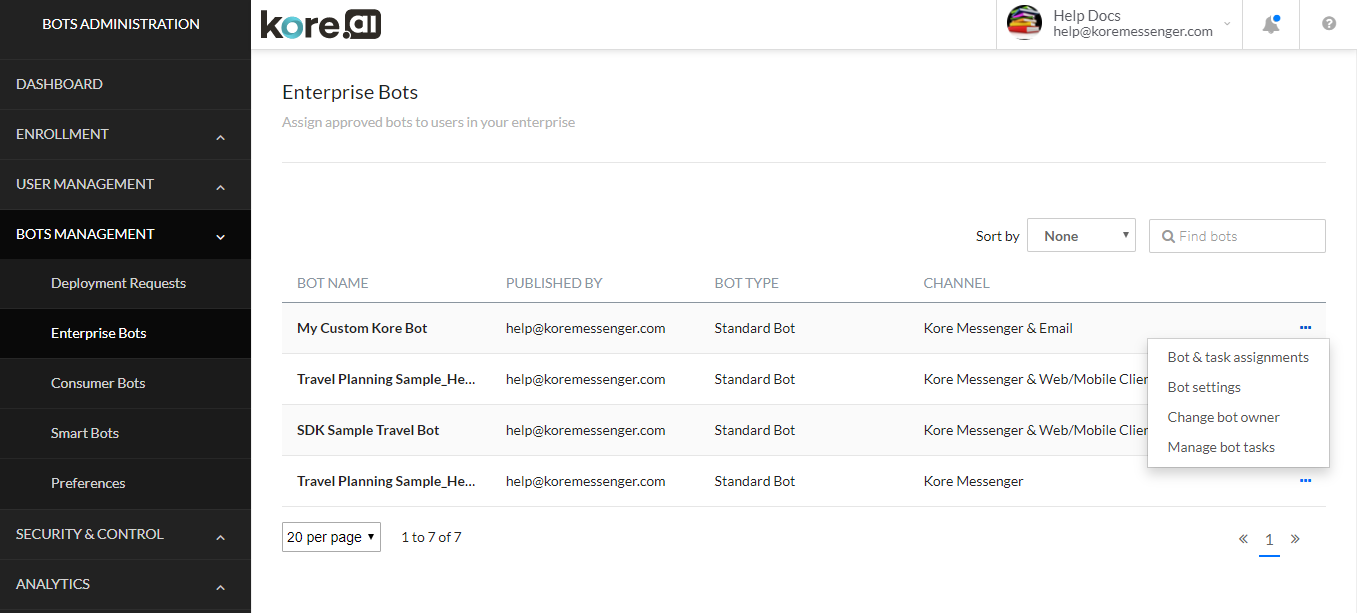
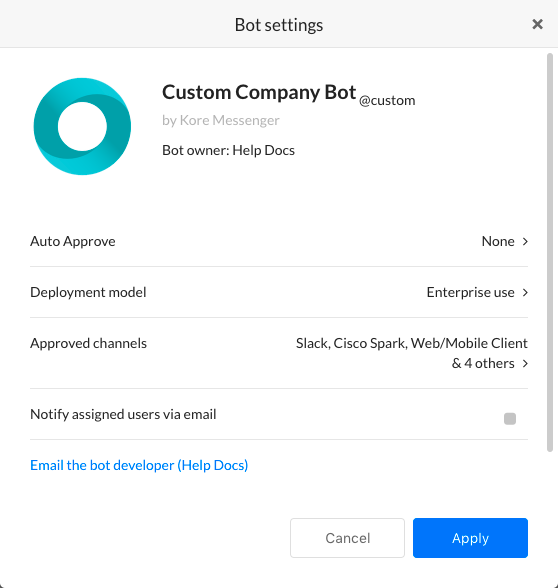
The following illustration is an example of the Smart Bots page in the Bots Management module.


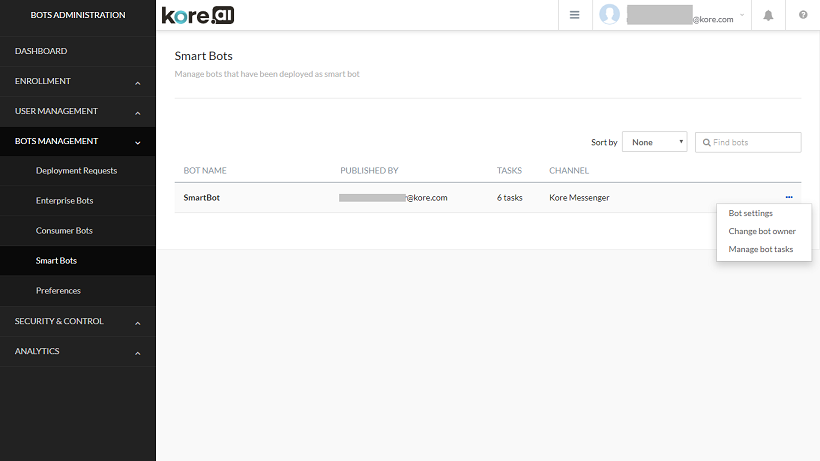
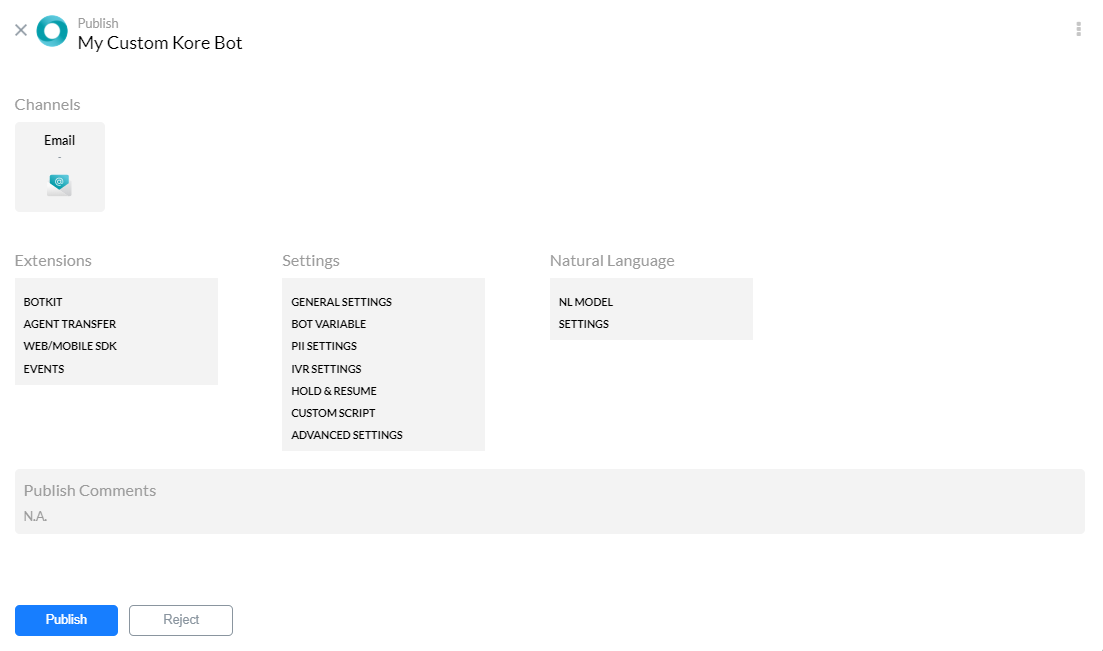
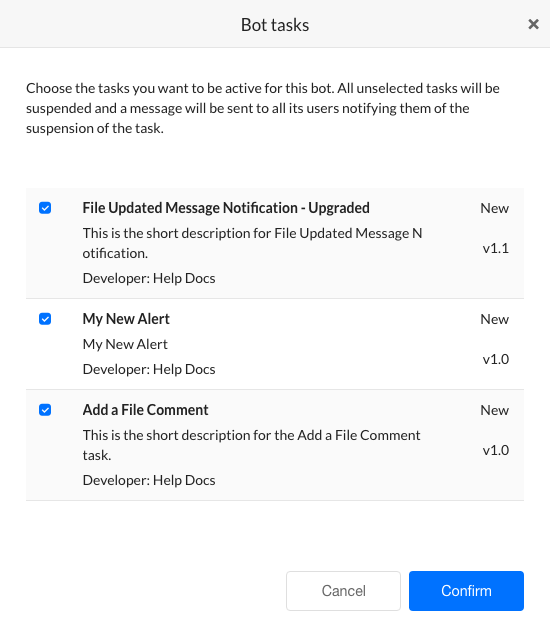
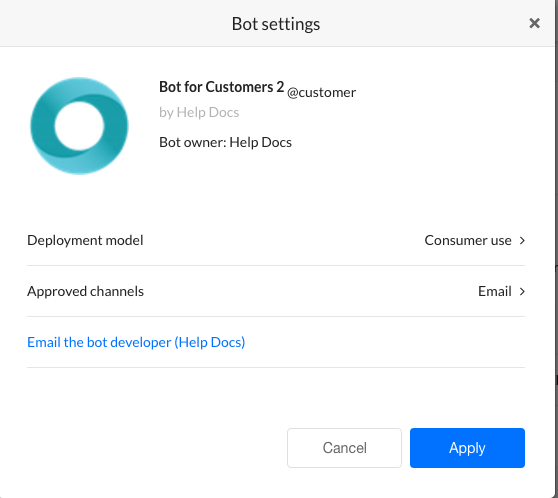
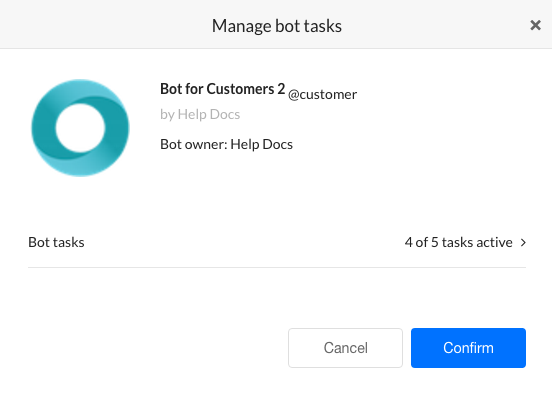
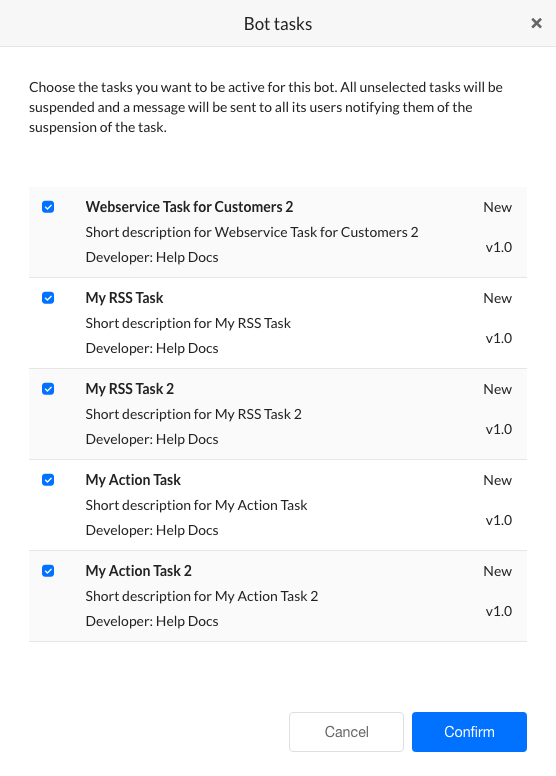
On the Smart Bots page, you can review and modify Bot settings such as channels and email settings, and manage approved tasks for the Bot.

Smart Bots Columns

The following list describes the columns displayed for each Smart bot.

COLUMN DESCRIPTION
Bot Name Displays the name of the bot, created by the user.
Published by Displays the name of the developer who created this Bot.
Tasks Number of tasks in the Bot.
Channels Displays the channels where bot will be accessible.

About the Action Bar

This section describes the commands available on the Action bar.

Using Sort By

A company can have a large number of Smart bots to automate the numerous tasks. You can easily sort the bot list by Bot Name. By default, the Bots are sorted by the descending order of creation date.

To sort the bots, in the Sort by drop-down list, select an option for Bot Name and the list is viewed in alphabetical order.
To remove the sorting, in the Sort by drop-down list, select None.

Using the Search Field

The list of entries in an admin console table can be very large depending on the size of your company, for example, a list of users or spaces. To find one or more specific users, groups, or spaces, in the Search field, enter at least three characters to begin find-as-you-type, or press return to start the search.

Note: The number of search terms in a search query is unlimited, however, no more than the first 20 characters of each search term is used to return search results.

To view all entries, clear the search field, and then press the Enter key.

Bot Settings

As the Bots Admin, you need to manage your deployed bots to your customers. In Bot Settings, you can add or remove channels that your customers can use to access your Bot, and if needed, send an email to the developer, for example, to request a change to the Bot.

  1. On the Smart Bots page in the Bots Management module, click the Ellipses  icon for the Bot that you want to modify Bot Settings for, and then click Bot settings. The Bot settings dialog is displayed.
  2. In the Auto Approve field, you can set the auto approve settings. There are three settings to choose from:
    • Do not approve any publish requests for this Bot – all future publish from this Bot need approvals by the Admin
    • Auto approve all publish requests for this bot – any future publish from this Bot will be approved automatically
    • Auto approve if publish requests include only following components for all other requests Admin needs to approve it:
      • New Channels – Automatically approve the Bot for channels are added.
      • New Tasks – Automatically approve the Bot when new tasks are published.
      • Channel Upgrades – Automatically approve the Bot when existing approved channels are upgraded.
      • Task Upgrades – Automatically approve the Bot when existing tasks are upgraded.
  3. In the Approved channels field, you can view and modify the channels available or deployed. Click the Expand BotsAdminExpandRight icon to display the Approved channels dialog. Select or clear one or more channels defined for this bot to be available to the users, and then click Done. At least one channel must be enabled to approve the bot.
  4. Click Email the bot developer ( < Developer Name > ) to open your default mail application to email a message to the Bot developer.
  5. Click Apply to save the changes.

Change Bot Owner

You can change the ownership of the Bot. For that you need to

  1. assign a new role to the current owner and
  2. select the new Owner from the list of developers.

Manage Bot Tasks

After you approve and deploy your Bots published in your account by a developer, you may decide to suspend a task or redeploy a suspended task or activate an inactive task published by the developer.

About Suspended Tasks

When you suspend a task in the Bots Admin console, end-user cannot access that task from the bot. The bot will not send alerts nor respond to action requests, and an alert is sent to all users configured for the task that the task is temporarily suspended. When the task is set back to Active, then an alert is sent to all users as well.

While a task is suspended, a developer can still access the task in Bot Builder and create and publish an upgrade, but the Bot task remains suspended until the Bots Admin explicitly changes the status back to Active.

Complete the steps in the following procedure to deploy or suspend tasks for an approved Bot.

  1. On the Smart Bots page in the Bots Management module, click the Ellipses  icon for the Bot that you want to modify deployed tasks for, and then click Manage Bot tasks.
  2. The Manage Bot tasks dialog is displayed.
  3. In the Bot tasks field, click the Expand BotsAdminExpandRight icon to display the available and deployed tasks. The Bot tasks dialog is displayed as shown in the following example.
  4. Select or clear the checkbox for the task to suspend a task or deploy a task, and then click Confirm.
  5. In the Bots tasks dialog, click Confirm.

The Bot status changed successfully message is displayed at the top of the page.

Bot Plan

You can view and if needed change the subscribed plan. See here for details.

Preferences

On the Preferences page in the Bots Management module of the Bots Admin Console, you can manage the admin approval process to deploy Bots and assign Bot tasks to managed users in your enterprise.

After an enterprise developer publishes a Bot or Bot task, you must approve the Bot, and then assign that Bot to a managed user. On this page, you can automate the approval and Bot task assignment process for all Bots at the enterprise level. You can also define auto-approve settings at the Bot level.

The following illustration is an example of the Preferences page in the Bots Management module.

Bots Management Preferences Page

By default, the Bots admin must approve and assign Bots published by enterprise developers.

To automate deployment requests:

  1. In the Deployment Requests section, click Automatically approve all new deployment requests. When deployment requests are automatically approved, the Enterprise Bot Assignments section is available.
  2. Click Save.

To automate Bot assignments

Note: Bot assignments cannot be configured unless deployment requests are set to automate.

  1. In the Enterprise Bots Assignments section, click Automatically assign all approved bots, their tasks, and channels.
  2. Click Save.

When deployment requests and Bot assignments are automatic, managed users are assigned new Bots and Bot Task immediately after the enterprise developer publishes the Bot or Bot task.