본 방법에서는 고객의 계좌 관련 데이터가 데이터 테이블에 저장되는 뱅킹 봇 시나리오를 살펴보겠습니다. 사용자의 요청에 따라 데이터가 업데이트될 방법을 살펴보겠습니다. 데이터 테이블의 정의 및 Kore.ai 봇 플랫폼에서 데이터 테이블을 구현하는 방법에 대한 자세한 내용은 여기를 참조하세요.
문제 설명
뱅킹 봇을 예로 들면. 특정 고객의 경우 다음과 같은 데이터가 저장됩니다. 이 데이터는 고객 요청에 따라 업데이트되어야 합니다. 고객은 이메일 ID 및 주소 세부 정보만 업데이트할 수 있습니다.
- ID,
- 이름,
- 이메일 ID,
- 주소,
- 유형

전제 조건
- 봇 구축 지식,
- 위에서 언급한 표에 액세스할 수 있는 뱅킹 봇 및 해당 표에 있는 데이터(데이터 생성 및 추가를 위한 활용 사례 예시는 여기를 참조합니다).
설정
다음 시나리오를 각각 하나씩 살펴보겠습니다.
- 다음을 위한 대화 작업:
- 필요한 정보 수집,
- 서비스를 호출하여 고객 정보를 업데이트합니다.
대화 작업 설정
필요한 정보를 수집하기 위한 대화 작업을 생성하고 서비스 노드를 사용하여 데이터 테이블을 수집된 값으로 업데이트합니다. 
대화 작업 생성
- 왼쪽 탐색 메뉴에서 봇 작업 -> 대화 작업을 선택합니다.
- 대화 작업에서 +를 클릭하여 새 작업 생성
- IntentName 입력(예: UpdateCustomer)
- 생성 및 진행하여 대화 빌더 페이지를 엽니다
- 의도 노드 기본 설정을 유지하고 의도 노드를 닫습니다.
- 의도 노드 옆의 +를 클릭하고 엔티티를 추가하여 고객 ID를 캡처합니다:
엔티티 이름 유형 사용자 프롬프트 CustId 문자열 고객 ID를 입력하세요 - 우선, 주어진 고객 ID에 대한 테이블에서 데이터를 가져온 다음 논리 노드를 사용하여 프로세스 흐름을 제어합니다.
데이터 가져오기
서비스 호출을 사용하여 테이블에서 데이터를 가져올 수 있습니다:
- 엔티티 노드에 대해 +를 클릭합니다.
- 서비스 -> 새 서비스 노드 옵션을 선택합니다.
- 일반 설정 섹션에서 다음을 설정합니다:
- 이름(예: GetCustomerData)
- 표시 이름(예: 고객 데이터 가져오기)
- 서비스 유형 데이터 서비스 선택
- 유형 테이블 선택
- 요청 정의에서 요청 추가를 클릭하여 테이블에서 데이터를 가져올 요청을 정의합니다.
- 데이터 서비스 요청 정의 페이지에서 다음을 입력합니다:
- 테이블 이름 선택을 사용자 지정 가능으로 선택합니다.
- 데이터 가져오기로 조치
- 필터 선택 CustId = {{context.entities.CustId}}를 선택합니다.
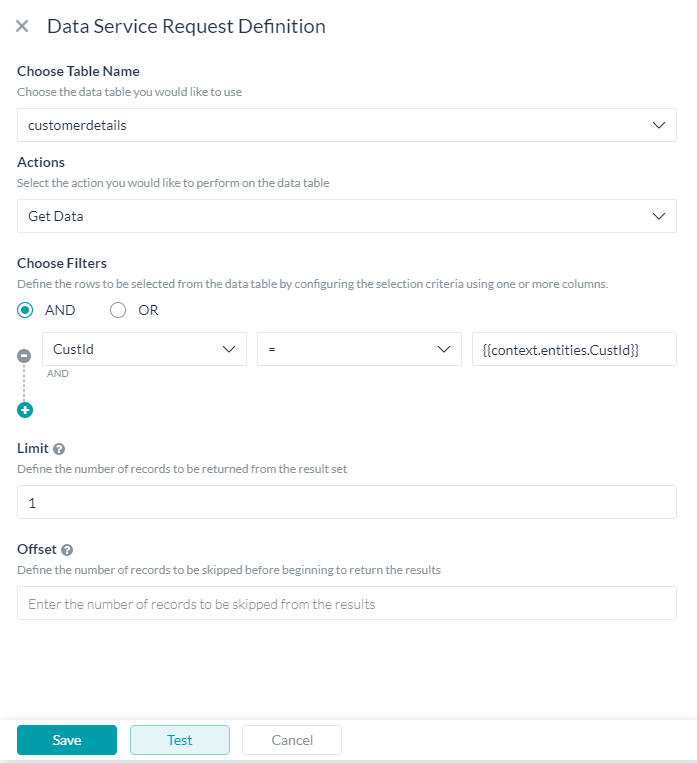
- 정의를 저장하고 서비스 노드를 닫습니다.
- 메시지 노드를 추가하여 다음 컨텍스트 변숫값을 사용하여 가져오는 레코드를 표시합니다. 하나의 레코드만 가져오므로 행에 대한 스태틱 [0] 참조를 사용합니다:
'For the customer number entered, we have the following details: {{context.GetCustomerData.response.body.queryResult[0].CustName}}, {{context.GetCustomerData.response.body.queryResult[0].CustEmail}}, {{context.GetCustomerData.response.body.queryResult[0].Address}}, {{context.GetCustomerData.response.body.queryResult[0].CustType}}'
데이터 업데이트
엔티티 노드와 논리 노드를 사용하여 고객의 입력값을 캡처하고 프로세스 흐름을 제어할 것입니다.
- 위에 추가된 마지막 메시지 노드에 대해 + 를 클릭합니다.
- 엔티티 노드를 선택하고 다음 설정을 사용하여 항목 목록(열거) 유형 엔티티를 추가합니다.
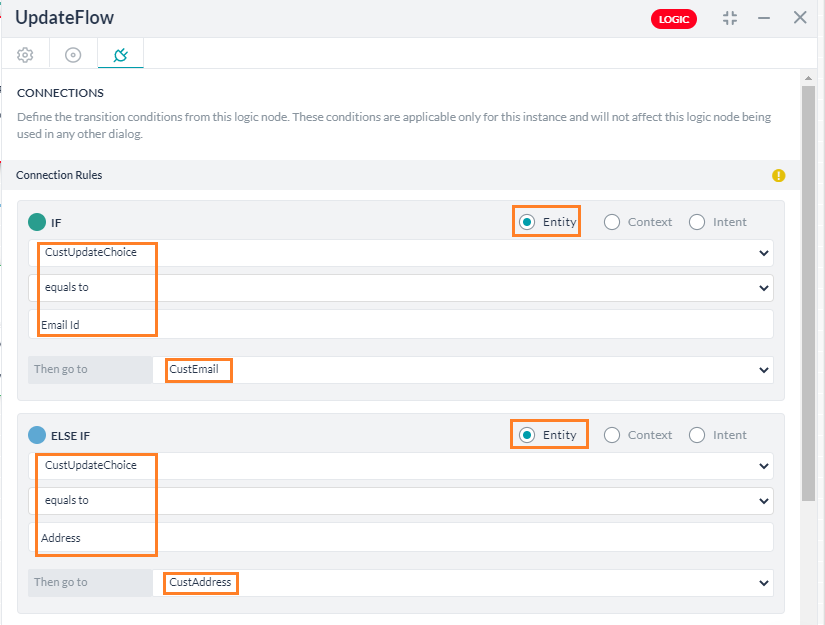
표시 이름 값 이메일 ID 이메일 ID 주소 주소 - 로직 노드를 추가하고 위의 엔티티 노드의 값을 기반으로 고객의 이메일 ID 또는 주소를 가져오며, 여기서 CustEmail 및 CustAddress 는 고객 이메일 ID 및 고객 주소를 캡처하는 엔티티입니다.
- 또한 현재 정보로 컨텍스트 변수를 입력하며, 이러한 변수는 데이터 테이블을 업데이트하는 데 사용됩니다.

- 이메일 ID 및 주소 엔티티에서 스크립트 노드를 트리거 하여 다음 스크립트를 사용하여 컨텍스트 변수를 적절히 수정합니다:
if (context.entities.CustUpdateChoice == 'Address') { context.custAdd = context.entities.CustAddress; } else { context.custEmail = context.entities.CustEmail; } - 서비스 -> 새 서비스 노드 옵션을 선택합니다.
- 일반 설정 섹션에서 다음을 설정합니다:
- 이름(예: UpdateCust)
- 표시 이름(예: 고객 데이터 업데이트)
- 서비스 유형 데이터 서비스 선택
- 유형 테이블 선택
- 요청 정의에서 요청 추가를 클릭하여 테이블에 데이터를 추가할 요청을 정의합니다.
- 데이터 서비스 요청 정의 페이지에서 다음을 입력합니다:
- 테이블 이름 선택을 이전에 정의된 사용자 지정 가능으로 선택합니다.
- 데이터 업데이트로 조치
- 다음과 같이 정의된 엔티티의 값을 할당하며. 모든 필드와 해당 값을 포함해야 합니다. 그렇지 않으면 필드가 null 값으로 설정됩니다:
열 엔티티 컨텍스트 CustName {{context.CustName}} CustEmail {{context.CustEmail}} Address {{context.CustAddress}} CustType {{context.CustType}} CustId {{context.CustId}} 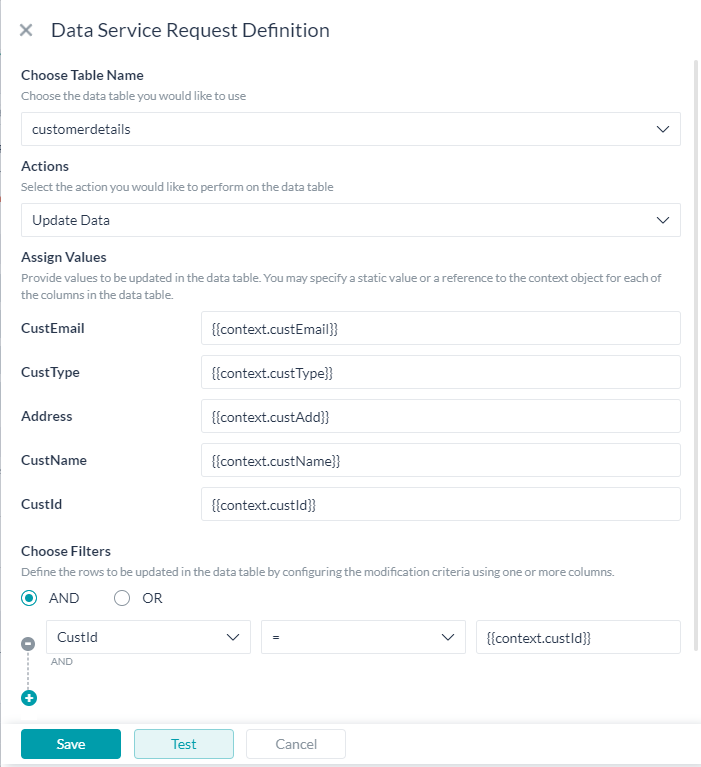
- 메시지 노드를 추가하여 성공 메시지를 표시합니다.
- 봇과 대화 옵션을 사용하여 메시지가 표시되면 값을 입력하고 메시지가 표시되는지 확인합니다.
결론
이 게시물에서 다음을 살펴보았습니다:
- 서비스 노드를 사용하여 테이블에서 데이터를 가져오고 이를 추가 처리에 사용하는 방법,
- 서비스 노드를 사용하여 대화 작업에서 테이블로 데이터를 업데이트하는 방법
このハウツーでは、顧客の口座関連データが保存されるデータテーブルのバンキングBotのシナリオを調査します。ユーザーからの要求でデータを更新できる方法を確認します。データテーブルおよびKore.ai Botプラットフォームでどのように導入されているかの詳細については、こちらを参照してください。
例題
以下のデータが保存される指定顧客のバンキングBotを考えてください。このデータは顧客の要求により更新する必要があります。顧客はメールIDおよびアドレス詳細のみを更新できます。
- ID
- 名前
- メールID
- アドレス、および
- タイプ
Pre-requisites
- Botビルドナレッジ
- 上記テーブルへのアクセス権付きバンキングBot、そのテーブルにあるデータ(データを作成および追加するユースケースは、こちらを参照してください)。
設定
次の各シナリオを1つずつ考えてみましょう。
- ダイアログタスク:
- 必須情報の収集、および
- サービスを呼び出し、顧客情報を更新
ダイアログタスクの設定
必須情報を収集するダイアログタスクを作成し、サービスノードを使用して収集した値でデータテーブルを更新します。
ダイアログタスクの作成
- 左のナビゲーションメニューからBotタスク -> ダイアログタスクを選択します。
- ダイアログタスクに対して+をクリックして、新しいタスクを作成します。
- IntentName、たとえばUpdateCustomerを入力します。
- 作成および続行して、ダイアログビルダーページを開きます。
- インテントノードのデフォルト設定を保持し、インテントノードを閉じます。
- インテントノードの隣の+をクリックし、エンティティを追加して顧客IDを取得します。
エンティティ名 タイプ ユーザープロンプト CustId 文字列 顧客IDの入力 - 最初に、指定した顧客IDのテーブルからデータを取得し、ロジックノードを使用してプロセスフローを制御します。
データの取得
サービスコールを使用して、テーブルからデータを取得できます。
- エンティティノードに対して、+をクリックします。
- サービス -> 新しいサービスノード オプションを選択します。
- 基本設定セクションから、以下を設定します。
- 名前、たとえばGetCustomerData
- 表示名、たとえば顧客データ取得
- サービスタイプで、データサービスを選択
- タイプで、テーブルを選択
- 要求定義で、要求を追加をクリックして要求を定義し、テーブルからデータを取得します。
- データサービス要求定義ページに、以下を入力します。
- 顧客テーブルとしての テーブル名の選択
- データ取得としてのアクション
- フィルタを選択して CustId = {{context.entities.CustId}}を選択
- 定義を保存し、サービスノードを 閉じます。
- 1つのレコードのみをフェッチし、行に対する静的 [0] 参照を使用しているため、メッセージノードを追加し、 以下のコンテキスト変数を使用してレコードの取得を表示します。
'For the customer number entered, we have the following details: {{context.GetCustomerData.response.body.queryResult[0].CustName}}, {{context.GetCustomerData.response.body.queryResult[0].CustEmail}}, {{context.GetCustomerData.response.body.queryResult[0].Address}}, {{context.GetCustomerData.response.body.queryResult[0].CustType}}'
データの更新
エンティティノードとロジックノードを使用して、顧客からの入力を取得し、プロセスフローを制御します。
- 上で追加した最後のメッセージに対して、+ をクリックします。
- エンティティノードを選択し、以下が設定された項目リスト(列挙) 型エンティティを追加します。
表示名 値 メールID メールID アドレス アドレス - ロジックノードを追加し、上のエンティティノードからの値に基づき、顧客からメールIDまたはアドレスのいずれかを取得します。このCustEmail および CustAddressは、顧客のメールIDおよび顧客のアドレスを取得するエンティティです。
- コンテキスト変数も現在の詳細で入力し、これらの変数はデータテーブルを更新するために使用されます。
- メールIDおよびアドレスから、エンティティはスクリプトノードをトリガーし、以下のスクリプトを使用して適切にコンテキスト変数を変更します。
if (context.entities.CustUpdateChoice == 'Address') { context.custAdd = context.entities.CustAddress; } else { context.custEmail = context.entities.CustEmail; } - サービス -> 新しいサービスノード オプションを選択します。
- 基本設定セクションから、以下を設定します。
- 名前、たとえばUpdateCust
- 表示名、たとえばUpdate Customer Data
- サービスタイプで、データサービスを選択
- タイプで、テーブルを選択
- 要求定義で、要求を追加をクリックして要求を定義し、テーブルへデータを追加します。
- データサービス要求定義ページに、以下を入力します。
- 前に定義した顧客テーブルとしての テーブル名の選択
- データ更新としてのアクション
- 以下のように定義されたエンティティからの値の割り当て。 すべてのフィールドとその値を含める必要があることを覚えておいてくださいい。そうしないと、フィールドはnul値に設定されます。
列 エンティティコンテキスト CustName {{context.CustName}} CustEmail {{context.CustEmail}} アドレス {{context.CustAddress}} CustType {{context.CustType}} CustId {{context.CustId}}
- メッセージノードを追加して、成功メッセージを表示します。
- Botとの会話オプションを使用して、プロンプト表示されたら値を入力し、表示されるメッセージを確認します。
結論
この投稿では、以下を確認しました。
- サービスノードを使用してテーブルからのデータの取得方法、およびそれを使用して追加処理する方法
- サービスノードを使用してダイアログタスクからテーブルへデータを更新する方法
Leave a Reply
In this How-To, we will explore a scenario in a Banking Bot, where the account-related data for a customer is stored in a Data Table. We will see how the data can be updated by a request from the user.
For details on what Data Tables are and how it is implemented in the Kore.ai Bots platform, refer here.
Problem Statement
Consider a Banking Bot, for a given customer, the following data is stored. This data needs to be updated as per customer request. Customers can update only email id and address details.
- Id;
- Name;
- Email id;
- Address; and
- Type
Pre-requisites
- Bot building knowledge;
- A Banking Bot with access to the above-mentioned table, and data existing in that table (refer here for use case example to create and add data).
Configurations
Let us consider each of the following scenarios one by one:
- Dialog Task to:
- gather required information; and
- invoke a service to update the customer information.
Dialog Task Configuration
We will be creating a dialog task to gather the required information, and use a Service node to update the data table with the values thus gathered.
Create Dialog Task
- From the left navigation menu, select Bot Tasks -> Dialog Tasks.
- Click the + against the Dialog Tasks to create a new Task
- Enter IntentName, say, UpdateCustomer
- Create & Proceed to open the dialog builder page.
- Retain the Intent Node default settings, and close the Intent Node.
- Click the + next to the intent node and add an Entities to capture the customer id:
Entity Name Type User Prompts CustId String Enter your customer id - First, we will fetch data from the table for the given Cust Id and then use a Logic node to control the process flow.
Fetch Data
You can use a Service call to fetch data from the table:
- Click the + against the entity node.
- Select Service -> New Service Node option.
- From the General Settings section configure the following:
- Name say GetCustomerData
- Display Name say Get Customer Data
- Service Type select Data Service
- Type select Table
- Under Request Definition click Add Request to define a request to fetch data from the table.
- In the Data Service Request Definition page, enter the following:
- Choose Table Name as customertable
- Actions as Get Data
- Choose Filters to select the CustId = {{context.entities.CustId}}
- Save the definition and close the service node.
- Add a Message Node to display the records fetches using the following context variable values, since we are fetching only one record, we are using a static [0] reference to the row:
'For the customer number entered, we have the following details: {{context.GetCustomerData.response.body.queryResult[0].CustName}}, {{context.GetCustomerData.response.body.queryResult[0].CustEmail}}, {{context.GetCustomerData.response.body.queryResult[0].Address}}, {{context.GetCustomerData.response.body.queryResult[0].CustType}}'
Update Data
We will be using an entity node and a logic node to capture the inputs from the customer and to control the process flow:
- Click the + against the last message node added above.
- Select an Entity Node and add a List of Items (enumerated) type entity with the following settings.
Display Name Value Email Id Email Id Address Address - Add a Logic Node and based upon the value from the entity node above fetch either Email ID or Address from the customer, here CustEmail and CustAddress are the entities to capture customer email id and customer address.
- Also populate the context variables with the current details, these variables would be used to update the data table.
- From the Email Id and Address entity trigger a Script Node to modify the context variables appropriately using the following script:
if (context.entities.CustUpdateChoice == 'Address') { context.custAdd = context.entities.CustAddress; } else { context.custEmail = context.entities.CustEmail; } - Select Service -> New Service Node option.
- From the General Settings section configure the following:
- Name say UpdateCust
- Display Name say Update Customer Data
- Service Type select Data Service
- Type select Table
- Under Request Definition click Add Request to define a request to add data to the table.
- In the Data Service Request Definition page, enter the following:
- Choose Table Name as customertable defined earlier
- Actions as Update Data
- Assign Values from the entities defined as follows, remember you need to include all the fields and their values, else the field would be set to null value:
Column Entity context CustName {{context.CustName}} CustEmail {{context.CustEmail}} Address {{context.CustAddress}} CustType {{context.CustType}} CustId {{context.CustId}}
- Add a Message node to display the success message.
- Using Talk to bot option, enter the values when prompted and see the message being displayed.
Conclusion
In this post, we have seen:
- How to fetch the data from the table using a service node and use it for further processing;
- How to update data to the table from the Dialog task using a service node;