본 방법에서는 사용자가 추가 계좌를 생성할 수 있는 뱅킹 봇 내 시나리오를 살펴보겠습니다. 디지털 양식을 사용하여 사용자로부터 필요한 모든 정보를 수집하고 계정을 생성하는 방법을 살펴보겠습니다. 디지털 양식의 정의 및 Kore.ai 봇 플랫폼에서 디지털 보기를 구현하는 방법에 대한 자세한 내용은 여기를 참조하세요.
문제 설명
뱅킹 봇이 다음과 같은 시나리오를 해결하려고 한다고 생각해 보세요.
- 이미 등록된 사용자가 추가 계좌를 개설하려고 합니다.
- 사용할 수 있는 계좌 유형에는 세 가지가 있으며, 각 유형에는 다음과 같은 추가 옵션이 있습니다:
- 저축 계좌,
- 현금 카드를 선택하고 최소 잔액을 설정할 수 있는 옵션이 있는 당좌 예금 계좌,
- 카드 유형을 플래티넘, 골드, 실버 또는 베이직으로 선택할 수 있는 옵션이 있는 신용 카드
전제 조건
- 봇 구축 지식
- 은행 봇
설정
다음 시나리오를 각각 하나씩 살펴보겠습니다:
- 사용자의 입력을 수집하는 디지털 양식
- 다음을 위한 대화 작업:
- 위의 디지털 양식 트리거,
- 사용자가 입력한 계정 정보를 캡처합니다.
디지털 양식 설정
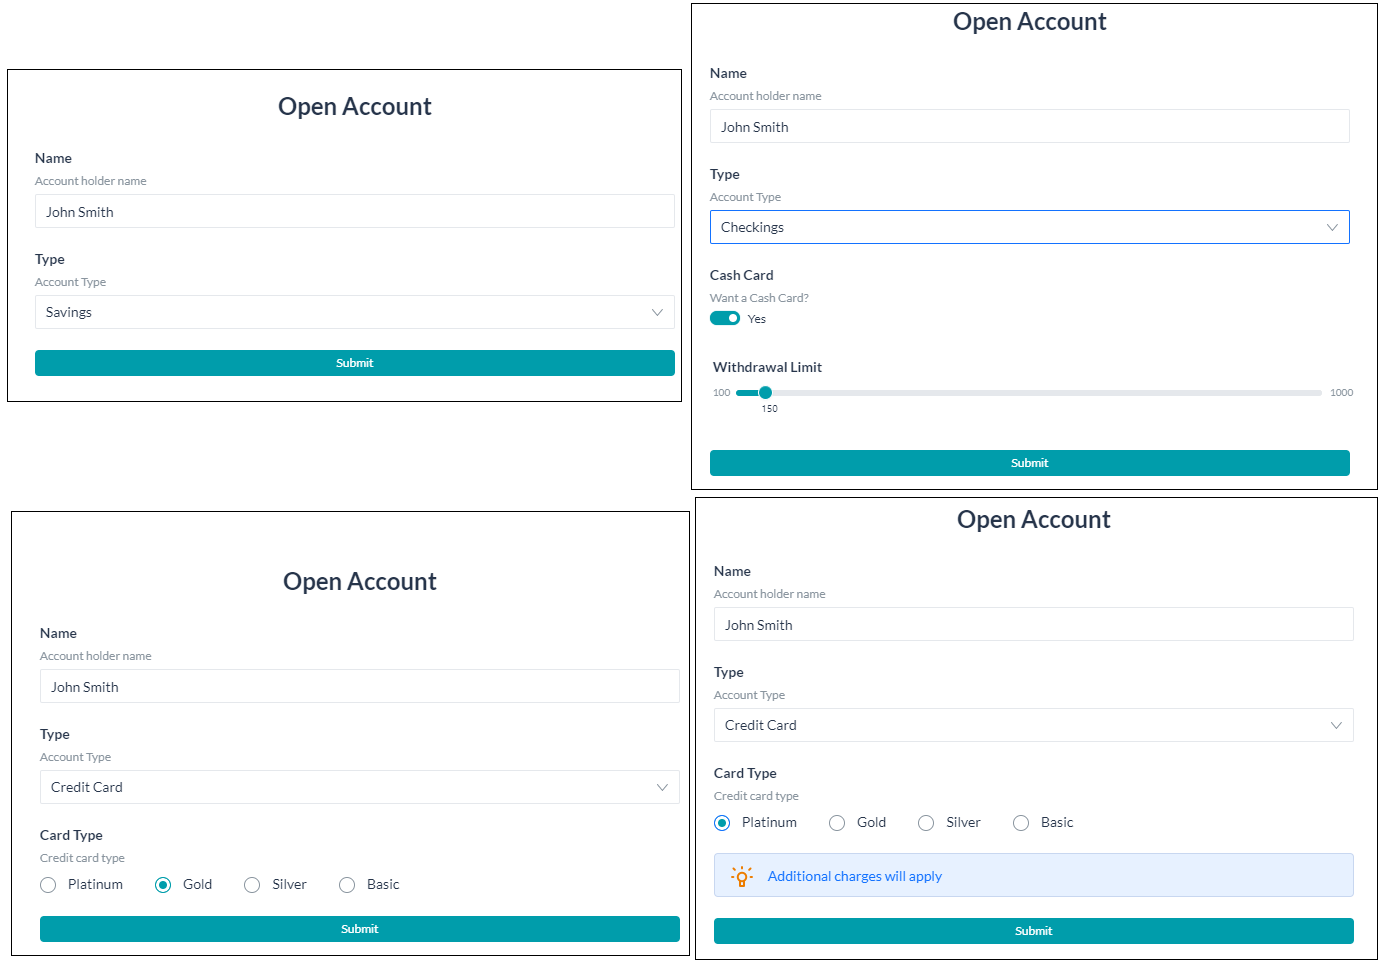
다음 정보를 수집할 양식을 만듭니다:
- 계정 이름 – 사용자 이름과 이를 변경할 옵션이 미리 입력됩니다,
- 사용자가 생성하고자 하는 계정 유형, 저축 계좌로 기본 선택,
- 위에서 선택한 계좌 유형에 따라 다음 세부 정보를 수집하세요:
- 저축 – 추가 정보가 필요하지 않습니다,
- 수표 – 현금 카드가 필요한지 여부, 필요하다면 해당 카드에 적용되는 최대 인출 한도(해당 카드에 100달러에서 1,000달러 사이로 부과됨),
- 신용 카드 – 필요한 카드 유형
- 추가 요금이 부과되는 플래티넘 카드,
- 골드,
- 실버, 또는
- 베이직
양식 생성
- Kore.ai 봇 빌더 플랫폼에서 뱅킹 봇을 엽니다.
- 상단 메뉴에서 구축 탭 선택
- 왼쪽 탐색 메뉴에서 디지털 스킬 -> 디지털 양식을 선택하여 디지털 양식 페이지에 액세스합니다.
- 새 양식을 클릭하고 다음을 입력합니다:
- 이름 – 양식의 이름(예: 계좌 열기)
- 양식에 대한 표시 이름(예: 계좌 열기)
- 양식의 설명
- 다음 단계를 위해 저장 및 진행합니다.

양식 에디터
- 왼쪽에 구성 요소와 빈 양식이 있는 양식 에디터를 엽니다. 필요에 따라 구성 요소를 양식으로 드래그 앤 드랍할 수 있습니다.
- 기본적으로 제출 버튼이 양식에 추가됩니다. 이렇게 하면 사용자 입력을 캡처하고 컨텍스트 객체에 저장하는 제출 이벤트가 트리거 됩니다.
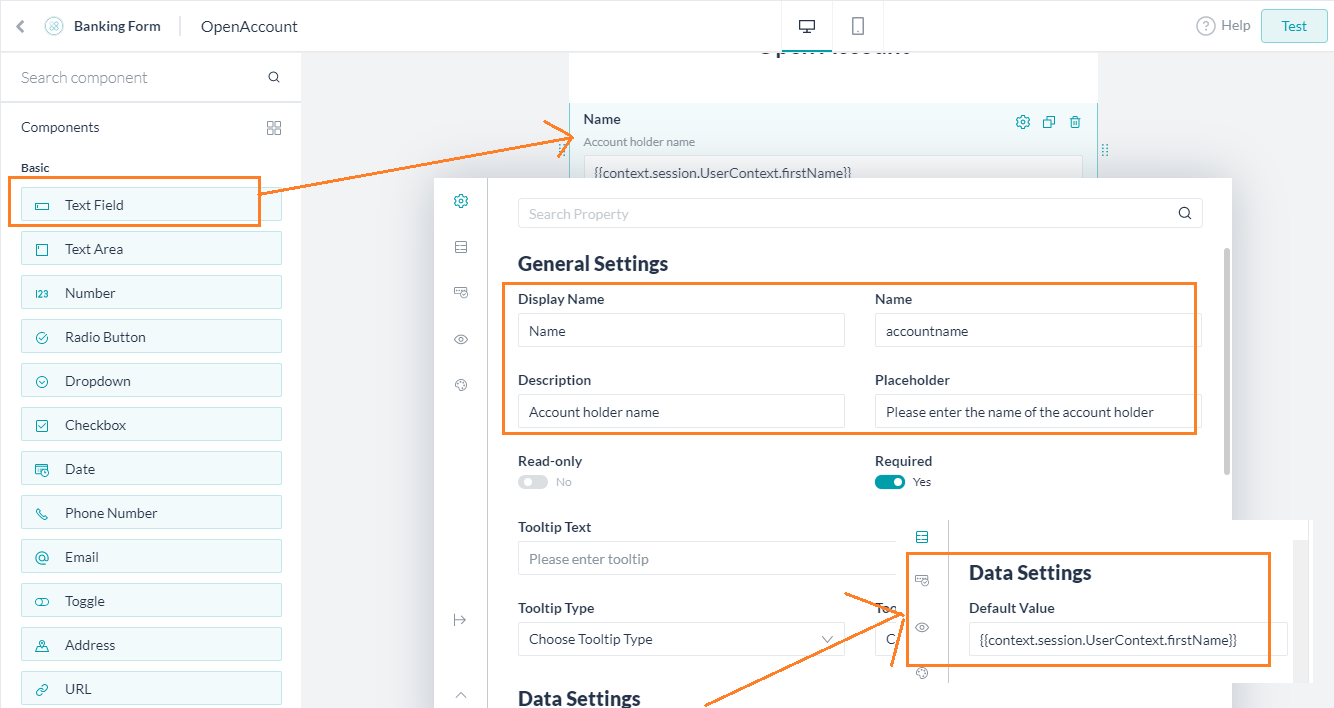
- 텍스트 필드 구성 요소를 양식으로 드래그 앤 드랍합니다.
- 구성 요소를 드래그 앤 드랍하면 해당 속성 설정 패널이 표시됩니다.
- 해당 패널에서 다음 값을 설정합니다:
- 표시 이름(예: 이름).
- 내부 참조에 사용되는 이름(예: accountname).
- 필드의 설명입니다.
- 공란인 경우 필드에 표시될 자리 표시자(예: 계정 소유자의 이름을 입력합니다)입니다.
- 데이터 설정을 스크롤하고 찾아 기본값
{{context.session.UserContext.firstName}}에을 입력합니다. 그러면 로그인 자격 증명에 따라 사용자 컨텍스트에 표시되는 사용자 이름이 필드에 미리 입력됩니다.

- 다음으로, 개설할 계좌 유형에 대한 선택 상자가 표시됩니다.
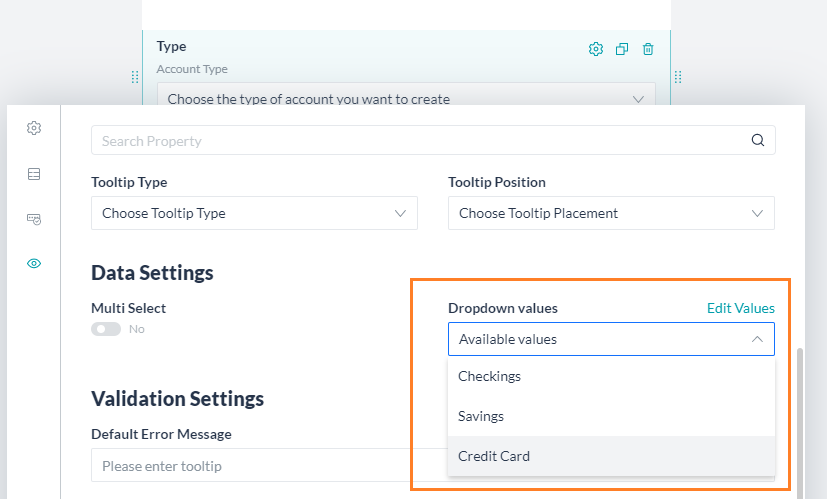
- 드롭다운 구성 요소를 양식으로 드래그 앤 드랍하고 다음 값을 설정합니다:
- 표시 이름(예: 유형).
- 내부 참조에 사용되는 이름(예: 계좌 유형).
- 필드의 설명입니다.
- 공란인 경우 필드에 표시될 자리 표시자(예: 개설하고자 하는 계좌의 유형을 선택합니다)입니다.
- 스크롤 하여 데이터 설정을 찾은 다음 다중 선택 옵션을 선택 취소하고 드롭다운 값에 대해 값 추가를 클릭하여 수표, 저축, 신용 카드 등의 값을 입력합니다. 값 하나를 기본값인 저축으로 표시할 수 있습니다. 실행 시 기본적으로 선택됩니다.
- 다음으로, 계좌 유형이 수표 계좌로 선택된 경우 현금 카드 옵션을 선택합니다.
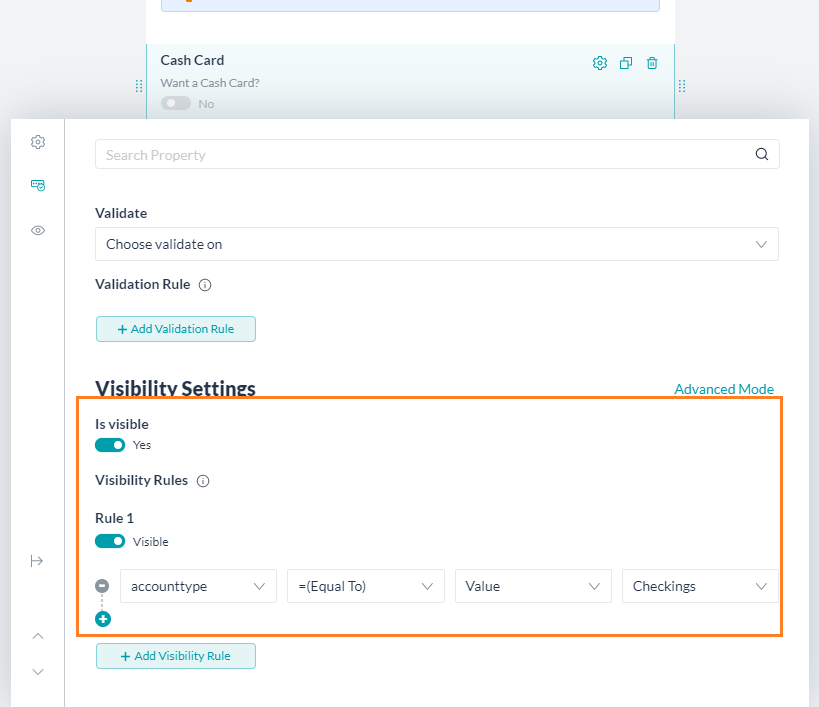
- 토글 구성 요소를 양식으로 드래그 앤 드랍하고 다음 값을 설정합니다:
- 표시 이름 (예: 현금 카드).
- 내부 참조에 사용되는 이름(예: cashcard).
- 필드의 설명입니다. 이 경우, 질문은 현금 카드를 원하시나요?입니다.
- 선택하면 값이 예로, 선택을 취소하면 아니요로 표시됩니다.
- 스크롤 하여 표시 설정을 찾습니다. 이 구성 요소는 계정 유형이 수표로 설정된 경우에만 표시되어야 합니다.
- 표시 필드에 대한 표시 규칙 -규칙 1 추가 계좌 유형 필드, =(동등) 연산자, 비교할 값, 수표 값 선택.
- 사용자가 현금 카드를 선택했다면 인출 한도는 똑같이 설정해야 합니다.
- 범위 슬라이더 구성 요소를 양식으로 드래그 앤 드랍하고 다음 값을 설정합니다:
- 표시 이름(예: 인출 한도).
- 내부 참조에 사용되는 이름(예: 인출 한도).
- 필드의 설명입니다.
- 공란인 경우 필드에 표시될 자리 표시자(예: 인출 한도 설정)입니다.
- 선택 취소는 백분율입니다
- 최솟값은 100이고 최댓값은 1,000입니다 .
- 데이터 설정에서 기본값을 150으로 설정할 수 있습니다. 이 값은 미리 선택되어 있습니다.
- 표시 규칙은 복합 규칙으로, 계정 유형이 수표이고 현금 카드가 선택되었습니다.
- 스크롤 하여 표시 설정을 찾습니다. 이 구성 요소는 계정 유형이 수표 및 체크 카드로 설정된 경우에만 표시되어야 합니다.
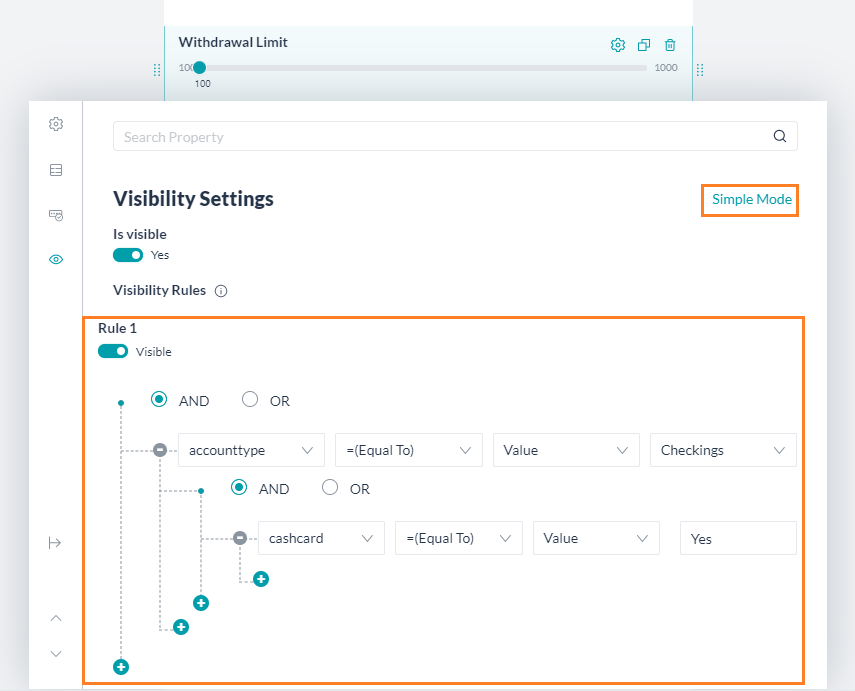
- 표시 필드에 대한 표시 규칙 -규칙 1 추가 계좌 유형 필드, =(동등) 연산자, 비교할 값, 수표 값 및 cashcard 필드 선택, =(동등) 연산자, 비교할 값, 예 값 선택.
- 고급 모드로 전환하여 표시 규칙을 입력할 수 있습니다
- 신용 카드 옵션의 경우 사용자는 카드 유형을 추가로 선택해야 합니다.
- 라디오 버튼 구성 요소를 양식으로 드래그 앤 드랍하고 다음 값을 설정합니다:
- 표시 이름(예: 카드 유형).
- 내부 참조에 사용되는 이름(예: cardtype).
- 필드의 설명입니다.
- 공란인 경우 필드에 표시될 자리 표시자(예: 신용 카드는 유형 선택)입니다.
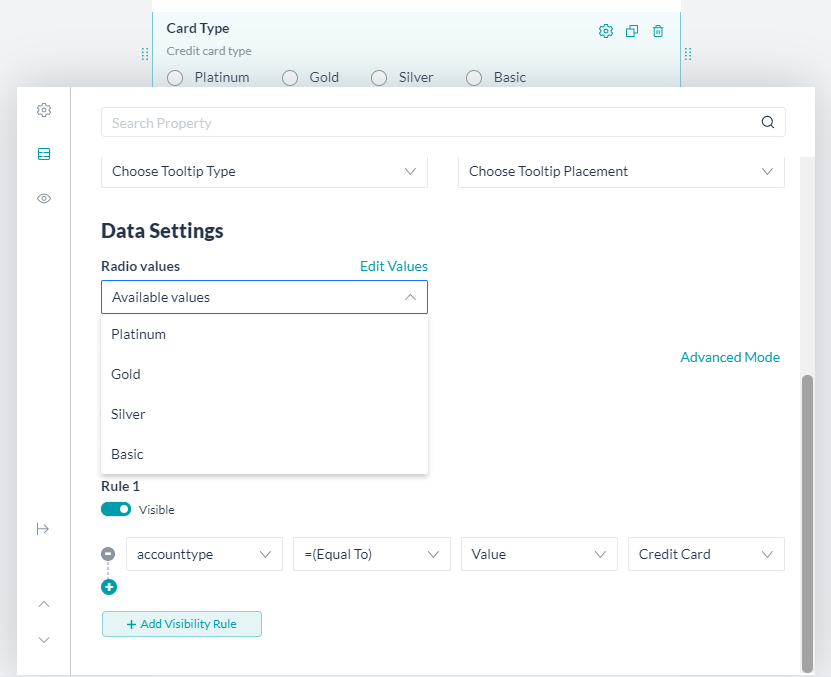
- 데이터 설정에서 라디오값을 플래티넘, 골드, 실버 및 베이직으로 설정할 수 있습니다.
- 스크롤 하여 표시 설정을 찾습니다. 이 구성 요소는 계정 유형이 신용 카드로 설정된 경우에만 표시되어야 합니다.
- 표시 플래그를 예로 설정합니다
- 표시 필드에 대한 표시 규칙 – 규칙 1 추가 계좌 유형 필드, =(동등) 연산자, 비교할 값, 신용 카드 값.
- 마지막으로, 사용자가 플래티넘 카드를 선택할 때 프로 팁입니다.
- 프로 팁 구성 요소를 양식으로 드래그 앤 드랍하고 다음 값을 설정합니다:
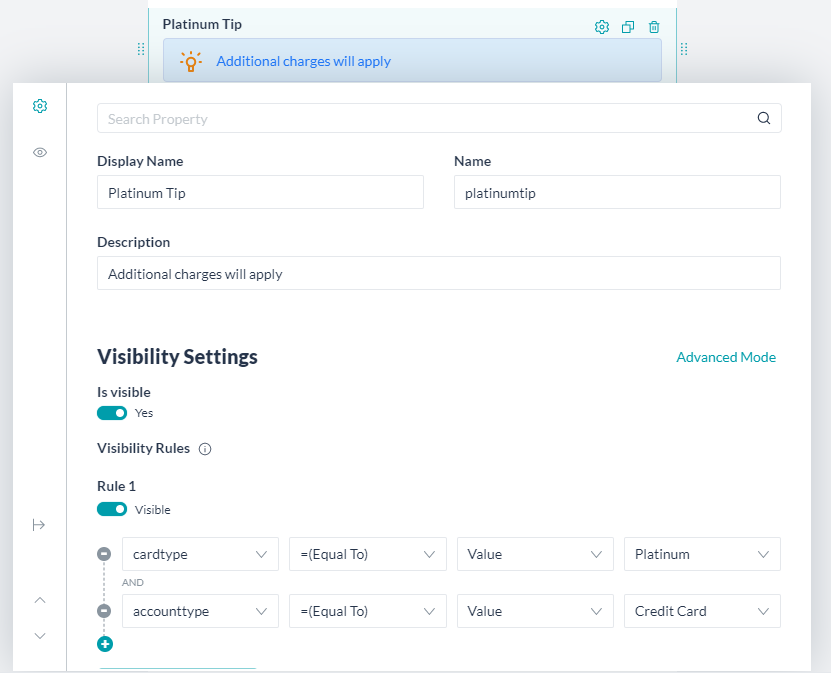
- 표시 이름 (예: 플래티넘 팁).
- 내부 참조에 사용되는 이름(예: platinumtip).
- 설명은 표시하고자 하는 팁입니다(예: 추가 요금이 적용됩니다).
- 스크롤 하여 표시 설정을 찾습니다. 이 구성 요소는 계정 유형이 신용 카드로 설정된 경우에만 표시되어야 합니다.
- 표시 플래그를 예로 설정합니다
- 표시 필드에 대한 표시 규칙 추가 – 규칙 1 추가 계좌 유형 필드,=(동등) 연산자, 비교할 값 , 신용 카드 값 및 cardtype 필드, =(동등) 연산자, 비교할 값, 플래티넘 값.
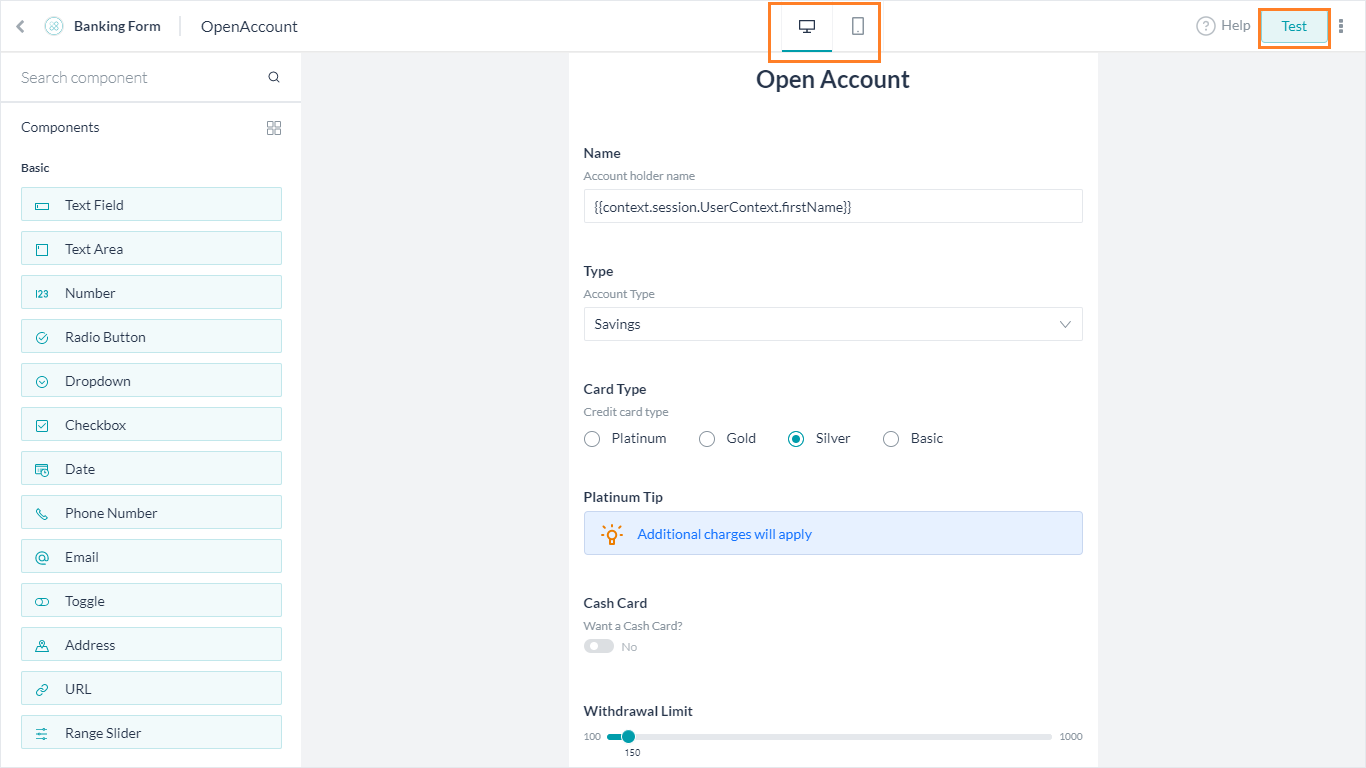
- 양식이 준비되었습니다.
- 데스크톱 보기와 모바일 보기 간에 전환하여 해당 장치에서 어떻게 표시되는지 확인할 수 있습니다.
- 테스트 버튼을 사용하여 미리 보기를 봅니다.
대화 작업 설정
대화 작업을 만들고 양식 노드를 추가하여 위 단계에서 생성한 디지털 양식을 트리거하고 서비스 노드를 사용하여 양식 데이터에서 새 계좌를 추가하기 위해 서비스 노드를 사용할 것입니다.
대화 작업 생성
- 상단 메뉴에서 구축 탭 선택
- 왼쪽 탐색 메뉴에서 대화형 스킬 -> 대화 작업을 선택합니다.
- 대화 작업에서 +를 클릭하여 새 작업 생성
- IntentName 입력(예: 계좌 열기)
- 생성 및 진행하여 대화 빌더 페이지를 엽니다
- 의도 노드 기본 설정을 유지하고 의도 노드를 닫습니다.
- 의도 노드 옆의 +를 클릭하고 양식 옵션을 선택합니다.
- 드롭다운 목록에서 이전에 생성한 양식(계좌 열기)을 선택합니다.

- 양식 경험을 선택하라는 메시지가 표시됩니다. Kore.ai 봇 플랫폼을 사용하면 양식과 채널에 따른 대화를 통해 사용자 입력값을 수집할 수 있습니다.
- 이 활용 사례에서는 UI 양식만 경험을 선택하겠습니다.
- 양식 노드가 추가되면 양식 이름 등을 사용자 커스터마이징 할 수 있습니다.
- 이름을 OpenAccountForm으로, 표시 이름을 계좌 개설을 위한 양식으로 변경합니다.
- 그런 다음 스크립트 노드를 사용하여 양식 노드에서 반환된 값을 캡처하고 같은 값을 표시하는 방법을 살펴보겠습니다.
- 양식 노드에 메시지 노드 추가
- 이름을 FormMessage로 설정하고 표시 이름을 양식 메시지로 설정합니다.
- 응답 관리를 클릭하여 메시지 에디터를 엽니다.

- JavaScript 탭을 선택하여 다음 세부 정보를 입력합니다. 이 코드는 사용자가 양식에 제출한 데이터를 컨텍스트 객체에서 캡처하고 그에 맞춰 이를 표시합니다.
var message;
message = 'You have opened a '+context.forms.OpenAccount.accounttype+' account in the name of '+context.forms.OpenAccount.accountname;
if (context.forms.OpenAccount.accounttype == 'Checkings' && context.forms.OpenAccount.cashcard == 'Yes')
  message = message + ' and opted for cash card with withdrawal limit set to '+ context.forms.OpenAccount.withdrawallimit;
if (context.forms.OpenAccount.accounttype == 'Credit Card')
  message = message + ' and opted for a '+ context.forms.OpenAccount.cardtype+' card';
print(message);
- 양식을 포함한 대화가 준비되었습니다

- 봇과 대화하고 두 대화를 모두 트리거 합니다. 양식이 표시되면 값을 입력한 다음 제출을 클릭하면 메시지가 표시됩니다.

- 위에 표시된 것처럼 컨텍스트 객체를 스크립트 또는 서비스 노드로 추가 처리를 위해 사용할 수 있습니다.
- 이 데이터를 데이터 테이블에 추가하는 방법은 여기를 참고하세요.
결론
이 게시물에서 다음을 살펴보았습니다:
- 디지털 양식을 생성하는 방법,
- 양식에 구성 요소 추가,
- 대화에서 양식을 트리거 하는 방법,
- 제출 후 대화에서 양식 데이터를 캡처하는 방법.
このハウツーでは、ユーザーが追加のアカウントを作成するバンキングボットにおいて、シナリオを探究します。ここでは、デジタルフォームを使用してユーザーから必要な情報を収集し、アカウントを作成する方法をご紹介します。デジタルフォームとは何か、およびKore.aiボットプラットフォームにどのように実装されているのかなどの詳細については、こちらをご参照ください。
問題提起
以下のようなシナリオに取り組もうとするバンキングボットを考えてみましょう。
- すでに登録されているユーザーが、追加で口座を開設したいと思っています。
- 3種類の口座があり、それぞれにオプションが用意されています。
- 普通預金口座;
- キャッシュカードの発行や最低残高の設定が可能な当座預金口座;
- プラチナ、ゴールド、シルバー、ベーシックのいずれかのタイプを選択できるクレジットカード
必要条件
- ボット構築のナレッジ
- バンキングボット
設定
以下のシナリオを一つずつ考えてみましょう。
- ユーザーからの入力を収集するデジタルフォーム
- 次を実行するダイアログタスク:
- 上記デジタルフォームの起動
- ユーザーが入力したアカウント情報の取り込み
デジタルフォームの設定
以下の情報を収集するためのフォームを作成します。
- 口座名 – ユーザーの名前と変更オプションが事前入力されています。
- ユーザーが作成したい口座の種類。デフォルトでは普通預金口座が選択されています。
- 上記で選択された口座の種類に基づいて、以下の詳細が収集されます。
- 普通預金 – それ以上の情報は必要ありません。
- 当座預金 – キャッシュカードが必要かどうか、必要な場合はそのカードに適用される最大引き出し限度額(100ドルから1000ドルの範囲)を確認します。
- クレジットカード – 必要なカードの種類
- プラチナカードには追加料金がかかります。
- ゴールド
- シルバー
- ベーシック
フォームを作成
- Kore.aiボットビルダープラットフォームから、バンキングボットを開きます。
- トップメニューから構築タブを選択します。
- 左側のナビゲーションメニューからデジタルスキル->デジタルフォームを選択すると、「デジタルフォーム」ページが表示されます。
- 新しいフォームをクリックし、以下のように入力します。
- 名前 – フォームの名前 例:OpenAccount
- フォームの表示名 例:口座を開く
- フォームの説明
- 保存して続行で次のステップへ。
フォームエディター
- フォームエディターを開くと、左側にコンポーネントが表示され、空白のフォームが表示されています。必要に応じてコンポーネントをフォームにドラッグアンドドロップできます。
- デフォルトでは、フォームに送信ボタンが追加されています。これにより、送信イベントが発生し、ユーザー入力をキャプチャして、コンテキストオブジェクトに保存します。
- テキストフィールドコンポーネントをフォームにドラッグアンドドロップします。
- コンポーネントをドラッグアンドドロップすると、すぐにそのコンポーネントのプロパティ設定パネルが表示されます。
- そのパネルで以下の値を設定します。
- 表示名:任意の名称(例:口座名)
- 内部参照に使用される名前:(例:accountname)
- フィールドの説明
- フィールドが空白のときに表示されるプレースホルダー値。例:口座名義人の名前を入力してください。
- スクロールしてデータ設定を見つけ、デフォルト値に
{{context.session.UserContext.firstName}}と入力します。これにより、ログイン資格情報に基づいて、ユーザーのコンテキストに表示されるユーザー名がフィールドに事前入力されます。
- 次に、開設する口座の種類を選択するボックスがあります。
- ドロップダウンコンポーネントをフォームにドラッグアンドドロップし、以下の値を設定します。
- 表示名例:タイプ。
- 内部的な参照に使用される名前例:accounttype。
- フィールドの説明 。
- 開設する口座の種類を選択してくださいのように、空白のときにフィールドに表示されるプレースホルダー 値。
- スクロールしてデータ設定を探し、複数選択のオプションを解除し、ドロップダウン値 に対して 値を追加をクリックして、小切手、貯金、クレジットカードの値を入力します。1つの値、普通預金をデフォルトとしてマークすることができます。これは、実行時にデフォルトで選択されます。
- 次に、口座の種類が当座預金の口座に選択されている場合、キャッシュカードオプションを選択します。
- トグルコンポーネントをフォームにドラッグアンドドロップし、以下の値を設定します。
- 表示名例:キャッシュカード。
- 内部的な参照に使用される名前例:cashcard。
- フィールドの説明 。この場合は、質問、キャッシュカードが欲しいですか?
- 選択されている場合は、はい、非選択の場合は、いいえ という値 。
- スクロールして、可視性設定を探します。このコンポーネントは、口座の種類が当座預金に設定されている場合にのみ表示されます。
- 可視性ルール- ルール1 フィールドに追加表示の場合、accounttype フィールドを選択, =(Equal To) 演算子、 値を当座預金値と比較。
- ユーザーがキャッシュカードを選択した場合は、引き出し限度額を設定する必要があります。
- レンジスライダーコンポーネントをフォームにドラッグアンドドロップし、以下の値を設定します。
- 表示名例:引き出し限度額。
- 内部的な参照に使用される名前例:withdrawallimit。
- フィールドの説明 。
- フィールドが空白の場合に表示されるプレースホルダー 値、例: 引き出し限度額を設定。
- 選択解除 はパーセンテージ
- 最小値は100、最大値は 1000。
- データ設定では、デフォルト値を150に設定でき、これは事前選択されています。
- 可視性ルールは複合ルールであり、口座の種類が当座預金で、キャッシュカードが選択されています。
- スクロールして、可視性設定を探します。このコンポーネントは、口座の種類が当座預金に設定されていて、かつキャッシュカードが選択されている場合にのみ視認できます。
- 可視性ルール を追加 – ルール 1 フィールドが視認できる条件として、accounttype フィールド , =(Equal To) 演算子、値比較対象、当座預金値 ANDキャッシュカードフィールドの選択、 =(Equal To) 演算子、値 選択対象、はい値を選択します。
- 詳細モードに切り替えて、可視性ルールを入力することができます
- クレジットカードオプションでは、カードの種類を選択する必要があります。
- ラジオボタンコンポーネントをフォームにドラッグアンドドロップし、以下の値を設定します。
- 表示名例:カードの種類。
- 内部的な参照に使用される名前例:cardtype。
- フィールドの説明 。
- フィールドが空白のときに表示されるプレースホルダー値。例: クレジットカードの種類を選択してください。
- データ設定では、ラジオ値をプラチナ、ゴールド、シルバー、および ベーシックに設定できます。
- スクロールして、可視性設定を探します。このコンポーネントは、口座の種類がクレジットカードに設定されている場合にのみ視認できます。
- 視認できるフラグをはいに設定
- 可視性ルール- ルール1 フィールドに追加視認できる場合、accounttype フィールドを選択, =(Equal To) 演算子、 値をクレジットカード値と比較。.
- 最後に、ユーザーがプラチナカードを選択したときのヒントです。
- ヒントコンポーネントをフォームにドラッグアンドドロップし、以下の値を設定します。
- 表示名例:プラチナチップ。
- 内部的な参照に使用される名前例:platinumtip。
- 説明には、表示したい情報を入力します。例:追加料金が発生します。
- スクロールして、可視性設定を探します。このコンポーネントは、口座の種類がクレジットカードに設定されている場合にのみ視認できます。
- 視認できるフラグをはいに設定
- 可視性ルール を追加 – ルール 1 フィールドが視認できる条件として、accounttype フィールド , =(Equal To) 演算子、値比較対象、クレジットカード値およびキャッシュカード フィールドの選択、 =(Equal To) 演算子、値 選択対象、プラチナ値を選択します。
- フォームの準備ができました。
- デスクトップ表示とモバイル表示を切り替えて、それらのデバイスでの見え方を確認することができます。
- テスト ボタンを使用して、プレビューを見ることができます。
ダイアログタスク設定
ここでは、ダイアログタスクを作成し、フォームノードを追加して、上記のステップで作成したデジタルフォームをトリガーし、サービスノードを使用して、フォームデータから新しい口座を追加するためのサービスコールを行います。
ダイアログタスクを作成
- トップメニューから構築タブを選択します。
- 左側のナビゲーションメニューから、会話スキル->ダイアログタスクを選択します。
- ダイアログタスクの+をクリックして、新しいタスクを作成します。
- IntentNameを入力します。例:OpenAccount
- 作成して続行し、ダイアログビルダーのページを開きます。
- インテントノードのデフォルト設定を維持して、インテントノードを終了します。
- インテントノードの横にある+をクリックして、フォームを選択します。
- ドロップダウンリストから、先ほど作成したフォーム(OpenAccount)を選択します。
- フォームエクスペリエンスを選択するように指示されます。Kore.ai Botsプラットフォームでは、フォームからの入力と、チャネルに応じた会話の両方によって、ユーザー入力を集めることができます。
- 今回のユースケースでは、フォームUIのみのエクスペリエンスを選択してみましょう。
- フォームノードが追加され、フォーム名などをカスタマイズできるようになります。
- 名前をOpenAccountFormに変更し、表示名 を口座開設用のフォームに変更しています。
- 次に、スクリプトノードを使用し、表示して、フォームノードから返された値をキャプチャする方法を見ていきましょう。
- フォームノードに メッセージノード を追加します。
- 名前をFormMessageに、表示名をフォームメッセージに設定します。
- レスポンスを管理をクリックして、メッセージエディターを開きます。
- JavaScriptタブを選択し、以下のコードを入力します。このコードは、ユーザーがフォームで送信したデータをコンテキストオブジェクトから取得し、それに合わせて表示します。
var message;
message = 'You have opened a '+context.forms.OpenAccount.accounttype+' account in the name of '+context.forms.OpenAccount.accountname;
if (context.forms.OpenAccount.accounttype == 'Checkings' && context.forms.OpenAccount.cashcard == 'Yes')
  message = message + ' and opted for cash card with withdrawal limit set to '+ context.forms.OpenAccount.withdrawallimit;
if (context.forms.OpenAccount.accounttype == 'Credit Card')
  message = message + ' and opted for a '+ context.forms.OpenAccount.cardtype+' card';
print(message);
- フォーム付きダイアログの準備ができました。
- ボットと会話 および上記のダイアログが表示されます。フォームが表示されますので、値を入力して[送信]をクリックすると、メッセージが表示されます。
- 上記のようなコンテキストオブジェクトを、スクリプト ノードやサービスノードで使用して、さらに処理を行うことができます。
- このデータをデータテーブルに追加する方法については、こちらをご覧ください 。
まとめ
この記事では、以下を見てきました。
- デジタルフォームの作成方法、
- フォームにコンポーネントを追加、
- ダイアログからFromを起動する方法
- ダイアログの送信後にフォームデータをキャプチャする方法
Leave a Reply
In this How-To, we will explore a scenario in a Banking Bot, where the user can create an additional account. We will see how Digital Forms can be used to gather all the required information from the user and create the account.
For details on what Digital Forms are and how it is implemented in the Kore.ai Bots platform, refer here.
Problem Statement
Consider a Banking Bot trying to address the following scenarios:
- An already registered user wants to open an additional account.
- There are three types of accounts that are available, each with further options:
- Savings Account;
- Checking Account with an option to opt for a Cash Card and set a Minumum Balance;
- Credit Card with an option to choose the type of card to be Platinum, Gold, Silver or Basic
Pre-requisites
- Bot building knowledge
- A Banking Bot
Configurations
Let us consider each of the following scenarios one by one:
- Digital Form to gather input from the user;
- Dialog Task to:
- trigger the above Digital Form; and
- capture the user-entered account information.
Digital Form Configuration
Create a form to gather the following information:
- Account Name – pre-populated with the user’s name with an option to change it;
- Type of Account that the user wants to create, default selection to Savings Account;
- Based on the type of account selected above the following details to be gathered:
- Savings – no further information needed;
- Checkings – whether Cash Card is required, if yes then the maximum withdrawal limit (range between $100 to $1000) to be enforced on that card;
- Credit Card – the type of card required
- Platinum card levies additional charge,
- Gold,
- Silver, or
- Basic
Form Creation
- From the Kore.ai Bot Builder platform, open the Banking Bot.
- Select the Build tab from the top menu.
- From the left navigation menu, select Digital Skills -> Digital Forms to access the Digital Forms page.
- Click New Form and enter the following:
- Name – name to the form, say OpenAccount
- Display Name for the form, say Open an Account
- Description of the form.
- Save & Proceed to the next step.
Form Editor
- Form Editor opens with components on the left, and a blank form. You can drag and drop components to the form as per your requirement.
- By default, a Submit button is added to the form. This would trigger the submit event which would capture the user input and save in context object.
- Drag and drop a Text Field component onto the form.
- As soon as you drag and drop a component, its property settings panel will be displayed.
- In that panel set the following values:
- Display Name say Name.
- Name used for internal reference, say accountname.
- Description of the field.
- Placeholder value to be displayed in the field when blank, say, Enter the name of the account holder.
- Scroll and locate Data Settings and for Default Value enter
{{context.session.UserContext.firstName}}this would pre-populate the field with the user name as it appears in the user context based on the login credentials.
- Next, a selection box for the type of account to be opened.
- Drag and drop a Dropdown component onto the form and set the following values:
- Display Name say Type.
- Name used for internal reference, say accounttype.
- Description of the field.
- Placeholder value to be displayed in the field when blank, say, Select the type of account you want to open.
- Scroll and locate Data Settings, deselect Multi Select option and against Dropdown values click Add Values to enter the values – Checkings, Savings, Credit Card. You can mark one value, Savings, as default. This would be selected by default at the time of execution
- Next, for the Cash Card option when the account type is selected to be a Checkings account.
- Drag and drop a Toggle component onto the form and set the following values:
- Display Name say Cash Card.
- Name used for internal reference, say cashcard.
- Description of the field. In this case, the question, Want a cash card?
- Value as Yes when selected and No when deselected.
- Scroll and locate Visibility Settings. This component should be visible only when the account type is set to Checkings.
- Add Visibility Rules – Rule 1 for the field to be Visible when, select, accounttype field, =(Equal To) operator, Value comparison with, Checkings value.
- If the user opts for cash card, then the withdrawal limit needs to be set on the same.
- Drag and drop a Range Slider component onto the form and set the following values:
- Display Name say Withdrawal Limit.
- Name used for internal reference, say withdrawallimit.
- Description of the field.
- Placeholder value to be displayed in the field when blank, say, Set the withdrawal limit.
- Deselect Is Percentage
- Value as 100 for Min and 1000 for Max.
- Under Data Settings, you can set the Default Value to be 150, this would be pre-selected.
- Visibility Rules would be a compound rule – account type is checkings and cash card is selected.
- Scroll and locate Visibility Settings. This component should be visible only when the account type is set to Checkings and the Cash Card is opted.
- Add Visibility Rules – Rule 1 field to be visible when, select, accounttype field, =(Equal To) operator, Value comparison with, Checkings value AND selecting cashcard field, =(Equal To) operator, Value comparison with, Yes value.
- You can switch to Advanced Mode to enter the visibility rules
- For the Credit Card option, the user needs to further select the type of card.
- Drag and drop a Radio Button component onto the form and set the following values:
- Display Name say Card Type.
- Name used for internal reference, say cardtype.
- Description of the field.
- Placeholder value to be displayed in the field when blank, say, Choose the type of credit card.
- Under Data Settings, you can set the Radio values to be Platinum, Gold, Silver, and Basic.
- Scroll and locate Visibility Settings. This component should be visible only when the account type is set to Credit Card.
- Set Is visible flag to Yes
- Add Visibility Rules – Rule 1 for the filed to be Visible when, select, accounttype field, =(Equal To) operator, Value comparison with, Credit Card value.
- Finally, the Pro-Tip, when user selects a Platinum card.
- Drag and drop a Pro Tip component onto the form and set the following values:
- Display Name say Platinum Tip.
- Name used for internal reference, say platinumtip.
- Description would be the tip you want to display, say, Additional charges will apply.
- Scroll and locate Visibility Settings. This component should be visible only when the account type is set to Credit Card.
- Set Is visible flag to Yes
- Add Visibility Rules – Rule 1 for the field to be Visible when, select, accounttype field, =(Equal To) operator, Value comparison with, Credit Card value AND selecting cardtype field, =(Equal To) operator, Value comparison with, Platinum value.
- Your form is ready.
- You can toggle between Desktop View and Mobile View to see how it looks in those devices.
- Use the Test button to see a preview.
Dialog Task Configuration
We will be creating a dialog task and adding a form node to trigger the Digital Form created in the above step and use a service node to make a service call to add the new account from the form data.
Create Dialog Task
- Select the Build tab from the top menu
- From the left navigation menu, select Conversational Skills -> Dialog Tasks.
- Click the + against the Dialog Tasks to create a new Task
- Enter IntentName, say, OpenAccount
- Create & Proceed to open the dialog builder page.
- Retain the Intent Node default settings, and close the Intent Node.
- Click the + next to the intent node and select the Form option.
- From the dropdown list select the form (OpenAccount) we created earlier.
- You will be prompted to select the Form Experience. Kore.ai Bots platform allows you to gather user input both from the form and through conversation based on the channel.
- For this use case, let us select Only Form UI experience.
- A Form Node would be added, you can customize the form name, etc.
- We are changing the Name to OpenAccountForm and Display Name to Form to open account.
- Next, we will see how to capture the values returned by the Form Node using a Script node and displaying the same.
- Add a Message Node to the form node.
- Set the Name to FormMessage and Display Name to Form Message.
- Click the MANAGE RESPONSES to open the message editor.
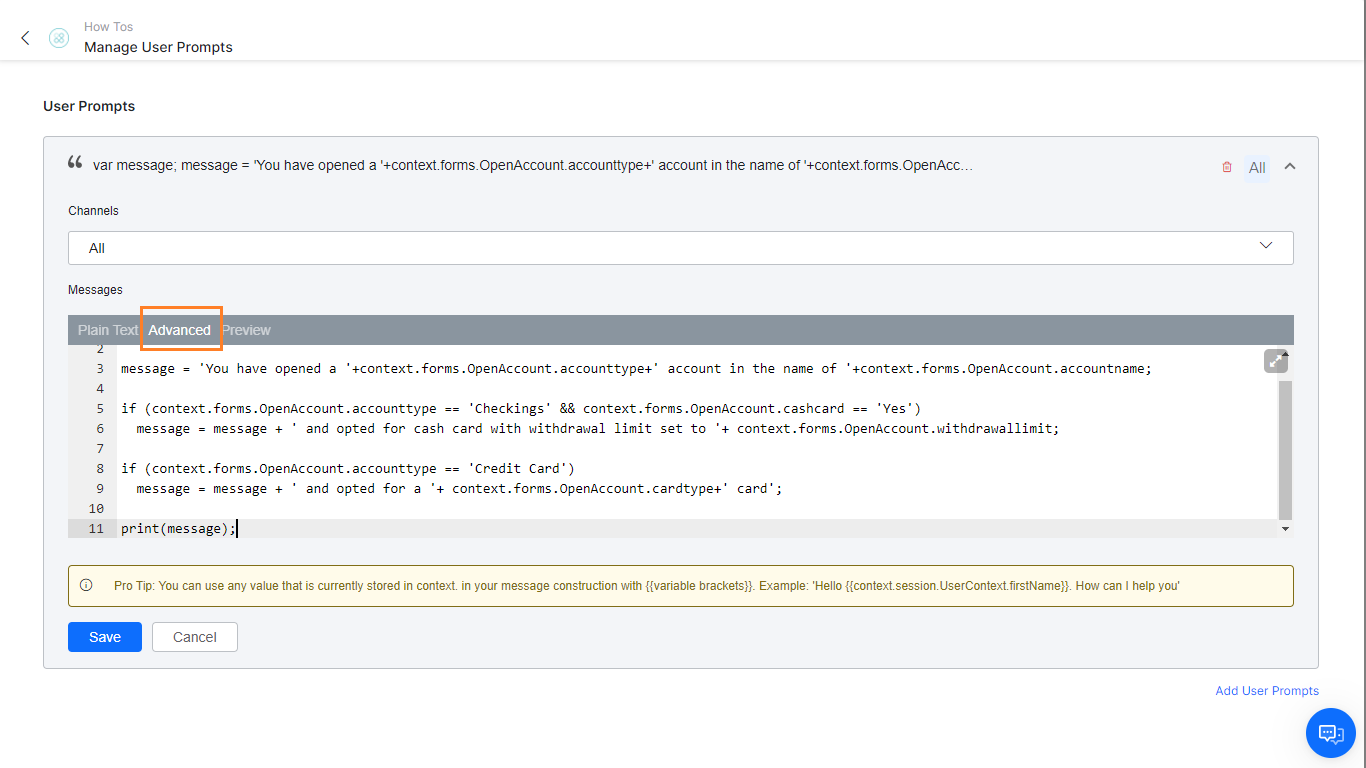
- Select the JavaScript tab and enter the following code. This code would capture from the context object, the data submitted by the user in the Form and display it accordingly.
var message;
message = 'You have opened a '+context.forms.OpenAccount.accounttype+' account in the name of '+context.forms.OpenAccount.accountname;
if (context.forms.OpenAccount.accounttype == 'Checkings' && context.forms.OpenAccount.cashcard == 'Yes')
  message = message + ' and opted for cash card with withdrawal limit set to '+ context.forms.OpenAccount.withdrawallimit;
if (context.forms.OpenAccount.accounttype == 'Credit Card')
  message = message + ' and opted for a '+ context.forms.OpenAccount.cardtype+' card';
print(message);
- Your dialog with form is ready
- Talk to bot and trigger the above dialog. The form will be displayed, enter the values and click Submit, the message would be displayed.
- You can use the context object as shown above it a Script or Service nodes for further processing.
- See here for how to add this data into data tables.
Conclusion
In this post, we have seen:
- How to create a Digital Form;
- Add components to the Form;
- How to trigger the From from a Dialog;
- How to capture the Form data from the Dialog post submission.