개발자가 세부 정보를 코딩하지 않아도 플랫폼이 사용자 발화에 응답하는 위치가 여러 곳 있습니다. 예를 들면 다음과 같습니다.

  • 기본 대화 봇이 사용자 의도를 찾지 못하거나 이해하지 못하는 경우.
  • 표준 응답 특정 질문, 인사말, 오류 및 경고 시나리오 등.
  • 이벤트 관리자 특정 일반 봇 이벤트를 정의할 수 있습니다. 자세히 확인하려면 여기를 클릭하세요.

이는 기본적으로 플랫폼에서 설정하지만, 비즈니스 요구 사항에 따라 사용자 정의할 수 있습니다. 이 문서에서는 이러한 사용자 정의를 살펴봅니다.

기본 대화

Kore.ai용 자연어 처리기가 사용자 의도를 결정하지 못하는 경우 대화 작업을 실행하거나 표준 오류 메시지를 표시하도록 선택할 수 있습니다. 기본 설정은 표준 오류 메시지를 표시하는 것입니다. 빌드 탭의 왼쪽 메뉴에서 인텔리전스 > 기본 대화를 클릭하여 기본 대화 작업을 정의합니다. 예를 들어, 봇에서 라이브 상담사로 대화를 전환하거나 사용자 의도가 봇 대화에서 결정되지 않은 경우 기본 메뉴와 같은 일반 대화를 실행할 수 있습니다. 기본 대화 작업이 정의되지 않은 경우 표준 오류 메시지와 표준 응답 섹션에 정의된 모든 사용자 정의가 사용됩니다. 다음 그림은 은행 포털 봇이 사용자 의도를 결정하지 못하는 경우 계정 도움말 가져오기 대화 작업을 실행하도록 설정한 봇 빌더의 기본 대화 섹션의 예입니다.

기본 대화 정의

다음 절차를 완료하려면 기본 대화로 선택할 대화를 미리 정의해야 합니다.

  1. 상단 메뉴에서 빌드 탭을 선택합니다.
  2. 왼쪽 메뉴에서 인텔리전스 > 기본 대화 옵션을 클릭합니다.
  3. 사용자의 의도를 알 수 없는 경우 섹션에서 대화 작업 자동 실행을 선택합니다.
  4. 기본 대화 작업 필드의 목록에서 기본 대화를 선택합니다.
  5. 저장을 클릭합니다.

설정이 성공적으로 저장됨 메시지가 표시됩니다.

표준 응답

Kore.ai 봇 빌더 도구에서 기본 자연어 처리 또는 사용자 입력 또는 이벤트에 대한 NLP 인터프리터 응답을 볼 수 있습니다. 예: 사용자 입력에 대한 응답 안녕! 봇은 실행 시 임의로 선택된 다음 응답 중 하나로 응답합니다.

  • 안녕!
  • 안녕하세요
  • 안녕하세요!
  • 안녕하세요 🙂

NLP 인터프리터는 이벤트, 조건, 트리거 또는 사용자 입력에 따라 사용자에게 미리 정의된 텍스트 응답을 표시합니다. 사용자 정의 봇과 이 봇의 사용자에 따라 이벤트 또는 입력 요청에 대해 표시되는 사용자의 기본 응답을 수정할 수 있습니다. 예

  • 사용자 입력 – 태어난 해가 언제입니까?
  • 이벤트 – 인증 실패
  • 트리거 – 작업이 취소되었습니다

표준 봇 응답을 모두 정의하거나 정의하기를 원하는 경우 사용자가 속한 지정된 채널에만 표시되는 채널 재정의 응답을 추가할 수 있습니다. 그렇지 않으면 표준 기본 응답 중 하나가 표시됩니다. 기본 표준 응답의 전체 목록을 보려면 여기를 클릭하세요. 예를 들어 SMS 채널에서는 데이터를 저장하기 위해 짧은 봇 응답만 사용할 수 있습니다.

기본 응답

봇 빌더의 기본 응답에 액세스하고 관리하려면 다음 단계를 따르십시오.

  • 상단 메뉴에서 빌드 탭을 선택합니다
  • 왼쪽 메뉴에서 인텔리전스 > 표준 응답을 클릭합니다.

각 표준 응답 카테고리 탭에 이벤트나 사용자 입력 다음에 하나 이상의 NLP 인터프리터 표준 응답이 나열됩니다. 기본 응답을 수정할 수 있으며, 필요한 경우 사용자 입력 또는 시스템 이벤트에 대한 응답으로 NLP 인터프리터가 임의로 선택한 추가 응답을 추가할 수 있습니다. 표준 응답 섹션에서 표준 봇 응답은 다음의 탭으로 분류됩니다.

  • 구문 – 봇 또는 사용자의 조치 결과로 사용자에게 표시되는 응답입니다. 예를 들어, 사용자가 작업을 취소하거나 사용자가 봇 요청에 잘못된 응답을 제공하는 경우를 들 수 있습니다.
  • 쿼리 – 봇에서 사용자에게 추가 정보를 요청하는 구문입니다. 예: 어떤 필드를 변경하시겠습니까?
  • 오류 및 경고 – 시나리오 중 오류가 발생할 경우 봇에서 사용자에게 보내는 문구(예:종료 날짜는 시작 날짜 이전이거나 같을 수 없습니다)
  • 질문 – 봇이 다른 카테고리에 포함되지 않을 경우 사용자에게 제공할 수 있는 질문입니다.
  • 선택 – 봇이 예/아니요 입력을 요청합니다. 예: 이 작업이 발생할 때마다 푸시 알림을 받으시겠습니까?
  • 인사말 – 봇을 설치할 때 봇의 최초 응답이나 다른 최초 연락. 예: 일정 기간 비활동 후 사용자가 다시 상호 작용을 하는 경우입니다.

응답 추가 및 편집

새 표준 응답 추가 참고 사항: 사용자에게 모호성이 제시되는 조건에서 표준 응답이 업데이트되는 경우 봇 응답에 모호한 선택 항목이 표시되지 않으므로 getChoices() 함수를 사용하여 모호성 목록을 표시해야 합니다(아래 6번 참조).

  1. 표준 응답에 대한 탭 카테고리를 선택합니다. 예: 인사말을 선택한 다음 응답을 추가하려는 상황을 지정하세요. 응답 추가를 클릭합니다.
    1. 채널 오버라이드 추가 대화 상자가 표시됩니다.
    2. 채널 선택 드롭다운 목록에서 채널을 선택하여 채널별 응답을 생성합니다. ‘모든 채널’ 옵션을 선택하여 모든 채널에 대한 응답을 활성화할 수 있습니다.
    3. 채널별 응답의 경우 작업 선택 드롭다운 목록에서 모든 작업을 선택하여 모든 작업에 이 채널별 응답을 적용하거나 특정 작업을 선택합니다.
    4. 특정 작업을 선택하면 필드 선택 드롭다운이 표시됩니다. 이 채널별 응답에 대한 모든 필드 또는 특정 필드를 선택합니다.
    5. 봇의 응답 편집기에서 단순 모드 탭의 기본 편집기 컨트롤을 사용하여 이 채널에 대한 기본 봇 응답을 재정의하거나 고급 모드 탭의 응답에 대한 사용자 정의 JavaScript를 작성할 수 있습니다. 다음의 경우:
      • 단순 모드 탭 – 기본 표준 응답의 텍스트를 입력합니다. 예: 반가워요. 당신이 다시 오시기를 기다렸어요!(*There* you are, I was ~hoping~ you would return soon!)를 입력한 다음 굵게, 기울임 꼴, 머리글 스타일, 하이퍼링크, 순서 있는 목록 및 순서 없는 목록의 형식화된 버튼을 사용하여 선택적으로 텍스트 형식을 지정합니다. 자세한 내용은 프롬프트 편집기 사용을 참조하세요.
      • 고급 모드 탭 – 다음 코드 예제에서 설명한 내용과 같이 JavaScript를 입력하여 채널 메시지를 재정의합니다.

        참고 사항: 다음 키를 사용하여 기본값을 반환합니다. response.message – 기본 메시지를 문자열로 반환합니다. response.choices – 옵션 선택 또는 확인 메시지 유형을 배열로 반환합니다.

        • Slack 채널 재정의 예시
          var message = {};
          var attachments = [];
          var attachment = {
              'text': "Exception occurred during API execution",
              'color': '#FFCC00',
              'attachment_type': 'default'
          };
          attachments.push(attachment);
          message.attachments = attachments;
          print(JSON.stringify(message));
        • FaceBook 채널 재정의 예시
          var message = {
              text: response.message
          };
          var buttons = [];
          for (var i = 0; i < response.choices.length; i++) {
              var choiceItem = response.choices[i];
              if (choiceItem.length > 20) {
                  choiceItem = choiceItem.substring(
                      0, 18) + '..';
              }
              var element = {
                  content_type: 'text',
                  title: choiceItem,
                  payload: choiceItem
              };
              buttons.push(element);
          }
          message.quick_replies = buttons;
          print(JSON.stringify(message));
        • 이메일 채널 재정의 예시
          var message = {};
          var text = response.message + ' <br> ';
          for (var i = 0; i < response.choices.length; i++) {
              text = text.concat(
                  '<u> + response.choices[i] + ' <
                  /u> <br>');
              }
              message.text = text;
              print(JSON.stringify(message));
        • SMS 채널 재정의 예시
          var message = {};
              var indexArray = ['a', 'b', 'c',
                  'd', 'e',
                  'f', 'g', 'h', 'i', 'j',
                  'k', 'l', 'm', 'n', 'o',
                  'p', 'q', 'r', 's', 't',
                  'u', 'v', 'w', 'x', 'y',
                  'z'
              ];
              var text = response.message + '\\n';
              for (var i = 0; i < response.choices
                  .length; i++) {
                  text = text.concat(indexArray[i] +
                      ') ' + response.choices[
                          i] + '\\n');
              }
              message.text = text;
              print(JSON.stringify(message));
    6. getChoices() 함수를 사용하면 메시지 형식 템플릿을 통해 응답 표시 형식을 사용자 정의할 수도 있습니다. getChoices( ) 함수가 호출되고 모호성이 있는 경우 플랫폼은 최종 사용자에게 옵션을 제공하기 위해 사용하는 배열로 모호한 선택 정보를 반환합니다. 예: 이런 뜻이 맞습니까의 표준 응답을 버튼 형식으로 표시하려면 다음 코드를 사용할 수 있습니다.
      var info =getChoices() ;
      var message = {
      "type": "template",
      "payload": {
        "template_type": "button",
        "text": "Did you mean",
        "subText": "You can now customize response for did you mean",
        "buttons": []
       }
      };
      for (i = 0; i < info.length; i++) {
      var button = {
        "type": "postback",
        "title": info[i],
        "payload": "payload1"
      };
      
      message.payload.buttons.push(button);
      }
      print(JSON.stringify(message)); 
      
    7. 완료를 클릭하여 응답 편집 대화를 저장하고 닫은 다음 새 표준 응답을 적용합니다.

開発者が詳細なコードを書かなくても、プラットフォームがユーザーの発話に応答できる場面がいくつかあります。たとえば、:

  • ユーザー インテントが検出されない場合やボットが理解できない場合の、デフォルトのダイアログ
  • 特定の質問やあいさつ、エラーおよび警告のシナリオなどへの標準応答
  • イベント ハンドラで特定の共通ボット イベントを定義することができます。詳細については、こちらをご覧ください。

これらはプラットフォームによりデフォルトで設定されていますが、ビジネス要件に応じてカスタマイズすることができます。このドキュメントでは、そのようなカスタマイズについて説明しています。

デフォルト ダイアログ

Kore.ai の自然言語処理がユーザーのインテントを決定できない場合、ダイアログ タスクを実行するか標準のエラー メッセージを表示するかを選択することができます。デフォルトでは、エラー メッセージを表示するように設定されています。[自然言語] > [デフォルトの会話] セクションで、[デフォルト ダイアログ] タブを選択してデフォルトのダイアログ タスクを定義します。たとえば、ボットからライブ エージェントへ会話を切り替えたり、ボットとの会話でユーザー インテントが決定できない場合は、メイン メニューのような汎用ダイアログを実行したりすることができます。デフォルト ダイアログ タスクが定義されていない場合は、標準エラー メッセージや「標準応答」セクションで定義されているカスタマイズが使用されます。以下の図は、銀行ポータル ボットで、ユーザー インテントが決定できない場合にアカウント ヘルプの取得ダイアログ タスクを実行するように設定されたボットビルダーの、「デフォルト ダイアログ」セクションの例です。

デフォルト ダイアログの定義

以下の手順を完了するには、デフォルト ダイアログとして選択できる 1 つのダイアログがあらかじめ定義されている必要があります。

  1. [自然言語] > [デフォルトの会話] タブで、「デフォルト ダイアログ」セクションを選択します
  2. 「ユーザーのインテントを理解できない場合」のセクションで、[ダイアログ タスクを自動的に実行] を選択します。
  3. 表示されている [デフォルト ダイアログ タスク] フィールドで、リストからデフォルトのダイアログを選択して [保存] をクリックします。

「設定が正常に保存されました」のメッセージが表示されます。

標準応答

Kore.ai ボットビルダー ツールでは、デフォルトの自然言語処理や、ユーザー入力やイベントに対する NLP インタープリタの応答を確認することができます。たとえば、ユーザーの「やあ!」という入力に対し、ボットは実行時に以下の応答のうち 1 つをランダムに選択して返答します。

  • やあ
  • こんにちは
  • こんにちは!
  • どうも 🙂

NLP インタープリタは、イベントや条件、トリガーまたはユーザー入力に基づいて事前定義されたテキストの応答をユーザーに表示します。カスタム ボットやボットのユーザーに応じて、イベントや入力の要求に対してユーザーに表示されるデフォルトの応答を変更したい場合があります。たとえば、:

  • ユーザー入力 - 生年月日は?
  • イベント - 認証エラーです。
  • トリガー - タスクがキャンセルされました。

両方の標準ボット応答を定義することができますが、必要に応じてユーザーがいる指定されたチャネルにのみ表示する、チャネル オーバーライド応答を追加することもできます。デフォルトの標準応答の一覧についてはこちらをご覧ください。たとえば SMS チャネルでは、データ量を節約するために短いボット応答のみを使用したい場合があります。

デフォルトの応答

ボットビルダーのデフォルトの応答を管理するには、

  • 左側のナビゲーション メニューにマウス ポインターを置き、[自然言語] > [デフォルトの会話] を選択します
  • [標準応答] セクションを選択して、下記の図のように [ステートメント] タブを表示します。

それぞれの標準応答のタブでは、イベントやユーザー入力に 1 つ以上の NLP インタープリタの標準応答がリスト化されています。デフォルトの応答を変更したり、必要に応じて NLP インタープリタがランダムに選んだ応答を、ユーザー入力やシステム イベントの応答として追加したりすることができます。「標準応答」セクションでは、標準のボット応答が以下のタブでカテゴリ分けされています。

  • ステートメント - ボットまたはユーザーの動作に応じて表示される応答です。たとえば、ユーザーがタスクをキャンセルしたり、ユーザーがボットの要求に対して有効でない応答を返した場合に表示されます。
  • 問い合わせ「どのフィールドを変更しますか?」のような、ボットからユーザーにさらなる情報を求めるためのステートメントです。
  • エラーと警告 - シナリオ内でエラーが発生した場合の、ボットからユーザーに向けたステートメントです。たとえば、「終了日を開始日以前に設定することはできません。」のようなものです。
  • 質問 - ボットがユーザーに尋ねる可能性のある、他のどのカテゴリにも該当しない質問です。
  • 選択肢 - ボットは「はい」または「いいえ」の入力を求めます。たとえば、「このタスクが発生するたびにプッシュ通知を受け取りますか?」のようなものです。
  • あいさつ - ボットがインストールされたとき、およびその他の初接触の際のボットの最初の応答です。たとえば、ユーザーがしばらくの非アクティブの状態から戻った場合など。

上記の図は、ボットの [自然言語] タブの「標準応答」セクションの [ステートメント] タブを示しています。

応答の追加および編集

新しい標準応答の追加 注意: あいまいさが提示されるような条件で標準応答が更新されている場合、ボットの応答はあいまいな選択肢を表示しないため、あいまいさのリストを提示するには “getChoices()“ 関数を使用する必要があります(以下のポイント 6 をご覧ください)。

  1. あいさつなどの標準応答のタブ カテゴリを選択して、応答を追加したい状況の上にマウス ポインターを置きます。 [応答を追加] をクリックします
    1. [チャネル オーバーライド を追加] ダイアログが表示されます。
    2. チャネル固有の応答を作成するには、[チャネルを選択] のドロップダウン リストでチャネルを選択します。[すべてのチャネル] オプションで、すべてのチャネルに応答を有効化できます。
    3. チャネル固有の応答の場合、[タスク] ドロップダウン リストから [すべてのタスク] を選択してこのチャネル固有の応答をすべてのタスクに適用するか、または特定のタスクを選択します。
    4. 特定のタスクが選択されている場合、[フィールドを選択] ドロップダウンが表示されます。[すべてのフィールド] またはこのチャネル固有の応答のための特定のフィールドを選択します。
    5. [ボット応答エディタ] では、[簡易モード] タブのベーシック エディタ コントロールを使用してこのチャネルのデフォルトのボット応答をオーバーライドできます。もしくは、[詳細設定モード] タブで応答のためのカスタム JavaScript を記述します。
      • [簡易モード] タブ - 「おかえりなさい、お待ちしていました。」のような、デフォルトの標準応答のテキストを入力します。必要に応じて、太字、イタリック、見出し、ハイパーリンク、番号付き/記号付きリストや、ラインの挿入などのボタンで書式を設定することもできます。詳しくは、「プロンプト エディタの使用」をご覧ください。
      • [詳細設定モード] タブ - 以下のコード例のように JavaScript を記述して、チャネル メッセージをオーバーライドします。

        注意:デフォルトの値を返すには、以下のキーを使用します。response.message - デフォルトのメッセージを文字列として返します。response.choices - オプションの選択肢または確認メッセージのタイプを配列として返します。

        • Slack チャネル オーバーライドの例
          var message = {};
          var attachments = [];
          var attachment = {
              'text': "Exception occurred during API execution",
              'color': '#FFCC00',
              'attachment_type': 'default'
          };
          attachments.push(attachment);
          message.attachments = attachments;
          print(JSON.stringify(message));
        • Facebook チャネル オーバーライドの例
          var message = {
              text: response.message
          };
          var buttons = [];
          for (var i = 0; i < response.choices.length; i++) {
              var choiceItem = response.choices[i];
              if (choiceItem.length > 20) {
                  choiceItem = choiceItem.substring(
                      0, 18) + '..';
              }
              var element = {
                  content_type: 'text',
                  title: choiceItem,
                  payload: choiceItem
              };
              buttons.push(element);
          }
          message.quick_replies = buttons;
          print(JSON.stringify(message));
        • メール チャネル オーバーライドの例
          var message = {};
          var text = response.message + ' <br> ';
          for (var i = 0; i < response.choices.length; i++) {
              text = text.concat(
                  '<u> + response.choices[i] + ' <
                  /u> <br>');
              }
              message.text = text;
              print(JSON.stringify(message));
        • SMS チャネル オーバーライドの例
          var message = {};
              var indexArray = ['a', 'b', 'c',
                  'd', 'e',
                  'f', 'g', 'h', 'i', 'j',
                  'k', 'l', 'm', 'n', 'o',
                  'p', 'q', 'r', 's', 't',
                  'u', 'v', 'w', 'x', 'y',
                  'z'
              ];
              var text = response.message + '\\n';
              for (var i = 0; i < response.choices
                  .length; i++) {
                  text = text.concat(indexArray[i] +
                      ') ' + response.choices[
                          i] + '\\n');
              }
              message.text = text;
              print(JSON.stringify(message));
    6. getChoices() 関数を使用すると、メッセージ書式テンプレートを使用して応答の表示形式をカスタマイズすることができます。getChoices() 関数が呼び出され、あいまいさが存在する場合、プラットフォームはあいまいな選択肢の情報をエンドユーザーに対してオプションとして提示できる配列として返します。たとえば、「もしかして」の標準応答をボタン形式で表示するには、以下のコードを使用します。
      var info =getChoices() ;
      var message = {
      "type": "template",
      "payload": {
        "template_type": "button",
        "text": "Did you mean",
        "subText": "You can now customize response for did you mean",
        "buttons": []
       }
      };
      for (i = 0; i < info.length; i++) {
      var button = {
        "type": "postback",
        "title": info[i],
        "payload": "payload1"
      };
      
      message.payload.buttons.push(button);
      }
      print(JSON.stringify(message)); 
      
    7. [完了] をクリックして [応答の編集] ダイアログを保存して終了し、新しい標準応答を適用します。

There are multiple places where the platform responds to user utterances without the developer having to code the details. Examples include:

  • Default Dialog when the user intent is not found or understood by the bot.
  • Standard Responses to certain questions, greetings, error and warning scenarios, etc.
  • Event Handlers for certain common bot events can be defined, click here for more.

Though these are set by default by the platform, you can customize them as per your business requirements. In this document, we look into such customizations.

Default Dialog

You can choose to run a dialog task or display a standard error message if the Natural Language Processor for Kore.ai cannot determine the user intent. The default setting is to display a standard error message.

Under the Build tab, from the left menu, click Intelligence > Default Dialog to define a default dialog task.

For example, you can switch the conversation from the bot to a live agent, or run a generic dialog such as the main menu if the user intent is not determined in the bot conversation.

If a default dialog task is not defined, standard error messages and any customizations defined in the Standard Responses section are used.

The following illustration is an example of the Default Dialog section in Bot Builder configured to run the Get Account Help dialog task when the user intent cannot be determined in the Banking Portal bot.

Define a Default Dialog

To complete the following procedure, you must have already defined a dialog to select as the default dialog.

  1. Select the Build tab from the top menu.
  2. From the left menu, click the Intelligence > Default Dialog option.
  3. In the If user’s intent is not understood section, select Automatically run a dialog task.
  4. In the Default Dialog Task field, select a default dialog from the list.
  5. Click Save.

The Settings successfully saved message is displayed.

Standard Responses

In the Kore.ai Bot Builder tool, you can view the default Natural Language Processing, or NLP interpreter responses to user inputs or events.

For example, a reply to a user input of Hi! The bot replies with one of the following responses, chosen randomly at runtime:

  • Hi!
  • Hello
  • Hi there!
  • Hey 🙂

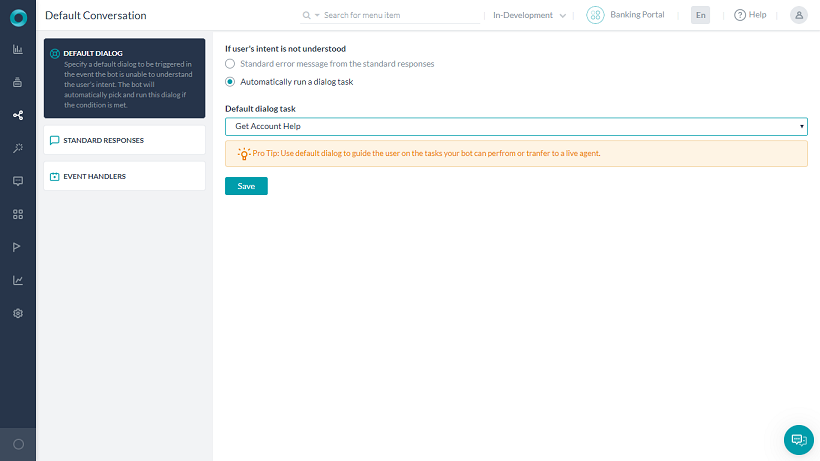
The NLP interpreter displays pre-defined text responses to users based on an event, condition, trigger, or user input. Depending on your custom bot and users of that bot, you may want to modify the default responses to users displayed for an event or request for input.

Example

  • User Input – When were you born?
  • Event – Authorization Failure
  • Trigger – Task canceled

You can define both standard bot responses, or if desired, add a channel override response that is displayed only in the specified channel the user is in, otherwise, one of the standard default responses is displayed. Click here for a comprehensive list of default standard responses.

For example, in the SMS channel, you may only want to use short bot responses to save data.

Default Responses

To access and manage the default responses in bot builder, follow the below steps:

  • Select the Build tab from the top menu
  • From the left menu, click Intelligence > Standard Responses.

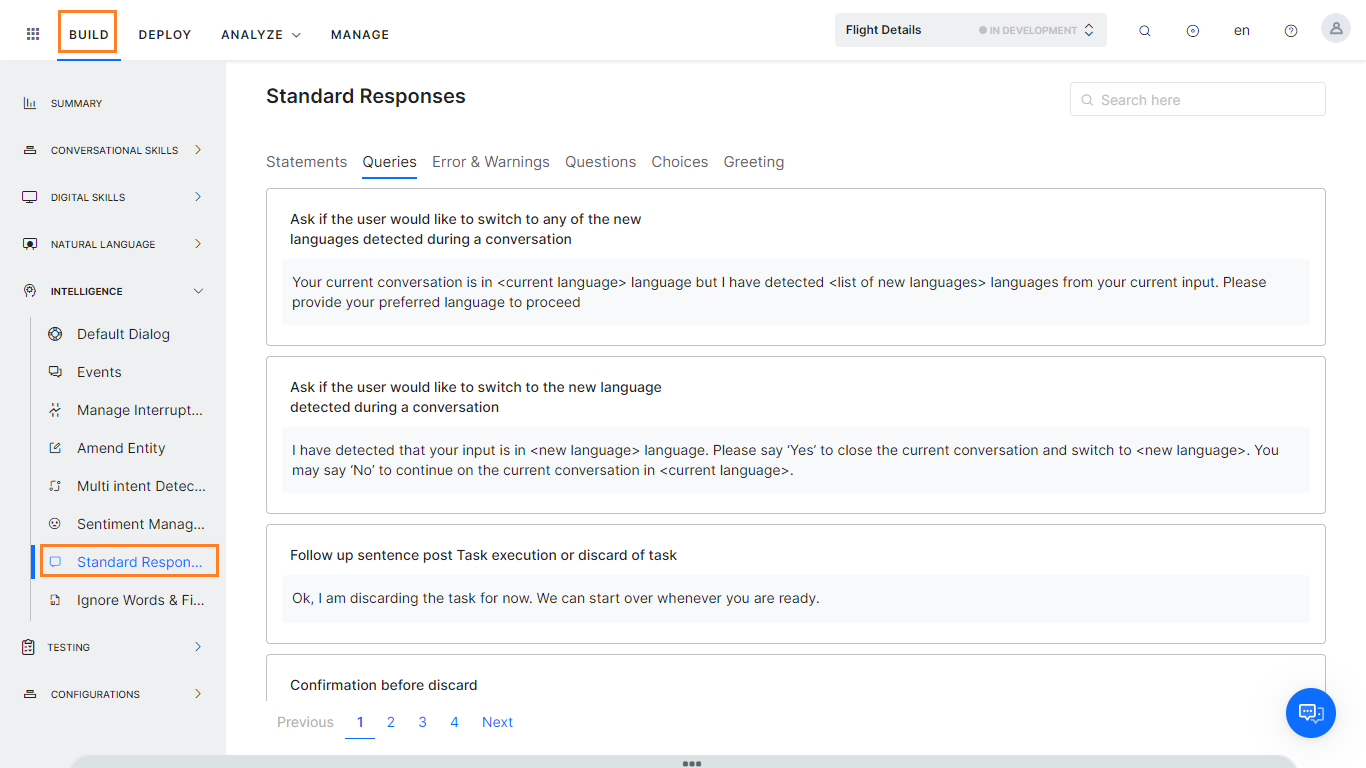
For each standard response category tab, the event or user input is listed followed by one or more NLP interpreter standard responses. You can modify the default response, and if needed, add additional responses selected randomly by the NLP interpreter in response to user input or system event.

In the Standard Response section, the standard bot responses are categorized in the following tabs:

  • Statements – Responses displayed to the user as the result of an action by the bot or user. For example, a user cancels a task, or a user gives an invalid response to your bot request.
  • Queries – Statements from the bot to the user to ask for more information. For example, Which field do you want to change?
  • Error & Warnings – Statements from the bot to the user when an error occurs during the scenario, such as the End date cannot be before or same as the start date!
  • Questions – Questions the bot may pose to the user when not included in any other category.
  • Choices – The bot is asking for Yes/No input. For example, Would you like to receive push notifications every time this task occurs?
  • Greeting – Initial responses by the bot when the bot is installed, or other initial contacts. For example, when a user returns to the interaction after a period of inactivity.

Add and Edit Responses

Add a New Standard Response

Note: If the standard responses are updated at the conditions wherein an ambiguity is presented to the user, the bot response will not display the ambiguous choices to the user and you need to use the function getChoices() to present the ambiguity list (refer to point 6 below).

  1. Select a tab category for the standard response. For example, Greeting, and then hover the situation for which you want to add the response. Click Add Response:
    1. The Add Channel Overrides dialog is displayed.
    2. In the Choose a channel drop-down list, select a channel to create a channel-specific response. You can go with the Any Channel option to enable the response for all channels.
    3. In the case of channel-specific response, from the Choose a Task drop-down list, select Any Task to apply this channel-specific response to all tasks or select a specific task.
    4. When a specific task is selected, the Choose a Field is drop-down is displayed. Select Any Field or a specific field for this channel-specific response.
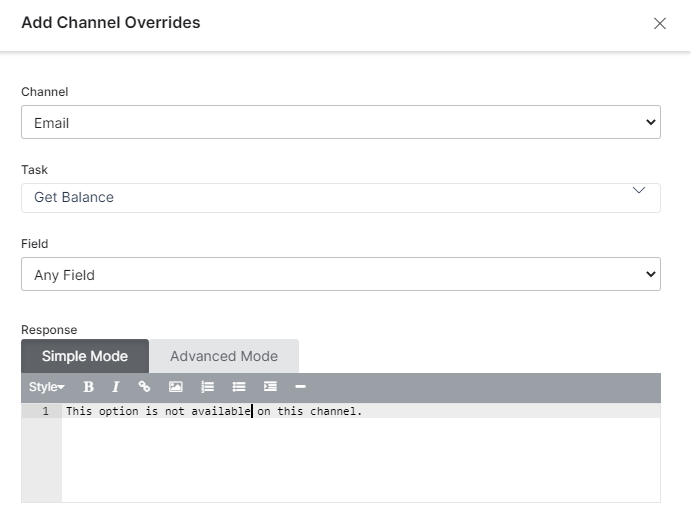
    5. In the bot Response editor, you can override the default Bot Response for this channel using basic editor controls on the Simple Mode tab, or write custom JavaScript for the response on the Advanced Mode tab. For the:
      • Simple Mode tab – Enter the text for the default standard response. For example, *There* you are, I was ~hoping~ you would return soon! and then optionally, format the text using the formatting buttons for bold, italics, header styles, hyperlinks, ordered and unordered lists, and inserting a line. For more information, refer to Using the Prompt Editor.
      • Advanced Mode tab – Enter JavaScript to override the channel message as described in the following code examples.

        Note: Use the following keys to return default values for:
        response.message – Returns the default message as a string.
        response.choices – Returns the options choice or confirmation message types as an array.

        • Slack Channel Override Example
          var message = {};
          var attachments = [];
          var attachment = {
              'text': "Exception occurred during API execution",
              'color': '#FFCC00',
              'attachment_type': 'default'
          };
          attachments.push(attachment);
          message.attachments = attachments;
          print(JSON.stringify(message));
        • FaceBook Channel Override Example
          var message = {
              text: response.message
          };
          var buttons = [];
          for (var i = 0; i < response.choices.length; i++) {
              var choiceItem = response.choices[i];
              if (choiceItem.length > 20) {
                  choiceItem = choiceItem.substring(
                      0, 18) + '..';
              }
              var element = {
                  content_type: 'text',
                  title: choiceItem,
                  payload: choiceItem
              };
              buttons.push(element);
          }
          message.quick_replies = buttons;
          print(JSON.stringify(message));
        • Email Channel Override Example
          var message = {};
          var text = response.message + ' <br> ';
          for (var i = 0; i < response.choices.length; i++) {
              text = text.concat(
                  '<u> + response.choices[i] + ' <
                  /u> <br>');
              }
              message.text = text;
              print(JSON.stringify(message));
        • SMS Channel Override Example
          var message = {};
              var indexArray = ['a', 'b', 'c',
                  'd', 'e',
                  'f', 'g', 'h', 'i', 'j',
                  'k', 'l', 'm', 'n', 'o',
                  'p', 'q', 'r', 's', 't',
                  'u', 'v', 'w', 'x', 'y',
                  'z'
              ];
              var text = response.message + '\\n';
              for (var i = 0; i < response.choices
                  .length; i++) {
                  text = text.concat(indexArray[i] +
                      ') ' + response.choices[
                          i] + '\\n');
              }
              message.text = text;
              print(JSON.stringify(message));
    6. Using the getChoices() function, you can also customize the response display format using the message formatting templates. When the getChoices() function is called and there is an ambuguity, the platform returns the ambiguous choices information as an array which can be used to present the options to the end users.
      For example, to display the standard response for Did you mean in a button format, you can use the following code:

      var info =getChoices() ;
      var message = {
      "type": "template",
      "payload": {
        "template_type": "button",
        "text": "Did you mean",
        "subText": "You can now customize response for did you mean",
        "buttons": []
       }
      };
      for (i = 0; i < info.length; i++) {
      var button = {
        "type": "postback",
        "title": info[i],
        "payload": "payload1"
      };
      
      message.payload.buttons.push(button);
      }
      print(JSON.stringify(message)); 
      
    7. Click Done to save and close the Edit Response dialog and apply the new standard response.