バーチャルエージェントとのインタラクションは、通常、チャット/メッセージツール、音声チャネル、デジタルアシスタントを使用して実施されます。多くの場合、バーチャルエージェントは、ユーザーが何らかの情報を要求したときにのみ、ユーザークエリに応答します。これは、実行のためにユーザー入力が必要なオンデマンドタスクを実施する場合に適しており、結果的に、通常は短い応答、確認、または確認応答となります。しかし、デジタルアシスタントの出現により、魅力的なユーザーインターフェースを介してユーザーにプロアクティブなアップデートを行うことが重要な要件となっています。これは、必要なユーザー入力を最小限に抑えながら、エンドユーザーに関連情報を提示する魅力的なウィジェットを提供することにより実現できます。ウィジェットは、チャットボット内からモバイル/Webアプリを起動することもできます。Kore.aiボットプラットフォームのパネルとウィジェットを使用して、顧客に関連する情報をプロアクティブに提示するインタラクティブなコンポーネントを設計できます。パネルは、1つ以上のウィジェットを保持するプレースホルダーです。ウィジェットは、エンドユーザーに情報を表示する個々のコンポーネントです。顧客は、会話モードでボットとやり取りしたり、ウィジェットから必要な情報を直接取得したりすることができます。メモ:この機能は、プラットフォームのバージョン7.2において導入されました。このドキュメントでは、パネルとウィジェットの動作と実装の概要を知ることができます。手順の説明については、 こちらの方法をご参照ください。
ユースケース
- 組織からは、パネルとウィジェットを使用して、従業員にさまざまな業務関連アクティビティのための単一のインターフェイスが提供されます。
- 各パネルは、販売、HR、ITSMなどのさまざまな機能にアクセスできます。
- 従業員は、これらのパネルにアクセスして、上記の各機能に関連する情報を入手し、フォローアップアクションを実行します。
- 例として、HRパネルには複数のウィジェットが以下を表示します:
- 全社的なお知らせ;
- 残高;
- ボット会話を通じて追加特典に加入する特典とオプション。
- 同様に、ITSMパネルには停止レポートおよび他の詳細が表示されます。
このドキュメントでは、概要および機能の実装の詳細を説明しています。ユースケースについてはこちらをご参照ください。
セットアップ
パネルとウィジェット は、ボットタスクメニューからアクセスできます。以下は、パネルとウィジェットの設定手順です。
- ウィジェットの設定:ウィジェットは、ボットタスクまたはJSONファイルを生成するJavaScriptなどの他のソースに接続して、定義します。なお、ダイアログタスクは、ウィジェットSDKがサポートするメッセージテンプレートを使用して、ウィジェットSDKチャネル用のボットレスポンスを定義する必要があります。サポートされるメッセージテンプレートは、こちらをご覧ください。
- ウィジェットのプレビュー:ボットビルダーからウィジェットをプレビューします。
- パネルのセットアップ:複数のパネルを作成して、各パネルに関連情報を表示するウィジェットをホストすることができます。事前定義されたウィジェットを使用することも、新規に作成することもできます。
- パネルをテストして、パネルとウィジェットが「チャット」ウィンドウにどのようにレンダリングされるかを確認します。
- ボットの公開:ボットを公開することで、パネルとウィジェットをエンドユーザーが利用できるようになります。
- パネルのホスト:ウィジェットを個別にホストするか、WebSDKと共同でホストするかを選択できます。SDKは、Kore.aiGitHubページからダウンロードできます。ウィジェットSDKをチャネルとして有効にしてください。
ウィジェットの設定
ウィジェットは個別のコンポーネントであり、エンドユーザーに情報を提供するためのボットと通信することができます。ウィジェットの情報ソースは、ダイアログタスクあるいは事前定義済みウィジェットテンプレートを使用して、JSONから作成できます。ウィジェットの設定手順:
- ウィジェットを作成するには、ウィジェットの作成ボタンを使用します。

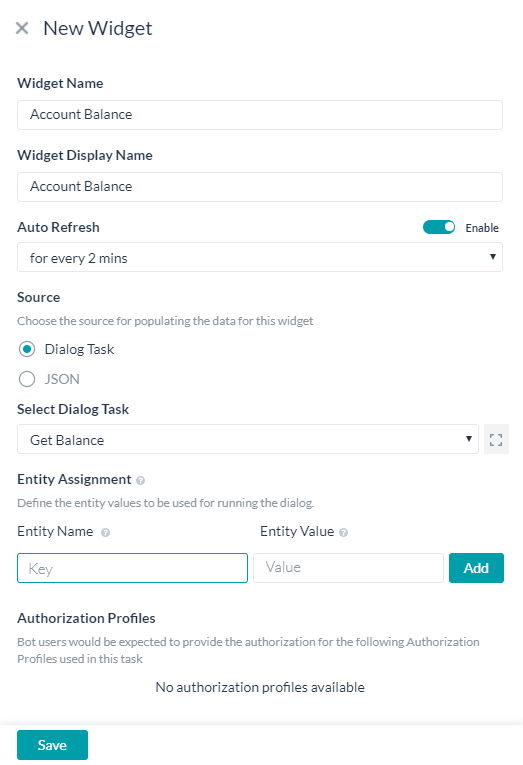
- 新規ウィジェットのポップオーバーで、次を入力します
- ウィジェットの名前
- ウィジェットの表示名
- 自動更新では、このウィジェットが新鮮なデータをポーリングする必要頻度を設定します。更新は、ウィジェットを含むパネルがアクティブな場合にのみ適用されます。
- ウィジェットのソースは、ダイアログタスクの実行によるものと、JSONを定義するJavaScriptによるものがあります:
- JSONは、表示されているJavaScriptエディターにおいて指定できます。

- ダイアログタスクオプションでは、タスクをトリガーして、その出力をウィジェットに表示することができます。
- ダイアログタスクの選択ドロップダウンにおいては、現在のボットで使用できるあらゆるタスクがリスト表示されているので、そのリストから1つを選択します。メモ:接続されたダイアログタスクでは、サポートされているウィジェットテンプレートのいずれかを使用して、必要な情報をウィジェットに表示するためにかならずメッセージノードを使用してください。サポートされているメッセージテンプレートについてはこちらをご覧ください。ダイアログタスクの横のアイコンを用いてダイアログタスクを開くと、エンティティ名などのタスクの詳細をご覧になれます。
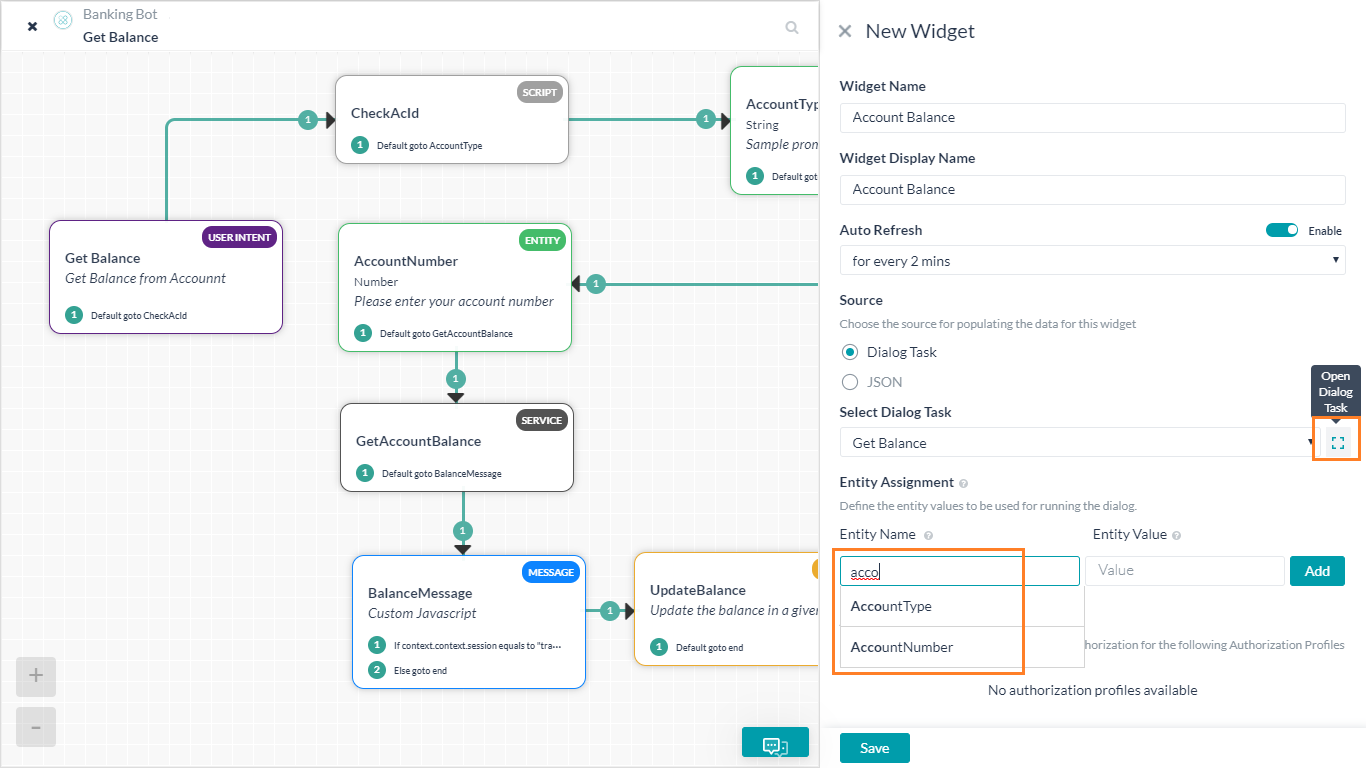
- 選択されたダイアログタスクで使用されるいずれのエンティティも、 エンティティ名をエンティティ値でマッピングすることにより、値を事前に入力する必要があります。
- 選択されたダイアログタスクに認証プロファイルが定義されている場合、同じプロファイルがここに表示されます。
- ダイアログタスクの選択ドロップダウンにおいては、現在のボットで使用できるあらゆるタスクがリスト表示されているので、そのリストから1つを選択します。メモ:接続されたダイアログタスクでは、サポートされているウィジェットテンプレートのいずれかを使用して、必要な情報をウィジェットに表示するためにかならずメッセージノードを使用してください。サポートされているメッセージテンプレートについてはこちらをご覧ください。ダイアログタスクの横のアイコンを用いてダイアログタスクを開くと、エンティティ名などのタスクの詳細をご覧になれます。
- JSONは、表示されているJavaScriptエディターにおいて指定できます。
- ウィジットの保存。
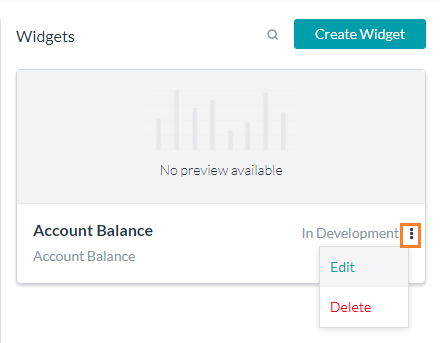
- ウィジェットは、保存されると“開発中”の状態になります。ウィジットを編集または削除することができます。
- ウィジェットの編集では、上記のいずれのフィールドも変更できるだけでなく、ウィジェットを実行およびプレビューすることができます。プレビューをウィジェットのサムネイル表示として保存できます。


パネルのセットアップ
パネルとは、1つ以上のウィジェットを保持するコンテナのことです。既存のウィジェットをパネルに追加したり、新しいウィジェットを作成することができます。
- パネルを作成するには、パネルの作成ボタンを使用します。
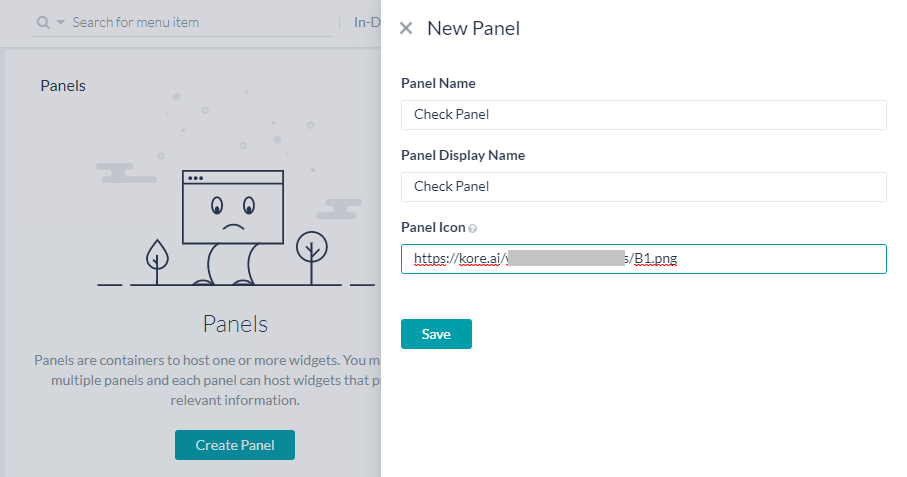
- 新規パネルのポップオーバーで、次を入力します
- パネルの名前。
- パネルの表示名。
- 「チャット」ウィンドウに表示されることになっているパネルアイコン(URLは画像ファイルの位置に )。
- パネルの保存。
- パネルは、保存されると“開発中”の状態になります。
- パネルにウィジェットを追加するには、ウィジェットの追加ボタンを使用します。ドロップダウンリストからウィジェットを選択します。
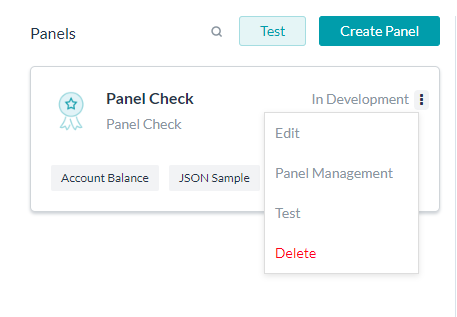
- 特定のパネルには、以下のオプションがあります。
- パネルの詳細を編集する。
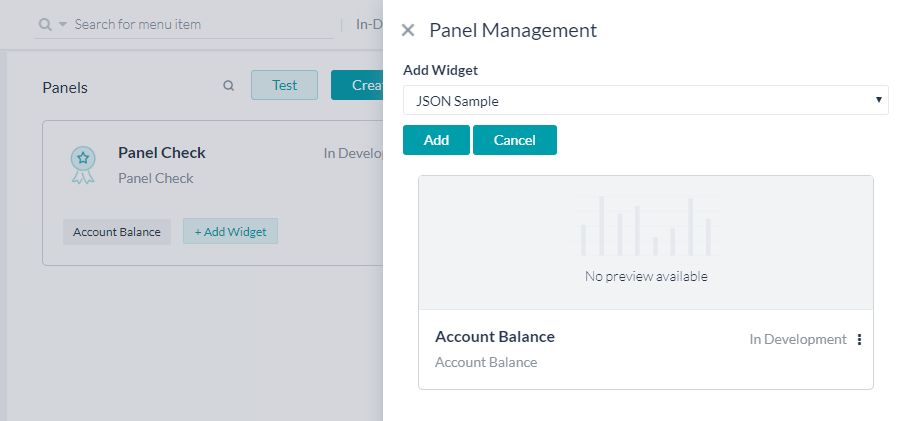
- 既存のウィジェットを追加したり、新しいウィジェットを作成したり、既に追加されているウィジェットをパネルから削除したりするためのパネル管理。
- 個々のパネルをテストします。これにより、現在のパネルがアクティブでデータが表示されたパネルリストとともに「ボットと会話」ウィンドウが開きます。
- パネルを削除する。
- パネルをテストする と、「チャット」ウィンドウがアクティブになっているすべてのパネルをリストアップされたボットと会話ウィンドウが開きます。パネルとやり取りしてテストすることができます。
公開
パネルとウィジェットが選択されていることを確認して、ボットを公開します。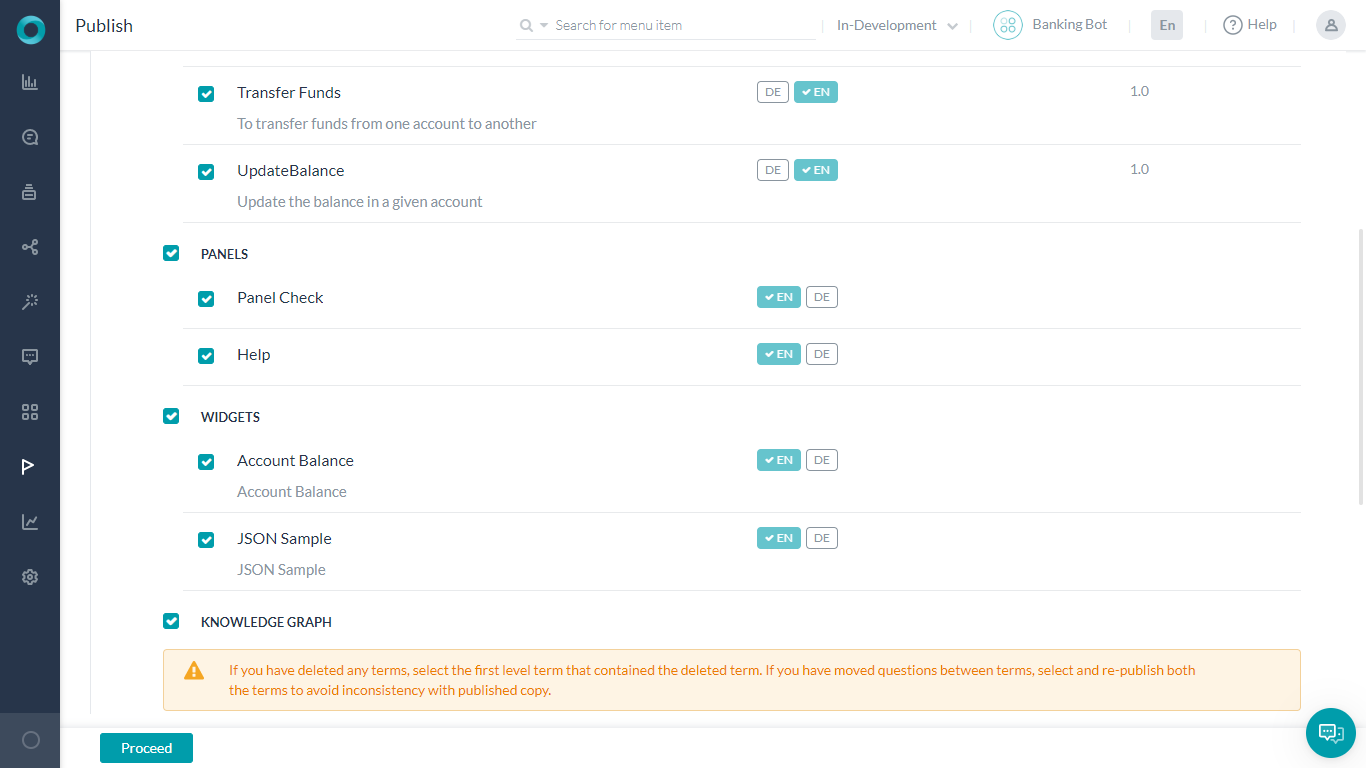 ボットの公開についてはこちらをご参照ください
ホスティング
ウィジェットSDKは、パネルやウィジェットをホストして管理するためのプラットフォームで提供されます。ウィジェットを個別にホストするか、WebSDKと共同でホストするかを選択できます。SDKは、Kore.aiGitHubページからダウンロードできます。ウィジェットSDKをチャネルとして有効にしてください。方法についてはこちらのチュートリアルをご参照ください。
일반적으로 가상 상담사와의 상호 작용은 대화/메시징 도구, 음성 채널 또는 디지털 비서를 통해서 수행합니다. 대부분의 경우 가상 상담사는 사용자가 일부 정보를 요청한 경우에만 사용자 질의에 응답합니다. 이는 실행을 위해 사용자 입력이 필요한 주문형 작업을 수행하는 데 적합하며 결과는 일반적으로 짧은 응답, 확인 또는 승인입니다. 그러나 디지털 상담사의 등장으로 사용자에게 참여적 사용자 인터페이스를 통해 사전 업데이트를 하는 것이 핵심 요구 사항이 되었습니다. 최소한의 사용자 입력을 통해 최종 사용자에 관련 정보를 제공하는 참여적 인터페이스를 제공함으로써 이를 달성할 수 있습니다. 이러한 위젯은 챗봇 내에서 모바일/웹 앱을 실행할 수도 있습니다.
Kore.ai 봇 플랫폼의 패널 및 위젯을 사용하여 대화형 구성 요소를 설계하고 관련 정보를 고객에게 사전에 제시할 수 있습니다. 패널은 하나 이상의 위젯을 호스팅하는 플레이스 홀더입니다. 위젯은 최종 사용자에게 정보를 표시하는 개별 구성 요소입니다. 고객은 대화 모드에서 봇과 상호 작용하거나 위젯에서 필요한 정보를 직접 가져올 수 있습니다.
참고 사항: 이 기능은 플랫폼 버전 7.2에서 도입되었습니다.
이 문서는 패널 및 위젯의 작업 및 구현에 대한 개요를 제공합니다. 단계별 사용 지침은 이 방법을 참조하세요.
사용 사례
- 패널 및 위젯을 사용하여 조직은 직원들에게 다양한 업무 관련 활동을 위한 단일 인터페이스를 제공합니다.
- 각 패널이 영업, HR, ITSM 등 다양한 기능에 액세스할 수 있게 해줍니다.
- 직원은 위의 각 기능과 관련된 정보를 얻기 위해 이와 같은 패널에 액세스하고 후속 조치를 취합니다.
- 예를 들어 HR 패널에는 다음을 표시하는 여러 위젯이 있습니다.
- 회사 전반의 공고문;
- 잔액 남기기;
- 봇 대화를 통한 혜택 및 추가 혜택 등록을 위한 옵션.
- 마찬가지로 ITSM 패널에는 중단 보고서와 기타 세부 정보가 표시됩니다.
이 문서는 기능의 개요 및 구현 세부 정보를 제공합니다. 사용 사례 예제는 여기를 참조하세요.
설정
봇 작업 메뉴에서 패널 및 위젯에 액세스할 수 있습니다. 다음은 패널 및 위젯을 설정하는 단계입니다.
- 위젯 설정: 봇 작업 또는 JSON 파일을 생성하는 JavaScript와 같은 기타 소스에 위젯을 연결하여 위젯을 정의하세요. 대화 작업에는 위젯 SDK 지원 메시지 템플릿을 사용하여 위젯 SDK 채널에 대해 정의된 봇 응답이 있어야 합니다. 지원되는 메시지 템플릿은 여기를 참조하세요.
- 위젯 미리 보기: 봇 빌더에서 위젯을 미리 봅니다.
- 패널 설정: 여러 패널을 생성할 수 있으며 각 패널은 관련 정보를 제공하는 위젯을 호스팅할 수 있습니다. 미리 정의된 위젯을 사용하거나 새로 생성할 수 있습니다.
- 패널 테스트를 통해 패널 및 위젯이 대화 창에서 어떻게 렌더링 되는지 확인합니다.
- 봇 게시: 최종 사용자가 패널과 위젯을 사용할 수 있도록 봇을 게시합니다.
- 패널 호스팅: 위젯을 독립적으로 호스팅하거나 WebSDK와 함께 공동 호스팅하도록 선택할 수 있습니다. Kore.ai GitHub 페이지에서 SDK를 다운로드할 수 있습니다. WidgetSDK를 채널로 활성화해야 합니다.
위젯 설정
위젯은 최종 사용자에게 정보를 제공하기 위해 봇과 소통할 수 있는 개별 구성 요소입니다. 위젯에 대한 정보 소스는 사전 정의된 위젯 템플릿을 사용하는 JSON 또는 대화 작업에서 가져올 수 있습니다. 위젯 설정 단계:
- 위젯 생성 버튼을 사용하여 위젯을 생성합니다.
- 새 위젯 팝오버에서 다음을 입력합니다.
- 위젯의 이름
- 위젯의 표시 이름
- 자동 새로고침 이 위젯에 최신 데이터 폴링이 필요한 빈도를 설정합니다. 새로고침은 위젯이 포함된 패널이 활성화된 경우에만 적용됩니다.
- 위젯 소스는 대화 작업의 실행 또는 JSON을 정의하는 JavaScript의 소스일 수 있습니다.
- JSON은 표시되는 JavaScript 편집기에서 지정할 수 있습니다.
- 대화 작업 옵션을 사용하면 작업을 실행하고 위젯에 출력을 표시할 수 있습니다.
- 대화 작업 선택 드롭다운은 현재 봇에서 사용 가능한 모든 작업을 나열하고 목록에서 하나를 선택합니다. 참고 사항: 연결된 대화 작업에서, 지원되는 위젯 템플릿 중 하나를 사용하여 위젯에 필요한 정보를 표시하려면 메시지 노드를 사용해야 합니다. 지원되는 메시지 템플릿은 여기를 참조하세요 엔티티 이름 등 작업 세부 정보를 확인을 위해 대화 작업 옆에 있는 아이콘으로 대화 작업을 열 수 있습니다.
- 엔티티 이름을 엔티티 값과 매핑한 값으로, 선택한 대화 작업에서 사용하는 모든 엔티티를 미리 채워 넣어야 합니다.
- 선택한 대화 작업에 권한 부여 프로필이 정의된 경우 동일한 프로필이 여기에 표시됩니다.
- 대화 작업 선택 드롭다운은 현재 봇에서 사용 가능한 모든 작업을 나열하고 목록에서 하나를 선택합니다. 참고 사항: 연결된 대화 작업에서, 지원되는 위젯 템플릿 중 하나를 사용하여 위젯에 필요한 정보를 표시하려면 메시지 노드를 사용해야 합니다. 지원되는 메시지 템플릿은 여기를 참조하세요 엔티티 이름 등 작업 세부 정보를 확인을 위해 대화 작업 옆에 있는 아이콘으로 대화 작업을 열 수 있습니다.
- JSON은 표시되는 JavaScript 편집기에서 지정할 수 있습니다.
- 위젯을 저장합니다.
- 저장되면 위젯은 개발 중 상태가 됩니다. 위젯을 편집하거나 삭제할 수 있습니다.
- 위의 필드에 대한 수정을 허용하는 것과 별개로 위젯 편집을 사용하면 위젯을 실행하고 미리 볼 수 있습니다. 미리 보기를 위젯의 섬네일로 저장할 수 있습니다.
패널 설정
패널은 하나 이상의 위젯을 포함하는 컨테이너를 말합니다. 기존 위젯을 패널에 추가하거나 새 위젯을 생성할 수 있습니다.
- 패널 생성 버튼을 사용하여 패널을 생성합니다.
- 새 패널 팝오버에서 다음을 입력합니다.
- 패널의 이름.
- 패널의 표시 이름.
- 대화 창에 표시할 패널 아이콘(이미지 파일의 위치 URL).
- 패널을 저장합니다.
- 저장되면 패널은 개발 중 상태가 됩니다.
- 위젯 추가 버튼을 사용하여 패널에 위젯을 추가합니다. 드롭다운 목록에서 위젯을 선택합니다.
- 지정된 패널에는 다음과 같은 옵션이 있습니다.
- 패널 세부 정보를 편집합니다.
- 패널 관리를 통해 기존 위젯을 추가하거나 새 위젯을 생성하거나 패널에서 이미 추가된 위젯을 제거할 수 있습니다.
- 개별 패널 테스트 – 현재 패널이 활성화되고 데이터가 표시된 패널 목록과 함께 봇과 대화 창을 엽니다.
- 패널을 삭제합니다.
- 테스트 패널은 대화 창이 활성화된 채로 모든 패널이 나열된 봇과 대화 창을 엽니다. 패널과 상호 작용하고 테스트할 수 있습니다.
게시
패널 및 위젯이 선택되었는지 확인하고 봇을 게시합니다.
봇 게시에 대한 자세한 내용은 여기를 참조하세요.
호스팅
패널 및 위젯을 호스팅하고 관리하는 플랫폼에서 위젯 SDK를 제공합니다. 위젯을 독립적으로 호스팅하거나 WebSDK와 함께 공동 호스팅하도록 선택할 수 있습니다. Kore.ai GitHub 페이지에서 SDK를 다운로드할 수 있습니다. WidgetSDK를 채널로 활성화해야 합니다. 방법은 이 튜토리얼을 참조하세요.
Leave a Reply
Interactions with virtual agents are typically conducted using chat / messaging tools, voice channels or digital assistants. In the majority of the cases, the virtual agents respond to the user queries only when the users have requested for some information. This works well for conducting on-demand tasks that need user input for execution and the result is usually a short response, confirmation or acknowledgment. But, with the emergence of Digital Assistants, the need for proactive updates to users via engaging user interface has become a key requirement. This can be achieved by providing engaging widgets that present relevant information to end-users with minimal need for user input. The widgets can also trigger mobile/web apps from within the chatbot.
Using Panels and Widgets from the Kore.ai Bots platform, you can design interactive components to proactively present relevant information to your customers. Panels are the placeholders that hold one or more widgets. Widgets are individual components that display information to the end-users. Your customers can interact with your bot either in the conversation mode or directly get the required information from the widgets.
Note: This feature was introduced in ver 7.2 of the platform
This document gives an overview of the working and implementation of Panels and Widgets. For an step-by-step usage instructions, refer to this how to.
Use Case
- Using Panels & Widgets, an organization offers to its employees a single interface for various work-related activities.
- Each of the Panels gives access to various functions like Sales, HR, ITSM, etc.
- Employee accesses these panels for information pertaining to each of the above functions and perform follow up actions.
- As an example, HR Panel has multiple widgets showing:
- company-wide announcements;
- leave balance;
- benefits and option to enrol for additional benefits through bot conversation.
- Similarly, the ITSM panel shows the outage report and other details.
This document gives an overview and the implementation details of the features. For an use case example, refer here.
Setup
You can access Panels & Widgets from under the Bot Tasks menu.
Following are the steps to setting up Panels and Widgets:
- Configure Widgets: Define widgets by connecting them either to your bot tasks or any other source like JavaScript generating JSON file. Note that the dialog tasks should have a Bot response defined for Widget SDK channel using the Widget SDK supported message template. See here for supported message templates.
- Preview the Widgets: Preview your widgets from the Bot Builder.
- Set up Panels: You may create multiple panels and each panel can host widgets that present relevant information. You can use the pre-defined widgets or create new.
- Test the Panels to see how the Panels and Widgets will be rendered in the chat window.
- Publish the Bot: Publish the bot so that the panels and widgets can be made available for your end-users.
- Host the Panel: You can choose to host your widgets independently or co-host them along with the WebSDK. You can download the SDKs from Kore.ai GitHub page. Do ensure to enable WidgetSDK as a channel.
Configure Widgets
Widgets are individual components that can communicate with the bot for presenting information to the end-users. The source of information for widgets can be from a Dialog Task or a JSON using any of the pre-defined widget templates.
Steps in configuring Widgets:
- Use Create Widget button to create a widget.
- In the New Widget popover, enter
- Name of the Widget
- Display Name for the Widget
- Auto Refresh to set the frequency with which this widget needs poll for fresh data. The refresh is applicable only when the Panel containing the Widget is active.
- Source for a widget can be either from the execution of Dialog Task or from JavaScript defining a JSON:
- JSON can be specified in the JavaScript Editor that is presented.
- Dialog Task option allows you to trigger a task and present the output in the widget.
- Select Dialog Task dropdown will list all available tasks in the current bot, select one from the list.
Note: In the connected Dialog Task make sure to use a Message node to present the required information in the widget using any of the supported widget templates. See here for supported message templates
You can use the icon next to the Dialog Task to open the Dialog Task for checking the task details like entity names etc..
- Any Entities used by the selected Dialog Task needs to be pre-populated with values by mapping Entity Name with Entity Values.
- If the selected Dialog Task has any authorization profile defined, the same will be displayed here.
- Select Dialog Task dropdown will list all available tasks in the current bot, select one from the list.
- JSON can be specified in the JavaScript Editor that is presented.
- Save the Widget.
- Once Saved the Widget will be In Development state. You can Edit or Delete the Widget.
- Edit widget, apart from allowing modification to any of the above fields, will allow you to Run & Preview the widget.
You can save the preview as the thumbnail display for the widget.
Set up Panels
Panel refers to containers that hold one or more widgets. You can add an existing widget to the Panel or create new widgets.
- Use Create Panel button to create a panel.
- In the New Panel popover, enter
- Name of the Panel.
- Display Name for the Panel.
- Panel Icon to be displayed in the chat window (URL to the location of the image file).
- Save the Panel.
- Once Saved the Panel will be In Development state.
- Use the Add Widget button to add widgets to the panel. Select widgets from the drop down list.
- You have the following options for a given Panel:
- Edit the panel details;
- Panel Management to add existing widgets, create new widget or remove already added widgets from the Panel;
- Test the individual Panel – this will open the talk to bot window along with the panel listing with the current panel active and data presented;
- Delete the Panel.
- Test panels will open the Talk to Bot window listing all the Panels with the chat window active. You can interact and test the Panels.
Publish
Publish your bot ensuring that the panels and widgets are selected.
Hosting
Widget SDK is provided by the platform for hosting and managing panels and widgets. You can choose to host your widgets independently or co-host them along with the WebSDK. You can download the SDKs from Kore.ai GitHub page. Do ensure to enable WidgetSDK as a channel. Refer to this tutorial on how.