사용자 정의 스크립트 파일을 사용하면 다른 작업, 노드 및 기타 봇 요소에서 사용할 수 있는 재사용 가능한 유틸리티 JavaScript 기능을 수집하고 관리할 수 있습니다. 사용자 정의 스크립트 파일을 봇에 업로드하면 봇의 어느 곳에서나 파일의 모든 기능에 액세스할 수 있으므로 중복 개발 노력이 줄어듭니다.
사용자 정의 스크립트 파일 사용하기
쇼핑 봇의 한 사용 사례를 통해 사용자 정의 스크립트 파일을 활용하여 개발 기간을 상당히 단축할 수 있는 방법을 알아보겠습니다. 소비자에게 다양한 옵션을 제공하는 쇼핑 봇의 다음 대화형 흐름을 살펴보세요. 아래 대화에서 봇은 먼저 사용자에게 여성용 또는 남성용 제품을 클릭하여 제품군을 선택하라는 메시지를 표시한 다음 의류, 신발 또는 액세서리와 같은 제품 유형을 선택하라는 메시지를 표시합니다. 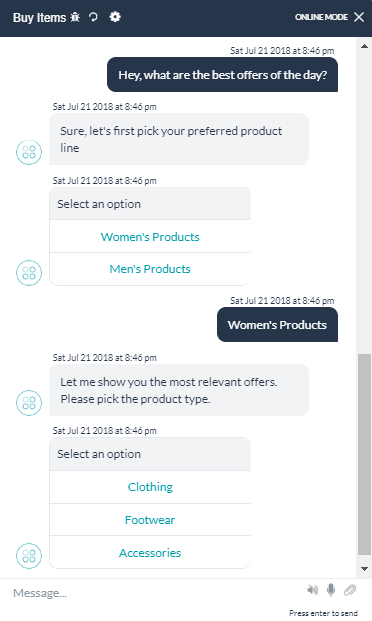 위의 대화에서 제품군 및 제품 유형 옵션은 기능면에서 모두 동일하지만 표시되는 선택 사항만 다르다는 것을 확인할 수 있습니다. 버튼 템플릿의 기능을 각 노드에 하드 코딩하는 대신 옵션을 전달하여 이러한 노드에서 호출할 수 있는 사용자 정의 스크립트 파일에 함수를 작성할 수 있습니다. 다음은 기능을 수행하기 위한 샘플 함수 스크립트입니다.
 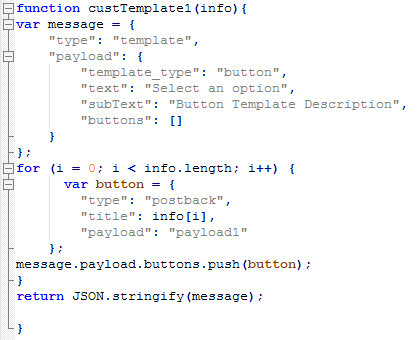 다음 이미지는 노드에서 함수를 호출하는 방법을 보여줍니다.
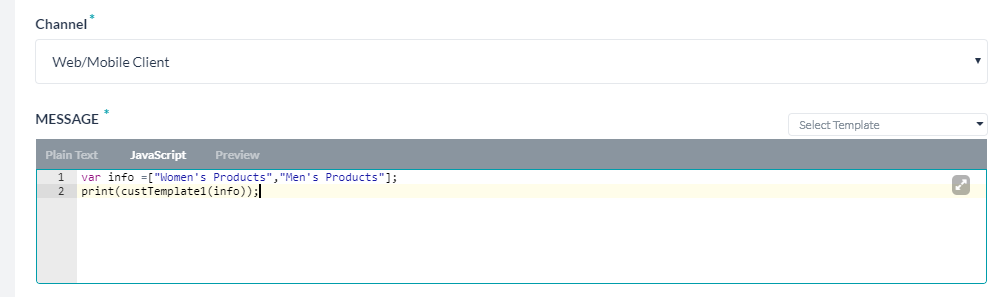
사용자 정의 스크립트 파일 업로드하기
스크립트 파일을 봇에 업로드하려면 다음 단계를 따르세요.
- 상단 메뉴에서 빌드 탭을 선택합니다
- 왼쪽 메뉴에서 설정 >봇 기능을 선택합니다.
- 사용자 정의 스크립트에서 가져오기를 클릭합니다.
- 사용자 정의 스크립트 가져오기 대화 상자에서 찾아보기를 클릭하고 로컬 컴퓨터의 스크립트 파일로 이동합니다. 가져오기를 클릭합니다.
- 가져오기가 성공적으로 완료되면 완료를 클릭합니다.
사용자 정의 스크립트 파일 업데이트하기
파일을 다운로드하고 수정한 다음 봇으로 다시 가져와 사용자 정의 스크립트 파일에 기능을 추가하거나 수정할 수 있습니다. 새 사용자 정의 스크립트 파일을 가져오면 기존 파일이 변경되며, 나중에 다시 되돌릴 수 없습니다. 따라서 다운로드한 파일의 복사본을 백업을 위해 보관하고 주의를 기울이는 것이 좋습니다.
- 상단 메뉴에서 빌드 탭을 선택합니다
- 왼쪽 메뉴에서 설정 >봇 기능을 선택합니다.
- 사용자 정의 스크립트에서 다운로드를 클릭하여 로컬 컴퓨터에 파일 복사본을 저장합니다.
- 파일을 변경한 후 새로 가져오기를 클릭합니다.
- 찾아보기를 클릭하여 로컬 컴퓨터에서 사용자 정의 스크립트 파일 위치로 이동한 다음 가져오기를 클릭합니다.
- 가져오기가 완료되면 완료를 클릭합니다.
カスタムスクリプトファイルは、さまざまなタスク、ノード、その他のボット要素で使用できる再利用可能なユーティリティJavaScript関数を、照合して管理することができます。ボットにカスタムスクリプトファイルをアップロードすると、ファイル内のすべての機能がボット内のどこからでもアクセスできるようになり、重複した開発作業を軽減することができます。
カスタムスクリプトファイルの使用
開発のオーバーヘッドを大幅に削減するには、カスタムスクリプトファイルをいかにして活用できるかを理解するために、ショッピングボットのユースケースを考えてみましょう。頻繁に複数のオプションを提示するショッピングボットの以下の会話フローを見てみましょう。以下のチャットでは、ボットはまず、女性用製品または男性用製品をクリックして製品ラインを選択することを指示し、さらに、衣類、靴、アクセサリーなどの製品タイプを選択することを指示します。 上のチャットでは、製品ラインと製品タイプのオプションは機能的には同じですが、表示される選択肢だけが異なることがわかります。ボタンテンプレートの機能を各ノードにハードコーディングする代わりに、オプションを渡せばこれらのノードから呼び出せるカスタムスクリプトファイルに、関数を記述することができます。以下は、その機能を遂行するためのサンプル関数スクリプトです。 以下の画像は、関数をノードから呼び出す方法を示しています。
カスタムスクリプトファイルのアップロード
ボットにスクリプトファイルをアップロードするには、以下の手順に従います。
- トップメニューから 構築タブを選択します
- 左側メニューから 設定>ボット機能を選択します。
- カスタムスクリプトの下のインポートをクリックします。
- カスタムスクリプトのインポートダイアログで、ブラウズをクリックして、ローカルマシンにあるスクリプトファイルに移動します。インポート をクリックします。
- インポートが正常に完了したら、完了をクリックします。
カスタムスクリプトファイルの更新
ファイルをダウンロードして変更した後、ボットにインポートすることによって、カスタムスクリプトファイルの機能を追加または変更することができます。新しいカスタムスクリプトファイルをインポートすることにより、既存のファイルを置き換えることができますが、そのファイルは後で取り戻すことはできません。そのため、十分ご注意のうえ、ダウンロードしたファイルのコピーをバックアップとして保管することをお勧めします。
- トップメニューから 構築タブを選択します
- 左側メニューから 設定>ボット機能を選択します。
- カスタムスクリプトの下にある ダウンロードをクリックすると、ファイルのコピーがローカルコンピュータに保存されます。
- ファイルに変更を加えた後、新規インポートをクリックします。
- ブラウズをクリックしてローカルコンピュータ上のカスタムスクリプトファイルの場所に移動して、インポートをクリックします。
- インポートが完了したら完了をクリックします。
Custom Script file enables you to collate and manage reusable utility JavaScript functions that can be used by different tasks, nodes, and other bot elements. Once you upload a custom script file to the bot, it reduces the redundant development efforts by making all the functions in the file accessible anywhere in the bot.
Using the Custom Script File
Let’s consider one use case from a shopping bot to understand how you can leverage the custom script file to reduce development overhead considerably. Take a look at the following conversation flow of a shopping bot that frequently presents consumers with multiple options to make a choice. In the below chat, the bot first prompts the user to select the product line by clicking women’s or men’s products, and then also prompts them to select a product type such as clothing, footwear, or accessories.
You can observe that both the product line and product type options in the above chat are identical in functionality, but only the choices that they show differ. Instead of hard-coding the functionality of the button template into each node, you can write a function in the custom script file that can be invoked by these nodes by passing options. Below is the sample function script to accomplish the functionality.
The following image shows how the function can be called from the nodes.
Uploading a Custom Script File
Follow these steps to upload the script file to the bot:
- Select the Build tab from the top menu
- From the left menu, select Configurations > Bot Functions
- Under the Custom Script, click Import.
- On the Import Custom Script dialog, click Browse and navigate to the script file in your local machine. Click Import.
- After the import is successful, click Done.
Updating Custom Script File
You can add or modify functions in the custom script file by downloading the file, making changes, and then importing it back to the bot. Importing a new custom script file replaces the existing file, which cannot be retrieved later. Therefore, we recommend you exercise caution and keep a copy of the downloaded file for backup.
- Select the Build tab from the top menu
- From the left menu, select Configurations > Bot Functions
- Under the Custom Script, click Download to save a copy of the file on your local computer.
- After you make changes to the file, click Import New.
- Click Browse to the location of the custom script file on your local computer and then click Import.
- Click Done when the import is complete.