Kore.aiストアは、Kore.aiプラットフォーム上で実行するボットのオンラインマーケットプレイスです。このストアのパーパスは、開発者がボットの機能を探索し、自分のアカウントにインポートできるようにすることです。テンプレートボットだけがストアに用意されており、ストアを訪れたユーザーはこれらすべてのボットを探索できます。テンプレートボットをインポートするには、Kore.aiプラットフォームのアカウントが必要になります。Kore.aiテンプレートボットは、Kore.aiアカウント、メール、Kore.aiメッセージング、Kore.aiスペース、SMS、Facebookメッセンジャーなどのチャネルでご利用いただけます。Kore.aiストアでKore.aiテンプレートボットを手に入れると、お気に入りのアプリとWebサイトからのアラートを、テキストメッセージやメール、その他のWebサービスシステムを通して受け取ることができます。
アクセスストア
ストアへのアクセス方法はさまざまです。以下からストアにアクセスできます。
- ストア
- Kore.aiプラットフォーム
ストア ストアにアクセスするには、https://bots.kore.ai/botstore/ に進みます。ストアで販売されているすべてのテンプレートボットを閲覧、探索、インストールすることができます。Kore.aiプラットフォームKore.aiプラットフォームのユーザーであれば、プラットフォーム内からストアにアクセスできます。Kore.aiプラットフォームに関連するボットのみを閲覧、探索、インストールすることができます。ストアでは、テンプレートボットを閲覧、探索、インストールすることができます。しかし、テンプレートボットをインストールするには、Kore.aiプラットフォームのアカウントにログインする必要があります。また、以下の条件でボットをフィルタリングすることができます。
- ドメイン
- 特徴
- システム連携
- チャネル
- 言語
- 製品
以下をベースにして、テンプレートボットを並べ替えることができます。
- 人気度
- 最も多くインストールされたもの
- 最近追加されたもの
- A-Zで並べ替え
ボットを探索
ボットをインストールする前に、テンプレートボットを探索することができます。探索オプションでは、技術的な仕様、サポートされているチャネル、システム連携、言語などを含めて、レストランボットの概要を知ることができます。
ストアから探索
ストアからテンプレートボットを探索するには、以下の手順に従います。
- https://bots.kore.ai/botstore/にアクセスします。
- ストアのランディングページには、テンプレートボットのリストが表示されています。
- 上部のドロップダウンリストから製品を選択した場合、その製品のテンプレートボットのみが表示されます。例として、ドロップダウンリストからKore.aiプラットフォームを選択した場合、Kore.aiプラットフォームのテンプレートボットのみが表示されます。
- テンプレートボットをポイントすると、そのボットのプレビューが表示されます。プレビューには、テンプレートボットの詳細と特徴が表示されます。
- プレビュー画面で探索をクリック。
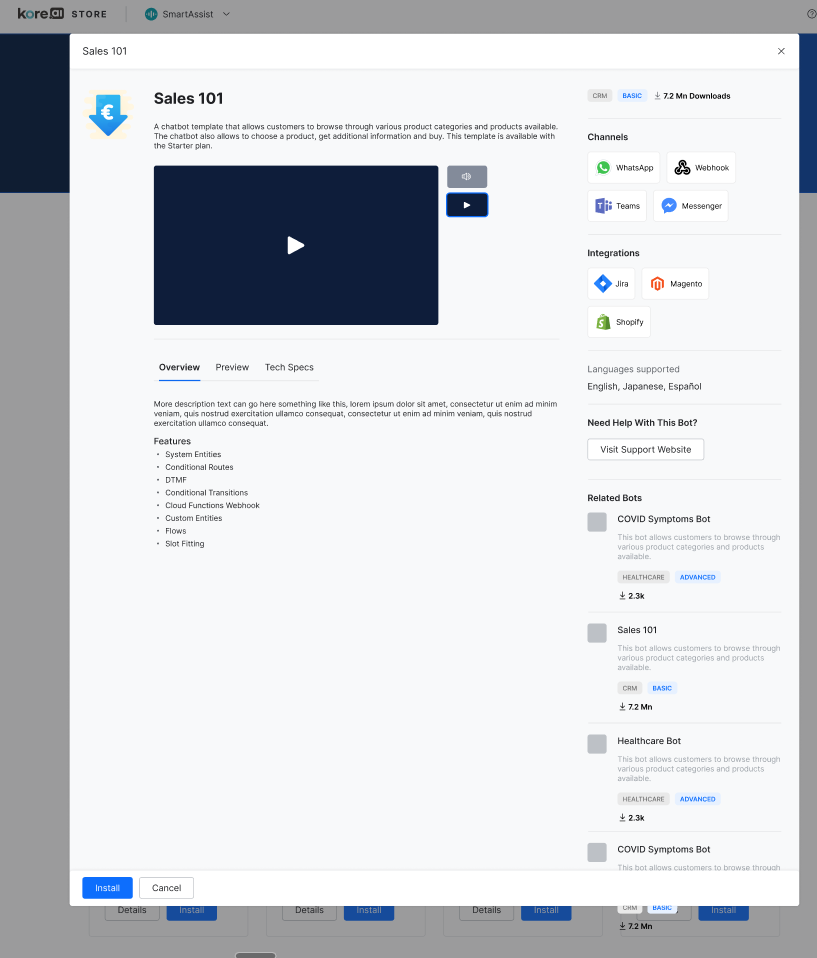
- ボットのダイアログボックスでは、ボットの特徴を説明する動画を見ることができます。
- ボットの概要を説明する3つのセクションがあります。
- 概要 – このセクションでは、テンプレートボットの概要と、このボットでサポートされている機能について説明します。
- プレビュー – このセクションでは、テンプレートボットのストーリーボードから構築されたストーリーのリストが表示されています。ストーリーをクリックすれば、そのストーリーのプレビューが表示されます。
- 技術仕様 – このセクションでは、ボットの技術面の詳細な概要を説明しています。ボットがどのように構築されたかについての情報が表示されます。
- 右の列には、サポートされているチャネルと言語 のリスト、および テンプレートボットと連携できる アプリ が表示されています。
- さらに詳しい情報や、ボットに関するヘルプが必要な場合は、サポートサイトへアクセスをクリックします。
- 関連するボットのセクションでは、テンプレートのボットに関連するボットを見つけることができます。
- ページの右上には、そのボットがダウンロードされた回数が表示されています。例:310万回のダウンロード。
- ボットを探索した後、必要であれば、インストールをクリックして、ボットをインストールします。
Kore.aiプラットフォームから探索
Kore.aiプラットフォームからテンプレートボットを探索するには、以下の手順に従います。
- 有効な資格情報で、Kore.aiプラットフォームにログインします。
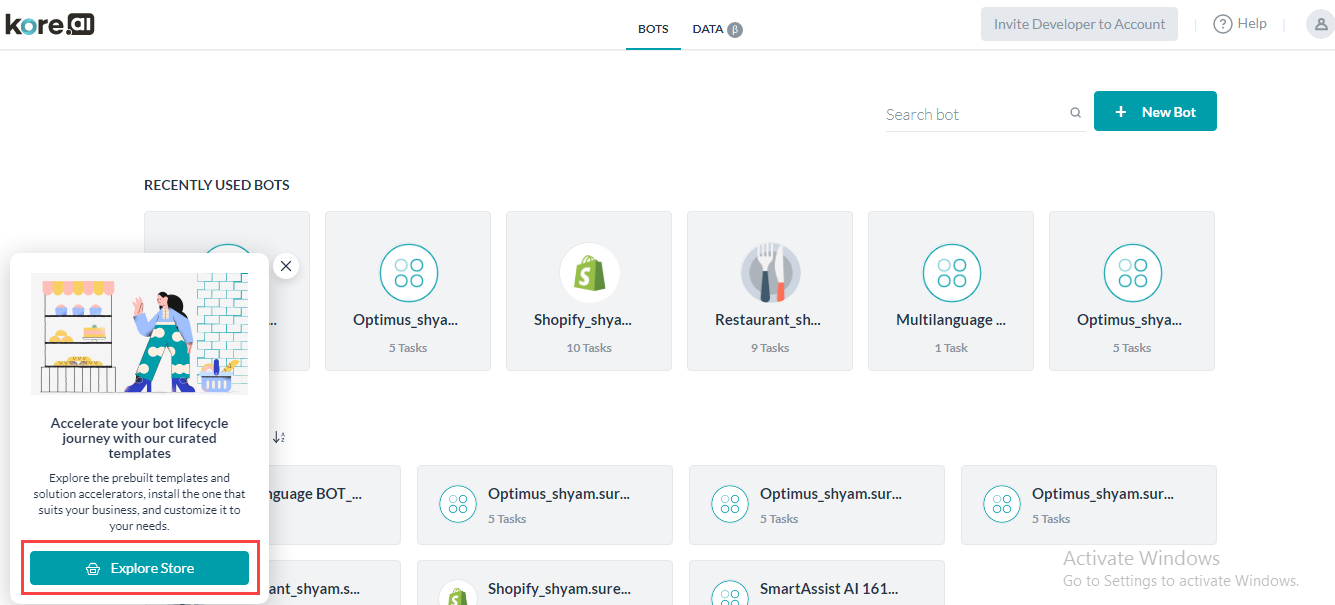
- ランディングページでは、左下にストアを探索のバナーが表示されています。
- ストアを探索をクリック。
- 「ボットストアからのテンプレート」ページでは、テンプレートボットのリストを見ることができます。
- テンプレートのボットをポイントすると、そのボットのプレビューが表示されます。プレビューには、ボットの説明、サポートしているチャネル、ボットの特徴が表示されます。
- プレビュー表示で探索をクリックして、インストールする前にテンプレートボットを探索します。
- ボットのダイアログボックスでは、ボットの特徴を説明する動画を見ることができます。
- ボットの概要を説明する3つのセクションがあります。
- 概要 – このセクションでは、テンプレートボットの概要と、このボットでサポートされている機能について説明します。
- プレビュー – このセクションでは、テンプレートボットのストーリーボードから構築されたストーリーのリストが表示されています。ストーリーをクリックすれば、そのストーリーのプレビューが表示されます。
- 技術仕様 – このセクションでは、ボットの技術面の詳細な概要を説明しています。ボットがどのように構築されたかについての情報が表示されます。
- 右の列には、サポートされているチャネルと言語 のリスト、および テンプレートボットと連携できる アプリ が表示されています。
- さらに詳しい情報や、ボットに関するヘルプが必要な場合は、サポートサイトへアクセスをクリックします。
- 関連するボットのセクションでは、テンプレートのボットに関連するボットを見つけることができます。
- ページの右上には、そのボットがダウンロードされた回数が表示されています。例:310万回のダウンロード。
- ボットを探索した後、必要であれば、インストールをクリックして、ボットをインストールします。
ボットをインストール
インストールとは、テンプレートボットをアカウントにインポートすることです。テンプレートボットは、ストアとKore.aiプラットフォームからインストールできます。
ストアからのインストール
ストアからテンプレートボットをインストールするには、以下の手順に従います。
- https://bots.kore.ai/botstore/にアクセスします。
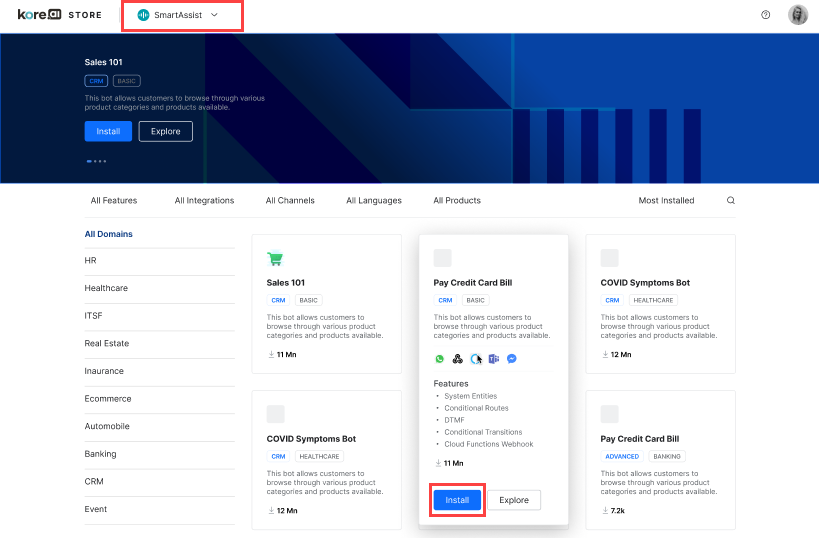
- ストアのランディングページでは、製品に基づいて利用可能なテンプレートボットのリストが表示されます。
- 上部のドロップダウンリストから製品を選択した場合、その製品のテンプレートボットのみが表示されます。例として、ドロップダウンリストからKore.aiプラットフォームを選択した場合、Kore.aiプラットフォームのテンプレートボットのみが表示されます。
- インストールしたい テンプレートボットをポイントします。プレビューでは、テンプレートボットの詳細と特徴が表示されます。
- プレビュー画面でインストールをクリック。
- 対応するダイアログボックスで、メールアドレスを入力します。
- 入力されたメールアドレスが既存ユーザーとして認識された場合は、ログインするためのパスワードの入力を指示します。
- 入力されたメールアドレスが新しいものであれば、アカウントの登録を指示するメッセージが表示されます。
- ログインに成功すると、ボットがインストールされ、そのステータスを示すダイアログボックスが表示されます。
Kore.aiプラットフォームからのインストール
Kore.aiプラットフォームからテンプレートボットをインストールするには、以下の手順に従います。
- 有効な資格情報で、Kore.aiプラットフォームにログインします。
- ランディングページで、右上の+新しいボットをクリックし、リストから 「ストアから開始」を選択します。
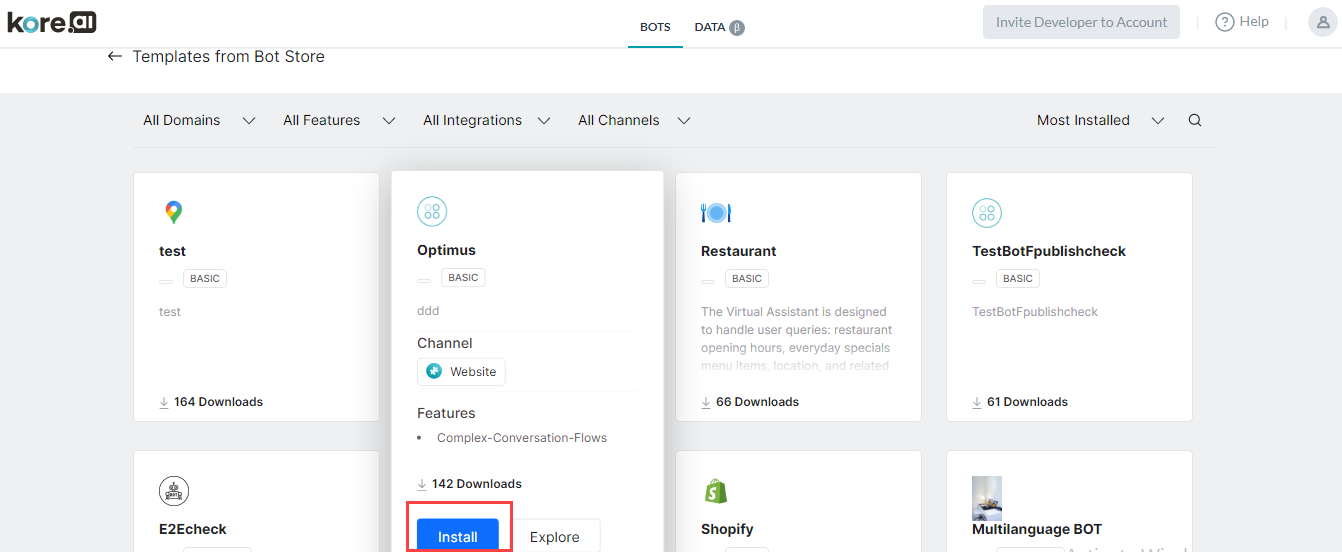
- 「ボットストアからのテンプレート」ページでは、テンプレートボットのリストを見ることができます。
- テンプレートのボットをポイントすると、そのボットのプレビューが表示されます。プレビューには、ボットの説明、サポートしているチャネル、ボットの特徴が表示されます。
- プレビュー画面でインストールをクリック。
- ボットの概要ページに サンプルボットの設定ウィンドウが表示されます。
- デフォルトでは、手順タブが選択されており、インストール手順を確認できます。
- 次へをクリック。
- 「ボットの設定」ページで、「ボット名」を入力します。
- アイコンを選択:
- 汎用ボットアイコン
- カスタムアイコン
- 次へをクリック。
- 「ボット変数をセットアップ」ページで、変数名に対応する値を入力します。
- 完了をクリック。
Kore.ai 스토어는 Kore.ai 플랫폼에서 실행되는 봇을 위한 온라인 마켓플레이스입니다. 스토어의 목적은 개발자가 봇의 기능을 살펴보고 자신의 계정으로 가져올 수 있도록 하는 것입니다. 스토어에서는 템플릿 봇만 사용할 수 있고 스토어를 방문하는 사용자는 이러한 모든 봇을 살펴볼 수 있습니다. 템플릿 봇을 가져오려면 Kore.ai 플랫폼 계정이 있어야 합니다. Kore.ai 템플릿 봇은 Kore.ai 계정 및 이메일, Kore.ai 메시징, Kore.ai 스페이스, SMS, Facebook Messenger 등의 채널과 함께 사용할 수 있습니다. Kore.ai 스토어에서 Kore.ai 템플릿 봇을 가져오고 텍스트 메시지, 이메일 또는 기타 웹 서비스 시스템을 통해 즐겨 찾는 앱과 웹 사이트로부터 알림을 받을 수 있습니다.
스토어 접근
스토어에 접근할 수 있는 방법은 다양합니다. 다음을 통해 스토어에 접근할 수 있습니다:
- 스토어
- Kore.ai 플랫폼
스토어 스토어에 접근하려면 https://bots.kore.ai/botstore/로 이동합니다. 스토어에서 사용할 수 있는 모든 템플릿 봇을 보고, 탐색하고 설치할 수 있습니다. Kore.ai 플랫폼 Kore.ai 플랫폼 사용자는 플랫폼 내에서 스토어에 접근할 수 있습니다. Kore.ai 플랫폼과 관련된 봇만 보고, 탐색하고 설치할 수 있습니다. 스토어에서, 템플릿 봇을 보고, 탐색하고 설치할 수 있습니다. 그러나, 템플릿 봇을 설치하려면, Kore.ai 플랫폼 계정에 로그인해야 합니다. 또한, 다음 기준에 따라 봇을 필터링할 수 있습니다:
- 도메인
- 기능
- 통합
- 채널
- 언어
- 제품
다음을 기준으로 템플릿 봇을 정렬할 수 있습니다:
- 인기도
- 가장 많이 설치됨
- 최근에 추가됨
- 가나다순 정렬
봇 탐색
설치 전에 템플릿 봇을 탐색할 수 있습니다. 탐색 옵션을 사용하면 기술 세부 사항, 지원되는 채널, 통합 및 언어를 포함한 봇의 개요를 얻을 수 있습니다.
스토어에서 탐색
스토어에서 템플릿 봇을 탐색하려면, 다음 단계를 따르세요:
- https://bots.kore.ai/botstore/로 이동합니다.
- 랜딩 페이지에서, 템플릿 봇 목록을 확인할 수 있습니다.
- 상단의 드롭다운 목록에서 제품을 선택하면, 해당 제품의 템플릿 봇만 표시됩니다. 예를 들어, 드롭다운 목록에서 Kore.ai 플랫폼을 선택하면, Kore.ai 플랫폼 템플릿 봇만 표시됩니다.
- 템플릿 봇 위에 마우스를 올리면 해당 봇의 미리 보기가 표시됩니다. 미리 보기에서는 기능과 함께 템플릿 봇 세부 정보가 표시됩니다.
- 미리 보기 디스플레이에서, 탐색을 클릭합니다.
- 봇 대화 상자에서, 봇의 기능을 설명하는 봇에 대한 동영상을 확인할 수 있습니다.
- 봇에 대한 개요를 제공하는 세 가지 섹션을 확인할 수 있습니다:
- 개요 – 이 섹션에서는 템플릿 봇과 이 봇에서 지원되는 기능 요약을 제공합니다.
- 미리 보기 – 이 섹션에서는 템플릿 봇의 스토리보드에서 작성된 스토리 목록이 표시됩니다. 스토리를 클릭하면, 해당 특정 스토리의 미리 보기가 제공됩니다.
- 기술 세부 사항 – 이 섹션에서는 봇의 기술적 측면에 대한 자세한 개요를 제공합니다. 봇이 구축된 방법에 대한 정보가 표시됩니다.
- 오른쪽 열에서, 채널과 지원되는 언어의 목록 및 템플릿 봇과 연동할 수 있는 앱을 확인할 수 있습니다.
- 봇에 대한 자세한 정보나 도움말이 필요한 경우, 지원 웹 사이트 방문을 클릭합니다.
- 관련된 봇 섹션에서 템플릿 봇과 관련된 봇을 확인할 수 있습니다.
- 페이지 오른쪽 상단에서, 봇이 다운로드된 횟수를 확인할 수 있습니다. 예: 3.1만 다운로드.
- 봇을 탐색한 후, 필요한 경우, 설치를 클릭하여 봇을 설치합니다.
Kore.ai 플랫폼에서 탐색
Kore.ai 플랫폼에서 템플릿 봇을 탐색하려면, 다음 단계를 따르세요:
- 유효한 자격 증명으로 Kore.ai 플랫폼에 로그인합니다.
- 랜딩 페이지에서, 왼쪽 하단에 있는 스토어 탐색 배너를 확인할 수 있습니다.
- 스토어 탐색을 클릭합니다.
- 봇 스토어의 템플릿 템플릿에서, 템플릿 봇의 목록을 확인할 수 있습니다.
- 템플릿 봇 위에 마우스를 올리면 해당 봇의 미리 보기가 표시됩니다. 미리 보기에서는 봇 설명, 지원되는 채널 및 봇 기능이 표시됩니다.
- 미리 보기 디스플레이에서, 설치하기 전에 탐색을 클릭하여 템플릿 봇을 탐색합니다.
- 봇 대화 상자에서, 봇의 기능을 설명하는 봇에 대한 동영상을 확인할 수 있습니다.
- 봇에 대한 개요를 제공하는 세 가지 섹션을 확인할 수 있습니다:
- 개요 – 이 섹션에서는 템플릿 봇과 이 봇에서 지원되는 기능 요약을 제공합니다.
- 미리 보기 – 이 섹션에서는 템플릿 봇의 스토리보드에서 작성된 스토리 목록이 표시됩니다. 스토리를 클릭하면, 해당 특정 스토리의 미리 보기가 제공됩니다.
- 기술 세부 사항 – 이 섹션에서는 봇의 기술적 측면에 대한 자세한 개요를 제공합니다. 봇이 구축된 방법에 대한 정보가 표시됩니다.
- 오른쪽 열에서, 채널과 지원되는 언어의 목록 및 템플릿 봇과 연동할 수 있는 앱을 확인할 수 있습니다.
- 봇에 대한 자세한 정보나 도움말이 필요한 경우, 지원 웹 사이트 방문을 클릭합니다.
- 관련된 봇 섹션에서 템플릿 봇과 관련된 봇을 확인할 수 있습니다.
- 페이지 오른쪽 상단에서, 봇이 다운로드된 횟수를 확인할 수 있습니다. 예: 3.1만 다운로드.
- 봇을 탐색한 후, 필요한 경우, 설치를 클릭하여 봇을 설치합니다.
봇 설치
설치는 템플릿 봇을 계정으로 가져오는 것을 의미합니다. 스토어와 Kore.ai 플랫폼에서 템플릿 봇을 설치할 수 있습니다.
스토어에서 설치
스토어에서 템플릿 봇을 설치하려면, 다음 단계를 따르세요:
- https://bots.kore.ai/botstore/로 이동합니다.
- 스토어 랜딩 페이지에서, 제품에 따라 사용할 수 있는 템플릿 봇 목록을 확인할 수 있습니다.
- 상단의 드롭다운 목록에서 제품을 선택하면, 해당 제품의 템플릿 봇만 표시됩니다. 예를 들어, 드롭다운 목록에서 Kore.ai 플랫폼을 선택하면, Kore.ai 플랫폼 템플릿 봇만 표시됩니다.
- 설치하려는 템플릿 봇 위로 마우스를 올립니다. 미리 보기에는 템플릿 봇 세부 정보가 기능과 함께 표시됩니다.
- 미리 보기 디스플레이에서, 설치를 클릭합니다.
- 해당 대화 상자에서, 이메일 주소를 입력합니다.
- 입력한 이메일 주소가 기존 사용자로 식별되면, 로그인할 암호를 입력하라는 메시지가 표시됩니다.
- 입력한 이메일 주소가 새로운 경우, 계정에 등록하라는 메시지가 표시됩니다.
- 로그인에 성공하면, 상태를 표시하는 대화 상자와 함께 봇이 설치됩니다.
Kore.ai 플랫폼에서 설치
Kore.ai 플랫폼에서 템플릿 봇을 설치하려면, 다음 단계를 따르세요:
- 유효한 자격 증명으로 Kore.ai 플랫폼에 로그인합니다.
- 랜딩 페이지의 오른쪽 상단에서, + 새 봇을 클릭하고 목록에서 스토어에서 시작을 선택합니다.
- 봇 스토어의 템플릿 템플릿에서, 템플릿 봇의 목록을 확인할 수 있습니다.
- 템플릿 봇 위에 마우스를 올리면 해당 봇의 미리 보기가 표시됩니다. 미리 보기에서는 봇 설명, 지원되는 채널 및 봇 기능이 표시됩니다.
- 미리 보기 디스플레이에서, 설치를 클릭합니다.
- 샘플 봇 설정 창이 봇 요약 페이지에 나타납니다.
- 기본적으로, 지시 사항 탭이 선택되어 있으며 설치 지시 사항을 확인할 수 있습니다.
- 다음을 클릭합니다.
- 봇 설정 페이지에서, 봇 이름을 입력합니다.
- 아이콘을 선택합니다:
- 일반 봇 아이콘
- 사용자 정의 아이콘
- 다음을 클릭합니다.
- 봇 변수 설정 페이지에서, 변수 이름에 해당하는 값을 입력합니다.
- 완료를 클릭합니다.
Leave a Reply
Kore.ai Store is an online marketplace for bots that run on the Kore.ai platform. The purpose of the store is to enable developers to explore the bot’s capabilities and import them into their accounts. Only Template Bots are available in the store and users visiting the store can explore all these bots. You must have a Kore.ai platform account to import the template bots.
Kore.ai template bots are available for use with your Kore.ai account and channels such as email, Kore.ai messaging, Kore.ai spaces, SMS, Facebook Messenger, and more. You can get Kore.ai template bots at the Kore.ai Store to receive alerts from your favorite apps and websites through text messages, emails, or other web service systems.
Access Store
There are different ways you can access the store. You can access the store from:
- Store
- Kore.ai Platform
Store
Go to https://bots.kore.ai/botstore/ to access the store. You can view, explore, and install all the template bots available in the store.
Kore.ai Platform
As a Kore.ai platform user, you can access the store from within the platform. You can view, explore, and install only the bots related to the Kore.ai platform.
In the store, you can view, explore, and install the template bots. But to install a template bot, you must log in to the Kore.ai platform account. Also, you can filter the bots based on the following criteria:
- Domains
- Features
- Integrations
- Channels
- Languages
- Products
You can sort the template bots based on:
- Popularity
- Most Installed
- Recently Added
- Sort by A-Z
Explore Bots
You can explore the template bot before installing it. The explore option allows you to get an overview of the bot including the technical specifications, supported channels, integrations, and languages.
Explore from the Store
To explore the template bot from the store, follow the below steps:
- Go to https://bots.kore.ai/botstore/.
- On the store landing page, you can find a list of template bots.
- If you select a product from the drop-down list on the top, it displays only the template bots of that product. For example, if you select Kore.ai Platform from the drop-down list, it displays only the Kore.ai Platform template bots.
- Hover over the template bot and it gives a preview of that bot. The preview displays the template bot details along with the features.
- On the preview display, click Explore.
- On the bot dialog box, you can find a video of the bot that explains the bot’s features.
- You can find three sections that give an overview of the bot:
- Overview – This section gives a summary of the template bot and the features supported in this bot.
- Preview – This section displays the list of stories that are built from the storyboard in the template bot. If you click a story, it gives a preview of that particular story.
- Technical Specifications – This section gives a detailed overview of the technical aspects of the bot. It displays information about how the bot was built.
- On the right column, you can find the list of channels and languages supported, and apps that you can integrate with the template bot.
- If you want more information or any help with the bot, click Visit Support Website.
- You can find the Related Bots section to find bots related to the template bot.
- On the top-right of the page, you can find the number of times the bot was downloaded. For example, 3.1 million downloads.
- After exploring the bot, if required, you can click Install to install the bot.
Explore from the Kore.ai Platform
To explore the template bot from the Kore.ai platform, follow the below steps:
- Log in to the Kore.ai platform with valid credentials.
- On the landing page, you can find the Explore Store banner at the bottom left.
- Click Explore Store.
- On the Templates from Bot Store page, you can find the list of template bots.
- Hover over a template bot and it gives a preview of that bot. The preview displays the bot description, channels supported, and bot features.
- On the preview display, click Explore to explore the template bot before you install it.
- On the bot dialog box, you can find a video of the bot that explains the bot’s features.
- You can find three sections that give an overview of the bot:
- Overview – This section gives a summary of the template bot and the features supported in this bot.
- Preview – This section displays the list of stories that are built from the storyboard in the template bot. If you click a story, it gives a preview of that particular story.
- Technical Specifications – This section gives a detailed overview of the technical aspects of the bot. It displays information about how the bot was built.
- On the right column, you can find the list of channels and languages supported, and apps that you can integrate with the template bot.
- If you want more information or any help with the bot, click Visit Support Website.
- You can find the Related Bots section to find bots related to the template bot.
- On the top-right of the page, you can find the number of times the bot was downloaded. For example, 3.1 million downloads.
- After exploring the bot, if required, you can click Install to install the bot.
Install Bots
Install refers to importing the template bots into your account. You can install template bots from the store and Kore.ai platform.
Install from the Store
To install template bots from the store, follow the below steps:
- Go to https://bots.kore.ai/botstore/.
- On the store landing page, you can find a list of template bots available based on products.
- If you select a product from the drop-down list on the top, it displays only the template bots of that product. For example, if you select Kore.ai Platform from the drop-down list, it displays only the Kore.ai Platform template bots.
- Hover over the template bot you want to install. The preview displays the template bot details along with the features.
- On the preview display, click Install.
- On the corresponding dialog box, enter the email address.
- If the entered email address is identified as the existing user, it prompts you to enter the password to log in.
- If the entered email address is new, it prompts you to sign up for an account.
- Upon successful login, the bot is installed with a dialog box displaying the status.
Install from the Kore.ai Platform
To install template bots from the Kore.ai platform, follow the below steps:
- Log in to the Kore.ai Platform with valid credentials.
- On the landing page, click + New Bot on the top-right and select Start from the Store from the list.
- On the Templates from Bot Store page, you can find the list of template bots.
- Hover over a template bot and it gives a preview of that bot. The preview displays the bot description, channels supported, and bot features.
- On the preview display, click Install.
- A Configure Sample Bot window appears on the Bot Summary page.
- By default, the Instructions tab is selected and you can find the installation instructions.
- Click Next.
- On the Bot Settings page, enter the Bot Name.
- Select an icon:
- Generic bot icon
- Custom icon
- Click Next.
- On the Setup Bot Variables page, enter the corresponding values for the variable names.
- Click Done.