서비스 노드의 URL을 인증을 관리하는 외부 애플리케이션에 제공하여 봇의 맞춤형 인증을 구현할 수 있습니다. 플랫폼은 성공 및 실패 인증 시나리오를 처리하고 해당 작업 흐름을 관리하는 데 필요한 기능을 제공합니다.
맞춤형 인증 구현을 위한 봇 빌더 메커니즘에는 다음 단계가 포함됩니다.
서비스 노드에서 맞춤형 인증 URL 생성
맞춤형 인증을 구현하려면 인증 서비스의 URL을 사용하여 대화 작업의 서비스 노드를 먼저 구성해야 합니다. 그렇게 한 후 플랫폼은 입력한 인증 URL을 봇의 Webhook에 내부적으로 추가하고 맞춤형 인증 URL을 생성합니다. 인증 프로세스를 완료한 후 필요한 세부 정보를 플랫폼으로 다시 보내는 인증 서비스를 쉽게 수행합니다.
컨텍스트 채우기 및 사용자에게 맞춤형 URL 제공
작업 실행 중 대화가 서비스 노드에 도달하면 플랫폼은 컨텍스트에 고객 인증 URL을 채우고 인증 자격 증명을 요청하는 메시지를 최종 사용자에게 제공합니다. 그런 다음 플랫폼은 외부 인증 서비스가 Webhook에서 응답을 전송할 때까지 기다립니다.
인증 후 콜백 수신
외부 시스템은 컨텍스트 개체에 채워진 Webhook URL을 사용하여 플랫폼에 대한 콜백을 자체적으로 수행합니다. 이 모든 작업이 완료되면 노드에 정의된 전환에 따라 대화 작업이 진행됩니다.
맞춤형 인증 서비스 설정
- 맞춤형 인증을 구현하려는 대화 작업을 엽니다.
- 작업 흐름에서 적절한 노드 뒤에 서비스 노드를 추가합니다.
- 노드의 구성 요소 속성 탭에서 노드의 이름을 입력합니다.
- 서비스 유형 드롭다운 목록에서 맞춤형 인증 서비스를 선택합니다.
- 인증 URL 필드에서 외부 인증 서비스 URL을 입력합니다.
- 응답 섹션에는 봇이 사용자에게 제공하는 기본 인증 요청 메시지가 표시됩니다. 메시지를 편집하거나 관리를 클릭하여 고급 또는 채널별 메시지를 정의할 수 있습니다. 메시지 형식 및 템플릿에 대해 알아보세요. 참고: 여기서 기본 메시지는 서비스 노드의 기본 이름을 기반으로 하며 다음과 같습니다. 다음 URL을 사용하여 인증을 진행하세요 {{context.<<Service Node Name>>.customAuthenticationURL}}. 나중에 노드 이름을 변경하는 경우 수정된 이름을 반영하려면 메시지도 업데이트해야 합니다.

- 노드의 전환을 정의합니다.
サービスノードから認証を管理する外部アプリケーションにURLを提供することで、ボットにカスタム認証を実装できます。このプラットフォームは、認証シナリオの成功と失敗を処理するために必要な、かつ対応するタスクフローを管理するために必要な機能を提供します。
ボットビルダーのメカニズムでカスタム認証を実装するには、以下の手順があります。
サービスノードからカスタム認証URLを生成します
カスタム認証を実装するためには、まず、ダイアログタスクのサービスノードに認証サービスのURLを設定する必要があります。これを実行すると、プラットフォームは内部的に、入力された認証URLをボットのWebhookに付加し、カスタム認証URLを作成します。これは、認証サービスが認証プロセスを完了した後に、必要な詳細情報をプラットフォームへ容易に送信できるようにするために実行されます。
コンテキストの入力とユーザーへのカスタムURLの提示
タスクの実行中、ダイアログがサービスノードに到達すると、プラットフォームは顧客認証URLをコンテキストに入力し、認証資格情報を依頼するメッセージをエンドユーザーに提示します。そこで、プラットフォームは、外部の認証サービスがWebhookで応答を送信するのを待ちます。
認証後にコールバックを受信
外部システムは、一部で、コンテキストオブジェクトに入力されたWebhook URLを使用して、プラットフォームへのコールバックを実行します。これらの作業が完了すると、ノードに定義された遷移に基づいてダイアログタスクが進行します。
カスタム認証サービスの設定
- カスタム認証を実装したいダイアログタスクを開きます。
- タスクフローの適切なノードの後に、サービスノードを追加します。
- ノードのコンテキストプロパティタブで、ノードの 名前 を入力します。
- サービスタイプドロップダウンリストで、カスタム認証サービスを選択します。
- 認証URLフィールドに、外部認証サービスのURLを入力します。
- 応答セクションでは、ボットがユーザーに提示するデフォルトの認証要求メッセージが表示されます。メッセージを編集するか、管理をクリックして、詳細メッセージまたはチャネル固有のメッセージを定義できます。メッセージのフォーマット化とテンプレートについて学びます。メモ:ここでのデフォルトメッセージは、サービスノードのデフォルト名に基づいており、以下のとおりです。次のURLで認証を進めてください。 {{context.<<Service Node Name>>.customAuthenticationURL}}後にノード名を変更した場合は、メッセージにも変更後の名前を反映させてください。
- ノードの遷移を定義します。
You can implement custom authentication for your bot by providing URL from the service node to an external application that manages the authentication. The platform provides the necessary functionality to handle successful and failed authentication scenarios and manage the corresponding task flows.
Bot Builder mechanism to implement custom authentication involves the following steps:
Generate the Custom Authentication URL from the Service Node
To implement custom authentication, you first need to configure a dialog tasks’ service node with the URL of the authenticating service. When you do so, the platform internally appends the authentication URL you entered with the bot’s webhook and creates a custom authentication URL. It performs to facilitate the authentication service to send back the necessary details to the platform after completing the authentication process.
Populate the Context and Present the Custom URL to the User
During task execution, when a dialog reaches the service node, the platform populates the customer authentication URL in the context and presents a message to the end-user requesting authentication credentials. Then, the platform waits for the external authentication service to send a response on the webhook.
Receive Callback after Authentication
The external system, on its part, performs a callback to the platform using the webhook URL, which is populated in the Context Object. Once all this is complete, the dialog task progresses based on the transitions defined for the node.
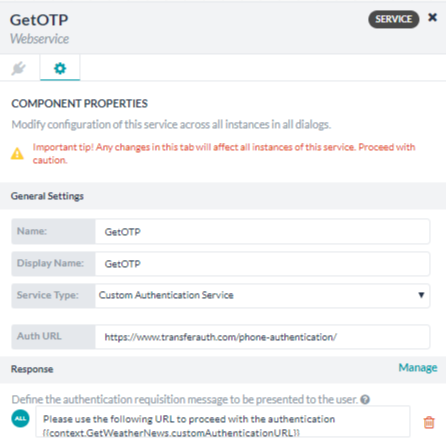
Configure the Custom Authentication Service
- Open the dialog task in which you want to implement the custom authentication.
- Add a service node after the appropriate node in the task flow.
- On the Component Properties tab of the node, enter a Name for the node.
- In the Service Type drop-down list, select Custom Authentication Service.
- In the Auth URL field, enter the URL of the external authentication service.
- Under the Response section, it shows the default authentication requisition message that the bot presents to the user. You can edit the message or click Manage to define advanced or channel-specific messages. Learn about message formatting and templates.
Note: The default message here is based on the default name of the service node and is as follows: Please use the following URL to proceed with the authentication {{context.<<Service Node Name>>.customAuthenticationURL}}. If you change the node name later, ensure that you also update the message to reflect the revised name.
- Define the transitions for the node.