릴리스 8.1.0부터는 스마트 봇 기능은 더 이상 지원되지 않습니다. 기존 스마트 봇을 계속 사용할 수 있지만 새 스마트 봇을 생성할 수 없습니다. 이 기능은 다음 릴리스에서 중단됩니다.
Kore.ai의 스마트 봇을 사용하면 기업은 중앙에 봇을 구축하고 기업 내 다양한 팀은 요구 사항에 맞게 봇 설정을 재사용하고 확장할 수 있습니다. 스마트 봇은 새 봇이 사전 정의된 봇의 설정과 작업을 상속할 수 있도록 하여 봇 구축 과정을 가속합니다. 자세한 개요는 여기를 클릭하세요. 이 문서는 자체 스마트 봇 생성과 엔터프라이즈 계정에서 이를 사용하는 방법에 대해 다룹니다.
스마트 봇 생성은 표준 봇 생성과 아주 유사하며 다음 단계를 포함합니다.
- 봇 생성,
- 봇 작업 정의,
- 봇 테스트하기,
- 채널 설정,
- 봇 설정 정의, 및
- 게시.
위 단계 중 몇 가지는 스마트 봇의 컨텍스트에 특별한 언급이 필요하며 이 문서에서 논의됩니다.
스마트 봇 생성
- 봇 빌더를 엽니다.
- 새 봇을 클릭하고 처음부터 시작 옵션을 선택합니다.
- 새 봇 생성 창에서 이름을 입력하고 기본 봇 언어를 설정합니다.
- 봇 유형의 드롭다운 목록에서, 스마트 봇을 선택합니다.
- 이렇게 하면 스마트 봇의 봇 작업 창이 열립니다.
- 작업, 흐름, 테스트, 배포를 추가하여 표준 봇과 같이 봇을 정의합니다.
설정 봇 설정
스마트 봇을 위해 특별히 설정되어야 하는 몇몇 봇 설정은 이 섹션에 언급됩니다.
봇 변수에 대한 옵션 설정
봇 변수로 중앙에 변수를 정의하고 봇 정의에 걸쳐 이를 재사용할 수 있습니다. 예를 들어 봇을 구축하는 동안 개발자들은 일반적으로 테스트를 위해 스테이징 엔드포인트를 사용합니다. 이러한 엔드포인트를 변수로서 설정할 수 있습니다. 봇을 내보내거나 게시할 때 이러한 변숫값을 프로덕션 엔드포인트로 대체할 수 있습니다. 봇 변수 정의는 표준 봇과 같습니다. 봇 변수를 설정하는 방법에 대해 학습하려면 여기를 참조하세요. 스마트 봇의 전역 변수에는 상속 도중 가시성 또는 변수 사용을 정의하기 위한 추가 옵션이 있습니다.
- 미리 입력됨: 이 옵션을 사용하여 자식 봇 개발자는 봇을 상속하는 동안 변수 설정 탭에서 변숫값을 보고 편집할 수 있습니다.
- 숨김: 봇을 상속하는 동안 자식 봇 개발자가 변숫값을 보거나 편집하는 것을 원치 않을 때 이 옵션을 사용합니다. 하지만 개발자는 상속 후 봇 변수 페이지에서 변수 이름과 값을 볼 수 있습니다.
- 설치 시 요청: 이 옵션을 사용하여 봇을 상속하는 동안 자식 봇 개발자로부터 봇 변수의 값을 받습니다. 상속된 봇의 개발자는 스마트 봇에 설정된 변숫값을 보지 못하며 값을 입력하지 않으면 봇 상속을 완료할 수 없습니다.
스마트 봇 설정
스마트 봇 상속을 위해 필요한 구성 설정은 봇 설정의 스마트 봇 설정 탭에서 설정될 수 있습니다. 이러한 설정은 발견, 미리보기 및 스마트 봇 설치 중 도움이 됩니다. 다음은 이를 설정하는 단계입니다.
- 봇의 탐색 패널 쪽에 마우스를 이동하여 설정 > 스마트 봇 설정을 클릭합니다.
- 다음 설정을 설정합니다.
- 마켓플레이스에서 사용자가 봇을 테스트하도록 허용: 이 옵션으로 사용자가 설치 전에 마켓플레이스에서 스마트 봇을 시험할 수 있습니다.
- 예, 사용자가 개발자 권한 부여를 시험할 수 있도록 허용합니다: 이 옵션을 사용하여 이 봇에 대한 체험 옵션을 허용하면 개발자는 계정의 마켓플레이스로 로그인하여 이 봇과 채팅할 수 있습니다.
- 아니요, 시험 기능을 활성화하지 않습니다: 이 옵션을 사용하여 계정의 마켓플레이스에서 이 봇에 대한 시험 옵션을 허용하지 않습니다.
- 스마트 봇 설명: 스마트 봇에 대한 설명을 입력하여 계정의 마켓플레이스에 보여줍니다.
- 구성 설명서: 같은 것을 설치하는 스마트 봇을 사용하는 개발자에게 설명서가 주어질 수 있습니다. 이것은 사용할 수 있는 작업과 목적, 입력되어야 하는 봇 변수 등의 목록과 같은 상세 정보를 포함해야 합니다. 이러한 설명서의 목적은 이 봇을 상속하는 개발자가 이 봇을 최대한 사용하도록 하는 것입니다. 개발자는 봇을 상속하는 동안 이러한 설명서를 볼 수 있습니다. 설명서를 포함한 PDF 파일을 업로드하거나 일반 텍스트 양식으로 이를 입력할 수 있습니다.
- 구성 설명서 URL: 추가로, 설명서 세부 정보 구성을 위한 URL이 있다면 제공할 수 있습니다.
- 마켓플레이스에서 사용자가 봇을 테스트하도록 허용: 이 옵션으로 사용자가 설치 전에 마켓플레이스에서 스마트 봇을 시험할 수 있습니다.
- 설정을 저장합니다.
스마트 봇 상속
봇 개발자는 계정 내에 게시된 스마트 봇을 보거나 설치할 수 있습니다. 참고: 개발자가 스마트 봇을 보고 상속하게 하려면 이를 게시해야 합니다. 봇 게시에 대한 자세한 내용은 여기를 참조하세요. 스마트 봇 상속을 위한 단계
- 봇 빌더를 엽니다.
- 랜딩 페이지의 오른쪽 상단에서 새 봇을 클릭합니다.
- 스마트 봇 설치 옵션을 선택합니다. 스마트 봇 선택 창이 열립니다.

- 스마트 봇 선택 창에서 상속하고자 하는 봇을 검색하거나 스크롤 합니다. 스마트 봇의 이름으로 마우스를 이동하고 설치를 클릭합니다. 스마트 봇 설정 창이 열립니다.
- 봇 이름 필드가 스마트 봇 이름에 추가된 접미사로 자동으로 채워집니다. 선택한 이름으로 이를 교체합니다.
- 봇에 사용자 정의 아이콘을 추가하고 싶다면, 아이콘 필드의 사용자 정의 아이콘을 선택하고 파일을 업로드합니다.
- 자식 봇이 다루게 되는 부모 봇에 업데이트를 어떻게 할지 결정하는 기본 설정 업데이트는 설정될 수 있습니다. 부모 봇에 변경 사항이 있다면, 자식 봇에 대한 업데이트는 게시된 버전 또는 자식 봇의 개발 중인 버전에 반영됩니다.
- 가능한 경우 게시된 버전에 봇 정의 업데이트 직접 추가는 봇의 게시된 버전으로 상속되는 모든 업데이트의 기본 설정입니다. 게시된 버전을 사용할 수 없는 경우, 업데이트는 개발 중인 버전에 적용됩니다. 이 설정은 관리자 콘솔에서 '모든 배포 요청을 보류하고 관리자가 명확하게 승인한 요청만 게시' 의 봇 설정을 재정의합니다.
- 개발 중인 버전에 항상 봇 정의 업데이트 추가는 자식 봇의 개발 중인 버전에 변경 사항을 적용합니다. 개발 중인 버전이 사용할 수 없는 경우 잠긴 상속 상태로 생성됩니다. 개발 중인 버전에서 작업이나 노드가 잠기지 않은 경우 게시된 버전에 동일하게 적용된다는 점에 유의하세요. 참고: 이 설청은 자식 봇의 고급 설정에서 추후에 수정될 수 있습니다.
- 다음으로, 변수 설정 탭을 클릭합니다. 미리 입력됨 또는 설치 시 요청 설정으로 구성된 변수의 목록을 보여줍니다. 설치 시 요청 변수에 값을 입력합니다. 선택적으로 미리 입력된 변수를 편집할 수 있습니다.
- 구성 설치 파일이 열립니다. 설명서를 신중하기 읽은 다음 다음을 클릭합니다.
- 자식 봇이 생성되며, 봇의 봇 작업 페이지가 열립니다.
자식 봇은 변수를 사용하는 로컬라이즈 관련 매개변수와 마찬가지로 스마트 봇을 그대로 또는 작업 및 지식 쿼리를 추가함으로써 상속된 기능을 확장하여 사용할 수 있습니다. 아래의 상속 시나리오 섹션은 자식 봇이 상속하는 요소 목록과 상속이 지속되거나 재정의되는 조건을 제공합니다.
상속 시나리오
자식 봇에서 상속은 다음과 같은 방식으로 적용됩니다.
- 상속 없음 자식 봇이 몇몇 요소를 상속하지 않는 경우
- 일회성 상속 상속은 일회성 과정이며 부모 스마트 봇의 일부 봇 요소로 추후 변경 사항이 자식 봇에 상속되지 않습니다. 그리고
- 지속된 상속 자식 봇이 부모 스마트 봇 내의 일부 봇 요소 변경 사항을 상속하는 경우. 기본 설정 업데이트 봇 설치 시 또는 고급 설정 탭에서 나중에 구성된 설정으로 자식 봇 버전을 게시된 버전 또는 개발 중인 버전 중 결정하며 업데이트합니다.
상속 비활성화: 스마트 봇 상속 옵션을 사용하는 자식 봇의 고급 설정에서 상속은 봇 수준에서 비활성화될 수 있습니다. 이 옵션은 부모 스마트 봇에서 자식 봇의 연결을 영구적으로 끊으며 조심히 사용되어야 합니다. 다음 섹션은 상속 없음, 일회성, 지속되는 상속을 포함하는 봇 요소 목록과 상속의 잠금을 해제하는 조치를 보여줍니다.
상속되지 않는 봇 요소
- 모든 구성된 채널
- BotKit 또는 웹 SDK 연결을 위한 스마트 봇에서 생성된 모든 앱
일회성 상속을 포함하는 봇 요소
- 엔티티 동의어
- 봇 설정
- 인증 프로필
- 기본 대화
참고: 기존 봇 작업의 엔티티 동의어에 일회성 상속이 있을 때 부모 봇에서 생성된 모든 새 작업의 NLP 입력은 자식 봇이 상속합니다.
지속된 상속을 포함하는 봇 요소
자식 봇이 상속하는 봇 작업은 지속된 상속을 가지며 이는 부모 봇 작업에 게시된 어떤 변경 사항이든 자식 봇에 자동으로 반영된다는 것을 의미합니다. 작업의 특정 부분을 편집하여 봇 요소의 지속된 상속을 재정의하거나 "잠금 해제"할 수 있습니다. 다음 테이블은 지속된 상속을 획득하는 봇 요소 목록을 보여주고 상속을 잠금 해제하기 위한 단계를 제공합니다.
| 기능 이름 | 상속 잠금 해제 |
| 대화 작업 | 대화 작업 페이지에서 작업 이름에 대한 잠금 아이콘을 클릭한 다음 잠금 해제를 클릭합니다. 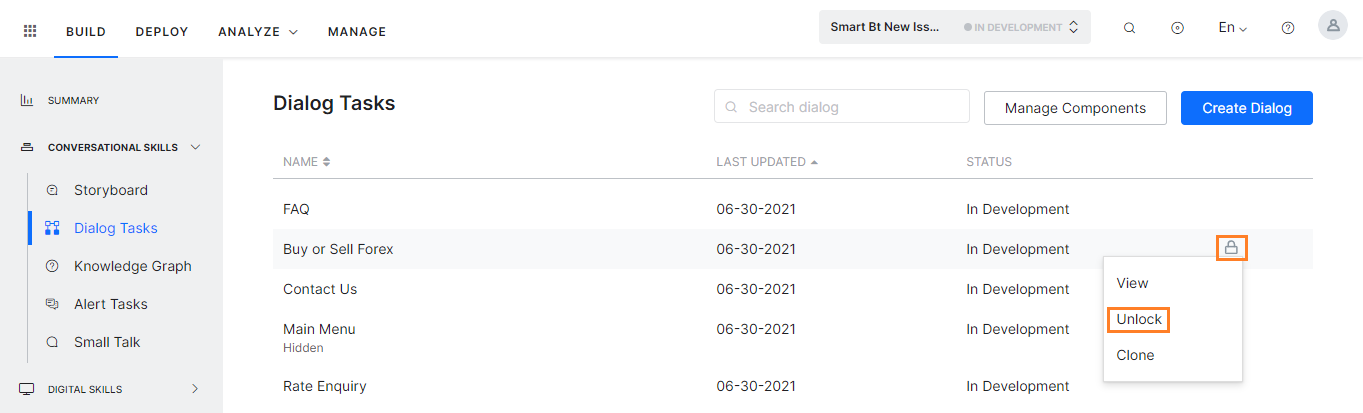 잠금 해제되면 다음 대화 컴포넌트가 업데이트를 수신하는 것을 멈추고 자식 봇 개발자는 이를 관리해야 합니다. 잠금 해제되면 다음 대화 컴포넌트가 업데이트를 수신하는 것을 멈추고 자식 봇 개발자는 이를 관리해야 합니다.
참고: 대화 작업을 잠금 해제하면 모든 대화 노드는 이를 각각 잠금 해제하기 전까지 잠깁니다. 잠긴 노드는 지속적으로 부모 봇에서 업데이트를 수신합니다. |
| 대화 노드 | 동의어 및 패턴을 제외한 모든 대화 노트 정의는 부모 봇과 함께 지속된 상속에 남습니다. 노드 상속 잠금 해제하기:
|
| Knowledge Graph | 자식 봇은 모든 용어, FAQ, 경로 동의어, 용어 사용 속성, 자식 용어 및 동의어의 지속된 상속을 얻습니다. 첫 번째 수준의 모든 노드에서 Knowledge Graph 상속을 잠금 해제할 수 있습니다. 첫 번째 수준 노드의 잠금 아이콘을 클릭하고 이를 잠금 해제하는 것을 확인하면 용어와 모든 자식 용어의 상속이 잠금 해제됩니다. 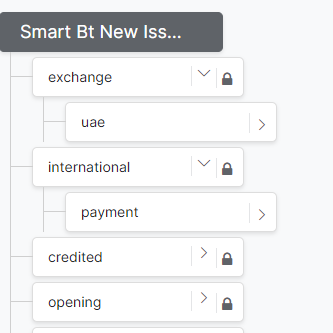 잠금 해제되면 다음 컴포넌트는 업데이트 수신을 멈춥니다. 잠금 해제되면 다음 컴포넌트는 업데이트 수신을 멈춥니다.
답변은 연관된 첫 번째 수준의 용어가 잠긴 상태일 때 같은 것을 편집하고 훈련하여 잠금 해제할 수 있습니다. 답변이 잠금 해제된 경우:
참고:
|
| 언어 관리 | 부모 봇이 활성화한 모든 언어는 자식 봇에 상속됩니다. 다음 시나리오는 자식 봇에서 상속을 잠금 해제합니다.
|
リリース8.1.0以降、スマートボット機能のサポートを終了しました。既存のスマートボットは引き続きご使用いただけますが、新しいスマートボットを作成することはできなくなります。この機能は今後のリリース以降廃止されます。
Kore.aiのスマートボットにより、エンタープライズが一元的にボットを構築し、エンタープライズ内の様々なチームがボットの設定を再利用したり、要件に合わせて拡張したりすることができるようになります。スマートボットは、あらかじめ定義されたボットの設定やタスクを新しいボットに継承させることで、ボット構築のプロセスを迅速化します。詳しい概要はこちらをクリックしてください。このドキュメントでは、独自のスマートボットを作成し、エンタープライズアカウント内で使用する方法について説明します。
スマートボットの作成は、標準ボットの作成とよく似ており、以下の手順が含まれています。
- ボットの作成
- ボットタスクの定義
- ボットのテスト
- チャネルの設定
- ボット設定の定義
- 公開。
上記のステップのうち、スマートボットの場合は特に注意が必要なものがあり、それについてはこのドキュメント内でご説明します。
スマートボットの作成
- ボットビルダーを開きます。
- 新しいボットをクリックし、[最初から開始]オプションを選択します。
- 新しいBotを作成ウィンドウで、名前を入力し、デフォルトのBot言語を設定します。
- ボットタイプのドロップダウンリストからスマートボットを選択します。
- スマートボットのボットタスクウィンドウを開きます。
- タスク、フロー、テスト、デプロイを追加することで、標準ボット、と同じようにボットを定義します。
ボットの設定
このセクションでは、スマートボット用に特別に設定する必要のあるボットの設定についていくつかご説明します。
ボット変数の設定オプション
ボット変数は、変数を一元的に定義し、ボット定義間で再利用することができます。例えば、ボットを構築する際、開発者は通常、テスト用のステージングエンドポイントを使用します。それらのエンドポイントを変数として設定することができます。ボットをエクスポートまたは公開する際に、これらの変数値をプロダクションエンドポイントに置き換えることができます。ボット変数の定義は標準ボットと同じです。ボット変数の設定方法はこちらを参照してください。スマートボットのグローバル変数には、継承時に変数の可視性や使用方法を定義するオプションが追加されます。
- 事前入力:このオプションを使用して、子ボットの開発者が、ボットを継承する際に変数を設定タブで変数の値を確認および編集できるようにします。
- 非表示: ボットを継承する際に、子ボットの開発者が変数の値を確認または編集できないようにする場合に、このオプションを使用します。ただし、子ボットの開発者は、継承後に「ボットの変数」ページで変数名と値を確認することができます。
- インストール時に要求:このオプションを使用して、ボットを継承する際に、子ボットの開発者からボット変数の値を取得します。継承されるボットの開発者は、スマートボットで設定された変数の値を確認することができず、値を入力しないとボットの継承を完了することができません。
スマートボットの設定
スマートボットを継承するために必要な環境設定は、ボット設定のスマートボットの設定タブから行えます。これらの設定は、スマートボットの検出、プレビュー、インストールの助けとなります。以下は、それらを設定する手順です。
- ボットのサイドナビゲーションパネルにカーソルを合わせ、設定 > スマートボットの設定をクリックします。
- 以下の設定を行います。
- ユーザーがマーケットプレイスでボットをテストできるようにする:このオプションは、インストールする前に、ユーザーがマーケットプレイスからスマートボットを試すことができます。
- はい。開発者権限での試用を許可します:このオプションを使用してこのボットの試行オプションを許可することで、お客様のアカウントのマーケットプレイスにログインして、開発者がこのボットとチャットできるようになります。
- いいえ。試行機能を有効にしません:このオプションを使用して、お客様のアカウントのマーケットプレイスでこのボットの試行オプションを無効にします。
- スマートボットの説明:スマートボットの説明を入力して、アカウントのマーケットプレイスに表示します。
- 設定手順:スマートボットを使用して、開発者にインストールの指示を出すことができます。これには、利用可能なタスク一覧とその目的、入力の必要があるボット変数などの詳細が含まれます。この手順書の目的は、このボットを受け継いだ開発者が最大限にボットを活用できるようにすることです。開発者は、ボットを継承する際に、この手順書を確認すことができます。手順書を含むPDFファイルをアップロードするか、プレーンテキスト形式で入力することができます。
- 設定手順のURL:さらに、設定方法の詳細を示すURLがある場合は、それを指定することもできます。
- ユーザーがマーケットプレイスでボットをテストできるようにする:このオプションは、インストールする前に、ユーザーがマーケットプレイスからスマートボットを試すことができます。
- 設定を保存します。
スマートボットの継承
ボット開発者は、自分のアカウント内で公開されているスマートボットを閲覧およびインストールすることができます。メモ: 作成したスマートボットを開発者に確認及び継承してもらうためには、ボットを公開する必要があります。ボットの公開の詳細については、こちらを参照してください。 スマートボットの継承ステップ
- ボットビルダーを開きます。
- ランディングページの右上にある新規ボットをクリックします。
- スマートボットをインストールオプションを選択します。スマートボットを選択ウィンドウが開きます。
- スマートボットを選択ウィンドウで、継承したいボットを検索またはスクロールします。スマートボットの名前にカーソルを合わせ、インストールをクリックします。 スマートボットを設定ウィンドウが開きます。
- ボット名フィールドには、スマートボットの名前に付加された拡張子が自動で入力されます。ご希望の名前に置き換えます。
- ボットのカスタムアイコンを追加したい場合は、アイコンフィールドでカスタムアイコンを選択して、ファイルをアップロードします。
- 子ボットでどのように親ボットの更新を処理するかを決める更新の優先順位を設定することができます。親ボットに変更があった場合、子ボットに対する更新は、子ボットの公開バージョンまたは開発中のバージョンに対して行われます。
- 利用可能な場合は、ボット定義の更新を公開されているバージョンに直接追加するのがデフォルト設定であり、すべての更新が子ボットの公開バージョンに継承されます。公開バージョンが利用できない場合は、更新は開発中のバージョンに適用されます。この設定は、管理コンソールの「管理者の明示的な承認がある場合のみ、すべてのデプロイリクエストおよび公開を保留する」というボットの設定よりも優先されることにご注意ください。
- ボット定義の更新を常に開発中のバージョンに追加するは、子ボットの開発中のバージョンに変更を適用します。開発中のバージョンが利用できない場合は、ロックされた継承状態で作成されます。開発中のバージョンでタスクやノードのロックが解除された場合は、公開済みのバージョンにも同じことが適用されることにご注意ください。 メモ:この設定は、後で子ボットの詳細設定から変更することができます。
- 次に、変数を設定タブをクリックします。事前入力またはインストール時に要求で設定されている変数の一覧が表示されます。インストール時に要求の変数の値を入力します。事前入力された変数があれば、任意でそれを編集します。
- インストールの設定ファイルが開きます。説明をよく読んでから、次へをクリックします。
- 子ボットが作成され、そのボットのボットタスクページが開きます。
子ボットは、スマートボットをそのまま使用すること、タスクやナレッジクエリを追加して継承された機能を拡張すること、あるいは変数を使用して関連するパラメータをローカライズすることができます。以下の継承のシナリオでは、子ボットに継承される要素一覧と、継承の継続や上書きの条件を示しています。
継承のシナリオ
子ボットでは、以下の方法で継承が適用されます。
- 非継承:一部の要素が子ボットに継承されません。
- 1回限りの継承:継承は1回限りで、親ボットの要素を変更しても、子ボットには継承されません。
- 継続的な継承:親ボットの要素の変更が子ボットにも引き継がれます。ボットのインストール時、またはそれ以降に詳細設定タブから設定された“更新の優先順位”の設定により、どのバージョンの子ボット(公開済みまたは開発中)を更新するかが決定されます。
継承を無効化: ボットレベルでの継承は、子ボットの詳細設定からスマートボットの継承オプションを使用して無効にすることができます。このオプションは、親のスマートボットから子ボットを永久にリンク解除するため、使用の際には注意します。以下のセクションでは、継承なし、1回限りの継承、継続的な継承のボット要素一覧と、継承を解除するアクションについてご紹介します。
継承されないボット要素
- 設定済みのチャネル
- BotKitまたはウェブSDKに接続するためにスマートボットで作成されたアプリ
1回限りの継承のボット要素
- エンティティの同義語
- ボットの設定
- 認証プロファイル
- デフォルトダイアログ
メモ: 既存のボットタスクのエンティティの同義語は一度だけ継承されますが、親ボットで作成された新しいタスクのNLPエントリは子ボットに継承されます。
継続的な継承のボット要素
子ボットに継承されるボットタスクは、継続的に継承されます。これは、親ボットのボットタスクに公開された変更は、子ボットにも自動的に反映されることを意味します。ボット要素の特定の部分を編集することで、継続的な継承を「ロック解除」することができます。以下の表は、継続的な継承を獲得するボット要素の一覧と、継承を解除するための手順を示したものです。
| 機能名 | 継承のロック解除 |
| ダイアログタスク | ダイアログタスクのページで、タスク名の横にあるロックアイコンをクリックして、ロック解除をクリックします。 ロックが解除されると、以下のダイアログコンポーネントは更新を受け取らなくなるため、子ボットの開発者が管理する必要があります。
メモ: ダイアログタスクのロックを解除した場合、すべてのダイアログノードは個別に解除するまでロックされたままです。ロックされたノードは、親ボットからの更新を継続して受け取ります。 |
| ダイアログノード | 同義語とパターンを除くすべてのダイアログノードの定義は、親ボットとの継続的な継承が行われます。ノードの継承をロック解除する方法は以下の通りです。
|
| ナレッジグラフ | 子ボットは、すべての用語、FAQ、パスの同義語、用語の使用プロパティ、子用語、およびその同義語を継続的に継承します。ナレッジグラフの継承は、第1-レベルのどのノードでも解除することができます。第一レベルのノードのロックアイコンをクリックしてロック解除を確認すると、その用語とその子用語すべての継承が解除されます。 ロック解除された場合、以下のコンポーネントの更新の受信が停止します。
関連する第1-レベルの用語がロック状態にある場合、その用語を編集してトレーニングすることで、回答のロックを解除することができます。回答がロック解除された場合:
メモ:
|
| 言語管理 | 親ボットで有効になっている言語は、子ボットにも継承されます。以下のシナリオは、子ボットでの継承をロック解除します。
|
Starting Release 8.1.0, the support for the Smart Bots functionality is deprecated. You may continue to use the existing Smart Bots but you will no longer be able to create new Smart Bots. This feature will be discontinued in the upcoming releases.
Kore.ai’s Smart Bots allow enterprises to build Bots centrally and allow various teams within the enterprise to reuse and extend the Bot configurations to suit their requirements. Smart Bots expedite the bot building process by allowing new bots to inherit the configuration and tasks of pre-defined bots.
For a detailed overview, click here.
This document deals with how you can create your own Smart Bots and use it within your enterprise account.
Creating a Smart Bot is similar to very similar to Creating a Standard bot and involves the following steps:
- Creating bot,
- Defining bot tasks,
- Testing the bot,
- Configuring channels,
- Defining bot settings, and
- Publishing.
Few of the above steps need special mention in the context of Smart Bots and are discussed in this document.
Creating a Smart Bot
- Open the Bot Builder.
- Click New Bot and select the Start from Scratch option
- On the Create New Bot window, enter a name, and set the default bot language.
- From the Bot Type drop-down list, select Smart Bot.
- It opens the Bot Tasks window of the smart bot.
- Define your Bot as you would any Standard Bot by adding tasks, flows, testing, and deploying.
Configure Bot Settings
Some Bot Settings that need to be configured specially for a Smart Bot are mentioned in this section.
Setup Options for Bot Variables
Bot Variables allow you to define variables centrally and reuse them across bot definition. For example, during bot building, developers typically use staging endpoints for testing. You can set those endpoints as variables. When you export or publish the bot, you can replace such variable values with the production endpoints. Defining Bot Variables remains the same as Standard Bots. Refer here to learn how to configure the Bot Variables.
Global Variables of Smart Bots will have an additional option to define the visibility or usage of variables during inheritance:
- Pre-Populated: Use this option to allow the child bot developers to see and edit the variable value in the Setup Variables tab while inheriting the bot.
- Hidden: Use this option when you do not want to allow the child bot developers to see or edit the variable value while inheriting the bot. They can, however, view the name and value of the variable on the Bot Variables page after inheriting.
- Ask on Install: Use this option to get the value of the bot variable from the child bot developer while inheriting the bot. Developers of the inherited bot cannot see the variable’s value set up in the smart bot and they cannot complete inheriting the bot without entering a value.
Smart Bot Settings
Configuration settings required to inherit the smart bot can be set from the Smart Bot Settings tab in the Bot Settings. These settings serve as an aid in the discovery, preview, and installation of the Smart Bot.
Following are the steps to configure them:
- Hover over the side navigation panel of the bot and click Settings > Smart Bot Settings.
- Configure the following settings:
- Allow User to Test the Bot in Marketplace: This option allows the user to try the smart bot from the marketplace before installing it.
- Yes, allow users to try using developer authorization: Use this option to allow the Try option for this bot, so your developers can chat with this bot by logging into your account’s marketplace.
- No, do not enable try capability: Use this option to disallow the Try options for this bot in your account’s marketplace.
- Smart Bot Description: Enter a description for the Smart Bot to show it in your account’s marketplace.
- Configuration Instructions: Instructions can be given to the developers using the Smart Bot for installing the same. This should include details like the list of tasks available and their purpose, bot variables that need to be populated, and so forth. The purpose of these instructions is to ensure that the developers inheriting this bot can put it to maximum use. Developers can see these instructions while inheriting the bot. You can either upload a PDF file containing the instructions or enter it in a plain text format.
- Configuration Instructions URL: Additionally, you can provide a URL, if any, for the configuration instructions details.
- Allow User to Test the Bot in Marketplace: This option allows the user to try the smart bot from the marketplace before installing it.
- Save the settings.
Inheriting a Smart Bot
Bot developers can view and install a Smart Bot published within their account.
NOTE: In order for the developers to see and inherit your smart bot, you need to publish it. Refer here for details on Publishing the Bot.
Steps to Inherit a Smart Bot
- Open the Bot Builder.
- On the top-right side of the landing page, click New Bot.
- Select the Install Smart Bot option. The Select Smart Bot window opens.
- On the Select Smart Bot window, search or scroll to the bot you want to inherit. Hover over the Smart Bot’s name and click Install. The Configure Smart Bot window opens.
- The Bot Name field is auto-filled with a suffix added to the Smart Bot name. Replace it with a name of your choice.
- If you want to add a custom icon for the bot, select Custom Icon in the icon field and upload the file.
- Update Preference can be set, which decides how the updates to the parent bot are to be handled by the child bot. When there are changes to the parent bot, the updates to the child bot can be made to the published version or the in-development version of the child bot.
- Add bot definition updates directly to published version when available is the default setting whereby all the updates get inherited by the published version of the child bot. In case the published version is not available, then the updates are applied to the in-development version
Note that this setting overrides the bot setting of ‘hold all deployment requests and publishing only on explicit approval from admin’ from the Admin Console. - Always add bot definition updates to the in-development version will apply the changes to the in-development version of the child bot. If the in-development version is not available it is created in the locked inheritance state. Note that if any tasks or nodes are unlocked in the in-development version the same will be applied to the published version.
Note: This setting can be modified later from the Advanced Settings of the child bot.
- Add bot definition updates directly to published version when available is the default setting whereby all the updates get inherited by the published version of the child bot. In case the published version is not available, then the updates are applied to the in-development version
- Next, click the Setup Variables tab. It shows the list of variables that are configured with Pre-Populated or Ask on Install settings. Enter the values for Ask on Install variables. Optionally, make edits to Pre-Populated variables if any.
- The Configuration Installation file opens. Read the instructions carefully and then click Next.
- The child bot gets created, and the Bot Tasks page of the bot opens.
The child bots can use the Smart Bot as is or extend the inherited functionality by adding tasks and knowledge queries, as well as localize relevant parameters using variables. The Inheritance Scenarios section below provides the list of elements that get inherited by the child bot and the conditions under which the inheritance continues or gets overridden.
Inheritance Scenarios
In a child bot, the inheritance applies in the following ways:
- No inheritance where some elements do not get inherited by the child bot;
- One-time inheritance wherein inheritance is a one-time process and any further changes to some bot elements in the parent smart bot will not be inherited by the child bot; and
- Continued inheritance where changes to some bot elements in the parent smart bot will be inherited by the child bot. Update Preference settings configured at the time of bot installation or later from the Advanced Settings tab will decide which version of the child bot – published or in-development – will get the updates.
Disable Inheritance: Inheritance can be disabled at the bot level, from the Advanced Settings of the child bot using the Smart Bot Inheritance option. This option will permanently delink the child bot from the parent smart bot and should be used with caution.
The following sections show the list of bot elements with no, one-time and continuous inheritance and the actions that unlock the inheritance.
Bot Elements that are not Inherited
- Any Configured Channels
- Any apps created in the Smart Bot for connecting to BotKit or Web SDK
Bot Elements with One-Time Inheritance
- Entity Synonyms
- Bot Settings
- Auth Profiles
- Default Dialog
Note: While the Entity Synonyms of existing bot tasks have a one-time inheritance, the NLP entries of any new task created in the parent bot will get inherited by the child bots.
Bot Elements with Continued Inheritance
Bot Tasks inherited by the child bot have a continued inheritance which means that any published changes to the bot tasks in the parent automatically reflect in the child bot. You can override or “unlock” the continued inheritance of bot elements by editing a certain portion of them. The following table shows the list of bot elements that acquire a continued inheritance and provides the steps to unlock the inheritance.
| Feature Name | Unlocking of Inheritance |
| Dialog Tasks | On the Dialog tasks page, click the lock icon against the task name, and then click Unlock. Once unlocked, the following dialog components will stop receiving updates and should be managed by the child bot developer:
Note: When you unlock a Dialog Task, all the Dialog Nodes are still locked until you unlock them individually. The locked nodes continue to receive updates from the parent bot. |
| Dialog Nodes | All Dialog node definitions except Synonyms and Patterns remain in the continued inheritance with the parent bot. To unlock the inheritance of the node:
|
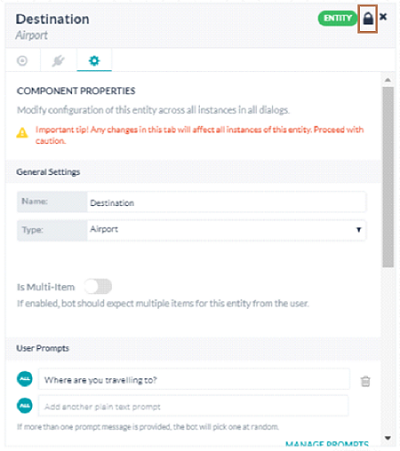
| Knowledge Graph | Child bots get continued inheritance of all terms, FAQs, path synonyms, term usage property, child terms, and their synonyms. You can unlock the inheritance of a Knowledge Graph at any of the first-level nodes. When you click the lock icon of a first-level node and confirm unlocking it, the inheritance of the term and all its child terms becomes unlocked. When unlocked, the following components will stop receiving updates:
Answers can be unlocked when the associated first-level term is in a locked state by editing and training the same. When an answer is unlocked:
Note:
|
| Language Management | Any Languages Enabled by the parent bot are inherited by the child bot. Following scenarios unlock the inheritance in the child bot:
|