サービスコール – テーブル
任意のデータテーブル/テーブルビューに割り当てられたボットから、ダイアログタスクのサービスノードを使用して、データを照会したり操作したりすることができます。サービスノードの設定の手順
- データにアクセスしたいボットとダイアログタスクを開きます。
- プロセスフローの適切な位置にサービスノードを追加します。
- サービスノードの詳細はこちらをクリックしてください。ここでは、データテーブルの統合のための設定についてご紹介します。
- コンポーネントのプロパティの設定
- 基本設定セクション
- 名前 – ノードの名前を入力します。
- 表示名 – ノードの表示名を入力します。
- サービスタイプ – データサービスを選択します。
- タイプ – テーブルを選択します。
- 基本設定セクション

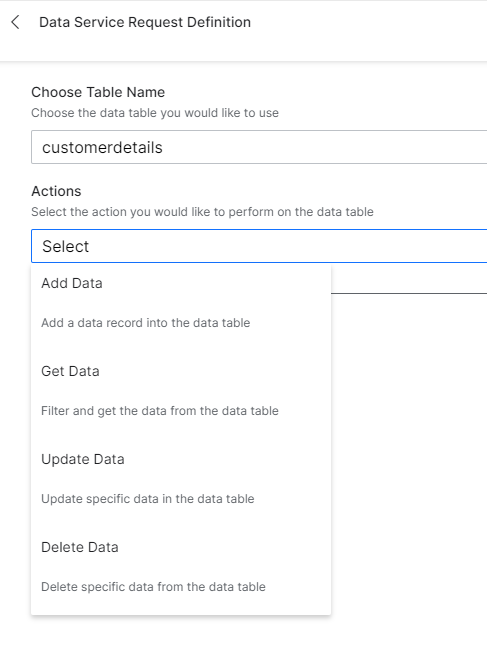
リクエストの定義 – リクエストを定義リンクをクリックしてサービスリクエストを定義します。スライドアウトページでは以下を設定します。
- データテーブルを選択 – このボットに割り当てられているデータテーブルを一覧から選択することができます。
- 動作 – 実行したいアクションを選択します。
- データを追加 – データを追加します(詳細は以下をご覧ください)。
- データを取得 – テーブルからデータを取得します(詳細は以下をご覧ください)。
- データを更新 – 既存のデータを変更します(詳細は以下をご覧ください)。
- データを削除 – データテーブルから行を削除します(詳細は以下をご覧ください)。
- サービスリクエストをテストすることができます。コンテキスト参照を使用したテストは、実行時に評価されてそれまではデータが利用できないため、失敗することにご留意ください。
- サービスリクエスト定義を保存する
- ボットの要件に応じて、インスタンスプロパティと接続プロパティを設定することができます。
- データテーブルから返されたデータは、コンテキストオブジェクトからアクセスして、必要に応じてタスクで使用することができます。
データの追加
データを追加するには、以下のことが必要です。
- データテーブルの各列の値を入力します。
- これらの値は、静的なものや、たとえばコンテキストオブジェクトへの参照などがあります。
{{context.entities.<entity-name>}}
- この電話での応答は、次のようになります。
  "stringTable": {
    "response": {
      "body": {
        "CustId": 1,
        "Type": "Preferred",
        "Address": "New York",
        "CustomerName": "John Smith",
        "Updated_On": 1593687904111,
        "Created_On": 1593687904111,
        "Updated_By": "st-b1376ff2-1111-1111-aa34-973ef73212f5",
        "Created_By": "st-b1376ff2-1111-1111-aa34-973ef73212f5",
        "sys_Id": "sys-5c46e351-ee51-5c27-80cf-c6c1e8f8f066",
        "_id": "5efdbf602de5bb5f3f54f728"
      }
    }
  }
データの取得
テーブルからデータをフィルタリングしたり取得するには、以下を行います。
- フィルターを選択して、フィルター基準を定義します。
- 列名 – ドロップダウンリストから選択;
- 演算子 – リストから選択;
- 比較値 – これらの値は、静的なものもあれば、たとえば
{{context.entities.<entity-name>}}のようなコンテキストオブジェクトへの参照もあります。 - AND/ORコネクタを使用して複数のフィルター基準を定義することができます。
- フィルター基準がない場合、すべての行は、以下で説明する制限値とオフセット値によって制限および取得されます。
- 制限プロパティは、取得する記録数の上限を設定するために使用します。指定しない場合は、デフォルトで10件の記録が取得されます。
- オフセットプロパティは、結果のデータセットからスキップされる記録を指定するために使用します。

- データの値には、以下の方法でアクセスすることができます。
{{context.<service_node_name>.response.body.queryResult[<index>].<column_name>}} - このサービスからの応答は、次のようになります。
"customerdetails": {
    "response": {
      "body": {
	"hasMore": true,
	"total": 4,
	"metaInfo": [
          {
            "name": "City",
            "type": "string"
          },
          {
            "name": "Name",
            "type": "string"
          },
          {
            "name": "sys_Id",
            "type": "string"
          },
          {
            "name": "Created_On",
            "type": "date"
          },
          {
            "name": "Updated_On",
            "type": "date"
          },
          {
            "name": "Created_By",
            "type": "string"
          },
          {
            "name": "Updated_By",
            "type": "string"
          }
        ],
        "queryResult": [
          {
            "CustId": 1,
            "Type": "Preferred",
            "Address": "New York",
            "CustomerName": "John Smith",
            "sys_Id": "sys-b088ab59-7640-5a8f-8999-61a265dd2bee",
            "Created_On": 1593152119161,
            "Updated_On": 1593152119161,
            "Created_By": "st-b1376ff2-2384-5541-aa34-973ef73212f5",
            "Updated_By": "st-b1376ff2-2384-5541-aa34-973ef73212f5"
          },
          {
            "CustId": 2,
            "Type": "Privileged",
            "Address": "Chicago",
            "CustomerName": "Jane Doe",
            "sys_Id": "sys-632c69ef-f6dd-5d83-ab32-f7837c8b63f9",
            "Created_On": 1593152443035,
            "Updated_On": 1593152443035,
            "Created_By": "st-b1376ff2-2384-5541-aa34-973ef73212f5",
            "Updated_By": "st-b1376ff2-2384-5541-aa34-973ef73212f5"
          }
	 ]
      }
    }
  }
データの更新
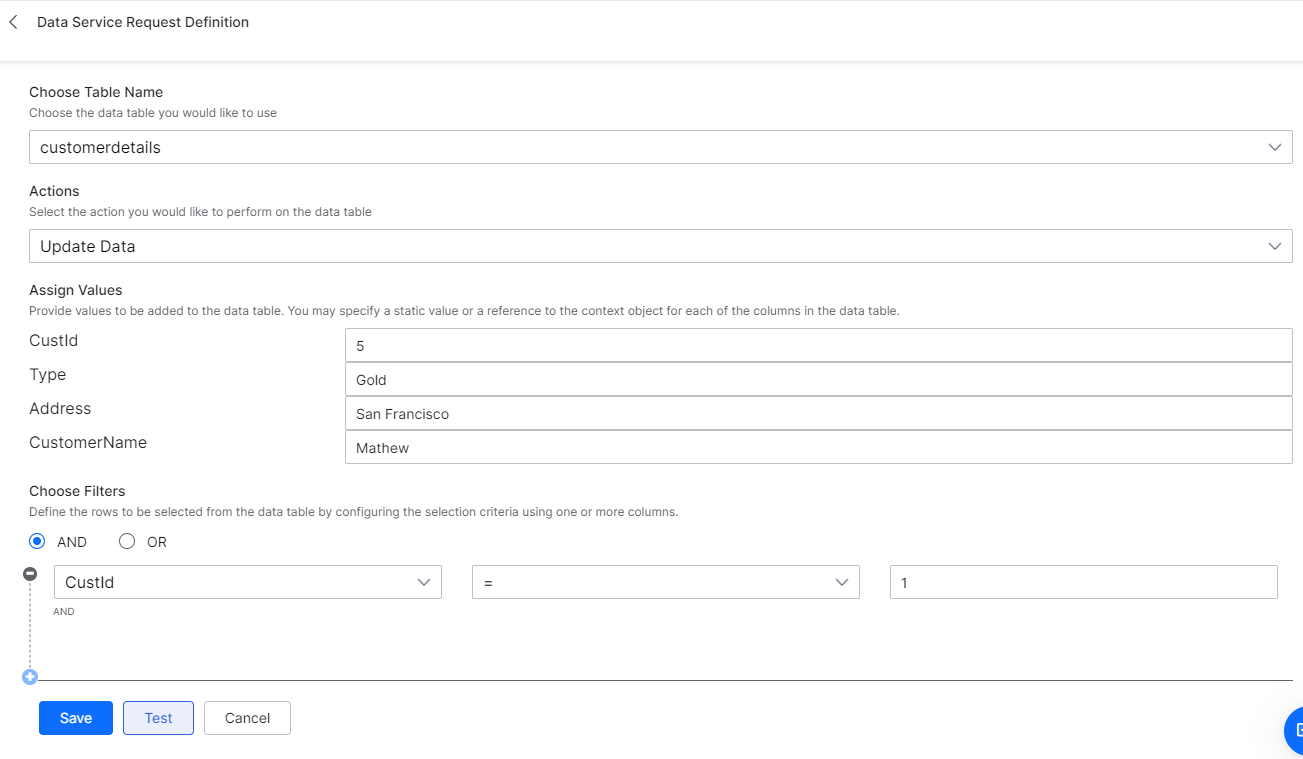
既存のものを変更するには、以下の方法があります。
- 更新する各列に対して値を割り当てます。いずれかの値が空白のままの場合、対応する列の元の値は保持されず、空白に設定されます。
- これらの値は、静的なもの、あるいはコンテキストオブジェクトへの参照です。
- フィルターを選択し、以下を使用して更新する行を指定するためのフィルター基準を定義します。
- 列名
- 演算子
- フィルター値 – これらの値は、静的なものと、たとえば
{{context.entities.<entity-name>}}のようなコンテキストオブジェクトへの参照があります。 - AND/ORコネクタを使用して複数のフィルター基準を定義することができます。
- このサービスからの応答は、次のようになります。
  "customerdetails": {
    "response": {
      "body": {
        "records": []
      }
    }
  }
データの削除
データテーブルから行を削除するには、以下の方法があります。
- 以下を使用して削除する行を指定するためのフィルター基準を定義する
- 列名
- 演算子
- フィルター値 – これらの値は、静的なものと、たとえば
{{context.entities.<entity-name>}}のようなコンテキストオブジェクトへの参照があります。AND/ORコネクタを使用して複数のフィルター基準を定義することができます。

- このサービスリクエストからの応答は、次のようになります。
"customerdetails": { "response": { "body": { "nDeleted": 1 } } }
サービスコール – ビュー
任意のデータテーブル/テーブルビューに割り当てられたボットから、ダイアログタスクのサービスノードを使用して、データを照会したり操作したりすることができます。サービスノードの設定のステップ
- データにアクセスしたいボットとダイアログタスクを開きます。
- プロセスフローの適切な位置にサービスノードを追加します。
- サービスノードの詳細はこちらをクリックしてください。ここでは、データテーブルの統合のための設定についてご紹介します。
- コンポーネントのプロパティの設定
- 基本設定セクション
- 名前 – ノードの名前を入力します。
- 表示名 – ノードの表示名を入力します。
- サービスタイプ – データサービスを選択します。
- タイプ – ビューを選択します。
- リクエストの定義 – リクエストを定義リンクをクリックしてサービスリクエストを定義します。
- 「スライドアウト」ページでは以下を設定します。
- テーブルビューを選択 – このボットに割り当てられているテーブルビューをリストから選択することができます。
- 結果のフィルタリング – 以下を使用してフィルター基準をさらに定義することができます。
- 列名
- 演算子
- フィルター値 – これらの値は、静的なものと、たとえば
{{context.entities.<entity-name>}}のようなコンテキストオブジェクトへの参照があります。
- AND/ORコネクタを使用して複数のフィルター基準を定義することができます。
- フィルター基準がない場合、すべての行は、以下で説明する制限値とオフセット値によって制限および取得されます。
- 取得したレコード数に制限を設定することができます。
- オフセット値を指定することで、結果データセットからいくつかのレコードをスキップすることができます。
- サービスリクエストをテストすることができます。コンテキスト参照を使用したテストは、実行時に評価されてそれまではデータが利用できないため、失敗することにご留意ください。
- サービスリクエスト定義を保存する
- 基本設定セクション
- ボットの要件に応じて、インスタンスプロパティと接続プロパティを設定することができます。
- データテーブルから返されたデータは、コンテキストオブジェクトからアクセスし、必要に応じてタスクで使用できます。
{{context.<service_node_name>.response.body.queryResult[<index>].<column_name>}} - このサービスからの応答は、次のようになります。
  "CustomerView": {
    "response": {
      "body": {
        "hasMore": true,
        "total": 4,
        "metaInfo": [
          {
            "name": "type",
            "type": "string"
          },
          {
            "name": "address",
            "type": "string"
          }
        ],
        "queryResult": [
          {
            "type": "Gold",
            "address": "New York"
          },
          {
            "type": "Gold",
            "address": "Chicago"
          },
          {
            "type": "Gold",
            "address": "Chicago"
          }
        ]
      }
    }
  }
서비스 호출 – 테이블
지정된 데이터 테이블/테이블 뷰에 할당된 봇에서 대화 작업의 서비스 노드를 사용하여 데이터를 쿼리하고 처리할 수 있습니다. 서비스 노드 설정 단계:
- 데이터에 액세스하려는 봇과 대화 작업을 엽니다.
- 프로세스 흐름에서 적절한 위치에 서비스 노드를 추가합니다.
- 서비스 노드에 대한 자세한 내용을 보려면 여기를 클릭하세요. 여기서는 데이터 테이블 통합에 대한 설정을 나열합니다.
- 구성 요소 속성 설정
- 일반 설정 섹션
- 이름 – 노드의 이름을 입력합니다.
- 표시 이름 – 노드의 표시 이름을 입력합니다.
- 서비스 유형 – 데이터 서비스를 선택합니다.
- 유형 – 테이블 을 선택합니다.
- 일반 설정 섹션
요청 정의 – 요청 정의 링크를 클릭하여 서비스 요청을 정의합니다. 슬라이드 아웃 페이지에서 다음을 설정합니다.
- 데이터 테이블 선택 – 이 봇에 할당된 데이터 테이블로 목록에서 선택할 수 있습니다.
- 조치 – 수행할 조치를 선택합니다.
- 데이터 추가 – 데이터를 추가합니다(자세한 내용은 아래 참조).
- 데이터 가져오기 – 테이블에서 데이터를 가져옵니다(자세한 내용은 아래 참조).
- 데이터 업데이트 – 기존 데이터를 수정합니다(자세한 내용은 아래 참조).
- 데이터 삭제 – 데이터 테이블서 데이터를 삭제합니다(자세한 내용은 아래 참조).
- 서비스 요청을 테스트할 수 있습니다. 컨텍스트 참조를 사용한 테스트는 런타임에 평가되는 경우 실패하므로 그때까지는 데이터를 사용할 수 없습니다.
- 서비스 요청 정의를 저장합니다.
- 봇 요구 사항에 따라 인스턴스 및 연결 속성을 설정할 수 있습니다.
- 데이터 테이블에서 반환된 데이터는 컨텍스트 개체에서 액세스할 수 있으며 필요에 따라 작업에서 사용할 수 있습니다.
데이터 추가
데이터를 추가하려면 다음을 수행해야 합니다.
- 데이터 테이블의 각 열에 대한 값을 제공합니다.
- 이러한 값은 정적 값이거나 컨텍스트 개체에 대한 참조일 수 있습니다(예:
{{context.entities.<entity-name>}} - 이 호출의 응답은 다음과 같습니다.
  "stringTable": {
    "response": {
      "body": {
        "CustId": 1,
        "Type": "Preferred",
        "Address": "New York",
        "CustomerName": "John Smith",
        "Updated_On": 1593687904111,
        "Created_On": 1593687904111,
        "Updated_By": "st-b1376ff2-1111-1111-aa34-973ef73212f5",
        "Created_By": "st-b1376ff2-1111-1111-aa34-973ef73212f5",
        "sys_Id": "sys-5c46e351-ee51-5c27-80cf-c6c1e8f8f066",
        "_id": "5efdbf602de5bb5f3f54f728"
      }
    }
  }
데이터 가져오기
테이블에서 데이터를 필터링하고 가져오려면 다음을 수행합니다.
- 필터 선택에서 다음을 사용해 필터 조건을 정의합니다.
- 열 이름 – 드롭다운 목록에서 선택합니다;
- 연산자 – 목록에서 선택합니다;
- 비교 값 – 이러한 값은 정적 값이거나 컨텍스트 개체에 대한 참조일 수 있습니다(예:
{{context.entities.<entity-name>}}. - AND/OR 커넥터를 사용하여 여러 필터 조건을 정의할 수 있습니다.
- 필터 조건이 없는 경우 모든 행을 아래에 언급된 제한 및 오프셋 값으로 가져올 수 있습니다.
- Limit 속성을 사용하여 가져올 레코드 수에 대한 제한을 설정할 수 있습니다. 지정되지 않은 경우 기본적으로 10개의 레코드를 가져옵니다.
- Offset 속성을 사용하여 결과 데이터 세트에서 건너뛸 레코드를 지정할 수 있습니다.
- 다음을 사용하여 데이터 값에 액세스할 수 있습니다.
{{context.<service_node_name>.response.body.queryResult[<index>].<column_name>}} - 이 서비스 호출의 응답은 다음과 같습니다.
"customerdetails": {
    "response": {
      "body": {
	"hasMore": true,
	"total": 4,
	"metaInfo": [
          {
            "name": "City",
            "type": "string"
          },
          {
            "name": "Name",
            "type": "string"
          },
          {
            "name": "sys_Id",
            "type": "string"
          },
          {
            "name": "Created_On",
            "type": "date"
          },
          {
            "name": "Updated_On",
            "type": "date"
          },
          {
            "name": "Created_By",
            "type": "string"
          },
          {
            "name": "Updated_By",
            "type": "string"
          }
        ],
        "queryResult": [
          {
            "CustId": 1,
            "Type": "Preferred",
            "Address": "New York",
            "CustomerName": "John Smith",
            "sys_Id": "sys-b088ab59-7640-5a8f-8999-61a265dd2bee",
            "Created_On": 1593152119161,
            "Updated_On": 1593152119161,
            "Created_By": "st-b1376ff2-2384-5541-aa34-973ef73212f5",
            "Updated_By": "st-b1376ff2-2384-5541-aa34-973ef73212f5"
          },
          {
            "CustId": 2,
            "Type": "Privileged",
            "Address": "Chicago",
            "CustomerName": "Jane Doe",
            "sys_Id": "sys-632c69ef-f6dd-5d83-ab32-f7837c8b63f9",
            "Created_On": 1593152443035,
            "Updated_On": 1593152443035,
            "Created_By": "st-b1376ff2-2384-5541-aa34-973ef73212f5",
            "Updated_By": "st-b1376ff2-2384-5541-aa34-973ef73212f5"
          }
	 ]
      }
    }
  }
데이터 업데이트
기존 항목을 수정하려면 다음을 수행할 수 있습니다.
- 업데이트할 각 열에 값 할당을 선택합니다. 값이 비어 있으면 해당 열의 원래 값이 유지되지 않으며 비어 있는 상태로 설정됩니다.
- 이러한 값은 정적 값이거나 컨텍스트 개체에 대한 참조일 수 있습니다.
- 필터 선택에서 다음을 사용해 필터 조건을 정의하여 업데이트할 행을 지정합니다.
- 열 이름,
- 연산자 및
- 필터값 – 이 값은 정적이거나
{{context.entities.<entity-name>}}와 같은 컨텍스트 개체에 대한 참조일 수 있습니다. - AND/OR 커넥터를 사용하여 여러 필터 조건을 정의할 수 있습니다.
- 이 서비스 호출의 응답은 다음과 같습니다.
  "customerdetails": {
    "response": {
      "body": {
        "records": []
      }
    }
  }
데이터 삭제
필요한 데이터 테이블에서 행을 삭제하려면
- 다음을 사용하여 삭제할 행을 지정하는 필터 조건을 정의합니다.
- 열 이름,
- 연산자 및
- 필터값에서 이러한 값은 정적이거나
{{context.entities.<entity-name>}}와 같은 컨텍스트 개체에 대한 참조일 수 있습니다. AND/OR 커넥터를 사용하여 여러 필터 조건을 정의할 수 있습니다.
- 이 서비스 요청의 응답은 다음과 같습니다.
  "customerdetails": {
    "response": {
      "body": {
        "nDeleted": 1
      }
    }
  }
서비스 호출 – 뷰
지정된 데이터 테이블/테이블 뷰에 할당된 봇에서 대화 작업의 서비스 노드를 사용하여 데이터를 쿼리하고 처리할 수 있습니다. 서비스 노드 설정 단계:
- 데이터에 액세스하려는 봇과 대화 작업을 엽니다.
- 프로세스 흐름에서 적절한 위치에 서비스 노드를 추가합니다.
- 서비스 노드에 대한 자세한 내용을 보려면 여기를 클릭하세요. 여기서는 데이터 테이블 통합에 대한 설정을 나열합니다.
- 구성 요소 속성 설정
- 일반 설정 섹션
- 이름 – 노드의 이름을 입력합니다.
- 표시 이름 – 노드의 표시 이름을 입력합니다.
- 서비스 유형 – 데이터 서비스를 선택합니다.
- 유형 – 보기를 선택합니다.
- 요청 정의 – 요청 정의 링크를 클릭하여 서비스 요청을 정의합니다.
- 슬라이드 아웃 페이지에서 다음을 설정합니다.
- 테이블 뷰 선택 – 이 봇에 할당된 테이블 뷰로 목록에서 선택할 수 있습니다.
- 결과 필터링 – 다음을 사용하여 필터 조건을 추가로 정의할 수 있습니다.
- 열 이름,
- 연산자 및
- 필터값 – 이 값은 정적이거나
{{context.entities.<entity-name>}}와 같은 컨텍스트 개체에 대한 참조일 수 있습니다.
- AND/OR 커넥터를 사용하여 여러 필터 조건을 정의할 수 있습니다.
- 필터 조건이 없는 경우 모든 행을 아래에 언급된 제한 및 오프셋 값으로 가져올 수 있습니다.
- 가져온 레코드 수 에 대한 제한을 설정할 수 있고
- 오프셋 값을 지정하여 결과 데이터 세트에서 몇 개의 레코드를 건너뛰도록 선택할 수 있습니다.
- 서비스 요청을 테스트할 수 있습니다. 컨텍스트 참조를 사용한 테스트는 런타임에 평가되는 경우 실패하므로 그때까지는 데이터를 사용할 수 없습니다.
- 서비스 요청 정의를 저장합니다.
- 일반 설정 섹션
- 봇 요구 사항에 따라 인스턴스 및 연결 속성을 설정할 수 있습니다.
- 데이터 테이블에서 반환된 데이터는 컨텍스트 개체에서 액세스할 수 있으며 다음을 사용하여 필요에 따라 작업에서 사용할 수 있습니다.
{{context.<service_node_name>.response.body.queryResult[<index>].<column_name>}} - 이 서비스 호출의 응답은 다음과 같습니다.
  "CustomerView": {
    "response": {
      "body": {
        "hasMore": true,
        "total": 4,
        "metaInfo": [
          {
            "name": "type",
            "type": "string"
          },
          {
            "name": "address",
            "type": "string"
          }
        ],
        "queryResult": [
          {
            "type": "Gold",
            "address": "New York"
          },
          {
            "type": "Gold",
            "address": "Chicago"
          },
          {
            "type": "Gold",
            "address": "Chicago"
          }
        ]
      }
    }
  }
Leave a Reply
Kore.ai’s Data offering lets you define Data Tables, Table Views, and manipulate them from your Virtual Assistant. This section deals with the manipulation aspect using the Service Node within a Dialog Task of your Virtual Assistant. For details on the data definition, refer here.
Service Call – Table
From the assigned bots for any given data table/table view, you can query and manipulate the data using the Service Node in the Dialog Tasks.
Steps to configure the Service node:
- Open the Bot and the Dialog Task where you want to access the data.
- Add a Service Node at the appropriate location in the process flow.
- Click here for details on Service Node. Here we will be listing the configurations for Data Table integration.
- Component Properties configuration
- General Settings section
- Name – enter a name for the node;
- Display Name – enter a display name for the node;
- Service Type – choose Data Service;
- Type – select Table.
- General Settings section
Request Definition – define the service request by clicking the Define Request link. In the slide-out page configure the following:
- Choose a Data Table – You can choose from the list, these are the data tables assigned to this bot.
- Actions – Select the action you would like to perform:
- Add Data – to add data (see below for details);
- Get Data – to fetch data from the table (see below for details;
- Update Data – to modify existing data (see below for details);
- Delete data – to delete rows from the data table (see below for details).
- You can Test the service request. Remember testing with context reference will fail as they will be evaluated at run time and the data will not be available till then.
- Save the service request definition
- You can set the Instance and Connections properties as per your bot requirements.
- The data returned from the data table can be accessed from the context object and used in your task as per your need.
Add Data
To add data, you need to:
- provide values for each column in the data table;
- these values can be static or a reference to a context object for example
{{context.entities.<entity-name>}} - The response from this call would be:
"stringTable": { "response": { "body": { "CustId": 1, "Type": "Preferred", "Address": "New York", "CustomerName": "John Smith", "Updated_On": 1593687904111, "Created_On": 1593687904111, "Updated_By": "st-b1376ff2-1111-1111-aa34-973ef73212f5", "Created_By": "st-b1376ff2-1111-1111-aa34-973ef73212f5", "sys_Id": "sys-5c46e351-ee51-5c27-80cf-c6c1e8f8f066", "_id": "5efdbf602de5bb5f3f54f728" } } }
Get Data
To filter and fetch data from the table, you can:
- Choose Filters to define filter criteria using:
- the column names – pick from the drop-down list;
- an operator – choose from the list;
- comparison value – these values can be static or a reference to a context object for example
{{context.entities.<entity-name>}}. - Multiple filter criteria can be defined using AND/OR connectors.
- In the absence of filter criteria, all rows are fetched limited by the limit and offset values mentioned below.
- Limit property can be used to set a limit on the number of records to be fetched. If not specified then 10 records would be fetched by default;
- Offset property can be used to specify the records to be skipped from the result data set.
- Data values can be accessed using:
{{context.<service_node_name>.response.body.queryResult[<index>].<column_name>}} - The response from this service call would be:
"customerdetails": { "response": { "body": { "hasMore": true, "total": 4, "metaInfo": [ { "name": "City", "type": "string" }, { "name": "Name", "type": "string" }, { "name": "sys_Id", "type": "string" }, { "name": "Created_On", "type": "date" }, { "name": "Updated_On", "type": "date" }, { "name": "Created_By", "type": "string" }, { "name": "Updated_By", "type": "string" } ], "queryResult": [ { "CustId": 1, "Type": "Preferred", "Address": "New York", "CustomerName": "John Smith", "sys_Id": "sys-b088ab59-7640-5a8f-8999-61a265dd2bee", "Created_On": 1593152119161, "Updated_On": 1593152119161, "Created_By": "st-b1376ff2-2384-5541-aa34-973ef73212f5", "Updated_By": "st-b1376ff2-2384-5541-aa34-973ef73212f5" }, { "CustId": 2, "Type": "Privileged", "Address": "Chicago", "CustomerName": "Jane Doe", "sys_Id": "sys-632c69ef-f6dd-5d83-ab32-f7837c8b63f9", "Created_On": 1593152443035, "Updated_On": 1593152443035, "Created_By": "st-b1376ff2-2384-5541-aa34-973ef73212f5", "Updated_By": "st-b1376ff2-2384-5541-aa34-973ef73212f5" } ] } } }
Update Data
To modify existing you can:
- Assign Values against each column to be updated.
If any value is left blank, then the corresponding column original values will NOT be retained but will be set as empty. - These values can be static or a reference to a context object.
- Choose Filters to define the filter criteria to specify the rows to be updated using
- the column names,
- an operator and
- filter value – these values can be static or a reference to a context object for example
{{context.entities.<entity-name>}}. - Multiple filter criteria can be defined using AND/OR connectors.
- The response from this service call would be:
"customerdetails": { "response": { "body": { "records": [] } } }
Delete data
To delete rows from the data table you need
- to define filter criteria to specify the rows to be deleted using
- the column names,
- an operator and
- filter value, these values can be static or a reference to a context object for example
{{context.entities.<entity-name>}}. Multiple filter criteria can be defined using AND/OR connectors.
- The response from this service request would be:
"customerdetails": { "response": { "body": { "nDeleted": 1 } } }
Service Call – View
From the assigned bots for any given data table/table view, you can query and manipulate the data using the Service Node in the Dialog Tasks.
Steps to configure the Service node:
- Open the Bot and the Dialog Task where you want to access the data.
- Add a Service Node at the appropriate location in the process flow.
- Click here for details on Service Node. Here we will be listing the configurations for Data Table integration.
- Component Properties configuration
- General Settings section
- Name – enter a name for the node;
- Display Name – enter a display name for the node;
- Service Type – choose Data Service;
- Type – select View.
- Request Definition – define the service request by clicking the Define Request link.
- In the slide-out page configure the following:
- Choose a Table View – You can choose from the list, these are the table views assigned to this bot.
- Filter the results – you can further define filter criteria using
- the column names,
- an operator and
- filter value – these values can be static or a reference to a context object for example
{{context.entities.<entity-name>}}.
- Multiple filter criteria can be defined using AND/OR connectors.
- In the absence of filter criteria, all rows are fetched limited by the limit and offset values mentioned below.
- You can set a limit on the number of records fetched and
- You can choose to skip a few records from the result data set by specifying the offset value.
- You can Test the service request. Remember testing with context reference will fail as they will be evaluated at run time and the data will not be available till then.
- Save the service request definition
- General Settings section
- You can set the Instance and Connections properties as per your bot requirements.
- The data returned from the data table can be accessed from the context object and used in your task as per your need, using:
{{context.<service_node_name>.response.body.queryResult[<index>].<column_name>}} - The response from this service call would be:
"CustomerView": { "response": { "body": { "hasMore": true, "total": 4, "metaInfo": [ { "name": "type", "type": "string" }, { "name": "address", "type": "string" } ], "queryResult": [ { "type": "Gold", "address": "New York" }, { "type": "Gold", "address": "Chicago" }, { "type": "Gold", "address": "Chicago" } ] } } }