봇 빌더에서 각 봇과 작업에는 HTTP 요청 메소드에 대해 반환된 표준 HTTP 상태 코드를 위한 조치와 함께 사전 정의된 일련의 오류 메시지가 포함되어 있습니다. 대부분의 경우 최종 사용자 응답에 기본 응답 및 조치로 충분하지만 기본적으로 정의되지 않은 다른 HTTP 상태 코드를 처리하거나 오류 메시지 자체를 사용자 정의하거나 오류가 발생할 경우 Kore.ai의 기본 응답을 변경해야 할 수 있습니다. 이 항목은 Kore.ai 봇 및 작업에 대한 오류 메시지를 사용자 정의하고 생성하는 방법을 설명합니다. 봇 또는 작업을 생성할 때 봇 또는 작업 설정의 오류 메시지 섹션에서 HTTP 상태 코드에 대한 오류 메시지를 추가하거나 사용자 정의할 수 있습니다.
사용자 정의 상태 코드
봇 또는 작업에 대해 기본적으로 약 25개의 HTTP 상태 코드가 정의되어 있습니다. HTTP 상태 코드 사용자 정의 방법
- 봇 빌더에서 봇 또는 작업을 엽니다
- 상단 메뉴에서 빌드 탭을 선택합니다
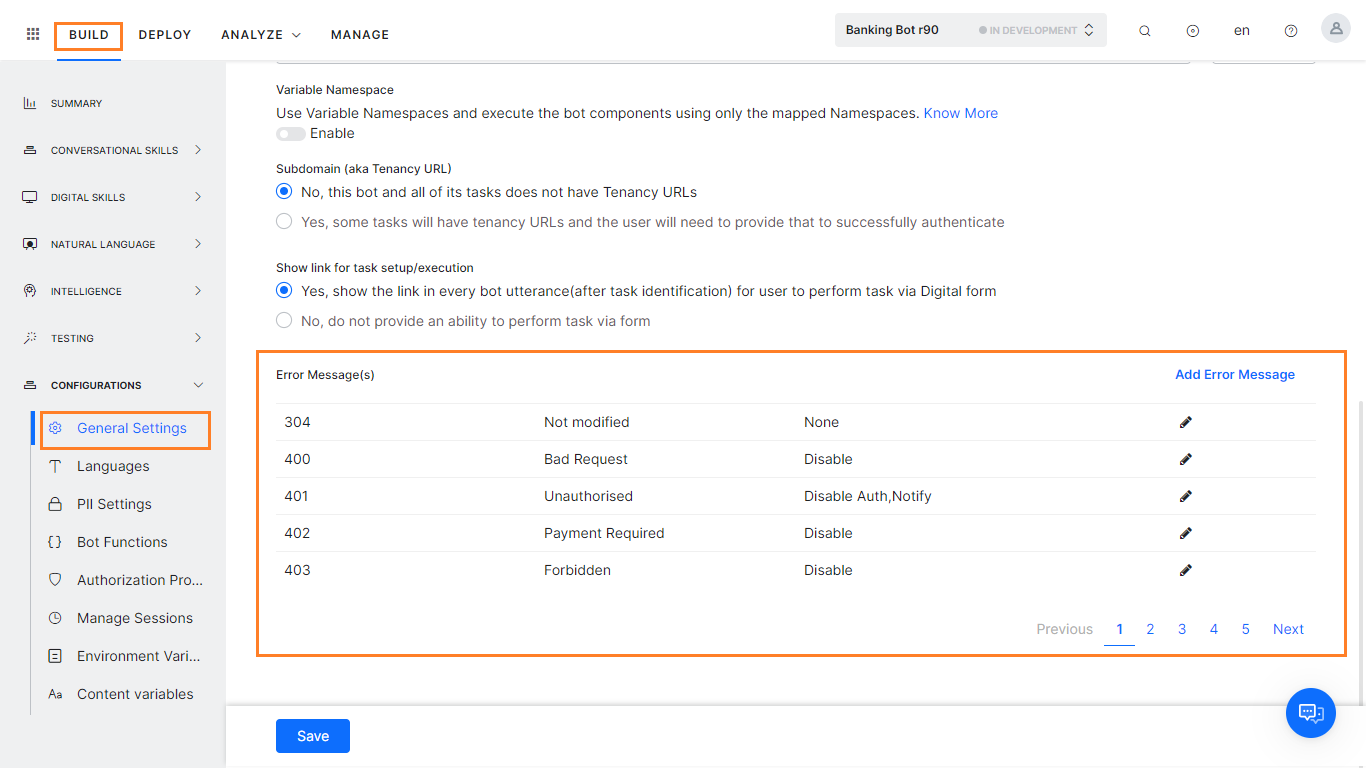
- 왼쪽 메뉴에서 설정 -> 일반 설정을 클릭합니다.
- 아래로 스크롤하여 오류 메시지 섹션을 찾습니다
- 사용자 정의할 코드의 편집
 아이콘을 클릭하여 오류 메시지 설정 대화 상자를 엽니다.
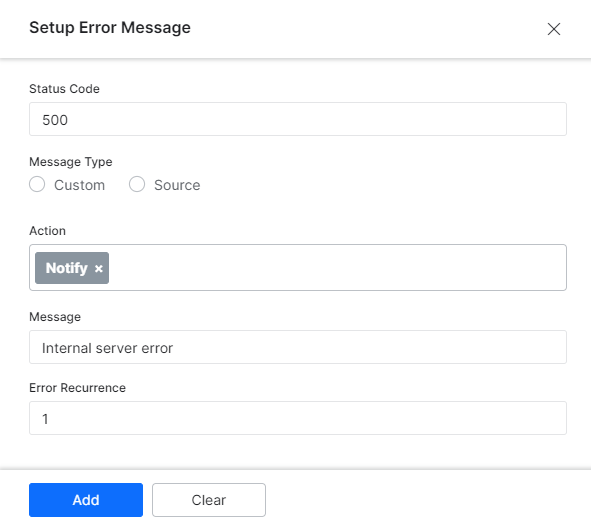
- 메시지 유형 필드에서 다음 중 하나를 선택합니다.
- 사용자 정의 – 최종 사용자에 대한 오류별 메시지를 정의하는 사용자 정의 메시지를 표시합니다.
- 소스 – 2XX 범위(성공 메시지) 이외의 HTTP 상태 코드에 대한 JSON 응답 페이로드에서 JSON 경로를 정의할 수 있는 오류 경로 필드를 표시합니다.
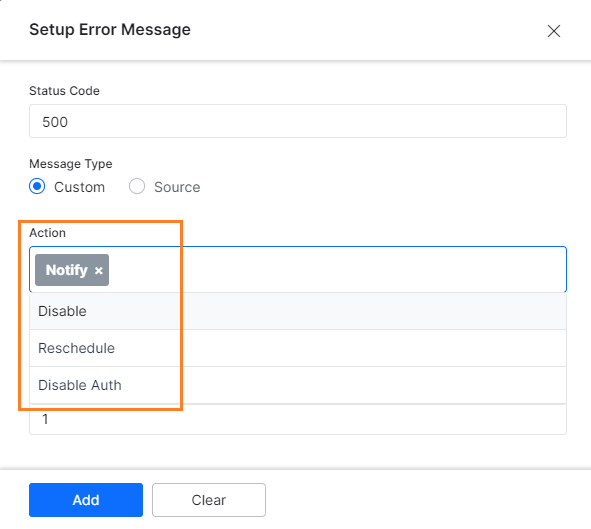
- 조치 필드에서 오류 반복 필드에 정의된 연속 오류 수에 도달하는 경우 수행할 동작을 지정합니다. 다음 중 하나를 선택합니다.
- 사용 안 함 – 오류가 발생할 때 작업이 비활성으로 설정됩니다. 필요한 경우 최종 사용자가 작업을 활성화할 수 있습니다.
- 일정 변경 – 오류가 발생할 때 작업을 다시 시도할 경과 시간(분)을 정의하는 데 사용되는 재시도 간격 필드를 표시합니다.
- 권한 부여 사용 안 함 – 오류가 발생하면 작업에 대해 정의된 권한 부여 메커니즘이 비활성화됩니다. 동일한 권한 부여 메커니즘을 사용하는 다른 작업도 비활성화됩니다.
- 알림 – 최종 사용자 인터페이스에 오류 메시지를 표시합니다.
- 메세지 필드(기본 메시지에만 사용 가능)에서 최종 사용자에게 표시되는 텍스트 메시지를 입력합니다.
- 오류 반복 필드에서 작업을 실행하기 전에 반환해야 하는 연속 오류 코드 수를 지정합니다. 기본적으로 오류 반복 필드는 "1"로 설정되어 있습니다.
- 추가를 클릭하여 사용자 정의 오류 메시지의 설치 오류 메시지 대화 상자를 저장하고 닫습니다.
새 HTTP 상태 코드를 생성하려면 오류 메시지 추가를 클릭하고 이전 섹션에서 설명한 대로 새 코드의 필드를 정의한 다음 추가를 클릭합니다.
ボットビルダーにおいて、それぞれのボットとタスクには、HTTPリクエストメソッドに返される標準的なHTTPステータスコードに対するアクションに加えて、事前定義済みのエラーメッセージのセットが含まれています。
ほとんどの場合、エンドユーザーへの応答はデフォルトの応答とアクションで十分なのですが、デフォルトでは定義されていない他のHTTPステータスコードを扱ったり、エラーメッセージ自体をカスタマイズしたり、エラー発生時のKore.aiによるデフォルトの応答を変更したりする必要があることもあります。
このトピックでは、Kore.aiボットとタスクのエラーメッセージをカスタマイズして作成する方法について説明します。
ボットまたはタスクを作成する際、ボットまたはタスク設定のエラーメッセージセクションで、HTTPステータスコードのエラーメッセージを追加またはカスタマイズすることができます。
カスタムステータスコード
ボットまたはタスクには、デフォルトで約25種類のHTTPステータスコードが定義されています。HTTPステータスコードをカスタマイズするには、
- ボットビルダーでボットまたはタスクを開きます。
- トップメニューから 構築タブを選択します
- 左側メニューから 設定->一般設定をクリックします。
- 下にスクロールしてエラーメッセージセクションを探します。
- カスタマイズするコードの編集アイコンをクリックして、エラーメッセージの設定ダイアログを開きます。
- メッセージタイプフィールドで、以下のいずれかを選択します。
- カスタム – エンドユーザー向けのエラー固有のメッセージを定義するためのカスタムメッセージフィールドを表示します。
- ソース – 2XX範囲のHTTPステータスコード(成功メッセージ)以外のHTTPステータスコードに対するJSON応答のペイロードからのJSONパスを定義することができる、エラーパスフィールドを表示します。
- アクションフィールドでは、エラーの繰り返しフィールドで定義済みの連続エラー回数に達したときに取るべきアクションを指定します。以下のうちいずれかを選択します。
- 無効 – タスクは、エラー発生時に 非アクティブに設定されています。エンドユーザーは、必要に応じてタスクをアクティブにすることができます。
- 再スケジュール – エラーが発生したときにタスクを再試行するまでの経過時間を分単位で定義するための再試行の間隔フィールドを表示します。
- 認証の無効化 – エラーが発生すると、タスクに定義された認証メカニズムが無効化されます。同じ認証メカニズムを使用している他のタスクも無効化されます。
- 通知 – エラーメッセージをエンドユーザーインターフェイスに表示します。
- メッセージフィールド(デフォルトのメッセージに対してのみ利用可能)に、エンドユーザー用に表示するテキストメッセージを入力します。
- エラーの繰り返し フィールドにおいえ、アクションが実行されるまでに返さなければならないエラーコードの連続回数を指定します。デフォルトでは、エラーの繰り返しフィールドは「1」に設定されています。
- 追加をクリックし、カスタムエラーメッセージを保存してエラーメッセージを設定ダイアログを閉じます。
新しいHTTPステータスコードを作成するには、エラーメッセージを追加をクリックして、前のセクションで説明したように新しいコードのフィールドを定義してから追加をクリックします。
Leave a Reply
In Bot Builder, each Bot and task contains a set of predefined error messages along with actions for standard HTTP Status codes returned for an HTTP Request method.
In most cases, the default response and action are sufficient for an end-user response, however, you may need to handle other HTTP Status codes not defined by default, or customize the error message itself, or change the default response by Kore.ai in the event of an error.
This topic describes how to customize and create error messages for Kore.ai Bots and tasks.
When you create a Bot or a task, you can add or customize error messages for HTTP Status codes in the Error Messages section of the Bot or task settings.
Custom Status Codes
There are approximately 25 HTTP Status codes defined by default for a Bot or task.
To customize an HTTP Status code
- Open the Bot or task in Bot Builder
- Select Build tab from top menu
- From the left menu click Configurations -> General Settings
- Scroll down to locate the Error Messages section.
- Click the Edit icon for the code that you want to customize to open the Setup Error Message dialog.
- In the Message Type field, select one of:
- Custom – Displays a Custom Message field to define an error-specific message for the end-user.
- Source – Displays the Error Paths field where you can define the JSON path from the JSON response payload for HTTP Status codes other than those in the 2XX range (success messages).
- In the Action field, specify the action to take when the number of consecutive errors defined in the Error Recurrence field is reached. Select one of:
- Disable – The task is set to Inactive when the error occurs. The end-user can activate the task when needed.
- Reschedule – Displays the Retry Interval field used to define the elapsed time in minutes after which to retry the task when the error occurs.
- Disable Auth – When the error occurs, the authorization mechanism defined for the task is disabled. Any other task that uses the same authorization mechanism is also disabled.
- Notify – Displays the error message in the end-user interface.
- In the Message field (available only for the default messages), enter the text message displayed to the end-user.
- In the Error Recurrence field, specify the number of consecutive error codes must be returned before the action is executed. By default, the Error Recurrence field is set to ” 1 “.
- Click Add to save and close the Setup Error Message dialog for your custom error message.
To create a new HTTP Status code, click Add Error Message, define the fields for your new code as described in the preceding section, and then click Add.