지금까지 Kore.ai 가상 비서 플랫폼에서 경고 작업을 설정하는 방법을 여기에서 확인했습니다. 이 섹션에서는 OAuth v2 with password grant를 사용한 경고 작업을 위한 권한 부여를 설정하는 방법을 살펴봅니다.
설정하기
다음 그림은 작업을 위한 사용자 정의 권한 부여 사용을 위해 정의해야 하는 oAuth v2 password grant 권한 부여 유형 필드의 예입니다.
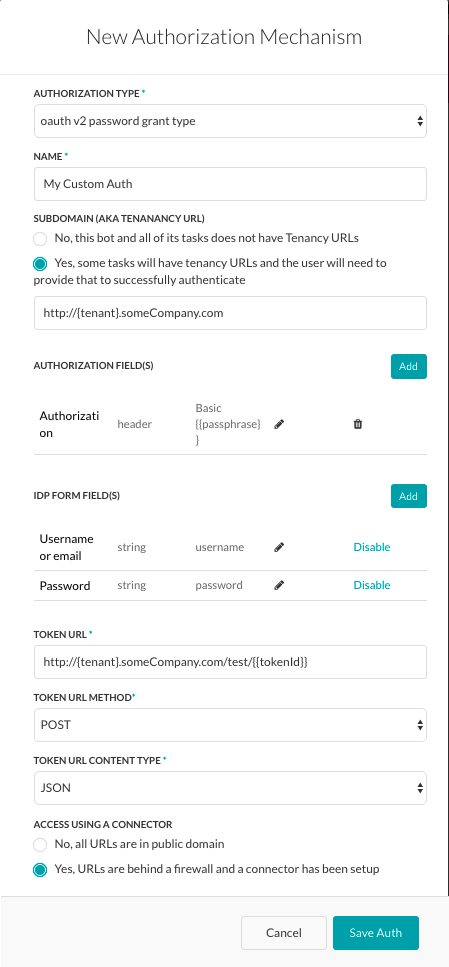
사용자 정의 권한 부여를 정의하려면, 권한 부여 유형 필드에서 oAuth v2 password grant를 선택합니다. 그런 다음 봇 빌더 사용자 인터페이스에 표시할 권한 부여의 이름을 지정합니다.
테넌시 정의
필요한 경우, 하위 도메인 섹션에서, 웹 애플리케이션 또는 사용자 인터페이스의 기본 URL이 URL의 테넌트 이름을 사용하는 경우 예를 선택합니다. 예: kore는 테넌트를 www.kore.someCompany.com.으로 사용하는 웹 서비스의 테넌트 조직입니다. 다음 예시 설정에서, 테넌시 URL은 {tenant} 조직 플레이스 홀더를 포함합니다. 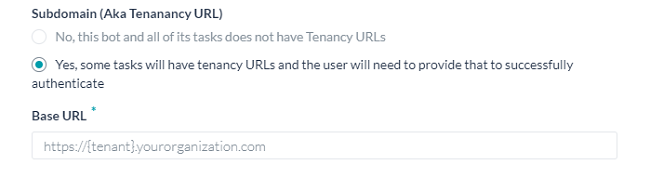
양식 필드
기본 사용자 이름과 암호 필드가 요구 사항을 충족하지 않는 경우, 권한 부여 양식 필드를 추가하여 최종 사용자에게 표시할 새 필드를 추가할 수 있습니다. 권한 부여 양식에 필드를 추가하려면,
- + 양식 필드 추가를 클릭합니다.
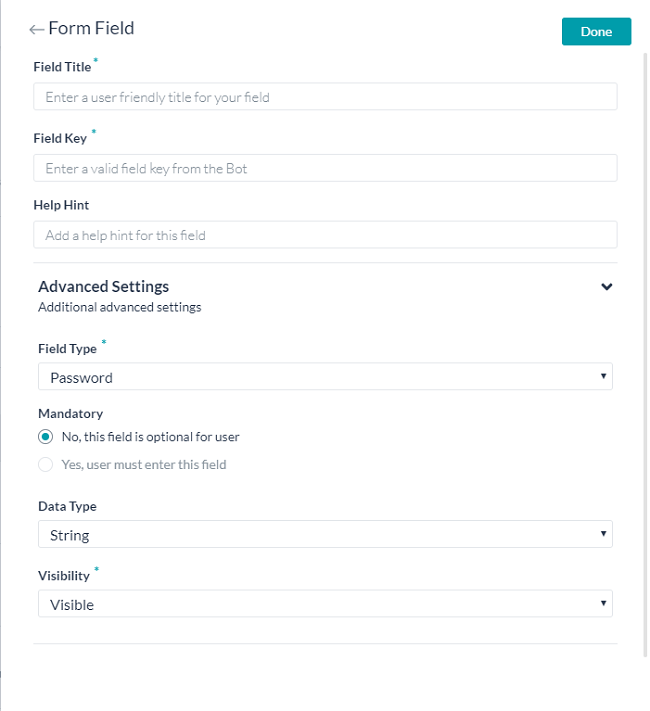
다음 그림은 권한 부여 대화 상자에 암호 필드를 추가하는 정의의 예입니다.
다음 표에서는 권한 부여 IDP 양식 필드를 정의하는 데 사용되는 필드를 설명합니다.
| 필드 이름 | 설명 |
|---|---|
| 필드 제목 | 인증 대화 상자에서 최종 사용자에게 표시되는 필드 이름을 지정합니다. |
| 필드 키 | 이 값은 인증 서비스에 대한 최종 사용자 입력을 나타냅니다. |
| 도움말 힌트 | 필드에 표시되는 도움말 텍스트로서 필드에 입력해야 하는 내용을 설명합니다. |
| 필드 유형 |
고급 옵션을 선택한 경우, 최종 사용자 인터페이스에서 표시되는 필드의 유형을 지정하여 다음 중 하나의 필드 키 값으로 할당된 사용자 입력을 수집합니다.
|
| 필수 | 고급 옵션을 선택한 경우, 최종 사용자가 인증을 완료하려면 이 필드를 정의해야 하는지 여부를 선택합니다. |
| 데이터 유형 | 고급 옵션을 선택한 경우, 최종 사용자의 입력으로 예상되는 데이터 유형(예: 문자열)을 지정합니다. |
| 가시성 | 고급 옵션을 선택한 경우, 인증 필드의 속성을 표시, 숨김 또는 읽기 전용으로 표시할지 여부를 지정합니다. |
권한 부여 필드
기본적으로, 권한 부여 필드는 작업 요청 메시지의 헤더 일부로 구성됩니다. 작업 요청에 추가 권한 부여 필드가 필요하거나 예상되는 권한 부여(예: 사회 보장 번호 또는 PIN)가 헤더의 일부가 아닌 경우, + 권한 부여 필드 추가를 클릭한 후 다음 그림과 같이 필드를 정의합니다.
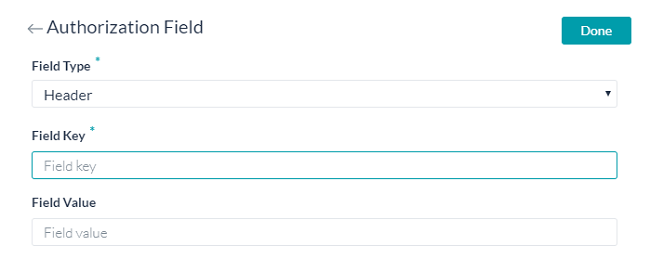
- 필드 유형 필드에서, 작업 요청 메시지 및 필요한 권한 부여 필드 유형에서 위치에 따라 다음 중 하나를 선택할 수 있습니다. 헤더 – 봇은 요청 헤더의 일부로 권한 부여 필드를 예상합니다.페이로드 – 봇은 요청 본문의 내용 일부로 권한 부여 필드를 예상합니다.쿼리 문자열 – 봇은 요청 본문에서 권한 부여 필드를 쿼리로 예상합니다.경로 매개변수 – 봇은 권한 부여 필드를 요청의 URL 경로의 일부로 예상합니다.
- 필드 키 필드에서, 선택한 필드 유형에 대한 필드 이름을 입력합니다.
- 필드 값 필드에 지정된 필드 키의 값을 입력합니다.
- 완료를 클릭합니다. 새 권한 부여 필드가 권한 부여 필드 섹션에 추가됩니다.
- 추가 인증 권한 필드를 추가하려면, 권한 부여 필드 섹션에서 추가를 클릭합니다.
토큰 URL 정의
토큰 URL을 정의하려면, 다음 단계를 수행하세요.
- 토큰 URL 필드에서, 권한 부여 메커니즘으로 작업을 배포하기 전에 봇 빌더에서 인증 설정 테스트에 사용할 수 있는 URL을 선택적으로 정의하세요. 동적 필드와 경로 매개 변수 필드, 쿼리 필드 등을 사용하여 URL 테스트를 정의할 수 있습니다. 예: http://{tenant}.someCompany.com/test/{{tokenId}}
- 토큰 URL 메소드 필드에서, Token URL에 대한 HTTP 요청 메소드 유형을 선택합니다. PUT, POST, PATCH, DELETE, GET 중 하나입니다.
- 토큰 URL 콘텐츠 유형 필드의 토큰 URL에서, 예상되는 콘텐츠 유형을 선택합니다. 다음 중 하나입니다. JSON, RSS, XML, URL Encoded JSON, CSV, Text, Twitter Encoded JSON, Multipart/Form-data,Multipart/Related 또는 Oracle ADF.
- 커넥터를 사용한 액세스 섹션에서, Kore.ai 커넥터 에이전트를 사용하여 Kore.ai 봇의 액세스를 활성화하려면 예를 선택합니다. 도메인에 활성 Kore.ai 커넥터가 정의되지 않은 경우, 봇 관리자 콘솔 시스템 관리자에게 문의하라는 경고 메시지가 표시됩니다. 자세한 내용은, 봇 관리 콘솔 설명서에서 Kore.ai 커넥터 사용을 참조하세요.
- 권한 부여 저장을 클릭하여 권한 부여 설정을 저장하고 새 권한 부여 메커니즘 대화 상자를 닫습니다.
테스트
권한 부여를 테스트하려면, 다음 단계를 수행하세요.
- 인증을 저장한 후, 새 권한 부여 유형의 권한 부여 URL을 정의한 경우, 권한 부여 테스트를 클릭하여 권한 부여 페이지에서 권한 부여 정의를 테스트하고 작업의 나머지 단계 개발을 계속 진행할 수 있습니다.

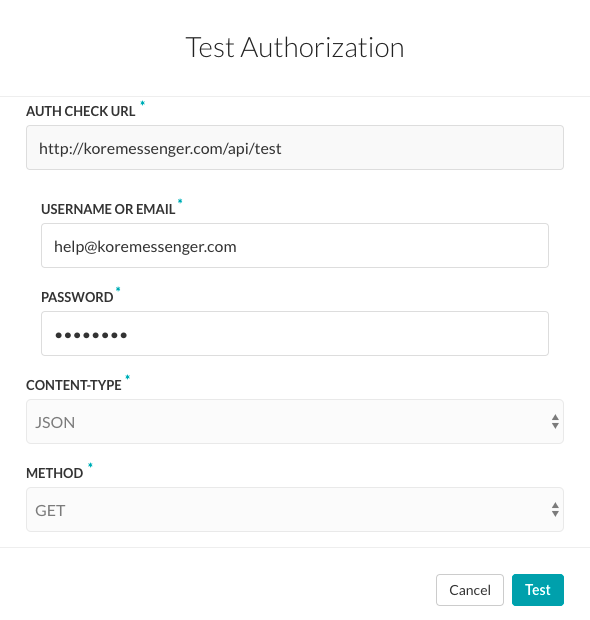
- 권한 부여 테스트를 클릭한 후, 권한 부여 테스트 창이 표시되고 다음 그림과 같이 권한 부여 확인 URL 섹션에서 지정한 URL로 채워집니다.
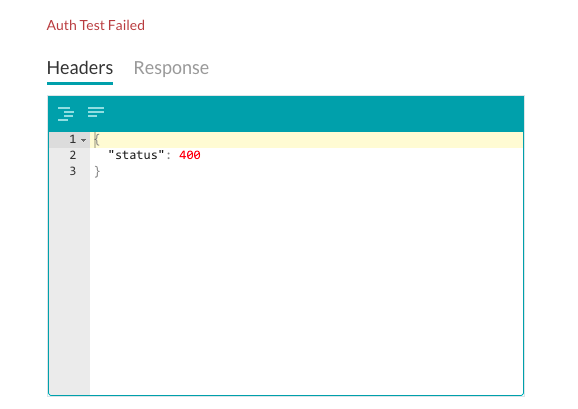
- 테스트를 클릭하여 권한 부여 테스트를 시작합니다. 인증 유효성 검증이 완료되면, 권한 부여 테스트 창이 닫히고 성공 또는 실패 검증 결과가 권한 부여 테스트 버튼 바로 오른쪽에 표시됩니다. 권한 부여가 실패하면, 다음 그림과 같이 헤더 및 응답 탭과 함께 권한 부여 테스트 실패 메시지가 표시됩니다.
こちらで、Kore.aiのバーチャルアシスタントプラットフォームでの通知タスクの設定方法について確認しました。このセクションでは、パスワード付与によるOAuth v2を使用した、通知タスクに対する基本的な権限の設定方法について見ていきます。
設定
以下の図とはoAuth v2 パスワード付与認証タイプフィールドの作例、タスクのためにカスタマイズした認証を有効にするために定義する必要があります。 カスタム認証を定義する場合、認証タイプフィールドのoAuth v2 パスワードの付与を選択してください。次にボットビルダーユーザーインターフェイスに表示される認証の名前を指定します。
テナントを定義する
必要に応じて、サブドメインセクションで、ウェブアプリケーションにベースURLやユーザーインターフェイスがURLにテナント名を使用する場合、はいを選択してください。例えば、koreは、www.kore.someCompany.comとしてテナントを使用したウェブサービスのテナント組織です。下記の設定の例では、テンナンシーURLは{tenant}組織のプレースホルダが含まれます。
フォームフィールド
デフォルトのユーザー名とパスワードのフィールドがご需要を満たしていない場合、認証フォームのフィールドを追加することで、エンドユーザーに表示される新しいフィールドを追加することができます。認証フォームにフィールドを追加するには、
- +フォームフィールドを追加をクリックします。
以下の図とはダイアログへのパスワード フィールドに追加する認証その定義の作例です。 以下のテーブルは認証IDPフォームフィールドの定義に使用するフィールドの説明です。
| フィールド名 | 説明 |
|---|---|
| フィールド タイトル | 認証ダイアログでエンドユーザー表示するフィールド名を指定します。 |
| フィールドキー | この値は認証サービスにエンドユーザーが入力する値を示します。 |
| ヘルプのヒント | フィールドに表示されるヘルプ文字はフィールドに入力すべくものを説明しています。 |
| フィールドタイプ | 上級オプションと選択した場合、エンドユーザーインターフェイスに表示されるフィールドのタイプを指定して、ユーザー入力の割り当てたフィールドキー値として収集します、以下のうちの一つ:
|
| 必須 | 上級オプションと選択した場合、エンドユーザーは必ずこのフィールドを定義して認証を完成してください。 |
| データタイプ | 上級オプションと選択した場合、エンドユーザーからの入力と予想するデータタイプを指定してください。例えば、文字列。 |
| 可視性 | [詳細オプション] を選択した場合、認証フィールドを表示、非表示、または読み取り専用のいずれにするかを指定します。 |
承認フィールド
デフォルトでは、認証フィールドとはタスクリクエストのメッセージのヘッダーの一部として調整されたものです。もしタスクリクエストには追加の認証フィールドが必須、または予想の認証はのヘッダーの一部ではないの場合(例:ソーシャルセキュリティ番号やPINなど)、+認証フィールドの追加をクリックして下記の図の通りにフィールドを定義します。
- フィールドタイプフィールドに、以下のうちの一つを選択することができます: 必須のタスクリクエストメッセージの位置および認証フィールドのタイプの次第です。ヘッダー―Botは、リクエストのヘッダの一部として認証フィールドを予想します。ペイロード―Botは、リクエストの本文のコンテンツの一部として認証フィールドを予想します。クエリ文字列―Botは認証フィールドをリクエストの本文にあるクエリとして予想します。パスパラメータ―Botは、認証フィールドをURLパスリクエストの一部として予想します。
- フィールドキーフィールドに、選択済のフィールドタイプフィールド名を入力してください。
- フィールド値フィールドに、フィールドキーの指定された値を入力してください。
- 完了をクリックします。新規の認証フィールドは認証フィールドのセクションに追加されました。
- 認証フィールドを追加する場合、認証フィールドセクションの追加をクリックしてください。
トークンURLの定義
トークンURLを定義するには、以下の手順に従います。
- トークン URLフィールドに、認証メカニズム付いたタスクの配置の前に、ボットビルダーからのテスト認証設定に使用できるのURLを任意に定義してください。ダイナミックフィールド、パスパラメータフィールド、クエリフィールドなどを使用して、テスト URL を定義することができます。たとえば、http://{tenant}.someCompany.com/test/{{tokenId}}
- トークンURLメソッドフィールドで、トークンURLのHTTPリクエストメソッドタイプを選択します。PUT、POST、PATCH、DELETE、GETのいずれか。
- トークンURLコンテンツタイプフィールドで、トークンURLから予想されるコンテンツタイプを選択します。以下のうちの一つ:JSON、RSS、XML、URL符号化済のJSON、CSV、文字、ツイッター 符号化済の JSON、マルチパート/フォームデータ、マルチパート/関連、やOracle ADF。
- コネクタでアクセスのセクションで、はいを選択するとKore.aiコネクタエイジェントでKore.aiボットへのアクセスをできるようにします。もしご使用のドメインは定義済の活動的なKore.ai コネクタではないの場合、警告メッセージは表示され、ボットのアドミンコンソールのシステムアドミニストレータに連絡します。詳細については、ボット管理コンソールのドキュメントのKore.aiコネクタの使用を参照してください。
- 認証を保存をクリックして認証設定を保存して新規認証メカニズムのダイアログを閉めます。
テスト
認証をテストするには、以下の手順に従います。
- 認証を保存した後、もし新規の認証タイプに定義済の認証チェックURLが定義済の場合、認証ページで認証の定義をテストできます、テスト認証をクリックしてからとタスクの残るステップの開発を続いてください。
- テスト認証をクリックすると、下記の図の通りに、テスト認証ダイアログは表示され、そして認証チェックURLセクションにご指定のURLが発生します。
- テストをクリックすると認証テストを開始します。認証の検証が完成の場合、テスト認証のウィンドウが閉じて、その検証の結果、成功や失敗は即刻、テスト認証のボタンに.表示します。認証失敗の場合、下記の図の通りに、認証テスト失敗のメッセージはヘッダーおよび応答のタブとともに表示します。
Leave a Reply
We have seen how an Alert task can be set up in Kore.ai virtual assistant platform here. In this section, we will see how authorization for the alert tasks can be set up using the OAuth v2 with password grant.
Setting Up
The following illustration is an example of the oAuth v2 password grant authorization type fields that you must define to enable a customized authorization for your task.
To define a custom authorization, select oAuth v2 password grant in the Authorization Type field. Then specify a Name for the authorization to be displayed in the Bot builder user interface.
Define Tenancy
If required, in the Subdomain section, select Yes if the base URL for a web application or user interface the uses a tenant name in the URL. For example, kore is the tenant organization for a web service using tenants as www.kore.someCompany.com.
In the following example configuration, the tenancy URL contains the {tenant} organization placeholder.
Form Fields
If the default username and password fields do not meet your needs, you can add new fields displayed to the end-user by adding authorization form fields. To add fields on the authorization form,
- Click + Add Form Field.
The following illustration is an example of a definition to add a password field to the authorization dialog.
The following table describes the fields used to define an authorization IDP form field.
| FIELD NAME | DESCRIPTION |
|---|---|
| Field Title | Specify the name of the field displayed to the end-user in the authentication dialog. |
| Field Key | The value represents the end-user input value to the authenticating service. |
| Help Hint | The help text displayed in the field to describe what should be entered into the field. |
| Field Type | When Advanced Options is selected, specify the type of field displayed in the end-user interface to collect the user input assigned as the value for the Field Key, one of:
|
| Mandatory | When Advanced Options is selected, select if the end-user must define this field to complete authentication. |
| Data Type | When Advanced Options is selected, specify the type of data expected as input from the end-user, for example, String. |
| Visibility | When Advanced Options is selected, specify if the authentication field should be visible, hidden, or displayed as read-only. |
Authorization Fields
By default, authorization fields are configured as part of the header of the task request message. If your task request requires additional authorization fields or the expected authorization is not part of the header, for example, social security number or PIN, click + Add Authorization Field and then define the fields as shown in the following illustration.
- In the Field Type field, you can select one of the following depending on where in the task request message and the type of authorization fields that are required.
Header – The Bot expects the authorization fields as part of the header of the request.Payload – The Bot expects the authorization fields as part of the content of the body of the request.Query String – The Bot expects the authorization fields as a query in the body of the request.Path Param – The Bot expects the authorization fields as part of the URL path for the request. - In the Field Key field, enter the name of the field for the selected Field Type.
- In the Field Value field, enter the value for the Field Key specified.
- Click Done. The new authorization field is added in the Authorization Fields section.
- To add additional authorization fields, click Add in the Authorization Fields section.
Define the Token URL
To define the token URL, follow the below steps:
- In the Token URL field, optionally define a URL that can be used to test the authentication settings from Bot Builder before you deploy the task with the authorization mechanism. You can use dynamic fields, path parameter fields, query fields, and so forth, to define the test URL, for example,
http://{tenant}.someCompany.com/test/{{tokenId}} - In the Token URL Method field, select the HTTP request method type for the Token URL. One of PUT, POST, PATCH, DELETE, and GET.
- In the Token URL Content Type field, select the content type expected from the Token URL. One of: JSON, RSS, XML, URL Encoded JSON, CSV, Text, Twitter Encoded JSON, Multipart/Form-data,Multipart/Related, or Oracle ADF.
- In the Access Using a Connector section, select Yes to enable access for Kore.ai Bots using the Kore.ai Connector agent. If your domain does not have any active Kore.ai Connectors defined, a warning message is displayed to contact the Bots Admin Console system administrator. For more information, refer to Using the Kore.ai Connector in the Bots Admin Console documentation.
- Click Save Auth to save the authorization settings and close the New Authorization Mechanism dialog.
Testing
To test your authorization, follow the below steps:
- After you save the authentication, if you have defined an Authorization URL for your new authorization type, you can test your authorization definition on the Authorization page when you click Test Authorization before continuing to develop the remain steps of your task.
- After you click Test Authorization, the Test Authorization window is displayed and populated with the URL you specified in the Authorization Check URL section, as shown in the following illustration.
- Click Test to begin the authorization test. When the validation of authentication is complete, the Test Authorization window is closed and the results of the validation, either success or failure, is displayed to the immediate right of the Test Authorization button. If the authorization fails, the Auth Test Failed message is displayed along with the Headers and Response tabs as shown in the following illustration.