여기서 보듯이 일부 경고 작업의 경우 webhook에서 제공하는 페이로드에 따라 알림이 표시될 때 최종 사용자에게 표시되는 데이터의 룩 앤드 필을 정의할 수 있습니다.
메시지 정의 정의하기
작업을 위한 두 가지 유형의 봇 응답을 정의할 수 있습니다.
- 모든 채널의 기본값: API 요청 및 정의된 처리기의 페이로드 응답에 따라 모든 채널의 기본 제목과 메시지 응답을 작성합니다. 자신만의 입력, Kore.ai 시스템에서 파생된 변수 키 집합, 사용자 정의 변수, 응답 샘플과 함께 응답 개체에서 데이터 혼합을 생성할 수 있습니다. 메시지는 일반적으로 요청 개체 데이터에서 ID 번호 또는 제목과 같은 변수를 하나 이상 포함하는 올바른 형식의 HTML 메시지로 표시됩니다.
- 채널별 응답: 또한 미리 정의된 메시지 템플릿을 선택된 채널에 적용하고 특정 채널(예: Facebook Messenger, Skype, SMS 또는 웹/모바일 SDK)을 위한 봇 응답 메시지를 사용자 정의할 수 있습니다.
메시지 정의 편집기 기능
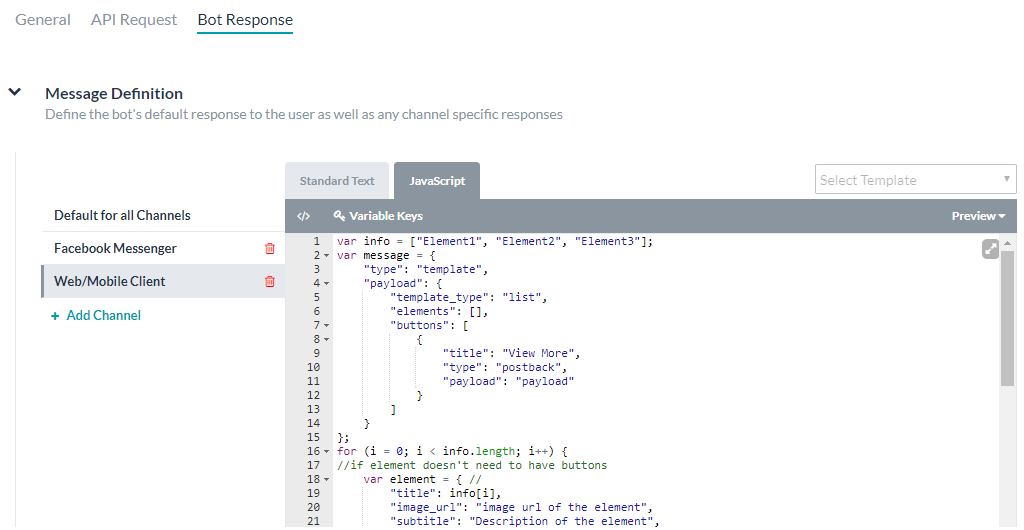
조치 작업의 편집기를 열려면, 봇 응답> 메시지 정의로 이동합니다. 메시지 정의 편집기는 다음 기능을 제공하는 세 개의 탭을 사용합니다.
- 표준 텍스트: 기본 편집기 컨트롤 및 HTML 마크업 및 변수 키를 사용하여 응답을 정의하고 형식을 지정합니다. 텍스트를 입력한 다음, 굵게, 기울임 꼴, 머리글 스타일, 하이퍼링크, 순서 있는 목록 및 순서 없는 목록의 버튼을 사용하고 라인을 삽입하여 형식을 지정합니다.

- JavaScript: 사용자 정의 코드를 추가하여 최종 사용자 작업 응답 메시지를 처리하고, 변수를 선언하고, 변수 키를 사용하고, 타사 애플리케이션과 상호 작용할 수 있습니다.
- 미리 보기: 봇 사용자가 확인할 수 있는 마크업으로 렌더링 된 출력 메시지의 샘플을 봅니다.
변수 키 추가하기
변수 키를 추가하려면 다음 단계를 따르세요.
- 표준 텍스트 또는 JavaScript 모드를 사용하여 변수 키를 추가하려면, 변수를 추가하려는 위치에 커서를 놓고 변수 키를 클릭합니다.
- 요청/응답 키 대화 상자에서 삽입하려는 변수가 포함된 키 노드 유형을 확장합니다.

- 추가하려는 변수(예:
response.data.id)를 선택한 다음 확인을 클릭합니다.
표준 키
표준 키는 재사용 가능한 데이터를 위한 다음 Kore.ai 변수 플레이스 홀더입니다.
- _labels _: GUID 대신 친숙한 레이블을 반환합니다. 예: 웹 서비스 API에서 사용자 데이터를 요청할 때 반환되는 프로젝트 또는 워크스페이스의 ID는 GUID입니다.
_labels_키를 사용하여 GUID 대신 최종 사용자에게 GUID의 친숙한 이름을 알려줄 수 있습니다. Kore.ai에서, 드롭다운 컨트롤은_labels_키의 응답을 다음과 같이 저장합니다. 예:{ "_labels_": { "15379386734832": "roadlabs.com", "26377329985341": "Test Project", "workspace": "roadlabs.com", "project": "Test Project" }, "_fields_": { "workspace": "15379386734832", "project": "26377329985341" } } - _tenant_ – 정의된 경우 엔터프라이즈에 대한 테넌트를 반환합니다. 예: JIRA는 https://koreteam.atlassian.net/browse/BBF-3265에서 koreteam과 같은 URL에 대한 테넌트가 필요합니다.
_tenant_키를 사용하여 다음과 같은 작업 응답에서 링크를 작성할 수 있습니다. - _fields_ – 페이로드 응답의 일부가 아닌, 사용자가 제공한 작업 필드 입력을 반환하는 데 사용됩니다. 예: JIRA 작업에서, 최종 사용자에게 워크스페이스 이름을 입력하라는 메시지가 표시됩니다.
_fields_키를 사용하여 최종 사용자 입력을 다음과 같이 저장할 수 있습니다._fields_["workspace"]
- _last_run – 웹 서비스 풀의 UTC 날짜 타임 스탬프를 ISO 8601 형식을 사용하여 반환하는 데 사용됩니다. 예: 2016-03-05T12:44:38+00:00. 예: 웹 서비스 요청이 페이로드 응답에서 모든 활동을 반환하는 경우,
_last_run키를 사용하여 다음 값의 앞 또는 뒤에 표시되는 결과를 필터링할 수 있습니다._last_run
세션 키
세션 키는 단일 세션 인스턴스와 관련된 사용자 데이터의 Kore.ai 변수 플레이스 홀더입니다.
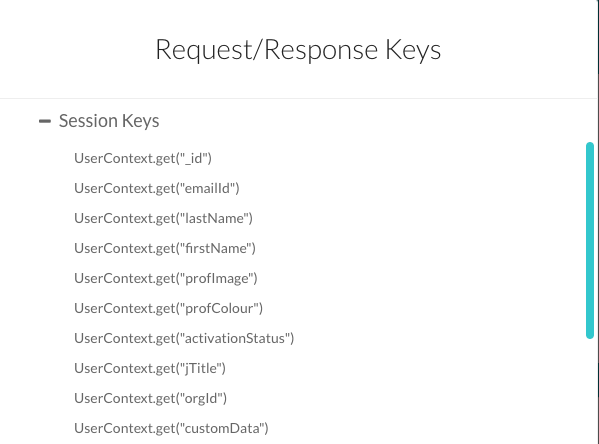
- UserContext.get("_id") – Kore.ai 사용자 ID입니다.
- UserContext.get("emailId") – userId에 연결된 이메일 주소입니다.
- UserContext.get("lastName") – 사용자의 성입니다.
- UserContext.get("firstName") – 사용자의 이름입니다.
- UserContext.get("profImage") – 사용자의 이미지 또는 아바타 파일 이름입니다.
- UserContext.get("profColor") – 사용자의 계정 색상입니다.
- UserContext.get("activationStatus") – 사용자의 계정 상태입니다.
- UserContext.get("jTitle") – 정의된 경우 사용자의 직함입니다.
- UserContext.get("orgId") – 정의된 경우 사용자 계정의 조직 ID입니다.
- UserContext.get("customData") – 개발자가 정의한 사용자 정의 키입니다.
- UserContext.get("identities") – 정의된 경우 대체 사용자 ID입니다.
봇 작업을 정의하는 방법과 해당 작업에 사용 가능한 키 컨텍스트에 따라 추가 세션 키를 사용할 수 있습니다. 세션 키 및 컨텍스트 키에 대한 자세한 내용은, 작업에서 세션 변수 및 컨텍스트 변수 사용하기를 참조하세요.
응답 키
응답 키는 API 응답 탭에서 응답 샘플 텍스트에서 직접 구문 분석됩니다. 응답 키는 정의된 응답 샘플에 따라 달라집니다.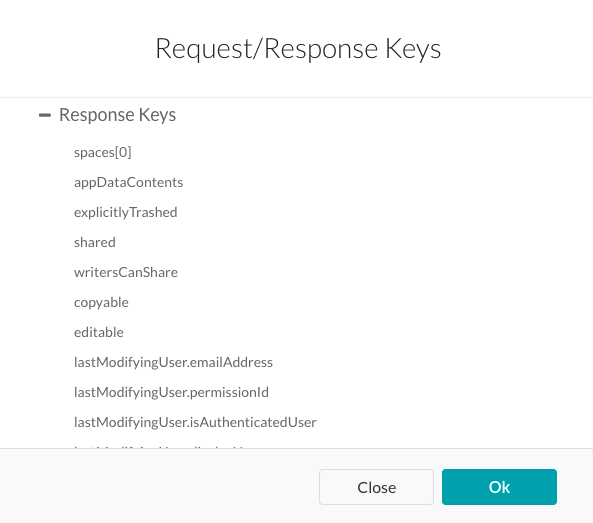
다음 목록은 Asana 작업에 사용 가능한 응답 키의 예입니다.
request.data.workspace
request.data.projects
request.data.name
request.data.notes
labels.498346170860
labels.30887755353556
labels["data.workspace"]
labels["data.projects"]
_tenant_
response.data.id
response.data.created_at
response.data.modified_at
response.data.name
response.data.notes
response.data.completed
response.data.assignee_status
response.data.completed_at
response.data.due_on
response.data.due_at
response.data.workspace.id
response.data.workspace.name
response.data.num_hearts
response.data.parent
response.data.followers[0].id
response.data.followers[0].name
response.data.hearted
response.data.assignee
response.data.projects[0].id
response.data.projects[0].name
response.data.memberships[0].project.id
response.data.memberships[0].project.name
response.data.memberships[0].section
보고서 키
보고서 키는 보고서 템플릿 정의 및 봇 응답에서 사용자가 클릭할 수 있는 메시지에 추가 정보 링크를 표시하는 데 사용할 수 있는 Kore.ai 변수 플레이스 홀더입니다.
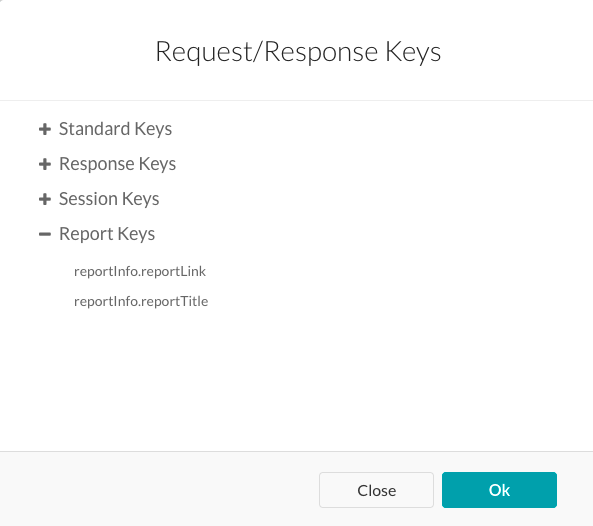
- reportInfo.reportLink – 이 작업에 대한 보고서 템플릿 정의 섹션에 정의된 링크입니다.
- reportInfo.reportTitle – 이 작업에 대한 보고서 템플릿 정의에 정의된 제목입니다.
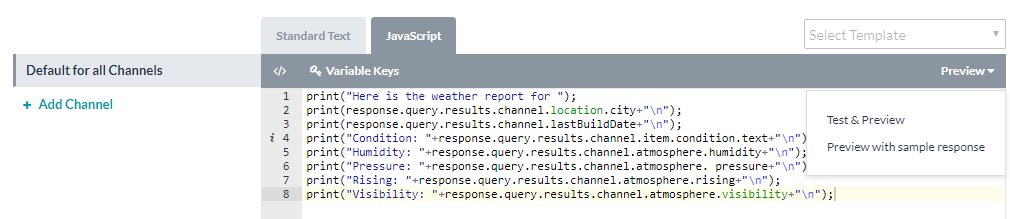
응답 미리 보기
메시지 편집기에서, 미리 보기를 클릭하여 다음 옵션 중 하나를 사용하여 응답 미리 보기를 생성합니다.
- 테스트 및 미리 보기 – 봇의 작업 설정 페이지를 열고 작업 설정을 정의하고, 인증한 다음 타사 웹 서비스(예: Asana)를 통해 생성된 응답의 미리 보기를 표시합니다.
- 샘플 응답으로 미리 보기 – 작업의 API 요청 탭의 응답 샘플 섹션에 정의된 키-값 쌍으로 제공된 샘플 데이터를 사용하여 미리 보기를 생성합니다.
사용자 정의 JavaScript 응답 예시
다음 예시에서는 작업 응답 메시지가 전송될 때 출력 메시지를 최종 사용자에게 표시하는 게시물 제목 및 게시물 설명 섹션을 정의하기 위해 JavaScript를 사용한 응답 개체를 표시합니다. 다음 예시에서, desc로 레이블이 표시된 변수는 JSON 응답에 캡션값이 정의되어 있는 경우에만 표시됩니다.
var desc = (caption !== "undefined" ? caption : "")
다음 예시에서는, 작업 제목을 사용하여 클릭 가능한 URL이 작업 응답 메시지에 표시됩니다.
var tasklink = '' + title + '';
이 마지막 예시에서, 링크 변수는 동영상 또는 사진 유형에 따라 다릅니다. 유형에 따라 적절한 링크가 표시됩니다.
var link = "";
switch (type) {
    case "video":
        var video = (typeof(video_url) != "undefined") ? video_url : permalink_url;
        link = '<video controls><source src ="' + video + '" type="video/mp4"></video>';
        break;
    case "photo":
        link = '<img src="' + image_permalink + '"></img>';
        break;
}
사용자 정의 JavaScript를 생성하여 작업의 페이로드 응답에 따라 JavaScript 탭에서 작업별 요구 사항을 처리할 수 있습니다.
채널별 봇 응답
작업 응답 메시지는 응답 메시지가 표시되는 채널에 따라 다를 수 있습니다. 예: Kore.ai 메신저 클라이언트, 이메일 또는 텍스트 메시지. 기본적으로, 모든 채널의 기본값으로 설정된 응답 메시지는 모든 채널에 전송됩니다. 그러나, 기본 응답 대신 해당 채널의 최종 사용자에게 표시할 20개 이상의 채널에 특정 응답을 정의할 수 있습니다.
- 특정 채널을 위한 응답 메시지를 정의하려면, + 채널 추가를 클릭하여 채널 선택 드롭다운 목록을 표시합니다.
- 채널(예: Kore.ai)을 선택한 다음 JavaScript 탭에서 해당 채널에 대한 응답을 설정합니다.
각 채널에는 하나의 응답만 정의할 수 있습니다. 다음 JavaScript 예시에서는 Kore.ai 기본 형식 지정 템플릿을 채널별로 재정의하는 방법을 보여 줍니다.
참고 사항: 다음 키를 사용하여 기본값을 반환합니다. response.message – 기본 메시지를 문자열로 반환합니다. response.message.choices – 옵션 선택 또는 확인 메시지 유형을 배열로 반환합니다.
- Slack 채널 재정의 예시
var message = {}; var attachments = []; var attachment = { 'text': "Exception occurred during API execution", 'color': '#FFCC00', 'attachment_type': 'default' }; attachments.push(attachment); message.attachments = attachments; print(JSON.stringify(message)); - FaceBook 채널 재정의 예시
var message = { text: response.message }; var buttons = []; for (var i = 0; i < response.choices.length; i++) { var choiceItem = response.choices[i]; if (choiceItem.length > 20) { choiceItem = choiceItem.substring( 0, 18) + '..'; } var element = { content_type: 'text', title: choiceItem, payload: choiceItem }; buttons.push(element); } message.quick_replies = buttons; print(JSON.stringify(message)); - 이메일 채널 재정의 예시
var message = {}; var text = response.message + ' <br> '; for (var i = 0; i < response.choices.length; i++) { text = text.concat( '<u> + response.choices[i] + ' < /u> <br>'); } message.text = text; print(JSON.stringify(message)); - SMS 채널 재정의 예시
var message = {};
    var indexArray = ['a', 'b', 'c',
        'd', 'e',
        'f', 'g', 'h', 'i', 'j',
        'k', 'l', 'm', 'n', 'o',
        'p', 'q', 'r', 's', 't',
        'u', 'v', 'w', 'x', 'y',
        'z'
    ];
    var text = response.message + '\\n';
    for (var i = 0; i < response.choices
        .length; i++) {
        text = text.concat(indexArray[i] +
            ') ' + response.choices[
                i] + '\\n');
    }
    message.text = text;
    print(JSON.stringify(message));
いくつかの通知タスクでは、こちらでご覧いただいた通り、Webhookによって送信されたペイロードによって通知が表示された際に、エンドユーザーに表示されるデータの見え方を定義します。
メッセージ定義の定義
タスクに対してBotの応答を2種類定義することができます。
- 全チャネルのデフォルト: API リクエストと定義済のプロセッサからのペイロード応答に基づいた全チャネルのデフォルト タイトルとメッセージ応答を作成します。応答オブジェクトや独自の入力、Kore.ai システムから派生した [変数キー] のセット、カスタム変数、応答サンプルを組み合わせたデータを作成することができます。メッセージは通常、整形された HTML メッセージとして表示され、リクエスト オブジェクト データからの ID 番号や件名の変数を 1 つ以上含んでいます。
- チャネル固有の応答: Facebook Messenger、Skype、SMS、Web/モバイル SDK など、特定のチャネル用にボット応答メッセージをカスタマイズすることができ、選択したチャネルに事前定義したメッセージ テンプレート (テーブル、リスト、グラフなど) を適用することもできます。
メッセージ定義エディター機能
アクション タスクのエディターを開くには、[ボットの応答] > [メッセージ定義] に移動します。メッセージ定義編集器は3つのタブで以下の特性を提供します:
- 標準文字: 基本編集器のコントロールおよびHTMLのmarkupに介して、変数キーで応答を定義およびフォーマット化ができます。文字を入力して、次に太字、斜体、見出しのスタイル、ハイパーリンク、 並び直しのリストや並び直しないのリスト、そして線の増加のボタンで、フォーマットの調整ができます。
- JavaScript: エンドユーザーのタスク応答メッセージを処理するカスタム コードを追加して変数を宣言し、変数キーを使用して、サードパーティー アプリケーションと対話できるようにします。
- プレビュー: ボットのユーザーが見る出力メッセージの表示サンプルを、マークアップ付きで表示します。
変数キーの追加
以下のステップに従って変数キーを追加してください:
- 標準テキストモードや JavaScript モードで変数キーを追加するには、変数を追加したい場所にカーソルを合わせて [変数キー] をクリックします。
- [リクエスト/応答キー] ダイアログで、挿入する変数を含むキー ノードのタイプを開きます。
- のような、追加する変数を選択して
response.data.id[OK]をクリックします。
標準キー
[標準キー] は、以下の再利用可能なデータのための Kore.ai 変数のプレースホルダーです。
- _labels_: GUID の代わりにフレンドリラベルを返します。例えば、WebサービスAPIからユーザデータを要求された場合、返されるプロジェクトやワークスペースのIDはGUIDとなります。
_labels_キーを使用して、GUID ではなく、ユーザー フレンドリーの GUID 名をエンドユーザーに表示することができます。Kore.ai では、次の例に示すようにドロップダウン コントロールが_labels_キー応答を格納します。{ "_labels_": { "15379386734832": "roadlabs.com", "26377329985341": "Test Project", "workspace": "roadlabs.com", "project": "Test Project" }, "_fields_": { "workspace": "15379386734832", "project": "26377329985341" } } - _tenant_ – 定義済のエンタープライズ向けのテナントを返します。たとえば JIRA には、URL が https://koreteam.atlassian.net/browse/BBF-3265 となるよう、テナント koreteam が必要です。以下のように、
_tenant_キーでタスク応答へのリンクを作成することができます。 - _fields_ – エンドユーザーが提供する、ペイロードの応答の一部ではないタスク フィールドの入力を返すために使用します。たとえば JIRA タスクでは、エンドユーザーはワークスペース名を入力するように促されます。
_fields_キーを使用して、エンドユーザーの入力を格納します。_fields_["workspace"]
- _last_run – 「2016-03-05T12:44:38+00:00」のような、ISO 8601 形式の Web サービスのポーリングの UTC 日付タイム スタンプを返すために使用します。たとえば、Web サービス リクエストがペイロード応答の全てのアクティビティを返す場合、
_last_runキーを使用して_last_run値の前後に表示された結果を絞り込むことができます。_last_run
セッションキー
[セッション キー] は、単一セッション インスタンス におけるユーザー データ用の Kore.ai 変数プレースホルダーです。
- UserContext.get(“_id”) – Kore.ai の userId です。
- UserContext.get(“emailId”) – userId に関連付けられたメール アドレスです。
- UserContext.get(“lastName”) – ユーザーの姓です。
- UserContext.get(“firstName”) – ユーザーの名です。
- UserContext.get(“profImage”) – ユーザーの画像やアバターのファイル名です。
- UserContext.get(“profColor”) – ユーザーアカウントの色です。
- UserContext.get(“activationStatus”) – ユーザーのアカウント ステータスです。
- UserContext.get(“jTitle”) – ユーザーの役職です (定義されている場合) 。
- UserContext.get(“orgId”) – ユーザーアカウントの組織 ID です (定義されている場合) 。
- UserContext.get(“customData”) – 開発者が定義したカスタム キーです。
- UserContext.get(“identities”) – ユーザーの代替 ID です (定義されている場合) 。
追加のセッションキーはボットタスクの定義そしてそのタスクに使用可能のキーのコンテキストの次第に、使用可能になります。セッションとコンテキストキーについての詳細については、タスクのセッション変数とコンテキスト変数を使用を参照してください。
応答キー
応答キーは [API 応答] タブにある [応答サンプル] のテキストから直接解析されます。応答キーは定義済の応答サンプルの次第に変わります。 次のリストは、Asanaタスクで使用できる応答キーの例です。
request.data.workspace
request.data.projects
request.data.name
request.data.notes
labels.498346170860
labels.30887755353556
labels["data.workspace"]
labels["data.projects"]
_tenant_
response.data.id
response.data.created_at
response.data.modified_at
response.data.name
response.data.notes
response.data.completed
response.data.assignee_status
response.data.completed_at
response.data.due_on
response.data.due_at
response.data.workspace.id
response.data.workspace.name
response.data.num_hearts
response.data.parent
response.data.followers[0].id
response.data.followers[0].name
response.data.hearted
response.data.assignee
response.data.projects[0].id
response.data.projects[0].name
response.data.memberships[0].project.id
response.data.memberships[0].project.name
response.data.memberships[0].section
レポート キー
レポートキーとはKore.ai 変数プレースホルダーとして、レポートテンプレート定義およびボットの応答を使用してユーザーがクリックできるメッセージに追加の情報へのリンクを表示します。
- reportInfo.reportLink – [レポート テンプレートの定義] セクションで定義された、当該タスクのリンクです。
- reportInfo.reportTitle – [レポート テンプレートの定義] セクションで定義された、当該タスクのタイトルです。
応答のプレビュー
メッセージ エディターで [プレビュー] をクリックすると、以下のオプションのうちの 1 つを使用して、応答プレビューを生成します。
- テストとプレビュー – ボットのタスク設定ページを開いてタスク設定と認証を定義し、Asana のようなサードパーティーの Web サービスにより生成された応答のプレビューを表示します。
- サンプル応答のプレビュー – タスクの [API リクエスト] タブの [応答サンプル] セクションで、定義済のキー/値ペアで提供されたサンプル データを介してプレビューを生成します。
カスタム JavaScript の応答の例
以下の例では、JavaScriptを使用して、タスクの応答メッセージが送信されたときにエンドユーザーに出力メッセージを表示するタイトルを投稿と説明を投稿セクションを定義する応答オブジェクトを示しています。以下の例では、descと書かれた変数は、JSON応答にキャプションの値が定義されている場合にのみ表示されます。
var desc = (caption !== "undefined" ? caption : "")
次の例では、タスクの [タイトル] を使用したクリック可能な URL が、タスクの応答メッセージに表示されます。
var tasklink = '' + title + '';
この最後の例では、リンク変数は、動画または写真のいずれかのタイプに依存します。タイプに応じて、適切なリンクが表示されます。
var link = "";
switch (type) {
    case "video":
        var video = (typeof(video_url) != "undefined") ? video_url : permalink_url;
        link = '<video controls><source src ="' + video + '" type="video/mp4"></video>';
        break;
    case "photo":
        link = '<img src="' + image_permalink + '"></img>';
        break;
}
タスクのペイロード応答に基づいて、[JavaScript] タブでタスク固有の要件を処理するためのカスタム JavaScript を作成することができます。
チャネル固有のボットの応答
タスク応答メッセージは、応答メッセージが表示されるチャンネル、例えばKore.ai Messengerクライアント、電子メール、テキストメッセージなどに依存している場合があります。デフォルトでは、すべてのチャンネルのデフォルトで設定した応答メッセージが、すべてのチャンネルに送信されます。ただし、デフォルトの応答ではなく、単一や複数の20+サポートチャンネルに対して、特定の応答を定義して、そのチャンネルのエンドユーザーに表示することができます。
- 特定のチャネルの応答メッセージを定義するには、+チャネルを追加をクリックして、チャネルを選択ドロップダウンリストを表示します。
- たとえば、[Kore.ai] などのチャネルを選択して、[JavaScript] タブでチャネルの応答を設定します 。
各チャンネルには一つの応答が定義可能です。以下のJavaScriptの例は各チャンネルのKore.aiのデフォルトフォーマットテンプレートをオーバーライドする方法。
注意: 以下のキーを使用して、response.message(デフォルトのメッセージを文字列として返す)、response.message.choices(オプションの選択または確認メッセージタイプを配列として返す)のデフォルト値を返します。
- Slack チャネルの上書き例
var message = {}; var attachments = []; var attachment = { 'text': "Exception occurred during API execution", 'color': '#FFCC00', 'attachment_type': 'default' }; attachments.push(attachment); message.attachments = attachments; print(JSON.stringify(message)); - FaceBook チャネルの上書き例
var message = { text: response.message }; var buttons = []; for (var i = 0; i < response.choices.length; i++) { var choiceItem = response.choices[i]; if (choiceItem.length > 20) { choiceItem = choiceItem.substring( 0, 18) + '..'; } var element = { content_type: 'text', title: choiceItem, payload: choiceItem }; buttons.push(element); } message.quick_replies = buttons; print(JSON.stringify(message)); - メール チャネルの上書き例
var message = {}; var text = response.message + ' <br> '; for (var i = 0; i < response.choices.length; i++) { text = text.concat( '<u> + response.choices[i] + ' < /u> <br>'); } message.text = text; print(JSON.stringify(message)); - SMS チャネルの上書き例
var message = {}; var indexArray = ['a', 'b', 'c', 'd', 'e', 'f', 'g', 'h', 'i', 'j', 'k', 'l', 'm', 'n', 'o', 'p', 'q', 'r', 's', 't', 'u', 'v', 'w', 'x', 'y', 'z' ]; var text = response.message + '\n'; for (var i = 0; i < response.choices .length; i++) { text = text.concat(indexArray[i] + ') ' + response.choices[ i] + '\n'); } message.text = text; print(JSON.stringify(message));
Leave a Reply
For some Alert tasks, as seen here, you can define the look and feel of the data presented to the end-user when the alert is displayed based on the payload delivered by the webhook.
Defining the Message Definition
You can define two kinds of bot responses for a task:
- The default for all channels: Author the default title and message response for all channels based on the payload response from the API request and any processors defined. You can create a mixture of data from the response object along with your own inputs, a set of Variable Keys derived from the Kore.ai system, custom variables, and the response sample. The message is displayed as a message, usually as a well-formed HTML message that contains one or more variables, such as the ID number or subject, from the request object data.
- Channel-specific response: You can also customize a Bot response message for specific channels, for example, Facebook Messenger, Skype, SMS, or Web/Mobile SDK, along with applying predefined message templates (tables, lists, graphs, etc.) for selected channels.
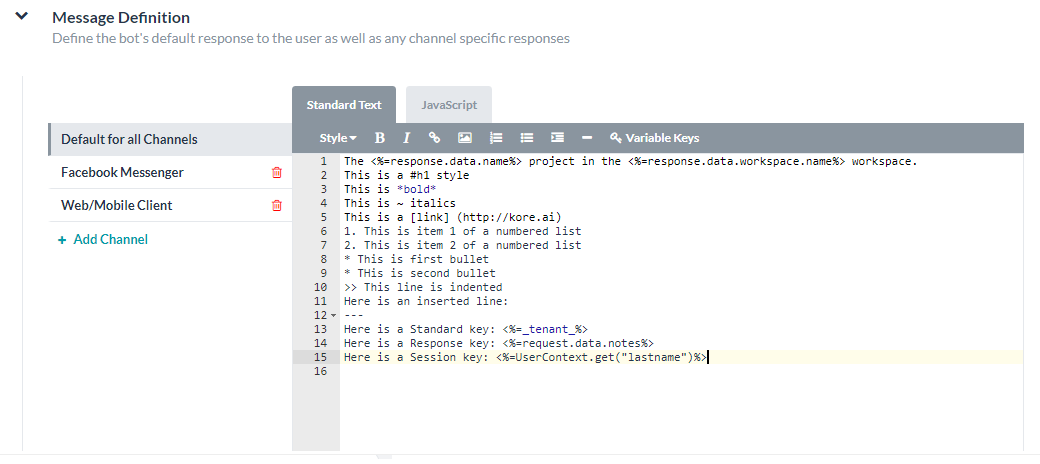
Message Definition Editor Features
To open the editor for your Action task, go to Bot Response > Message Definition. The Message Definition editor uses three tabs to offer the following features:
- Standard Text: Use basic editor controls and HTML markup, and variable keys to define and format the response. Enter text, and then format it using buttons for bold, italics, header styles, hyperlinks, ordered and unordered lists, and inserting lines.
- JavaScript: Add custom code to handle the end-user task response message, declare variables, use variable keys, and interact with third-party applications.
- Preview: View a sample of the rendered output message, with markup, as the bot users see it.
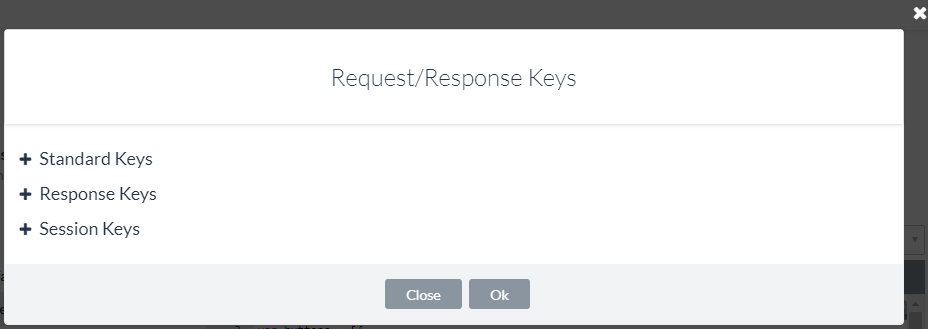
Adding Variable Keys
Follow these steps to add variable keys:
- Whether you are using Standard Text or JavaScript mode, to add a variable key, place the cursor where you want to add the variable and then click Variable Keys.
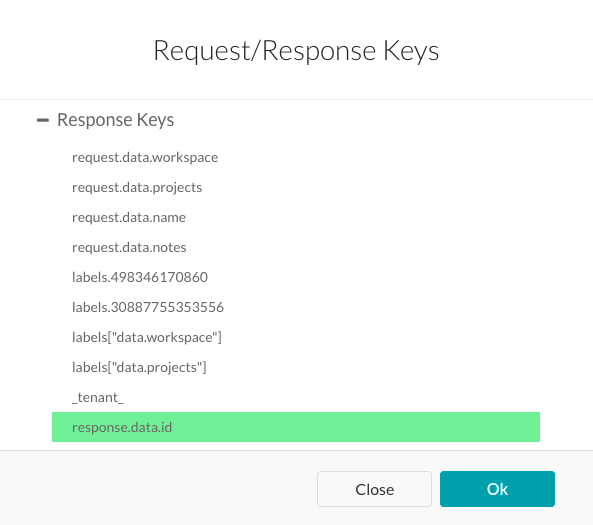
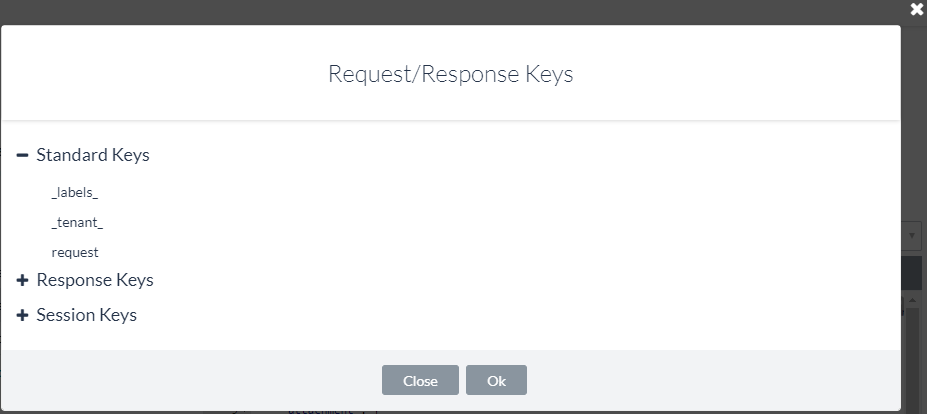
- In the Request/Response Keys dialog, expand the type of key node that contains the variable you want to insert.
- Select the variable that you want to add, for example,
response.data.idand then click Ok,
Standard Keys
Standard Keys are the following Kore.ai variable placeholders for reusable data.
- _labels _: Returns the friendly label in place of a GUID. For example, when user data is requested from a web service API, the ID of a project or workspace returned is a GUID. You can use the
_labels_key to show the user-friendly name of the GUID to the end-user instead of the GUID. In Kore.ai, a drop-down control stores the response for the_labels_key as, for example:{ "_labels_": { "15379386734832": "roadlabs.com", "26377329985341": "Test Project", "workspace": "roadlabs.com", "project": "Test Project" }, "_fields_": { "workspace": "15379386734832", "project": "26377329985341" } } - _tenant_ – Returns the tenant for the enterprise when defined. For example, JIRA requires a tenant for URLs, such as koreteam, in https://koreteam.atlassian.net/browse/BBF-3265. You can use the
_tenant_key to build a link in a task response such as: - _fields_ – Used to return a task field input provided by the end-user that is not part of a payload response. For example, in a JIRA task, the end-user is prompted to enter a workspace name. You can use the
_fields_key to store the end-user input as:_fields_["workspace"]
- _last_run – Used to return the UTC date timestamp of a web service poll using ISO 8601 format, for example, 2016-03-05T12:44:38+00:00. For example, if a web service request returns all activity in a payload response, you can use the
_last_runkey to filter results displayed before or after the value for_last_run
Session Keys
Session Keys are Kore.ai variable placeholders for user data specific to a single session instance.
- UserContext.get(“_id”) – The Kore.ai userId.
- UserContext.get(“emailId”) – The email address associated with the userId.
- UserContext.get(“lastName”) – The last name of the user.
- UserContext.get(“firstName”) – The first name of the user.
- UserContext.get(“profImage”) – The image or avatar filename of the user.
- UserContext.get(“profColor”) – The account color for the user.
- UserContext.get(“activationStatus”) – The account status of the user.
- UserContext.get(“jTitle”) – The title of the user, if defined.
- UserContext.get(“orgId”) – The organizational ID of the user account, if defined.
- UserContext.get(“customData”) – A developer defined custom key.
- UserContext.get(“identities”) – Alternate user IDs, if defined.
Additional session keys may be available depending on how the Bot task is defined and the context of keys available for that task. For more information about session and context keys, see Using Session and Context Variables in Tasks.
Response Keys
Response Keys are parsed directly from your Response Sample text in the API Response tab. Response Keys vary depending on the Response Sample defined.
The following list is an example of Response Keys available for an Asana task.
request.data.workspace request.data.projects request.data.name request.data.notes labels.498346170860 labels.30887755353556 labels["data.workspace"] labels["data.projects"] _tenant_ response.data.id response.data.created_at response.data.modified_at response.data.name response.data.notes response.data.completed response.data.assignee_status response.data.completed_at response.data.due_on response.data.due_at response.data.workspace.id response.data.workspace.name response.data.num_hearts response.data.parent response.data.followers[0].id response.data.followers[0].name response.data.hearted response.data.assignee response.data.projects[0].id response.data.projects[0].name response.data.memberships[0].project.id response.data.memberships[0].project.name response.data.memberships[0].section
Report Keys
Report Keys are Kore.ai variable placeholders that you can use in Report Template Definitions and Bot Responses to show links for additional information in a message that a user can click.
- reportInfo.reportLink – The link defined in the Report Template Definition section for this task.
- reportInfo.reportTitle – The title defined in the Report Template Definition for this task.
Previewing the Response
On the message editor, click Preview to generate a preview of your response using one of the following options:
- Test & Preview – Opens the task setup page for your Bot to define the task settings, authenticate, and then shows a preview of your response generated through your third-party web service, for example, Asana.
- Preview with sample response – Generates the preview using the sample data provided with the key-value pairs defined in the Response Sample section on the API Request tab for the task.
Examples of Custom JavaScript Response
The following examples show response objects using JavaScript to define the Post Title and Post Description sections that display output messages to the end-user when the task response message is sent.
In the following example, the variable labeled desc is only displayed if the value for the caption is defined in the JSON response.
var desc = (caption !== "undefined" ? caption : "")
In the next example, a clickable URL using the task title is displayed in the task response message.
var tasklink = '' + title + '';
In this last example, the link variable depends on the type, either video or photo. Based on the type, the proper link is displayed.
var link = "";
switch (type) {
case "video":
var video = (typeof(video_url) != "undefined") ? video_url : permalink_url;
link = '<video controls><source src ="' + video + '" type="video/mp4"></video>';
break;
case "photo":
link = '<img src="' + image_permalink + '"></img>';
break;
}
You can create custom JavaScript to handle task-specific requirements on the JavaScript tab based on the payload response for the task.
Channel-Specific Bot Response
A task response message may be dependent on the channel that the response message is displayed in, for example, in the Kore.ai Messenger client, an email, or in a text message. By default, the response message that you configure for Default for all Channels is sent to all channels. However, you can define a specific response for one or more of the 20+ supported channels to display to the end-user in that channel instead of the default response.
- To define the response message for a specific channel, click + Add Channel to display the Choose a Channel drop-down list.
- Select a channel, for example, Kore.ai, and then configure the response for that channel on the JavaScript tab.
Only one response can be defined for each channel. The following JavaScript examples show how you can override the Kore.ai default formatting template by channel.
Note: Use the following keys to return default values for:
response.message – Returns the default message as a string.
response.message.choices – Returns the options choice or confirmation message types as an array.
- Slack Channel Override Example
var message = {}; var attachments = []; var attachment = { 'text': "Exception occurred during API execution", 'color': '#FFCC00', 'attachment_type': 'default' }; attachments.push(attachment); message.attachments = attachments; print(JSON.stringify(message)); - FaceBook Channel Override Example
var message = { text: response.message }; var buttons = []; for (var i = 0; i < response.choices.length; i++) { var choiceItem = response.choices[i]; if (choiceItem.length > 20) { choiceItem = choiceItem.substring( 0, 18) + '..'; } var element = { content_type: 'text', title: choiceItem, payload: choiceItem }; buttons.push(element); } message.quick_replies = buttons; print(JSON.stringify(message)); - Email Channel Override Example
var message = {}; var text = response.message + ' <br> '; for (var i = 0; i < response.choices.length; i++) { text = text.concat( '<u> + response.choices[i] + ' < /u> <br>'); } message.text = text; print(JSON.stringify(message)); - SMS Channel Override Example
var message = {};
    var indexArray = ['a', 'b', 'c',
        'd', 'e',
        'f', 'g', 'h', 'i', 'j',
        'k', 'l', 'm', 'n', 'o',
        'p', 'q', 'r', 's', 't',
        'u', 'v', 'w', 'x', 'y',
        'z'
    ];
    var text = response.message + '\\n';
    for (var i = 0; i < response.choices
        .length; i++) {
        text = text.concat(indexArray[i] +
            ') ' + response.choices[
                i] + '\\n');
    }
    message.text = text;
    print(JSON.stringify(message));