ウィジェットSDKチャネルを使用すると、ボットからの情報を表示したり、ボットとのやり取りを可能にしたりするウィジェットをホストできます。
ウィジェットSDKチャネルをボットに追加するには、最初に登録するか、ボットビルダーでアプリを作成する必要があります。アプリを作成するときは、Kore.aiサーバーと安全にコミュニケートするためにアプリケーションの資格情報をプロビジョニングします。アプリを作成したら、ウィジェットSDKチャネルをボットに追加するために、構成でそのアプリ登録を使用できます。ウィジェットSDKチャネルの追加
- ウィジェットSDKチャネルを追加したいボットを開きます。
- ボットメニューで、チャネル>ウィジェットSDKをクリックします。
- 構成タブに移動します。
- アプリの選択ドロップダウンリストで、既存のアプリ登録を選択するか、アプリの作成をクリックして新しいアプリを作成します。

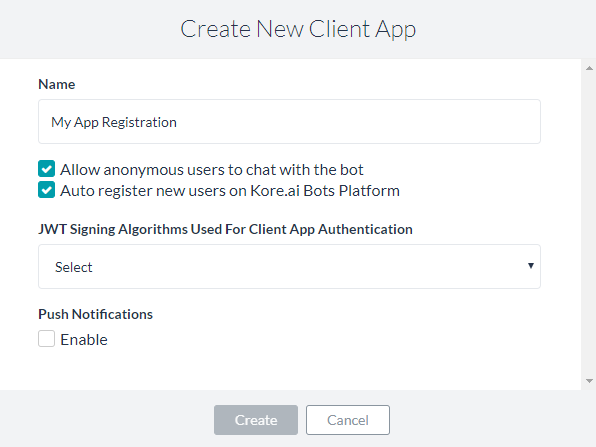
- 名前フィールドに、ボットビルダーで使用されるアプリ登録の名前を入力します(例:My App Registration)。
- アプリのスコープを選択します:
- 匿名ユーザーがボットとチャットできるようにする:匿名ユーザーがボットと対話できるようにします。
- Kore.aiボットプラットフォームに新規ユーザーを自動登録しますユーザーアサーションが不明な場合に、Kore.aiでの自動ユーザー登録を制御する場合に選択します。
- [クライアントアプリ認証に使用されるJWT署名アルゴリズム]プルダウンリストで、次のセキュリティアルゴリズムのいずれかを選択します:
- RS256:パブリックキーフィールドを選択して、有効にします。Kore.aiボットプラットフォームはパブリックキーをクライアントアプリケーションに認証するために使用します。
- HS256: シークレットキーとクライアントIDを生成する場合に選択します。クライアントIDがSDKの初期化には必要であり、Kore.aiボットプラットフォームがクライアントアプリケーションを認証するために使用するシークレット キーです。
- 必要に応じて、プッシュ通知セクションで有効化をクリックし、通知の送信先のURLを指定します。
- 作成をクリックします。アプリ登録の詳細が表示されます。
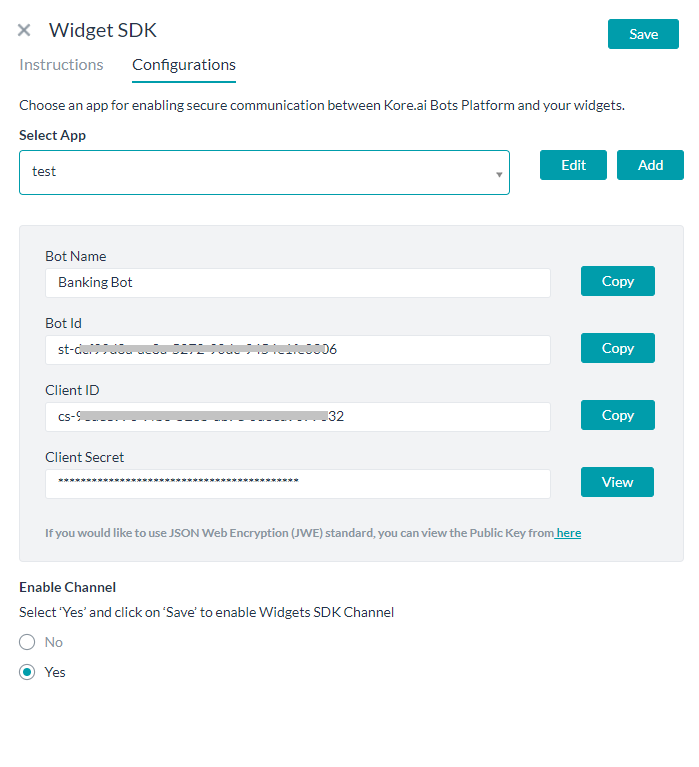
- アプリの登録の詳細をアプリケーションのクリップボードにコピーするには、コピー、ボット名、ボットID、クライアントIDをクリックします。クライアントシークレットで、ビューをクリックし、次いでコピーをクリックします。
- チャネルを有効にするセクションで、はいを選択して、保存直後にチャネルを有効にします。
- 保存をクリックして設定を保存し、ウィジェットSDKチャネルページを閉じます。

“チャネル情報が正常に更新されました”というメッセージがページの右上隅に表示されます。有効にしたら、ボットをウェブアプリケーションにシステム連携するステップについてはこちらをご覧ください。
チャネルの編集
ウィジェットSDKチャネルを編集するには、チャネルカードをクリックするだけです。その他の編集オプションについては、変更するチャネルにマウスを合わせてから、表示される設定![]() アイコンをクリックしてコマンドメニューを表示します。チャネルを変更するには、次のコマンドのいずれかを選択します:
アイコンをクリックしてコマンドメニューを表示します。チャネルを変更するには、次のコマンドのいずれかを選択します:
- 無効化/有効化―無効化をクリックして、ボットのWeb/Mobile Clientチャネルの使用を一時的に無効にします。チャネルが無効になっている場合は、有効化をクリックしてWidget SDKチャネルを使用できるようにします。
- 削除―削除をクリックし、削除の確認ダイアログでOKをクリックして、ボットチャネル構成を完全に削除します。
警告:この操作は永久的で、元に戻す、ことはできません。
Widget SDK 채널을 사용하면 봇의 정보를 보여주고 봇과의 상호 작용을 활성화하는 위젯을 호스팅할 수 있습니다.
봇에 Widget SDK 채널을 추가하려면, 우선 봇 빌더에서 앱을 등록하거나 생성해야 합니다. 앱을 생성하는 경우, 애플리케이션에 인증 정보를 프로비저닝하여 Kore.ai 서버와 안전하게 통신합니다. 앱 생성 후, 설정에서 앱 등록을 사용하여 Widget SDK 채널을 봇에 추가할 수 있습니다. Widget SDK 채널을 추가하려면
- Widget SDK 채널을 추가하고 싶은 봇을 엽니다.
- 봇 메뉴에서, Channel > Widget SDK을 클릭합니다.
- Configurations 탭으로 이동합니다.
- Select App 드롭다운 목록에서, 기존 앱 등록을 선택하거나 Create App을 클릭하여 새 앱을 생성합니다.
- Name 필드에서, 봇 빌더에서 사용한 앱 등록에 대한 이름을 입력합니다(예:My App Registration).
- 앱에 대해 다음과 같은 범위 중 하나를 선택합니다.
- Allow anonymous users to chat with the bot: 익명 사용자가 봇과 상호작용 할 수 있도록 활성화합니다.
- Kore.ai 봇 플랫폼에 새 사용자를 Auto register: 사용자 어설션을 알 수 없는 경우 Kore.ai에서 자동 유저 등록을 제어하려면 선택하세요.
- Algorithms Used For Client App Authentication 드롭다운 목록에서, 다음과 같은 보안 알고리즘 중 하나를 선택합니다.
- RS256: Public Key 필드를 활성화하려면 선택합니다. Public Key는 Kore.ai 봇 플랫폼에서 클라이언트 애플리케이션을 인증하기 위해 사용됩니다.
- HS256: Secret Key 및 Client ID를 생성하려면 선택합니다. Client ID는SDK 초기화를 위해 필요하며, Secret Key는 Kore.ai 플랫폼에서 클라이언트 애플리케이션을 인증하기 위해 사용됩니다.
- 선택적으로, Push Notifications 섹션에서, Enable을 클릭한 후 알림을 보낼 URL을 지정합니다.
- Create를 클릭합니다. 앱 등록 세부정보가 나타납니다.
- 애플리케이션의 클립보드에 앱 등록 세부정보를 복사하려면, Bot Name, Bot ID, Client ID에대해 Copy를 클릭할 수 있습니다. Client Secret의 경우, View를 클릭한 후 Copy를 클릭합니다.
- Enable Channel 섹션 에서, Yes를 선택하여 채널을 저장 후 즉시 사용합니다.
- Save을 클릭하여 설정을 저장하고 Widget SDK Channel 페이지를 닫습니다.
Channel Information updated successfully 메시지가 페이지의 오른쪽 상단에 표시됩니다. 사용 가능으로 일단 설정되면 웹 애플리케이션에서 봇을 통합하기 위한 단계는 see here하세요.
채널 편집
Widget SDK 채널을 편집하려면, 채널 카드를 클릭하기면 하면 됩니다. 더 많은 편집 옵션을 위해서는, 수정하기 위해 채널 위로 마우스를 이동한 후 Settings ![]() 아이콘을 클릭하여 명령 메뉴를 표시합니다. 채널을 수정하려면 다음과 같은 명령 중 하나를 선택하세요.
아이콘을 클릭하여 명령 메뉴를 표시합니다. 채널을 수정하려면 다음과 같은 명령 중 하나를 선택하세요.
- Disable/Enable – Disable을 클릭하여 봇의 웹/모바일 클라이언트 채널 사용을 일시적으로 비활성화합니다. 채널이 사용하지 않음으로 설정된 경우, Enable을 클릭하여 Widget SDK 채널 사용을 사용함으로 설정합니다.
- Delete – Delete를 클릭한 후 Delete Confirmation 대화창의 OK를 클릭하여 봇 채널 설정을 영구적으로 삭제합니다.
경고: 이 작업은 영구적이므로 취소할 수 없습니다.
Leave a Reply
Widgets SDK channel allows you to host widgets for presenting information from your bots and enabling interaction with your bots.
To add the Widget SDK Channel to your bot, you must first register, or create an app in Bot Builder. When you create an app, you are provisioning credentials for you application to communicate securely with Kore.ai servers. After you create an app, you can use that app registration in the configuration to add the Widget SDK Channel to your Bot.
To add the Widget SDK channel
- Open the bot to which you want to add the Widget SDK channel.
- On the bots menu, click Channel > Widget SDK.
- Navigate to Configurations tab.
- In the Select App drop-down list, select your existing app registration or click Create App to create a new app.
- In the Name field, enter the name for the app registration used in Bot Builder, for example, My App Registration.
- Select one of these scopes for the app:
- Allow anonymous users to chat with the bot: enables anonymous users to interact with the bot.
- Auto register new users on Kore.ai Bots Platform: Select to control the auto-user registration in Kore.ai if the user assertion is unknown.
- In the JWT Signing Algorithms Used For Client App Authentication drop-down list, select one of the following security algorithms:
- RS256: Select to enable the Public Key field. The Public Key is used by the Kore.ai Bots Platform to authenticate the client application.
- HS256: Select to generate a Secret Key and a Client ID. The Client ID is required for SDK initialization, and the Secret Key used by the Kore.ai Bots Platform to authenticate the client application.
- Optionally, In the Push Notifications section, click Enable and then specify a URL to send the notifications to.
- Click Create. The app registration details appear.
- To copy the app registration details to the clipboard for your application, you can click Copy for Bot Name, Bot ID, and Client ID. For Client Secret, click View, and then click Copy.
- In the Enable Channel section, select Yes to enable the channel immediately after saving.
- Click Save to save the settings and close the Widget SDK Channel page.
The Channel Information updated successfully message is displayed on the top-right corner of the page.
Once enabled see here for steps to integrate your Bot at your web application.
Editing the Channel
To edit the Widget SDK channel, just click on the Channel card.
For more edit options, hover your mouse over the channel to modify, and then click the Settings ![]() icon displayed to show the command menu.
icon displayed to show the command menu.
Select one of the following commands to modify the channel:
- Disable/Enable – Click Disable to temporarily disable use of the Web/Mobile Client channel for your Bot. When the channel is disabled, click Enable to enable use of the Widget SDK channel.
- Delete – Click Delete, and then click OK in the Delete Confirmation dialog to permanently delete the Bot channel configuration.
Warning: This operation is permanent, and cannot be undone.