Kore.ai 봇에 Twilio Voice 채널을 추가하려면, Twilio 전화번호를 얻고 Webhook 통합을 설정하여 봇과 통신해야 합니다. Kore.ai 봇에 Twilio Voice 채널을 추가하여 최종 사용자가 그들의 Twilio Voice 계정을 사용하여 봇과 상호작용할 수 있습니다. 봇에 Twilio Voice 채널을 추가하려면, 다음을 수행해야 합니다.

  1. Get a Twilio Number – Twilio Voice 채널을 활성화하려면, Twilio 전화번호를 생성하여 이 봇과 연결합니다.
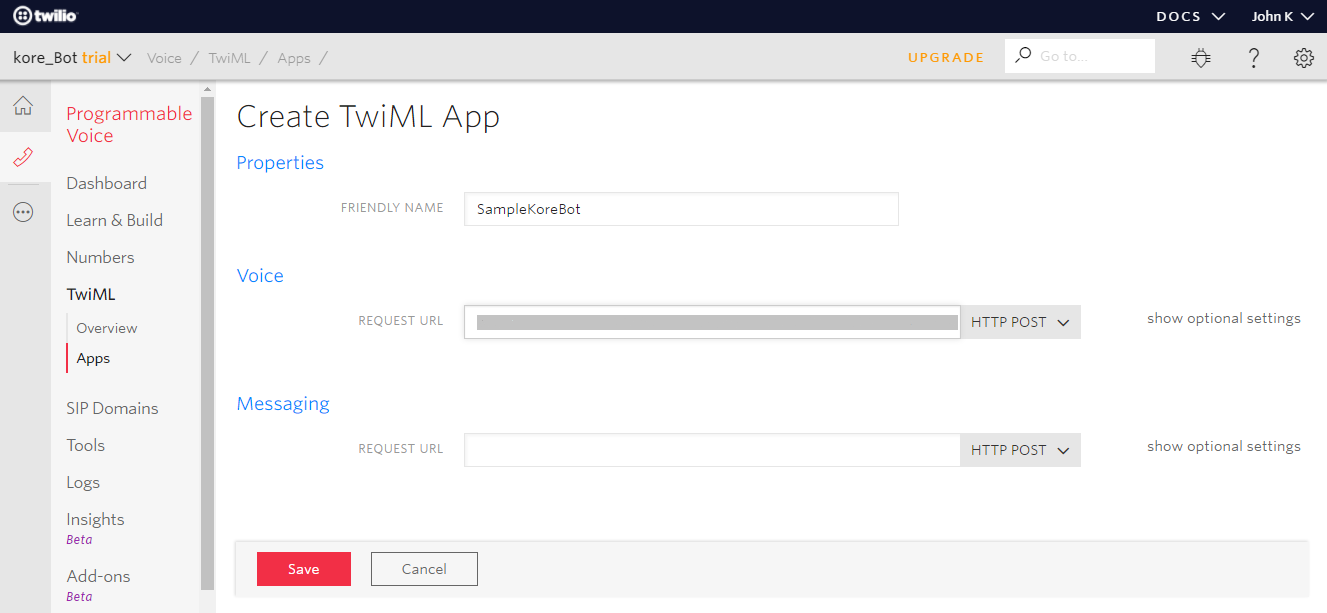
  2. Set Up Integration – 통합을 설정하려면, TwiML 앱을 생성하고 Twilio Voice 채널 페이지의 Configurations 탭에서 Webhook URL 세부 정보를 얻어 Voice의 Request URL에 입력하여 채널을 활성화합니다.
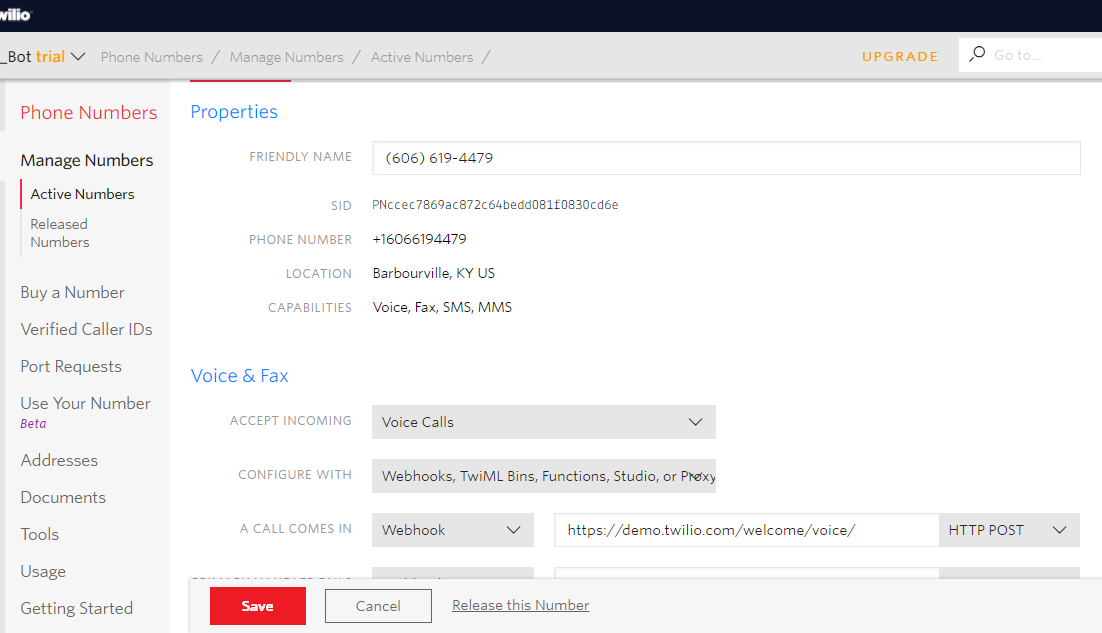
  3. Associate TwiML App with Twilio Phone Number – TwiML 앱과 Wilio 전화번호를 연결하려면, TwiML 앱에 선호하는 활성 Twilio 번호를 설정합니다.
  4. Optional Configuration to Set Up Agent – 에이전트 전송 기능을 사용하려면, Kore.ai 에이전트 전송 SDK를 설정합니다.
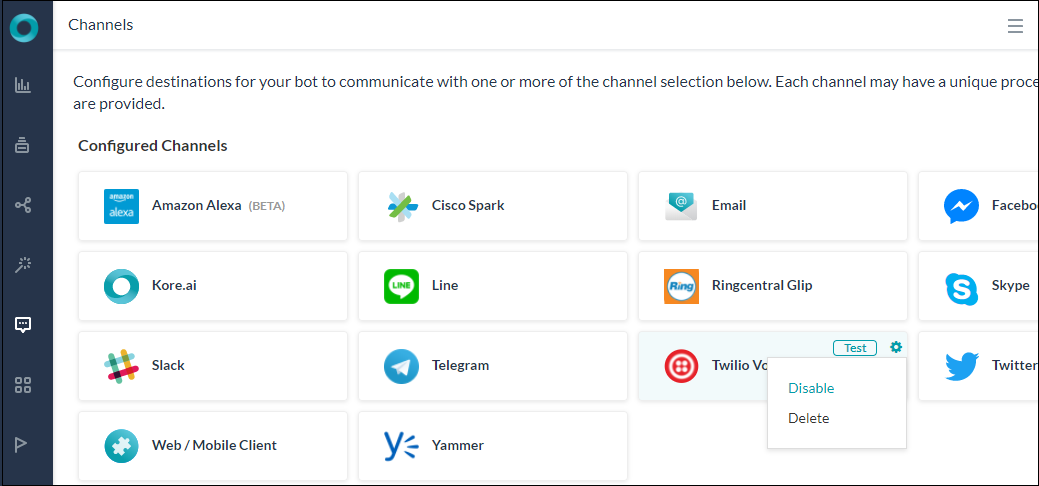
  5. Enable Channel – 일단 통합을 설정하고 설정을 완료해 채널을 활성화합니다.
참고 사항: Twilio Voice는 음성 기반 채널에서 작동하도록 특별히 제작된 봇에서 활성화되어야 합니다. Twilio Voice를 봇의 채널로 사용하기 전에 다음 제약 조건을 검토하세요:

  1. 봇과 통신하는 데 사용자 권한이 필요한 엔터프라이즈 봇은 Twilio Voice에서 지원되지 않습니다.
  2. 외부 시스템과 통신하는 데 사용자 권한이 필요한 작업은 포함되지 않아야 합니다.
  3. Webhook 노드는 비동기식으로 작동하지만 Twilio Voice에서는 현재 지원되지 않습니다.
  4. Twilio Voice 채널에서 최상의 사용자 경험을 위해 대화 상자 작업만 사용하세요.
  5. Twilio Voice에 설정할 봇 응답이 간단한 일반 텍스트 메시지인지 확인하세요.
  6. 사용자 측에서 잠시 정적이 있고 난 뒤 봇이 Twilio Voice에서 사용자 음성 응답을 수신하며 이는 최종 사용자에게 지연으로 나타날 수 있습니다.

전제 조건

  1. Log in to your Twilio Voice account하여 봇과 연결하기 위한 신규 Twilio 번호를 생성합니다.
  2. Twilio 번호를 얻으려면:
    1. Products and Services 메뉴로 이동하고 Phone Numbers를 선택합니다.
    2. 이 봇과 연결할 새 Twilio 전화번호를 생성하세요. 이미 이 봇과 연결할 Twilio 전화번호가 있는 경우 다음 단계로 진행할 수 있습니다. Twilio 계정 유형에 따라 이미지가 변경될 수 있습니다.
  3. 통합(integration) 설정:
    1. Phone Numbers 메뉴의 Tools 섹션으로 이동합니다.
    2. TwiML Apps을 선택하고 새 TwiML 앱을 생성합니다.
    3. 앱의 이름을 입력하고 Twilio 음성 채널의 페이지의 Configurations 탭에 있는 Webhook URL을 복사하여 Voice의 Request URL에 입력합니다.
    4. Save를 클릭하여 앱 생성을 완료합니다.
  4. TwiML 앱을 Twilio 전화번호와 연결하려면:
    1. Phone Numbers 아래의 Manage Numbers 메뉴로 이동합니다.
    2. Active Numbers 섹션에서 TwiML App을 연결할 번호를 선택합니다.
    3. Voice & Fax 섹션의 Configure With필드에서 TwiML App을 선택합니다.
    4. 새 필드 TWIML APP이 표시됩니다. 이전 단계에서 설정한 앱을 선택합니다.
    5. Save를 클릭하여 앱 연결을 완료합니다.
  5. 선택적으로, Agent Transfer 기능으로 사용자 통화 대화를 다른 Twilio 번호로 전송하도록 또한 설정할 수 있습니다. 이를 위해서는, Kore.ai Agent Transfer를 설정해야 합니다.
    1. Kore.ai GitHub 저장소에서 Agent Transfer를 다운로드하고 data.message, transferCallToAgentagentPhonenumber 매개 변수를 정의하세요
      • data.message: call is transferred to agent가 시작될 때 최종 사용자가 읽을 메시지를 정의합니다.
      • transferCallToAgent: 에이전트 전송을 활성화하려면 이 플래그를 True로 설정하고 그렇지 않으면 False로 설정합니다.
      • agentPhonenumber: 사용자 통화 대화를 전달할 Twilio 전화번호를 입력합니다.

Twilio Voice 채널 사용함

Twilio Voice 채널을 활성화하려면 다음 단계를 따르세요.

  1. 봇 빌더의 Bots 섹션에서, Twilio Voice 채널을 추가하려는 봇을 클릭하세요.
  2. Channels 탭에서, Twilio Voice 아이콘을 클릭하세요. Twilio Voice Channel 페이지가 표시됩니다.
  3. 채널 설정을 마치려면, Configurations 탭으로 이동합니다.
    1.  Kore.ai 봇과 연결할 Twilio 번호를 입력합니다.
    2. 최종 사용자가 봇으로 통신할 Language를 선택합니다.
    3. Enable Channel 섹션에서, Yes를 선택한 후 Save을 클릭하여 사용자 생성 절차와 채널 활성화를 완료합니다.
  4. Voice Call Properties 탭에서, 세부 정보를 입력하여 채널 레벨 음성 속성을 설정합니다. click here for more details.
  5. Twilio 채널을 활성화하면, 음성 호출 설정을 위해 Telephony Welcome Event를 설정하는 것이 좋습니다. 이것은 Twilio 채널을 통해 사용자가 봇에 연결할 경우 환영 메시지를 재생합니다. 이를 위해:
    1. Natural Language > Default Conversation > Event Handlers 에서 Telephony Welcome Event 설정.
    2. Use Voice Call Properties을 클릭하여 음성 통화 설정 섹션을 엽니다.
    3. Initial Prompts 텍스트 상자에서, 봇에 사용자가 연결할 경우 재생되어야 하는 메시지를 입력합니다.
    4. 기타 설정 필드에 관한 자세한 내용은 Configuring Voice Call Settings for a Node 섹션을 참조하세요.

Twilio Voice 채널 편집

Twilio Voice 채널을 편집하려면 다음 단계를 따르세요.

  1. 수정하려면 채널로 마우스를 이동한 후 Settings 아이콘을 클릭하여 다음 이미지에 보이는 것과 같이 명령 메뉴를 표시합니다. 채널을 수정하려면 다음과 같은 명령 중 하나를 선택하세요.
  • Disable/EnableDisable을 클릭하여 봇의 Twilio Voice 사용을 일시적으로 비활성화하세요. Twilio Voice 채널 사용을 활성화하려면, Enable을 클릭하세요.
  • DeleteDelete를 클릭하세요. 삭제 확인 대화 상자에서, OK를 클릭하여 봇 채널 설정을 영구적으로 삭제합니다.
경고: 이 작업은 영구적이므로 취소할 수 없습니다.

To add Twilio Voice as a channel to your Kore.ai bot, you must get a Twilio phone number and set up webhook integration to communicate with the bot. Adding the Twilio Voice channel to your Kore.ai bot allows end users of your bot to interact with your bot using their Twilio Voice accounts. To add the Twilio Voice channel to your bot, you must:

  1. Get a Twilio Number – To enable Twilio Voice channel, create a Twilio phone number to associate with this bot.
  2. Set Up Integration – To set up the integration, create a TwiML App and get Webhook URL details from Configurations tab of Twilio Voice channel page to enter it in the Request URL for Voice to activate the channel.
  3. Associate TwiML App with Twilio Phone Number – To associate TwiML App with Twilio Phone Number, configure your preferred active Twilio number with TwiML App.
  4. Optional Configuration to Set Up Agent Transfer – To use Agent Transfer functionality, set up the Kore.ai Agent Transfer SDK.
  5. Enable Channel – Once you set up the integration and complete configuration, enable the channel.

Note: Twilio Voice must be enabled for bots that are specifically built to work on voice-based channels. Review the following constraints before enabling Twilio Voice as a channel for this bot:

  1. Enterprise bots that require user’s authorization to communicate with the bot are not supported on Twilio Voice.
  2. Tasks that require user’s authorization to communicate with external systems must not be included.
  3. Webhook Nodes work asynchronously and are currently not supported on Twilio Voice.
  4. Use only dialog tasks for best user experience on Twilio Voice channel.
  5. Ensure that the bot responses you configure for Twilio Voice are brief, plain text messages only.
  6. Bot receives user’s voice response from Twilio Voice only after few moments of silence at user’s end and this can appear as a lag to the end-user.

Prerequisites

  1. Log in to your Twilio Voice account to create a new Twilio number to associate with your bot.
  2. To get a Twilio Number:
    1. Go to the Products and Services menu and select Phone Numbers.
    2. Create a new Twilio phone number to associate with this bot. If you already have a Twilio phone number that you want to associate with this bot, then you can proceed to the next steps.
      Note that the image may change depending on your Twilio account type.
  3. To set up the integration:
    1. Go to the Tools section of the Phone Numbers menu.
    2. Select TwiML Apps to create a new TwiML App.
    3. Enter a name for the app and copy the Webhook URL from the Configurations tab of the Twilio Voice Channel page and enter in the Request URL for Voice.
    4. Click Save to complete the app creation.
  4. To associate TwiML App with Twilio Phone Number:
    1. Go to the Manage Numbers menu under Phone Numbers.
    2. From Active Numbers section, select the number you want to associate the TwiML App.
    3. Under Voice & Fax section, select TwiML App as the choice in Configure With field.
    4. A new field TWIML APP is displayed. Select the app you have configured in the previous steps.
    5. Click Save to complete this app association.
  5. Optionally, you can also set up Agent Transfer functionality to transfer the user’s call conversation to another Twilio number. For this, you must configure the Kore.ai Agent Transfer SDK.
    1. Download the Agent Transfer SDK from the Kore.ai GitHub repository and define data.message, transferCallToAgent and agentPhonenumber parameters.
      • data.message: Define the message to be read out to the end-user when the call is transferred to agent is initiated.
      • transferCallToAgent: Set this flag to True to enable Agent Transfer and False to disable.
      • agentPhonenumber: Provide your Twilio phone number to which the user call conversation is transferred.

Enable Twilio Voice Channel

To enable the Twilio Voice Channel, follow the below steps:

  1. In the Bots section of the Bot Builder, click the bot you want to add to the Twilio Voice channel.
  2. On the Channels tab, click the Twilio Voice icon. The Twilio Voice Channel page is displayed.
  3. To complete the Channel setup, go to the Configurations tab.
    1.  Enter your Twilio Number to associate with the Kore.ai bot.
    2. Select a Language to communicate with the bot by end-users.
    3. In the Enable Channel section, select Yes, and then click Save to complete the user creation process and channel activation.
  4. From the Voice Call Properties tab,  enter the details to configure the channel level voice properties, click here for more details.
  5. Once you have enabled the Twilio channel, it is recommended to configure the Telephony Welcome Event for Voice Call Settings. This plays a welcome message for users when they connect to the bot through the Twilio channel.
    For this:

    1. From Natural Language > Default Conversation > Event Handlers configure Telephony Welcome Event.
    2. Click Use Voice Call Properties to open the Voice Call settings section.
    3. Under the Initial Prompts text box, enter the message that needs to be played when the user connects to the bot.
    4. For details regarding other configuration fields, refer to the Configuring Voice Call Settings for a Node section.

Edit Twilio Voice Channel

To edit the Twilio Voice channel, follow the below steps:

  1. Hover over the channel to modify and click the Settings icon to display the command menu as shown in the following image.

    Select one of the following commands to modify the channel:
  • Disable/Enable – Click Disable to temporarily disable the use of the Twilio Voice for your bot. To enable the use of the Twilio Voice channel, Click Enable.
  • Delete – Click Delete. On the Delete Confirmation dialog box, click OK to permanently delete the bot channel configuration.
Warning: This operation is permanent and cannot be undone.