대화 테스트를 사용하면 엔드투엔드 대화형 흐름을 시뮬레이션하여 대화 작업을 평가하거나 회귀 테스트를 수행할 수 있습니다. 테스트 케이스를 만들어 다양한 비즈니스 시나리오를 캡처한 후 나중에 실행하여 봇의 성능을 검증할 수 있습니다. 

테스트 케이스

테스트 케이스는 대화형 흐름을 캡처하는 일련의 테스트 단계로 구성됩니다. 각 테스트 단계는 단계 번호, 테스트 입력, 예상 출력, 실제 출력, 테스트 결과의 조합입니다.  단계#는 실행 순서를 정의합니다.  테스트 입력은 대화의 사용자 메시지 부분을 나타냅니다.  예상 출력은 봇에서 예상되는 봇 메시지를 나타냅니다. 실제 출력은 테스트 실행 중 봇의 응답을 나타냅니다. 플랫폼은 실제 출력을 예상 출력과 비교하여 평가하고 테스트 단계의 통과 여부를 결정합니다.  테스트 결과는 실제 출력이 예상 출력과 동일한지 여부를 나타냅니다. 테스트 결과는 통과, 실패, 또는 실행되지 않음일 수 있습니다.

테스트 케이스 생성 

새 테스트 케이스는 ‘봇과 대화’를 사용하는 동안 대화를 기록하여 생성할 수 있습니다. 새 테스트 케이스를 생성하려면 다음 단계를 따르세요. 

1단계: 화면의 오른쪽 하단 모서리에 있는 아이콘을 클릭하여 ‘봇과 대화’를 시작합니다. ‘봇과 대화’는 플랫폼의 모든 모듈에서 실행할 수 있습니다.

2단계: ‘대화 기록’을 클릭하여 테스트 케이스의 일부가 될 메시지의 기록을 시작합니다. 

3단계: 관련 사용자 메시지를 입력하여 봇과 인터렉션합니다.

4단계: 새 테스트 케이스를 생성하려면, ‘기록 중지’를 클릭한 다음 ‘테스트 케이스 생성’을 클릭합니다.

5단계: 다음 화면에서, ‘테스트 케이스 이름’, ‘설명’ 및 ‘태그’와 같은 필요한 세부 정보를 추가하고 ‘추가’를 클릭합니다.

6단계: 대화 테스트 모듈로 이동하여 추가된 테스트 케이스를 실행하거나 동일한 단계를 수행하여 다른 테스트 케이스를 추가합니다. 

태그

태그는 테스트 케이스를 분류하고 정리하는 데 도움이 됩니다. 테스트 케이스 생성 시 또는 테스트 케이스 속성의 ‘일반 설정’에서 태그를 추가할 수 있습니다.

일반 설정

 테스트 케이스가 생성된 후, 오버플로 메뉴의 ‘일반 설정’에 액세스할 수 있습니다. 일반 설정에는 편집 가능한 속성이 몇 가지 있으며 보기 전용 속성이 일부 있습니다.

다음 속성을 편집할 수 있습니다.

  • 테스트 케이스 이름
  • 테스트 케이스 설명
  • 테스트 케이스 태그

또한, 다음 속성을 볼 수는 있지만 편집할 수는 없습니다.

  • 테스트 케이스 생성 날짜 및 시간
  • 테스트 케이스를 생성한 사용자의 이름
  • 마지막으로 업데이트한 날짜 및 시간
  • 테스트 케이스를 마지막으로 업데이트한 사용자의 이름

테스트 케이스 실행

다음 단계에서는 테스트 케이스 실행 방법 및 실행에 따른 자세한 분석 보고서를 얻는 방법을 안내합니다.  1단계: 실행하려는 테스트 케이스를 선택합니다. 2단계: ‘테스트 케이스 실행’을 클릭하여 실행을 시작합니다.  3단계: 그런 다음, 테스트하려는 봇의 버전을 선택해야 합니다. 선택한 버전에 따라, 봇이 테스트 케이스의 일부가 될 서비스 호출을 수행하기 위해 유효한 권한 부여 토큰이 있는지 확인합니다.  4단계: 마지막 결과 열에서 테스트 케이스의 실행 및 상태 도커의 진행 상황을 모니터링할 수 있습니다.  5단계: 테스트 케이스 실행이 끝나면, 테스트 케이스를 클릭하여 실행 기록을 볼 수 있습니다.  6단계: 나열된 테스트 실행 중 하나를 클릭하여 테스트 실행에 대한 세부 정보를 봅니다.  테스트 케이스는 비동기로 실행됩니다. 즉, 여러 테스트 케이스를 선택한 경우에도, 순차적으로 실행됩니다. 실행이 완료되기 전에 테스트 실행을 취소할 수 있습니다.  테스트 케이스 실행이 시작되면, 플랫폼은 하나 이상의 테스트 단계가 실패한 경우에도 테스트 케이스를 계속 실행합니다. 그러나, 테스트 실행이 60초 이상 테스트 단계에서 멈추면 플랫폼은 시간 초과로 실행을 중단하게 됩니다. 

테스트 결과 해석하기

모든 테스트 실행에 대한 다음의 세부 정보는 저장됩니다. 

  • 실행 완료 날짜 및 시간.
  • 테스트 케이스가 개발 중인 버전의 봇 또는 게시된 버전의 봇에 대해 실행되었는지 여부를 나타내는 버전 유형. 
  • 실행 결과를 나타내는 실행 결과. 테스트 케이스는 테스트 단계 중 적어도 하나가 실패한 경우 실패한 것으로 처리됩니다. 
  • 실행 시간은 총 실행 기간을 나타냅니다. 
  • 테스트 단계 세부 정보는 통과, 실패 또는 실행되지 않은 단계를 나타냅니다. 
  • 실행 오류 세부 정보는 사용자가 테스트 케이스를 중단하거나 오류로 인해 테스트 단계가 시간 초과되어 테스트 실행을 완료할 수 없는 경우에만 표시됩니다. 

제한

다음 모듈은 현재 버전의 대화 테스트로 테스트할 수 없습니다. 

  • 디지털 양식
  • 콘텐츠 변수 또는 컨텍스트 변수가 사용되는 동적으로 생성된 봇 메시지.

Test Runner 도구

기록된 테스트 케이스를 JSON으로 다운로드할 수 있습니다. 이 JSON 파일은 Kore Github 저장소에서 제공하는 Test Runner와 함께 사용하여 동일한 대화로 봇을 테스트할 수 있습니다. 이 도구는 브랜치를 포크하고 요구 사항에 따라 변경을 수행할 수 있는 오픈 소스 코드입니다. 핵심 포인트

  • 봇과 대화하는 동안 언제든지 기록을 시작하거나 중지할 수 있습니다.
  • 전체 대화는 테스트 케이스로 저장됩니다.
  • 테스트 케이스를 나누어 테스트 스위트를 생성하려는 경우, 대화 중에 “모두 지우기” 명령어를 사용하여 달성할 수 있습니다. “모두 지우기” 전의 대화는 테스트 케이스로 저장되고 이후 대화는 다른 테스트 케이스로 저장됩니다. 두 테스트 케이스 모두 테스트 스위트 형태로 단일 파일로 저장됩니다. 요구 사항에 따라 필요한 만큼의 테스트 케이스로 대화를 나눌 수 있습니다.
  • 전체 대화는 JSON 파일에 저장되며 기록이 끝나면 다운로드할 수 있습니다.

테스트 도구는 JSON 파일의 사용자 입력을 사용하여 봇과 대화하고 봇 응답과 기록된 봇 응답을 비교합니다. 결과는 테스트 결과 스프레드시트에 기록되며, 개발자 입력과 실제 결과 및 예상 결과, 테스트 실행 상태(통과 또는 실패)를 포함한 테스트 실행에 대한 종합적인 보고서를 제공합니다. 이 스프레드시트를 사용하여 실패한 테스트 케이스를 보고하고, 추적하고, 다시 테스트할 수 있습니다. Test Runner에 대한 자세한 내용은 Kore Github를 참조하세요.

会話テストでは、エンドツーエンドの会話フローをシミュレーションして、ダイアログタスクの評価やリグレッションを行うことができます。さまざまなビジネスシナリオをキャプチャするために、テストケースを作成し、さらに後の時点でそれらを実行してボットのパフォーマンスを検証することができます。 

テストケース

テストケースは、会話フローをキャプチャする一連のテストステップで構成されています。テストステップはそれぞれ、ステップ番号、テスト入力、想定出力、実際の出力、テスト結果などの組み合わせになります。 ステップ#は、実行の順序を定義します。 テスト入力は、会話の中のユーザーメッセージ部分を表しています。 想定出力は、ボットから予測されるボットメッセージを表します。 実際の出力は、テスト実行中におけるボットの応答を表します。プラットフォームは、想定出力に対する実際の出力を評価して、テストステップが合格するかどうかを決定します。 テスト結果は、実際の出力が想定出力と同じであるかどうかを示します。テスト結果は、合格、不合格、不実施のいずれかです。

テストケースの作成 

新しいテストケースは、ボットと会話を使用しながら、会話を記録することにより作成することができます。以下の手順で、新しいテストケースを作成します。 ステップ1:画面右下のアイコンをクリックして「ボットと会話」を起動します。「ボットと会話」は、プラットフォーム上のいずれのモジュールからでも起動できます。

ステップ2:「会話の記録」をクリックすると、テストケースの一部となるメッセージの記録が始まります。

ステップ3:関連するユーザーメッセージを入力して、ボットと対話します。
ステップ4:新しいテストケースを作成するには、「記録停止」をクリックしてから「テストケースの作成」をクリックします。
ステップ5:次画面において、「テストケース名」、「説明」、「タグ」など必要情報を追加して、「追加」をクリックします。

ステップ6:会話テストモジュールに移動して、追加したテストケースを実行するか、または同じ手順で別のテストケースを追加します。 

タグ

タグは、テストケースを分類して整理するのに役立ちます。タグの追加は、テストケースの作成時に行うか、テストケースのプロパティの「一般設定」から行うかを選択できます。

一般設定

 テストケースを作成した後、オーバーフローメニューから「一般設定」にアクセスできます。一般設定には、いくつかの編集可能なプロパティおよびわずかな表示専用のプロパティがあります。

以下のプロパティに編集するオプションがあります。

  • テストケース名
  • テストケースの説明
  • テストケースのタグ

さらに、以下のプロパティを表示はできますが、編集はできません。

  • テストケース作成の日時
  • テストケースを作成したユーザーの名前
  • 直近の更新日時
  • テストケースを直近に更新したユーザーの名前

テストケースの実行

以下の手順で、テストケースを実行する方法、および実行に基づいた詳細な分析レポートを取得する方法について説明します。 ステップ1:実行したいテストケースを選択します。ステップ2:「テストケースの実行」をクリックして、実行を開始します。 ステップ3:次に、テストしたいボットのバージョンを選択する必要があります。選択したバージョンに基づいて、テストケースの一環としてのサービスコールを行うボットに対する有効な認証トークンがあることをご確認ください。 ステップ4:テストケースとステータスドッカーに対する最終結果の列から、進捗状況を監視することができます。 ステップ5:テストケースの実行が終わると、そのテストケースをクリックして実行履歴を表示することができます。 ステップ6:リストアップされたテスト実行のうちからいずれかをクリックすると、そのテスト実行の詳細が表示されます。 テストケースは非同期に実行されています。つまり、複数テストケースが選択されているときでも、実行は順番に行われています。テストの実行が完了する前に、実行をキャンセルするオプションがあります。 テストケースの実行が開始されると、1つ以上のテストステップが不合格であっても、プラットフォームはテストケースを実行し続けます。しかし、テストの実行が1つのテストステップで60秒以上停止したままになると、プラットフォームはタイムアウトし、実行を中止します。 

テスト結果の解釈

すべてのテスト実行に対して、以下の詳細が保存されます。

  • 実行完了の日時。
  • テストケースがボット開発中のバージョン、あるいは公開済みのバージョンのどちらに対して実行しているかを示すバージョンタイプ。 
  • 実行の結果を示す「実行結果」です。テストステップが少なくとも1つ不合格であれば、テストケースは不合格として扱われます。 
  • 実行時間は、実行の合計時間を示します。 
  • テストステップの詳細は、合格、不合格、または未実行のステップの合計を表します。 
  • 実行エラーの詳細は、ユーザーがテストケースを中止したか、テストステップがエラーによりタイムアウトしたために、プラットフォームがテスト実行を完了できなかった場合にのみ表示されます。 

制限事項

以下のモジュールは、現在のバージョンの会話テストではテストできません。 

  • デジタルフォーム
  • コンテンツやコンテキスト変数を使用して動的に生成されるボットメッセージ。

ランナーツールのテスト

記録したテストケースをJSONとしてダウンロードするオプションがあります。このJSONファイルは、同じ会話でボットをテストするために、Kore Githubリポジトリで提供されているテストランナーで使用することができます。このツールは、ブランチをフォークして要件に応じて変更できるオープンソースコードであることに注意してください。キーポイント

  • ボットとの会話中、いつでも記録を開始および停止することができます。
  • 会話全体がテストケースとして保存されます。
  • テストケースを分割してテストスイートを作成したい場合は、会話中に“discard all”コマンドを使用して、実現できます。“discard all”以前の会話をテストケースとして保存すると、その後の会話は別のテストケースとなります。両方のテストケースは、テストスイートとして1つのファイルに保存されます。必要に応じて、会話をいくつものテストケースに分割することができます。
  • 会話全体はJSONファイルに格納されていますので、記録を終了したあとは、ダウンロードすることができます。

テストツールは、JSONファイルからのユーザー入力を用いてボットと会話し、ボットレスポンスと記録されたボットレスポンスを比較します。結果は、テスト結果スプレッドシートに記録され、開発者の入力、実際の結果と想定結果、テスト実行のステータス(合格または不合格)など、テスト実行の総合的レポートが提供されます。このスプレッドシートを使用して、不合格となったテストケースの報告、記録、再テストを行うことができます。テストランナーの詳細については、Kore Githubをご参照ください。

Conversation Testing enables you to simulate end-to-end conversational flows to evaluate the dialog task or perform regression. You can create Test Cases to capture various business scenarios and run them at a later point in time to validate the performance of the bot. 

Test Cases

Test Cases consist of a sequence of Test Steps that capture the conversational flow. Each Test Step is a combination of Step Number, Test Input, Expected Output, Actual Output, and Test Result. 

Step# defines the sequence of execution. 

Test Input represents the user message part of the conversation. 

Expected Output represents the bot message that is anticipated from the bot.

Actual Output represents the response of the bot during test execution. The platform will evaluate the Actual Output against the Expected Output to determine if a test step is passed or not. 

Test Result indicates if the actual output is the same as the expected output. Test Result can be Pass, Failed, or Not Executed.

Test Case Creation 

New Test Cases can be created by recording the conversation while using ‘Talk to Bot’. Follow the following steps to create a new test case. 

Step 1: Launch ‘Talk to Bot’ by clicking on the icon in the bottom right corner of your screen. ‘Talk to Bot’ can be launched from any module on the platform. 

Step 2: Click on ‘Record Conversation’ to start recording the messages that are going to be part of the test case. 

Step 3: Interact with the bot by entering relevant user messages. 

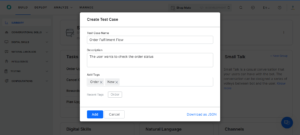
Step 4: To create a new test case, click on ‘Stop Recording’ and then click on ‘Create Test Case’. 

Step 5: In the next screen, add the necessary details such as ‘Test Case Name’, ‘Description’ and ‘Tags’ and click on ‘Add’.

Step 6: Navigate to the Conversation Testing module to execute the added test case or add another test case by following the same steps. 

Tags

Tags help in classifying and organizing test cases. You can choose to add a tag at the time of the creation of a test case or from the ‘General Settings’ under the Test Case properties.

General Settings

 After a test case is created, you can access the ‘General Settings’ from the overflow menu. The General Settings has a few editable and few view-only properties.

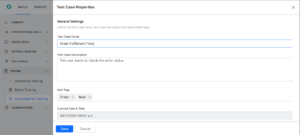
You have the option to edit the following properties.

  •       Test Case Name
  •       Test Case Description
  •       Test Case Tags

Additionally, the following properties can be viewed but not edited.

  •       Date & Time of Test Case Creation
  •       Name of the User who created the Test Case
  •       Date & Time of the last update
  •       Name of the user who last updated the test case

Test Case Execution

The following steps will guide you on how to execute a test case and obtain a detailed analytical report based on the execution. 

Step 1: Select the Test Cases that you would like to execute.

Step 2: Click on ‘Run Test Case’ to start the execution. 

Step 3: Next, you are required to choose the Version of the Bot that you want to test. Based on the version selected, please ensure that you have valid authorization tokens for the bot to make the service calls that would be part of the test case. 

Step 4: You can monitor the progress of the execution from the last result column against the test case and the status docker. 

Step 5: Once the test case execution is over, you can click on the test case to view the execution history. 

Step 6: Click on any of the listed test runs to view the details of the test run. 

Test Cases are executed asynchronously i.e. even when multiple test cases are selected, the execution happens sequentially. You have the option to cancel the test execution before the execution is completed. 

Once the test case execution has started, the platform continues to execute the test case even when one or more test steps fail. However, if the test execution is stuck at a test step for more than 60s the platform will timeout and abort the execution. 

Interpreting Test Results

The following details are stored against every test execution. 

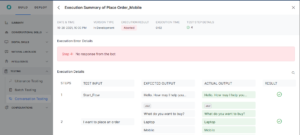
  • Date & Time of Execution completion.
  • Version Type to indicate if the test case was run against the In-development or the Published version of the bot. 
  • Execution Result to indicate the result of the execution. A test case is treated as failed if at least one of the test steps is failed. 
  • Execution Time indicates the total time duration of the execution. 
  • Test Step Details represent the total steps that were passed, failed, or not executed. 
  • Execution Error Details are shown only when the platform is unable to complete the test execution either because of the user aborting the test case or the test step timing out due to an error. 

Limitations

The following modules cannot be tested with the current version of conversation testing. 

  • Digital Forms
  • Dynamically generated bot messages where content or context variables are used.

Test Runner Tool

You have an option to download the recorded test cases as JSON. This JSON file can be used with the Test Runner provided at the Kore Github repository to test the bot with the same conversation. Note that this tool is an open-source code that you can fork a branch and make changes as per your requirements.

Key Points

  • You can start and stop the recording anytime during your conversation with the bot.
  • The entire conversation is saved as a Test Case.
  • In case you want to split the Test Cases and generate a Test Suite, you can achieve it using “discard all” command during the conversation. The conversation before “discard all” is saved as a test case and the conversation after is another test case. Both the test cases will be saved as a single file as Test Suite. You can split the conversation into as many test cases as per your requirement.
  • The entire conversation is stored in a JSON file which will be available for download once the recording ends.

The Testing Tool will converse with the bot using the user input from the JSON file and compare the bot response with the recorded bot responses.

The results are recorded in a Test Results spreadsheet providing a comprehensive report of the test run, with the developer input, actual and expected results, and the status of the test run (passed or failed). You can use this spreadsheet to report, keep a track of, and re-test the failed test cases.

For more details on the Test Runner refer to the Kore Github.