본 방법에서는 사용자에게 매일 선호하는 위치의 날씨 업데이트를 제공해야 하는 여행 봇 시나리오를 살펴보겠습니다. 같은 작업을 달성하기 위해 경고 작업을 사용하겠습니다. 또한 이 경고 작업에서 자동 구독을 활성화하여 스마트 상태로 만드는 방법도 확인하겠습니다. 경고 작업의 정의와 Kore.ai 봇 플랫폼에서 경고 작업이 어떻게 구현되는지에 대한 자세한 내용은 여기를 참조하세요.
문제 설명
봇의 등록된 사용자는 사전 지정된 시간 또는 지정된 시간 간격으로 알림 형태의 날씨 업데이트를 전송해야 합니다. 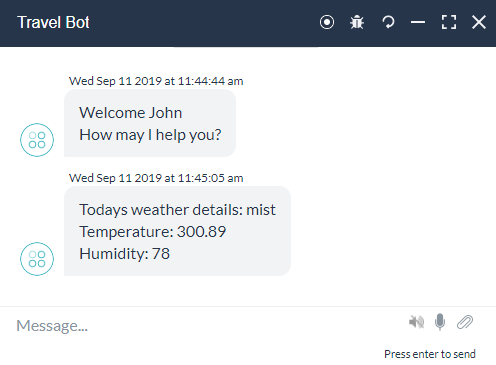
본 문서에서는 이러한 상황을 충족하고 적절한 조치를 취하는 데 경고 작업이 어떻게 사용될 수 있는지 설명합니다.
전제 조건
- 봇 구축 기본 지식.
- 작업 중인 봇, 뱅킹 봇을 사용합니다.
- 날씨 업데이트를 제공하는 웹 서비스에 액세스합니다. 다음에서 호스팅 되는 REST 서비스를 사용합니다: http://api.openweathermap.org. 이 서비스를 사용하려면 무료 알림 서비스에 등록해야 합니다. API 키를 사용하여 해당 API에 액세스하겠습니다.
구현
경고 작업 설정
경고 작업을 사용하여 실시간으로 또는 사용자 정의된 일정에 따라 관련 서비스를 폴링하여 엔터프라이즈 시스템에서 고객 및 직원에게 적시에 관련 있는 맞춤형 정보를 전달할 수 있습니다. 단계:
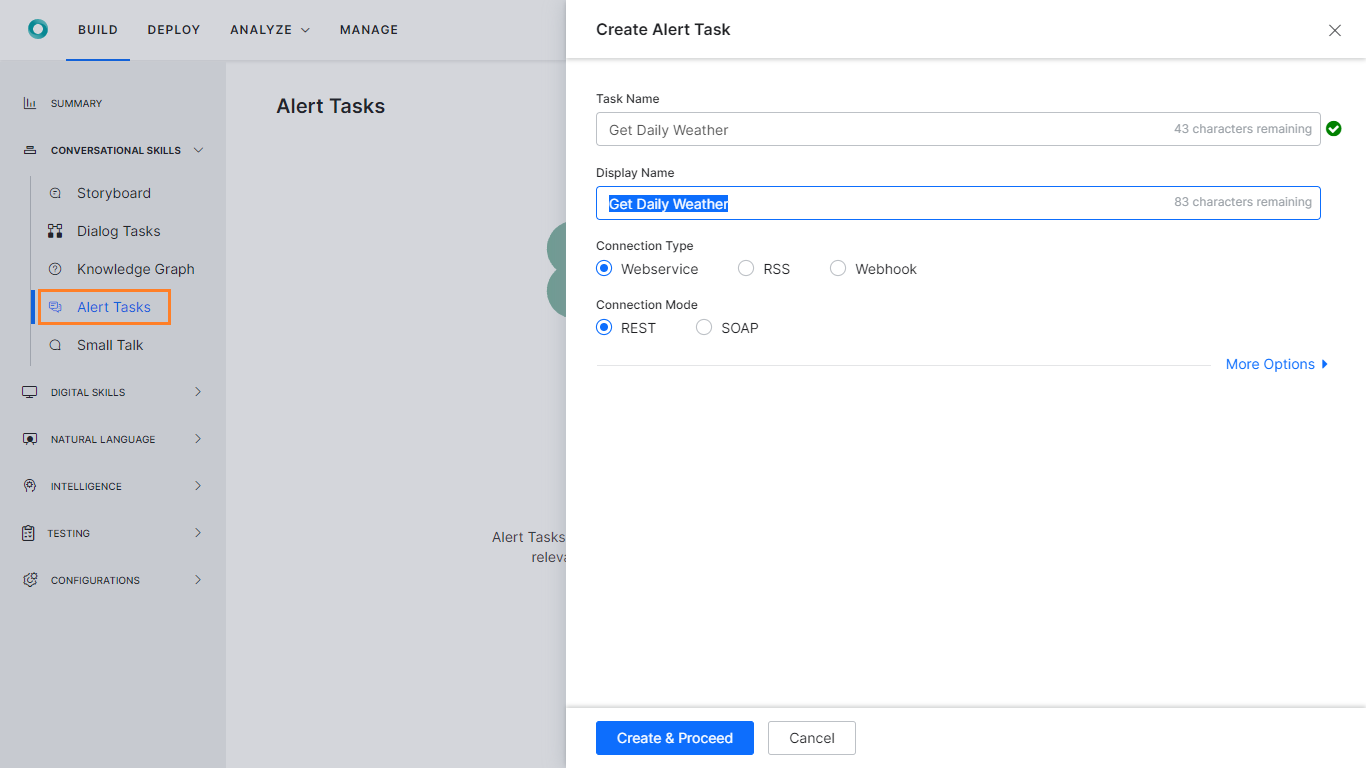
- 구축 -> 대화형 스킬에서 경고 작업을 추가합니다.
- 작업 세부 정보 페이지에서:
- 작업 이름(예: 일별 날씨 가져오기)을 입력합니다.
- 연결 유형을 선택합니다. Webservice로 선택하겠습니다.
- 연결 모드를 선택합니다. REST를 사용하겠습니다.
- 생성 및 진행 클릭
- 알림 설정 페이지로 바로 이동합니다
- 필요하다면 일반 설정을 검토하고 수정합니다. 이 활용 사례에서는 설정을 수정할 필요가 없습니다.
- API 요청 탭 선택
- 콘텐츠 유형이 JSON으로 설정되어 있는지 확인
- 활용 사례에 대해 인증 공급자를 설정할 필요가 없습니다. 사용 중인 API에 인증 요건이 있는 경우 동일하게 설정합니다.
- 매개 변수를 설정하여 사용자로부터 선호 도시를 수집합니다. 필수 필드로 설정되었는지 확인합니다. 이는 API 요건입니다.

- 활용 사례에는 초기화 요건이 필요하지 않습니다. 요청을 전송하기 전에 JavaScript를 실행해야 한다면 이 옵션을 사용합니다.
- 요청에서 API 추가를 클릭하여 호출되어야 하는 서비스 API를 추가합니다. 다음과 같은 API에서 GET 메서드를 사용하고 있습니다.
http://api.openweathermap.org/data/2.5/weather?q={cityname}&APPID=<your-app-id>- 위 URL의 APPID는 가입할 때 OpenWeather에서 사용자에게 할당됩니다. 계정에 로그인한 후 API 키 섹션에서 찾을 수 있습니다.
- 매개 변수 목록이 이전에 입력한 매개 변수로 자동으로 채워집니다.
- API를 저장합니다.

- API를 테스트하여 설정이 올바른지 확인합니다. 메시지가 표시되면 샘플 도시 이름을 입력하고 성공 메시지와 적절한 응답을 수신하는지 확인합니다.
- 응답을 저장합니다.
- 다음으로 봇 응답의 형식을 지정해야 합니다. 이 활용 사례에서는 사용자에게 보여주기 위해 API 호출이 반환하는 날씨 설명, 온도 및 습도 세부 정보를 파싱합니다. 다음과 같은 풍부한 텍스트를 사용하여 동일한 결과를 얻을 수 있습니다:
오늘 날씨 세부 정보: <%=weather[0].description%> 온도: <%=main.temp%> 습도: <%=main.humidity%>

API 호출이 반환하는 값은 변수 키 옵션에서 액세스할 수 있습니다. 변수 키를 클릭하면 요청/응답 키 창이 열립니다. 사용할 수 있는 다양한 변수가 분류되어 있습니다. 응답 키 섹션을 확장하여 API 호출의 응답에 액세스하고 표시하고자 하는 값의 키를 선택한 다음 확인을 클릭합니다. 그러면 키가 적절한 형식으로 에디터에 삽입됩니다.(예시는 다음 섹션에서 확인)<%=weather[0].description%>
- 메시지 정의를 저장합니다.
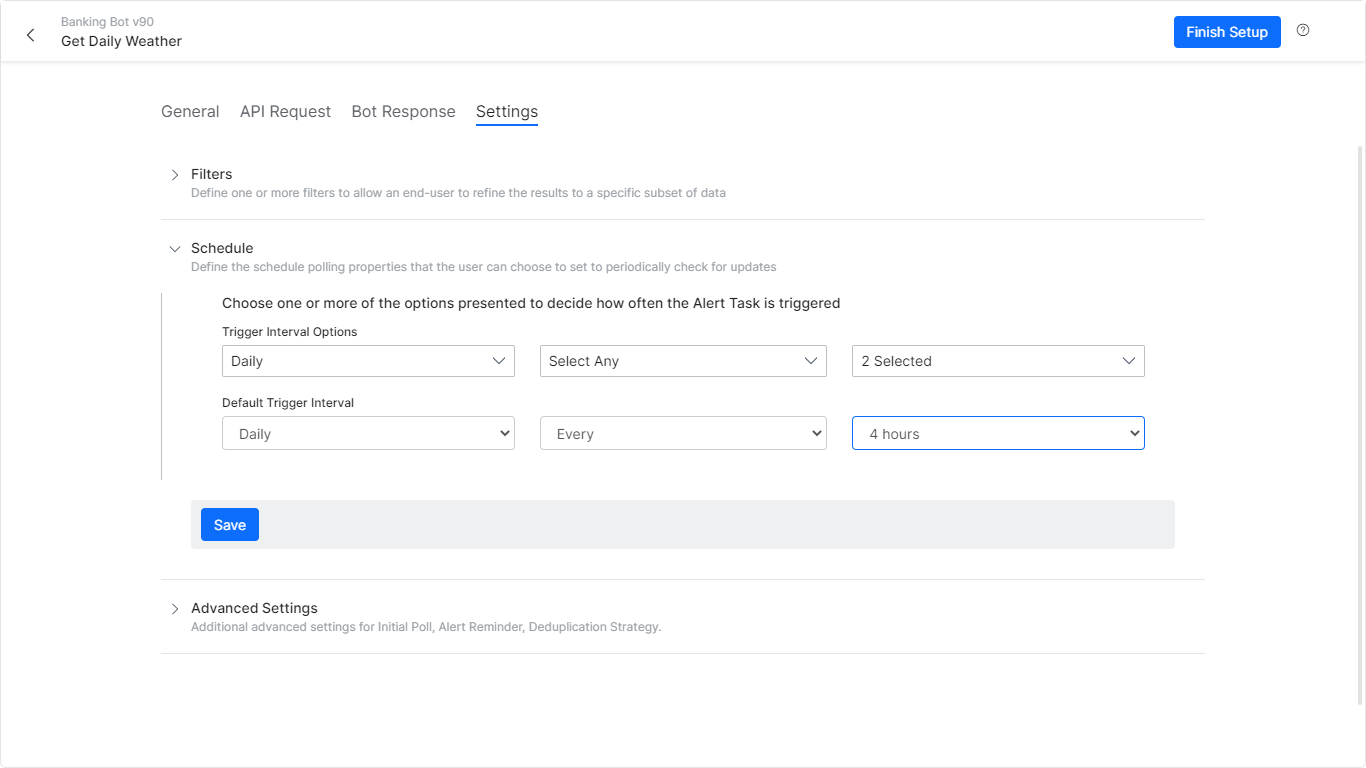
- 설정 탭을 선택하고 일정 섹션을 확장합니다. 이 섹션을 사용하여 초기 일정을 설정합니다. 이러한 옵션은 초기 설정을 위해 사용자가 선택할 수 있도록 제공됩니다. 예를 들어, 이 예에서는 스케줄을 매일 오전 10:30으로 설정한 후 4시간마다 업데이트하도록 설정했습니다. 사용자는 오전 10시 30분에 한 번만 선택하면 추가 업데이트를 받지 않습니다.
- 설정 마무리
실행
봇을 게시하고 사용자와 공유하기 전에 봇과 대화 기능에서 이를 테스트할 수 있습니다.
- 봇과 대화를 실행합니다.
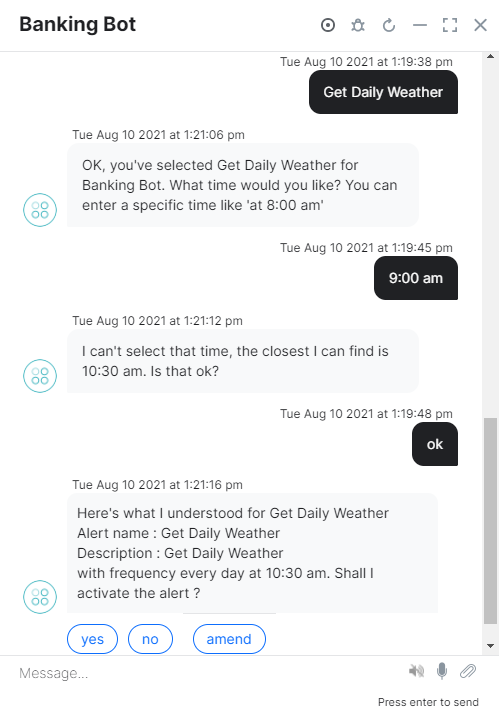
- 일정 작업을 시작하고 일별 날씨 가져오기(설정한 경고 작업의 이름)를 합니다.
- 도시 이름을 입력하라는 메시지가 표시됩니다.
- 그런 다음 특정 시간을 입력하라는 메시지가 표시됩니다. 시간을 입력하거나 “매 x 분”을 입력할 수 있습니다.
- 입력한 시간이 설정한 일정 시간과 일치하지 않으면 가장 가까운 시간이 표시됩니다. 빈도 설정도 마찬가지입니다.
- 이 설정은 한 번만 가능합니다. 이 시점부터 이 봇에 대한 봇과 대화를 실행할 때마다 지정된 시간에 날씨 알림이 표시됩니다.
- 사용자는 다른 대화 작업과 마찬가지로 경고 작업 이름을 사용하여 작업을 트리거하고 알림을 수동으로 설정할 수 있습니다. 사용자가 봇 사용을 시작할 때 경험하게 되는 경험은 위에서 언급한 흐름과 비슷합니다.
스마트 알림
알림 구독 서비스 유형 서비스 노드를 추가하여 사용자에 대한 알림을 자동으로 설정할 수 있습니다.(예: 환영 대화 작업) 참고 사항: 게시된 경고 작업만 알림 구독에 사용할 수 있습니다.
- 대화에서 경고 작업에 대한 트리거 역할을 할 서비스 노드를 추가합니다.
- 서비스 유형을 알림 구독 서비스로 설정합니다.

- 요청 정의를 클릭하고 이미 설정된 경고 작업을 선택합니다. 이 경우 일별 날씨 가져오기입니다. 참고 사항: 게시된 경고 작업만 알림 구독에 사용할 수 있습니다.
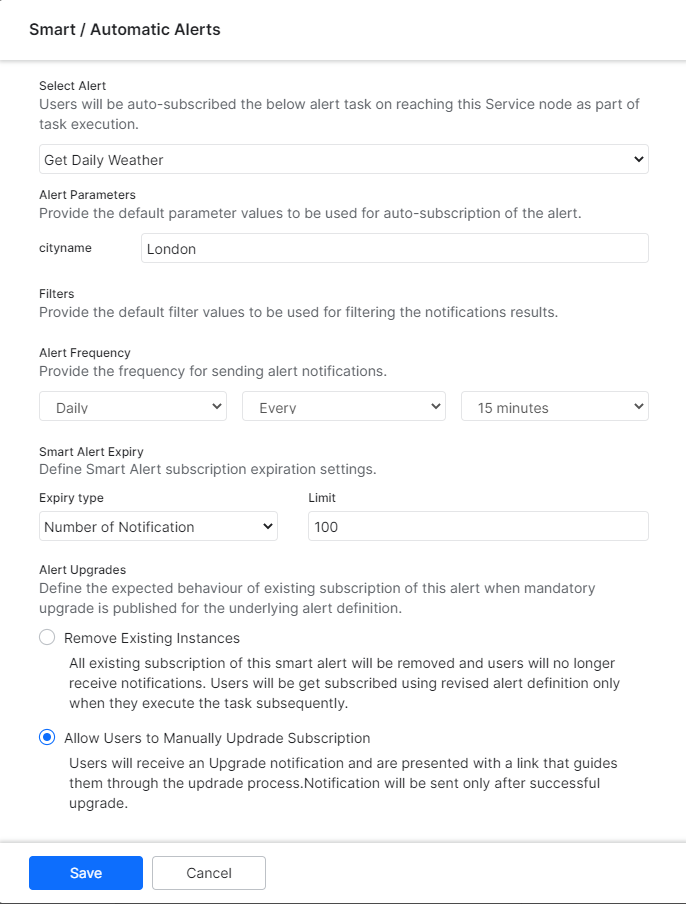
- 스마트/자동 알림 창으로 이동합니다.
- 필요에 따라 알림 매개 변수를 설정합니다.
- 알림 빈도를 설정합니다.
- 알림 만료 값은 구독 기간 또는 전송된 알림 수에 따라 설정할 수 있습니다. 이러한 값은 서비스 구독이 제한된 경우에 유용합니다. 여기에서는 알림 수를 최대값으로 설정했습니다.
- 또한 경고 작업이 업데이트 및 게시될 경우 알림 업그레이드 동작을 정의할 수 있습니다.
- 저장합니다
- 환영 또는 onConnect 이벤트에서 이 작업을 트리거 하여 사용자가 선호하는 도시 및 시간을 입력할 수 있습니다.
- 설치 시 이 서비스 노드에 처음으로 접속하면 사용자 개입 없이 구독이 적용됩니다.
このハウツーでは、たとえば旅行ボットで、ユーザーが希望する場所の気象情報を毎日提供してもらわなければならないというシナリオを探究しましょう。今回は、アラートタスクを使用して、上記のことを実現します。また、このアラートタスクで自動サブスクリプションを有効にして、スマートに行う方法もご紹介します。アラートタスクとは何か、そして、Kore.aiボットプラットフォームにどのように実装されているのかなどの詳細については、こちらをご参照ください。
問題提起
ボットに登録しているユーザーは、事前に指定した時刻および/または時間間隔で、アラートの形で更新された気象情報を送信してもらう必要があります。
この文書では、そのような状況に対応し、適切なアクションを取るためにアラートタスクを利用する方法についてご紹介します。
必要条件
- ボット構築のナレッジ
- 作業するボット、私たちは バンキングボットを使用しています。
- 気象情報を提供するWebサービスにアクセスできます。以下でホストされているRESTサービスを使用しています。http://api.openweathermap.org.このサービスを利用しようとする場合は、無料のアラートサービスに登録し、APIキーを使用してAPIにアクセスする必要があります。
導入
アラートタスクを設定
アラートタスクは、リアルタイムまたはユーザー定義のスケジュールに従って関連サービスにポーリングすることにより、企業システムから顧客や従業員にタイムリーで適切な情報を提供するために使用されます。手順:
- 構築->会話スキルからアラートタスクを追加します。
- タスクの詳細ページで:
- タスク名をたとえば毎日の気象情報取得と入力します。
- 接続タイプを選択し、ここではWebサービスを選択します。
- 接続モードを選択し、ここでは RESTを使用します。
- 作成・続行をクリック
- 「アラート設定」ページが示されます。
- 必要に応じて 一般設定を確認し、変更します。今回のユースケースでは、ここで設定を変更する必要はありません。
- APIリクエストタブを選択
- コンテンツタイプがJSONに設定されていることを確認します。
- 今回のユースケースでは、認証プロバイダを設定する必要はありません。使用しているAPIに認証が必要な場合も、同様に設定します。
- パラメータを設定して、ユーザーから希望する都市を収集します。必須項目として設定されていることを確認します。これがAPI要件です。
- 今回のユースケースでは、イニシャライザの要件は必要ありません。これは、リクエストを送信する前にJavaScriptを実行する必要がある場合に使用します。
- リクエストにおいて、APIを追加 をクリックして、呼び出す必要のあるサービスAPIを追加します。以下のAPIから取得メソッドを使用しています。
http://api.openweathermap.org/data/2.5/weather?q={cityname}&APPID=<your-app-id>- 上記URLのAPPIDは、サインアップ時にOpenWeatherから割り当てられたものです。自分のアカウントにログインした後、APIキーセクションから見つけることができます。
- パラメータリストには、先に入力したパラメータが自動的に入力されていることに注意してください。
- APIを保存 。
- APIテストして、構成が適切であることを確認します。プロンプトが表示されたら、サンプルの都市名を入力し、成功メッセージと適切なレスポンスが表示されることを確認します。
- レスポンスを保存 。
- 次に、ボットレスポンスをフォーマットする必要があります。今回のユースケースでは、APIコールから返された気象状況、気温、湿度の詳細を解析して、ユーザーに提示します。以下のリッチテキストを使用して、上記のことを実行します。
今日の天気の詳細:<%=weather[0].description%>温度:<%=main.temp%>湿度:<%=main.humidity%>
APIコールで返された値は、可変キーオプションからアクセスできます。可変キーをクリックすると、「リクエスト/レスポンスキー」ウィンドウが開きます。利用可能なさまざまな変数が分類されています。APIコールからのレスポンスにアクセスするために、レスポンスキーセクションを展開し、表示したい値のキーを選択してOKをクリックすると、キーが適切な形式でエディタにインサートされます。例:以下のような選択 –<%=weather[0].description%>
- メッセージ定義を保存 。
- 設定タブを選択し、スケジュールセクションを展開。初期スケジュールを設定するためにこのセクションを使用すると、初期設定用に選択先ユーザーに提供されるオプションが用意されています。例として、毎日午前10時30分に更新され、その後4時間ごとに更新されるというスケジュールが設定されています。ユーザーは午前10時30分を1回だけを選択して、それ以降の更新は受け取らないようにできます。
- 最終セットアップ
実行
ボットを公開してユーザーと共有する前に、ボットと会話 機能を使用して、テストすることができます。
- ボットと会話を起動。
- スケジュールタスク、毎日の天気を取得 (設定したアラートタスクの名前)を開始。
- 都市名を入力するように指示されます。
- 次に、特定の時間を入力するように指示されますので、時間を入力するか、または「x分ごと」を入力してください。
- ご存じのように、入力した時間が設定されたスケジュール時間と一致しない場合は、最も近い時間が表示されます。周波数の設定も同様です。
- これは1回限りの設定です。これ以降、このボットのために「ボットと会話」を起動すると、指定した時間に天気予報が表示されるようになります。
- ユーザーは、他のダイアログタスクと同様に、アラートタスク名を使用してタスクを起動し、手動でアラートを設定することができます。ユーザーがボットを使い始めたときの体験は、上記のフローに近いものになるでしょう。
スマートアラート
ウェルカムダイアログタスクなどでアラートサブスクリプションサービスタイプのサービスノードを追加することで、ユーザーは自動的にアラートを設定することができます。メモ:公開されたアラートタスクのみが、アラートサブスクリプションに利用できます。
- アラートタスクの起動として動作するサービスノードをダイアログに追加します。
- サービスタイプ を アラートサブスクリプションサービスに設定します。
- リクエストを定義をクリックし、すでに設定されているアラートタスク(ここでは毎日の天気を取得)を選択します。メモ:公開されたアラートタスクのみが、アラートサブスクリプションに利用できます。
- スマート/自動アラートウィンドウが表示されます。
- 必要に応じて、アラートパラメータをセットアップします。
- アラート頻度を設定
- アラートの有効期限は、サブスクリプションの期間または通知の回数に基づいて設定できます。これらは、サービスのサブスクリプションが制限されている場合に便利です。ここでは、通知回数を最大値に設定しています。
- また、アラートタスクが更新されて公開された場合、アラートアップグレード の動作も定義できます。
- 保存
- このタスクは、ウェルカムイベントやonConnectイベントから起動することができ、ユーザーは希望の都市や時間を入力することができます。
- セットアップ時に、このサービスノードが初めてヒットすると、ユーザーが介入しなくてもサブスクリプションが有効になります。
Leave a Reply
In this How-To, we will explore a scenario in a Bot, say traveling Bot, where the user needs to be provided with weather updates daily for a preferred location. We will be using an Alert task to achieve the same. We will also see how auto subscription can be enabled on this Alert task, making it smart.
For details on what Alert task is and how it is implemented in the Kore.ai Bots platform, refer here.
Problem Statement
A registered user of a Bot needs to be sent a weather update in the form of an alert, on a pre-specified time of the day and/or at a specified interval of time.
In this document, we will show how an Alert Task can be used to cater to such situations and take appropriate action.
Pre-requisites
- Basic Bot building knowledge.
- A working Bot, we are using a Banking Bot.
- Access to a web service that gives a weather updates. We are using a REST service hosted at: http://api.openweathermap.org. If you want to use this service, you need register to their free alert service as we will be using the API key to access their APIs.
Implementation
Setting Alert Task
Alert tasks can be used to deliver timely, relevant, and personalized information from enterprise systems to customers and employees by polling the relevant service in real-time or according to a user-defined schedule.
Steps:
- From Build -> Conversational Skills add an Alert Task.
- On the task details page:
- Enter a Task Name, say Get Daily Weather
- Choose the Connection Type, we will go with Webservice
- Choose the Connection Mode, we will be using REST
- Click Create & Proceed
- You will be directed to the Alert Settings page
- Review and modify the General Settings if needed. For our use case, we do not need to modify any settings here.
- Select the API Request tab
- Ensure that the Content Type is set to JSON
- We do not need to set Authorization Provider for our use case. Configure the same if the API you are using has any authorization requirements.
- Set Parameter to gather the preferred City from the User. Ensure that it is set as a Mandatory field. This is the API requirement.
- We will not need any Initializer requirements for our use case. Use this in case any JavaScript needs to be executed before the request is sent.
- Under Request click Add API to add the service API that needs to be invoked. We are using a GET method from the following API:
http://api.openweathermap.org/data/2.5/weather?q={cityname}&APPID=<your-app-id>- The APPID in the above url is assigned to you by OpenWeather when you sign up. You can find it from the API keys section after you login to your account.
- Notice that the Parameters list is populated automatically with the parameters entered earlier.
- Save the API.
- Test the API to ensure that the configuration is proper. Enter a sample city name, when prompted and ensure you get a success message and a proper Response.
- Save the response.
- Next we need to format the Bot Response. For our use case, we will be parsing the weather description, temperature and humidity details returned by the API call to be presented to the user.
We are using the following rich text to achieve the same:Todays weather details: <%=weather[0].description%> Temperature: <%=main.temp%> Humidity: <%=main.humidity%>
The values returned by the API call can be accessed from the Variable Keys option. Clicking Variable Keys opens the Request/Response Keys window. The various variables available are categorized. Expand Response Keys section to access the response from API call and select the key for the value you want to display and click OK, the key will be inserted in the editor in the appropriate format, for example for the following selection –<%=weather[0].description%>
- Save the Message Definition.
- Select Setttings tab and expand the Schedule section. Use this section to configure an initial schedule, these are the options that are provided to the user to choose from for the initial setup.
For example, in this example, we have set the schedule to be at 10:30 am daily followed by an update every 4 hrs. The user may choose just once at 10:30 am and not get the further updates.
- Finish Setup
Execution
Before publishing and sharing the Bot with a user, you can test it from the Talk to bot feature.
- Launch Talk to bot.
- Initiate the schedule task, Get Daily Weather (name of the Alert Task we configured).
- You will be prompted to enter city name.
- Next you will be prompted to enter a specific time, you can enter a time or enter “every x minutes”.
- As you can see if the time you enter does no match the scheduled time configured, the nearest time will be presented. Same is the case with the frequency setting.
- This is a one-time setup. From this point onwards whenever you launch Talk to Bot for this Bot, you will be given the Weather Alert at the specified time.
- The user can trigger the task using the Alert Task name, just like any other Dialog Task and set up the alert manually. The experience User will have when they start using your Bot will be similar to the above-mentioned flow.
Smart Alert
You can set the alert for the user automatically by adding the Alert Subscription Service type Service node in, say, a welcome dialog task. NOTE: Only published Alert Tasks are available for Alert subscription.
- Add a Service Node in the Dialog which will act as the trigger for the Alert Task.
- Set the Service Type to be Alert Subscription Service.
- Click Define Request and select the already configured Alert Task, in this case, Get Daily Weather.
NOTE: Only published Alert Tasks are available for Alert subscription. - You will be navigated to the Smart/Automatic Alerts window
- Set up the Alert Parameters as required.
- Set the Alert Frequency
- You can set the Alert Expiry values based upon either the duration of the subscription or the number of notifications sent, these will come in handy in case your subscription to the service is limited. Here we have set the Number of Notification to a maximum value.
- You can also define the Alert Upgrade behavior in case the Alert task is updated and published.
- Save
- You can trigger this task from Welcome or onConnect Event, so the user can enter their preferred city and time.
- On setup, the first time this service node is hit the subscription will be in effect without user intervention.