본 방법에서는 한 번의 클릭으로 사용자가 자신의 계좌 세부 정보를 볼 수 있는 뱅킹 봇 시나리오를 살펴보겠습니다. 패널 및 위젯을 사용하여 이 디지털 보기를 표시하는 방법을 살펴보겠습니다. 위젯을 사용하여 대화 작업을 트리거하고 적절한 메시지를 표시하고 패널을 사용하여 이러한 위젯을 보관합니다. 또한 Widget SDK를 사용하는 웹/모바일 클라이언트에서 패널을 호스팅하는 방법에 대해서도 알아봅니다. 디지털 보기의 정의 및 Kore.ai 봇 플랫폼에서 디지털 보기를 구현하는 방법에 대한 자세한 내용은 여기를 참조하세요.
문제 설명
뱅킹 봇이 다음과 같은 시나리오를 해결하려고 한다고 생각해 보세요. 본 문서에서는 디지털 보기(패널, 위젯), Widget SDK 및 웹/모바일 클라이언트를 사용하여 위에 언급된 모든 시나리오를 달성할 수 있는 자세한 단계별 접근 방법을 제공합니다.

설정
다음 시나리오를 각각 하나씩 살펴보겠습니다.
- Widget SDK 채널을 사용하여 주어진 계좌의 잔액을 표시하는 대화 작업입니다.
- 위의 대화 작업을 트리거 하는 위젯과 위젯이 있는 패널 세트입니다.
- 스태틱 JSON 템플릿 메시지를 표시하는 위젯을 보유하는 패널입니다.
메시지 템플릿
먼저 위젯에서 트리거 되는 대화 작업에는 Widget SDK 채널에 대한 메시지 정의가 있어야 합니다.  다음 메시지를 사용하여 계좌 세부 정보를 표시합니다:
var output = context.entities.AccountType + ' 계좌의 잔액은' + context.GetAccountBalance.response.body.Balance + '입니다'; var message = { "elements": [ { "title": "Account View", "sub_title": output, "icon": "https://kore.ai/wp-content/uploads/banking-home.png", } ] }; print(JSON.stringify(message));
위젯 설정
대화 작업 위젯
대화 작업을 트리거하기 위해 두 개의 위젯을 생성하겠습니다. 현재 계좌: 먼저 사용자의 현재 계좌에서 잔액을 표시하도록 위젯을 설정하는 방법을 살펴보겠습니다.
- 왼쪽 탐색 메뉴에서 봇 작업 아래 디지털 보기를 엽니다.
- 위젯 생성 버튼을 클릭합니다.
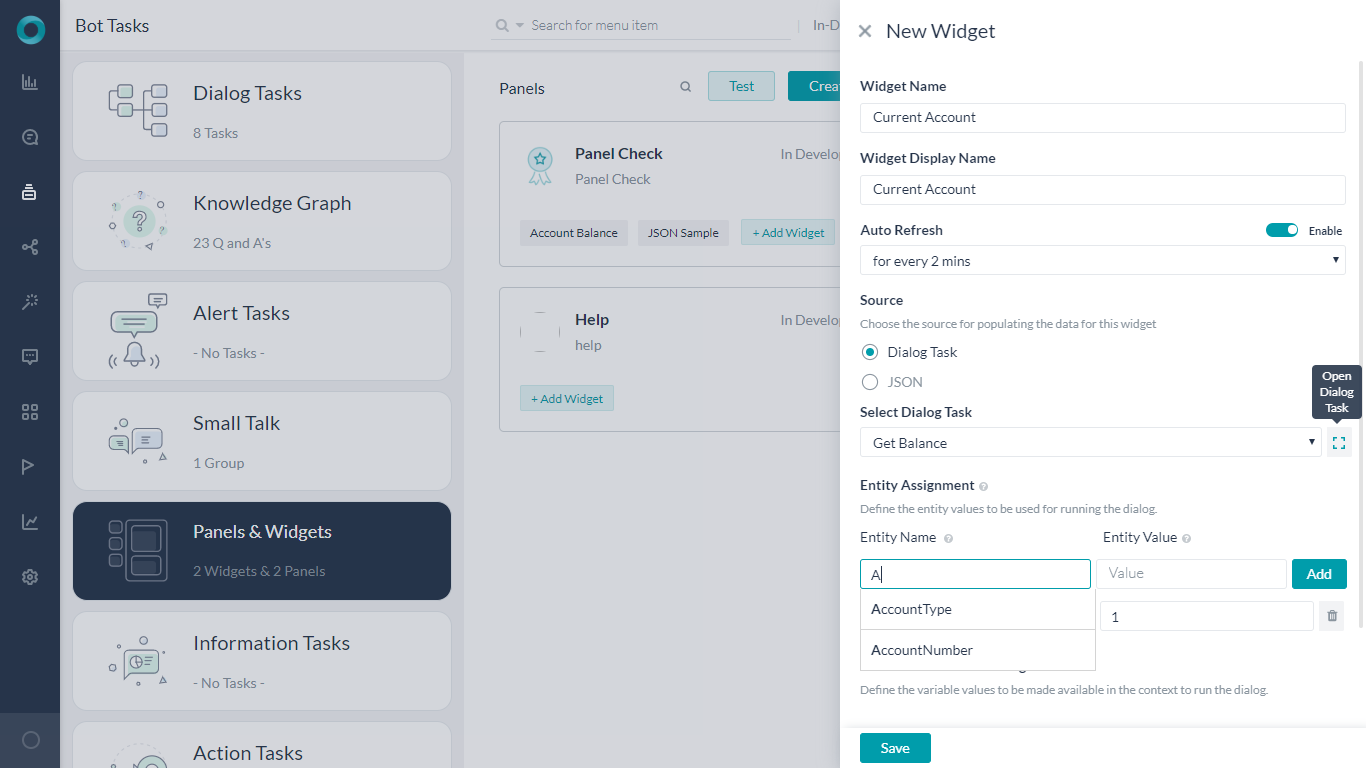
- 위젯 이름과 표시 이름을 지정합니다.
- 소스를 설정하면 대화 작업이 트리거 되므로 대화 작업을 선택합니다.
- 활용 사례대로 대화 작업 선택을 잔액 가져오기로 선택합니다
- 엔티티 할당에서, 대화 작업 요건에 따라 다음 요소(입력할 때 나타나는 드롭 박스에서 선택 가능)를 설정합니다.
- 계좌 유형 는 현재
- 계좌 번호 는 1. 대화 작업 드롭다운 옆에 있는 대화 작업 열기 아이콘을 사용하여 대화를 열고 필요한 엔티티를 확인할 수 있습니다.
- 위젯을 저장합니다.
- 위젯을 편집하고 실행 및 미리보기를 클릭하여 위젯 결과를 봅니다.

- 미리 보기로 저장 하면 결과가 위젯에 대한 섬네일로 설정됩니다.
저축 계좌 같은 계좌 번호의 저축 계좌에서 계좌 보기를 위해 위의 단계를 반복합니다.

패널 설정
이렇게 생성된 위젯은 런타임 표시 및 실행을 위해 패널에 연결되어야 합니다.
- 패널 생성 버튼을 클릭하여 패널을 생성합니다.
- 새 패널 창에 패널 이름, 표시 이름 및 아이콘 URL을 입력합니다.

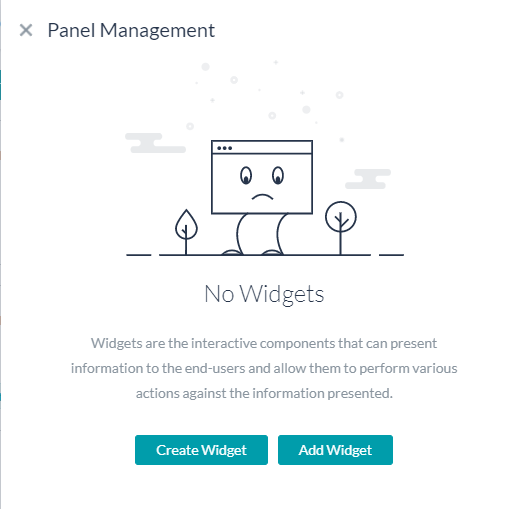
- 위젯 추가 버튼을 클릭하여 패널 관리 창을 엽니다.
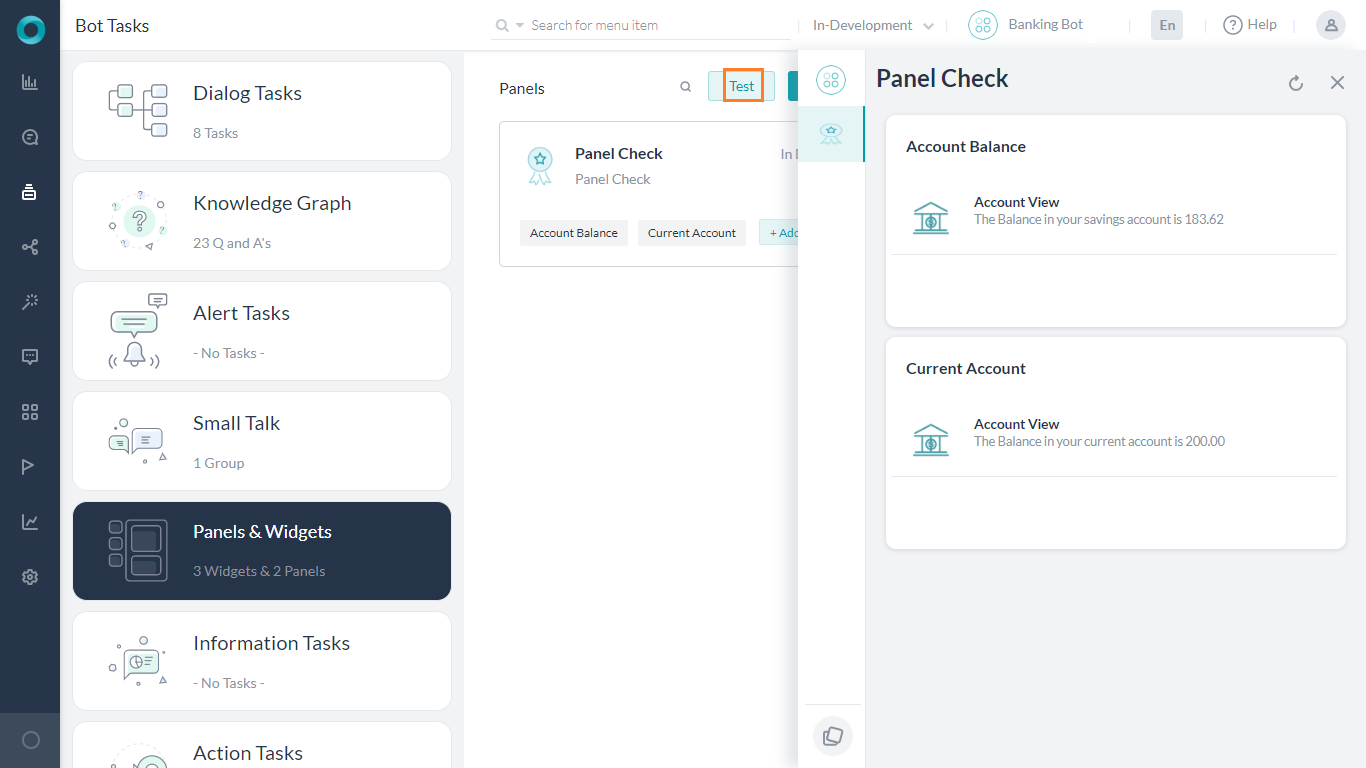
- 위젯 추가를 사용하여 표시하고자 하는 위젯을 선택하고 추가합니다. 이 경우 계좌 잔액 및 현재 계좌 위젯입니다.

- 테스트 버튼을 사용하여 위젯이 작동 중인 것을 확인합니다.
JSON 위젯이 포함된 패널
스태틱 JSON 콘텐츠로 위젯을 생성하는 방법을 살펴보겠습니다. JSON을 사용하여 원형 차트를 표시하겠습니다.
- 새 패널을 생성하고 JSON 예시로 명명하려면 패널 생성을 클릭합니다.
- 추가 아이콘을 사용하여 패널 관리를 선택하면 위젯 생성 옵션이 표시됩니다. 해당 옵션을 클릭합니다.
- 새 위젯 대화에서 이름을 입력하고 소스를 JSON으로 설정합니다.

- JavaScript 에디터에서 다음을 입력합니다. 이것은 여행, 음식, 숙박 등 다양한 헤드에서 소비한 금액에 대한 분할이 포함된 원형 차트를 표시하는 메시지 템플릿입니다. 지원되는 메시지 템플릿에 대한 자세한 내용은 여기를 참조하세요.
var message = { "templateType": "piechart", "pie_type": "regular", "title": "Summary", "description": "monthly report", "elements": [ { "title": "Airlines", "value": "1264.0", "displayValue": "$ 1,234" }, { "title": "Hotels", "value": "568.10", "displayValue": "$ 568" }, { "title": "Food", "value": "324.50", "displayValue": "$ 324" } ] }; print(JSON.stringify(message)); - 패널을 테스트하면 두 개의 패널 아이콘이 모두 표시됩니다. 각각의 아이콘을 클릭하여 해당 아이콘이 작동 중인 것을 확인합니다.

게시
봇 게시를 위해 우선 채널 활성화:
- 왼쪽 탐색 메뉴에서 게시를 위해 채널을 선택합니다. 이 활용 사례에서는 웹/모바일 클라이언트와 Widget SDK 채널을 모두 선택합니다.
- 설정 탭에서 채널을 선택하고 봇 이름, 봇 ID, 클라이언트 ID 및 클라이언트 시크릿을 기록합니다.
- 왼쪽 탐색 메뉴에서 게시 옵션을 선택합니다. 작업 및 언어 섹션에서 개발한 위젯 및 패널이 게시용으로 선택되어 있는지 확인합니다.
- 게시로 진행합니다.
호스팅
웹/모바일 클라이언트에서 패널을 호스팅하겠습니다. Widget SDK 사용에 대한 자세한 내용은 여기를 참조하세요.
- Kore.ai Widget SDK를 다운로드하고 https://github.com/Koredotcom/web-kore-sdk로 이동한 다음 다운로드를 클릭합니다.
- …/SDKApp/sdk 폴더에 모든 파일의 압축을 풉니다.
- 위의 SDK 폴더를 열고 UI 폴더로 이동합니다.
- 다음을 엽니다:
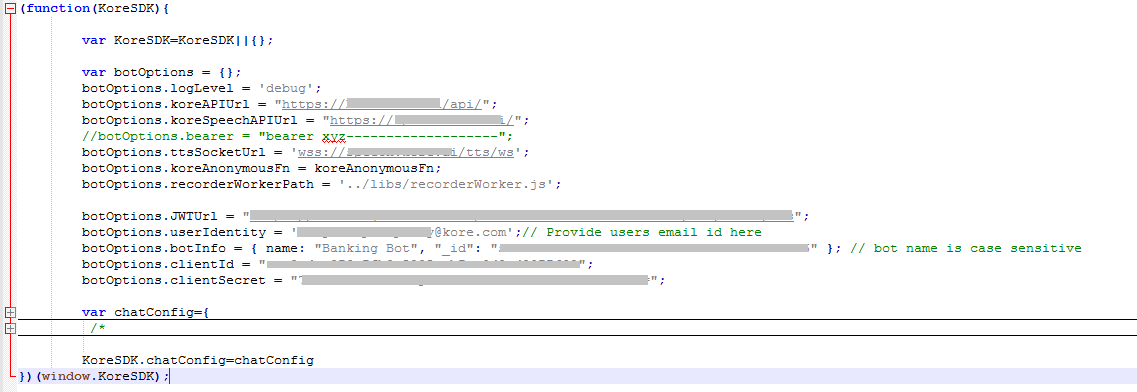
kore-config.js - 위 섹션에서 복사한 '웹/모바일 클라이언트' 채널 설정으로
botOptions을 설정합니다.botOptions.botInfobotOptions.clientIdbotOptions.clientSecret
요건에 따라 다른 변경 사항을 변경합니다.
- 다음을 엽니다:
kore-widgets-config.js - 위 섹션에서 복사한 'Widget SDK' 채널 설정으로
botOptionsWiz을 설정합니다.botOptionsWiz.botInfobotOptionsWiz.clientIdbotOptionsWiz.clientSecret
요건에 따라 다른 변경 사항을 변경합니다.

- 브라우저의
index_widgets_chat.html파일을 열고 위젯과 함께 채팅 창을 확인합니다.
- 패널을 각각 호스팅하려면
index_widgets.html파일을 사용합니다. 웹 사이트에서 같은 것을 호스팅했는지 확인하려면 GitHub를 참조하세요.
こちらの案内では、ワンクリックでユーザーが口座の詳細を表示できるバンキングBotのシナリオについて見ていきます。パネルとウィジェットを使用して、デジタルビューをどのように表示できるかを見ていきましょう。ウィジェットを使用することでダイアログタスクをトリガーして適切なメッセージを表示でき、パネルを使用することでこれらのウィジェットを保持します。また、ウィジェットSDKを使用してパネルをウェブ/モバイルクライアント上でホストする方法についてもご説明します。デジタルビューとは何か、またKore.aiのBotプラットフォームにどのように導入されているかについての詳細は、こちらを参照してください。
例題
以下のシナリオに取り組むバンキングBotを検討します。 このドキュメントでは、デジタルビュー(パネル、ウィジェット)、ウィジェットSDK、ウェブ/モバイルクライアントを使用して、上記のすべてのシナリオを実現するための詳細な手法を説明します。
設定
次の各シナリオを1つずつ考えてみましょう。
- ウィジェットSDKチャネルを使用して特定の口座の残高を表示するダイアログタスクです。
- ウィジェットは上記のダイアログタスクをトリガーし、ウィジェットとパネルをセットします。
- パネルは静的なJSONテンプレートメッセージを表示するウィジェットを保持します。
メッセージテンプレート
まず、ウィジェットからトリガーされるダイアログタスクには、ウィジェットSDKチャネル用にメッセージ定義が必要となります。 ここでは口座の詳細を表示するために次のメッセージを使用しています。
var output = 'The Balance in your' + context.entities.AccountType + ' account is ' + context.GetAccountBalance.response.body.Balance;
var message = {
    "elements": [
        {
            "title": "Account View",
            "sub_title": output,
            "icon": "https://kore.ai/wp-content/uploads/banking-home.png",
        }
    ]
};
print(JSON.stringify(message));
ウィジェットの設定
ダイアログタスクのウィジェット
ダイアログタスクをトリガーする2つのウィジェットを作成します。当座預金:まず、ユーザーの現在の口座残高を表示するようにウィジェットを設定する方法を見ていきましょう。
- 左側のナビゲーションメニューから、Botタスクの下部にあるデジタルビューを開きます。
- ウィジェットを作成ボタンをクリックします。
- ウィジェット名と表示名を付けます。
- ソースを設定します。ダイアログタスクをトリガーしているため、ダイアログタスクを選択します。
- ユースケースに従って、ダイアログタスクを選択を残高取得として選択します。
- エンティティの割り当てで、ダイアログタスクの要件に従って次のエンティティを設定します(入力時に表示されるドロップボックスから選択できます)。
- AccountTypeを当座
- AccountNumberを1.「ダイアログタスクを選択」ドロップダウンの横にあるダイアログタスクを開くアイコンを使用して、ダイアログを開き、必要なエンティティを確認することができます。
- ウィジェットを保存します。
- ウィジェットを編集し、実行とプレビューをクリックして、ウィジェットのアウトプットを確認します。
- プレビューとして保存を行うと、アウトプットをウィジェットに対するサムネイルとして設定します。
普通預金口座 同じ口座番号の普通預金口座から、口座の表示のために上記の手順を繰り返します。
パネルの設定
このようにして作成されたウィジェットは、ランタイムの表示と実行のためにパネルに添付する必要があります。
- パネルを作成ボタンをクリックして、パネルを作成します。
- 新しいパネルウィンドウの中に、パネル名、表示名、アイコンURLを入力します。
- ウィジェットを追加ボタンをクリックして、パネル管理ウィンドウを開きます。
- ウィジェットを追加を使用して、表示するウィジェット(この場合は口座残高と当座預金のウィジェット)を選択して追加します。
- テストボタンを使用して、ウィジェットの動作を確認します。
JSONウィジェットのパネル
静的なJSONコンテンツを使用してウィジェットを作成する方法をご説明します。JSONを使用して円グラフを表示させます。
- パネルを作成をクリックして新しいパネルを作成しJSONの例と名前を付けます。
- 詳細アイコンを選択してパネル管理を選択すると、ウィジェットを作成のオプションが見つかりますので、それをクリックします。
- 新しいウィジェットダイアログで名前を入力し、ソースをJSONに設定します。
- JavaScriptエディタには次のように入力します。これは、交通費、食費、宿泊費などのさまざまな局面で費やされた金額の内訳を円グラフで表示するためのメッセージテンプレートです。サポートされているメッセージテンプレートの詳細については、こちらを参照してください。
var message = { "templateType": "piechart", "pie_type": "regular", "title": "Summary", "description": "monthly report", "elements": [ { "title": "Airlines", "value": "1264.0", "displayValue": "$ 1,234" }, { "title": "Hotels", "value": "568.10", "displayValue": "$ 568" }, { "title": "Food", "value": "324.50", "displayValue": "$ 324" } ] }; print(JSON.stringify(message)); - パネルをテストすると、両方のパネルアイコンが表示されますので、それぞれをクリックして実際の動作を確認してください。
公開
Botを公開するには、まずチャネルを有効にします。
- 左側のナビゲーションメニューから、公開するチャネルを選択します。このユースケースでは、ウェブ/モバイルクライアントとウィジェットSDKのチャネルの両方を選択します。
- チャネルを選択し、設定タブからBot名、BotId、クライアントId、クライアントシークレットをメモします。
- 左側のナビゲーションメニューから、公開オプションを選択します。「タスクと言語」セクションで、開発したウィジェットとパネルが公開用に選択されていることを確認します。
- 公開として続行します。
ホスティング
パネルはウェブ/モバイルクライアントでホストします。ウィジェットSDKの使用方法の詳細についてはこちらをご覧ください。
- Kore.aiウィジェットSDKをダウンロードするには、https://github.com/Koredotcom/web-kore-sdkにアクセスし、ダウンロードをクリックします。
- すべてのファイルを…/SDKApp/sdkフォルダに展開します。
- 上記のSDKフォルダを開き、UIフォルダに移動します。
- 次を開きます。
kore-config.js - 上記のセクションでコピーしたウェブ/モバイルクライアントのチャネル設定の
botOptionsを設定します。botOptions.botInfobotOptions.clientIdbotOptions.clientSecret
要件に応じて他の変更内容を加えます。
- 次を開きます。
kore-widgets-config.js - 上記のセクションでコピーしたウィジェットSDKのチャネル設定の
botOptionsWizを設定します。botOptionsWiz.botInfobotOptionsWiz.clientIdbotOptionsWiz.clientSecret
要件に応じて他の変更内容を加えます。
- ブラウザで
index_widgets_chat.htmlファイルを開き、ウィジェットと共にチャットウィンドウを表示します。 - パネルを個別にホストする場合は、
index_widgets.htmlファイルを使用します。ウェブサイトで同じものをホストする方法については、GitHubを参照してください。
Leave a Reply
In this How-To, we will explore a scenario in a Banking Bot, where with just one click user can view his/her account details. We will see how this Digital View can be presented using Panels and Widgets. Widgets can be used to trigger Dialog Tasks and display appropriate messages and Panel can be used to hold these Widgets.
We will also see how the Panel can be hosted on Web/Mobile Client using the Widget SDK.
For details on what Digital Views are and how it is implemented in the Kore.ai Bots platform, refer here.
Problem Statement
Consider a Banking Bot trying to address the following scenarios:
This document gives a detailed step-by-step approach to achieving all the above-mentioned scenarios using – Digital Views (Panels, Widgets), Widget SDK and Web/Mobile Client.
Pre-requisites
- Bot building knowledge
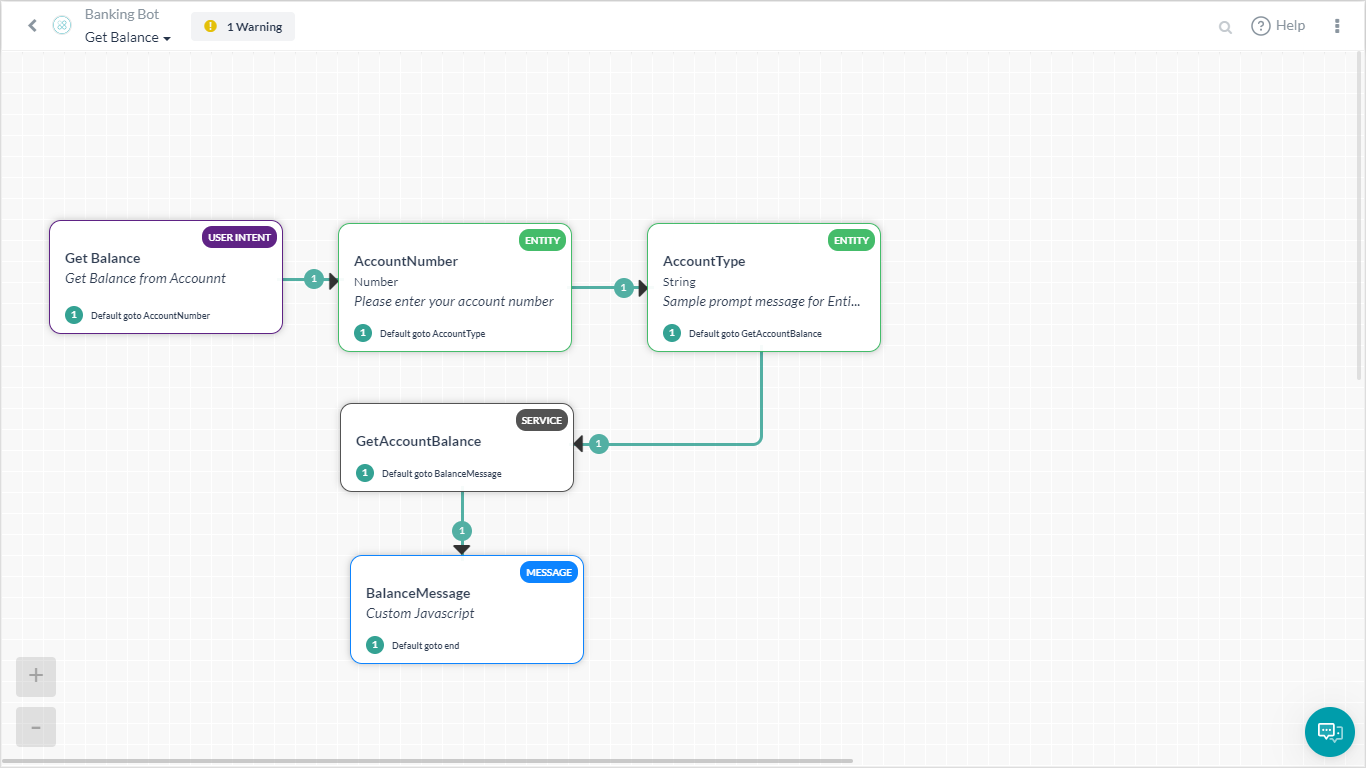
- A Banking Bot with a dialog as mentioned below:
- Get Balance – Dialog task prompting the user for their Account Number and Account Type and displaying the available balance in the account.
- Get Balance – Dialog task prompting the user for their Account Number and Account Type and displaying the available balance in the account.
Configurations
Let us consider each of the following scenarios one by one:
- Dialog Task to display balance in a given account using Widget SDK channel.
- Widgets to trigger the above dialog task and a Panel set with the widgets.
- Panel to hold a widget displaying static JSON templace message.
Message Template
First, the Dialog task which would be triggered from the Widget should have a message definition for the Widget SDK channel.
We are using the following message to display the account details:
var output = 'The Balance in your' + context.entities.AccountType + ' account is ' + context.GetAccountBalance.response.body.Balance;
var message = {
"elements": [
{
"title": "Account View",
"sub_title": output,
"icon": "https://kore.ai/wp-content/uploads/banking-home.png",
}
]
};
print(JSON.stringify(message));
Widgets Configuration
Dialog Task Widgets
We will be creating two Widgets to trigger a Dialog Task.
Current Account:
First, let us see how to configure a Widget to display balance from the current account of the user.
- From the left navigation menu, under Bot Tasks open Digital Views.
- Click the Create Widget button.
- Give a Widget Name and a Display Name.
- Set the Source, we are triggering Dialog Task, hence select Dialog Task.
- Select Dialog Task as Get Balance, as per our use case
- In the Entity Assignment, set the following entities (you can select from the drop box that appears as you type) as per the Dialog Task requirement:
- AccountType to current;
- AccountNumber to 1.
You can use the Open Dialog Task icon, next to the select Dialog Task drop down, to open the dialog and check the entities needed.
- Save the widget.
- Edit the widget and click Run & Preview to see the widget output.
- Save as preview will set the output as the thumbnail against the widget.
Savings Account
Repeat the above steps for Account View from savings account of the same account number.
Panel Configuration
The Widgets thus created need to be attached to a Panel for runtime display and execution.
- Click the Create Panel button to create a Panel.
- In the New Panel widnow, enter Panel Name, Display Name and a URL for Icon.
- Click the Add Widget button to open the Panel Management window.
- Use the Add Widget to select and add the Widgets that we want to display, in this case Account Balance and Current Account widgets.
- Use the Test button to see the widgets in action.
Panel with JSON Widgets
We will see how to create Widgets with static JSON content. We will use a JSON to display a pie chart.
- Click on Create Panel to create a new panel and name it JSON Example.
- Use the more icon and select Panel Management, there you will find the option to Create Widget. Click on that.
- In the New Widget dialog, enter the Name, and set the source to JSON.
- Enter the following in the JavaScript Editor. This is a message template to display a pie chart with a break up for amounts spent under various heads like travel, food, and accommodation. For more on supported message templates, refer here.
var message = { "templateType": "piechart", "pie_type": "regular", "title": "Summary", "description": "monthly report", "elements": [ { "title": "Airlines", "value": "1264.0", "displayValue": "$ 1,234" }, { "title": "Hotels", "value": "568.10", "displayValue": "$ 568" }, { "title": "Food", "value": "324.50", "displayValue": "$ 324" } ] }; print(JSON.stringify(message)); - Test the panel and you will see both the panel icons, click on each to see them in action.
Publish
To publish the Bot first enable channels:
- From left navigation menu, select Channel for publishing. For our use case we will select both Web/Mobile Client and Widget SDK channels.
- Select the channels and from Configurations tab, make a note of the Bot Name, Bot Id, Client Id and Client Secret.
- From left navigation menu, select Publish option. Under Tasks & languages section, ensure that the Widget and Panels we developed are selected for publication.
- Proceed with the Publish.
Hosting
We will be hosting the Panels in the web/mobile client. See here for more details on the Widget SDK usage.
- Download the Kore.ai Widget SDK, go to https://github.com/Koredotcom/web-kore-sdk, and then click Download.
- Extract all files to the …/SDKApp/sdk folder.
- Open the above SDK folder, and traverse to UI folder.
- Open the
kore-config.js - Configure your
botOptionswith the ‘web/mobile client’ channel configurations copied in above section.botOptions.botInfobotOptions.clientIdbotOptions.clientSecret
Make other changes as per your requirements.
- Open the
kore-widgets-config.js - Configure your
botOptionsWizwith the ‘Widget SDK’ channel configurations copied in above section.botOptionsWiz.botInfobotOptionsWiz.clientIdbotOptionsWiz.clientSecret
Make other changes as per your requirements.
- Open the
index_widgets_chat.htmlfile in the browser and see the chat window along with the widgets.
- If you want to host the Panels individually use the
index_widgets.htmlfile. See the GitHub for hosting the same in your web site.