자주 묻는 질문 중 하나는 봇에서 인간 상담사에게 채팅을 전송하는 방법입니다. 이 작업은 봇이 고객 서비스 공간에 있는 경우 특히 필요합니다. 챗봇은 인간을 완전히 대체하기 위한 것이 아닙니다. 챗봇이 만족스럽게 대답하지 못하거나 사용자가 처음부터 사람과 대화하고 싶을 때가 많습니다. 이 경우 챗봇은 채팅을 인간 상담원이나 고객 관리 담당자에게 전송해야 합니다. 하지만 어떻게 할 수 있을까요? 본 문서에서는 Kore.ai 상담사 전환을 사용하여 라이브 채팅을 봇에 통합하는 방법에 대해 간략하게 설명합니다. 상담사 전환용 소스 코드는 Kore.ai github repo에서 사용할 수 있습니다: https://github.com/Koredotcom/BotKit
개요
봇이 전체 솔루션의 핵심 요소가 될 것입니다. 봇은 정상적인 기능을 모두 수행하는 것 외에도 사용자와 상담사 간의 대리인 역할을 합니다.
- 봇: 사용자가 상호 작용하는 채팅 봇.
- 사용자: 사용자는 이 봇을 사용하는 고객입니다.
- 상담사: 상담사는 사용자와 채팅하는 사람입니다. 상담사는 채팅 창도 필요합니다. 이를 위해 liveprson/livechat 소프트웨어를 사용합니다.
전제 조건
- 완벽한 기능을 갖춘 봇(뱅킹 봇을 사용하겠습니다).
- Kore의 github에서 BotKit SDK를 다운로드
- Node.js를 다운로드 및 설치합니다. BotKit SDK를 사용하려면 SDK가 설치된 서버에서 node.js를 실행해야 합니다.
https://nodejs.org/en/download/로 이동하여 Mac의 경우 .pkg 파일 유형으로 OS를 선택하고 Windows의 경우 .msi 파일 유형을 선택합니다.- 터미널 창에서
node -v명령을 실행하여 설치 및 버전을 확인합니다(예: v6.10.2).
- 테스트 콜백 서버 애플리케이션입니다. 콜백 서버 애플리케이션을 시뮬레이션하기 위해 https://dl.equinox.io/ngrok/ngrok/stable의 NGROK를 사용할 것입니다. 다음은 NGROK를 설치하는 단계입니다.
- https://dl.equinox.io/ngrok/ngrok/stable를를 엽니다.
- 운영 체제에 맞는 ngrok 파일을 다운로드하고 설치합니다.
- Windows에서 NGROK 다운로드:
- Windows 시스템에 32비트 또는 64비트용 zip 파일 다운로드
- 압축을 풀고
ngrok.exe를 실행하여 ngrok를 설치합니다.
- Mac에서 NGROK 다운로드:
Command+Space키를 누르고 Terminal을 입력한 다음 enter/return 키를 누릅니다.- 터미널 앱에서 실행:
ruby -e "$(curl -fsSL https://raw.githubusercontent.com/Homebrew/install/master/install)" < /dev/null 2> /dev/null및 enter/return 키를 누릅니다. 화면에 암호를 입력하라는 메시지가 나타나면 Mac의 사용자 암호를 입력하여 계속 진행하세요. 암호를 입력할 때 화면에 표시되지 않지만, 시스템에서 암호를 허용합니다. 암호를 입력하고 Enter/Return 키를 누르면 됩니다. 그런 다음 명령이 완료될 때까지 기다립니다. - Run
brew cask install ngrok
- Windows에서 NGROK 다운로드:
- 라이브 에이전트 소프트웨어. LiveChatInc.com을 사용할 것입니다. 본인 소유의 LiveChat 구독을 사용하거나, LiveChatInc.com에서 Start using LiveChat now!에 회사 이메일을 입력하여 무료 30일 평가판 계정을 설정할 수 있습니다. 가입하고 계정을 생성합니다.
설계 및 설정
- 봇 개발자로 Kore.ai 봇 빌더(https://bots.kore.ai/botbuilder)를 엽니다.
- 상담사 전환을 설정해야 하는 봇을 선택합니다.
- 대화 작업(콜백 지원)을 열거나 생성하고 상담사 전환 노드를 추가합니다.
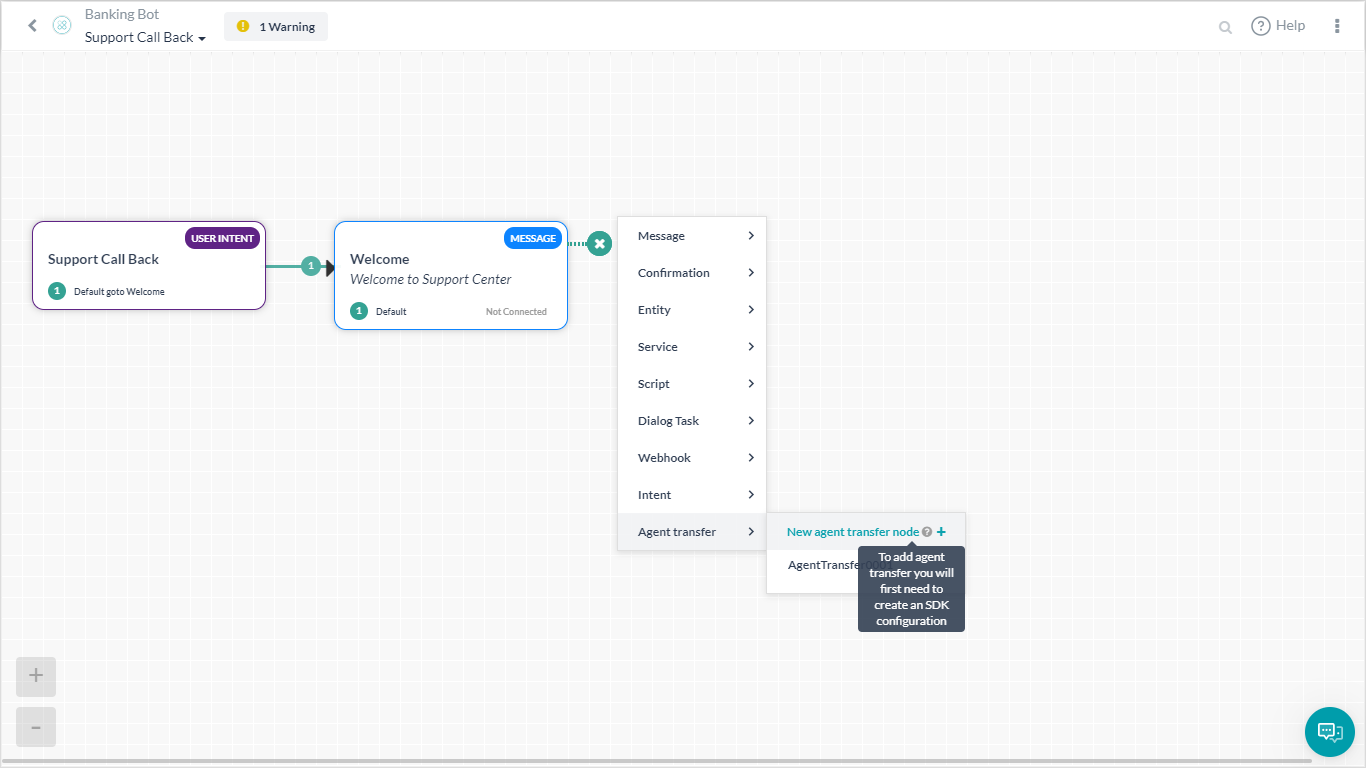
- 이름(LiveChat) 및 설명을 입력하고 저장을 클릭합니다.
- ‘SDK가 현재 설정/구독되지 않았습니다. API 확장으로 이동하여 SDK를 설정하세요.‘라는 메시지를 보게 될 겁니다. SDK를 설정하는 방법은 본 문서에서 나중에 보여드릴 것이기 때문에 현재 이 메시지는 무시하세요.
- 봇 빌더 화면에서 API 확장 -> 상담사 전환으로 이동
- 앱 이름 섹션에서 목록의 기존 앱을 선택하거나 앱 생성 옵션을 사용하여 새 앱을 생성합니다.
- 봇 ID, 클라이언트 ID, 클라이언트 시크릿 키를 기록합니다.
- BotKit SDK 이벤트가 호출할 애플리케이션의 콜백 URL을 입력합니다. NGROK를 사용하고 있으므로 콜백 URL을 얻는 방법을 보여드리겠습니다:
- Terminal 창에서 다음 명령으로 ngrok를 시작하여 포트 8003을 모니터링합니다.
ngrok http 8003. - ngrok 포워딩 URL을 복사합니다. 형식은 다음과 같습니다.
http://XXXXXXaa.ngrok.io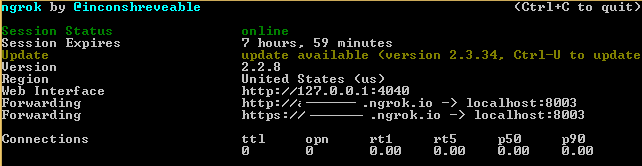
- 이 포워딩 URL을 콜백 URL로 사용하고 저장합니다. 참고 사항: ngrok가 다시 시작될 때마다 포워딩 URL이 변경됩니다. ngrok이 다시 시작될 때마다 콜백 URL을 변경해야 합니다.
- Terminal 창에서 다음 명령으로 ngrok를 시작하여 포트 8003을 모니터링합니다.
- 상담사 전환은 대화 수준에서 설정됩니다. 대화 작업을 열고 상담사 전환 노드를 열어 설정이 아래와 보이는 것과 같이 저장되었는지 확인할 수 있습니다. 필수 이벤트를 선택할 수 있습니다(자세한 내용은 아래 참조).
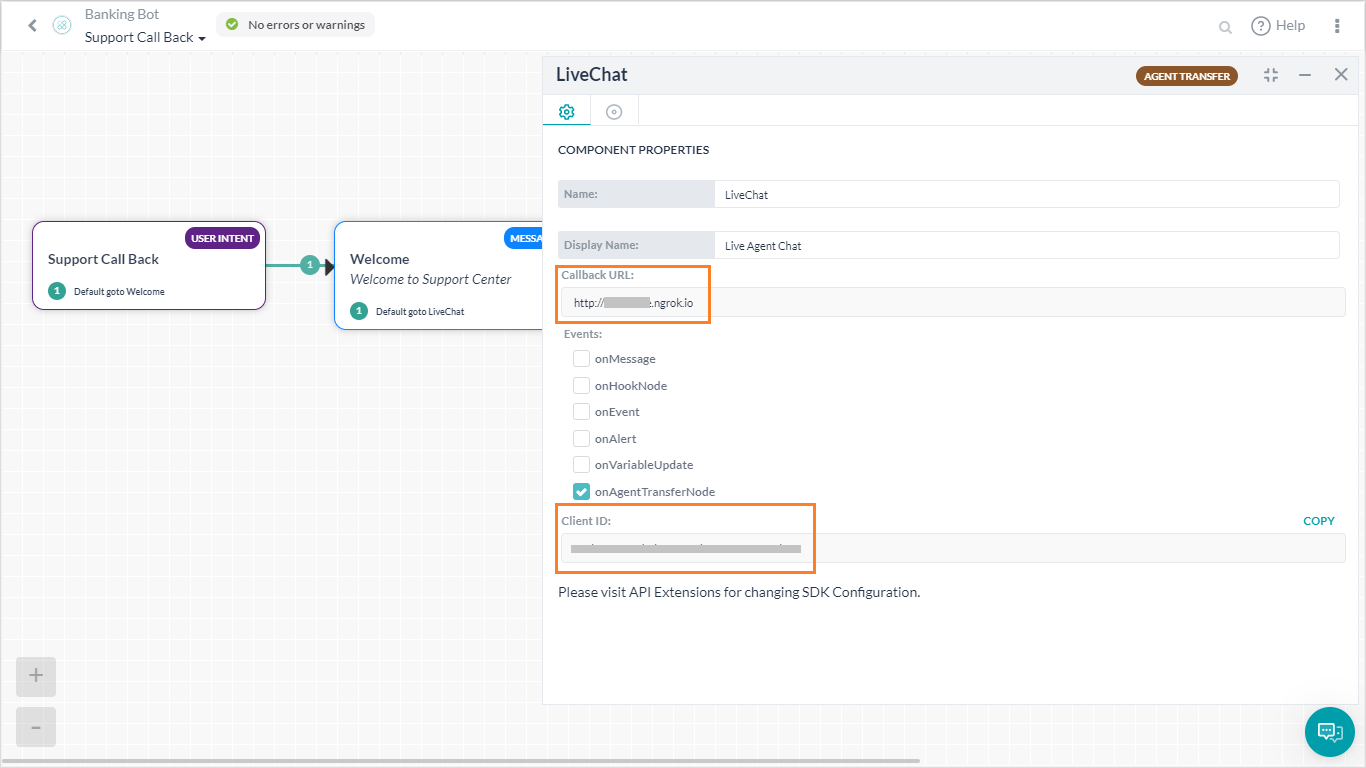
- 엔터프라이즈 요건 및 라이선스 가용성에 따라 LiveChat, LivePerson, Concentrix, Vayusphere 등과 같은 라이브 에이전트 소프트웨어를 설치합니다. LiveChat을 사용하고 있기 때문에 상담사 전환에 필요한 라이선스 세부 정보를 얻는 방법을 알려드리겠습니다.
- LiveChat 계정에 로그인합니다.
- 왼쪽 탐색에서 설정으로 이동하여 채팅 링크를 선택합니다.
- URL을 복사하고 라이선스 코드를 기록합니다. URL이
https://lc.chat/now/104xx297/라면 라이선스 코드는 다음과 같습니다.104xx297
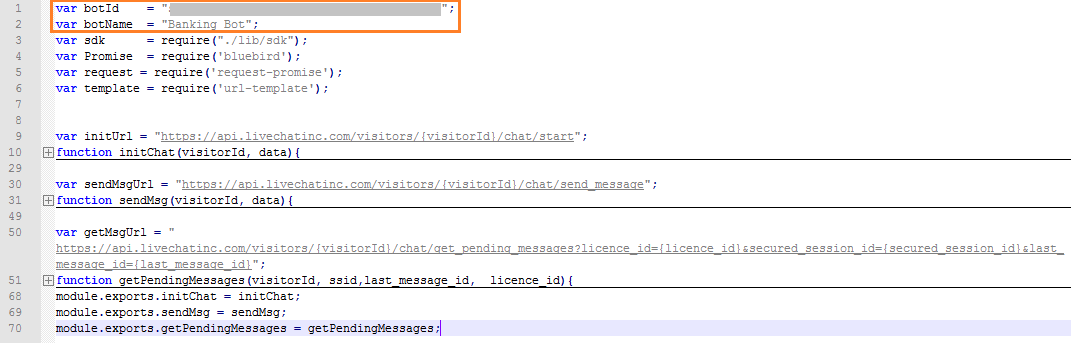
- 다운로드한 BotKit SDK 폴더를 열고 다음을 수행합니다.
- 편집
livechatapi.js:- 이전에 복사한 봇의 botId와 botName을 각각 부여하세요.
- 이 JS 파일은 3개의 Kore API를 포함함 – 초기화, 메시지 보내기, 메시지 받기. 필요하다면 인간 상담사 전환용으로 작성된 새 API를 여기에 넣어야 합니다. 예: 연결을 끊어야 한다면 작성된 연결 API를 끊고 livechatapi.js로 이동해야 합니다.
- 편집
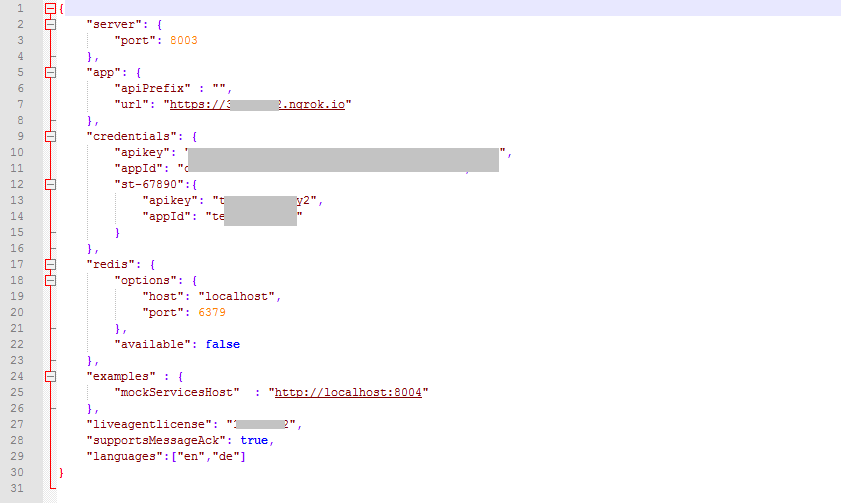
config.json- 클라이언트 ID, 클라이언트 시크릿 키, 실행 중인 각 서버 포트 및 타사 서버의 liveagent 라이선스가 여기에 표시됩니다.
- 클라이언트 ID, 클라이언트 시크릿은 이벤트 및 확장에서 복사할 수 있습니다 – 상담사 전환
- ngrok 포워딩 URL은 ngrok 실행 인스턴스에서 복사할 수 있습니다. 이것은 콜백 URL입니다. 이것은 URL 엔트리여야 합니다.
- Liveagentlicense는 livechat의 채팅 링크에 주어진 코드입니다
- 편집
LiveChat.js- 이전에 복사한 봇의 botId와 botName을 각각 부여하고 저장
- 이전에 복사한 봇의 botId와 botName을 각각 부여하고 저장
- app.js를 편집
- 다음 줄을 추가합니다.
sdk.registerBot(require('./LiveChat.js')) - 필요하지 않다면 기존 SDK.registerBot 문을 삭제합니다.
- 다음 줄을 추가합니다.
- 편집


실행
- 터미널 창을 열고 다음 명령을 입력하여 BotKit SDK를 실행합니다.
node app.js - 아래 보이는 대로 오류 없이 서버를 실행하기 위해 누락된 모듈을 모두 설치하세요. 예를 들어, "method url-template, node-schedule is missing" 오류가 표시되면 Windows의 경우
npm install <module-name>을 사용하여 위의 모듈을 설치하고 Mac의 경우sudo npm install <module-name>을 사용합니다. - ngrok 및 node.js 서버가 서로 다른 터미널에서 실행됩니다.
- 사용자가 봇에서 채팅을 시작하면 봇은 호출을 상담사에게 전송하고 사용자에게 메시지를 전송합니다
- 상담사는 livechat에서 이에 대한 알림을 받습니다
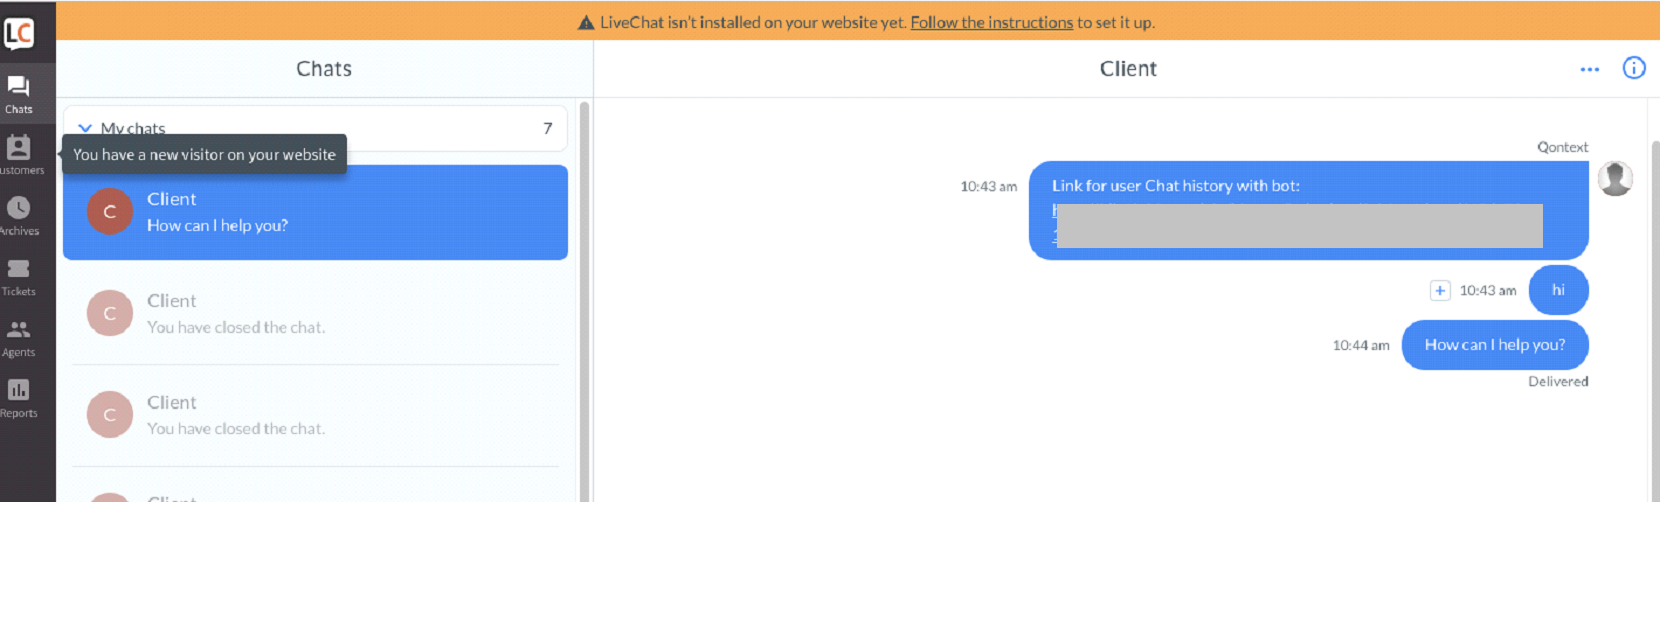
- 이제 상담사와 사용자 간의 연결이 설정되고 대화가 계속됩니다.
이벤트
참고 사항: 사용자, BOT에서 메시지를 보내고 상담사에게 전송하는 데 필요한 이벤트 및 방법은 LiveChat.JS에 설명되어 있습니다.
- on_user_message 이벤트는 사용자가 메시지를 보내고 sendBotMessage 메서드를 사용하여 이 메시지를 봇에 보낼 때 트리거 됩니다.
- on_bot_message는 봇이 메시지를 보낼 때 트리거 되고 SendUserMessage 메서드를 사용하여 이 메시지를 사용자에게 보냅니다.
- on_agent_transfer 이벤트는 서비스 agentTransfer 노드가 봇에서 트리거 될 때 트리거 됩니다. 그리고 이 이벤트는 내부적으로 initChat API를 호출하는 connectToAgent 메서드를 사용하여 에이전트에 연결됩니다.
- gethistory 메서드는 봇과 사용자의 채팅 기록을 전환된 상담사에게 제공합니다
- scheduleJob은 5초마다 실행되며 내부적으로 getPendingMessages를 호출하는 상담사에서 보류 중인 메시지를 폴링합니다
- getPendingMessages는 상담사에서 보류 중인 모든 메시지를 가져와서 이를 사용자에게 전달합니다.
- chat_closed는 상담사가 사용자와 채팅을 종료할 때 트리거 됩니다.
よくある質問の1つは、チャットをBotからヒューマンエージェントに転送する方法です。これは、Botがカスタマーサービス期間にある場合は特に必要です。チャットBotが完全に人間に置き変わることはありません。多くの場合、チャットBotが満足に答えられない、または最初からユーザーが人間と話したい/チャットしたい場合があります。この場合、チャットBotはチャットをヒューマンエージェントまたはカスタマーケア担当者へ転送する必要があります。どのようにそれを達成するのでしょうか? この記事では、Kore.aiエージェント転送を使用してライブチャットをBotに連携する方法の概要を説明します。エージェント転送のソースコードは、以下のKore.ai githubリポジトリにあります。https://github.com/Koredotcom/BotKit
概要
当社のBotはソリューション全体の中心部分です。通常のすべての機能の実行の他に、当社のBotはユーザーとエージェント間のプロキシとしても機能します。
- Bot: ユーザーがインタラクトするチャットBot。
- ユーザー:ユーザーとは このBotを使用する顧客です。
- エージェント:エージェントとはユーザーとチャットする人間です。エージェントにもチャットウィンドウが必要です。このために、当社はliveperson/livechatソフトウェアを使用します。
Prerequisites
- 完全機能Bot(当社はバンキングBotを使用)。
- Koreのgithub からBotKit SDKをダウンロードします。
- Node.jsをダウンロードし、インストールします。BotKit SDKをSDKがインストールされている同じサーバー内で実行するにはnode.jsが必要です。
https://nodejs.org/en/download/へ移動し、Macの場合は.pkgファイルタイプとして、Windowsの場合は.msiファイルタイプとしてOSを選択します。- 端末ウィンドウで、
node -vコマンドを実行して、インストールとバージョン、たとえばv6.10.2を検証します。
- テストコールバックサーバーアプリケーション。https://dl.equinox.io/ngrok/ngrok/stable からの NGROKを使用して、コールバックサーバーアプリケーションをシミュレーションします。以下は、NGROKをインストールするステップです。
- https://dl.equinox.io/ngrok/ngrok/stable を開きます。
- オペレーティングシステムのngrokファイルをダウンロードおよびインストールします。
- WindowsへのNGROKのダウンロード:
- Windowsマシン32-ビットまたは64-ビット用のzipファイルをダウンロードします。
- 解凍して、
ngrok.exeファイルを実行し、ngrokをインストールします。
- MacへのNGROKのダウンロード:
Command+Spaceを押し、端末を入力し、Enter/Returnキーを押します。- 以下の端末アプリを
ruby -e "$(curl -fsSL https://raw.githubusercontent.com/Homebrew/install/master/install)" < /dev/null 2> /dev/null実行し、Enter/Returnキーを押します。画面でパスワードの入力を促されたら、Macのユーザーパスワードを入力して、続行してください。パスワードを入力しても画面上には表示されませんが、システムは承認しています。したがって、パスワードを入力して、ENTER/RETURNキーを押します。コマンドが終了するのを待機します。 - ライブエージェントソフトウェアを
brew cask install ngrok
- WindowsへのNGROKのダウンロード:
- 実行します。LiveChatInc.com を使用します。独自のLiveChatサブスクリプションを使用、または LiveChatを今すぐ始める!にビジネスeメールを入力して、 LiveChatInc.comで30日間の無償試用アカウントをセットアップできます。サインアップして、アカウントを作成します。
設計および設定
- Bot開発者として、Kore.ai Botビルダー – https://bots.kore.ai/botbuilder を開きます。
- エージェント転送を設定する必要があるBotを選択します。
- ダイアログタスク(サポートコールバック)開くまたは作成し、 エージェント転送ノードを追加します。
- 名前(LiveChat)と説明を入力し、保存します。
- メッセージ「SDKは現在設定/サブスクリプションされていません。APIの拡張へ移動して、SDKを設定してください」が表示されます。この記事の後半でSDKの設定方法を示しますので、現在はこのメッセージは無視してください。
- Botビルダー画面から、API拡張 -> エージェント転送へ移動します。
- アプリ名セクションで、リストから既存のアプリを選択、またはアプリ作成オプションを使用して新しいアプリを作成します。
- BotID、クライアントID および クライアントシークレットキーを書き留めます。
- BotKIt SDKイベントが呼び出すアプリケーションのコールバックURLを入力します。NGROKを使用しているため、コールバックURLの取得方法を示します。
- 端末Windowで、ngrok を起動し、以下のコマンドを使用してポート8003を監視します。
ngrok http 8003. - ngrokを転送するURLをコピーします。以下のフォーマットとなります。
http://XXXXXXaa.ngrok.io - コールバックURLとしてこの転送URLを使用し、保存します。注意:ngrokが再起動されると、常に転送URLが変更されます。ngrokが再起動されるたびに、コールバックURLが変更されていることを確認してください。
- 端末Windowで、ngrok を起動し、以下のコマンドを使用してポート8003を監視します。
- エージェント転送はダイアログレベルで設定されます。ダイアログタスクを開き、エージェント転送ノードを開き、以下に示すように設定が保存されていることを確認できます。必須イベントは選択できます(詳細は以下を参照)。
- エンタープライズ要件およびライセンスの可用性に応じて、Livechat、Liveperson、Concentrix、Vayusphere などのライブエージェントソフトウェアをインストールします。LiveChatを使用しているため、エージェント転送に必要なライセンスの取得方法を知る必要があります。
- LiveChatアカウントにサインインします。
- 左のナビゲーションから設定へ移動し、チャットリンクを選択します。
- URLをコピーし、ライセンスコードを書き留めます。URLが
https://lc.chat/now/104xx297/の場合、ライセンスコードは104xx297
- ダウンロードした BotKit SDKフォルダを開き、以下を行います。
- 編集
livechatapi.js:- 前にコピーしたBotのそれぞれのbotIdとbotNameを指定します。
- このJSファイルには、3つのKoreのAPI – 初期化、メッセージ送信、メッセージ取得が含まれます。必要に応じて、ヒューマンエージェント転送に記述された新しい APIは、ここに配置する必要があります。例:接続を終了する必要がある場合は、記述した終了接続 apiはlivechatapi.jsに入る必要があります。
- 編集
config.json- クライアントID、クライアントシークレットキー、実行中のそれぞれのサーバーポート、およびサードパーティのliveagentライセンスがここに入ります。
- クライアントId、クライアントシークレットは、イベントおよび拡張 – エージェントへの転送からコピーできます。
- Ngrok転送urlはインスタンスを実行中のngrokからコピーできます。コールバックurlです。これがURLエントリです。
- Liveagentlicenseは、Livechatのチャットリンクで指定されるコードです。
- 編集
LiveChat.js- 前にコピーしたBotのそれぞれのbotIdとbotNameを指定し、保存します。
- 前にコピーしたBotのそれぞれのbotIdとbotNameを指定し、保存します。
- app.jsを編集します。
- 以下の行を追加します。
sdk.registerBot(require('./LiveChat.js')) - サポートされていない場合は、既存のsdk.registerBotステートメントを削除します。
- 以下の行を追加します。
- 編集
実行
- 端末ウィンドウを開き、以下のコマンドを入力してBotKit SDK を実行します。
node app.js - 以下に示すように、エラーなしでサーバーを正常に実行するために欠落しているモジュールがすべてインストールされていることを確認してください。例、エラー「メソッド url-template、node-scheduleが欠落しています」が表示される場合は、Windowsの場合はコマンド
npm install <module-name>、Macの場合はsudo npm install <module-name>を使用して、上のモジュールをインストールします。 - ngrokおよびnode.jsサーバーが別の端末で実行されます。
- ユーザーがBotからチャットを始める場合、Botはコールをエージェントに転送し、メッセージをユーザーに送信します。
- エージェントはlivechat上でこれに関する通知を受け取ります。
- これで、エージェントとユーザー間の接続が確立され、会話が続行します。
イベント
注意:ユーザー、Botからメッセージを送信、エージェントに転送するために必要なイベントとメソッドは、LiveChat.JSに概要説明されています。
- ユーザーがメッセージを送信すると、on_user_message イベントがトリガーされ、このメッセージはsendBotMessageメソッドを使用してBotへ送信されます。
- Botがメッセージを送信すると on_bot_message がトリガーされ、このメッセージはSendUserMessageメソッドを使用してユーザーへ送信されます。
- サービスagentTransferノードがBotでトリガーされると、on_agent_transfer イベントがトリガーされます。このイベントは内部でinitChat APIをコールするconnectToAgentメソッドを使用してエージェントに接続されます。
- gethistory メソッド、ユーザーのBotとのチャット履歴を転送されたエージェントに送信します。
- scheduleJob は5秒ごとに実行され、内部で getPendingMessagesをコールするエージェントからの保留メッセージをポーリングします。
- getPendingMessages はエージェントからのすべての保留メッセージを取得し、ユーザーに配信します。
- エージェントがユーザーとのチャットをクローズすると、chat_closed がトリガーされます。
Leave a Reply
One of the frequently asked questions is how to transfer a chat to a human agent from the Bot. This is especially necessary if your bot is in the space of customer service. Chatbots are not meant to completely replace humans. Many times chatbot will fail to answer satisfactorily or user would just want to talk/chat to a human from the beginning. When this happens the chatbot should transfer the chats to a human agent or a customer care representative. But how to achieve that?
In this article, we will give an overview of how we can integrate a live chat into our bot using Kore.ai Agent Transfer. The source code for the Agent Transfer is available at Kore.ai github repo: https://github.com/Koredotcom/BotKit
Overview
Our Bot would be the central piece to the entire solution. Apart from performing all its normal functionality, our bot would also act as a proxy between user and agent.
- Bot: Chat Bot that the Users interact.
- Users: Users are the customers who would be using this Bot.
- Agent: Agents are humans who would chat with the users. Agent will also need a chat window. For this we will use liveperson/livechat software.
Prerequisites
- A fully functional Bot (we will be using a Banking Bot).
- Download BotKit SDK from Kore’s github
- Download and Install the Node.js. The BotKit SDK requires node.js to run on the same server where the SDK is installed.
- Go to
https://nodejs.org/en/download/and select your OS as a .pkg file type for Mac and .msi file type for Windows. - In a Terminal window, run the
node -vcommand to verify installation and version, for example, v6.10.2.
- Go to
- A test callback server application. We will be using NGROK from https://dl.equinox.io/ngrok/ngrok/stable to simulate the callback server application. Following are the steps to install NGROK:
- Open https://dl.equinox.io/ngrok/ngrok/stable.
- Download and install the ngrok file for your operating system.
- Downloading NGROK on Windows:
- Download the zip file for your Windows machine 32-bit or 64-bit
- Unzip and run the
ngrok.exefile to install ngrok.
- Downloading NGROK on mac:
- Press
Command+Spaceand type Terminal and press enter/return key. - Run in Terminal app:
ruby -e "$(curl -fsSL https://raw.githubusercontent.com/Homebrew/install/master/install)" < /dev/null 2> /dev/nulland press enter/return key.
If the screen prompts you to enter a password, please enter your Mac’s user password to continue. When you type the password, it won’t be displayed on the screen, but the system would accept it. So just type your password and press ENTER/RETURN key. Then wait for the command to finish. - Run
brew cask install ngrok
- Press
- Downloading NGROK on Windows:
- A live agent software. We will be using LiveChatInc.com. You can use your own LiveChat subscription or set up a free 30-day trial account at LiveChatInc.com by entering your business email in the Start using LiveChat now!. Sign up and create an account.
Design and Configuration
- As a Bot developer, open Kore.ai Bot Builder – https://bots.kore.ai/botbuilder
- Select the Bot for which Agent Transfer needs to be configured.
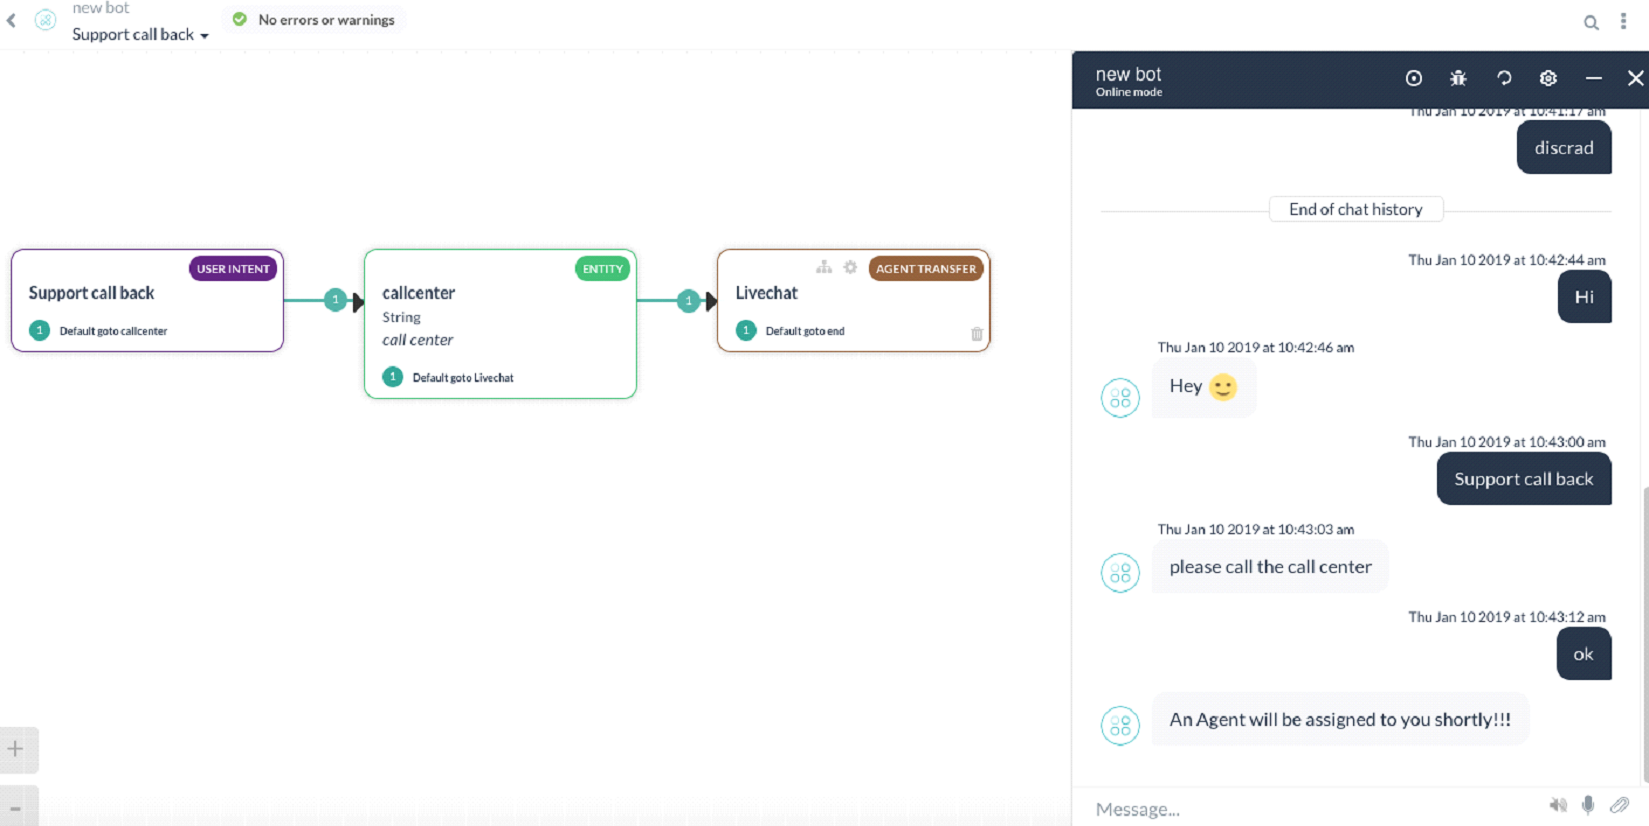
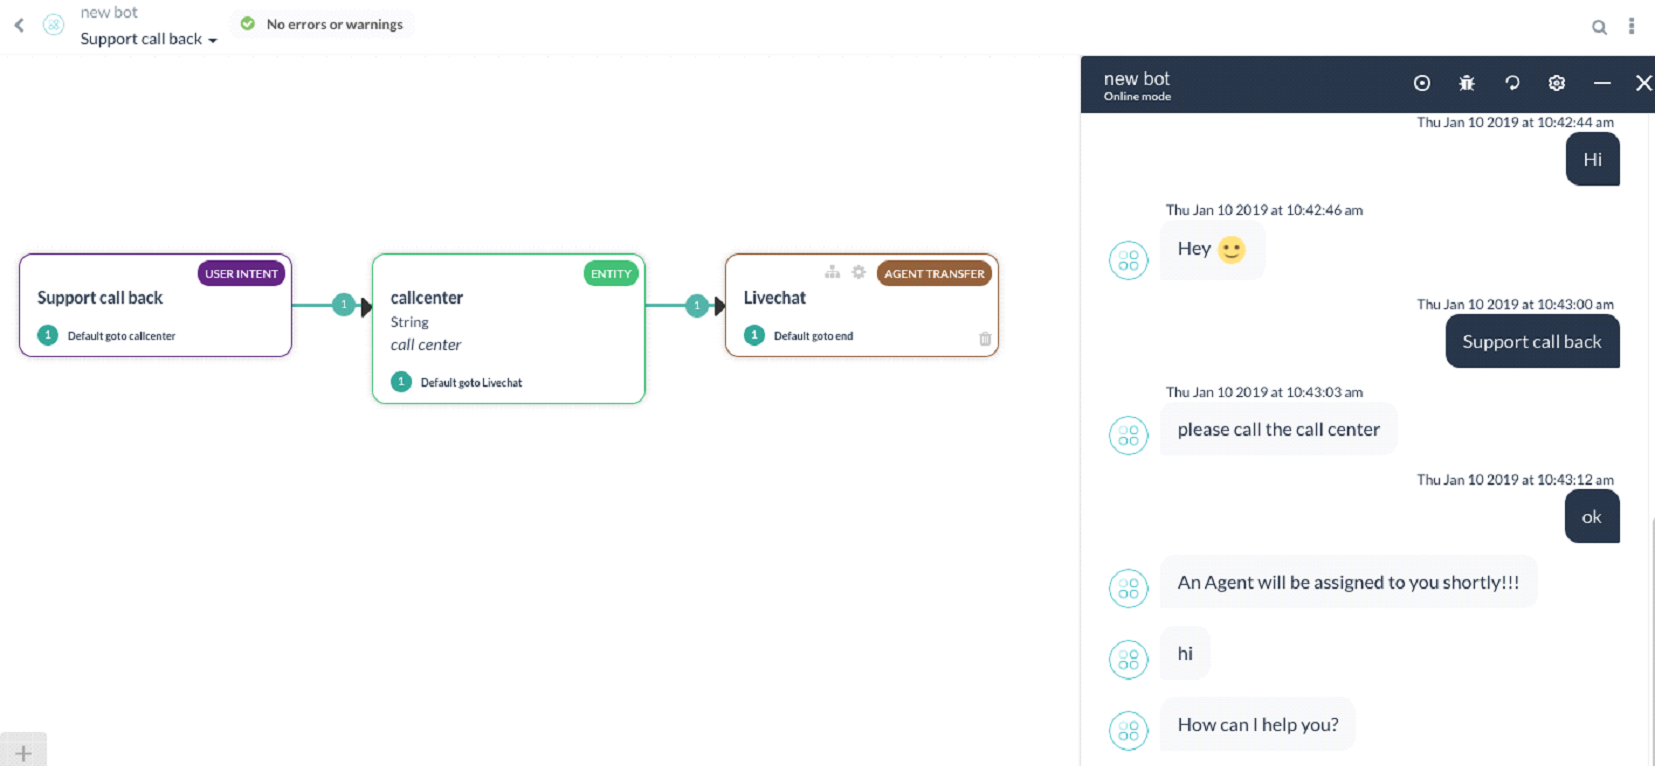
- Open or create a dialog task (Support Call Back) and add an Agent transfer node.
- Enter a Name (LiveChat) and Description and Save.
- You will see a message ‘SDK is not currently configured/Subscribed. Please go to API Extensions to configure the SDK.’. For now ignore this message as we will be showing how to configure SDK, later in this article.
- From the Bot Builder screen traverse to API Extensions -> Agent Transfer
- In the App Name section, select an existing app from the list or use the Create App option to create a new app.
- Make a note of the Bot ID, Client ID and Client Secret keys.
- Enter the Callback URL of your application, to be invoked by BotKIt SDK events. Since we are using NGROK, we will show how to obtain the callback URL:
- In a Terminal Window, start ngrok to monitor port 8003 using the following command:
ngrok http 8003. - Copy ngrok forwarding URL. It will be in the format –
http://XXXXXXaa.ngrok.io
- Use this forwarding URL as the call back URL and save.
Note: The forwarding URL changes whenever the ngrok is restarted. Make sure you make the changes to the callback URL every time ngrok is restarted.
- In a Terminal Window, start ngrok to monitor port 8003 using the following command:
- The agent transfer is configured at the dialog level. You can open the dialog task, and open agent transfer node to see that the configuration is saved as shown below. You can select the Events required (see below for details)
- Install any live agent software eg Livechat, Liveperson, Concentrix, Vayusphere etc depending on your enterprise requirement and license availability. Since we are using LiveChat, we will should you how to obtain the license details needed for Agent Transfer:
- Sign in to your LiveChat account.
- Go to Settings from the left navigation and select chat link.
- Copy the URL and note the license code. If the URL is
https://lc.chat/now/104xx297/and then the license code is104xx297
- Open the downloaded BotKit SDK folder and do the following:
- Edit
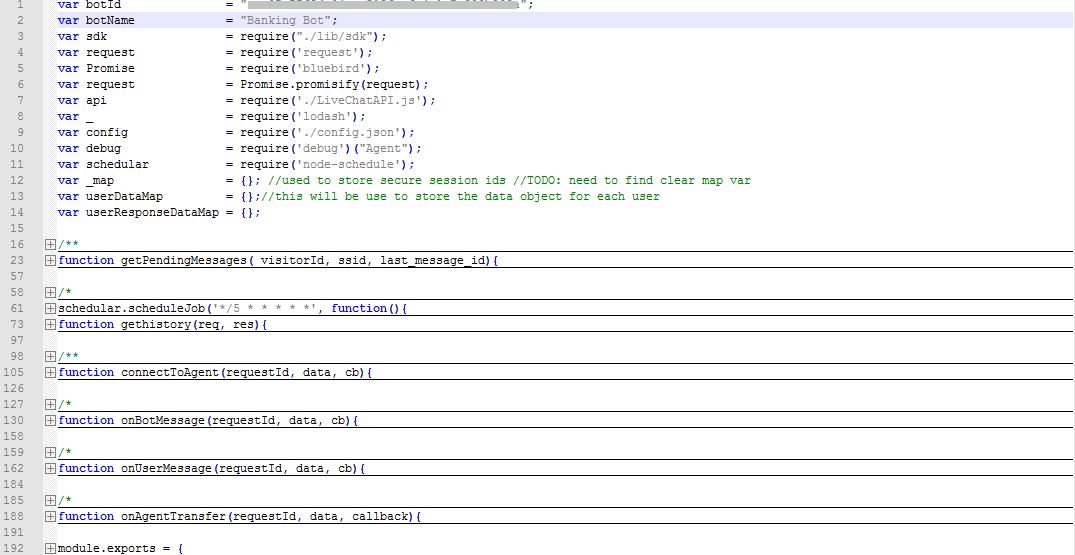
livechatapi.js:- Give the respective botId and botName of your bot, which you have copied earlier.
- This JS file contains 3 API’s of Kore – Initialization, Send Message, Get Message. If required, any new API’s written for human agent transfer should be put in here.
Example: If closing connection is required, then close connection api written needs to go into livechatapi.js
- Edit
config.json- Client ID, Client Secret key, respective server ports running and liveagent license of the third-party server goes here.
- Client Id, Client Secret can be copied from Events and Extensions – Agent Transfer.
- ngrok forwarding url can be copied from ngrok running instance. It is the call back url. This should be the URL entry.
- Liveagentlicense is the code given in the chatlink of livechat
- Edit
LiveChat.js- Give the respective botId and botName of your bot, which you have copied earlier and save
- Give the respective botId and botName of your bot, which you have copied earlier and save
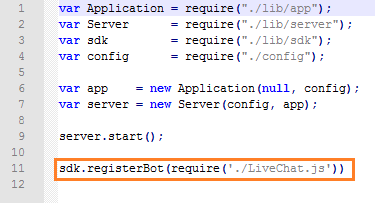
- Edit app.js
- Add the following line
sdk.registerBot(require('./LiveChat.js')) - Delete any existing sdk.registerBot statements, if not needed
- Add the following line
- Edit
Execution
- Open a terminal window and run the BotKit SDK by entering the command:
node app.js - Please make sure to install all the missing modules for running the server successfully without any errors as shown below.
Example, if error “method url-template, node-schedule are missing” is shown, then install the above modules using command
npm install <module-name>for windows,sudo npm install <module-name>for mac - ngrok and node.js server will be running in different terminals.
- When user initiates the chat from the bot, bot transfers the call to an agent and sends a message to the user
- Agent receives a notification about this on the livechat
- Now connection between agent and the user has been established and the conversation continues.
Events
Note: The events and methods required for sending messages from User, bot and transferring to Agent are outlined in LiveChat.JS
- on_user_message event is triggered when a user sends a message and this message is sent to the bot using sendBotMessage method.
- on_bot_message is triggered when bot sends a message and this message is sent to the user using SendUserMessage method.
- on_agent_transfer event is triggered when the service agentTransfer node is triggered in bot. And this event connects to the agent using connectToAgent method, which internally calls initChat API
- gethistory method, gives the chat history of the user with the bot to the transferred agent
- scheduleJob is run for every 5 secs and it polls for the pending messages from the Agent, which internally calls getPendingMessages
- getPendingMessages gets all the pending messages from Agent and delivers it to the User
- chat_closed gets triggered when the agent closes the chat with the user.