문제 설명
뱅킹 봇이 다음과 같은 시나리오를 해결하려고 한다고 생각해 보세요.
- 이미 등록된 사용자가 추가 계좌를 개설하려고 합니다.
- 사용할 수 있는 계좌 유형에는 세 가지가 있으며, 각 유형에는 다음과 같은 추가 옵션이 있습니다:
- 저축 계좌,
- 현금 카드를 선택하고 최소 잔액을 설정할 수 있는 옵션이 있는 당좌 예금 계좌,
- 카드 유형을 플래티넘, 골드, 실버 또는 베이직으로 선택할 수 있는 옵션이 있는 신용 카드
- 위의 데이터는 UI 양식을 사용하는 사용자에게서 수집됩니다.
- 이 데이터를 데이터 테이블로 업데이트해야 합니다.
전제 조건
- 봇 구축 지식
- 다음에 액세스할 수 있는 뱅킹 봇
- 여기에서 생성된 것과 같은 고객 세부 정보 테이블
- 계좌 세부 정보 테이블, 위의 링크에 표시된 것과 같은 단계를 사용하여 다음 데이터 테이블을 생성합니다.
- 이름(예: accountdetails)
- 설명(예: 계좌 세부 정보 테이블)
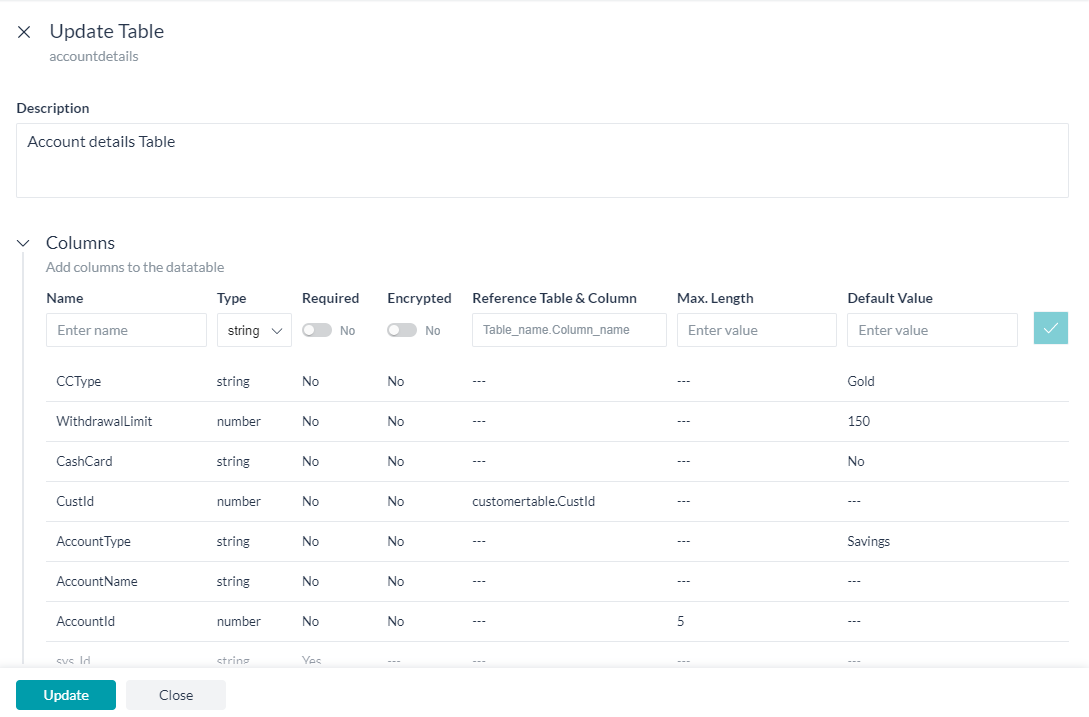
- 열 섹션에서 다음 세부 정보를 추가합니다:
열 이름 유형 필수 추가 설정 AccountId 숫자 예 암호화됨 및 최대 길이 5 AccountName 문자열 예 – AccountType 문자열 아니요 – CustId 숫자 예 참조 테이블 및 열을 customertable.CustId로 CashCard 문자열 아니요 – WithdrawalLimit 숫자 아니요 – CCType 문자열 아니요 –
- UI Form, 여기에 보여지는 대로 설정된 UI Form을 사용하겠습니다.
설정
다음 시나리오를 각각 하나씩 살펴보겠습니다.
- 다음을 위한 대화 작업:
- 고객 ID 캡처,
- UI 양식을 트리거 하여 계좌 세부 정보 수집,
- 서비스 노드를 호출하여 계좌 데이터를 추가합니다.
대화 작업 설정
대화 작업을 만들고 양식 노드를 추가하여 위 단계에서 생성한 UI 양식을 트리거하고 서비스 노드를 사용하여 양식 데이터에서 새 계좌를 추가하기 위해 서비스 노드를 사용할 것입니다. 
대화 작업 생성
- 왼쪽 탐색 메뉴에서 봇 작업 -> 대화 작업을 선택합니다.
- 대화 작업에서 +를 클릭하여 새 작업 생성
- IntentName 입력(예: AddAccount)
- 생성 및 진행하여 대화 빌더 페이지를 엽니다
- 의도 노드 기본 설정을 유지하고 의도 노드를 닫습니다.
- 의도 노드 옆의 +를 클릭하고 엔티티 노드를 선택합니다. 이것은 고객 ID를 캡처하는 데 사용됩니다
- 이름 입력(예: CustId)
- 유형을 숫자로 선택
- 사용자 프롬프트(고객 ID 입력)
- 엔티티 노드를 닫습니다.
- 서비스 노드를 추가하여 입력한 고객 ID의 유효성을 확인합니다.
- 고객 ID가 유효하다면 논리 노드를 추가하여 양식을 진행하고 그렇지 않으면 고객 ID를 묻는 메시지를 표시합니다.

- InvalidCustId는 다음 JavaScript를 포함한 메시지 노드입니다.
context.entities.CustId = null; print('유효하지 않은 고객 ID를 입력하셨습니다. 다시 시도해주세요'); - 그런 다음 양식 노드를 추가하고 드롭다운 목록에서 양식(OpenAccount)을 선택합니다.
- 양식 경험을 선택하라는 메시지가 표시됩니다. Kore.ai 봇 플랫폼을 사용하면 양식과 채널에 따른 대화를 통해 사용자 입력값을 수집할 수 있습니다.
- 이 활용 사례에서는 UI 양식만 경험을 선택하겠습니다.
- 양식 노드가 추가되면 양식 이름 등을 사용자 커스터마이징 할 수 있습니다.
- 이름을 OpenAccountForm으로, 표시 이름 을 계좌 개설을 위한 양식으로 변경합니다.
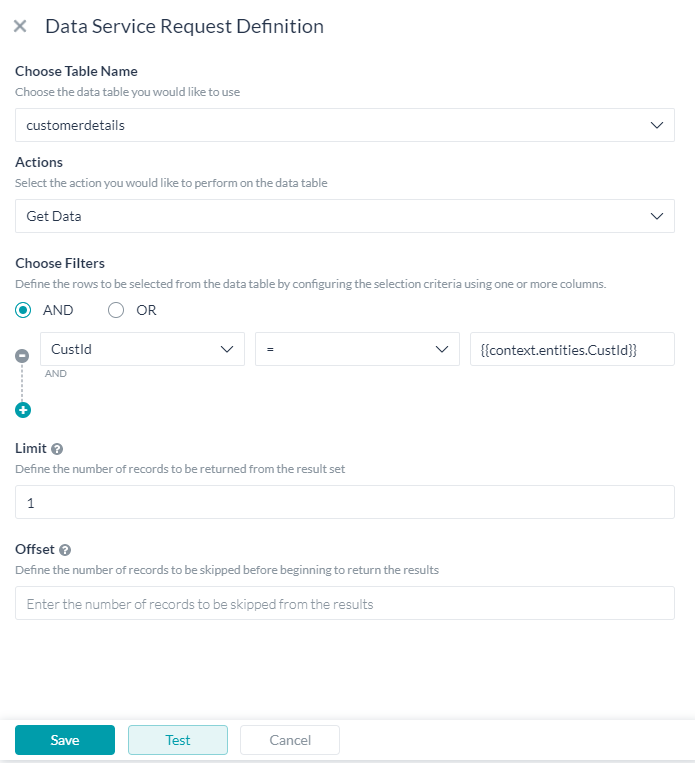
- 서비스 노드를 사용하여 고객 ID에 대한 기존 계좌 세부 정보를 가져옵니다
- 다음으로 스크립트 노드를 사용하여 양식 노드에서 반환된 값을 캡처하고 같은 프로세스를 처리하여 다음 계좌 ID 값을 얻고 원하지 않는 필드를 null로 설정하는 방법을 살펴보겠습니다.
- 다음 스크립트를 사용합니다:
//get the next account id var resultSet = context.GetAcctData.response.body.queryResult; var id = 0; if (!resultSet.length) { id=1; } else { for (var i=0; i<resultSet.length; i++) { if (id < resultSet[i].AccountId) { id = resultSet[i].AccountId; } } id++; } context.accountid = id; context.name=context.GetCustData.response.body.queryResult[0].CustName; //set unwanted fields to null if (context.forms.OpenAccount.accounttype == 'Savings') { context.cashcard = null; context.withdrawallimit = null; context.cardtype = null; context.type=context.forms.OpenAccount.accounttype; } if (context.forms.OpenAccount.accounttype == 'Checkings') { context.cardtype = null; context.cashcard = context.forms.OpenAccount.cashcard; context.withdrawallimit = context.forms.OpenAccount.withdrawallimit; context.type=context.forms.OpenAccount.accounttype; } if (context.forms.OpenAccount.accounttype == 'Credit Card') { context.cashcard = null; context.withdrawallimit = null; context.cardtype = context.forms.OpenAccount.cardtype; context.type=context.forms.OpenAccount.accounttype; }
- 다음 스크립트를 사용합니다:
- 서비스 노드를 사용하여 이전 스크립트 노드에 입력된 컨텍스트 변수를 사용하여 계좌 세부 정보를 추가합니다.

- 데이터 테이블 업데이트를 위한 양식 및 서비스 노드 대화가 준비되었습니다.
- 봇과 대화하고 단계를 따라 주어진 고객 ID에 계좌를 추가합니다.
결론
이 게시물에서 다음을 살펴보았습니다:
- 데이터 테이블에서 데이터 가져오는 방법,
- 대화에서 양식을 트리거 하는 방법,
- 양식에서 캡처한 데이터를 데이터 테이블에 추가하는 방법
このハウツーでは、ユーザーが追加の口座を作成できるバンキングBotのシナリオについてご説明します。UIフォームから収集されたデータをどのように使用してデータテーブルに口座を作成できるかを確認します。どのUIフォームがKore.ai Botプラットフォームでどのように導入されているかの詳細については、こちらを参照してください。どのデータテーブルがKore.ai Botプラットフォームでどのように導入されているかの詳細については、こちらを参照してください。
例題
以下のシナリオに取り組むバンキングBotを検討します。
- すでに登録済みのユーザーが追加の口座を開設したいと考えています。
- 利用可能な口座には3つのタイプがあり、それぞれに追加のオプションがあります。
- 普通預金口座
- キャッシュカードを選択して最小残高を設定するオプションを備えた当座預金口座
- プラチナ、ゴールド、シルバー、ベーシックからいずれかを選択できるクレジットカード
- 上記データはUIフォームを使用するユーザーから収集されます。
- このデータはデータテーブルに更新する必要があります。
Pre-requisites
- Botビルドナレッジ
- アクセス権付きバンキングBot
- ここで作成された顧客詳細テーブル
- 口座詳細テーブル、上のリンクで表示される同じステップを使用して、以下のデータテーブルを作成します。
- 名前、たとえばaccountdetails
- 説明、たとえば口座詳細テーブル
- 列セクションに、以下の詳細を追加します。
列名 タイプ 必須 追加設定 AccountId 数 あり 暗号化および最大長5 AccountName 文字列 あり – AccountType 文字列 なし – CustId 数 あり customertable.CustIdとしての参照テーブルおよび列 CashCard 文字列 なし – WithdrawalLimit 数 なし – CCType 文字列 なし –
- UIフォーム、 ここに示すように設定されたUIフォームを使用します。
設定
次の各シナリオを1つずつ考えてみましょう。
- ダイアログタスク:
- 顧客IDを取得
- UIフォームをトリガーして口座詳細を収集、および
- サービスノードを呼び出し、口座データを追加します。
ダイアログタスクの設定
ダイアログタスクを作成し、フォームノードを追加して上のステップで作成したUIフォームをトリガーし、サービスノードを使用してサービスコールし、フォームデータから新しい口座を追加します。
ダイアログタスクの作成
- 左のナビゲーションメニューからBotタスク -> ダイアログタスクを選択します。
- ダイアログタスクに対して+をクリックして、新しいタスクを作成します。
- IntentName、たとえばAddAccountを入力します。
- 作成および続行して、ダイアログビルダーページを開きます。
- インテントノードのデフォルト設定を保持し、インテントノードを閉じます。
- インテントノードの隣の+をクリックし、エンティティノードを選択します。これは顧客IDの取得に使用されます。
- 名前、たとえばCustIdを入力します。
- 数としてタイプを選択します。
- 顧客IDの入力として、ユーザープロンプトを選択します。
- エンティティノードを閉じます。
- サービスノードを追加し、入力した顧客IDの有効期限をチェックします。
- 顧客IDが有効の場合は、ロジックノードを追加し、そうでない場合は、顧客IDをプロンプト表示します。
- InvalidCustId は、以下のJavaScriptがあるメッセージノードです。
context.entities.CustId = null; print(「無効な顧客IDを入力しました。再試行してください」)
- 次に、フォームノードを追加し、ドロップダウンリストからフォームを選択します(OpenAccount)。
- フォームエクスペリエンスを選択する画面が表示されます。Kore.aiのBotプラットフォームを使用することで、フォームからの入力およびチャネルに基づいた会話の両方を通じて、ユーザー入力を収集できます。
- このユースケースでは、フォームUIのみエクスペリエンスを選択しましょう。
- フォームノードが追加され、フォーム名などをカスタマイズできるようになります。
- ここでは、名前をOpenAccountFormに、表示名を口座の開設へのフォームに変更します。
- サービスノードを使用して、顧客IDの既存の口座詳細を取得します。
- 次に、スクリプトノードを使用してフォームノードによって返された値を取得する方法を確認し、それを処理して次の口座IDを取得し、不要フィールドにnullを設定します。
- 以下のスクリプトを使用します。
//get the next account id var resultSet = context.GetAcctData.response.body.queryResult; var id = 0; if (!resultSet.length) { id=1; } else { for (var i=0; i<resultSet.length; i++) { if (id < resultSet[i].AccountId) { id = resultSet[i].AccountId; } } id++; } context.accountid = id; context.name=context.GetCustData.response.body.queryResult[0].CustName; //set unwanted fields to null if (context.forms.OpenAccount.accounttype == 'Savings') { context.cashcard = null; context.withdrawallimit = null; context.cardtype = null; context.type=context.forms.OpenAccount.accounttype; } if (context.forms.OpenAccount.accounttype == 'Checkings') { context.cardtype = null; context.cashcard = context.forms.OpenAccount.cashcard; context.withdrawallimit = context.forms.OpenAccount.withdrawallimit; context.type=context.forms.OpenAccount.accounttype; } if (context.forms.OpenAccount.accounttype == 'Credit Card') { context.cashcard = null; context.withdrawallimit = null; context.cardtype = context.forms.OpenAccount.cardtype; context.type=context.forms.OpenAccount.accounttype; }
- 以下のスクリプトを使用します。
- サービスノードを使用し、前のスクリプトノードで入力されたコンテキスト変数を使用して口座詳細を追加します。
- データテーブルを更新するフォームとサービスノードによるダイアログが準備できました。
- Botと話し、ステップに従って指定顧客IDに口座を追加します。
結論
この投稿では、以下を確認しました。
- データテーブルからのデータの取得方法
- ダイアログからフォームをトリガーする方法
- フォームから取得したデータのデータテーブルへの追加方法
Leave a Reply
In this How-To, we will explore a scenario in a Banking Bot, where the user can create an additional account.
We will see how data collected from the UI Forms can be used to create the account in a Data Table.
For details on what UI Forms are and how it is implemented in the Kore.ai Bots platform, refer here.
For details on what Data Tables are and how it is implemented in the Kore.ai Bots platform, refer here.
Problem Statement
Consider a Banking Bot trying to address the following scenarios:
- An already registered user wants to open an additional account.
- There are three types of accounts that are available, each with further options:
- Savings Account;
- Checking Account with an option to opt for a Cash Card and set a Minumum Balance;
- Credit Card with an option to choose the type of card to be Platinum, Gold, Silver or Basic
- The above data is collected from the user using a UI form.
- This data needs to be updated to the data table.
Pre-requisites
- Bot building knowledge
- A Banking Bot with access to
- Customer details table as created here
- Account details table, using the same steps shown in the above link create the following data table:
- Name, say accountdetails;
- Description, say Account details Table;
- Under the Column section add the following details:
Column Name Type Required Additional Settings AccountId number Yes Encrypted & Max Length of 5 AccountName string Yes – AccountType string No – CustId number Yes Reference table & column as
customertable.CustIdCashCard string No – WithdrawalLimit number No – CCType string No –
- UI Form, we will be using the UI Form configured as shown here.
Configurations
Let us consider each of the following scenarios one by one:
- Dialog Task to:
- capture the customer id;
- trigger the UI Form to gather account details; and
- invoke the service node to add the account data.
Dialog Task Configuration
We will be creating a dialog task and adding a form node to trigger the UI Form created in the above step and use a service node to make a service call to add the new account from the form data.
Create Dialog Task
- From the left navigation menu, select Bot Tasks -> Dialog Tasks.
- Click the + against the Dialog Tasks to create a new Task
- Enter IntentName, say, AddAccount
- Create & Proceed to open the dialog builder page.
- Retain the Intent Node default settings, and close the Intent Node.
- Click the + next to the intent node and select the Entity node. This will be used to capture the customer id
- Enter Name, say, CustId
- Select Type, as Number
- User Prompt, as Enter your Customer Id
- Close the entity node.
- Add a Service node to check for the validity of the customer id entered.
- Add a Logic node to proceed with the Form if the customer id is valid else prompt for the customer id.
- The InvalidCustId is a Message node with the following JavaScript:
context.entities.CustId = null; print('You have entered an invalid customer id, try again'); - Next, add a Form node and from the dropdown list select the form (OpenAccount).
- You will be prompted to select the Form Experience. Kore.ai Bots platform allows you to gather user input both from the form and through conversation based on the channel.
- For this use case, let us select Only Form UI experience.
- A Form Node would be added, you can customize the form name, etc.
- We are changing the Name to OpenAccountForm and Display Name to Form to open account.
- Using a Service node, fetch any existing account details for the customer id.
- Next, we will see how to capture the values returned by the Form Node using a Script node and process the same to get the next account id value and set to null the unwanted fields.
- Use the following script:
//get the next account id
var resultSet = context.GetAcctData.response.body.queryResult;
var id = 0;

if (!resultSet.length) {
    id=1;
} else {
    for (var i=0; i<resultSet.length; i++) {
        if (id < resultSet[i].AccountId) {
            id = resultSet[i].AccountId;
         }
        }
    id++;
    }
context.accountid = id;
context.name=context.GetCustData.response.body.queryResult[0].CustName;

//set unwanted fields to null
if (context.forms.OpenAccount.accounttype == 'Savings')
	{ context.cashcard = null;
	  context.withdrawallimit = null;
	  context.cardtype = null;
	  context.type=context.forms.OpenAccount.accounttype;
	  }

if (context.forms.OpenAccount.accounttype == 'Checkings')
	{ context.cardtype = null;
      context.cashcard = context.forms.OpenAccount.cashcard;
	  context.withdrawallimit = context.forms.OpenAccount.withdrawallimit;
	  context.type=context.forms.OpenAccount.accounttype;
	  }

if (context.forms.OpenAccount.accounttype == 'Credit Card')
	{ context.cashcard = null;
	  context.withdrawallimit = null;
	  context.cardtype = context.forms.OpenAccount.cardtype;
	  context.type=context.forms.OpenAccount.accounttype;
	  }
- Use the following script:
- Use a Service node to add the account details using the context variables populated in the previous Script node.
- Your dialog with form and service nodes to update the data table is ready.
- Talk to bot and follow the steps to add an account to a given customer id.
Conclusion
In this post, we have seen:
- How to fetch data from data tables;
- How to trigger the From from a Dialog;
- How to add the data captured from the form to a data table.