Kore.ai 봇에 Line 채널을 추가하려면, Webhook 통합을 설정하여 Line과 Kore.ai 간 통신을 설정해야 합니다. Kore.ai 봇에 Line 채널을 추가하면 봇의 최종 사용자가 사용자의 Line 계정을 사용하여 봇과 상호작용할 수 있습니다. 봇에 Line 채널을 추가하려면, 다음을 수행해야 합니다.

  1. Create a Provider – Line 채널을 설정하려면, Line 개발자 계정으로 로그인하여 봇에 사용하고자 하는 새 공급자를 생성하거나 공급자를 선택한 후 채널에 추가합니다. Line 채널을 활성화하려면 Line 개발자 포털에서 개발자 계정을 생성하고 등록해야 합니다.
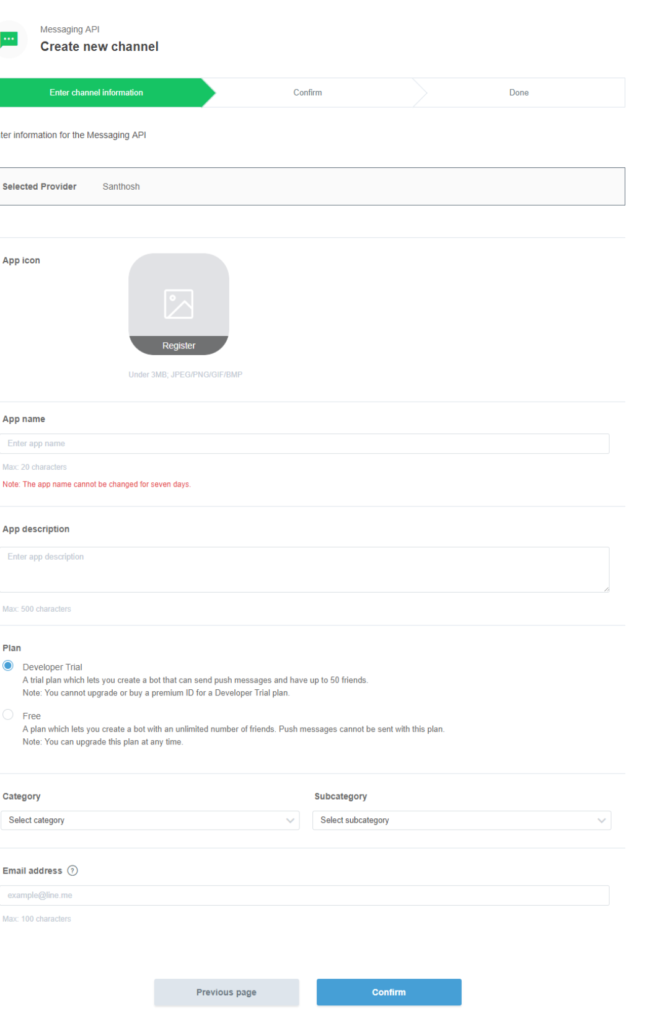
  2. Enter Channel Information – 앱 아이콘, 앱 이름, 플랜, 카테고리, 하위 카테고리, 이메일 주소와 같은 메시징 API에 대한 채널 정보를 입력합니다.
  3. Setup Webhook Integration – Kore.ai 봇에 Line 통합을 활성화하려면, 봇 빌더의 Line 채널 Configurations 탭에 있는 Webhook URL을 복사하여 Webhook 통합을 활성화합니다.
  4. Enable Channel – 봇 빌더에서 통합 설정 및 설정 세부 정보 입력 후에 채널을 활성화해야 합니다.
Line 공급자 생성
  1. LINE Developer account portal에 로그인합니다.
  2. 봇에 사용하길 원하는 Provider가 이미 있는 경우 Provider List에서 공급자를 선택합니다.
  3. Messaging API 섹션에서 Create Channel을 클릭합니다.
  4. 또는 새 공급자를 추가하려면 Create new provider 옵션을 사용하여 새 공급자를 생성하세요.
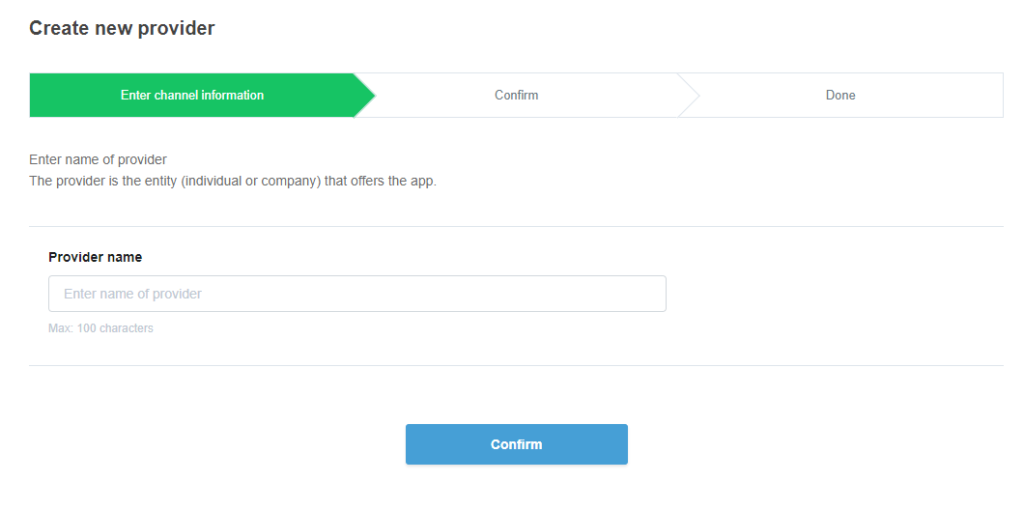
  5. Provider name을 입력하고 새 공급자를 생성합니다.
  6. 공급자를 생성한 후 Messaging API 섹션에서 Create Channel을 선택하여 채널 추가를 계속합니다.
Line 채널 추가
  1. Bot BuilderBots 섹션에서, Line 채널을 추가할 봇을 클릭하세요.
  2. Channels 탭에서, LINE 아이콘을 클릭하세요. LINE Channel 페이지가 표시됩니다.
  3. Enter channel information 필드에서, 필요한 세부 정보를 입력하고 앱 아이콘, 앱 이름, 플랜, 카테고리, 하위 카테고리와 같은 채널을 생성합니다.
  4. Confirm을 클릭하여 검토하고 채널 생성을 계속합니다.

참고: Kore.ai 플랫폼은 봇의 최종 사용자에게 비대화형 메시지를 보내기 위해 PUSH_MESSAGE를 사용합니다. 이러한 시나리오는 알림 통지, 세션 종료 메시지와 Line 채널의 replyToken을 사용할 수 없거나 만료된 기타 시나리오와 같은 사례를 포함합니다. 이러한 API 호출은 요금이 청구될 수 있습니다. Line 플랜 옵션을 검토하고 필요에 맞는 적절한 플랜을 선택합니다.

채널 세부 정보 확인
    1. 채널이 생성되면 사용 가능한 채널 리스트가 있는 Provider dashboard로 리디렉션됩니다.
    2. 위에서 생성한 채널을 선택하고 채널 설정을 계속합니다.
    3. Line 채널의 Channel IDChannel Secret을 확인하고 이 페이지의 Configurations 탭에 입력합니다.
Webhook 통합 활성화
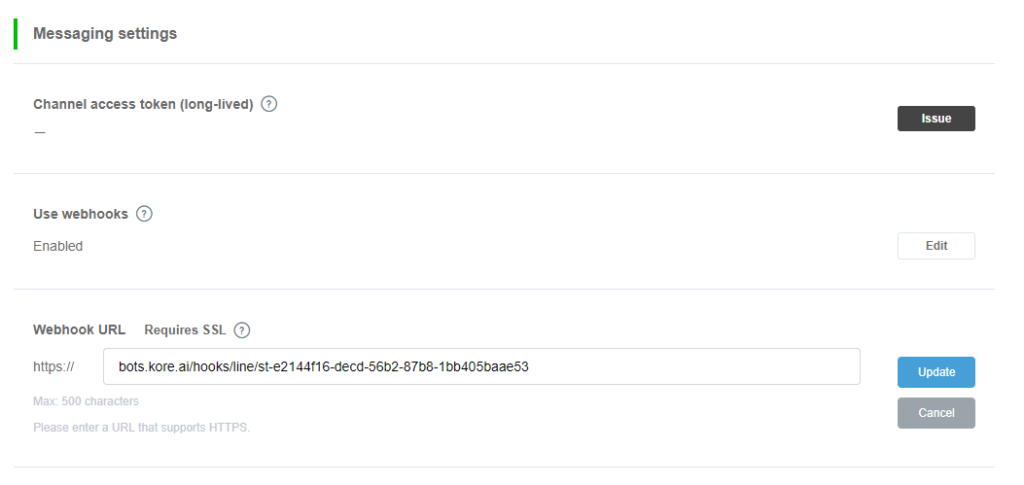
  1. Webhook 통합을 설정하려면, Messaging Settings 섹션으로 이동하여 Use Webhooks 옵션을 활성화합니다.
  2. 채널 페이지의 Configurations 탭에 있는 Webhook URL을 복사하여 Webhook URL 필드에 입력합니다.
  3. Update를 클릭합니다.

  4. Webhook URL을 저장한 후 Verify를 클릭하여 Line의 Webhook 호출이 Kore.ai 플랫폼에서 수신되는지 확인합니다.
추가 옵션 검토
  1. Line 채널에서 사용 가능한 그룹 행동과 자동 응답, 인사말 메시지와 같은 추가 옵션을 검토합니다.
  2. 이 페이지의 Configurations 탭으로 이동하여 설정 과정을 완료합니다.
    1. Webhook URL: Line이 이미 https://를 포함하고 있음으로 해당 부분을 제외한 URL을 입력합니다.
    2. 채널 ID: Line 채널의 Channel ID를 확인하여 여기에 입력합니다.
    3. 채널 시크릿: Line 채널의 Channel Secret을 확인하여 여기에 입력합니다.

Line 채널 편집

Line 채널을 편집하려면 다음 단계를 따르세요.

  1. 채널 위로 마우스를 이동하고 클릭하여 수정합니다. 채널 설정에서 필요한 업데이트와 저장을 할 수 있습니다.
  2. 또한 Settings 아이콘을 클릭하여 채널 정보를 사용하지 않거나 삭제할 수도 있습니다.
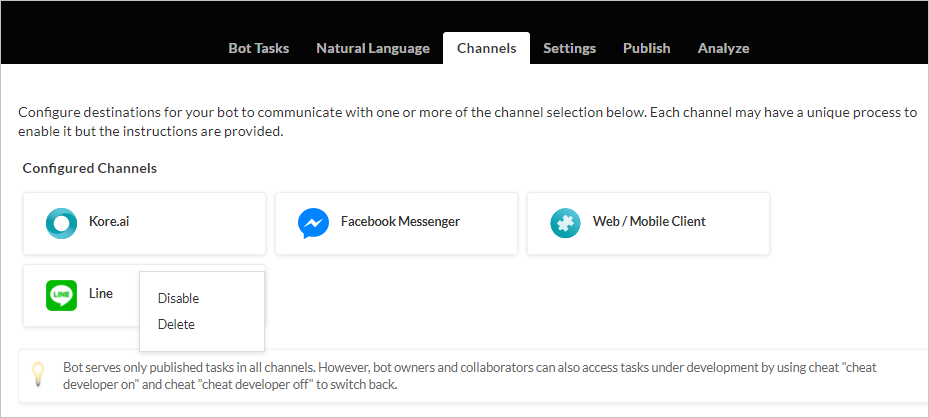
    채널을 수정하려면 다음과 같은 명령 중 하나를 선택하세요.
  • Disable/EnableDisable을 클릭하여 봇의 Line 채널 사용을 일시적으로 비활성화하세요. Line 채널 사용을 활성화하려면, Enable을 클릭하세요.
  • DeleteDelete를 클릭하세요. Delete Confirmation 대화 상자에서, OK을 클릭하여 봇 채널 설정을 영구적으로 삭제합니다.
경고: 이 작업은 영구적이므로 취소할 수 없습니다.

LINEチャネルをKore.aiボットに追加するには、Webhookシステム連携をセットアップしてLINEとKore.ai間の接続を構成する必要があります。Kore.aiボットにLINEチャネルを追加すると、ボットのエンドユーザーが“LINE”アカウントを使用してボットと対話できるようになります。ボットにLINEチャネルを追加するには、次のことを行う必要があります:

  1. プロバイダーの作成―LINEチャネルを設定するには、LINE 開発者アカウントにログインして新しいプロバイダーを作成するか、このボットに使用するプロバイダーを選択してからチャネルを追加します。LINEチャネルを有効にするには、LINE開発者ポータルで開発者アカウントを作成して登録する必要があります。
  2. チャネル情報の入力―アプリアイコン、アプリ名、プラン、カテゴリ、サブカテゴリ、メールアドレスなどのメッセージングAPIのチャネル情報を入力します。
  3. Webhookシステム連携のセットアップ―Kore.aiボットへのLINEシステム連携を有効にするには、ボットビルダーのLINEチャネルページの構成タブにあるWebhook URLをコピーしてWebhookシステム連携を有効にします。
  4. チャネルの有効化―システム連携のセットアップとボットビルダーでの構成の詳細の入力後、チャネルを有効にする必要があります。
LINEプロバイダーの作成
  1. LINE開発者アカウントポータルにログインします。
  2. このボットに使用する“Provider”がすでにある場合は、“Provider List”からそれを選択します。
  3. Messaging API セクションで、Create Channelをクリックします。
  4. または、新しいプロバイダーを追加する場合は、Create new providerオプションを使用して新しいプロバイダーを作成します。
  5. Provider nameを入力し、新しいプロバイダーを作成します。
  6. プロバイダーを作成したら、Messaging APIセクションでCreate Channelを選択して、チャネルの追加を続行します。
LINEチャネルの追加
  1. ボットビルダーボットセクションで、LINEチャネルを追加したいボットをクリックします。
  2. チャネルタブで、LINEアイコンをクリックします。LINEチャネルページが表示されます。
  3. チャネル情報の入力フィールドにアプリアイコン、アプリ名、プラン、カテゴリ、サブカテゴリなどの必要な詳細を入力し、チャネルを作成します。
  4. 確認をクリックして、チャネルの作成をレビューして続行します。

メモ:Kore.aiプラットフォームは、“PUSH_MESSAGE” APIを使用して、非対話型メッセージをボットのエンドユーザーに配信します。これらのシナリオには、アラート通知、セッション終了メッセージ、およびLINEチャネルからの“リプライトークン”が使用できないか、期限切れになっている場合のその他のシナリオが含まれます。呼び出されたこれらのAPIコールは課金される場合があります。 LINEプランのオプションを確認し、ニーズに合った適切なプランを選択してください。

チャネルの詳細をキャプチャ
    1. チャネルが作成されると、使用可能なチャネルのリストが表示されたProvider dashboardにリダイレクトされます。
    2. 上記で作成したチャネルを選択して、チャネル設定を続行します。
    3. LINEチャネルのChannel IDChannel Secretをキャプチャし、このページのConfigurations タブに入力します。
Webhook統合の有効化
  1. Webhook統合を設定するには、Messaging Settingsクションに移動し、Use Webhooksオプションを有効にします。
  2. チャネルページのConfigurationsタブにある“Webhook URL”をコピーして、Webhook URLフィールドに入力します。
  3. Updateをクリックします。
  4. Webhook URLを保存した後、Verify をクリックして、LINEからのWebhook呼び出しがKore.aiプラットフォームによって認識されることを確認します。
追加オプションのレビュー
  1. グループの動作、自動返信、グリーティングメッセージなど、自分のLINEチャネルで使用できる追加のオプションをレビューします。
  2. このページのConfigurationsタブに移動して、セットアップを完了します
    1. WEBHOOK URL:LINEにはすでにその部分が含まれているため、“https://”なしでURLを指定してください。
    2. チャネルID:LINEチャネルの“チャネルID”をキャプチャー、ここに入力します。
    3. チャネルシークレット:LINEチャネルから“チャネルシークレット”をキャプチャし、ここに入力します。

LINEチャネルの編集

LINEチャネルを編集するには、以下のステップに従います:

  1. チャネルにカーソルを合わせ、クリックして変更します。チャネル構成に必要な更新を加えて保存することができます。
  2. 設定アイコンをクリックして、チャネル情報を無効にしたり削除したりすることもできます。 チャネルを変更するには、次のコマンドのいずれかを選択します:
  • 無効化/有効化無効化をクリックして、ボットのLINEチャネルの使用を一時的に無効にします。 LINEチャネルの使用を有効にするには、有効化をクリックします。
  • 削除削除をクリックします。削除の確認ダイアログボックスで、OKをクリックして、ボットチャネル構成を完全に削除します。
警告:この操作は永久的で、元に戻すことはできません。

To add the LINE channel to your Kore.ai bot, you must set up a webhook integration to configure the connection between LINE and Kore.ai. Adding the LINE channel to your Kore.ai bot allows end-users of your bot to interact with your bot using their LINE accounts. To add the LINE channel to your bot, you must:

  1. Create a Provider – To set up the LINE channel, log in to your LINE developer account to create a New Provider or select a Provider that you want to use for this bot and then add the channel. To enable the LINE channel, you must create and register for a developer account in the LINE Developers portal.
  2. Enter Channel Information – Enter channel information for Messaging API like App Icon, App Name, Plan, Category, subcategory, and email address.
  3. Setup Webhook Integration – To enable the LINE integration to your Kore.ai bot, enable webhook integration by copying the Webhook URL provided in the Configurations tab of the LINE Channel page in the bot builder.
  4. Enable Channel – After the integration setup and entering the configuration details in the bot builder, you must enable the channel.
Create Line Provider
  1. Log in to your LINE Developer account portal.
  2. If you already have a Provider that you want to use for this bot, then choose the provider from Provider List.
  3. Under the Messaging API section, click Create Channel.
  4. Or, if you wish to add a new provider, use the Create new provider option to create a new provider.
  5. Enter the Provider name and create a new provider.
  6. After you have created the provider, select Create Channel under the Messaging API section to continue with the addition of the channel.
Add LINE Channel
  1. In the Bots section of the Bot Builder, click the bot for which you want to add the LINE channel.
  2. On the Channels tab, click the LINE icon. The LINE Channel page is displayed.
  3. In the Enter channel information field, provide the required details and create the channel like App Icon, App Name, Plan, Category, Sub-category.
  4. Click Confirm to review and proceed with channel creation.

Note: Kore.ai platform uses PUSH_MESSAGE APIs to deliver non-interactive messages to the end-users of the bot. These scenarios include cases like alert notifications, session closure messages, and any other scenario where the replyToken from the Line channel is either not available or expired. These API calls called may be charged; review the LINE plan options and select the appropriate plan that suits your needs.

Capture Channel Details
    1. After the channel is created, you are redirected to the Provider dashboard with a list of channels available.
    2. Select the channel you have created above to continue with channel configurations.
    3. Capture the Channel ID and Channel Secret of your LINE channel and provide them in the Configurations tab of this page.
Enable Webhook Integration
  1. To set up webhook integration, go to Messaging Settings section and enable the Use Webhooks option.
  2. Copy the Webhook URL provided in the Configurations tab of the Channels page and enter in the Webhook URL field.
  3. Click Update.
  4. After saving the webhook URL, click Verify to ensure that the webhook call from LINE is acknowledged by the Kore.ai platform.
Review Additional Options
  1. Review additional options available for your LINE channels like group behavior, auto-replies, and greetings messages.
  2. Go to the Configurations tab of this page and complete the setup.
    1. WEBHOOK URL: Provide URL without https:// as LINE already includes that part.
    2. CHANNEL ID: Capture the Channel ID of your LINE channel and provide it here.
    3. CHANNEL SECRET: Capture Channel Secret from your LINE channel and provide it here.

Edit LINE Channel

To edit the LINE channel, follow the below steps:

  1. Hover over the channel and click to modify. You can make necessary updates to your channel configurations and save them.
  2. You can also disable or delete the channel information by clicking the Settings icon.

    Select one of the following commands to modify the channel:
  • Disable/Enable – Click Disable to temporarily disable the use of the LINE channel for your bot. To enable the use of the LINE channel, Click Enable.
  • Delete – Click Delete. On the Delete Confirmation dialog box, click OK to permanently delete the bot channel configuration.
Warning: This operation is permanent and cannot be undone.