Kore.ai 봇이 애플리케이션 서버와 Kore.ai 서버 간에 통신할 수 있도록 하려면, 애플리케이션을 위한 콜백 URL을 지정한 앱을 Kore.ai 봇 빌더에서 생성 및 등록하고, 애플리케이션과 개발자 계정의 봇 간에 보안 통신에 필요한 클라이언트 ID클라이언트 시크릿 인증 토큰을 생성해야 합니다. 이 주제에서는 Kore.ai SDK를 사용할 때 앱을 만들고 등록 자격 증명을 생성하는 방법을 설명합니다. 대화 작업의 webhook 및 메시지에 액세스하려면, 봇을 위한 앱을 구독해야 합니다. 봇과 사용자의 모든 메시지는 메시지 이벤트 형태로 SDK에 전송됩니다. Webhook 노드가 대화 작업에 정의되면, webhook 이벤트는 실행 시 SDK로 전송됩니다. 봇 이벤트 메시지, webhook 및 애플리케이션 간에 통신을 허용하려면, 네트워크에서 Kore.ai SDK를 설치, 호스팅 및 설정해야 합니다.

앱 생성 방법

  1. 상단 메뉴에서 배포 탭을 선택합니다
  2. 왼쪽 메뉴에서 연동 -> BotKit을 클릭합니다.
  3. BotKit SDK 페이지.
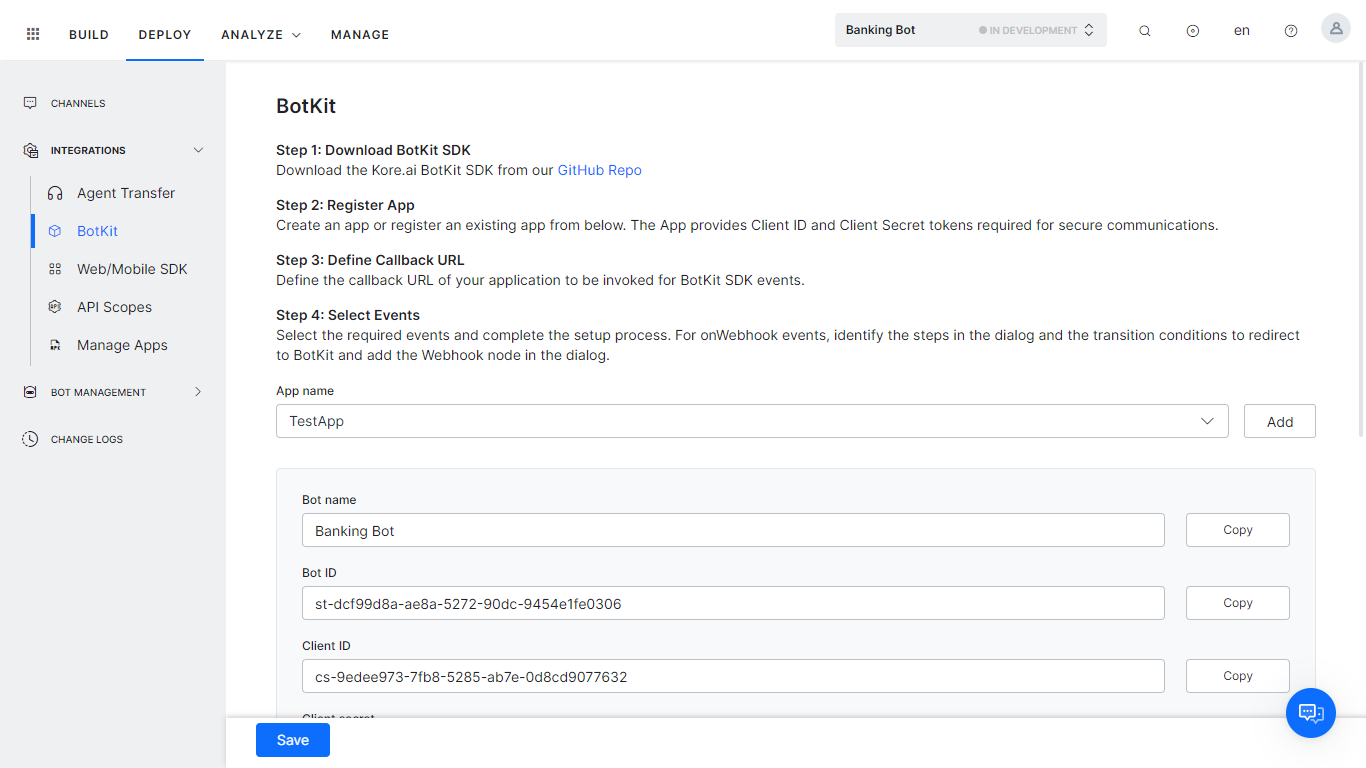
  4. BotKit SDK 페이지에서, 앱 이름 드롭다운 목록 옆에 있는 추가 버튼을 클릭합니다. 앱 생성 대화 상자가 열립니다.
  5. 앱 이름 필드에서, 앱 등록 이름(예: TestApp)을 입력한 다음, 다음을 클릭합니다.
  6. 앱이 성공적으로 생성되었다는 메시지가 나타나면, 완료를 클릭합니다. 
  7. 다음 필드가 나타납니다.
    1. 클라이언트 ID클라이언트 시크릿이 생성됩니다
    2. 표시되는 콜백 URL 필드에서, Kore.ai가 데이터를 푸시하기를 원하는 애플리케이션의 URL을 입력합니다. 예: https://koremessenger.com/postURL.
    3. 이벤트 섹션에서, 다음 중 한 가지 이상을 선택합니다.
      1. OnMessage – 사용자로부터 메시지가 수신될 때 이벤트를 실행합니다.
      2. OnHookNode – WebHook 노드가 대화 작업 흐름에서 발견될 때 이벤트를 실행됩니다.
      3. onEvent – 대화 또는 FAQ가 완료될 때마다 이벤트를 실행합니다.
      4. onAlert – 사용자가 알림 메시지를 받을 때 이벤트를 실행합니다.
      5. onVariableUpdate – 봇이 게시될 때 이벤트를 실행합니다
    4. 저장을 클릭합니다.

자격 증명과 함께 새 앱 등록은 BotKit 섹션에 표시됩니다.

Kore.ai ボットがアプリケーション サーバーと Kore.ai サーバーとの間で通信できるようにするには、Kore.ai ボットビルダーでアプリを作成して登録する必要があります。このアプリは、アプリケーションのコールバック URLを指定し、アプリケーションと開発者アカウントにあるすべてのボット間の安全な通信に必要なクライアント IDおよびクライアント シークレット認証トークンを生成します。このトピックでは、Kore.ai SDK を使用してアプリを作成し、登録の資格情報を生成する方法について説明します。ダイアログ タスクの Webhook とメッセージにアクセスするには、ボット用のアプリをサブスクライブする必要があります。ボットとユーザーからのメッセージはすべて、メッセージ イベントとして SDK に送信されます。Webhook ノードがダイアログ タスクに定義されると、実行時に Webhook イベントが SDK に送信されます。ボット イベント メッセージ、Webhook、およびアプリケーションの間の通信を許可するには、Kore.ai SDK をネットワークにインストール、ホスト、設定する必要があります。

アプリを作成するには

  1. トップメニューから、[デプロイ] タブを選択します。
  2. 左側のメニューで、[システム連携 > BotKit] をクリックします。
  3. BotKit SDK ページです。
  4. BotKit SDK ページで、[アプリ名] ドロップダウン リストの横にある [追加] ボタンをクリックします。"アプリの作成" ダイアログが開きます。
  5. アプリ名" フィールドに、「TestApp」などのアプリ登録の名前を入力し、 [次へ] をクリックします。
  6. 「アプリの作成に成功しました」というメッセージが表示されたら、[完了] をクリックします。 
  7. 以下のフィールドが表示されます。
    1. クライアント IDクライアント シークレットが生成されました
    2. 表示された "コールバック URL" フィールドへ、Kore.ai にデータを追加したいアプリケーションの URL を入力します。例: https://koremessenger.com/postURL
    3. [イベント] セクションで、以下のうち 1 つ以上を選択します。
      1. OnMessageー ユーザーからのメッセージを受信したときに、イベントをトリガーします。
      2. OnHookNode ー ダイアログのタスク フローで Webhook ノードが検出されときに、イベントをトリガーします。
      3. onEvent ー ダイアログや FAQ が終了するたびに、イベントをトリガーします。
      4. onAlert ー ユーザーが警告メッセージを受信したときに、イベントをトリガーします。
      5. onVariableUpdate ー ボットが公開されたときに、イベントをトリガーします。
    4. [保存] をクリックします。

新しいアプリの登録が、資格情報とともに BotKit セクションに表示されます。

To enable your Kore.ai Bot to communicate between your application servers and Kore.ai servers, you need to create and register an app in Kore.ai Bot Builder that specifies the callback URL for your application and generates the Client ID and Client Secret authentication tokens required for secure communications between your application and any Bots in your developer account.

This topic describes how to create an app and generate registration credentials when using the Kore.ai SDK.

To access webhooks and messages in Dialog tasks, you need to subscribe to an app for your bot. All messages from the bot and user are sent to the SDK as message events. When a Webhook node is defined in a Dialog task, the webhook event is sent to the SDK at runtime. You must install, host, and configure the Kore.ai SDK in your network to allow communications between the bot event messages and webhooks, and your application.

To create an app

  1. Select the Deploy tab from the top menu
  2. From the left menu click Integrations -> BotKit.
  3. The BotKit SDK page.
  4. On the BotKit SDK page, click the Add button next to the App Name drop-down list. The Create App dialog opens.
  5. In the App Name field, enter the name of the app registration, for example, TestApp, and then click Next.
  6. Once the App Created Successfully message appears, click Done. 
  7. The following fields appear.
    1. The Client ID and Client Secret are generated
    2. In the Callback URL field displayed, enter the URL for your application that you want Kore.ai to push data to, for example, https://koremessenger.com/postURL.
    3. In the Events section, select one or more of:
      1. OnMessage – Triggers an event when a message from a user is received.
      2. OnHookNode – Triggers an event when a WebHook node is encountered in the Dialog task flow.
      3. onEvent – Triggers an event every time a Dialog or FAQ is finished.
      4. onAlert – Triggers an event when the user receives an alert message.
      5. onVariableUpdate – Triggers an event when the bot is published
    4. Click Save.

The new app registration along with credentials is displayed in the BotKit section.