스크립트 노드를 사용하여 대화 작업에서 JavaScript 코드를 작성할 수 있습니다. 스크립트 노드를 사용하여 다음 조치를 수행할 수 있습니다.
- API 호출을 실행하기 전에 사용자 입력 매개 변수를 조작합니다.
- 대화를 계속하기 전에 API 응답 페이로드에서 매개 변수를 조작합니다.
- 사용자에게 사용자 정의 오류 메시지를 표시합니다.
- 복잡한 비즈니스 규칙을 기반으로 의사 결정을 합니다.
스크립트 노드를 사용하여 대화 작업에서 JavaScript 코드를 작성할 수 있습니다. 스크립트 노드를 사용하여 다음 조치를 수행할 수 있습니다.
봇 빌더에서 대화를 테스트할 때 스크립트 노드에 오류 대화에 Context 개체와 함께 줄 번호 및 열 번호를 포함하여 스크립트 노드 오류가 표시됩니다. 다음 그림과 같이 스크립트 노드의 오류 대화상자에서 직접 스크립트를 업데이트하고 테스트 할 수 있습니다.
대화 작업에서 스크립트 노드를 설정하려면 다음 단계를 수행합니다.
대화 작업에서 스크립트 노드를 설정하려면 다음 단계를 수행합니다. 참고: 플랫폼의 v9.0 이후에는 스크립트 노드가 봇 작업 노드 아래에 분류됩니다. 봇 조치 노드에 대해 자세히 알아보려면 여기를 클릭하세요.
참고: 이 섹션에서 설정하거나 편집한 설정은 이 노드를 사용하는 다른 모든 대화 작업에 반영됩니다.
JavaScript를 사용하여 API 호출 전후에 데이터를 처리하여 대화 작업을 사용자 정의할 수 있습니다. 예를 들어, 대화 흐름의 방향을 지정합니다. Context 개체 타이프 어헤드 기능을 사용하여 다음 설명과 같이 동적 변수를 식별하고 선택할 수 있습니다. 자세한 내용은 컨텍스트 개체를 참조하세요. 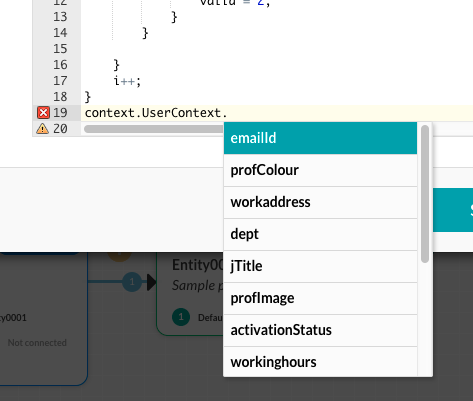
JavaScript에서 세션 변수를 사용하여 세션 데이터에서 데이터를 가져올 수 있습니다. 예를 들어, context.session.UserContext.identities를 사용하여 사용자 ID를 얻은 후 다음 예제와 같이 데이터를 context에 넣을 수 있습니다.
var x = context.session.UserContext.identities;
var isEmailFound = false;
for (var i = 0; i < x.length; i++) {
    if (x[i].type === "mapped") {
        var identity = x[i].val;
        var arr = identity.split("/");
        var pattern = /^cs/i;
        var result = arr[0].match(pattern);
        if (result) {
            isEmailFound = true;
            context.UserSession.put("rtmEmail", arr[1], '20000');
        }
    }
}
...
자세한 내용은 작업에서 세션 및 컨텍스트 변수 사용하기를 참조하세요.
다음 코드 예제에서는 ID가 입력되지 않았을 때 서비스 노드 응답 본문의 Context 개체 변수를 사용하여 고객 ID를 반환합니다 data.results
var data = context.getcontactsService.response.body;
if (data & amp; & amp; typeof(data.results) != 'undefined') {
 context.customerID = data.results.customerId;
} else {
 context.customerID = context.Usersession.customerID;
}
다음 스크립트 노드 코드 예에서는 Context 개체 변수를 사용하여 선택한 계정 유형에 대한 제한을 초과하지 않는 은행 송금액을 확인합니다.
var valid = 0;
var i = 0;
while (context.accdata.length - i) {
 if (context.accdata[i].accountType == context.entities.FromAccountName) {
  if ((context.accdata[i].amount - context.entities.Amount) < 0) { valid = 3; } else { if (context.entities.Amount > context.accdata[i].transferLimit) {
    valid = 0;
   } else {
    valid = 2;
   }
  }
 }
 i++;
}
context.canProceed = valid;
スクリプトノードでは、ダイアログタスクにJavaScriptのコードを書くことができます。スクリプトノードを使用して、以下のアクションを実行できます。
ボットビルダーでダイアログをテストすると、スクリプトノードエラーが スクリプトノードのエラーダイアログに行番号と列番号、関連するContextオブジェクトとともに表示されます。次の図のように、スクリプトノードのエラー ダイアログで直接スクリプトを更新したりテストしたりすることができます。
ダイアログタスクにおけるスクリプトノードのセットアップは、以下の手順で行います。
ダイアログタスクにおけるスクリプトノードのセットアップは、以下の手順で行います。メモ:プラットフォームのv9.0以降では、スクリプトノードはボットアクションノードの下に分類されます。ボットアクションノードの詳細はこちらをクリックしてください。
メモ:これらのセクションでセットアップまたは編集した設定は、このノードを使用する他のすべてのダイアログタスクに反映されます。
JavaScriptを使用して、APIコールの前後でデータを処理して、ダイアログタスクをカスタマイズすることができます。例:ダイアログのタスクフローを指示。Contextオブジェクトの先行入力機能を使用して、次の図のように動的変数を特定して選択することができます。詳細情報は、コンテキストオブジェクトをご参照ください。
JavaScript では、セッション変数を使用してセッションデータからデータを取得することができます。例として、context.session.UserContext.identitiesを使用して、ユーザーIDを手にいれ(GET)、次の例に示すように、そのデータをcontextに入力する(PUT)ことができます。
var x = context.session.UserContext.identities;
var isEmailFound = false;
for (var i = 0; i < x.length; i++) {
    if (x[i].type === "mapped") {
        var identity = x[i].val;
        var arr = identity.split("/");
        var pattern = /^cs/i;
        var result = arr[0].match(pattern);
        if (result) {
            isEmailFound = true;
            context.UserSession.put("rtmEmail", arr[1], '20000');
        }
    }
}
...
詳細については、タスクのセッション変数とコンテキスト変数の使用をご参照ください。
以下のコード例は、IDが提供されない場合に、サービスノードの応答本文からContextオブジェクト変数を使用して、顧客IDを返します。 data.results
var data = context.getcontactsService.response.body;
if (data & amp; & amp; typeof(data.results) != 'undefined') {
 context.customerID = data.results.customerId;
} else {
 context.customerID = context.Usersession.customerID;
}
次のスクリプトノードのコード例では、Contextオブジェクト変数を使用して、選択した口座の種類の制限を超過しない銀行送金額を検証しています。
var valid = 0;
var i = 0;
while (context.accdata.length - i) {
 if (context.accdata[i].accountType == context.entities.FromAccountName) {
  if ((context.accdata[i].amount - context.entities.Amount) < 0) { valid = 3; } else { if (context.entities.Amount > context.accdata[i].transferLimit) {
    valid = 0;
   } else {
    valid = 2;
   }
  }
 }
 i++;
}
context.canProceed = valid;
A Script Node allows you to write JavaScript code in a dialog task.
You can use the script node to perform the following actions:
When you test a dialog in the bot builder, script node errors are displayed in the Error in Script Node dialog with the line number and column number, along with the associated Context object. You can update and test the script directly in the Error in Script Node dialog as shown in the following illustration.
Setting up a script node in a dialog task involves the following steps:
Setting up a script node in a dialog task involves the following steps:
Note: Post v9.0 of the platform, the Script node is categorized under the Bot Action node. For details on the Bot Action node, click here.
Note: The configurations you set up or edit in these sections reflect in all other dialog tasks that use this node.
Using JavaScript, you can customize your dialog task by processing data before or after an API call. For example, directing the dialog task flow. You can use the Context object type-ahead feature to identify and select dynamic variables as shown in the following illustration. For more information, refer to Context Object.
In JavaScript, you can fetch data from the session data using session variables. For example, you can GET the user ID using context.session.UserContext.identities, and then PUT the data into context as shown in the following example.
var x = context.session.UserContext.identities;
var isEmailFound = false;
for (var i = 0; i < x.length; i++) {
    if (x[i].type === "mapped") {
        var identity = x[i].val;
        var arr = identity.split("/");
        var pattern = /^cs/i;
        var result = arr[0].match(pattern);
        if (result) {
            isEmailFound = true;
            context.UserSession.put("rtmEmail", arr[1], '20000');
        }
    }
}
...
For more information, refer to Using Session and Context Variables in Tasks.
The following code example returns the customer ID using a Context object variable from the service node response body when the ID is not provided in the data.results
var data = context.getcontactsService.response.body;
if (data & amp; & amp; typeof(data.results) != 'undefined') {
 context.customerID = data.results.customerId;
} else {
 context.customerID = context.Usersession.customerID;
}
The next script node code example validates the bank transfer amount that does not exceed limits for the type of account selected using Context object variables.
var valid = 0;
var i = 0;
while (context.accdata.length - i) {
 if (context.accdata[i].accountType == context.entities.FromAccountName) {
  if ((context.accdata[i].amount - context.entities.Amount) < 0) { valid = 3; } else { if (context.entities.Amount > context.accdata[i].transferLimit) {
    valid = 0;
   } else {
    valid = 2;
   }
  }
 }
 i++;
}
context.canProceed = valid;