“Asanaサンプル”ボットには、アプリをAsanaに登録し、認証トークンを生成し、それらのトークンをボットビルダーのボットに追加するための基本構成が含まれています。構成後、ボットと会話機能を使用してボットをテストし、次の構成済みアラートおよびアクションのいずれかをテストできます。

  • ダイアログタスク
    • タスク割り当て
    • タスク作成
  • アクションタスク
    • タスクを割り当てられた

Asanaサンプルボットのインストール

“Asanaサンプル”ボットはボットビルダーでのみ利用可能であり、新しいボットとして追加する必要があります。これは、一部のボット機能を示すために特別に構成された限定的な設計です。

メモ:このボットはKore.aiボットストアで入手できるAsanaの組み込みボットと似ていますが、同じではありません。

ステップ1:Asanaサンプルボットのインストール

  1. ボットビルダーにログオン。
  2. サンプルボットを表示するには、新しいボットを追加の横にある下向き矢印をクリックし、サンプルボットをインストールを選択します。
  3. “Asanaサンプル”ボットを検索して選択し、表示されたインストールボタンをクリックします。
  4. Asanaサンプルページの手順タブで、後でAsanaアプリ登録の際に貼り付けるコールバックURL、https://idp.kore.ai/workflows/callbackをメモします。

ステップ2:Asanaにアプリを登録

  1. https://app.asana.comにアクセスしAsanaにログオンします。
  2. ウィンドウの右上隅で、ログインに使用したAsanaアカウント名をクリックします。
  3. 「プロファイル設定」ダイアログが開きます。
  4. アプリ>開発者アプリの管理をクリックします。開発者アプリの管理ページが表示されます。
  5. 所有するアプリセクションで、新しいアプリケーションの登録をクリックします。
  6. 所有しているアプリセクションのアプリ名フィールドに、Asanaアプリの名前、たとえば“My Asana App”を入力します。
  7. アプリのURLフィールドにhttps://bots.kore.aiと入力します。
  8. リダイレクトURLフィールドに、ボットビルダーからコピーしたURL(https://idp.kore.ai/workflows/callback)を貼り付けます。
  9. 作成をクリックします。クライアントIDクライアントシークレットなどの新しいフィールドが表示されます。保存をクリックします。“My Asanaアプリ”が新しいアプリケーションとして追加されました

ステップ3:サンプルボットにAsanaクライアントの詳細を入力します

  1. サンプルボットを開き、構成タブをクリックします。
  2. 構成タブのそれぞれのフィールドにあるAsanaクライアントIDクライアントシークレットをコピーします。
  3. “Asanaサンプルが正常にインストールされました”というメッセージが表示されます。

ステップ4:アプリの承認

  1. ホームページのボットビルダーでボットを選択し、ボットと会話アイコンをクリックしてAsanaサンプルボットをテストします。
  2. 次のイラストに示すように、最初にボットを使用する際、Kore.aiにAsanaアカウントへのアクセスを許可するためのリンクが表示されます。 Asanaボットの実行ウィンドウ
  3. リンクをクリックして、Asanaを使用するユーザーのワンタイム認証を完了します。

ステップ5:サンプルボットのカスタマイズ

ボットと会話を使用してボットを試し、すべてのアラートとアクションをテストします。次に、ボットビルダーでボットの「構成」タブを確認します。

ボットタスク – タスクを追加または変更します。このボットは、2つのダイアログタスクと1つのアクションタスクで構成されています。ダイアログタスク、情報タスク、ナレッジタスクを追加し、フローを構成することもできます。詳細

自然言語 – ボットの自然言語処理と機械語の理解をレビューして最適化します。詳細

チャネル – いくつかの通信チャネルに対してこのボットを有効にします。このボットは、デフォルトでKoreチャネルに対して有効になっています。詳細

設定―名前、アイコン、その他の設定などのボット設定を編集または定義します。詳細

公開―エンタープライズの標準ボットまたはKore.aiボットストアのアラート、アクション、またはダイアログタスクを公開できます。詳細については、タスクの公開を参照してください。

分析チャット履歴を使用して、ボットプラットフォームとユーザー間の会話をすべて確認できます。詳細については、チャットログセクションでボットとユーザー間の成功したインタラクションと失敗したインタラクションの両方を確認および分析できます。必要に応じて、インタラクションに基づいてボットトレーニングを開始し、将来のコミュニケーショントランザクションをより適切に処理できます。詳細については、ボットの分析を参照してください。

Asana 샘플 봇은 Asana로 앱을 등록하는 기본 설정, 인증 토큰 생성, 그리고 이러한 토큰을 봇 빌더의 봇에 추가하는 것을 포함합니다. 설정 후에, 봇과 대화 기능을 사용하여 다음 설정된 알림 및 조치를 테스트할 수 있습니다.

  • 대화 작업
    • 작업 할당
    • 작업 생성
  • 조치 작업
    • 할당된 작업 가져오기

Asana 샘플 봇 설치

Asana 샘플 봇은 봇 빌더에서만 사용할 수 있으며 새 봇으로 추가되어야 합니다. 이 봇은 특정 봇 기능을 설정하기 위해 특별히 설정된 한정적으로 설계되었습니다.

참고: 이 봇은 Kore.ai 봇 스토어에서 이용할 수 있는 Asana의 내장 봇과 유사하지만 같지 않습니다.

1단계: Asana 샘플 봇 설치

  1. 봇 빌더에 로그인합니다.
  2. 샘플 봇을 보려면, +새 봇 옆의 아래 화살표를 클릭하고 샘플 봇 설치를 선택합니다.
  3. Asana 샘플 봇을 검색하고 가리킨 다음 표시된 설치 버튼을 클릭합니다.
  4. Asana 샘플 페이지의 지시 사항 탭에서, 추후 Asana 앱 등록에 붙여넣을 콜백 URL인 https://idp.kore.ai/workflows/callback을 기록합니다.

2단계: Asana에서 앱 등록

  1. https://app.asana.com에서 Asana로 로그인합니다.
  2. 창의 오른쪽 상단 코너에서 로그인할 때 사용하는 Asana 계정 이름을 클릭합니다.
  3. 내 프로필 설정 대화창이 열립니다.
  4. 앱 > 개발자 앱 관리를 클릭합니다. 개발자 앱 관리 페이지가 표시됩니다.
  5. 소유한 앱 섹션에서, 새 애플리케이션 등록을 클릭합니다.
  6. 소유한 앱 섹션의 앱 이름 필드에서, Asana 앱의 이름을 입력합니다(예:내 Asana 앱).
  7. 앱 URL 필드에 https://bots.kore.ai를 입력합니다.
  8. 리디렉트 URL 필드에 봇 빌더에서 복사한 URL인 https://idp.kore.ai/workflows/callback을 붙여넣습니다.
  9. 생성을 클릭합니다. 클라이언트 ID클라이언트 시크릿과 같은 새로운 필드가 표시됩니다. 저장을 클릭합니다. 새 애플리케이션으로 내 Asana 앱이 추가됩니다.

3단계: 샘플 봇에서 Asana 클라이언트 세부 정보 입력

  1. 샘플 봇을 열고 설정 탭을 클릭합니다.
  2. 설정 탭의 각 필드에 있는 Asana 클라이언트 ID클라이언트 시크릿을 복사합니다.
  3. 성공적으로 Asana 샘플 설치됨 메시지가 표시됩니다.

4단계: 앱 권한 부여

  1. 봇 빌더의 페이지에서 봇을 선택한 다음 봇과 대화 아이콘을 클릭하여 Asana 샘플 봇을 테스트합니다.
  2. Kore.ai가 Asana 계정에 액세스하도록 권한을 부여하는 링크가 다음 그림에 표시된 대로 봇을 처음으로 사용 시 표시됩니다. Asana 봇 실행 창
  3. 링크를 클릭하고 Asana로 사용자에 대한 일회성 인증을 마칩니다.

5단계: 샘플 봇 커스터마이징

봇과 대화를 사용하여 봇을 체험하고 모든 알림과 조치를 테스트합니다. 그런 다음 봇 빌더의 봇 설정 탭을 검토합니다.

봇 작업 – 작업을 추가하거나 수정합니다. 이 봇은 2개의 대화 작업과 1개의 조치 작업으로 구성되어 있습니다. 대화 작업, 정보 작업, 지식 작업, 설정 흐름도 추가할 수 있습니다.

자연어 더 알아보기 – 봇의 자연어 처리와 기계어 이해에 대해 검토하고 최적화합니다. 더 알아보기.

채널 – 한 개 이상의 통신 채널에 대해 해당 봇을 활성화합니다. 이 봇은 기본값으로 Kore 채널에 활성화되어 있습니다. 더 알아보기.

설정 – 봇 설정을 편집하거나 정의합니다. 예를 들면 이름, 아이콘 및 기타 설정입니다. 더 알아보기.

게시 – 기업용 표준 봇에 알림, 조치, 또는 대화 작업을 게시하거나 Kore.ai 봇 스토어에 게시할 수 있습니다. 자세한 정보는 작업 게시하기를 참조하세요.

분석채팅 기록을 사용하여 봇 플랫폼과 사용자 사이의 전체 대화를 검토할 수 있습니다. 더 자세하게 말하자면, 채팅 로그 섹션에서 봇과 사용자 사이의 성공적이거나 성공적이지 못한 상호작용 모두를 검토하고 분석할 수 있습니다. 필요하다면 인터렉션에 따라 향후 통신 교류가 더 나아지도록 봇 훈련을 시작할 수 있습니다. 자세한 정보는 봇 분석하기를 참조하세요.

The Asana Sample bot contains a basic configuration for registering an app with Asana, generating authentication tokens, and then adding those tokens to the bot in Bot Builder. After configuration, you can test the bot using the Talk to Bot feature to test any of the following configured alerts and actions.

  • Dialog Tasks
    • Assign Task
    • Create Task
  • Action Tasks
    • Get task assigned to me

Installing the Asana Sample Bot

The Asana Sample Bot is only available in Bot Builder and must be added as a new bot. It is a limited design specifically configured to demonstrate certain bot features.

Note: This Bot is similar but not the same as the built-in bot for Asana available at the Kore.ai Bot Store.

Step 1: Install the Asana sample bot

  1. Log on to Bot Builder.
  2. To view your sample bots, click the down-arrow next to the  +New Bot and select Install Sample Bots.
  3. Search and point to Asana Sample bot, and then click the Install button displayed.
  4. On the Asana Sample page, on the Instructions tab, note the callback URL, https://idp.kore.ai/workflows/callback that you will later paste into your Asana App registration.

Step 2: Register the App on Asana

  1. Log on to Asana at https://app.asana.com.
  2. On the top right-hand corner of the window, click the Asana account name using which you logged in.
  3. My Profile Settings dialog opens.
  4. Click Apps > Manage Developer Apps. The Developer App Management page is displayed.
  5. Under the Apps You Own section, click Register New Application.

  6. In the Apps you own section, in the App Name field, enter the name of your Asana App, for example, My Asana App.
  7. In the  App URL field, enter https://bots.kore.ai.
  8. In the Redirect URL field, paste the URL copied from the Bot Builder, https://idp.kore.ai/workflows/callback.
  9. Click Create. New fields like Client ID and Client Secret get displayed. Click Save. The My Asana App is added as a new application.

Step 3: Enter the Asana Client Details Back in the Sample Bot

  1. Open the sample bot and click the Configuration tab.
  2. Copy the Asana Client ID and Client Secret in the respective fields of the Configuration tab.
  3. The Asana Sample successfully installed message is displayed.

Step 4: Authorize the App

  1. In Bot Builder on the Home page, select your bot, and then click the Talk to Bot  icon to test the Asana Sample bot.
  2. A link to authorize Kore.ai to access your Asana account is displayed on first use of the bot as shown in the following illustration.
    Asana Run Bot Window
  3. Click the link, and then complete a one-time authorization for the user with Asana.

Step 5: Customizing the Sample Bot

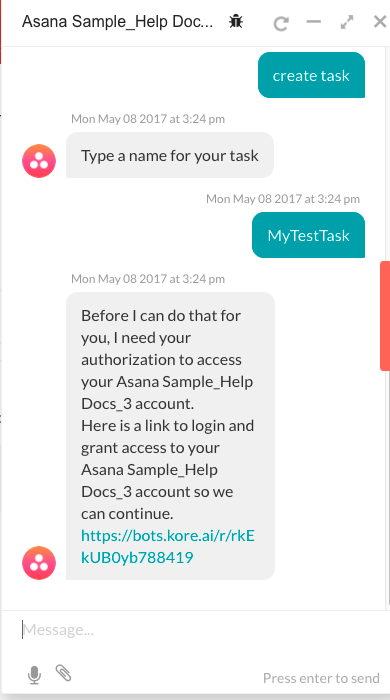
Try out your bot using Talk to Bot and test all the alerts and actions. Then review the configuration tabs of the bot in Bot Builder:

Bot Tasks – Add or modify tasks. This bot is configured with 2 dialog tasks and 1 actions task. You can also add dialog tasks, information tasks, knowledge tasks, and configure flows. Know more

Natural Language – Review and optimize natural language processing and machine language understanding of your bot. Know more.

Channels – Enable this bot for one or more communication channels. This bot is enabled for the Kore channel by default. Know more.

Settings – Edit or define bot settings, such as name, icon, and other settings. Know more.

Publishing – You can publish alert, action, or dialog tasks for Standard Bots for an enterprise or to the Kore.ai Bot Store. For more information, see Publishing Tasks.

Analyze – You can review the full conversation between the Bots Platform and a user using Chat History. For more detail, you can review and analyze both successful, and unsuccessful interactions between a Bot and a user in the Chat Logs section. If necessary, based on the interaction, you can initiate Bot training to better handle future communication transactions. For more information, see Analyzing Your Bot.