봇 관리자 콘솔의 보안 및 제어 모듈에 있는 Kore.ai 싱글 사인 온 페이지에서, 다음을 사용하여 Kore.ai 관리된 사용자에 싱글 사인 온(SSO) 인증을 설정할 수 있습니다.

  • OpenID Connect
  • SAML(Security Assertion Markup Language)
  • WS-Federation 사인 온 프로토콜.

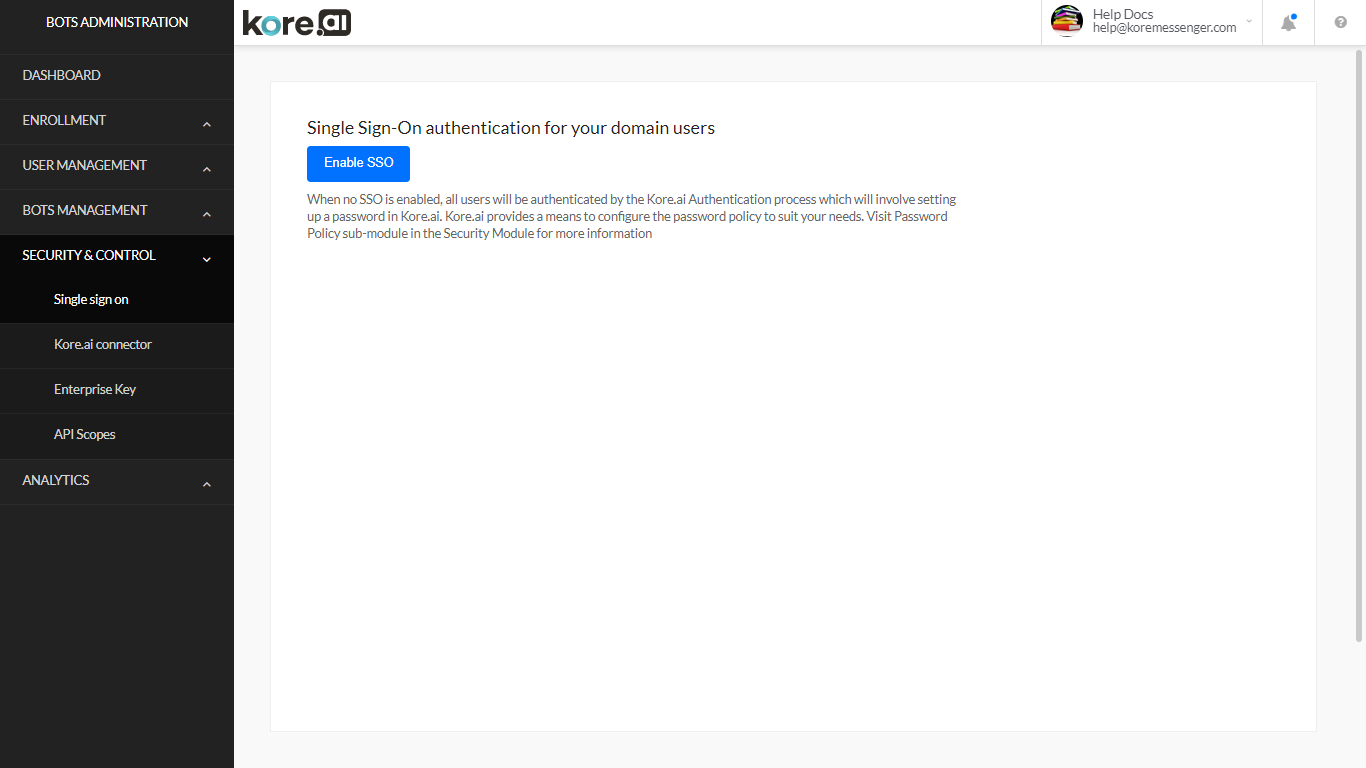
SSO를 사용하면 기존 ID 공급자를 사용하여 Kore.ai 애플리케이션에 쉽게 접근할 수 있습니다. SSO를 사용하면 사용자가 회사 계정에 한 번 로그인한 후, Kore.ai 애플리케이션에 접근할 때, 시스템은 동일한 로그인 자격 증명을 자동으로 사용할 수 있습니다. 예를 들어, WS-Federation 사인온 프로토콜을 사용하면, 사용자는 Microsoft® Active Directory® 서버 자격 증명을 사용하여 Kore.ai 애플리케이션에 사인 온 할 수 있습니다. 다음 그림은 봇 관리자 콘솔 보안 및 제어 모듈의 싱글 사인 온 페이지를 보여줍니다.

SSO 활성화 또는 비활성화

회사에서 필요한 보안에 따라, Kore.ai 애플리케이션에 접근하는 사용자에 대해 싱글 사인 온(SSO)을 활성화하거나 비활성화할 수 있습니다. SSO가 비활성화되었거나 SSO 인증 유효 기간이 만료되면, 사용자는 자격 증명을 사용하여 생성하고 로그인해야 합니다. 계정 별 암호 정책이 정의되지 않은 경우, 사용자의 기본 Kore.ai 암호는 자동으로 활성화됩니다.

싱글 사인 온 활성화 방법

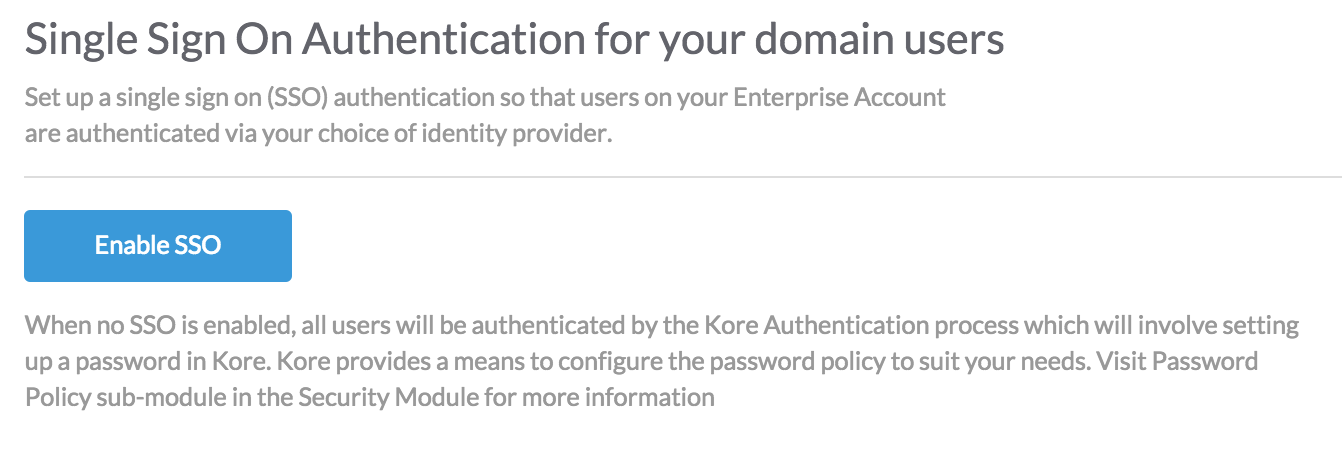
  • 보안 및 제어 모듈의 싱글 사인 온 페이지에서, SSO 활성화를 클릭합니다.SSO 활성화

싱글 사인 온 비활성화 방법

  • 보안 및 제어 모듈의 싱글 사인 온 페이지에서, SSO 비활성화를 클릭한 다음, 사용자 암호 정책을 설정합니다.SSO 비활성화

OpenID Connect

봇 관리자 콘솔의 보안 및 제어 모듈에서 Open ID Connect 프로토콜을 사용하여 SSO를 설정하려면 다음 절차의 단계를 완료합니다. Kore.ai는 WS-Federation 및 SAML Connect 프로토콜도 지원합니다.

  1. 봇 관리자 콘솔에서 보안 및 제어 모듈의 싱글 사인 온 페이지에서, SSO 활성화를 클릭합니다.
  2. 적절한 사인 온 프로토콜 선택 섹션에서, OpenID Connect를 선택합니다.
  3. SSO for OpenID Connect용 SSO 설정 섹션에서, ID 공급자(예: Google로 로그인)를 선택합니다.
  4. 저장을 클릭합니다.
  5. ID 공급자 정보가 성공적으로 업데이트됨 메시지가 페이지의 상단에 표시됩니다.

WS-Federation

봇 관리자 콘솔의 보안 및 제어 모듈에서 WS-Federation 프로토콜을 사용하여 싱글 사인 온(SSO)을 설정하려면 다음 절차의 단계를 완료합니다.

  1. 봇 관리자 콘솔에서 보안 및 제어 모듈의 싱글 사인 온 페이지에서, SSO 활성화를 클릭합니다.
  2. 적절한 사인 온 프로토콜 선택 섹션에서, WS-Federation을 선택합니다.
  3. WS-Federation용 SSO 설정 섹션에서, ID 제공자를 선택한 다음, 다음 설정을 정의합니다.
    • Windows Azure®
      • Azure AD 사인 온 엔드포인트 URL – Kore.ai가 Azure를 사용하여 로그인 및 로그 오프 요청을 보내는 URL입니다. 인증에 대한 응답은 Azure Active Directory 구성 설정에 정의된 응답 URL로 전송됩니다.
      • Azure AD Federation 메타데이터 문서Azure Active Directory를 통한 인증에 사용되는 페더레이션 메타데이터 문서용 URL입니다.
    • 기타 – Azure 이외의 일반 WS-Federation ID 공급자 구성입니다
      • AD 사인 온 엔드포인트 URL – Kore.ai가 WS-Federation ID 공급자를 사용하여 로그인 및 로그 오프 요청을 보내는 URL입니다.
      • AD Federation 메타데이터 문서 URL – Azure Active Directory를 통한 인증에 사용되는 WS-Federation 메타데이터 문서용 URL입니다.
  4. 싱글 사인 온 공급자의 관리자 콘솔에서, Kore.ai와 SSO 공급자 간에 데이터를 교환하는 데 사용되는 URL도 정의해야 합니다. URL 이름은 SSO 공급자에 따라 다를 수 있지만, 다음 URL을 다음과 같이 정의해야 합니다.

    • SAML 2.0
      • LDAP 속성: nameId
      • 클레임 속성: uri
    • SAML 1.1
      • LDAP 속성: nameId
      • 클레임 속성: emailAddress
    • ACS(Assertion Consumer Service) URL 또는 콜백 URLhttps://idp.kore.ai/authorize/callback으로 정의.
    • 인증값 외에도, ADFS를 사용할 때 사용자의 이메일 주소를 Active Directory의 LDAP 속성으로 전달해야 합니다. 자세한 내용은, ADFS용 속성을 참조하세요.
    • 저장을 클릭합니다.

ID 공급자 정보가 성공적으로 업데이트됨 메시지가 페이지의 상단에 표시됩니다.

SAML

SAML(Security Assertion Markup Language)은 안전한 토큰을 사용하는 웹 브라우저 싱글 사인 온(SSO)을 위한 표준 프로토콜입니다. SAML은 모든 암호를 완전히 제거하고, 대신에 표준 암호화 및 디지털 서명을 사용하여 ID 공급자에서 SaaS 애플리케이션으로 안전한 로그인 토큰을 전달합니다. SAML은 ID 공급자와 서비스 제공자가 서로 별도로 존재할 수 있도록 해주는 솔루션을 제공합니다. 사용자가 SAML를 사용한 애플리케이션에 로그인하면, 서비스 공급자는 적절한 ID 공급자로부터 권한 부여를 요청합니다. ID 공급자가 사용자의 자격 증명을 인증한 다음, 사용자의 권한을 서비스 공급자에게 반환하면, 이제 사용자는 애플리케이션을 사용할 수 있습니다.

SAML 작동 방식

SAML SSO는 사용자 ID를 한 장소(ID 공급자)에서 다른 장소(서비스 공급자)로 전송하는 방식으로 작동합니다. 이 작업은 디지털 서명된 XML 문서 교환을 통해 수행됩니다. 다음 시나리오를 고려합니다. 사용자는 ID 공급자 역할을 하는 시스템에 로그인됩니다. 사용자는 지원 또는 회계 애플리케이션(서비스 공급자)과 같은 원격 애플리케이션에 로그인하려고 합니다. 다음과 같은 일이 발생합니다.

  1. 사용자가 인트라넷의 링크, 북마크 또는 이와 유사한 곳에서 링크를 사용하여 원격 애플리케이션에 접근하고 애플리케이션이 로드됩니다.
  2. 애플리케이션은 사용자의 출처를 애플리케이션 하위 도메인, 사용자 IP 주소 또는 이와 유사한 것으로 식별하고 사용자를 다시 ID 공급자로 리디렉션하여 인증을 요청합니다. 이것은 인증 요청입니다.
  3. 사용자는 ID 공급자와 기존 활성 브라우저 세션이 있거나 ID 공급자에 로그인하여 세션을 설정합니다.
  4. ID 공급자는 사용자의 사용자 이름 또는 이메일 주소가 포함된 XML 문서 형식으로 인증 응답을 작성하고, X.509 인증서를 사용하여 서명하고, 이 정보를 서비스 공급자에게 게시합니다.
  5. ID 공급자를 이미 알고 있고 인증서 지문이 있는 서비스 공급자는 인증 응답을 검색하고 인증서 지문을 사용하여 응답의 유효성을 검사합니다.
  6. 사용자의 ID가 설정되고 사용자에게 앱 권한이 제공됩니다.

Kore.ai 구현

Kore.ai 봇 플랫폼 내에서 SAML을 사용하는 두 가지 방법이 있습니다.

  • 봇 빌더에 접근하기 위한 개발자 인증용,
  • 봇에 접근하기 위한 사용자 인증용.

사용 사례 1: 봇 빌더 인증.

기업은 엔터프라이즈 SSO를 사용하여 봇 빌더 도구에 대한 접근을 설정할 수 있습니다. 봇 개발자 및 관리자는 엔터프라이즈 ID 공급자가 수행한 SSO를 사용하여 봇 빌더에 로그인할 수 있습니다. Kore.ai 봇 플랫폼에서 SSO 흐름: 다음은 SAML을 사용하여 SSO가 설정된 후 Kore.ai 봇 플랫폼 내의 흐름입니다.

  1. 클라이언트는 사용자 세부 정보로(로그인 URL을 사용하여) Kore 앱 서버를 호출하고 ID 공급자 정보(SAML)를 가져옵니다.
  2. Kore 앱 서버는 Kore idproxy 서버와 핸드셰이크 요청을 시작합니다.
  3. Kore idproxy 서버는 사용자 세부 정보로 ID 공급자(SAML)에 대한 요청을 시작합니다.
  4. 인증에 성공하면, ID 공급자(SAML)는 Kore idproxy 서버에 어설션 응답을 반환합니다.
  5. ID 공급자의 응답을 확인한 후, Kore idproxy 서버는 Kore 앱 서버에 대한 요청을 시작합니다.
  6. Kore idproxy 서버에서 토큰 인증이 성공하면, Kore 앱 서버는 사용자에게 접근 권한을 부여합니다.

버전 7.2 릴리스 후, Kore.ai는 IDP 개시 흐름을 지원하며, 여기서 플랫폼은 SAML 응답을 사용하여 직접 포스트 백을 가져오고 어설션을 검증하고 사용자를 등록/식별할 수 있습니다. 이러한 모드(SP 기반 및 IDP 기반 흐름)의 설정은 서로 다르며 아래의 설정 단계에서 강조됩니다. SAML를 사용하여 SSO를 설정하려면 아래를 참조하세요

사용 사례 2: 최종 사용자 인증

이 시나리오에서, 봇 채팅 인터페이스는 SSO를 통한 사용자 인증이 필요한 고객 포털 또는 모바일 앱에 내장되어 있습니다. 봇 접근은 인증된 사용자로 자동으로 제한됩니다. 작업에 SSO 기반 인증이 필요한 API 호출이 필요한 경우, 개발자는 다음 단계를 따를 수 있습니다

  • 클라이언트에서, 개발자는 로그인한 사용자의 SSO 토큰을 검색하고 Bot SDK API에서 secureCustomPayload 매개 변수를 사용하여 봇에 이 토큰을 전달해야 합니다.
  • 대화 작업에서, 봇 개발자는 이 토큰을 읽기 위해서 사용자 정의 논리를 작성하고, 서비스 노드 또는 webhook 노드를 사용한 보안 API 호출을 위한 API 헤더로 추가할 수 있습니다.

클라이언트의 토큰 정보는 SSO 공급자와 페이로드에 따라 다르므로, 개발자는 사용자 정의 논리를 작성해야 합니다.

SAML을 사용한 SSO 설정

Kore.ai 봇 관리자 콘솔에서 SAML(Security Assertion Markup Language) 프로토콜을 사용하여 싱글 사인 온(SSO)을 설정하려면 다음 단계를 완료합니다. Kore.ai는 WS-Federation 및 OpenID Connect 프로토콜도 지원합니다. 자세한 내용은, 싱글 사인 온 사용을 참조하세요.

  1. 봇 관리자 콘솔에서 보안 및 제어 모듈의 싱글 사인 온 페이지에서, SSO 활성화를 클릭합니다.
  2. 적절한 사인 온 프로토콜 선택 섹션에서, SAML을 선택합니다.
  3. SAML용 SSO 설정 섹션에서, ID 제공자를 선택한 다음, 다음 중 하나의 설정을 정의합니다.
    • Okta
      • Okta 싱글 사인 온 URLOkta용 SSO URL입니다. 서비스 공급자 개시 SAML 흐름을 활성화합니다.
      • ID 공급자 발급자 – 사용자 인증 기능을 포함하여 사용자 ID를 제공하는 엔티티입니다.
      • 인증서 – 사용자 서명을 검증하는 데 사용되는 ID 공급자로부터 서비스 공급자가 저장한 공개 인증서. 여러 개의 인증서(최대 2개)를 추가할 수 있으며, 이미 추가된 유효하지 않은 인증서를 삭제할 수 있습니다. 플랫폼은 인증에 최신 인증서를 사용합니다. 유효하지 않은 경우 이전 인증서가 사용됩니다.
      • SP 개시 SAML 흐름용 ACS URL – 이것은 서비스 제공 시작 SAML 흐름용 리디렉션 URL입니다.
      • IDP 개시 SAML 흐름용 ACS URL – 이것은 ID 공급 개시 SAML 흐름용 계정별 URL입니다.
      • SAML 속성 매핑 – 이 옵션을 활성화하면 SAML 속성을 Kore.ai 그룹 이름 또는 관리자 역할 이름으로 매핑할 수 있습니다. 활성화되면, 다음을 수행할 수 있습니다.
        • Kore.ai 속성으로 SAML 속성을 매핑하는 방법을 정의합니다.
          • 전체 동기화 – 사용자가 로그인할 때마다, 플랫폼은 응답에 있는 SAML 속성을 기준으로 사용자의 그룹 및 역할 할당을 업데이트합니다. 모든 기존 할당이 제거됩니다. SAML 응답에서 사용할 수 있는 새 그룹 또는 역할 할당만 할당됩니다
          • 포함 전용 – 사용자가 로그인할 때마다, 플랫폼은 SAML 응답에서 사용할 수 있는 새 그룹 또는 역할만 할당합니다. 모든 기존 할당이 유지됩니다. 새 할당은 SAML 응답에서 사용 가능한 것으로 추가됩니다
        • 하나 이상의 매핑 쌍을 정의합니다. 각 쌍에는 다음이 포함됩니다
          • SAML 속성 이름 – SAML 응답에서 사용할 수 있는 SAML 속성의 이름
          • SAML 속성값 – SAML 속성과 관련된 값
          • 속성 유형 – 연결할 매핑 유형(예: 그룹 이름 또는 역할 이름)을 나타냅니다
            • 그룹 이름 – Kore.ai 계정에 정의된 사용자 그룹을 나타냅니다
            • 역할 이름 – 다음을 나타냅니다
            • Kore.ai 계정에 정의된 관리자 역할
            • 봇 빌더 접근
            • 새 봇 생성
            • 데이터 테이블 및 뷰 관리
          • Kore.ai 속성 – 그룹 이름 또는 역할 이름을 나타냅니다. 목록에는 다음을 포함하여야 합니다.
            • 모든 관리자 역할 목록
            • 봇 빌더 접근
            • 새 봇 생성
            • 데이터 테이블 및 뷰 관리
        Kore.ai SSO용 Okta

        Okta에서 Kore.ai 용 싱글 사인 온을 설정하려면, 먼저 Okta 계정에 Kore.ai 앱을 추가한 다음, Okta에서 URL과 보안 인증서를 Kore.ai 계정으로 복사해야 합니다. 이 항목에서는 Okta 계정에 Kore.ai 앱을 추가한 다음, Okta를 사용하여 SSO를 위한 Kore.ai 설정에 필요한 URL과 인증서에 접근하는 방법을 설명합니다. 이 절차를 완료하려면, 봇 관리자 콘솔의 싱글 사인 온 페이지에서 Okta를 SAML 공급자로 먼저 선택해야 합니다. Okta에 Kore.ai 앱 추가 방법

        1. Okta에 로그인합니다.
        2. 페이지에서, 관리자를 클릭합니다. 대시보드 페이지가 표시됩니다.
        3. 상단 탐색 바에서, 애플리케이션을 클릭합니다. 애플리케이션 페이지가 표시됩니다.
        4. 애플리케이션 추가를 클릭합니다. 애플리케이션 추가 페이지가 표시됩니다.
        5. 애플리케이션 생성을 클릭합니다
        6. 일반 설정에서, 앱 이름을 입력하고 다음을 클릭합니다.
        7. SAML 설정에서, 싱글 사인 온 URL을 제공합니다. 이것을 얻는 방법:
          • Kore.ai 봇 빌더 관리자 콘솔 로그인
          • 보안 및 제어 -> 싱글 사인 온 페이지
          • SAML을 활성화한 후 Okta 선택
          • SP 개시 SAML 흐름용 ACS URL 필드에는 필수 URL이 포함됩니다
        8. 또한 Audience URI 필드에, https://idp.kore.com을 입력합니다
        9. 참고 사항: 온프레미스 계정의 경우, SP 개시 SAML 흐름용 ACS URL은 https://idproxy-dev.kore.com/authorize/callback으로 표시됩니다. 이것은 Okta 플랫폼에서 “싱글 사인 온 URL”로 업데이트되어야 하며, https://idproxy-dev.kore.com은 “Audience URL”로 업데이트되어야 합니다.
        10. 필요에 따라 emailId 및 firstName와 같은 속성 문장을 제공할 수 있습니다.
        11. 마침을 클릭합니다.
      • 사인 온 탭의 설정 섹션에서, 설정 지침 보기를 클릭합니다. <앱 이름> 애플리케이션에 대한 SAML 2.0 설정 방법 페이지가 표시됩니다.
      • 다음 URL을 다음 위치로 복사합니다.
        • ID 공급자 싱글 사인 온 URL 필드를 Kore.ai의 Okta 싱글 사인 온 URL 필드로 복사.
        • ID 공급자 발급자 필드를 Kore.ai ID 공급자 발급자 필드로 복사
      • Okta X.509 인증서 필드에서, 인증서 데이터를 복사한 다음, 이 데이터를 Kore.ai 인증서 텍스트 상자에 붙여넣습니다.

        참고 사항: —–BEGIN CERTIFICATE—– 헤더 이후 및 —–END CERTIFICATE—- 푸터 이전의 데이터만 복사하여 Kore.ai에 붙여넣어야 합니다.

  • Kore.ai에서, 저장을 클릭합니다. Okta 로그인 연동이 완료됩니다.

ID 공급자 정보가 성공적으로 업데이트됨 메시지가 페이지의 상단에 표시됩니다. 설정을 테스트하려면, Kore.ai 봇 관리자 콘솔을 로그 오프하고 다시 로그인합니다. Okta 포털이 표시될 것입니다.

  • OneLogin – 자세한 내용은, 아래를 참조하거나, OneLogin 문서에서, Kore.ai를 위한 SSO 설정을 참조하세요.
    • SAML 2.0 엔드포인트 – 서비스 공급자 개시 SAML 흐름을 활성화하는 OneLogin용 HTTP SSO 엔드포인트입니다. 예: https://app.onelogin.com/trust/saml2/http-post/sso/358111.
    • 발급자 URLOneLogin 발급자의 URL입니다. 예: https://app.onelogin.com/saml/metadata/358111.
    • X.509 인증서 – ID 공급자로부터 서비스 공급자가 저장한 공개 인증서로 사용자 서명 검증에 사용됩니다. 여러 개의 인증서(최대 2개)를 추가할 수 있으며, 이미 추가된 유효하지 않은 인증서를 삭제할 수 있습니다. 플랫폼은 인증에 최신 인증서를 사용합니다. 유효하지 않은 경우 이전 인증서가 사용됩니다.
    • SP 개시 SAML 흐름용 ACS URL – 이것은 서비스 제공 시작 SAML 흐름용 리디렉션 URL입니다.
    • IDP 개시 SAML 흐름용 ACS URL – 이것은 ID 공급 개시 SAML 흐름용 계정별 URL입니다.
    • SAML 속성 매핑 – 이 옵션을 활성화하면 SAML 속성을 Kore.ai 그룹 이름 또는 관리자 역할 이름으로 매핑할 수 있습니다. 활성화되면, 다음을 수행할 수 있습니다.
      • Kore.ai 속성으로 SAML 속성을 매핑하는 방법을 정의합니다.
        • 전체 동기화 – 사용자가 로그인할 때마다, 플랫폼은 응답에 있는 SAML 속성을 기준으로 사용자의 그룹 및 역할 할당을 업데이트합니다. 모든 기존 할당이 제거됩니다. SAML 응답에서 사용할 수 있는 새 그룹 또는 역할 할당만 할당됩니다
        • 포함 전용 – 사용자가 로그인할 때마다, 플랫폼은 SAML 응답에서 사용할 수 있는 새 그룹 또는 역할만 할당합니다. 모든 기존 할당이 유지됩니다. 새 할당은 SAML 응답에서 사용 가능한 것으로 추가됩니다
      • 하나 이상의 매핑 쌍을 정의합니다. 각 쌍에는 다음이 포함됩니다
        • SAML 속성 이름 – SAML 응답에서 사용할 수 있는 SAML 속성의 이름
        • SAML 속성값 – SAML 속성과 관련된 값
        • 속성 유형 – 연결할 매핑 유형(예: 그룹 이름 또는 역할 이름)을 나타냅니다
          • 그룹 이름 – Kore.ai 계정에 정의된 사용자 그룹을 나타냅니다
          • 역할 이름 – 다음을 나타냅니다
          • Kore.ai 계정에 정의된 관리자 역할
          • 봇 빌더 접근
          • 새 봇 생성
          • 데이터 테이블 및 뷰 관리
        • Kore.ai 속성 – 그룹 이름 또는 역할 이름을 나타냅니다. 목록에는 다음을 포함하여야 합니다.
          • 모든 관리자 역할 목록
          • 봇 빌더 접근
          • 새 봇 생성
          • 데이터 테이블 및 뷰 관리
      Kore.ai SSO용 OneLogin

      OneLogin을 사용하여 Kore.ai에서 싱글 사인 온을 설정하려면, 먼저 OneLogin 계정에 Kore.ai 앱을 추가한 다음, OneLogin에서 URL과 보안 인증서를 Kore.ai 계정으로 복사해야 합니다. 이 항목에서는 OneLogin 계정에 Kore.ai 앱을 추가한 다음, OneLogin을 사용하여 SSO를 위한 Kore.ai 설정에 필요한 URL과 인증서에 접근하는 방법을 설명합니다. 이 절차를 완료하려면, 봇 관리자 콘솔의 싱글 사인 온 페이지에서 OneLogin을 SAML 공급자로 먼저 선택해야 합니다. OneLogin에 Kore.ai 앱 추가 방법

      1. OneLogin에 로그인합니다.
      2. 메뉴에서, 앱 추가를 클릭합니다. 애플리케이션 검색 페이지가 표시됩니다.
      3. 검색 필드에서, Kore.ai를 입력한 다음, Enter 키를 누릅니다. OneLogin용 Kore.ai 앱이 표시됩니다.
      4. Kore.ai 앱을 클릭합니다. Kore.ai 추가 페이지가 표시됩니다.
      5. 선택적으로, OneLogin 포털에서 사용자에게 표시되는 표시 이름 또는 아이콘을 변경한 다음, 저장을 클릭합니다. Kore.ai 앱이 OneLogin용 회사 앱에 추가되고 Kore.ai 앱 페이지가 표시됩니다.
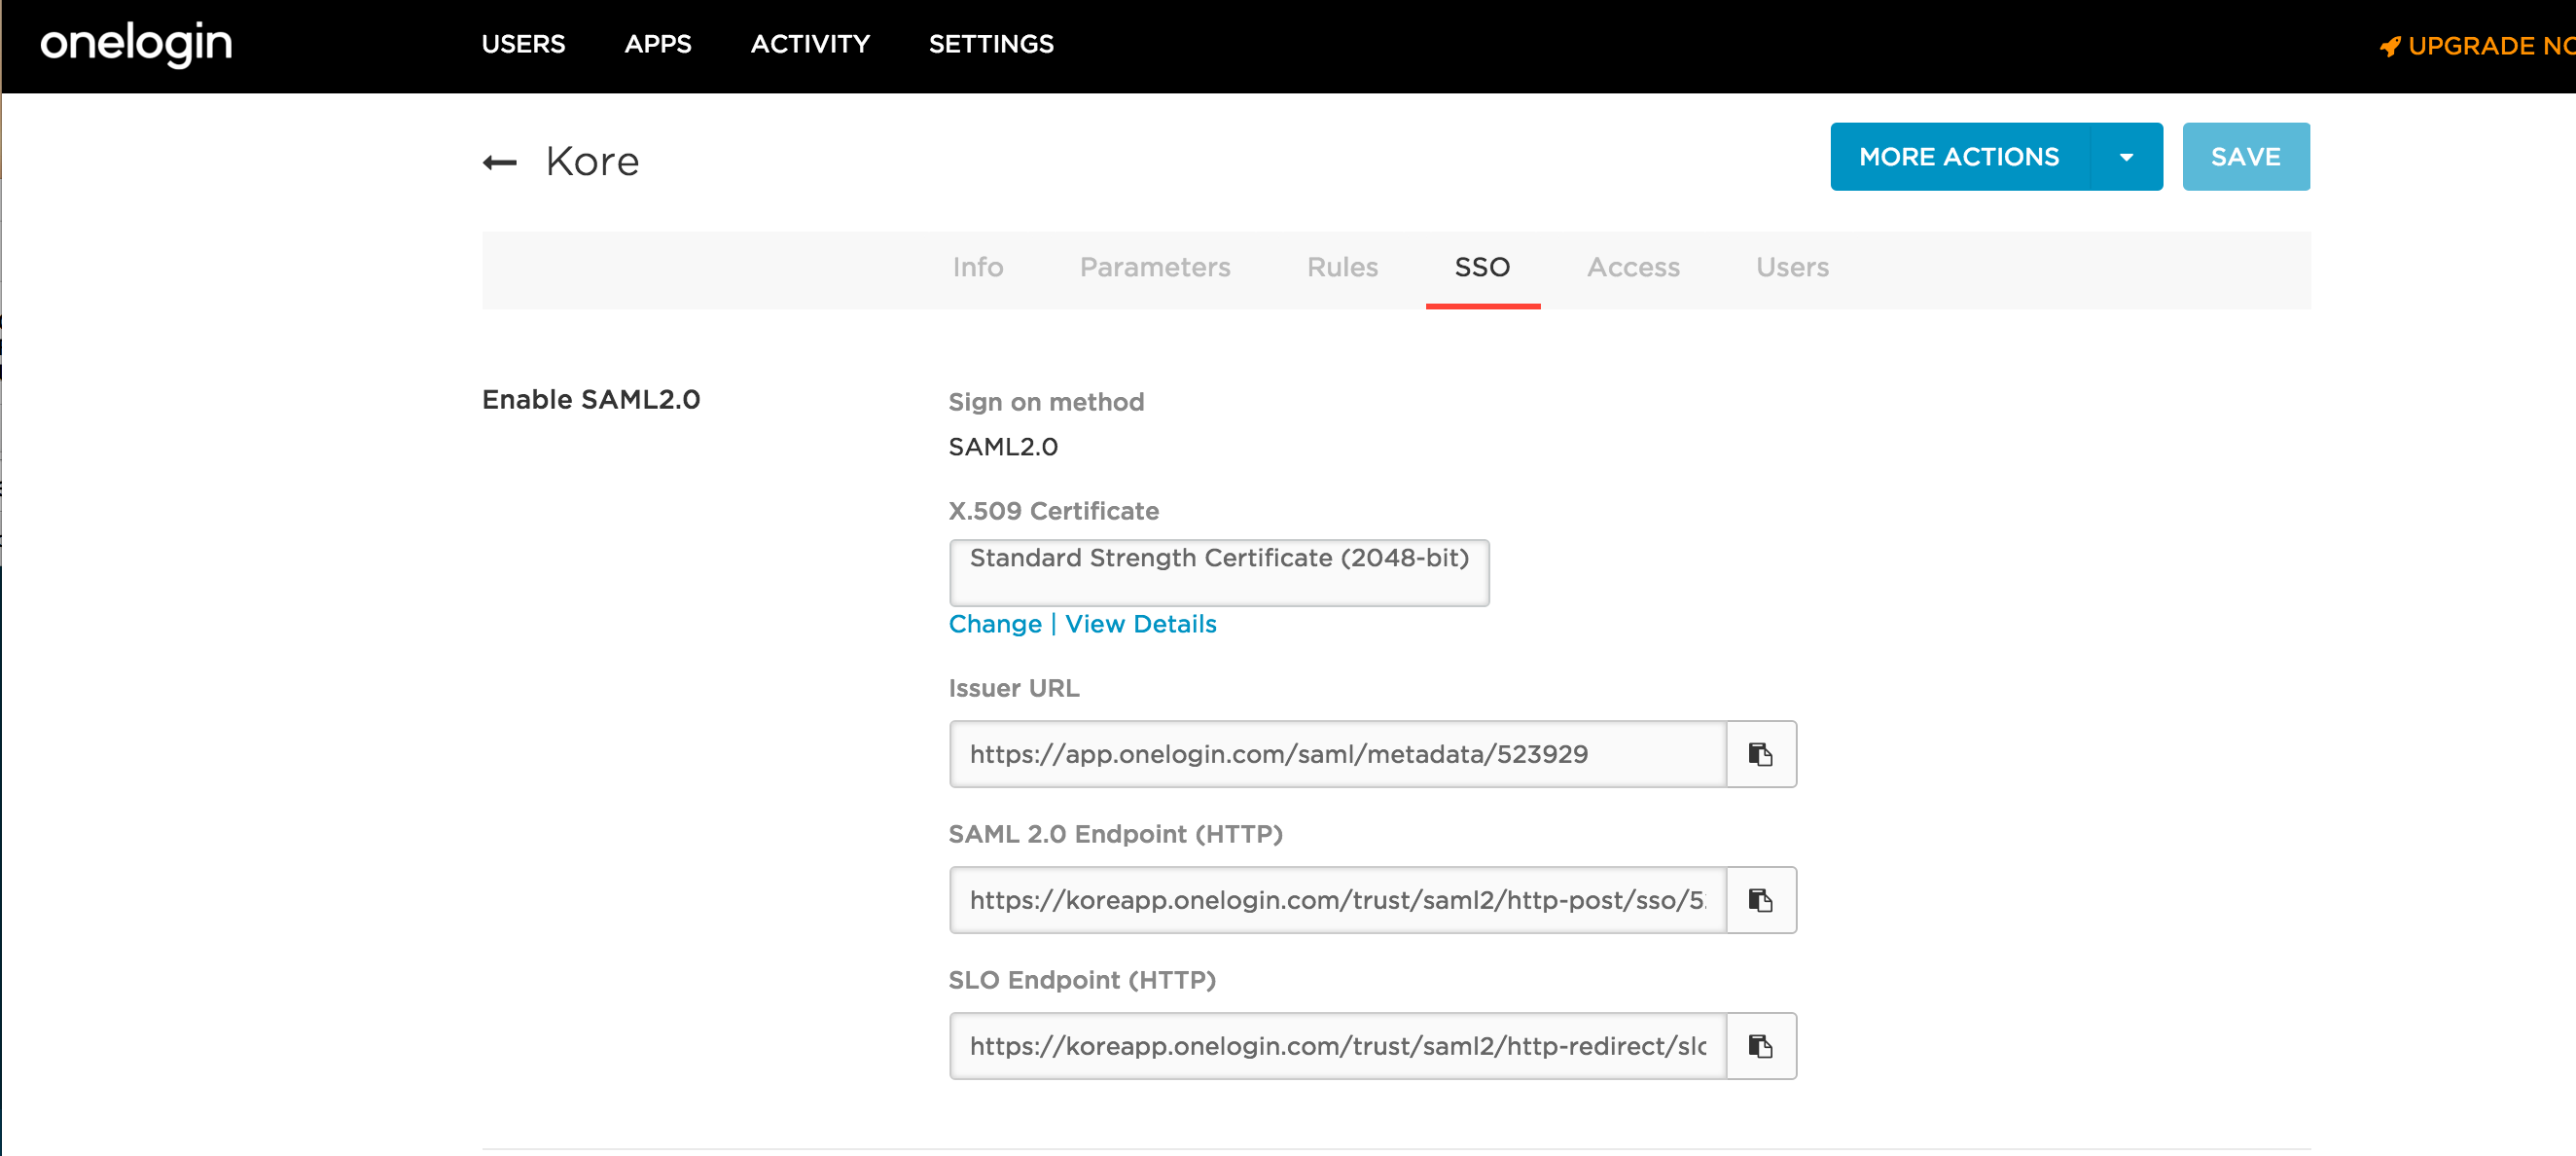
      6. SSO 탭의 SAML2.0 활성화 섹션에서, URL을 다음 위치로 복사합니다.
        • OneLogin SAML 2.0 엔드포인트(HTTP) 필드를 Kore.ai SAML 2.0 엔드포인트 필드로 복사
        • OneLogin 발급자 URL 필드를 Kore.ai 발급자 URL 필드로 복사
      7. OneLogin X.509 인증서 필드에서, 세부 정보 보기를 클릭합니다. 표준 강도 인증서(2048비트) 페이지가 표시됩니다.
      8. X.509 인증서 섹션에서, 인증서 데이터를 복사한 다음, 이 데이터를 Kore.ai X.509 인증서 텍스트 상자에 붙여넣습니다.

        참고 사항: —–BEGIN CERTIFICATE—– 헤더 이후 및 —–END CERTIFICATE—- 푸터 이전의 데이터만 복사하여 Kore.ai에 붙여넣어야 합니다.

      9. Kore.ai에서, 저장을 클릭합니다.

      ID 공급자 정보가 성공적으로 업데이트됨 메시지가 페이지의 상단에 표시됩니다. 설정을 테스트하려면, Kore.ai 봇 관리자 콘솔을 로그 오프하고 다시 로그인합니다. OneLogin 포털이 표시될 것입니다. OneLogin 싱글 사인 온

    • Bitium –
      • 싱글 사인 온 URL – 서비스 공급자 개시 SAML 흐름을 활성화하는 Bitium용 HTTP SSO 엔드포인트입니다. 예: https://www.bitium.com/7655.
      • 발급자 URLOneLogin 발급자의 URL입니다. 예: https://bitium.com/7655/saml/82456/metadata.xml.
      • 인증서 – 사용자 서명을 검증하는 데 사용되는 ID 공급자로부터 서비스 공급자가 저장한 공개 인증서. 여러 개의 인증서(최대 2개)를 추가할 수 있으며, 이미 추가된 유효하지 않은 인증서를 삭제할 수 있습니다. 플랫폼은 인증에 최신 인증서를 사용합니다. 유효하지 않은 경우 이전 인증서가 사용됩니다.
      • SP 개시 SAML 흐름용 ACS URL – 이것은 서비스 제공 시작 SAML 흐름용 리디렉션 URL입니다.
      • IDP 개시 SAML 흐름용 ACS URL – 이것은 ID 공급 개시 SAML 흐름용 계정별 URL입니다.
      • SAML 속성 매핑 – 이 옵션을 활성화하면 SAML 속성을 Kore.ai 그룹 이름 또는 관리자 역할 이름으로 매핑할 수 있습니다. 활성화되면, 다음을 수행할 수 있습니다.
        • Kore.ai 속성으로 SAML 속성을 매핑하는 방법을 정의합니다.
          • 전체 동기화 – 사용자가 로그인할 때마다, 플랫폼은 응답에 있는 SAML 속성을 기준으로 사용자의 그룹 및 역할 할당을 업데이트합니다. 모든 기존 할당이 제거됩니다. SAML 응답에서 사용할 수 있는 새 그룹 또는 역할 할당만 할당됩니다
          • 포함 전용 – 사용자가 로그인할 때마다, 플랫폼은 SAML 응답에서 사용할 수 있는 새 그룹 또는 역할만 할당합니다. 모든 기존 할당이 유지됩니다. 새 할당은 SAML 응답에서 사용 가능한 것으로 추가됩니다
        • 하나 이상의 매핑 쌍을 정의합니다. 각 쌍에는 다음이 포함됩니다
          • SAML 속성 이름 – SAML 응답에서 사용할 수 있는 SAML 속성의 이름
          • SAML 속성값 – SAML 속성과 관련된 값
          • 속성 유형 – 연결할 매핑 유형(예: 그룹 이름 또는 역할 이름)을 나타냅니다
            • 그룹 이름 – Kore.ai 계정에 정의된 사용자 그룹을 나타냅니다
            • 역할 이름 – 다음을 나타냅니다
            • Kore.ai 계정에 정의된 관리자 역할
            • 봇 빌더 접근
            • 새 봇 생성
            • 데이터 테이블 및 뷰 관리
          • Kore.ai 속성 – 그룹 이름 또는 역할 이름을 나타냅니다. 목록에는 다음을 포함하여야 합니다.
            • 모든 관리자 역할 목록
            • 봇 빌더 접근
            • 새 봇 생성
            • 데이터 테이블 및 뷰 관리
        Bitium용 Kore.ai SSO

        Bitium에서 Kore.ai 용 싱글 사인 온을 설정하려면, 먼저 Bitium 계정에 Kore.ai 앱을 추가한 다음, Bitium에서 URL과 보안 인증서를 Kore.ai 계정으로 복사해야 합니다. 이 항목에서는 Bitium 계정에 Kore.ai 앱을 추가한 다음, Bitium을 사용하여 SSO를 위한 Kore.ai 설정에 필요한 URL과 인증서에 접근하는 방법을 설명합니다. 이 절차를 완료하려면, 봇 관리자 콘솔의 싱글 사인 온 페이지에서 Bitium을 SAML 공급자로 먼저 선택해야 합니다. Bitium에 Kore.ai 앱 추가 방법

        1. Bitium에 로그인합니다.
        2. Manage <Company Name> 메뉴에서, Manage Apps를 클릭한 다음, Add an App을 클릭합니다. Add Apps 대화 상자가 표시됩니다.
        3. 검색 필드에서, Kore.ai를 입력한 다음, Enter 키를 누릅니다. Bitium용 Kore.ai 앱 설치 대화 상자가 표시됩니다.
        4. Manage Organization 메뉴에서, Manage Apps를 클릭한 다음, Kore.ai를 클릭합니다.
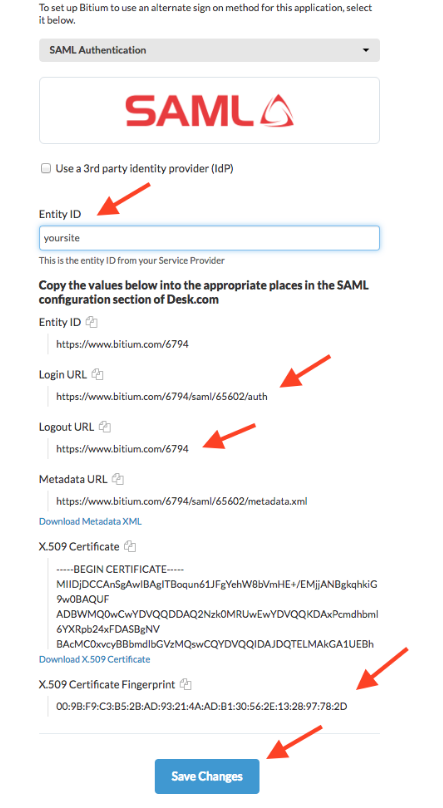
        5. Single Sign-On 탭의 Select a Single Sign-On Provider 섹션에서, SAML Authentication을 선택합니다.
        6. Bitium에서 다음 URL을 봇 관리자 콘솔 Bitium 설정 섹션으로 복사합니다.
          • Bitium Login URL 필드를 Kore.ai Single Sign-On 필드로 복사합니다
          • Bitium Logout URL 필드를 Kore.ai Issuer URL 필드로 복사합니다
        7. Bitium X.509 인증서 필드에서, 인증서 데이터를 복사한 다음, 이 데이터를 봇 관리자 콘솔 인증서 텍스트 상자에 붙여넣습니다.

          참고 사항: —–BEGIN CERTIFICATE—– 헤더 이후 및 —–END CERTIFICATE—- 푸터 이전의 데이터만 복사하여 Kore.ai에 붙여넣어야 합니다.

        8. Kore.ai에서, 저장을 클릭합니다.

        ID 공급자 정보가 성공적으로 업데이트됨 메시지가 페이지의 상단에 표시됩니다. 설정을 테스트하려면, Kore.ai 봇 관리자 콘솔을 로그 오프하고 다시 로그인합니다. Bitium 포털이 표시될 것입니다.
        Bitium 싱글 사인 온

      • 기타 – 일반 SAML ID 공급자 설정입니다. Kore.ai 내장 설정을 사용하지 않는 경우 이 옵션을 선택합니다.
        • 싱글 사인 온 URL – Kore.ai가 WS-Federation ID 공급자를 사용하여 로그인 및 로그 오프 요청을 보내는 URL입니다. 이는 서비스 공급자 개시 SAML 흐름을 활성화하기 위한 것입니다.
        • 발급자 URL – Azure Active Directory를 통한 인증에 사용되는 WS-Federation 메타데이터 문서용 URL입니다.
        • 인증서 – 사용자 서명을 검증하는 데 사용되는 ID 공급자로부터 서비스 공급자가 저장한 공개 인증서. 여러 개의 인증서(최대 2개)를 추가할 수 있으며, 이미 추가된 유효하지 않은 인증서를 삭제할 수 있습니다. 플랫폼은 인증에 최신 인증서를 사용합니다. 유효하지 않은 경우 이전 인증서가 사용됩니다.
        • SP 개시 SAML 흐름용 ACS URL – 이것은 서비스 제공 시작 SAML 흐름용 리디렉션 URL입니다.
        • IDP 개시 SAML 흐름용 ACS URL – 이것은 ID 공급 개시 SAML 흐름용 계정별 URL입니다.
        • SAML 속성 매핑 – 이 옵션을 활성화하면 SAML 속성을 Kore.ai 그룹 이름 또는 관리자 역할 이름으로 매핑할 수 있습니다. 활성화되면, 다음을 수행할 수 있습니다.
          • Kore.ai 속성으로 SAML 속성을 매핑하는 방법을 정의합니다.
            • 전체 동기화 – 사용자가 로그인할 때마다, 플랫폼은 응답에 있는 SAML 속성을 기준으로 사용자의 그룹 및 역할 할당을 업데이트합니다. 모든 기존 할당이 제거됩니다. SAML 응답에서 사용할 수 있는 새 그룹 또는 역할 할당만 할당됩니다
            • 포함 전용 – 사용자가 로그인할 때마다, 플랫폼은 SAML 응답에서 사용할 수 있는 새 그룹 또는 역할만 할당합니다. 모든 기존 할당이 유지됩니다. 새 할당은 SAML 응답에서 사용 가능한 것으로 추가됩니다
          • 하나 이상의 매핑 쌍을 정의합니다. 각 쌍에는 다음이 포함됩니다
            • SAML 속성 이름 – SAML 응답에서 사용할 수 있는 SAML 속성의 이름
            • SAML 속성값 – SAML 속성과 관련된 값
            • 속성 유형 – 연결할 매핑 유형(예: 그룹 이름 또는 역할 이름)을 나타냅니다
              • 그룹 이름 – Kore.ai 계정에 정의된 사용자 그룹을 나타냅니다
              • 역할 이름 – 다음을 나타냅니다
              • Kore.ai 계정에 정의된 관리자 역할
              • 봇 빌더 접근
              • 새 봇 생성
              • 데이터 테이블 및 뷰 관리
            • Kore.ai 속성 – 그룹 이름 또는 역할 이름을 나타냅니다. 목록에는 다음을 포함하여야 합니다.
              • 모든 관리자 역할 목록
              • 봇 빌더 접근
              • 새 봇 생성
              • 데이터 테이블 및 뷰 관리
          • 싱글 사인 온 공급자의 관리자 콘솔에서, Kore.ai와 SSO 공급자 간에 데이터를 교환하는 데 사용되는 URL도 정의해야 합니다. URL 이름은 SSO 공급자에 따라 다를 수 있지만, 다음 URL을 다음과 같이 정의해야 합니다.
            • ACS(Assertion Consumer Service) URL 또는 콜백 URLhttps://idp.kore.ai/authorize/callback으로 정의.
            • 인증값 외에도, ADFS를 사용할 때 사용자의 이메일 주소를 Active Directory의 LDAP 속성으로 전달해야 합니다. 자세한 내용은, ADFS용 속성을 참조하세요.
            • ID URL 또는 싱글 사인 온 URLhttps://idp.kore.ai로 정의
        • 저장을 클릭합니다.

        ID 공급자 정보가 성공적으로 업데이트됨 메시지가 페이지의 상단에 표시됩니다.

ADFS용 속성 ADFS용 LDAP를 사용하여 싱글 사인 온을 설정하는 경우, 인증 속성 외에도, 타사 SSO 공급자는 ACS(Assertion Consumer Service) URL 또는 콜백 URL을 통해 추가 속성을 Kore.ai로 보낼 수 있습니다. WS-Federation 프로토콜용 Windows Azure 또는 SAML 프로토콜용 OneLogin과 같은 SSO를 위해 내장형 Kore.ai 앱을 사용하는 경우, Kore.ai 앱을 SSO 공급자 관리자 콘솔에 추가할 때 필요한 속성은 이미 Kore.ai에 설정되어 있습니다. 다음 데이터는 콜백 URL에서 Kore.ai로 전달된 속성 데이터의 예입니다.

<Attribute Name="FirstName" NameFormat="urn:oasis:names:tc:SAML:2.0:attrname-format:uri" FriendlyName="First Name"> <AttributeValue>Michael</AttributeValue> </Attribute> <Attribute Name="LastName" NameFormat="urn:oasis:names:tc:SAML:2.0:attrname-format:uri" FriendlyName="Last Name"> <AttributeValue>Mehra</AttributeValue> </Attribute> <Attribute Name="DisplayName" NameFormat="urn:oasis:names:tc:SAML:2.0:attrname-format:uri" FriendlyName="Display Name"> <AttributeValue>Michael Mehra</AttributeValue> </Attribute> <Attribute Name="EmailAddress" NameFormat="urn:oasis:names:tc:SAML:2.0:attrname-format:uri" FriendlyName="Email"> <AttributeValue>michael.mehra@acme.com</AttributeValue> </Attribute>

이러한 속성은 필수인 EmailAddress를 제외하고 선택 사항입니다. Email Address 속성은 다음 nameId 형식을 사용합니다.

SAML 2.0: NameID Format="urn:oasis:names:tc:SAML:2.0:attrname-format:uri" SAML 1.1: NameID Format="urn:oasis:names:tc:SAML:1.1:nameid:format:emailAddress

ADFS의 매핑 속성 ADFS는 Microsoft가 기존 Active Directory 자격 증명을 사용하여 웹 로그인을 제공하는 Windows Server의 표준 역할로 제공하는 서비스입니다. SAML 또는 WS-Federation 프로토콜을 사용하여 ADFS로 로그인하는 경우, 인증값 외에 다른 값을 전달할 수 있습니다. 특성값은 SQL Server 관리자 콘솔의 신뢰 당사자 트러스트 대화 상자에서 클레임 규칙으로 정의됩니다. 클레임 규칙을 편집하려면, ADFS 관리신뢰 당사자 트러스트 폴더를 선택한 다음, 작업 사이드바에서 클레임 규칙 편집을 클릭합니다. 새 규칙을 추가하려면, 규칙 추가를 클릭한 다음, LDAP 속성 보내기 템플릿을 선택합니다. 다음 매핑 값을 입력합니다.

  • SAML 2.0
    • LDAP 속성: nameId
    • 클레임 속성: uri
  • SAML 1.1
    • LDAP 속성: nameId
    • 클레임 속성: emailAddress

SSO 대신 관리자 암호를 사용한 로그인

봇 관리자는 타사 보안 시스템(예: Google)을 사용하여 싱글 사인 온(SSO)을 활성화할 수 있습니다. 어떤 이유로, SSO 보안 시스템에 장애가 발생하거나, 타사 보안 시스템의 SSO 로그인 자격 증명을 잊어버린 경우에도, Kore.ai 봇 관리자 콘솔에 여전히 로그인하고 SSO를 우회할 수 있습니다. 사용자 정의 관리자 역할이 있는 봇 관리자는 사용자 정의 권한이 하나 이상의 모듈에 대해 활성화된 경우 SSO를 우회하고 관리자 암호를 사용할 수 있습니다. Kore.ai 디렉토리 에이전트에 로그인하려면, 사용자 정의 관리자는 등록 – 디렉토리 동기화에 대해 활성화된 권한이 있어야 합니다. SSO를 활성화하기 전에, 봇 관리자는 가입 시 제공된 로그인 자격 증명을 사용하여 봇 관리자 콘솔에 로그인해야 합니다. 봇 관리자가 SSO를 설정하고 활성화한 후에도, 다음 URL에서 봇 관리자 콘솔에 바로 접근할 수 있습니다.

https://bots.kore.ai/admin

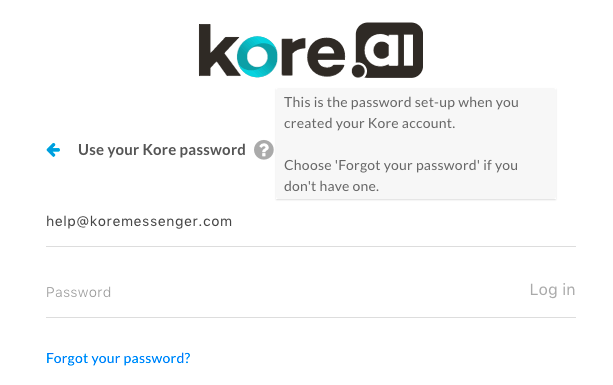
다음 로그인 페이지가 표시되며 봇 관리자 암호 자격 증명을 사용하여, 봇 관리자 콘솔에 로그인하고 활성화된 경우 SSO를 우회할 수 있습니다.
암호를 사용하여 SSO 없이 봇 관리자 콘솔 로그인
봇 관리자 암호가 기억나지 않는 경우, 이메일 ID를 입력한 다음, 이전 이미지에 표시된 비밀번호를 잊으셨습니까? 링크를 클릭합니다. 봇 관리자 암호를 재설정하는 방법에 관한 지침이 포함된 이메일이 귀하의 Kore.ai 이메일 계정으로 발송됩니다.

로그 오프

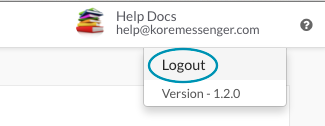
봇 관리자 콘솔과의 세션이 끝난 경우, 봇 계정을 안전하게 유지하기 위해 콘솔을 로그 오프하고 세션을 종료해야 합니다. 로그 오프하려면, 사용자 이름을 클릭한 다음, 다음 그림과 같이 로그아웃을 클릭합니다.
봇 관리자 콘솔에서 로그아웃
봇 관리자 콘솔 세션이 15분 이상 유휴 상태인 경우, 세션은 자동으로 종료되며, 대신에 세션 창의 다음 작업으로 Kore.ai 웹 클라이언트를 엽니다. 새 세션을 시작하려면, 봇 관리자 콘솔 entadminsettingsicon 아이콘을 클릭하고 로그인합니다.

Leave a Reply

Your email address will not be published. Required fields are marked *

Fill out this field
Fill out this field
Please enter a valid email address.
You need to agree with the terms to proceed

Kore.aiシングルサインオンページのボット管理コンソールのセキュリティと制御モジュールで、次を使用してKore.ai管理対象ユーザーのシングルサインオン(SSO)認証を構成できます。

  • OpenID接続
  • セキュリティアサーションマークアップ言語(SAML)
  • WS-Federationサインオンプロトコル。

SSOを使用すると、既存のIDプロバイダーを使用してKore.aiアプリケーションに簡単にアクセスできます。たとえば、SSOを利用することで、ユーザーは会社のアカウントで一度ログオンすると、Kore.aiアプリケーションにアクセスする際に同じログイン認証情報をシステムで自動的に使用することができます。

たとえば、WS-Federationサインオンプロトコルを使用すると、ユーザーがMicrosoft®Active Directory®サーバーの資格情報を使用してKore.aiアプリケーションにサインオンできるようになります。

次のイラストは、ボット管理コンソールのセキュリティと制御モジュールのシングルサインオンページを示しています。

SSOを有効または無効にする

会社に必要なセキュリティに応じて、Kore.aiアプリケーションにアクセスするユーザーのシングルサインオン(SSO)を有効または無効にできます。SSOを無効にしたり、SSO認​​証の有効期間が満了する場合、ユーザーは自分の資格情報を使用して作成およびログオンする必要があります。アカウント固有のパスワードポリシーが定義されていない場合、デフォルトのKore.aiパスワードポリシーがユーザーに対して自動的に適用されます。

シングルサインオンを有効にする

  • セキュリティと制御モジュールのシングルサインオンページで、SSOを有効にするをクリックします。
    SSOを有効化

シングルサインオンを無効にする

  • セキュリティと制御モジュールのシングルサインオンページで、SSOを無効にするをクリックし、次にユーザーパスワードポリシーを構成します。
    SSOの無効化

OpenID接続

次の手順のステップを実行して、ボット管理コンソールのセキュリティと制御モジュールでOpen ID接続プロトコルを使用してSSOを構成します。Kore.aiは、WS-FederationおよびSAML接続プロトコルもサポートしています。

  1. ボット管理コンソールのセキュリティと制御モジュールのシングルサインオンページで、SSOを有効にするをクリックします。
  2. 適切なサインオンプロトコルの選択セクションで、OpenID接続を選択します。
  3. OpenID接続のSSOの構成セクションで、IDプロバイダーを選択します、たとえばGoogleでサインイン
  4. 保存をクリックします。
  5. Dプロバイダー情報が正常に更新されましたというメッセージがページの上部に表示されます。

WSフェデレーション

次の手順のステップを実行して、ボット管理コンソールのセキュリティと制御モジュールで、WS-Federationプロトコルを使用してシングルサインオン(SSO)を構成します。

  1. ボット管理コンソールのセキュリティと制御モジュールのシングルサインオンページで、SSOを有効にするをクリックします。
  2. 適切なサインオンプロトコルの選択セクションで、WS-Federationを選択します。
  3. WS-FederationのSSOの構成セクションで、IDプロバイダーを選択し、次の設定を定義します。
    • Windows Azure®
      • Azure ADサインオンエンドポイントURL―Kore.aiがAzureを使用してサインオンおよびサインオフ要求を送信するURL。認証の応答は、Azure Active Directory構成設定で定義された返信URLに送信されます。
      • Azure ADフェデレーションメタデータドキュメントAzure Active Directoryでの認証に使用されるフェデレーションメタデータドキュメントのURL。
    • その他―Azure以外の一般的なWS-FederationIDプロバイダーの構成
      • ADサインオンエンドポイントURL―Kore.aiがWS-Federation IDプロバイダーを使用してサインオンおよびサインオフ要求を送信するURL。
      • ADフェデレーションメタデータドキュメントURL―Active Directoryでの認証に使用されるWS-FederationメタデータドキュメントのURL。
  4. シングルサインオンプロバイダーの管理コンソールで、Kore.aiとSSOプロバイダーの間でデータを交換するために使用されるURLも定義する必要があります。URL名はSSOプロバイダーによって異なる場合がありますが、これらのURLを定義する必要があります。

    • SAML 2.0
      • LDAP Attribute: nameId
      • Claim Attribute: uri
    • SAML 1.1
      • LDAP Attribute: nameId
      • Claim Attribute: emailAddress
    • アサーションコンシューマーサービス(ACS)URLまたはコールバックURL(https://idp.kore.ai/authorize/callback)
    • ADFSを使用する場合は、認証値に加えて、ユーザーのメールアドレスをActive DirectoryからLDAP属性として渡す必要があります。詳細はADFS向け属性をご覧ください。
    • 保存をクリックします。

Dプロバイダー情報が正常に更新されましたというメッセージがページの上部に表示されます。

SAML

セキュリティアサーションマークアップ言語(SAML)は、セキュアトークンを使用するWebブラウザのシングルサインオン(SSO)の標準プロトコルです。SAMLはすべてのパスワードを完全に排除し、代わりに標準の暗号化とデジタル署名を使用して、IDプロバイダーからSaaSアプリケーションに安全なサインイントークンを渡します。SAMLはIDプロバイダーとサービスプロバイダーが、互いに別々に存在できるようにするソリューションを提供します。ユーザーがSAML対応アプリケーションにログインすると、サービスプロバイダーは適切なIDプロバイダーに承認を要求します。IDプロバイダーはユーザーの資格情報を認証してから、ユーザーの承認をサービスプロバイダーに返します。これで、ユーザーはアプリケーションを使用できるようになります。

SAMLの仕組み

SAML SSOは、ユーザーのIDをある場所(IDプロバイダー)から他の場所(サービスプロバイダー)に転送することで機能します。これは、デジタル署名されたXMLドキュメントの交換を通じて行われます。次のシナリオを考えてください:ユーザーはIDプロバイダーとして機能するシステムにログインします。ユーザーはサポートアプリケーションやアカウンティングアプリケーション(サービスプロバイダー)などのリモートアプリケーションにログインしたいと考えています。次のことが起こります。

  1. ユーザーは、イントラネットやブックマークなどのリンクを使用してリモートアプリケーションにアクセスし、アプリケーションをロードします。
  2. アプリケーションはユーザーのオリジンを(アプリケーションのサブドメイン、ユーザーのIPアドレスなどによって)識別し、ユーザーをIDプロバイダーにリダイレクトして、認証を要求します。これが認証要求です。
  3. ユーザーはIDプロバイダーとの既存のアクティブなブラウザーセッションを持っているか、IDプロバイダーにログインしてセッションを確立します。
  4. IDプロバイダーは、ユーザーのユーザー名またはメールアドレスを含むXMLドキュメントの形式で認証レスポンスを作成し、X.509証明書を使用して署名し、この情報をサービスプロバイダーに送信します。
  5. すでにIDプロバイダーを認識しており、証明書のフィンガープリントを持っているサービスプロバイダーは、認証レスポンスを取得し、証明書のフィンガープリントを使用して検証します。
  6. ユーザーのIDが確立され、ユーザーにアプリへのアクセスが提供されます。

Kore.aiの実装

Kore.aiボットプラットフォーム内でSAMLを使用する方法は2つあります。

  • ボットビルダーにアクセスするための開発者認証として、
  • ボットにアクセスするためのユーザー認証用として。

ユースケース1:ボットビルダーの認証。

エンタープライズは自身のSSOを使用してボットビルダーツールへのアクセスを設定できます。ボットの開発者と管理者は、エンタープライズのIDプロバイダーによって行われるSSOを使用してボットビルダーにログインできます。Kore.aiボットプラットフォームからのSSOフロー:以下は、SSOがSAMLを使用して構成された後のKore.aiボットプラットフォーム内のフローです。

  1. クライアントはユーザーの詳細を使用して(ログインURLを使用して)Koreアプリサーバーを呼び出し、IDプロバイダー情報(SAML)を取得します。
  2. Koreアプリサーバーは、Kore idproxyサーバーとのハンドシェイクリクエストを開始します。
  3. Kore idproxyサーバーは、ユーザーの詳細を使用してIDプロバイダー(SAML)へのリクエストを開始します。
  4. 認証が成功すると、IDプロバイダー(SAML)はKore idproxyサーバーにアサーションレスポンスを返します。
  5. IDプロバイダーからのレスポンスを確認すると、Kore idproxyサーバーはKoreアプリサーバーへのリクエストを開始します。
  6. Kore idproxyサーバーからのトークンの認証が成功すると、Koreアプリサーバーはユーザーにアクセスを許可します。

v7.2リリース以降、Kore.aiはIDPが開始するフローをサポートします。このフローでは、プラットフォームがSAMLレスポンスで直接ポストバックを取得し、アサーションを検証してユーザーを登録/特定できます。これらのモードの構成(SPベースのフローとIDPベースのフロー)は異なり、以下の構成ステップで強調表示されています。SAMLを使用してSSOを構成するには、以下を参照してください

ユースケース2:エンドユーザーの認証

このシナリオでは、ボットチャットインターフェイスはSSOを介したユーザー認証を必要とする、カスタマーポータルまたはモバイルアプリに組み込まれています。ボットへのアクセスは、自動的に認証されたユーザーに制限されます。  タスクがSSOベースの認証を必要とするAPI呼び出しを必要とする場合、開発者は以下のステップに従うことができます

  • クライアント側では、開発者はログインしたユーザーのSSOトークンを取得し、ボットSDK APIのsecureCustomPayloadパラメーターを使用してボットに渡す必要があります。
  • ダイアログタスクでは、ボット開発者はこのトークンを読み取るためにカスタムロジックを記述し、サービスノードまたはWebhookノードを使用して行われる安全なAPI呼び出しのためのAPIヘッダーとして追加できます。

クライアントのトークン情報はSSOプロバイダーとペイロードによって異なるため、開発者はカスタムロジックを作成する必要があります。

SAMLを使用したSSOの構成

Kore.aiボット管理コンソールでセキュリティアサーションマークアップ言語(SAML)プロトコルを使用してシングルサインオン(SSO)を構成するには、次のステップを実行します。Kore.aiは、WS-FederationおよびOpenID接続プロトコルもサポートしています。詳細については、シングルサインオンの使用をご覧ください。

  1. ボット管理コンソールのセキュリティと制御モジュールのシングルサインオンページで、SSOを有効にするをクリックします。
  2. 適切なサインオンプロトコルの選択セクションで、SAMLを選択します。
  3. SAMLのSSOを構成セクションで、IDプロバイダーを選択し、次の設定を定義します。
    • Okta
      • OktaシングルサインオンURLOktaのSSOURLは、サービスプロバイダーが開始するSAMLフローを有効にするためのものです。
      • IDプロバイダー発行者―ユーザーを認証する機能を含むユーザーIDを提供するエンティティ。
      • 証明書―ユーザー署名の検証に使用されるIDプロバイダーから提供されサービスプロバイダーによって保存される公開証明書。複数(最大2)の証明書を追加したり、すでに追加された無効な証明書を削除したりできます。プラットフォームは最新の証明書を認証に使用します。それが無効な場合は、古い証明書が使用されます。
      • SPが開始するSAMLフローのACS URL―これは、サービスプロバイダーが開始するSAMLフローのリダイレクトURLです。
      • IDPが開始するSAMLフローのACS URL―これは、サービスプロバイダーが開始するSAMLフローのアカウントに特有のURLです。
      • SAML属性のマッピング―このオプションを有効にすると、SAML属性がKore.aiグループ名または管理者ロール名にマッピングされます。有効にすると、次のことができます。
        • SAML属性をKore.ai属性とどのようにマッピングするかを定義します。
          • 完全同期―ユーザーがサインインするたびに、プラットフォームは、レスポンスに存在するSAML属性に基づいてユーザーのグループと役割の割り当てを更新します。既存の割り当てはすべて削除されます。SAMLレスポンスで使用可能な新しいグループまたは役割の割り当てのみが割り当てられます
          • 包含のみ―ユーザーがサインインするたびに、プラットフォームはSAMLレスポンスで使用可能な新しいグループまたは役割のみを割り当てます。既存の割り当てはすべて保持されます。SAMLレスポンスで利用可能な新しい割り当てが追加されます
        • 1つ以上のマッピングペアを定義します。各ペアが含むのは
          • SAML属性名―SAMLレスポンスで使用可能なSAML属性の名前
          • SAML属性値―SAML属性に関連付けられた値
          • 属性タイプ―関連付けられるマッピングのタイプ、つまりグループ名または役割名を指します
            • グループ名―Kore.aiアカウントで定義されているユーザーグループのいずれかを指します
            • 役割名―以下を参照してください
            • Kore.aiアカウントで定義された管理者の役割
            • ボットビルダーへのアクセス権
            • 新しいボットの作成
            • データテーブルとビューの管理
          • Kore.ai属性―グループ名または役割名のいずれかを参照します。リストは次のものを含んでいる必要があります。
            • すべての管理者の役割のリスト
            • ボットビルダーへのアクセス権
            • 新しいボットの作成
            • データテーブルとビューの管理
        Kore.ai SSOのOkta

        OktaでKore.aiのシングルサインオンを構成するには、最初にKore.aiアプリをOktaアカウントに追加してから、URLとセキュリティ証明書をOktaからKore.aiアカウントにコピーする必要があります。このトピックでは、Kore.aiアプリをOktaアカウントに追加し、Oktaを使用してSSOのKore.ai構成に必要なURLと証明書にアクセスする方法について説明します。この手順を完了するには、ボット管理コンソールのシングルサインオンページでSAMLプロバイダーとしてOktaをすでに選択している必要があります。Kore.aiアプリをOktaに追加するには

        1. Oktaにログオンします。
        2. ホームページで、管理者をクリックします。ダッシュボードページが表示されます。
        3. 上部のナビゲーションバーで、アプリケーションをクリックします。アプリケーションページが表示されます。
        4. アプリケーションの追加をクリックします。アプリケーションの追加ページが表示されます。
        5. アプリケーションの作成をクリックします
        6. 一般設定で、アプリ名を入力して次へをクリックします。
        7. SAMLの構成で、シングルサインオンURLを提供します。これを取得するには:
          • Kore.aiボットビルダー管理コンソールにログインします
          • セキュリティと制御―>シングルサインオンページ
          • SAMLを有効にしてOktaを選択した後
          • SPが開始するSAMLフローフィールドのACS URLには、必要なURLが含まれます。
        8. また、オーディエンスURIフィールドにhttps://idp.kore.comと入力します。
        9. メモ:オンプレミスアカウントの場合、SPが開始するSAMLフローのACS URLはhttps://idproxy-dev.kore.com/authorize/callbackとして表示されます。これは、Oktaプラットフォームで「シングルサインオンURL」として更新する必要があり、https://idproxy-dev.kore.comは「オーディエンスURL」として更新する必要があります
        10. 要件に応じて、emailId、firstNameなどの属性ステートメントを指定できます。
        11. 完了をクリックします。
      • サインオンタブの設定セクションで、セットアップ手順の表示をクリックします。<app-name>アプリケーション用にSAML2.0を設定する方法ページが表示されます。
      • 次のURLをコピーします。
        • IDプロバイダーのシングルサインオンURLフィールドからKore.aiのOktaシングルサインオンURLフィールドへ。
        • IDプロバイダー発行者フィールドからKore.aiIDプロバイダー発行者フィールド
      • Okta X.509証明書フィールドで、証明書データをコピーしてから、そのデータを[Kore.ai証明書テキストボックスに貼り付けます。

        メモ:—– BEGIN CERTIFICATE —–ヘッダーの後、—– END CERTIFICATE —-フッターの前のデータのみをコピーして、Kore.aiに貼り付ける必要があります

  • Kore.aiで、保存をクリックします。これで、Oktaログインのシステム連携が完了します。

Dプロバイダー情報が正常に更新されましたというメッセージがページの上部に表示されます。構成をテストするには、Kore.aiボット管理コンソールからログオフしてから再度ログオンします。Oktaポータルが表示されます。

  • OneLogin―詳細については、以下を参照するか、OneLoginのドキュメントで、Kore.aiのSSOの構成を参照してください。
    • SAML 2.0エンドポイント―サービスプロバイダーが開始するSAMLフローを有効にするOneLoginのHTTP SSOエンドポイント(例:https://app.onelogin.com/trust/saml2/http-post/sso/358111)。
    • 発行者のURLOneLogin発行者のURL、たとえばhttps://app.onelogin.com/saml/metadata/358111
    • X.509証明書―ユーザー署名の検証に使用されるIDプロバイダーから提供されサービスプロバイダーによって保存される公開証明書。複数(最大2)の証明書を追加したり、すでに追加された無効な証明書を削除したりできます。プラットフォームは最新の証明書を認証に使用します。それが無効な場合は、古い証明書が使用されます。
    • SPが開始するSAMLフローのACS URL―これは、サービスプロバイダーが開始するSAMLフローのリダイレクトURLです。
    • IDPが開始するSAMLフローのACS URL―これは、サービスプロバイダーが開始するSAMLフローのアカウントに特有のURLです。
    • SAML属性のマッピング―このオプションを有効にすると、SAML属性がKore.aiグループ名または管理者ロール名にマッピングされます。有効にすると、次のことができます。
      • SAML属性をKore.ai属性とどのようにマッピングするかを定義します。
        • 完全同期―ユーザーがサインインするたびに、プラットフォームは、レスポンスに存在するSAML属性に基づいてユーザーのグループと役割の割り当てを更新します。既存の割り当てはすべて削除されます。SAMLレスポンスで使用可能な新しいグループまたは役割の割り当てのみが割り当てられます
        • 包含のみ―ユーザーがサインインするたびに、プラットフォームはSAMLレスポンスで使用可能な新しいグループまたは役割のみを割り当てます。既存の割り当てはすべて保持されます。SAMLレスポンスで利用可能な新しい割り当てが追加されます
      • 1つ以上のマッピングペアを定義します。各ペアが含むのは
        • SAML属性名―SAMLレスポンスで使用可能なSAML属性の名前
        • SAML属性値―SAML属性に関連付けられた値
        • 属性タイプ―関連付けられるマッピングのタイプ、つまりグループ名または役割名を指します
          • グループ名―Kore.aiアカウントで定義されているユーザーグループのいずれかを指します
          • 役割名―以下を参照してください
          • Kore.aiアカウントで定義された管理者の役割
          • ボットビルダーへのアクセス権
          • 新しいボットの作成
          • データテーブルとビューの管理
        • Kore.ai属性―グループ名または役割名のいずれかを参照します。リストは次のものを含んでいる必要があります。
          • すべての管理者の役割のリスト
          • ボットビルダーへのアクセス権
          • 新しいボットの作成
          • データテーブルとビューの管理
      Kore.ai SSOへのOneLogin

      OneLoginを使ってKore.aiのシングルサインオンを構成するには、最初にKore.aiアプリをOneLoginアカウントに追加してから、URLとセキュリティ証明書をOneLoginからKore.aiアカウントにコピーする必要があります。このトピックでは、Kore.aiアプリをOneLoginアカウントに追加し、OneLoginを使用してSSOのKore.ai構成に必要なURLと証明書にアクセスする方法について説明します。この手順を完了するには、ボット管理コンソールのシングルサインオンページでSAMLプロバイダーとしてOneLoginをすでに選択している必要があります。Kore.aiアプリをOneLoginに追加するには

      1. OneLoginにログオンします。
      2. APPSメニューで、アプリを追加をクリックします。アプリケーションの検索ページが表示されます。
      3. 検索フィールドにKore.aiと入力し、入力キーを押します。OneLogin用のKore.aiアプリが表示されます。
      4. Kore.aiアプリをクリックします。Kore.aiの追加ページが表示されます。
      5. 必要に応じて、OneLoginポータルでユーザーに表示される表示名またはアイコンを変更し、保存をクリックします。Kore.aiアプリがOneLoginのための会社のアプリに追加され、Kore.aiアプリのページが表示されます。
      6. SSOタブのSAML2.0を有効にするセクションで、次のURLをコピーします。
        • OneLogin SAML 2.0エンドポイント(HTTP)フィールドからKore.ai SAML2.0エンドポイントフィールドへ
        • OneLogin発行者URLフィールドからKore.ai発行者URLフィールドへ
      7. OneLogin X.509証明書フィールドで、詳細の表示をクリックします。標準強度証明書(2048ビット)ページが表示されます。
      8. X.509証明書フィールドで、証明書データをコピーしてから、そのデータをKore.aiX.509証明書テキストボックスに貼り付けます。

        メモ:—– BEGIN CERTIFICATE —–ヘッダーの後、—– END CERTIFICATE —-フッターの前のデータのみをコピーして、Kore.aiに貼り付ける必要があります

      9. Kore.aiで、保存をクリックします。

      Dプロバイダー情報が正常に更新されましたというメッセージがページの上部に表示されます。構成をテストするには、Kore.aiボット管理コンソールからログオフしてから再度ログオンします。OneLoginポータルが表示されます。
      OneLoginシングルサインオン

    • Bitium
      • シングルサインオンURL―サービスプロバイダーが開始したSAMLフローを有効にするBitiumのHTTP SSOエンドポイント、たとえばhttps://www.bitium.com/7655
      • 発行者のURLOneLogin発行者のURL、たとえばhttps://bitium.com/7655/saml/82456/metadata.xml
      • 証明書―ユーザー署名の検証に使用されるIDプロバイダーから提供されサービスプロバイダーによって保存される公開証明書。複数(最大2)の証明書を追加したり、すでに追加された無効な証明書を削除したりできます。プラットフォームは最新の証明書を認証に使用します。それが無効な場合は、古い証明書が使用されます。
      • SPが開始するSAMLフローのACS URL―これは、サービスプロバイダーが開始するSAMLフローのリダイレクトURLです。
      • IDPが開始するSAMLフローのACS URL―これは、サービスプロバイダーが開始するSAMLフローのアカウントに特有のURLです。
      • SAML属性のマッピング―このオプションを有効にすると、SAML属性がKore.aiグループ名または管理者ロール名にマッピングされます。有効にすると、次のことができます。
        • SAML属性をKore.ai属性とどのようにマッピングするかを定義します。
          • 完全同期―ユーザーがサインインするたびに、プラットフォームは、レスポンスに存在するSAML属性に基づいてユーザーのグループと役割の割り当てを更新します。既存の割り当てはすべて削除されます。SAMLレスポンスで使用可能な新しいグループまたは役割の割り当てのみが割り当てられます
          • 包含のみ―ユーザーがサインインするたびに、プラットフォームはSAMLレスポンスで使用可能な新しいグループまたは役割のみを割り当てます。既存の割り当てはすべて保持されます。SAMLレスポンスで利用可能な新しい割り当てが追加されます
        • 1つ以上のマッピングペアを定義します。各ペアが含むのは
          • SAML属性名―SAMLレスポンスで使用可能なSAML属性の名前
          • SAML属性値―SAML属性に関連付けられた値
          • 属性タイプ―関連付けられるマッピングのタイプ、つまりグループ名または役割名を指します
            • グループ名―Kore.aiアカウントで定義されているユーザーグループのいずれかを指します
            • 役割名―以下を参照してください
            • Kore.aiアカウントで定義された管理者の役割
            • ボットビルダーへのアクセス権
            • 新しいボットの作成
            • データテーブルとビューの管理
          • Kore.ai属性―グループ名または役割名のいずれかを参照します。リストは次のものを含んでいる必要があります。
            • すべての管理者の役割のリスト
            • ボットビルダーへのアクセス権
            • 新しいボットの作成
            • データテーブルとビューの管理
        BitiumのためのKore.ai SSO

        BitiumでKore.aiのシングルサインオンを構成するには、最初にKore.aiアプリをBitiumアカウントに追加してから、URLとセキュリティ証明書をBitiumからKore.aiアカウントにコピーする必要があります。このトピックでは、Kore.aiアプリをBitiumアカウントに追加し、Bitiumを使用してSSOのKore.ai構成に必要なURLと証明書にアクセスする方法について説明します。この手順を完了するには、ボット管理コンソールのシングルサインオンページでSAMLプロバイダーとしてBitiumをすでに選択している必要があります。Kore.aiアプリをBitiumに追加するには

        1. Bitiumにログオンします。
        2. 会社名の管理メニューで、アプリの管理をクリックし、アプリの追加をクリックします。アプリを追加ダイアログが表示されます。
        3. 検索フィールドにKore.aiと入力し、入力キーを押します。Bitium用のKore.aiアプリインストールが表示されます。
        4. 組織の管理メニューで、アプリの管理をクリックし、Kore.aiをクリックします。
        5. シングルサインオンタブのシングルサインオンプロバイダーの選択セクションで、SAML認証を選択します。
        6. 次のURLをBitiumからボット管理コンソールのBitium構成セクションにコピーします。
          • Kore.aiシングルサインオンフィールドへのBitiumログインURLフィールド
          • Bitium Logout URLフィールドからKore.ai発行者URLフィールドへ
        7. Bitium X.509証明書フィールドで、証明書データをコピーしてから、そのデータをボット管理コンソール証明書テキストボックスに貼り付けます。

          メモ:—– BEGIN CERTIFICATE —–ヘッダーの後、—– END CERTIFICATE —-フッターの前のデータのみをコピーして、Kore.aiに貼り付ける必要があります

        8. Kore.aiで、保存をクリックします。

        Dプロバイダー情報が正常に更新されましたというメッセージがページの上部に表示されます。構成をテストするには、Kore.aiボット管理コンソールからログオフしてから再度ログオンします。Bitiumポータルが表示されます。
        Bitiumシングルサインオン

      • その他―ジェネリックなSAMLIDプロバイダーの構成。Kore.aiの組み込み構成を使用していない場合は、このオプションを選択します。
        • シングルサインオンURL―Kore.aiがWS-Federation IDプロバイダーを使用してサインオンおよびサインオフ要求を送信するURL。これはサービスプロバイダーが開始したSAMLフローを有効にするためです。
        • 発行者URL―Active Directoryでの認証に使用されるWS-FederationメタデータドキュメントのURL。
        • 証明書―ユーザー署名の検証に使用されるIDプロバイダーから提供されサービスプロバイダーによって保存される公開証明書。複数(最大2)の証明書を追加したり、すでに追加された無効な証明書を削除したりできます。プラットフォームは最新の証明書を認証に使用します。それが無効な場合は、古い証明書が使用されます。
        • SPが開始するSAMLフローのACS URL―これは、サービスプロバイダーが開始するSAMLフローのリダイレクトURLです。
        • IDPが開始するSAMLフローのACS URL―これは、サービスプロバイダーが開始するSAMLフローのアカウントに特有のURLです。
        • SAML属性のマッピング―このオプションを有効にすると、SAML属性がKore.aiグループ名または管理者ロール名にマッピングされます。有効にすると、次のことができます。
          • SAML属性をKore.ai属性とどのようにマッピングするかを定義します。
            • 完全同期―ユーザーがサインインするたびに、プラットフォームは、レスポンスに存在するSAML属性に基づいてユーザーのグループと役割の割り当てを更新します。既存の割り当てはすべて削除されます。SAMLレスポンスで使用可能な新しいグループまたは役割の割り当てのみが割り当てられます
            • 包含のみ―ユーザーがサインインするたびに、プラットフォームはSAMLレスポンスで使用可能な新しいグループまたは役割のみを割り当てます。既存の割り当てはすべて保持されます。SAMLレスポンスで利用可能な新しい割り当てが追加されます
          • 1つ以上のマッピングペアを定義します。各ペアが含むのは
            • SAML属性名―SAMLレスポンスで使用可能なSAML属性の名前
            • SAML属性値―SAML属性に関連付けられた値
            • 属性タイプ―関連付けられるマッピングのタイプ、つまりグループ名または役割名を指します
              • グループ名―Kore.aiアカウントで定義されているユーザーグループのいずれかを指します
              • 役割名―以下を参照してください
              • Kore.aiアカウントで定義された管理者の役割
              • ボットビルダーへのアクセス権
              • 新しいボットの作成
              • データテーブルとビューの管理
            • Kore.ai属性―グループ名または役割名のいずれかを参照します。リストは次のものを含んでいる必要があります。
              • すべての管理者の役割のリスト
              • ボットビルダーへのアクセス権
              • 新しいボットの作成
              • データテーブルとビューの管理
          • シングルサインオンプロバイダーの管理コンソールで、Kore.aiとSSOプロバイダーの間でデータを交換するために使用されるURLも定義する必要があります。URL名はSSOプロバイダーによって異なる場合がありますが、これらのURLを定義する必要があります。
            • アサーションコンシューマーサービス(ACS)URLまたはコールバックURL(https://idp.kore.ai/authorize/callback)
            • ADFSを使用する場合は、認証値に加えて、ユーザーのメールアドレスをActive DirectoryからLDAP属性として渡す必要があります。詳細はADFS向け属性をご覧ください。
            • URLを特定またはhttps://idp.kore.aiとしてのサインオンURL
        • 保存をクリックします。

        Dプロバイダー情報が正常に更新されましたというメッセージがページの上部に表示されます。

ADFSの属性 認証属性に加えて、ADFS用のLDAPを使用してシングルサインオンを構成すると、サードパーティのSSOプロバイダーがアサーションコンシューマーサービス(ACS)URLまたはコールバックURLを介して追加の属性をKore.aiに送信できます。WS-Federationプロトコル用のWindows AzureやSAMLプロトコル用のOneLoginなど、SSO用の組み込みKore.aiアプリを使用している場合、Kore.aiアプリをSSOプロバイダーの管理コンソールに追加するときには、必要な属性はKore.ai用に既に構成されています。  次のデータはコールバックURLでKore.aiに渡される属性データの例です。

<Attribute Name="FirstName" NameFormat="urn:oasis:names:tc:SAML:2.0:attrname-format:uri" FriendlyName="First Name"> <AttributeValue>Michael</AttributeValue> </Attribute> <Attribute Name="LastName" NameFormat="urn:oasis:names:tc:SAML:2.0:attrname-format:uri" FriendlyName="Last Name"> <AttributeValue>Mehra</AttributeValue> </Attribute> <Attribute Name="DisplayName" NameFormat="urn:oasis:names:tc:SAML:2.0:attrname-format:uri" FriendlyName="Display Name"> <AttributeValue>Michael Mehra</AttributeValue> </Attribute> <Attribute Name="EmailAddress" NameFormat="urn:oasis:names:tc:SAML:2.0:attrname-format:uri" FriendlyName="Email"> <AttributeValue>michael.mehra@acme.com</AttributeValue> </Attribute>

これらの属性は、必要なEmailAddressを除いてオプションです。Email Address属性は、次のnameId形式を使用します。

SAML 2.0: NameID Format="urn:oasis:names:tc:SAML:2.0:attrname-format:uri" SAML 1.1: NameID Format="urn:oasis:names:tc:SAML:1.1:nameid:format:emailAddress

ADFSでのマッピング属性 ADFSは既存のActive Directory資格情報を使用してWebログインを提供する、Windows Serverの標準の役割としてMicrosoftによって提供されるサービスです。SAMLまたはWS-Federationプロトコルを使用してADFSでログオンする場合、認証値に加えて他の値を渡すことができます。属性値は、SQLサーバー管理コンソールの証明書利用者の信頼ダイアログでクレームルールとして定義されています。クレームルールを編集するには、ADFS管理証明書利用者の信頼フォルダーを選択し、アクションサイドバーからクレームルールの編集をクリックします。新しいルールを追加するには、ルールの追加をクリックし、LDAP属性の送信テンプレートを選択します。次のマッピング値を入力します。

  • SAML 2.0
    • LDAP Attribute: nameId
    • Claim Attribute: uri
  • SAML 1.1
    • LDAP Attribute: nameId
    • Claim Attribute: emailAddress

SSOの代わりに管理者パスワードを使用してログオン

ボット管理者として、Googleなどのサードパーティのセキュリティシステムを使用してシングルサインオン(SSO)を有効にできます。何らかの理由でSSOセキュリティシステムに障害が発生した場合、またはサードパーティのセキュリティシステムのSSOログオン資格情報を忘れた場合でも、SSOをバイパスしてKore.aiボット管理コンソールにログオンできます。カスタム管理者の役割を持つボット管理者は、少なくとも1つのモジュールでカスタム権限が有効になっている場合にのみ、SSOをバイパスして管理者パスワードを使用できます。Kore.aiディレクトリエージェントにログオンするには、カスタム管理者が登録―ディレクトリ同期に対して有効になっている特権を持っている必要があります。SSOを有効にする前に、ボット管理者は、サインアップ時に提供されたログオン資格情報を使用してボット管理コンソールにログオンしている必要があります。ボット管理者がSSOを構成して有効にした後も、次のURLからボット管理者コンソールに直接アクセスできます。

https://bots.kore.ai/admin

次のログオンページが表示され、ボット管理者パスワードの資格情報を使用して、ボット管理コンソールにログオンし、有効になっている場合はSSOをバイパスできます。
パスワードを使用してSSOなしでボット管理コンソールにログオン
ボット管理者のパスワードを思い出せない場合は、メールIDを入力して、前の画像に示されているリンクにあるパスワードを忘れた場合をクリックします。ク。ボット管理者パスワードをリセットする方法が記載されたメールがKore.aiメールアカウントに送信されます。

ログオフ

ボット管理コンソールとのセッションが終了したら、ボットアカウントを安全に保つためにコンソールからログオフしてセッションを閉じる必要があります。ログオフするには、次のイラストに示すように、ユーザー名をクリックしてからログアウトをクリックします。
ボット管理コンソールからログアウト
ボット管理コンソールセッションが15分以上アイドル状態の場合、セッションは自動的に終了し、代わりにセッションウィンドウの次のアクションでKore.ai webクライアントが開きます。 新しいセッションを開始するには、ボット管理コンソールentadminsettingsiconアイコンをクリックしてログオンします。

Leave a Reply

Your email address will not be published. Required fields are marked *

Fill out this field
Fill out this field
Please enter a valid email address.
You need to agree with the terms to proceed

On the Kore.ai Single Sign-On page, in the Security & Control module of the Bots Admin Console, you can configure Single Sign-On (SSO) authentication for your Kore.ai managed users using the following:

  • OpenID Connect
  • Security Assertion Markup Language (SAML)
  • WS-Federation sign-on protocol.

SSO enables easy access to the Kore.ai application using your existing identity provider. With SSO, your users can log on once, for example, to your company account, and when accessing their Kore.ai application, the same login credentials can be used automatically by the system.

For example, using the WS-Federation sign-on protocol, you can enable a user to sign on to the Kore.ai application using Microsoft® Active Directory® server credentials.

The following illustration shows the Single Sign-On page in the Bots Admin Console Security & Control module.

Enable or Disable SSO

Depending on the security required for your company, you can enable or disable Single Sign-On (SSO) for users accessing the Kore.ai application.

When you disable SSO or when the SSO authentication validity period expires, users must create and log on using their credentials. If no account specific password policies have been defined, then default Kore.ai password policies are automatically enabled for the users.

To enable Single Sign-On

  • In the Security & Control module, on the Single Sign On page, click Enable SSO.Enable SSO

To disable Single Sign-On

  • In the Security & Control module, on the Single Sign On page, click Disable SSO, and then configure user password policies.Disable SSO

OpenID Connect

Complete the steps in the following procedure to configure SSO using Open ID Connect protocol in the Security & Control module of the Bots Admin Console. Kore.ai also supports WS-Federation and SAML Connect protocols.

  1. In the Security & Control module on the Single Sign On page in the Bots Admin Console, click Enable SSO.
  2. In the Select suitable Sign-On Protocol section, select OpenID Connect.
  3. In the Configure SSO for OpenID Connect section, select an identity provider, for example, Sign in with Google.
  4. Click Save.
  5. The Identity Provider information successfully updated message is displayed at the top of the page.

WS-Federation

Complete the steps in the following procedure to configure Single Sign-On (SSO) using the WS-Federation protocol in the Security & Control module of the Bots Admin Console.

  1. In the Security & Control module on the Single Sign On page in the Bots Admin Console, click Enable SSO.
  2. In the Select suitable Sign-On Protocol section, select WS-Federation.
  3. In the Configure SSO for WS-Federation section, select an identity provider, and then define the settings for:
    • Windows Azure®
      • Azure AD Sign-On End Point URL – The URL that Kore.ai sends sign on and sign off requests using Azure. The response for the authentication is sent to the Reply URL defined in your Azure Active Directory configuration settings.
      • Azure AD Federation Metadata Document – The URL for the federation metadata document used for authentication with Azure Active Directory.
    • Other – Generic WS-Federation identity provider configuration, other than Azure
      • AD Sign-On End Point URL – The URL that Kore.ai sends sign on and sign off requests using your WS-Federation identity provider.
      • AD Federation Metadata Document URL – The URL for the WS-Federation metadata document used for authentication with Active Directory.
  4. In the administrative console for your Single Sign-On provider, you will also need to define the URLs that are used to exchange data between Kore.ai and your SSO provider. While the URL names may vary by SSO provider, you will need to define these URLs:

    • SAML 2.0
      • LDAP Attribute: nameId
      • Claim Attribute: uri
    • SAML 1.1
      • LDAP Attribute: nameId
      • Claim Attribute: emailAddress
    • Assertion Consumer Service (ACS) URL or Callback URL as https://idp.kore.ai/authorize/callback.
    • In addition to authentication values, you must pass the email address of the user as an LDAP attribute from Active Directory when using ADFS. For more information, see Attributes for ADFS.
    • Click Save.

The Identity Provider information successfully updated message is displayed at the top of the page.

SAML

Security Assertion Markup Language (SAML) is a standard protocol for web browser Single Sign-On (SSO) using secure tokens. SAML completely eliminates all passwords and instead uses standard cryptography and digital signatures to pass a secure sign-in token from an identity provider to a SaaS application.

SAML provides a solution to allow your identity provider and service providers to exist separately from each other. When a user logs into a SAML-enabled application, the service provider requests authorization from the appropriate identity provider. The identity provider authenticates the user’s credentials and then returns the authorization for the user to the service provider, and the user is now able to use the application.

How SAML works

SAML SSO works by transferring the user’s identity from one place (the identity provider) to another (the service provider). This is done through an exchange of digitally signed XML documents.

Consider the following scenario: A user is logged into a system that acts as an identity provider. The user wants to log in to a remote application, such as a support or accounting application (the service provider). The following happens:

  1. The user accesses the remote application using a link on an intranet, a bookmark, or similar and the application loads.
  2. The application identifies the user’s origin (by application subdomain, user IP address, or similar) and redirects the user back to the identity provider, asking for authentication. This is the authentication request.
  3. The user either has an existing active browser session with the identity provider or establishes one by logging into the identity provider.
  4. The identity provider builds the authentication response in the form of an XML-document containing the user’s username or email address, signs it using an X.509 certificate, and posts this information to the service provider.
  5. The service provider, which already knows the identity provider and has a certificate fingerprint, retrieves the authentication response and validates it using the certificate fingerprint.
  6. The identity of the user is established and the user is provided with app access.

Kore.ai Implementation

There are two ways SAML can be used within Kore.ai Bots Platform:

  • For developer authentication to access the Bot Builder,
  • For user authentication to access the Bot.

Use case 1: Bot builder authentication.

Enterprises can set up access to the Bot builder tool using the enterprise SSO. Bot developers and admins can log into bot builder using SSO done by the enterprise identity provider.

SSO flow from Kore.ai Bots platform: The following is the flow within the Kore.ai Bots platform once SSO is configured using SAML:

  1. The client makes a call to Kore app server (using the login URL) with user details to get identity provider info (SAML).
  2. Kore app server initiates a handshake request with the Kore idproxy server.
  3. Kore idproxy server initiates a request to the identity provider (SAML) with user details.
  4. On successful authentication, the identity provider (SAML) returns an assertion response to the Kore idproxy server.
  5. Upon verifying the response from the identity provider, Kore idproxy server initiates a request to the Kore app server.
  6. On successful authentication of the token from Kore idproxy server, Kore app server grants access to the user.

Post v7.2 release, Kore.ai supports the IDP initiated flow, wherein the platform gets the postback directly with SAML response and is able to validate the assertion and register/identify the user. The configuration for these modes – SP-based and IDP-based flow is different and is highlighted in the configuration steps below.

Refer below to configure SSO using SAML

Use case 2: End-user authentication

In this scenario, the bot chat interface is embedded on the customer portal or Mobile app that requires user authentication via SSO.  
The Bot access is automatically limited to authenticated users.  If the task requires API invocation that requires SSO based authentication the developer can follow the below steps

  • On the client, developer needs to retrieve SSO token of the logged in user and pass it to the bot using the secureCustomPayload parameter in the Bot SDK API.
  • In the dialog task, Bot developer can write custom logic to read this token and add it as API headers for secure API calls made using service node or webhook node.

The token information on the client varies depending upon the SSO provider and the payload, accordingly the developer would need to write custom logic.

Configuring SSO using SAML

Complete the following steps to configure Single Sign-On (SSO) using Security Assertion Markup Language (SAML) protocol in the Kore.ai Bots Admin Console. Kore.ai also supports WS-Federation and OpenID Connect protocols. For more information, see Using Single Sign-On.

  1. In the Security & Control module on the Single Sign On page in the Bots Admin Console, click Enable SSO.
  2. In the Select a suitable Sign-On Protocol section, select SAML.
  3. In the Configure SSO for SAML section, select an identity provider, and then define the settings for one of:
    • Okta
      • Okta Single Sign-On URL – The SSO URL for Okta this is to enable Service Provider initiated SAML flow.
      • Identity Provider Issuer – The entity that provides the user identities including the ability to authenticate a user.
      • Certificate – The public certificate stored by the service provider from the identity provider used to validate a user signature. You can add multiple (max of 2) certificates, delete already added invalid certificates, platform will use the latest certificate for authorization, in case it is invalid then the older certificate would be used.
      • ACS URL for SP Initiated SAML Flow – This is the redirect URL for Service Provided initiated SAML flow.
      • ACS URL for IDP Initiated SAML Flow – This is the account-specific URL for Identity Provided initiated SAML flow.
      • SAML Attribute Mapping – Enable this option to map SAML Attributes with Kore.ai Group Names or Admin Roles Names. Once enabled, you can:
        • define how the SAML attributes should be mapped with Kore.ai attributes:
          • Full Sync – Every time the user signs in, the platform will update the user’s Group and Role assignments based on the SAML Attributes present in the response. All existing assignments will be removed. Only the new group or role assignments as available in the SAML response will be assigned
          • Inclusion Only – Every time the user signs in, the platform will only assign the new group or roles available in the SAML response. All existing assignments will be retained. New assignments will be added as available in the SAML responses
        • define one or more mapping pairs. Each pair includes
          • SAML Attribute Name – Name of the SAML attribute as available in the SAML response
          • SAML Attribute Value – Value associated with the SAML attribute
          • Attribute Type – Refers to the type of mapping to be associated i.e. Group Name or Role Name
            • Group Name – Refers to any of the user groups defined in the Kore.ai account
            • Role Name – Refers to the following
            • Admin Roles defined in the Kore.ai account
            • Bot Builder Access
            • New Bot Creation
            • Manage Data Tables and Views
          • Kore.ai Attribute – Refers to either Group Name or Role Name. The list should include the following:
            • List of all Admin Roles
            • Bot Builder Access
            • New Bot Creation
            • Manage Data Tables and Views
        Okta for Kore.ai SSO

        To configure Single Sign-On in Okta for Kore.ai, you must first add the Kore.ai app to your Okta account, and then copy URLs and the security certificate from Okta into your Kore.ai account. This topic describes how to add the Kore.ai app to your Okta account, and then access the URLs and certificate needed for the Kore.ai configuration for SSO using Okta.
        To complete this procedure, you must have already selected Okta as a SAML provider on the Single Sign On page in the Bots Admin Console.
        To add the Kore.ai app to Okta

        1. Log on to Okta.
        2. On the Home page, click Admin. The Dashboard page is displayed.
        3. On the top navigation bar, click Applications. The Applications page is displayed.
        4. Click Add Application. The Add Application page is displayed.
        5. Click Create application
        6. In the General settings, provide an App name and click Next.
        7. In Configure SAML, provide the Single SignOn URL. To obtain this:
          • Login to Kore.ai Bot Builder Admin Console
          • under Security & Control -> Single Sign on page
          • after enabling SAML and selecting Okta
          • ACS URL for SP Initiated SAML Flow field would contain the required URL
        8. And in the Audience URI field, enter https://idp.kore.com
        9. Note: For on-prem accounts, the ACS URL for SP Initiated SAML Flow is displayed as https://idproxy-dev.kore.com/authorize/callback . This needs to be updated as “single sign on URL” in Okta platform and https://idproxy-dev.kore.com needs to be updated as the “Audience URL”
        10. You can provide the Attribute statements like emailId, firstName as per your requirement.
        11. Click Finish.
      • On the Sign On tab, in the Settings section, click View Setup Instructions. The How to Configure SAML 2.0 for <app-name> Application page is displayed.
      • Copy the URLs in the:
        • Identity Provider Single Sign-On URL field to the Okta Single Sign-On URL field in Kore.ai.
        • Identity Provider Issuer field to the Kore.ai Identity provider issuer field
      • In the Okta X.509 Certificate field, copy the certificate data, and then paste the data into the Kore.ai Certificate text box.

        Note: Only data after the —–BEGIN CERTIFICATE—– header and before the —–END CERTIFICATE—- footer should be copied and pasted into Kore.ai.

  • In Kore.ai, click Save. This will complete the integration of Okta login.

The Identity Provider information successfully updated message is displayed at the top of the page. To test the configuration, log off the Kore.ai Bots Admin Console, and log on again. The Okta portal should be displayed.

  • OneLogin – For more information, refer below, or in the OneLogin documentation, see Configuring SSO for Kore.ai.
    • SAML 2.0 Endpoint – The HTTP SSO endpoint for OneLogin to enable Service Provider initiated SAML flow, for example, https://app.onelogin.com/trust/saml2/http-post/sso/358111.
    • Issuer URL – The URL for the OneLogin issuer, for example,https://app.onelogin.com/saml/metadata/358111.
    • X.509 Certificate – The public certificate stored by the service provider from the identity provider used to validate a user signature. You can add multiple (max of 2) certificates, delete already added invalid certificates, platform will use the latest certificate for authorization, in case it is invalid then the older certificate would be used.
    • ACS URL for SP Initiated SAML Flow – This is the redirect URL for Service Provided initiated SAML flow.
    • ACS URL for IDP Initiated SAML Flow – This is the account-specific URL for Identity Provided initiated SAML flow.
    • SAML Attribute Mapping – Enable this option to map SAML Attributes with Kore.ai Group Names or Admin Roles Names. Once enabled, you can:
      • define how the SAML attributes should be mapped with Kore.ai attributes:
        • Full Sync – Every time the user signs in, the platform will update the user’s Group and Role assignments based on the SAML Attributes present in the response. All existing assignments will be removed. Only the new group or role assignments as available in the SAML response will be assigned
        • Inclusion Only – Every time the user signs in, the platform will only assign the new group or roles available in the SAML response. All existing assignments will be retained. New assignments will be added as available in the SAML responses
      • define one or more mapping pairs. Each pair includes
        • SAML Attribute Name – Name of the SAML attribute as available in the SAML response
        • SAML Attribute Value – Value associated with the SAML attribute
        • Attribute Type – Refers to the type of mapping to be associated i.e. Group Name or Role Name
          • Group Name – Refers to any of the user groups defined in the Kore.ai account
          • Role Name – Refers to the following
          • Admin Roles defined in the Kore.ai account
          • Bot Builder Access
          • New Bot Creation
          • Manage Data Tables and Views
        • Kore.ai Attribute – Refers to either Group Name or Role Name. The list should include the following:
          • List of all Admin Roles
          • Bot Builder Access
          • New Bot Creation
          • Manage Data Tables and Views
      OneLogin for Kore.ai SSO

      To configure Single Sign-On in Kore.ai using OneLogin, you must first add the Kore.ai app to your OneLogin account, and then copy URLs and the security certificate from OneLogin into your Kore.ai account. This topic describes how to add the Kore.ai app to your OneLogin account, and then access the URLs and certificate needed for the Kore.ai configuration for SSO using OneLogin.
      To complete this procedure, you must have already selected OneLogin as a SAML provider on the Single Sign On page in the Bots Admin Console.
      To add the Kore.ai app to OneLogin

      1. Log on to OneLogin.
      2. On the APPS menu, click Add Apps. The Find Applications page is displayed.
      3. In the Search field, enter Kore.ai, and then press Enter. The Kore.ai app for OneLogin is displayed.
      4. Click the Kore.ai app. The Add Kore.ai page is displayed.
      5. Optionally, change the display name or the icons displayed to your users in the OneLogin portal, and then click SAVE. The Kore.ai app is added to your Company apps for OneLogin and the Kore.ai app page is displayed.
      6. On the SSO tab, in the Enable SAML2.0 section, copy the URLs in the:
        • OneLogin SAML 2.0 Endpoint (HTTP) field to the Kore.ai SAML 2.0 Endpoint field
        • OneLogin Issuer URL field to the Kore.ai Issuer URL field
      7. In the OneLogin X.509 Certificate field, click View Details. The Standard Strength Certificate (2048-bit) page is displayed.
      8. In the X.509 Certificate section, copy the certificate data, and then paste the data into the Kore.ai X.509 Certificate text box.

        Note: Only data after the —–BEGIN CERTIFICATE—–header and before the —–END CERTIFICATE—- footer should be copied and pasted into Kore.ai.

      9. In Kore.ai, click Save.

      The Identity Provider information successfully updated message is displayed at the top of the page. To test the configuration, log off the Kore.ai Bots Admin Console, and log on again. The OneLogin portal should be displayed.
      OneLogin Single Sign-On

    • Bitium –
      • Single Sign-On URL – The HTTP SSO endpoint for Bitium to enable Service Provider intiated SAML flow, for example, https://www.bitium.com/7655.
      • Issuer URL – The URL for the OneLogin issuer, for example,https://bitium.com/7655/saml/82456/metadata.xml.
      • Certificate – The public certificate stored by the service provider from the identity provider used to validate a user signature. You can add multiple (max of 2) certificates, delete already added invalid certificates, platform will use the latest certificate for authorization, in case it is invalid then the older certificate would be used.
      • ACS URL for SP Initiated SAML Flow – This is the redirect URL for Service Provided initiated SAML flow.
      • ACS URL for IDP Initiated SAML Flow – This is the account-specific URL for Identity Provided initiated SAML flow.
      • SAML Attribute Mapping – Enable this option to map SAML Attributes with Kore.ai Group Names or Admin Roles Names. Once enabled, you can:
        • define how the SAML attributes should be mapped with Kore.ai attributes:
          • Full Sync – Every time the user signs in, the platform will update the user’s Group and Role assignments based on the SAML Attributes present in the response. All existing assignments will be removed. Only the new group or role assignments as available in the SAML response will be assigned
          • Inclusion Only – Every time the user signs in, the platform will only assign the new group or roles available in the SAML response. All existing assignments will be retained. New assignments will be added as available in the SAML responses
        • define one or more mapping pairs. Each pair includes
          • SAML Attribute Name – Name of the SAML attribute as available in the SAML response
          • SAML Attribute Value – Value associated with the SAML attribute
          • Attribute Type – Refers to the type of mapping to be associated i.e. Group Name or Role Name
            • Group Name – Refers to any of the user groups defined in the Kore.ai account
            • Role Name – Refers to the following
            • Admin Roles defined in the Kore.ai account
            • Bot Builder Access
            • New Bot Creation
            • Manage Data Tables and Views
          • Kore.ai Attribute – Refers to either Group Name or Role Name. The list should include the following:
            • List of all Admin Roles
            • Bot Builder Access
            • New Bot Creation
            • Manage Data Tables and Views
        Kore.ai SSO for Bitium

        To configure Single Sign-On in Bitium for Kore.ai, you must first add the Kore.ai app to your Bitium account, and then copy URLs and the security certificate from Bitium into your Kore.ai account. This topic describes how to add the Kore.ai app to your Bitium account, and then access the URLs and certificate needed for the Kore.ai configuration for SSO using Bitium.
        To complete this procedure, you must have already selected Bitium as a SAML provider on the Single Sign On page in the Bots Admin Console.
        To add the Kore.ai app to Bitium

        1. Log on to Bitium.
        2. On the Manage < Company Name > menu, click Manage Apps, then click Add an App. The Add Apps dialog is displayed.
        3. In the Search field, enter Kore.ai, and then press Enter. The Install Kore.ai app for Bitium  dialog is displayed.
        4. On the Manage Organization menu, click Manage Apps, and then click Kore.ai.
        5. On the Single Sign-On tab, in the Select a Single Sign-On Provider section, select SAML Authentication.
        6. Copy the following URLs from Bitium into the Bots Admin Console Bitium configuration section:
          • Bitium Login URL field to the Kore.ai Single Sign-On field
          • Bitium Logout URL field to the Kore.ai Issuer URL field
        7. In the Bitium X.509 Certificate field, copy the certificate data, and then paste the data into the Bots Admin Console Certificate text box.

          Note: Only data after the —–BEGIN CERTIFICATE—– header and before the —–END CERTIFICATE—- footer should be copied and pasted into Kore.ai.

        8. In Kore.ai, click Save.

        The Identity Provider information successfully updated message is displayed at the top of the page. To test the configuration, log off the Kore.ai Bots Admin Console, and log on again. The Bitium portal should be displayed.
        Bitium Single Sign-On

      • Other – Generic SAML identity provider configuration. Select this option if you are not using a Kore.ai built-in configuration.
        • Single Sign-On URL – The URL that Kore.ai sends sign on and sign off requests using your WS-Federation identity provider. This is to enable Service Provider initiated SAML flow.
        • Issuer URL – The URL for the WS-Federation metadata document used for authentication with Active Directory.
        • Certificate – The public certificate stored by the service provider from the identity provider used to validate a user signature. You can add multiple (max of 2) certificates, delete already added invalid certificates, platform will use the latest certificate for authorization, in case it is invalid then the older certificate would be used.
        • ACS URL for SP Initiated SAML Flow – This is the redirect URL for Service Provided initiated SAML flow.
        • ACS URL for IDP Initiated SAML Flow – This is the account-specific URL for Identity Provided initiated SAML flow.
        • SAML Attribute Mapping – Enable this option to map SAML Attributes with Kore.ai Group Names or Admin Roles Names. Once enabled, you can:
          • define how the SAML attributes should be mapped with Kore.ai attributes:
            • Full Sync – Every time the user signs in, the platform will update the user’s Group and Role assignments based on the SAML Attributes present in the response. All existing assignments will be removed. Only the new group or role assignments as available in the SAML response will be assigned
            • Inclusion Only – Every time the user signs in, the platform will only assign the new group or roles available in the SAML response. All existing assignments will be retained. New assignments will be added as available in the SAML responses
          • define one or more mapping pairs. Each pair includes
            • SAML Attribute Name – Name of the SAML attribute as available in the SAML response
            • SAML Attribute Value – Value associated with the SAML attribute
            • Attribute Type – Refers to the type of mapping to be associated i.e. Group Name or Role Name
              • Group Name – Refers to any of the user groups defined in the Kore.ai account
              • Role Name – Refers to the following
              • Admin Roles defined in the Kore.ai account
              • Bot Builder Access
              • New Bot Creation
              • Manage Data Tables and Views
            • Kore.ai Attribute – Refers to either Group Name or Role Name. The list should include the following:
              • List of all Admin Roles
              • Bot Builder Access
              • New Bot Creation
              • Manage Data Tables and Views
          • In the administrative console for your Single Sign-On provider, you will also need to define the URLs that are used to exchange data between Kore.ai and your SSO provider. While the URL names may vary by SSO provider, you will need to define these URLs:
            • Assertion Consumer Service (ACS) URL or Callback URL as https://idp.kore.ai/authorize/callback.
            • In addition to authentication values, you must pass the email address of the user as an LDAP attribute from Active Directory when using ADFS. For more information, see Attributes for ADFS.
            • Identity URL or Sign On URL as https://idp.kore.ai
        • Click Save.

        The Identity Provider information successfully updated message is displayed at the top of the page.
Attributes for ADFS
When you configure Single Sign-On using LDAP for ADFS, in addition to authentication attributes, your third-party SSO provider can send additional attributes to Kore.ai through the Assertion Consumer Service (ACS) URL or Callback URL.

If you are using a built-in Kore.ai app for SSO, such as Windows Azure for WS-Federation protocol, or OneLogin for SAML protocol, required attributes are already configured for Kore.ai when you add the Kore.ai app to your SSO provider admin console.

The following data is an example of attribute data passed to Kore.ai in the callback URL.

<Attribute Name="FirstName" NameFormat="urn:oasis:names:tc:SAML:2.0:attrname-format:uri" FriendlyName="First Name">
<AttributeValue>Michael</AttributeValue>
</Attribute>
<Attribute Name="LastName" NameFormat="urn:oasis:names:tc:SAML:2.0:attrname-format:uri" FriendlyName="Last Name">
<AttributeValue>Mehra</AttributeValue>
</Attribute>
<Attribute Name="DisplayName" NameFormat="urn:oasis:names:tc:SAML:2.0:attrname-format:uri" FriendlyName="Display Name">
<AttributeValue>Michael Mehra</AttributeValue>
</Attribute>
<Attribute Name="EmailAddress" NameFormat="urn:oasis:names:tc:SAML:2.0:attrname-format:uri" FriendlyName="Email">
<AttributeValue>michael.mehra@acme.com</AttributeValue>
</Attribute>

These attributes are optional except for the EmailAddress, which is required. The Email Address attribute uses the following nameId format:

SAML 2.0:
NameID Format="urn:oasis:names:tc:SAML:2.0:attrname-format:uri"
SAML 1.1:
NameID Format="urn:oasis:names:tc:SAML:1.1:nameid:format:emailAddress

Mapping Attributes in ADFS

ADFS is a service provided by Microsoft as a standard role for Windows Server that provides a web login using existing Active Directory credentials. When using SAML or WS-Federation protocols to log on with ADFS, you can pass other values in addition to the authentication values.

The attribute values are defined as Claim Rules in the Relying Party Trust dialog in the SQL Server admin console. To edit the Claim Rules, select the Relying Party Trusts folder in ADFS Management, and then click Edit Claim Rules from the Actions sidebar. To add a new rule, click Add Rule, and then select the Send LDAP Attributes template. Enter the following mapping values:

  • SAML 2.0
    • LDAP Attribute: nameId
    • Claim Attribute: uri
  • SAML 1.1
    • LDAP Attribute: nameId
    • Claim Attribute: emailAddress

Logging On Using Your Admin Password Instead of SSO

As an Bots Admin, you can enable Single Sign-On (SSO) using a third-party security system, for example, Google. If for some reason, your SSO security system fails, or you forget your SSO log on credentials for your third-party security system, you can still log on to the Kore.ai Bots Admin Console and bypass SSO.

A Bots Admin with a custom admin role can only bypass SSO and use their admin password if custom privileges are enabled for at least one module. To log on to the Kore.ai Directory Agent, the custom admin must have privileges enabled for Enrollment – Directory Sync.

Before you can enable SSO, the Bots Admin must have logged on the Bots Admin Console using the log on credentials provided when signing up. After the Bots Admin configures and enables SSO, you can still access the Bots Admin Console directly at the following URL:

https://bots.kore.ai/admin

The following log on page is displayed and using your Bots Admin password credentials, you can log on to the Bots Admin Console and bypass SSO, if enabled.
Using Your Password to Log On to the Bots Admin Console without SSO
If you cannot remember your Bots Admin password, enter your email ID, and then click the Forgot your password? link shown in the previous image. An email is sent to your Kore.ai email account with instructions on how to reset your Bots Admin password.

Logging Off

When you are finished with your session with the Bots Admin Console, you should log off the console and close your session to keep your bots account secure. To log off, click on your user name, and then click Logout as shown in the following illustration.
Logging out of the Bots Admin Console
If your Bots Admin Console session is idle for more than 15 minutes, your session is automatically terminated, and the next action in the session window will open the Kore.ai web client instead. To start a new session, click the Bots Admin Console entadminsettingsicon icon and log on.

Leave a Reply

Your email address will not be published. Required fields are marked *

Fill out this field
Fill out this field
Please enter a valid email address.
You need to agree with the terms to proceed