등록 > 대량 초대 페이지에서, 계정에 가입하려는 사용자의 이메일을 포함하는 텍스트 파일을 사용할 수 있습니다. 이 옵션은 많은 수의 구성원 등록 시 특히 유용합니다.

가져오기 파일은 한 줄에 하나의 이메일 주소가 있는 기본 텍스트 파일이어야 하며 .txt 파일 형식으로 저장해야 합니다. 대량 초대 파일을 생성한 후에는, 파일을 업로드해야 합니다.

대량 초대 정보

대량 초대 파일을 사용하여 계정에 새 사용자를 추가할 때 다음 사항을 유의해야 합니다.

  • 유효하지 않은 이메일 형식이 있는 항목은 무시됩니다.
  • 초대 이메일은 성공적으로 가져온 각 이메일 주소로 전송됩니다.
  • 기존 계정 사용자에게는 초대가 전송되지 않습니다.

다음 그림은 등록 모듈의 대량 초대 페이지의 예입니다.

대량 초대 파일 생성

엔터프라이즈 봇 플랫폼 계정에 추가하려는 사용자의 모든 이메일 주소로 초대 파일을 생성할 수 있습니다. 대량 초대 파일 생성 방법

  1. 텍스트 편집기에서 다음 예와 같이 각 줄 또는 쉼표로 구분된 목록으로 전체 이메일 주소를 입력합니다. .txt 파일의 경우:  Kore.aiUser1@kore.com Kore.aiUser2@kore.com Kore.aiUser3@kore.com
  2. 대량 초대 파일을 .txt 파일(예: Kore.aiImport.txt)로 저장합니다.
  3. 대량 초대 파일을 생성한 후, 파일을 업로드하여 사용자를 초대할 수 있습니다.

다음 이미지는 Kore.ai 계정에 초대할 사용자의 사용자 정의 목록으로 업로드할 수 있는 대량 초대 파일 생성에 사용되는 텍스트 편집기의 예입니다. create-a-bulk-invite

대량 초대 파일 업로드

이 항목에서는 사용자 이메일 주소가 포함된 파일을 업로드하여 계정에 Kore.ai 사용자로 초대하는 방법을 설명합니다. 대량 초대 파일 업로드 방법

  1. 등록 모듈의, 대량 초대 페이지에서, 파일 선택을 클릭합니다.
  2. 이전 섹션에서 언급한 대로 생성된 대량 초대 파일로 이동한 다음, 열기를 클릭합니다. 파일 이름이 파일 선택 버튼 오른쪽에 표시됩니다.
  3. 초대장 전송을 클릭합니다. 가져오기 상태는 초대장 전송 버튼 바로 다음에 설명되어 있습니다.
  4. 여기서 세부 정보 보기 링크를 클릭하여 가져오기 세부 정보를 검토합니다. 또한, 파일 기반 대량 사용자 초대 기록 링크를 클릭하여 이전 대량 초대 가져오기에서 가져오기 상태를 검토할 수 있습니다.

다음 이미지는 업로드 세부 정보의 위치를 보여 줍니다.
enrollmentbulkinvitepage

결과 보기

필요한 경우 사용자별로 대량 초대 가져오기 작업 결과를 검토할 수 있습니다. 대량 사용자 가져오기 결과 보는 방법

  1. 등록 모듈의, 대량 초대 페이지에서, 세부 정보 보기 여기를 클릭합니다.
  1. 파일 기반 대량 사용자 초대 보고서 대화 상자가 다음 그림과 같이 표시됩니다.

EnrollmentBulkInviteHistoryResults 초대 기록을 클릭하여 대량 사용자 초대 기록 대화 상자를 열고 이전 날짜의 보고서를 선택합니다.

기록 보기

모든 과거 대량 초대 가져오기 작업을 해당 가져오기 결과와 함께 검토할 수 있습니다. 대량 사용자 초대 결과 보는 방법

  1. 등록 > 대량 초대 페이지에서, 파일 기반 대량 사용자 초대 기록을 클릭합니다.
  2. 대량 사용자 초대 기록 대화 상자가 다음 그림과 같이 표시됩니다.
  3. 가져오기의 결과를 보려면, 확인하려는 가져오기의 보고서 열에서, 결과를 클릭합니다.
  4. 파일 기반 대량 사용자 초대 보고서 대화 상자가 다음 그림과 같이 표시됩니다.
    EnrollmentBulkInviteHistoryResults

登録>一括招待ページで、アカウントに参加させたいユーザーのメールアドレスを含むテキストファイルを使用できます。このオプションは多数のメンバーを登録する場合に特に便利です。

インポートファイルは、1行に1つのメールアドレスを持つ基本的なテキストファイルであり、.txtファイル形式で保存されている必要があります。一括招待ファイルを作成したら、ファイルをアップロードする必要があります。

一括招待について

一括招待ファイルを使用してアカウントに新しいユーザーを追加する場合は、次の点に注意する必要があります:

  • 無効なメール形式のエントリは無視されます。
  • インポートに成功した各メールアドレスに招待メールが送信されます。
  • 招待状は既存のアカウントユーザーには送信されません。

次のイラストは、登録モジュールの一括招待ページの例です。

一括招待ファイルを作成

エンタープライズボットプラットフォームアカウントに追加したいユーザーのすべてのメールアドレスを使用して招待ファイルを作成できます。一括招待ファイルを作成

  1. テキストエディタで各行に完全なメールアドレスを入力するか、または次の例に示すようにカンマ区切りのリストに入力します。.txtファイルの場合:  Kore.aiUser1@kore.com Kore.aiUser2@kore.com Kore.aiUser3@kore.com
  2. 一括招待ファイルを.txtファイル、たとえばKore.aiImport.txtとして保存します。
  3. 一括招待ファイルを作成したら、ファイルをアップロードして、自身のユーザーを招待できます。

次の画像は、Kore.aiアカウントに招待するユーザーのカスタムリストとともにアップロードできる、一括招待ファイルを作成するために使用されるテキストエディタの例です。create-a-bulk-invite

一括招待ファイルをアップロード

このトピックでは、ユーザーのメールアドレスを含むファイルをアップロードして、ユーザーを自身のアカウントのKore.aiユーザーとして招待する方法について説明します。一括招待ファイルをアップロード

  1. 登録モジュールの一括招待ページで、ファイルの選択をクリックします。
  2. 前のセクションで説明したように作成された一括招待ファイルに移動し、開くをクリックします。ファイル名は、ファイルの選択ボタンの右側に表示されます。
  3. 招待状を送信をクリックします。インポートのステータスは、招待状の送信ボタンの直後に表示されます。
  4. インポートの詳細をレビューするには、詳細をここに表示リンクをクリックします。さらに、、ファイルベースの一括ユーザーインポート履歴リンクをクリックして、以前の一括招待インポートからのインポートステータスをレビューできます。

次の画像は、アップロードの詳細の位置を示しています。
enrollmentbulkinvitepage

結果を表示

必要に応じて、ユーザーごとに一括招待インポートのオペレーション結果をレビューできます。現在の一括ユーザーインポートの結果を表示するには

  1. 登録モジュールの一括招待ページで、詳細表示はこちらをクリックします。
  1. 次のイラストのようにファイルベースの一括ユーザー招待に関するレポートダイアログが表示されます。

招待の履歴をクリックして一括ユーザー招待の履歴ダイアログを開き、前の日付のレポートをクリックします。
EnrollmentBulkInviteHistoryResults

履歴を表示

過去のすべての一括招待インポートオペレーションを、そのインポートの結果とともにレビューできます。現在の一括ユーザー招待の結果を表示するには

  1. 登録一括招待ページで、ファイルベースの一括ユーザーの招待履歴をクリックします。
  2. 次のイラストのように一括ユーザー招待の履歴ダイアログが表示されます。
  3. インポートの結果を表示するには、表示するインポートのレポート列で、結果.をクリックします。
  4. 次のイラストのようにファイルベースの一括ユーザー招待に関するレポートダイアログが表示されます。EnrollmentBulkInviteHistoryResults

On the Enrollment > Bulk Invite page, you can use a text file that contains email addresses of the users you want to join your account. This option is particularly useful to enroll a large number of members.

The import file should be a basic text file with one email address per line and saved as a .txt file format. After you create a bulk invite file, you need to upload the file.

About Bulk Invites

When using a bulk invite file to add new users to your account, the following needs to be kept in mind:

  • Entries with an invalid email format are ignored.
  • Invitation emails are sent to each email address which was successfully imported.
  • Invites are not sent to existing account users.

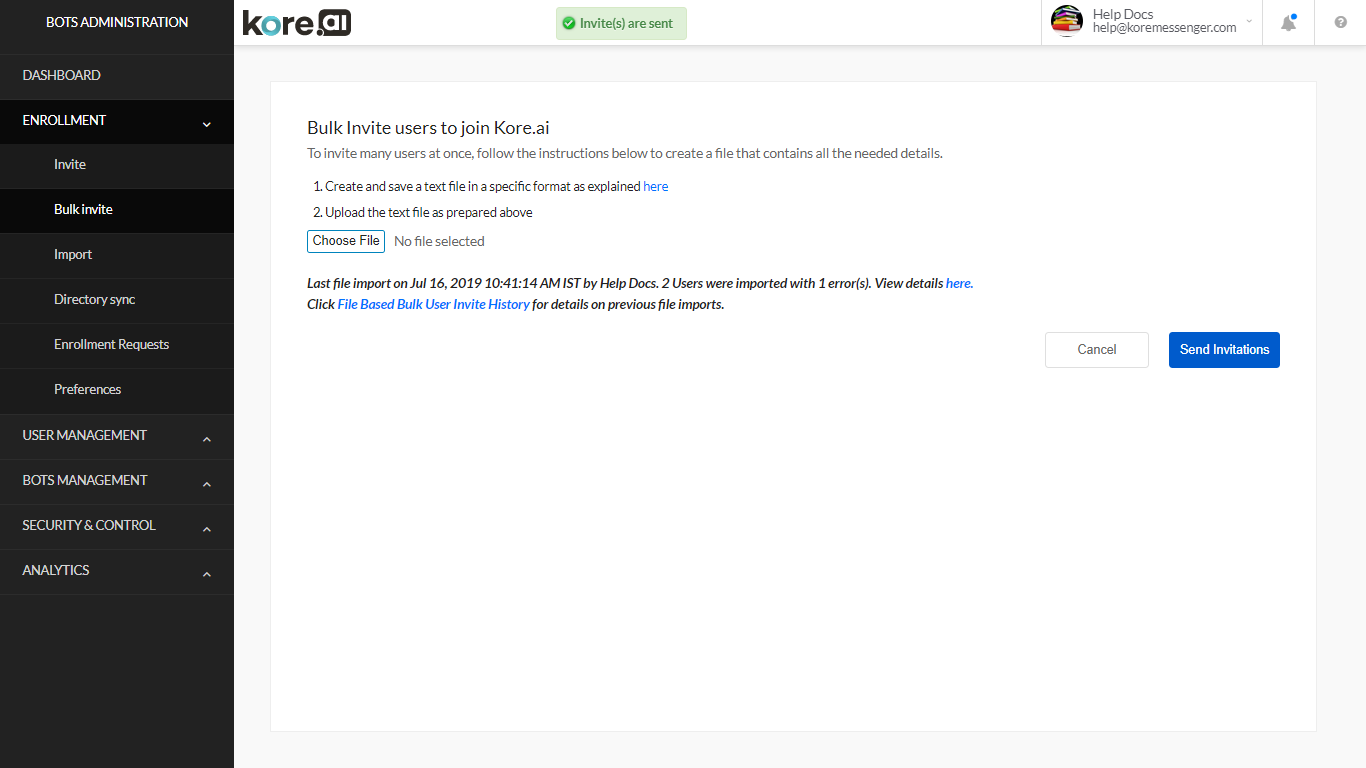
The following illustration is an example of the Bulk Invite page in the Enrollment module.
Create a Bulk Invite File

You can create an invitation file with all the email addresses of the users you want to add to your Enterprise Bots Platform account.

To create a bulk invite file

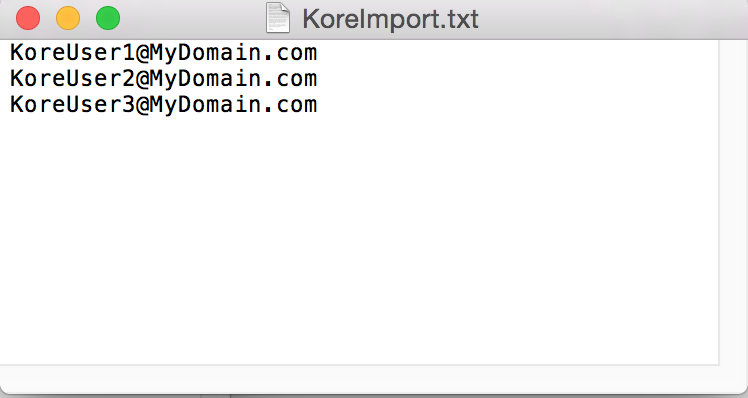
  1. In a text editor, enter a complete email address on each line or in a comma-separated list as shown in the following example:
    For a .txt file:
     Kore.aiUser1@kore.com
    Kore.aiUser2@kore.com
    Kore.aiUser3@kore.com
  2. Save the bulk invite file as a .txt file, for example, Kore.aiImport.txt.
  3. After you create a bulk invite file, you can upload the file to invite your users.

The following image is an example of text editor used to create a bulk invite file that can be uploaded with your custom list of users to invite to your Kore.ai account.
create-a-bulk-invite

Upload a Bulk Invite File

This topic describes how to upload a file that contains user email addresses to invite the users to become Kore.ai users in your account.

To upload a bulk invite file

  1. In the Enrollment module, on the Bulk Invite page, click Choose File.
  2. Navigate to your bulk invite file created as mentioned in the previous section, and then click Open. The filename is displayed to the right of the Choose File button.
  3. Click Send Invitations. The status of the import is described immediately following the Send Invitations button.
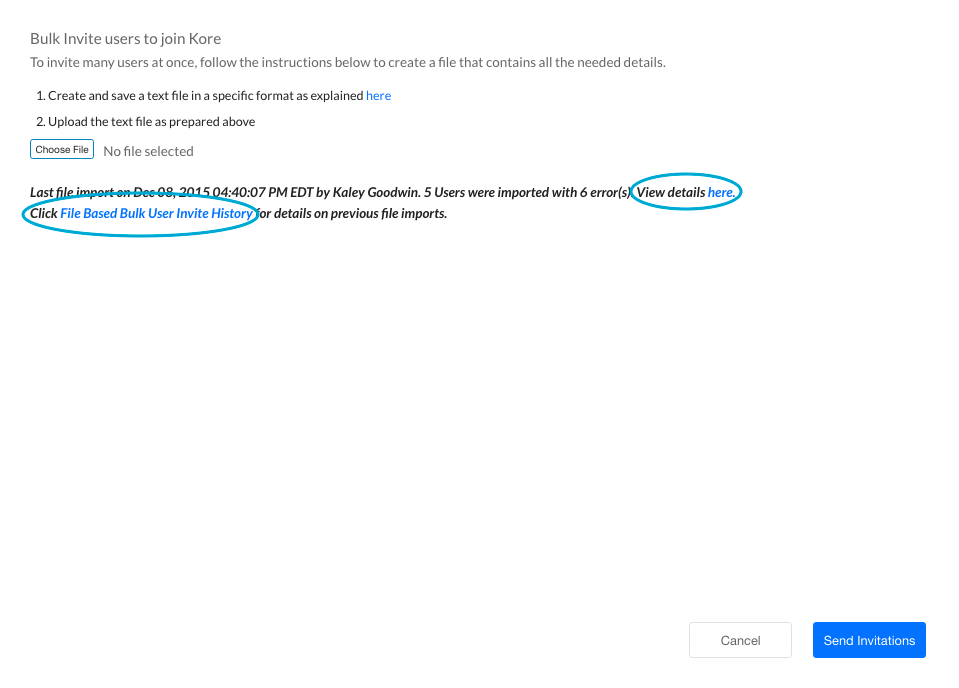
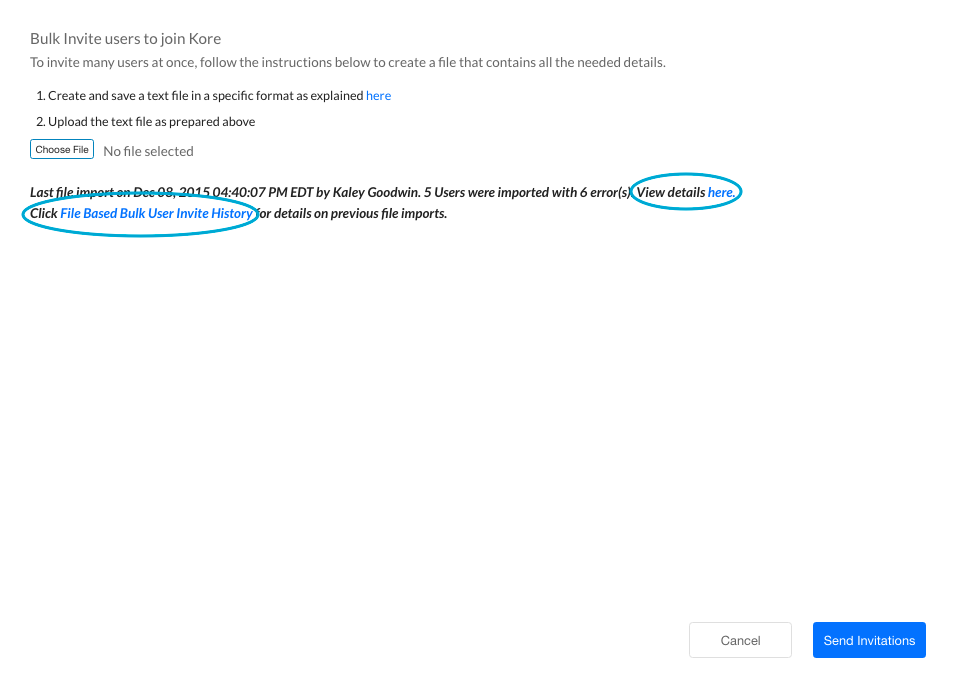
  4. Click the View details here link to review the details of the import. In addition, you can click the File Based Bulk User Invite History link to review import statuses from prior bulk invite imports.

The following image shows the location of the upload details.
enrollmentbulkinvitepage

View the Results

You can review the bulk invite import operation results on a per-user basis if needed.

To view results of a bulk user import

  1. In the Enrollment module, on the Bulk Invite page, click View details here.
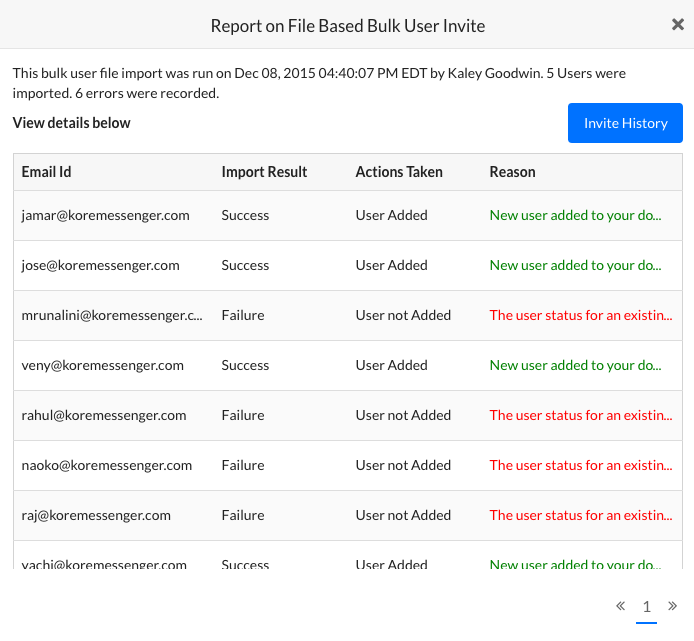
  1. The Report on File Based Bulk User Invite dialog is displayed as shown in the following illustration.
EnrollmentBulkInviteHistoryResults
Click Invite History to open the History of Bulk User Invite dialog to select a report from a previous date.

View History

You can review all historical bulk invite import operations along with the results of that import.

To view results of a bulk user invite

  1. On the Enrollment > Bulk Invite page, click File Based Bulk user Invite History.
  2. The History of Bulk User Invite dialog is displayed as shown in the following illustration.
  3. To view the results of an import, in the Report column for the import that you want to view, click Results.
  4. The Report on File Based Bulk User Invite dialog is displayed as shown in the following illustration.
    EnrollmentBulkInviteHistoryResults