OAuth v1은 웹, 모바일, 데스크톱 애플리케이션에서 간단하고 표준적인 방법으로 보안 권한 부여 사용이 가능한 개방형 프로토콜입니다. OAuth v1을 사용하려면 애플리케이션이 권한 부여 메커니즘에 필요한 설정을 구성하려면 로그인 자격 증명이 필요하므로 웹 애플리케이션에 계정을 먼저 등록해야 합니다.
OAuth v1 작동 방법
- Kore.ai 애플리케이션은 웹 애플리케이션에서 권한이 없는 요청 토큰을 얻습니다.
- Kore.ai 애플리케이션은 사용자를 웹 애플리케이션의 로그인 대화 상자로 리디렉션합니다.
- 사용자는 요청 토큰의 권한을 부여하고 자신의 계정과 연결합니다.
- 웹 애플리케이션은 사용자를 Kore.ai 애플리케이션으로 다시 리디렉션합니다.
- Kore.ai 애플리케이션은 요청 토큰을 액세스 토큰으로 교환합니다.
- 액세스 토큰을 사용하여 Kore.ai 애플리케이션은 사용자를 대신하여 공급자의 보호된 리소스에 액세스할 수 있습니다.
설정
봇에 권한 부여를 정의하려면, 다음 단계를 따릅니다.
- 권한 부여 프로필을 설정하고자 하는 봇을 엽니다.
- 상단 메뉴에서 구축 탭을 선택합니다.
- 왼쪽 메뉴에서, 설정->프로필 권한 부여를 클릭합니다.
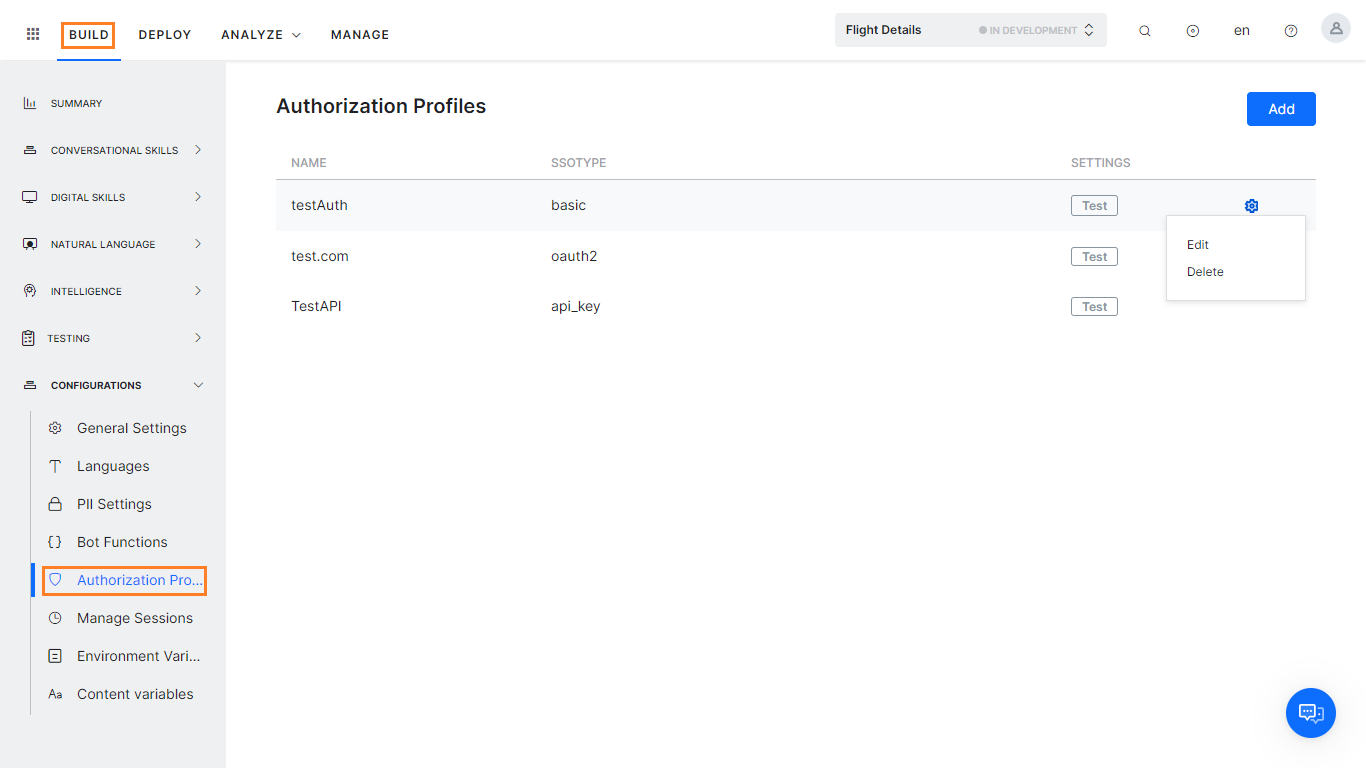
- 추가를 클릭합니다. 새 권한 부여 메커니즘 대화 상자가 열립니다.
- 권한 부여 유형의 드롭다운 목록에서, OAuth v1을 선택합니다.
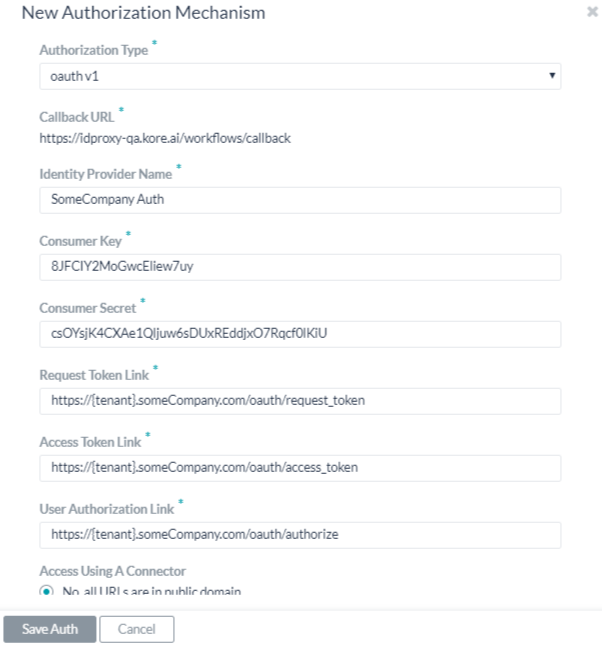
- 다음 그림은 봇을 위한 사용자 정의 권한 부여 사용을 위해 정의해야 하는 OAuth v1 권한 부여 유형 필드의 예입니다.

OAuth v1을 정의하려면 다음 표에 설명된 필드를 정의하세요.
| 필드 이름 | 설명 |
|---|---|
| 권한 부여 유형 | OAuth v1로 설정합니다. |
| 콜백 URL | 최종 사용자 권한 부여가 완료된 후 최종 사용자를 리디렉션하기 위해 웹 애플리케이션 또는 웹 서비스가 사용하는 URL입니다. 이 값 https://idp.kore.ai/workflows/callback/은 OAuth v1 설정을 정의할 때 Kore.ai 애플리케이션에서 읽기 전용 값으로 제공합니다. |
| ID 공급자 이름 | 웹 애플리케이션 또는 웹 서비스 이름(예: Twitter)입니다. 이 필드는 필수입니다. |
| 소비자 키 | 웹 애플리케이션에 대한 Kore.ai 애플리케이션 식별자로 제공되는 값입니다. 이 필드는 필수입니다. |
| 소비자 시크릿 | Kore.ai 애플리케이션이 소비자 키의 소유권을 설정하기 위해 제공하는 시크릿 값입니다. 이 필드는 필수입니다. |
| 요청 토큰 링크 | Kore.ai 애플리케이션이 권한이 없는 요청 토큰을 얻기 위해 사용하는 URL입니다. Kore.ai 애플리케이션이 최종 사용자로부터 권한 부여를 받고 액세스 토큰을 얻는 데 사용하는 값입니다. 예: https://{tenant}.someCompany.com/oauth/request_token 최종 사용자 권한 부여 후 Kore.ai 애플리케이션에서 액세스 토큰을 요청할 수 있습니다. 이 필드는 필수입니다. |
| 액세스 토큰 링크 | 최종 사용자 권한 부여 요청 토큰을 액세스 토큰으로 교환하는 데 사용되는 URL입니다. 액세스 토큰은 최종 사용자 자격 증명을 사용하지 않고 Kore.ai 애플리케이션이 최종 사용자를 대신하여 웹 애플리케이션 또는 웹 서비스에 대한 액세스 권한을 얻는 데 사용하는 값입니다. 예: https://{tenant}.someCompany.com/oauth/access_token 이 필드는 필수입니다. |
| 사용자 권한 부여 링크 | Kore.ai 애플리케이션이 액세스 토큰을 사용하여 웹 애플리케이션이나 웹 서비스에 액세스하기 위한 최종 사용자 권한을 획득하는 데 사용되는 URL입니다. 이 필드는 필수입니다. 동적 필드, 경로 매개 변수 필드, 쿼리 필드 등을 사용하여 권한 부여 URL을 정의할 수 있습니다. 예: https://kore.someCompany.com/sap/opu/odata/sap/{{authfield1}}?$format=json 또는 https://{tenant}.service-now.com/api/now/v1/table/incident 더 자세한 내용은 작업에서 세션 및 컨텍스트 변수 사용하기를 참조하세요. |
| 커넥터를 사용한 액세스 | Kore.ai 커넥터 에이전트를 사용하여 Kore.ai 봇의 액세스를 사용하도록 설정하려면 예를 선택합니다. 이 옵션은 Kore.ai 커넥터 에이전트가 엔터프라이즈 온프레미스 네트워크에서 설정되어 사용함으로 설정한 경우에만 표시됩니다. 더 자세한 정보는 Kore.ai 커넥터 사용하기를 참조하세요. |
테넌시 정의
필요한 경우 하위 도메인 섹션에서 웹 애플리케이션 또는 사용자 인터페이스의 기본 URL이 URL의 테넌트 이름을 사용하는 경우 예를 선택합니다. 예를 들어, kore는 테넌트를 www.kore.somCompany.com에서 사용하는 웹 서비스의 테넌트 조직입니다. 다음 예시 설정에서 테넌시 URL은 {tenant} 조직 플레이스 홀더를 포함합니다. 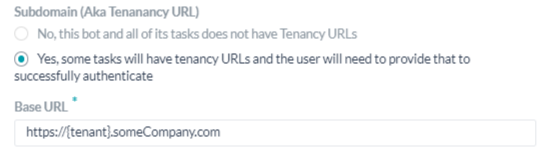
추가 필드 추가
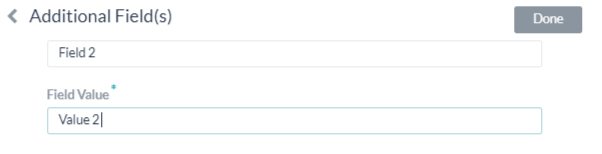
열기를 클릭하여 추가 필드 대화창을 연 다음 추가 권한 부여 입력 필드를 나타내는 하나 이상의 키/값 쌍을 입력합니다. 기본 사용자 이름과 암호 필드가 권한 부여 입력의 요구 사항을 충족하지 않는 경우 추가 필드을 추가하여 최종 사용자에게 표시할 키/값 쌍으로 사용자 정의 필드를 추가할 수 있습니다. 예를 들어 권한 부여 프로세스에 PIN 코드가 필요한 경우 사용자 이름 및 암호 필드 외에도 이러한 필드를 사용할 수 있습니다. 추가 필드는 다음 그림에 표시된 대로 추가됩니다.
다음 필드를 지정합니다.
- 필드 키 – 권한 부여를 지정할 사용자 정의 필드의 이름입니다.
- 필드 값 – 권한 부여를 지정할 사용자 정의 필드의 값입니다.
- 추가를 클릭하여 추가 필드를 저장합니다.
추가 필드를 더 추가하려면 추가 필드 섹션에서 추가를 클릭합니다.
권한 부여 필드 추가
기본적으로 권한 부여 없음 필드는 봇 요청 메시지의 헤더 일부로 구성됩니다. 봇 요청에 추가 권한 부여 필드가 필요하거나 예상되는 권한 부여(예: 사회 보장 번호 또는 PIN)가 헤더의 일부가 아닌 경우 권한 부여 필드 섹션에서 추가를 클릭한 후 다음 그림과 같이 필드를 정의합니다.
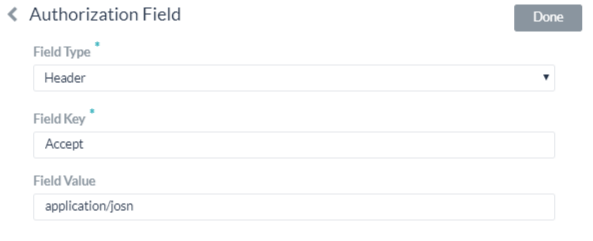
- 필드 유형 필드에서 봇 요청 메시지 및 필요한 권한 부여 필드 유형에서 위치에 따라 다음 중 하나를 선택할 수 있습니다.
- 헤더 – 봇은 요청 헤더의 일부로 권한 부여 필드를 예상합니다.
- 페이로드 – 봇은 요청 본문 내용의 일부로 권한 부여 필드를 예상합니다.
- 쿼리 문자열 – 봇은 요청 본문에서 권한 부여 필드를 쿼리로 예상합니다.
- 경로 매개 변수 – 봇은 권한 부여 필드를 요청의 URL 경로의 일부로 예상합니다.
- 필드 키 필드에서 선택한 필드 유형에 대한 필드 이름을 입력합니다.
- 필드 값 필드에 지정된 필드 키의 값을 입력합니다.
- 추가를 클릭합니다. 새 권한 부여 필드가 권한 부여 필드 섹션에 추가됩니다.
추가 인증 권한 필드를 추가하려면 권한 부여 필드 섹션에서 추가를 클릭합니다.
권한 부여 테스트
권한 부여를 저장한 후, 봇의 남은 단계를 개발하기 위해 계속하기 전에 테스트를 클릭하면 권한 부여 페이지에서 권한 부여 정의를 테스트할 수 있습니다. 테스트를 클릭하면 권한 부여 토큰 URL, 소비자 키 및 소비자 토큰을 사용하여 테스트가 실행됩니다. 테넌시가 정의되면 권한 부여 테스트 대화창이 나타납니다. 테스트를 클릭하여 권한 부여 테스트를 시작합니다. 권한 부여 유효성 검증이 완료되면 권한 부여 테스트 대화창이 닫히고 성공 또는 실패 검증 결과가 권한 부여 테스트 버튼 바로 오른쪽에 표시됩니다. 권한 부여가 실패하면 헤더 및 응답 탭과 함께 권한 부여 테스트 실패 메시지가 표시됩니다. 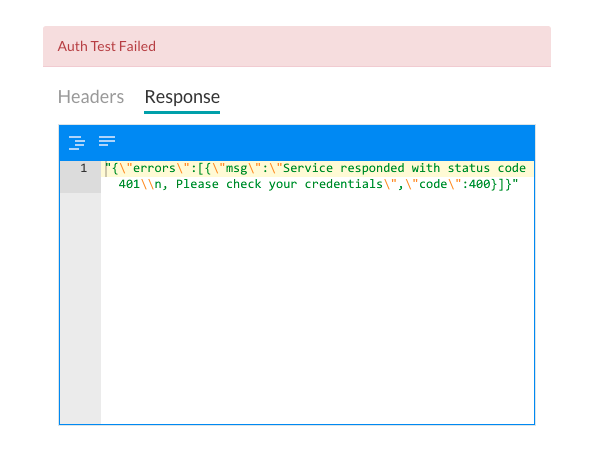
Oauth v1は新規のWeb、モバイル、デスクトップアプリケーションから簡単に標準的な方法で安全認証を可能にするオープンプロトコルです。OAuth v1の使用で認証メカニズムの設定を設定するためには、そのアプリケーションのログイン認証クレデンシャルが必要になるため、まずはウェブアプリケーションにアカウントをログインする必要があります。
OAuth v1の仕組み
- Kore.aiアプリケーションはウェブアプリケーションから未認証のリクエストトークンを取得します。
- Kore.aiアプリケーションはユーザーをウェブアプリケーションのロクインダイアログへ導き直します。
- ユーザーはリクエストトークンを認証してそのアカウントと連結します。
- ウェブアプリケーションはユーザーをKore.ai アプリケーションへ導き直します。
- Kore.aiアプリケーション はリクエストトークンをアクセス トークンに変換します。
- アクセストークンはKore.aiアプリケーションをユーザーの身分として、提供元の保護済のリソースへアクセスことを可能にします。
設定
ボットに認証を定義するには、以下の手順に従います。
- 認証プロファイルを設定するボットを開きます。
- トップメニューから構築タブを選択します。
- 左側のメニューから、構成―>認証プロファイルをクリックします
- 追加をクリックします。新しい認証メカニズムダイアログが開きます。
- 認証タイプドロップダウンリストでoAuth v1を選択します。
- 以下の図とはoAuth v1認証タイプフィールドの作例、タスクのためにカスタマイズした認証を有効にするために定義する必要があります。
oAuth v1を定義する場合、下記のテーブルの説明の通りにフィールドを定義してください。
| フィールド名 | 説明 |
|---|---|
| 認証タイプ | oAuth v1に設定します。 |
| コールバックURL | エンドユーザーの認証が完了した後、エンドユーザーを導き直しするためにウェブアプリケーションまたはウェブサービスが使用するURLです。oAuth v1の設定を定義すると、Kore.aiアプリケーションがhttps://idp.kore.ai/workflows/callback/をリードオンリー値として提供します。 |
| 身分の提供元の名前 | ウェブアプリケーションやウェブサービスの名前、例えば、“Twitter”。このフィールドは必須です。 |
| コンシューマーキー | Kore.aiアプリケーションがウェブアプリケーションへの認識として提供される値。このフィールドは必須です。 |
| コンシューマーシックレット | コンシューマーキーの所有権を確立するために、Kore.aiアプリケーションが提供するシックレット値。このフィールドは必須です。 |
| リクエストトークンリンク | Kore.aiアプリケーションが未認証のリクエストトークンを取得するために使用するURL。リクエストトークンとはKore.aiアプリケーションがアクセストークンを取得ためのエンドユーザーからの認証を取得ための値。例えば、https://{tenant}.someCompany.com/oauth/request_token。エンドユーザーの認証の後、Kore.aiアプリケーションからアクセストークンを要求することができます。このフィールドは必須です。 |
| アクセストークンリンク | エンドユーザーが認証済のリクエストトークンをアクセストークンと交換するために使用されるURL。アクセストークンとはKore.aiアプリケーションが、エンドユーザーがクレデンシャルのログではなく、エンドユーザーの行為によりウェブアプリケーションやウェブサービスへのアクセスを得るために使用する値です。例えば、https://{tenant}.someCompany.com/oauth/access_token。このフィールドは必須です。 |
| ユーザー認証リンク | これは、Kore.aiアプリケーションがアクセストークンを使用してWebアプリケーションまたはWebサービスにアクセスするためのエンドユーザー認証を取得するために使用されるURLです。このフィールドは必須です。ダイナミックフィールド、パスパラメータフィールド、クエリフィールドなどを使用して、認証URLを定義することができます。(例:https://kore.someCompany.com/sap/opu/odata/sap/{{authfield1}}/?$format=json またはhttps://{tenant}.service-now.com/api/now/v1/table/incident)詳細については、タスクのセッション変数とコンテキスト変数を使用を参照してください。 |
| コネクタを使用してアクセス | はいを選択して、Kore.aiコネクタエージェントを使用したKore.aiボットへのアクセスを有効にします。このオプションは、Kore.aiコネクタ エージェントが企業の社内ネットワークで構成、有効化されている場合に表示されます。詳細については、Kore.ai Connectorの使用をご覧ください。 |
テナントを定義する
必要に応じて、サブドメインセクションで、ウェブアプリケーションにベースURLやユーザーインターフェイスがURLにテナント名を使用する場合、はいを選択してください。例えば、koreは、www.kore.someCompany.comとしてテナントを使用したウェブサービスのテナント組織です。下記の設定の例では、テンナンシーURLは{tenant}組織のプレースホルダが含まれます。
フィールドの追加
追加をクリックして追加のフィールドダイアログを開き、追加の認証入力フィールドを表す1つ以上のキー/値の組み合わせを入力します。デフォルトのユーザー名とパスワードのフィールドが承認入力のニーズを満たしていない場合は、 追加フィールド を追加することで、エンドユーザーに表示されるキーと値のペアとしてカスタムフィールドを追加できます。これらのフィールドは、たとえば、ユーザー名フィールドとパスワードフィールドに加えて、認証プロセスでPINコードが必要な場合に使用することができます。下図のように、追加のフィールドが追加されます。
以下のフィールドを指定 してください:
- フィールド キー―認証に指定するカスタム フィールド名です。
- フィールド値 – 認証時に指定するカスタムフィールドの値。
- 追加をクリックして追加のフィールドを保存します。
追加のフィールドを追加する場合、認証フィールドセクションの追加をクリックしてください。
認証フィールドの追加
デフォルトでは、ボットリクエストメッセージのヘッダーの一部として、認証フィールドは設定されていません。ボットリクエストに認証フィールドが必要、または想定される認証がヘッダーの一部ではない場合(例:ソーシャルセキュリティ番号やPINなど)、認証フィールドの追加をクリックして下図の通りにフィールドを定義します。
- フィールドタイプフィールドに、以下のうちの一つを選択することができます。 必須のボットリクエストメッセージの位置および認証フィールドのタイプの次第です。
- ヘッダー – ボットは認証フィールドをリクエストのヘッダーの一部として求めます。
- ペイロード – ボットは認証フィールドをリクエスト本体のコンテンツの一部として求めます。
- クエリー文字列 – ボットは認証フィールドをリクエストのボディにあるクエリー として予想します。
- パースパラメータ(PathParam) – 認証フィールドをURLパースリクエストの一部として予想されるボット。
- フィールドキーフィールドに、選択済のフィールドタイプフィールド名を入力してください。
- フィールド値フィールドに、フィールドキーの指定された値を入力してください。
- 追加をクリックします。新規の認証フィールドは認証フィールドのセクションに追加されました。
認証フィールドを追加する場合、認証フィールドセクションの追加をクリックしてください。
認証のテスト
認証を保存した後、ボットの残りのステップの開発を続ける前に、認証ページでテストをクリックして、認証定義をテストすることができます。テストをクリックすると、認証トークンのURLとコンシューマーキーおよびコンシューマートークンを使用してテストが実行されます。テンナンシーが定義済みの場合、テスト認証ダイアログが表示されます。テストをクリックすると認証テストを開始します。認証の検証が完成の場合、テスト認証のウィンドウが閉じて、その検証の結果、成功や失敗は即刻、テスト認証のボタンに表示します。認証失敗の場合、“認証テスト失敗”のメッセージがヘッダーおよびレスポンスのタブとともに表示されます。
OAuth v1 is an open protocol to allow secure authorization in a simple and standard method from web, mobile, and desktop applications.
To use OAuth v1, you must first register an account with the web application as you will need the login credentials for that application to configure the settings for the authorization mechanism.
How OAuth v1 Works
- The Kore.ai application obtains an unauthorized request token from the web application.
- The Kore.ai application redirects the user to a login dialog at the web application.
- The user authorizes the request token, associating it with their account.
- The web application redirects the user back to the Kore.ai application.
- The Kore.ai application exchanges the request token for an access token.
- The access token allows the Kore.ai application to access a protected resource at the provider, on behalf of the user.
Configuration
To define Authorization for your bot, follow these steps:
- Open the bot for which you want to configure an Authorization profile.
- Select the Build tab from the top menu.
- From the left menus, click Configurations -> Authorization Profile
- Click Add. The New Authorization Mechanism dialog opens.
- In the Authorization Type drop-down list, select oAuth v1.
- The following illustration is an example of the oAuth v1 authorization type fields that you must define to enable a customized authorization for your Bot.
To define oAuth v1, define the fields described in the following table.
| FIELD NAME | DESCRIPTION |
|---|---|
| Authorization Type | Set to oAuth v1. |
| Callback URL | The URL used by the web application or web service to redirect the end-user after end-user authorization is complete. This value, https://idp.kore.ai/workflows/callback/, is provided as a read-only value by the Kore.ai application when you define oAuth v1 settings. |
| Identity Provider Name | The name of the web application or web service, for example, Twitter. This field is required. |
| Consumer Key | The value provided as the Kore.ai application identification to the web application. This field is required. |
| Consumer Secret | The secret value provided by the Kore.ai application to establish ownership of the Consumer Key. This field is required. |
| Request Token Link | The URL used by the Kore.ai application to obtain an unauthorized request token. The request token is a value used by the Kore.ai application to obtain authorization from the end-user to obtain an access token. For example, https://{tenant}.someCompany.com/oauth/request_token. After end-user authorization, an access token can be requested by the Kore.ai application. This field is required. |
| Access Token Link | The URL used to exchange the end-user authorized request token for an access token. The access token is the value used by the Kore.ai application to gain access to the web application or web service on behalf of the end-user, instead of using the end-user credentials. For example, https://{tenant}.someCompany.com/oauth/access_token. This field is required. |
| User Authorization Link | This is the URL used to obtain end-user authorization for the Kore.ai application to access the web application or web service using the access token. This field is required. You can use dynamic fields, path parameter fields, query fields, and so forth, to define the Authorization URL, for example, https://kore.someCompany.com/sap/opu/odata/sap/{{authfield1}}/?$format=json or https://{tenant}.service-now.com/api/now/v1/table/incident For more information, see Using Session and Context Variables in Tasks. |
| Access Using a Connector | Select Yes to enable access for Kore.ai Bots using the Kore.ai Connector agent. This option is only visible if a Kore.ai Connector agent is configured and enabled in your enterprise on-premises network. For more information, see Using the Kore.ai Connector. |
Defining Tenancy
If required, in the Subdomain section, select Yes if the base URL for a web application or user interface the uses a tenant name in the URL. For example, kore is the tenant organization for a web service using tenants at www.kore.someCompany.com.
In the following example configuration, the tenancy URL contains the {tenant} organization placeholder.
Adding Additional Fields
Click Add to open the Additional Fields dialog and then enter one or more key/value pairs that represent additional authorization input fields.
If the default username and password fields do not meet your needs for authorization input, you can add custom fields as key/value pairs that are displayed to the end-user by adding Additional Fields. You can use these fields, for example, if a PIN code is required in the authorization process, in addition to the Username and Password fields.
Additional Fields are added as shown in the following illustration.
Specify the following fields:
- Field Key – The name of the custom field to specify for authorization.
- Field Value – The value for the custom field to specify for authorization.
- Click Add to save the Additional Field.
To add more Additional Fields, click Add in the Additional Fields section.
Adding Authorization Fields
By default, no authorization fields are configured as part of the header of the Bot request message. If your Bot request requires authorization fields or the expected authorization is not part of the header, for example, social security number or PIN, click Add in the Authorization Fields section and then define the fields as shown in the following illustration.
- In the Field Type field, you can select one of the following depending on where in the Bot request message and the type of authorization fields that are required.
- Header – The Bot expects the authorization fields as part of the header of the request.
- Payload – The Bot expects the authorization fields as part of the content of the body of the request.
- Query String – The Bot expects the authorization fields as a query in the body of the request.
- Path Param – The Bot expects the authorization fields as part of the URL path for the request.
- In the Field Key field, enter the name of the field for the selected Field Type.
- In the Field Value field, enter the value for the Field Key specified.
- Click Add. The new authorization field is added in the Authorization Fields section.
To add additional authorization fields, click Add in the Authorization Fields section.
Testing the Authorization
After you save the authorization, you can test your authorization definition on the Authorization page when you click Test before continuing to develop the remain steps of your Bot. When you click Test, the test is executed using the authorization token URLs and the Consumer Key and Consumer Token. If the tenancy was defined, the Test Authorization dialog is displayed. Click Test to begin the authorization test. When the validation of authorization is complete, the Test Authorization dialog is closed and the results of the validation, either success or failure, is displayed to the immediate right of the Test Authorization button. If the authorization fails, the Auth Test Failed message is displayed along with the Headers and Response tabs.