개요

Unblu는 조직의 상담사 및 어드바이저가 고객 및 웹 사이트 방문자와 협업할 수 있는 대화형 플랫폼입니다. 이는 라이브 채팅, 보안 텍스트 메시지, 화상 채팅과 같은 온라인 채널을 통해 협업할 수 있도록 하여 고객 경험을 개선할 수 있도록 합니다. 봇이 고객 서비스 영역 내에 있다면 봇에서 채팅을 인간 상담사에게 전송하는 것이 필요합니다. 챗봇은 인간을 완전히 대체하기 위한 것이 아닙니다. 때때로 챗봇이 만족스럽게 대답하지 못하거나 사용자가 사람과 대화하기를 원하는 경우가 있습니다. 이 경우 챗봇은 채팅을 인간 상담사나 고객 관리 담당자에게 전송해야 합니다. 사용자가 이 작업을 할 수 있도록 Kore를 Unblu 애플리케이션과 통합할 수 있습니다. 여기서 봇은 전체 솔루션의 핵심입니다. 봇은 모든 기능을 수행하는 것 외에도 사용자와 상담사 간의 대리인 역할도 합니다.

  • : 사용자가 상호 작용하는 채팅 봇.
  • 사용자: 사용자는 이 봇을 사용하는 고객입니다.
  • 상담사: 상담사는 사용자와 채팅하는 사람입니다. 상담사는 채팅 창도 필요합니다. 이를 위해 Unblu 소프트웨어를 사용할 수 있습니다.

전제 조건

전제 조건은 다음과 같습니다:

  • 완전히 기능을 갖춘 봇.
  • Unblu 계정.
  • Kore의 GitHub에서 BotKit SDK를 다운로드합니다.
  • <Node.js> 파일을 다운로드하고 설치합니다. BotKit SDK를 사용하려면 SDK가 설치된 같은 서버에서 <node.js> 파일을 실행해야 합니다. <node.js> 버전은 반드시 v12.0 이상이어야 합니다.
  • Ngrok하여 콜백 서버 애플리케이션을 시뮬레이션합니다.

설정

Kore-Unblu 통합을 수행하려면 다음 단계를 따르세요:

  1. 유효한 자격 증명을 사용하여 Kore 봇 플랫폼에 로그인합니다.
  2. 상단 메뉴에서 배포 탭 선택
  3. 통합에서 상담사 전환 옵션 선택
  4. 상담사 전환 페이지에서 앱 이름 옆 있는 추가를 클릭합니다(이미 생성된 것이 있다면 드롭다운에서 기존 앱을 선택할 수 있습니다).
  5. 클라이언트 앱 생성 창에서 이름 필드에 앱 이름을 입력합니다.
  6. JTI 또는 JWE 암호화 또는 둘 모두를 적용하도록 선택할 수 있습니다. 이 활용 사례에서 이것들은 무시하겠습니다.
  7. 다음 >완료를 클릭합니다.
  8. Callback URL 필드에서 BotKit URL 엔드포인트를 입력합니다. 예: https://<domainname>/unblu.
  9. 저장을 클릭합니다.
  10. 이제 유효한 자격 증명을 사용하여 Unblu 계정에 로그인합니다.
  11. 오른쪽 상단에서 프로필을 클릭하고 관리 섹션에서 계정 관리를 선택합니다.
  12. 계정 설정 페이지에는 기본적으로 계정 개요가 표시됩니다.
  13. 왼쪽 창의 사이트 통합 섹션에서 도메인을 선택합니다.
  14. 도메인 페이지에서 오른쪽 위에 있는 새 도메인을 클릭합니다.
  15. 새 도메인 창에서 도메인 URL 필드에 URL을 입력합니다.  참고 사항: 이것은 콜백 URL입니다. 7단계를 참조하세요. 고정 공용 IP 또는 Ngrok IP가 아니라면 IP가 변경될 때마다 업데이트해야 합니다.
  16. 프로토콜 필드에서 둘 모두를 선택합니다.
  17. 저장을 클릭합니다.

위의 설정을 완료한 후 <config.json> 파일에서 필요한 사항을 변경합니다. 샘플값으로 <sample_config_file.txt>를 참조하세요.

  1. <config.json> 파일로 이동하여 아래 언급된 사항들을 변경합니다.
  2. 섹션에서 URL(Ngrok 또는 공개적으로 액세스할 수 있는 URL)을 붙여넣습니다. 아래 이미지를 참조하세요.
  3. 자격 증명 섹션에서 다음과 같은 Kore 봇 세부 정보를 붙여넣습니다: API 키(클라이언트 시크릿), 앱 ID(클라이언트 ID) 및 봇 이름. 아래 이미지를 참조하세요.

    이러한 세부 정보를 찾으려면,

    1. 유효한 자격 증명을 사용하여 Kore 봇 플랫폼에 로그인합니다.
    2. 상단 메뉴에서 배포 탭 선택
    3. 통합에서 BotKit 옵션 선택
    4. 필요에 따라 세부 정보를 찾을 수 있습니다.
  4. Unblu 섹션에서 아래와 같이 변경합니다:
    1. Unblu 자격 증명 섹션 아래의 Unblu 자격 증명을 붙여넣습니다.
    2. 외부 메신저 섹션 아래에 채팅에서 표시하고자 하는 이름, 설명 등을 입력합니다. 외부 메신저 세부 정보에 액세스하려면,
      1. Unblu 데스크톱 애플리케이션에 로그인합니다.
      2. 왼쪽 창의 외부 통합 섹션에서, 외부 메신저를 선택합니다.
      3. 외부 메신저 페이지에서 해당 메신저를 선택하면 메신저 세부 정보를 찾을 수 있습니다.
    3. 상담사 섹션 아래에서, 생성하고자 하는 상담사의 세부 정보를 입력합니다.
    4. 명명된 영역 섹션 아래에서, 이름메타 태그 ID를 입력합니다. 명명된 영역을 생성하려면,
      1. Unblu 애플리케이션에 로그인합니다.
      2. 왼쪽 창의 사이트 통합 섹션에서, 명명된 영역을 선택합니다. 
      3. 명명된 영역 페이지에서 오른쪽 위에 있는 새 명명된 영역을 클릭합니다.
      4. 새 명명된 영역 창에서, 도메인 이름 드롭다운 목록에서 등록된 도메인을 선택하고 이름 필드에 이름을 입력합니다. 새 도메인 등록을 클릭하여 도메인을 등록할 수도 있습니다.
      5. 저장을 클릭합니다.
    5. 관리자 섹션 아래에서, Unblu 사용자 이름을 입력합니다.
  5. <config.json> 파일을 업데이트한 후, npm i 명령을 실행하여 종속성을 설치합니다.
  6. npm start 명령을 실행하여 통합 설정을 실행합니다.    참고 사항: Webhook URL은 위에서 언급한 대로 API 확장, <config.json> 파일 및 Unblu 계정의 외부 메신저 섹션(각 메신저의 엔드포인트 URL)에서 같아야 합니다(API 확장 내 BotKit URL, app.url 및 unblu.custom.external_messenger).
  7. 상담사 전환은 대화 수준에서 설정됩니다. 대화 작업을 열고 상담사 전환 노드를 열어 설정이 저장되었는지 확인할 수 있습니다.

Leave a Reply

Your email address will not be published. Required fields are marked *

Fill out this field
Fill out this field
Please enter a valid email address.
You need to agree with the terms to proceed

概要

Unbluは、組織内のエージェントおよびアドバイザーが、顧客およびWebサイト訪問者とコラボするための会話型プラットフォームです。ライブチャット、セキュアテキストメッセージ、ビデオチャットなどのオンラインチャネルによるコラボレーションを可能にし、より良い顧客体験を実現できます。

Myボットが顧客サービスの領域にある場合、ボットから人間のエージェントにチャットを転送することが必要となります。チャットボットは、完全に人間に置き換わるものではありません。時には、チャットボットから満足のいく回答を得られなかったり、ユーザーが人間とのチャットを望んだりすることもあります。このような場合、チャットボットは人間のエージェントやカスタマーケア担当者にチャットを転送する必要があります。このタスクを実行するために、KoreはUnbluアプリケーションとシステム連携することができます。

ここでは、ボットがソリューション全体の核となります。ボットは、すべての機能を実行するだけでなく、ユーザーとエージェントの間のプロキシとしての役割も果たします。

  • ボット: ユーザーが対話するチャットボット。
  • ユーザー: ユーザーとは、このボットを使用している顧客のことです。
  • エージェント: エージェントとは、ユーザーとチャットする人間のことです。また、エージェントにはチャットウィンドウも必要です。そのためには Unblu のソフトウェアを使用できます。

必要条件

必要条件は以下のとおりです。

  • 完全に機能するボット。
  • Unbluのアカウント。
  • BotKit SDKを、KoreのGitHubからダウンロード。
  • <Node.js> ファイルをダウンロードしてインストールします。BotKit SDKには、<node.js>のファイルが必要です。これにより、SDKがインストールされている同じサーバー上で動作します。<node.js> のバージョンはv12.0以上である必要があります。
  • Ngrokでコールバックサーバーアプリケーションをシミュレーションしています。

設定

Kore-Unbluのシステム連携を実行するには、以下の手順に従います。

  1. 有効な資格情報で、ボットプラットフォームにログイン。
  2. トップメニューから デプロイタブを選択します
  3. システム連携からエージェントへの転送オプションを選択
  4. アプリ名のとなりの「エージェントへの転送」ページで、追加をクリックします(既にアプリを作成している場合は、ドロップダウンから既存のアプリを選択できます)。
  5. 「クライアントアプリを作成」ウィンドウで、アプリ名フィールドにアプリ名を入力します。
  6. JTIまたはJWEのいずれかの暗号化の実施、あるいはその両方の暗号化の実施を選択できます。今回のユースケースでは、これらを無視します。
  7. 次へ > 完了をクリック。
  8. コールバックURLフィールドに、BotKit URLエンドポイントを入力します。例:https://<domainname>/unblu。
  9. 保存をクリック。
  10. ここで、有効な資格情報を使用して、Unbluアカウントにログインします。
  11. 右上の自身のプロフィールをクリック。管理セクションで アカウント管理を選択。
  12. デフォルトでは「アカウント設定」ページで、アカウントの概要 が表示されています。
  13. 左側のペインでは、サイト統合セクションでドメインを選択。
  14. 「ドメイン」ページで、右上の新規ドメインをクリック。
  15. 「新規ドメイン」ウィンドウで、ドメインのURLフィールドにURLを入力します。 メモ:これがコールバックURLです。ステップ7をご参照ください。これが定数のパブリックIPやNgrok IPでない場合は、IPが変わるたびに更新する必要があります。
  16. プロトコルフィールドで両方を選択。
  17. 保存をクリック。

上記の設定が完了したら、<config.json>ファイルに必要な変更を加えます。サンプル値に、<sample_config_file.txt> をご参照ください。

  1. <config.json> ファイルに移動して、下記の変更を行ってください。
  2. アプリ セクションで、URL(Ngrokまたは一般にアクセス可能なURL)を貼り付けます。下の画像をご参照ください。
  3. 資格情報セクションに、 Koreボットの詳細を貼り付けます。API Key(クライアントシークレット)、App ID(クライアントID)、およびボット名。下の画像をご参照ください。

    これらの詳細を探すために、

    1. 有効な資格情報で、ボットプラットフォームにログイン。
    2. トップメニューから デプロイタブを選択します
    3. システム連携からBotKitオプションを選択
    4. 必要に応じて詳細を確認できます。
  4. Unblu」セクションで、以下のように変更します。
    1. Unblu資格情報セクションで、Unbluの資格情報を貼り付けます。
    2. external_messengerセクションにおいて、チャットに表示したい名前や説明などを入力します。外部メッセンジャーの詳細にアクセスするには、
      1. Unbluデスクトップアプリケーションにログインします。
      2. 左側のペインにおいて、外部システム連携セクションで 外部メッセンジャーを選択します。
      3. 「外部メッセンジャー」ページでは、各メッセンジャーを選択すると、メッセンジャーの詳細が表示されます。
    3. エージェントセクションにおいて、作成したいエージェントの詳細を入力します。
    4. named_areaセクションで、名前メタタグIDを入力します。名前付きのエリアを作成するには、
      1. Unbluアプリケーションにログインします。
      2. 左側のペインにおいて、サイトシステム連携セクションで 名前付きエリアを選択します。 
      3. 「名前付きエリア」ページで、右上の新しい名前付き領域 をクリックします。
      4. 「新しい名前付きエリア」ウィンドウで、ドメイン名ドロップダウンリストから登録済みのドメインを選択して、名前フィールドに名前を入力します。新規ドメインの登録をクリックして、ドメインを登録することもできます。
      5. 保存をクリック。
    5. 管理者セクションで、Unbluのユーザー名を入力します。
  5. <config.json>ファイルを更新した後、コマンドnpm iを実行して依存関係をインストールします。
  6. コマンドnpm startを実行することで、システム連携セットアップを実行します。    メモ:WebフックのURLは、API拡張機能<config.json>ファイル、および前述の通り(API エクステンションにおけるBotkit URL、アプリURLおよび unblu.custom.external_messenger)Unbluアカウントの外部メッセンジャーセクション(各メッセンジャーのエンドポイントURL)において同じである必要があります。
  7. エージェントへの転送は、ダイアログレベルで設定されます。ダイアログタスクを開き、エージェント転送ノードを開くと、設定が保存されていることを確認できます。

Leave a Reply

Your email address will not be published. Required fields are marked *

Fill out this field
Fill out this field
Please enter a valid email address.
You need to agree with the terms to proceed

Overview

Unblu is a conversational platform that allows agents and advisors in your organization to collaborate with your customers and website visitors. It enables collaboration through online channels like live chat, secure text messaging, and video chat to achieve a better customer experience.

Transferring a chat to a human agent from the bot is necessary if your bot is in the space of customer service. Chatbots are not meant to completely replace humans. At times, the chatbot fails to answer satisfactorily or the user wants to chat with a human being. If this happens, the chatbot should transfer the chats to a human agent or a customer care representative. To help users accomplish this task, Kore can be integrated with the Unblu application.

Here, the bot is the core of the entire solution. Apart from performing all its functionalities, the bot also acts as a proxy between users and agents.

  • Bot: Chat Bot that the user interacts with.
  • Users: Users are the customers who are using this bot.
  • Agent: Agents are humans who chat with users. The agent will also need a chat window. For this, you can use Unblu software.

Prerequisites

The prerequisites are listed below:

  • A fully functional bot.
  • An Unblu account.
  • Download BotKit SDK from Kore’s GitHub.
  • Download and install the <Node.js> file. The BotKit SDK requires <node.js> files to run on the same server where the SDK is installed. The <node.js> version must be v12.0 and above.
  • Ngrok to simulate the callback server application.

Configuration

To perform the Kore-Unblu integration, follow the below steps:

  1. Log in to the Kore bots platform with valid credentials.
  2. Select the Deploy tab from the top menu
  3. From Integrations select the Agent Transfer option
  4. On the Agent Transfer page, next to App Name, click Add (you can select an existing app from the drop-down if you have already created one)
  5. On the Create Client App window, enter the app name in the Name field.
  6. You can choose to enforce JTI or JWE encryption or both. For this use case we will ignore them.
  7. Click Next > Done.
  8. In the Callback URL field, enter the BotKit URL endpoint. For example, https://<domainname>/unblu.
  9. Click Save.
  10. Now, log in to the Unblu account with valid credentials.
  11. Click your profile on the top-right; under the Administration section, select Manage Account.
  12. On the Account Configuration page, by default, Account Overview is displayed.
  13. On the left pane, under the Site Integration section, select Domains.
  14. On the Domains page, click New Domain on the top-right.
  15. On the New Domain window, enter the URL in the Domain URL field. 
    Note: This is the Callback URL. Refer to step 7. If this is not a constant public IP or Ngrok IP, you must update the IP whenever it changes.
  16. In the Protocol field, select Both.
  17. Click Save.

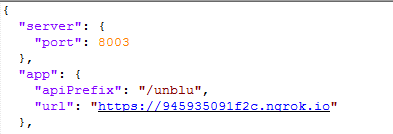
After completing the above configurations, make the required changes in the <config.json> file. Refer to <sample_config_file.txt> for sample values.

  1. Go to <config.json> file and make the below-mentioned changes.
  2. Under the app section, paste the URL (Ngrok or publicly accessible URL). Refer to the below image.
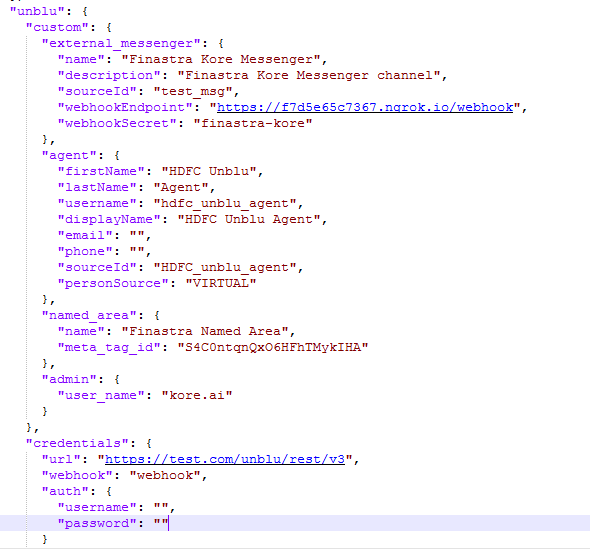
  3. Under the credentials section, paste the Kore bot details: API Key (client secret), App ID (client id), and Bot Name. Refer to the below image.

    To find these details,

    1. Log in to the Kore bots platform with valid credentials.
    2. Select the Deploy tab from the top menu
    3. From Integrations select the BotKit option
    4. You can find the details as needed.
  4. Under the Unblu section, make the below changes:
    1. Paste Unblu credentials under the Unblu credentials section.
    2. Under the external_messenger section, enter the name, description, etc., you want to display in the chat.
      To access the external messenger details,

      1. Log in to the Unblu desktop application.
      2. On the left pane, under the External Integration section, select External Messengers.
      3. On the External Messengers page, select the respective messenger and you can find the messenger details.
    3. Under the agent section, enter the agent details you want to create.
    4. Under the named_area  section, enter a Name and Meta Tag ID.
      To create a named area,

      1. Log in to the Unblu application.
      2. On the left pane, under the Site Integration section, select Named Areas
      3. On the Named Areas page, click New Named Area on the top-right.
      4. On the New Named Area window, select a registered domain from the Domain Name drop-down list and enter a name in the Name field. You can also register a domain by clicking Register a New Domain.
      5. Click Save.
    5. Under the admin section, enter the Unblu username.
  5. After you have updated the <config.json> file, install the dependencies by executing the command npm i.
  6. Run the integration setup by executing the command npm start.   
    Note: The webhook URL must be the same in API Extensions, <config.json> file, and the external messenger section (Endpoint URL of the respective messenger) of your Unblu account as mentioned above (The Botkit URL in API Extensions, app.url, and unblu.custom.external_messenger).
  7. The agent transfer is configured at the dialog level. You can open the dialog task, and open the agent transfer node to see that the configuration is saved.

Leave a Reply

Your email address will not be published. Required fields are marked *

Fill out this field
Fill out this field
Please enter a valid email address.
You need to agree with the terms to proceed