Overview
Unblu is a conversational platform that allows agents and advisors in your organization to collaborate with your customers and website visitors. It enables collaboration through online channels like live chat, secure text messaging, and video chat to achieve a better customer experience.
Transferring a chat to a human agent from the bot is necessary if your bot is in the space of customer service. Chatbots are not meant to completely replace humans. At times, the chatbot fails to answer satisfactorily or the user wants to chat with a human being. If this happens, the chatbot should transfer the chats to a human agent or a customer care representative. To help users accomplish this task, Kore can be integrated with the Unblu application.
Here, the bot is the core of the entire solution. Apart from performing all its functionalities, the bot also acts as a proxy between users and agents.
- Bot: Chat Bot that the user interacts with.
- Users: Users are the customers who are using this bot.
- Agent: Agents are humans who chat with users. The agent will also need a chat window. For this, you can use Unblu software.
Prerequisites
The prerequisites are listed below:
- A fully functional bot.
- An Unblu account.
- Download BotKit SDK from Kore’s GitHub.
- Download and install the <Node.js> file. The BotKit SDK requires <node.js> files to run on the same server where the SDK is installed. The <node.js> version must be v12.0 and above.
- Ngrok to simulate the callback server application.
Configuration
To perform the Kore-Unblu integration, follow the below steps:
- Log in to the Kore bots platform with valid credentials.
- Select the Deploy tab from the top menu
- From Integrations select the Agent Transfer option
- On the Agent Transfer page, next to App Name, click Add (you can select an existing app from the drop-down if you have already created one)
- On the Create Client App window, enter the app name in the Name field.
- You can choose to enforce JTI or JWE encryption or both. For this use case we will ignore them.
- Click Next > Done.
- In the Callback URL field, enter the BotKit URL endpoint. For example, https://<domainname>/unblu.
- Click Save.
- Now, log in to the Unblu account with valid credentials.
- Click your profile on the top-right; under the Administration section, select Manage Account.
- On the Account Configuration page, by default, Account Overview is displayed.
- On the left pane, under the Site Integration section, select Domains.
- On the Domains page, click New Domain on the top-right.
- On the New Domain window, enter the URL in the Domain URL field.
Note: This is the Callback URL. Refer to step 7. If this is not a constant public IP or Ngrok IP, you must update the IP whenever it changes.
- In the Protocol field, select Both.
- Click Save.
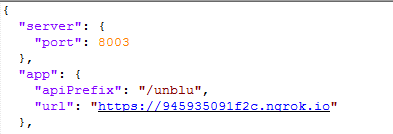
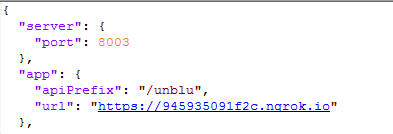
After completing the above configurations, make the required changes in the <config.json> file. Refer to <sample_config_file.txt> for sample values.
- Go to <config.json> file and make the below-mentioned changes.
- Under the app section, paste the URL (Ngrok or publicly accessible URL). Refer to the below image.

- Under the credentials section, paste the Kore bot details: API Key (client secret), App ID (client id), and Bot Name. Refer to the below image.

To find these details,
- Log in to the Kore bots platform with valid credentials.
- Select the Deploy tab from the top menu
- From Integrations select the BotKit option
- You can find the details as needed.
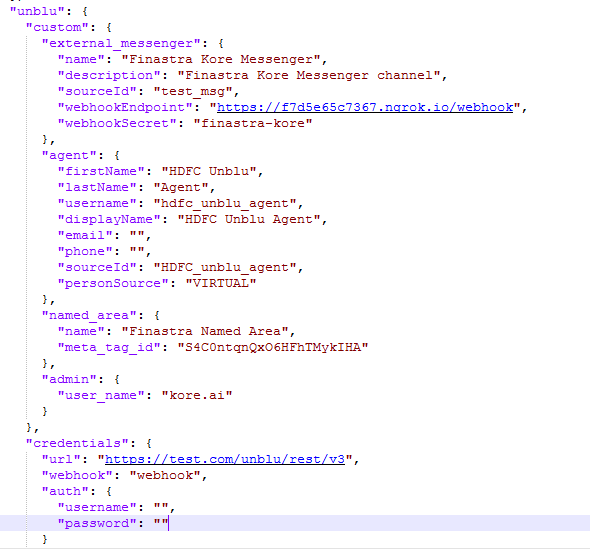
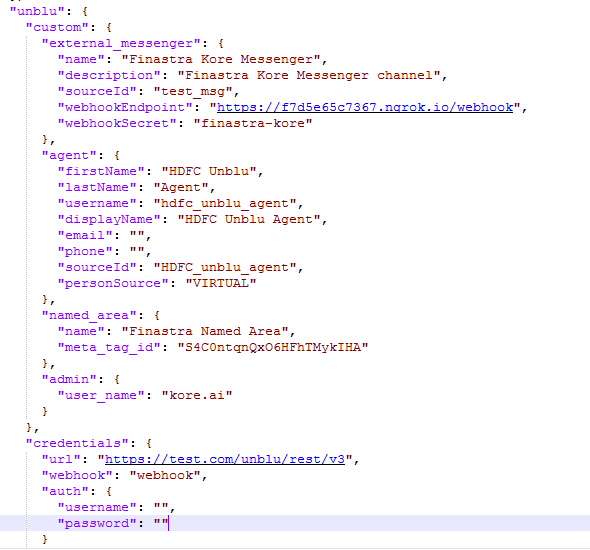
- Under the Unblu section, make the below changes:
- Paste Unblu credentials under the Unblu credentials section.
- Under the external_messenger section, enter the name, description, etc., you want to display in the chat.
To access the external messenger details,
- Log in to the Unblu desktop application.
- On the left pane, under the External Integration section, select External Messengers.
- On the External Messengers page, select the respective messenger and you can find the messenger details.
- Under the agent section, enter the agent details you want to create.
- Under the named_area section, enter a Name and Meta Tag ID.
To create a named area,
- Log in to the Unblu application.
- On the left pane, under the Site Integration section, select Named Areas.
- On the Named Areas page, click New Named Area on the top-right.
- On the New Named Area window, select a registered domain from the Domain Name drop-down list and enter a name in the Name field. You can also register a domain by clicking Register a New Domain.
- Click Save.
- Under the admin section, enter the Unblu username.

- After you have updated the <config.json> file, install the dependencies by executing the command npm i.
- Run the integration setup by executing the command npm start.
Note: The webhook URL must be the same in API Extensions, <config.json> file, and the external messenger section (Endpoint URL of the respective messenger) of your Unblu account as mentioned above (The Botkit URL in API Extensions, app.url, and unblu.custom.external_messenger).
- The agent transfer is configured at the dialog level. You can open the dialog task, and open the agent transfer node to see that the configuration is saved.


