봇 관리자 또는 관리 사용자는 조직의 LDAP Active Directory와 동기화할 수 있도록 Kore.ai를 설정하여 회사의 사용자를 Kore.ai에 등록할 수 있습니다. 등록 > 디렉토리 동기화 페이지에서, 다음을 수행할 수 있습니다.

  • 클라우드 기반 에이전트를 사용하여 Active Directory(AD) 서버에 연결
  • 회사 Active Directory와 수동으로 동기화 시작
  • 기존 사용자 또는 그룹에 원치 않는 업데이트 방지에 사용되는 제외 규칙 생성
  • Active Directory에서 가져올 배포 목록 정의
  • Active Directory에서 가져올 조직 단위 정의
  • 동기화를 위한 자동화된 일정 설정.

Kore.ai는 이름, 부서, 직함, 전화번호, 위치 및 조직의 사용자 상태와 같은 사용자 프로필 데이터를 포함하는 조직의 구성원 정보와 일치시키기 위해 LDAP Active Directory와 동기화할 수 있습니다. Kore.ai 사용자가 회사를 그만두고 Active Directory에서 비활성화된 경우, Kore.ai는 다음에 예정된 Active Directory 동기화 중에 자동으로 Kore.ai 계정을 비활성화할 수 있습니다. 동기화 중에는 회사의 Active Directory가 수정되지 않습니다.

참고 사항: 버전 8.1 이후, AD 동기화용 Kore.ai 디렉토리 에이전트의 지원이 중단되었습니다. 이 문서에 자세히 설명된 클라우드 커넥터 옵션을 사용하거나, 사용자 동기화 시 공개 API를 사용할 수 있습니다. 자세한 내용은 여기를 클릭하세요.

필수 구성 요소 Active Directory 동기화를 설정하려면, 다음이 필요합니다.

  1. LDAP 서버에서 작업을 읽고 실행할 수 있는 관리자 권한 보유.
  2. LDAP 질의 및 LDAP 서버 관리 숙지.
  3. Microsoft Active Directory LDAP 서버 보유.

Kore.ai는 Active Directory에 대한 접근을 설정하고 회사에 맞게 동기화 프로세스를 설정하는 과정을 안내하는 마법사 기반 접근 방식을 제공합니다. 구성원 및 필요한 경우 배포 목록과 조직 단위에 대한 동기화를 정의할 수 있습니다.

구성

클라우드 기반 커넥터를 사용하여 Active Directory를 설정하려면, 봇 관리자 콘솔에 로그인하고 회사 Active Directory 동기화에 필요한 구성 설정에 접근하려면 다음 단계를 완료해야 합니다.

  1. 등록 모듈의 디렉토리 동기화 페이지에서, 클라우드 기반 커넥터를 선택합니다.
  2. 설정 섹션에서, 설정을 클릭합니다.
  3. 회사 디렉토리와 동기화 설정 대화 상자가 표시됩니다. 여기에 주어진 단계를 따라 진행합니다.

AD 동기화 설정

동기화 설정을 정의하려면 다음 절차의 단계를 완료합니다. 동기화 설정을 이미 정의한 경우, 설정을 수정하고 동기화를 수동으로 시작할 수 있습니다.

참고 사항: 7.3 이전 버전의 플랫폼에 구축된 봇을 사용하는 경우, 업그레이드 또는 설정을 위한 옵션이 제공됩니다. 업그레이드 없이 설정을 진행하면 설정 단계의 다음 옵션을 사용할 수 없습니다. -AD 하위 그룹 또는 옵션에 접근하여 AD의 OU에 대한 Kore.ai 내에 그룹을 생성 -AD 서버의 수신 페이로드에서 올바른 키에 매핑하여 사용자 데이터에 사용자 정의 필드 추가 – 포함 규칙 지정. 또한, 이전 버전은 향후 릴리스에서 더 이상 사용되지 않습니다.

다음 절차에서는, 클라우드 기반 연결 설정 대화 상자를 설명합니다.

  1. 연결 탭에서, 다음 필드를 정의합니다. EnrollmentDirectorySyncConfigTab
  1. 호스트 이름 – 도메인 호스트의 이름입니다. 예: MyCompany.com 또는 10.12.6.151.
  2. 서버 포트 – 도메인 호스트의 포트 번호입니다. 예: 10042.
  3. 기본 DN – 도메인에서 사용자 및 그룹의 서버 위치입니다. 예: dc=kore,dc=com.
  4. 사용자 ID – 도메인 컨트롤러에 연결하기 위한 인증용 사용자 이름입니다.
  5. 암호 – 도메인 컨트롤러에 연결하기 위한 인증용 사용자 암호입니다.
  6. SSL – HTTPS를 위해 SSL을 활성화하려면 선택합니다.
  7. 연결 테스트 – 인증 및 호스트 구성 설정을 테스트하려면 클릭합니다.
  8. 계속하려면 저장 및 다음을 클릭합니다.
  • 선택적으로, 조직 단위 탭에서, 회사 디렉토리에서 가져올 필요가 있는 조직 단위를 정의할 수 있습니다. 선택한 OU의 그룹과 하위 그룹이 플랫폼에 동기화되고 AD 서버에 있는 그룹의 계층이 플랫폼에 유지됩니다.
    1.  다음을 선택할 수 있습니다
      • 모든 조직 단위 가져오기,
      • 어떤 단위도 가져오지 않음 또는
      • 특정 단위 가져오기.
    2. . 계속하려면 저장 및 다음을 클릭합니다.
  • 선택적으로, 배포 목록 탭에서, Active Directory에서 배포 목록 가져오기를 선택할 수 있습니다.
  • 사용자 탭에서, 회사 디렉토리에서 가져오기가 필요한 원하는 사용자 속성(프로필 필드)을 정의할 수 있습니다. 가져오기 기준, 포함 규칙 및 제외 규칙을 설정하여 조직에서 가져오려는 정보를 제어할 수 있습니다.
    1. 사용자 속성 자식 탭에서 사용자 프로필 정보를 가져올 수 있습니다
      • 관련 LDAP 속성에 대하여 Kore.ai 사용자 프로필 필드의 사전 정의된 기본 매핑 사용 또는
      • 고객 속성 이름 및 값을 사용하여 고유한 사용자 정의 매핑 생성을 생성합니다.
    2. 포함 규칙에서, 프로필 매개변수를 사용하여 동기화 조건 또는 필터를 정의하여 AD 서버에서 사용자 선택을 동기화할 수 있습니다. LDAP 필터 구문을 사용하여 규칙을 작성할 수 있습니다. 자세한 내용은 여기를 참조.
    3. 제외 규칙 자식 탭에서, 기본 사용자 및 사용자 정의 사용자 데이터에 대한 수신 사용자 레코드를 제한하는 규칙을 생성할 수 있습니다.
  • 선택적으로, Kore.ai 제외 탭에서, 동기화 제외 항목을 설정하여 Active Directory가 특정 사용자(기본 사용자 및 사용자 정의 사용자), 배포 목록 또는 조직 그룹을 대체하지 못하도록 할 수 있습니다.
  • 예약 탭에서, 다음 그림과 같이 Active Directory와의 동기화 예약을 활성화하고 정의합니다. botsadminenrollmentdirectorysyncscheduletab
    1. 동기화 활성화 – 동기화 예약을 활성화하거나 비활성화하려면 클릭합니다.
    2. 동기화 빈도 – 다음 중 하나를 선택합니다.
      • 매일 – 일일 동기화를 시작할 동기화 시작 날짜 및 시간을 지정합니다.
      • 매주 – 동기화할 요일 및 매주 동기화를 시작할 동기화 시작 날짜 및 시간을 지정합니다.
      • 매월 – 동기화할 월의 요일과 매월 동기화를 시작할 동기화 시작 날짜 및 시간을 지정합니다.
      • 기타 – 동기화할  또는 의 수와 동기화를 시작할 동기화 시작 날짜 및 시간을 지정합니다.
  • 저장을 클릭하여 동기화 설정을 저장하고 회사 디렉토리와 동기화 설정 대화 상자를 닫습니다.

Active Directory 동기화 결과를 보려면, 여기를 참조하세요. 삭제된 사용자 관련 중요 사항:

  • AD 서버에서 삭제되거나 삭제된 것으로 표시된 사용자는 봇 플랫폼에서도 삭제되며 AD 동기화 과정 중에 사용자 목록에서 사용할 수 없습니다
  • 사용자 레코드는 상호 참조 및 감사 목적으로 데이터베이스에 유지됩니다
  • 이러한 사용자의 모든 로그인 시도는 시스템에 의해 차단됩니다
  • 삭제는 사용자가 속한 특정 계정에 대해 수행됩니다. 즉, 사용자가 여러 계정의 일부인 경우, 사용자는 여전히 활성 상태에 있는 다른 계정에 접근할 수 있습니다.
  • 다음 사용자는 계정에서 삭제할 수 없습니다
    • 사용자는 하나 이상의 봇 소유자입니다
    • 사용자는 계정 소유자입니다

    이러한 사용자는 AD 동기화 과정 중에 계정에서 삭제되지 않습니다. AD 동기화 로그에는 이러한 이유와 함께 삭제할 수 없는 사용자 목록이 포함됩니다.

수동 동기화

예약된 동기화 간에 많은 변경 사항이 있을 때 업데이트를 위해 Active Directory와 수동으로 동기화를 시작해야 할 수 있습니다. 이 절차를 완료하려면, 계정에 이미 동기화 설정이 정의되어 있어야 합니다. Active Directory 동기화 설정 접근 방법은 사용 중인 커넥터 유형에 따라 다릅니다. Kore.ai Active Directory 설정 대화 상자에 접근하려면 다음 절차 중 하나를 완료합니다. 클라우드 기반 커넥터를 사용한 Active Directory 수동 동기화 방법

  • 등록 > 디렉토리 동기화 페이지의 현재 설정 섹션에서, 다음 그림과 같이 지금 실행을 클릭합니다. 디렉토리 동기화 수동 시작

디렉토리 동기화가 진행 중 메시지가 페이지의 상단에 표시됩니다.

보고서 보기

계정에 Active Directory 동기화를 설정하고 실행한 후, 동기화 결과를 검토해야 합니다. 이 항목에서는 현재 Active Directory 동기화에 대한 보고서에 접근하고 확인하는 방법을 설명합니다. Active Directory 동기화 실행의 마지막 실행 결과 접근 방법은 사용 중인 커넥터 유형에 따라 다릅니다. Kore.ai Active Directory 동기화의 마지막 실행 결과에 접근하려면 다음 절차 중 하나를 완료합니다. 클라우드 기반 커넥터를 사용하여 Active Directory 동기화의 마지막 실행 보고서를 보는 방법

  • 봇 관리자 콘솔 등록 모듈의 디렉토리 동기화 페이지에서, 다음 그림과 같이 여기를 클릭합니다. 최신 동기화 보고서 - 클라우드 커넥터

마지막 실행 보고서 보기

Active Directory 동기화 보고서 대화 상자가 다음 그림과 같이 표시됩니다. 보고서 보기

기록 보기

모든 과거 Active Directory 동기화 작업을 해당 동기화 결과와 함께 검토할 수 있습니다. 이 항목에서는 보고서 접근 방법과 동기화에 대한 세부 정보를 검색하는 방법을 설명합니다. Active Directory 동기화 실행의 기록에 접근하는 방법은 사용 중인 커넥터 유형에 따라 다릅니다. Kore.ai Active Directory 동기화의 기록 결과에 접근하려면 다음 절차 중 하나를 완료합니다. 클라우드 기반 커넥터를 사용하여 Active Directory 동기화의 과거 보고서를 보는 방법

  • 봇 관리자 콘솔 등록 모듈의 디렉토리 동기화 페이지에 있는 현재 설정 섹션에서, 다음 그림과 같이 동기화 기록을 클릭합니다. 클라우드 커넥터 디렉토리 동기화 결과

보고서 보기

Active Directory 동기화 실행의 기록 대화 상자에서, 가져오기의 결과를 보려면, 확인하려는 가져오기의 보고서 열에서, 동기화 결과를 클릭합니다. 디렉토리 동기화 결과 대화 상자

ボット管理者または管理者ユーザーとして、会社のユーザーをKore.aiに登録するために、組織のLDAP Active Directoryと同期するようにKore.aiを構成できます。登録>ディレクトリ同期ページで、次の操作を実行できます。

  • クラウドベースのエージェントを使用して、自社のActive Directory(AD)サーバーに接続します
  • 自社のActive Directoryとマニュアル同期を開始します
  • 既存のユーザーまたはグループへの不要な更新を防ぐために使用される除外ルールを作成します
  • Active Directoryからインポートする配布リストを定義します
  • Active Directoryからインポートする組織単位を定義します
  • 同期の自動スケジュールを設定します。

Kore.aiは、LDAP Active Directoryと同期して、組織のメンバー情報を照合し、たとえば、名前、部門、役職、電話番号、場所、組織内のユーザーステータスなどのユーザープロファイルデータを含めることができます。Kore.aiユーザーが会社を辞め、Active Directoryで非アクティブ化された場合、Kore.aiは次にスケジュールされたActive Directory同期中にKore.aiアカウントを自動的に更新し非アクティブ化できます。同期中に会社のActive Directoryが変更されることはありません。

メモ:v8.1以降、AD Sync用のKore.aiディレクトリエージェントのサポートは終了しました。このドキュメントで詳細に説明されているクラウドコネクタオプションを使用するか、パブリックAPIを使用してユーザーを同期できます。詳細については、ここをクリックしてください

必要条件 Active Directory同期を構成するには、次が必要です:

  1. LDAPサーバーでアクションを読み取って実行するための管理アクセス権を持っている。
  2. LDAPクエリとLDAPサーバー管理に精通している。
  3. Microsoft Active Directory LDAPサーバーを持っている。

Kore.aiはActive Directoryへのアクセスを設定し、会社用にカスタマイズされた同期プロセスを構成するための、プロセスを通したウィザードベースのアプローチを提供します。メンバー、および必要に応じて配布リストと組織単位の同期を定義できます。

設定

クラウドベースのコネクタを使用してActive Directoryを構成するには、ボット管理コンソールにログオンし、次の手順を実行して、会社のActive Directory同期の構成設定にアクセスする必要があります。

  1. 登録モジュールのディレクトリ同期ページで、クラウドベースのコネクタを選択します。
  2. 構成セクションで、構成をクリックします。
  3. 会社のディレクトリとの同期の構成ダイアログが表示されます。ここに記載されているステップに従って続行してください。

AD同期の構成

次の手順のステップを実行して、同期設定を定義します。既に同期設定を定義している場合は、設定を変更して手動同期を開始できます。

メモ:v7.3より前のプラットフォームで構築されたボットを使用している場合は、アップグレードまたは構成するオプションがあります。アップグレードせずに構成に進むと、構成手順の次のオプションは使用できなくなります:―ADサブグループへのアクセスまたはADのOU用にKore.ai内にグループを作成するオプション。―ADサーバーの着信ペイロードから適切なキーにマッピングすることにより、ユーザーデータにカスタムフィールドを追加する;―包含ルールを指定する。また、古いバージョンは今後のリリースで非推奨になります。

次の手順では、クラウドベースの接続設定ダイアログについて説明します。

  1. 接続タブで、次のフィールドを定義します。 EnrollmentDirectorySyncConfigTab
  1. ホスト名―ドメインホストの名前、たとえばMyCompany.com10.12.6.151
  2. サーバーポート―ドメインホストのポート番号、たとえば10042
  3. ベースDN―ドメイン内のユーザーとグループのサーバーの位置、たとえばdc=kore,dc=com
  4. ユーザーID―認証のためユーザーがドメインコントローラーに接続するユーザー名。
  5. パスワード―認証のためユーザーがドメインコントローラーに接続するパスワード。
  6. SSL―HTTPSのSSLを有効にする場合に選択します。
  7. 接続のテスト―クリックして、認証とホスト構成の設定をテストします。
  8. 保存して次へをクリックして続行します。
  • オプションの組織ユニットタブで、会社のディレクトリからインポートする必要のある組織ユニットを定義できます。選択したOUのグループとサブグループはプラットフォームに同期され、ADサーバーに存在するグループの階層はプラットフォームで維持されます。
    1. 次を選ぶことができます。
      • すべての組織ユニットをインポート
      • ユニットはインポートしない
      • 特定のユニットをインポートする
    2. .保存して次へをクリックして続行します。
  • オプションで、配布リストタブで、Active Directoryから配布リストをインポートするを選択できます。
  • ユーザータブで、自社のディレクトリからインポートする必要のある希望のユーザー属性(プロファイルフィールド)を定義します。インポート基準、包含ルール、および除外ルールを設定して、自分の組織からインポートする情報を制御できます。
    1. ユーザー属性チャイルドタブで、ユーザープロファイル情報をインポートできます
      • Kore.aiユーザープロファイルフィールドの関連するLDAP属性へ事前定義されたデフォルトマッピングを使用する、または
      • 顧客属性の名前と値を使用して、独自のカスタムマッピングを作成します。
    2. 包含ルールでは、プロファイルパラメーターを用いて同期条件またはフィルターを定義することで、ADサーバーから選択したユーザーを同期できます。  LDAPフィルター構文を使用してルールを記述できます。詳細については、ここを参照してください
    3. 除外ルールのチャイルドタブで、ユーザー(デフォルトおよびカスタム)データの受信するユーザーレコードを制限するルールを作成できます。
  • オプションで、Kore.aiの除外タブで同期の除外を定義して、Active Directoryが特定のユーザー(デフォルトおよびカスタム)、配布リスト、または組織グループを置き換えないようにすることができます。
  • 次のイラストに示すように、スケジュールタブで、Active Directoryとの同期スケジュールを有効にして定義します。 botsadminenrollmentdirectorysyncscheduletab
    1. 同期を有効にする―クリックして、同期スケジュールを有効または無効にします。
    2. 同期頻度―次のいずれかを選択します:
      • 毎日同期の開始日時を指定して、毎日の同期を開始します。
      • 毎週―毎週の同期を開始する曜日と、毎週の同期の開始日時を指定します。
      • 毎月―毎月の同期を開始する日と、毎月の同期の開始日時を指定します。
      • その他―同期する日数または週数と、同期の開始日時を指定します。
  • 保存をクリックして同期設定を保存し、会社のディレクトリとの同期の構成ダイアログを閉じます。

Active Directory同期の結果を表示したい場合は、こちらを参照してください。削除されたユーザーに関する注意:

  • ADサーバーで削除または削除済みとしてマークされたユーザーは、ボットプラットフォームからも削除され、AD同期プロセス中はユーザーのリストに表示されなくなります。
  • ユーザーレコードは、相互参照および監査の目的でデータベースに保持されます
  • そのようなユーザーによるログインの試みは、システムによってブロックされます
  • 削除はユーザーが属する特定のアカウントに対してのみ行われます。つまり、ユーザーが複数のアカウントの一部である場合、ユーザーはまだアクティブな状態にある他のアカウントにはアクセスできます。
  • 次のユーザーはアカウントから削除できません:
    • ユーザーが1つ以上のボットのボットオーナーの場合
    • ユーザーがアカウント所有者の場合

    このようなユーザーは、AD同期プロセス中にアカウントから削除されることはありません。AD Syncログには、削除できなかったユーザーのリストと理由が含まれます。

手動同期

スケジュールされた同期の間に多くの変更がある場合は、Active Directoryとの手動同期を開始して更新したい場合があります。この手順を完了するには、アカウントの同期設定をあらかじめ定義しておく必要があります。Active Directory同期構成にアクセスする方法は、使用しているコネクタの種類によって異なります。次のいずれかの手順を実行して、Kore.ai Active Directory構成ダイアログにアクセスします。クラウドベースのコネクタを使用してActive Directory同期を手動で開始する

  • 次のイラストに示すように、登録ディレクトリ同期ページの現在の設定セクションで、今すぐ実行をクリックします。 ディレクトリ同期を手動で開始

ディレクトリ同期が進行中というメッセージがページの上部に表示されます。

レポートを表示

アカウントのActive Directory同期を構成して実行した後、同期の結果をレビューする必要があります。このトピックでは、現在のActive Directory同期のレポートにアクセスして表示する方法について説明します。Active Directory同期実行の最新の実行結果にアクセスする方法は、使用しているコネクタの種類によって異なります。次のいずれかの手順を実行して、Kore.ai Active Directory同期の最新の実行結果にアクセスします。クラウドベースのコネクタを使用してActive Directory同期の最終実行レポートを表示する

  • 次のイラストに示すように、ボット管理コンソールの登録モジュールのディレクトリ同期ページで、ここをクリックします。 最新の同期レポート―クラウドコネクタ

最新の実行レポートを表示

次のイラストのようにActive Directory同期に関するレポートダイアログが表示されます。 レポートを表示

履歴を表示

過去のすべてのアクティブディレクトリ同期オペレーションを、その同期結果とともにレビューできます。このトピックでは、レポートにアクセスする方法と、同期に関する詳細を取得する方法について説明します。Active Directory同期実行の履歴にアクセスする方法は、使用しているコネクタの種類によって異なります。次のいずれかの手順を実行して、Kore.ai Active Directory同期の履歴にアクセスします。クラウドベースのコネクタを使用してActive Directory同期の履歴レポートを表示する

  • 次のイラストに示すように、登録モジュールのディレクトリ同期ページの現在の設定セクションで、同期履歴をクリックします。 クラウドコネクタディレクトリの同期結果

レポートを表示

Active Directory同期実行の履歴ダイアログで、インポートの結果を表示するには、表示するインポートのレポート列で、同期結果.をクリックします。 ディレクトリ同期結果ダイアログ

As a Bots Admin or admin user, you can configure Kore.ai to synchronize with your organizational LDAP Active Directory to enroll users from your company into Kore.ai. On the Enrollment > Directory sync page, you can do the following:

  • Use a cloud-based agent to connect to your Active Directory (AD) server
  • Manually start synchronization with your company Active Directory
  • Create exclusion rules used to prevent unwanted updates to existing users or groups
  • Define distribution lists to import from Active Directory
  • Define organizational units to import from Active Directory
  • Set up an automated schedule for synchronization.

Kore.ai can synchronize with your LDAP Active Directory to match the member information from your organization to include, for example, user profile data such as name, department, title, telephone number, location, and user status in the organization.
If a Kore.ai user leaves your company and is deactivated in Active Directory, Kore.ai can automatically deactivate the Kore.ai account during the next scheduled Active Directory synchronization. Your company’s Active Directory is never modified during synchronization.

Note: Post v8.1, the support for Kore.ai Directory Agent for AD Sync has been discontinued. You can use the Cloud Connector option discussed in detail in this document or use the public APIs for synchronizing your users, click here for details.

Prerequisites

To configure Active Directory synchronization, you must:

  1. Have administrative access for reading and executing actions on your LDAP server.
  2. Familiarity with LDAP queries and LDAP server administration.
  3. Have a Microsoft Active Directory LDAP Server.

Kore.ai offers a wizard-based approach that will take you through the process to set up access to an Active Directory and configure the synchronization process customized for your company. You can define synchronization for members, and if needed, distribution lists and organizational units.

Configuration

To configure Active Directory using the cloud-based connector, you must log on to the Bots Admin Console, and complete the following steps to access the configuration settings for your company Active Directory sync.

  1. In the Enrollment module, on the Directory Sync page, select Cloud-Based Connector.
  2. From the Configure section, click Configure.
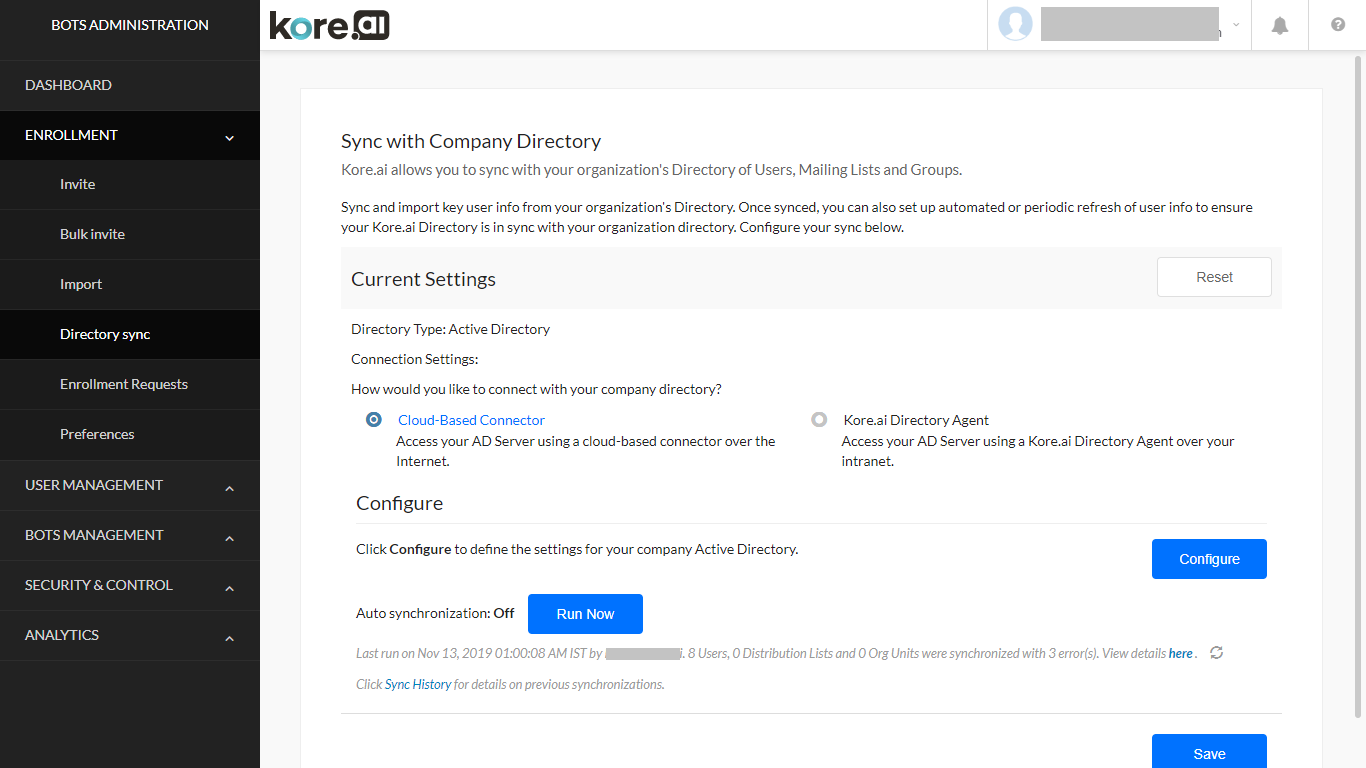
  3. The Configure Synchronization with your Company Directory dialog is displayed. Follow the steps given here to proceed.

AD Sync Configuration

Complete the steps in the following procedure to define the synchronization settings. If you have already defined your synchronization settings, you can modify the settings and initiate a manual sync.

NOTE: If you are using a bot built on the platform from before v7.3, you will have an option to Upgrade or Configure. If you proceed to Configure without Upgrade the following options from the configuration steps will not be available:
-access to AD sub-Groups or option to create a group within Kore.ai for the OUs in AD;
-add custom fields to the user data by mapping it to the right key from the AD server incoming payload;
– specify the inclusion rules.
Also, the older version would be deprecated in the upcoming releases.

In the following procedure, the cloud-based connection settings dialogs are described.

  1. On the Connection tab, define the following fields:
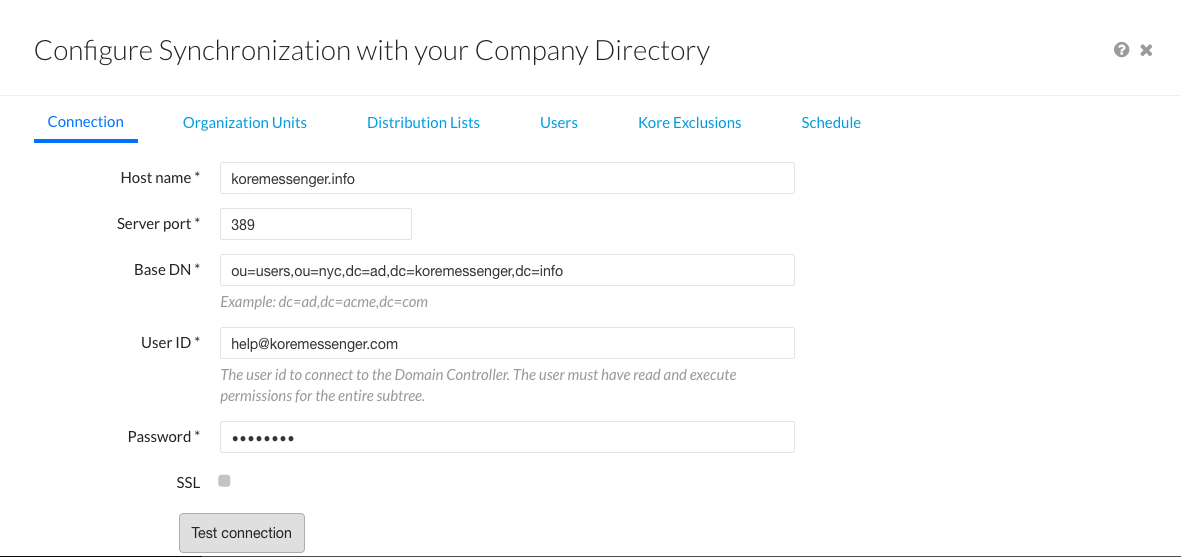
    EnrollmentDirectorySyncConfigTab
  1. Host Name – The name of the domain host, for example, MyCompany.com or 10.12.6.151.
  2. Server Port – The port number for the domain host, for example, 10042.
  3. Base DN – The server location for users and groups in a domain, for example, dc=kore,dc=com.
  4. User ID – The username for authentication to connect to the domain controller.
  5. Password – The password for authentication to connect to the domain controller.
  6. SSL – Select to enable SSL for HTTPS.
  7. Test Connection – Click to test the authentication and Host configuration settings.
  8. Click Save and next to continue.
  • Optionally, on the Organizational Units tab, you can define the Org Units that need to be imported from your company directory. Groups and sub-groups from the selected OU will be synchronized into the platform and the hierarchy of groups as present in the AD Server will be maintained in the platform.
    1.  You can choose to
      • Import all Organization Units,
      • Not Import any unit, or
      • Import specific units.
    2. . Click Save and next to continue.
  • Optionally, on the Distribution Lists tab, you can select to Import Distribution Lists from Active Directory.
  • On the Users tab, you can define the desired User Attributes (profile fields) that need to be imported from your company directory. You can set import criteria, inclusion rules, and exclusion rules to control the information that you want to import from your organization.
    1. On the User Attributes child tab you can import the user profile information
      • using predefined Default mapping of Kore.ai user profile fields to relevant LDAP attributes or
      • create your own custom mapping with the Customer Attribute name and values.
    2. On the Inclusion Rules, you can sync select users from your AD Server by defining the sync criteria or filters using the profile parameters. You can write the rules using the LDAP filter syntax, refer here for more.
    3. On the Exclusion Rules child tab, you can create rules to limit incoming user records for the user (default and custom) data.
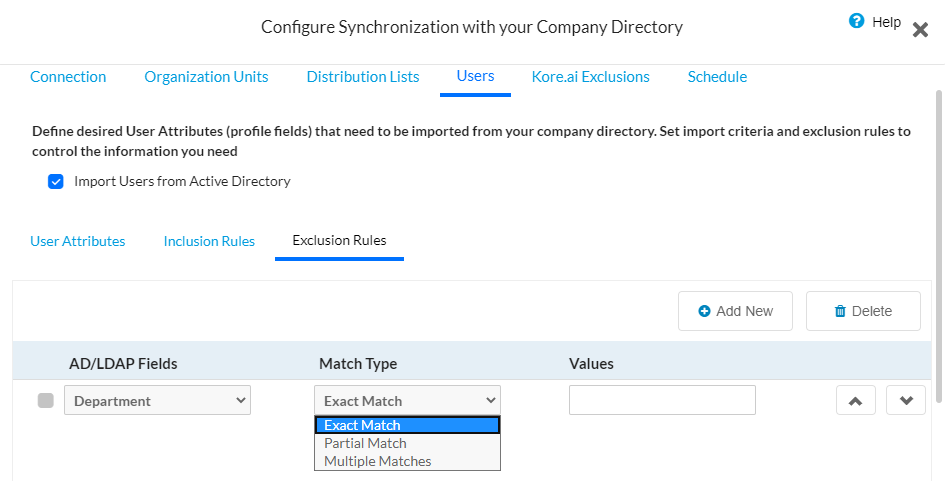
  • Optionally, on the Kore.ai Exclusions tab, you can define exclusions for synchronization to prevent Active Directory from replacing specific users (default and custom), distribution lists, or organizational groups.
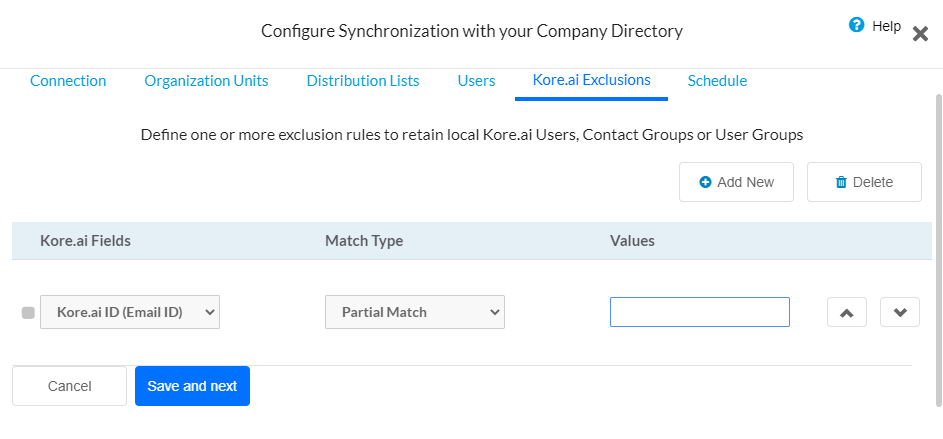
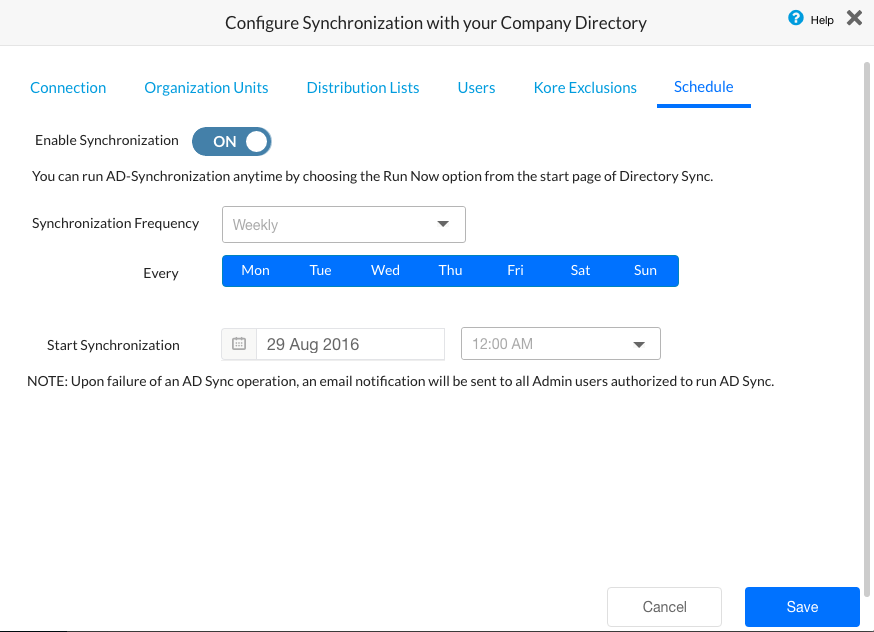
  • On the Schedule tab, enable and define the synchronization schedule with the Active Directory as shown in the following illustration.
    botsadminenrollmentdirectorysyncscheduletab

    1. Enable Synchronization – Click to enable or disable a synchronization schedule.
    2. Synchronization Frequency – Select one of:
      • Daily – Specify the Start Synchronization date and time to begin the daily sync.
      • Weekly – Specify the day of the week to synchronize and the Start Synchronization date and time to begin the weekly sync.
      • Monthly – Specify the day of the month to synchronize and the Start Synchronization date and time to begin the monthly sync.
      • Other – Specify the number of DAY(S) or WEEK(S) to synchronize and the Start Synchronization date and time to begin the sync.
  • Click Save to save the synchronization settings and close the Configure Synchronization with your Company Directory dialog.

You may want to view the results of Active Directory sync, see here.

Notes regarding deleted users:

  • Users who are deleted or marked as deleted in the AD Server will be deleted from the Bots Platform as well and will be not available in the list of users during AD sync process
  • The user record will be retained in the database for any cross-reference and audit purposes
  • Any login attempts by such users will be blocked by the system
  • Deletion would be against a specific Account to which the user belongs to i.e. if the user is part of multiple accounts, then the user will be able to access any other accounts in which the user is still an active state
  • The following user cannot be deleted from the account
    • User is Bot Owner for one or more bots
    • User is Account Owner

    Such users will not be deleted from the account during the AD Sync process. The AD Sync logs will contain the list of such users who could not be deleted along with the reason.

Manual Sync

You may want to initiate manual sync with your Active Directory to update when there are many changes between scheduled syncs.
To complete this procedure, you must have already defined synchronization settings for your account.

How you access the Active Directory Sync configuration depends which type of connector you are using. Complete one of the following procedures to access the Kore.ai Active Directory configuration dialog.

To manually start an Active Directory sync using the cloud-based connector

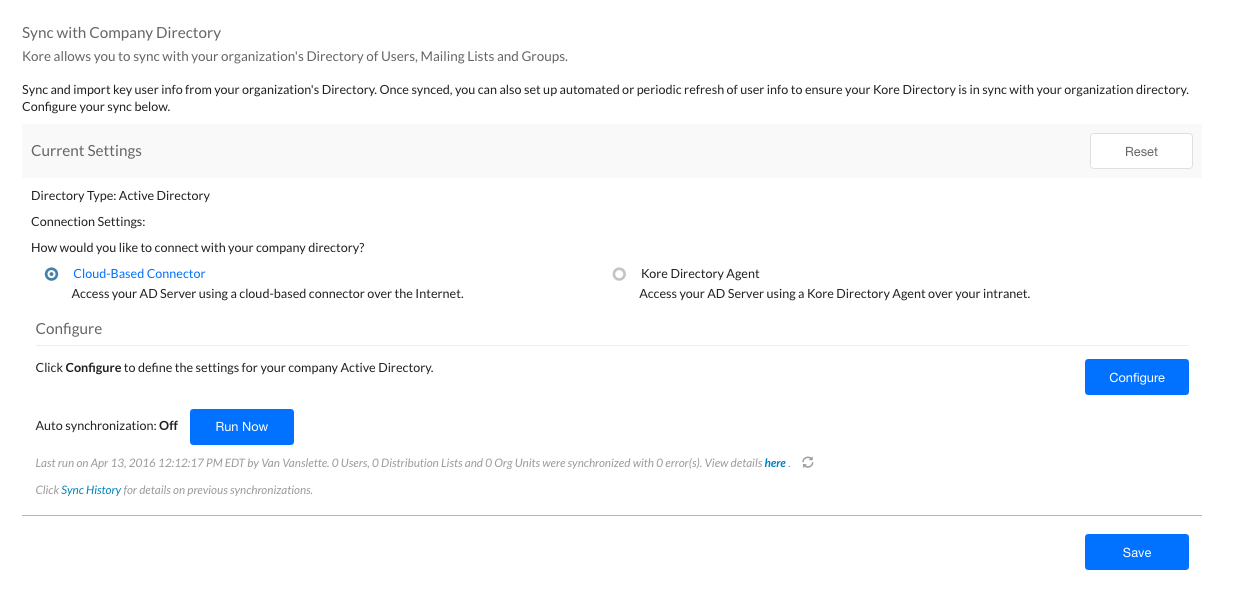
  • In the Enrollment > Directory Sync page, in the Current Settings section, click Run Now as shown in the following illustration.
    Manually Start a Directory Sync

The Directory Synchronization is in-progress message is displayed at the top of the page.

View Report

After you configure and run an Active Directory sync for your account, you should review the results of the sync. This topic describes how to access and view a report for the current Active Directory sync.

How you access the last run results for your Active Directory sync runs depends which type of connector you are using. Complete one of the following procedures to access the last run results for Kore.ai Active Directory sync.

To view the last run report for an Active Directory sync using the cloud-based connector

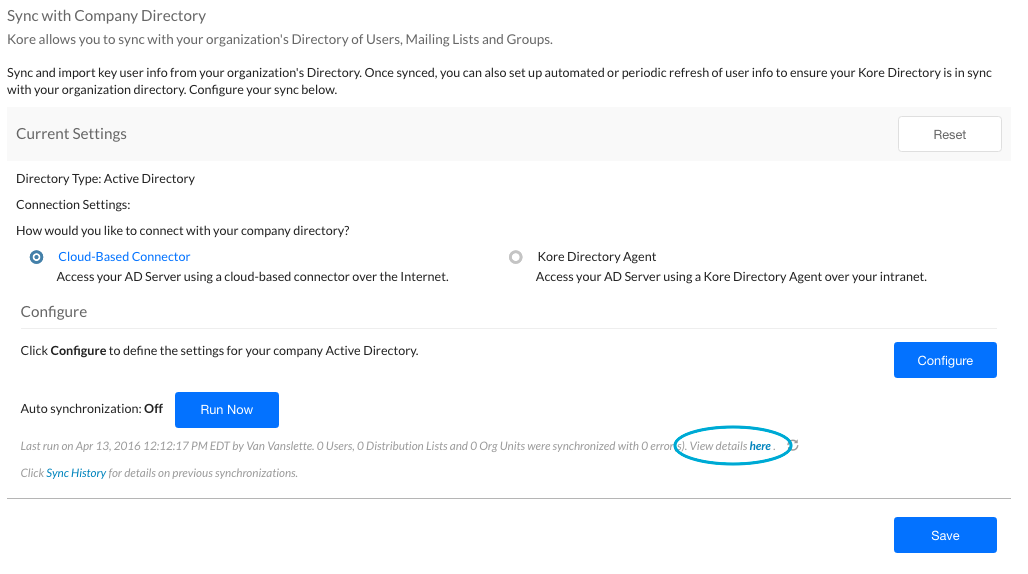
  • In the Bots Admin Console Enrollment module, on the Directory Sync page, click here as shown in the following illustration.
    Latest Sync Report - Cloud Connector

Viewing the Last Run Report

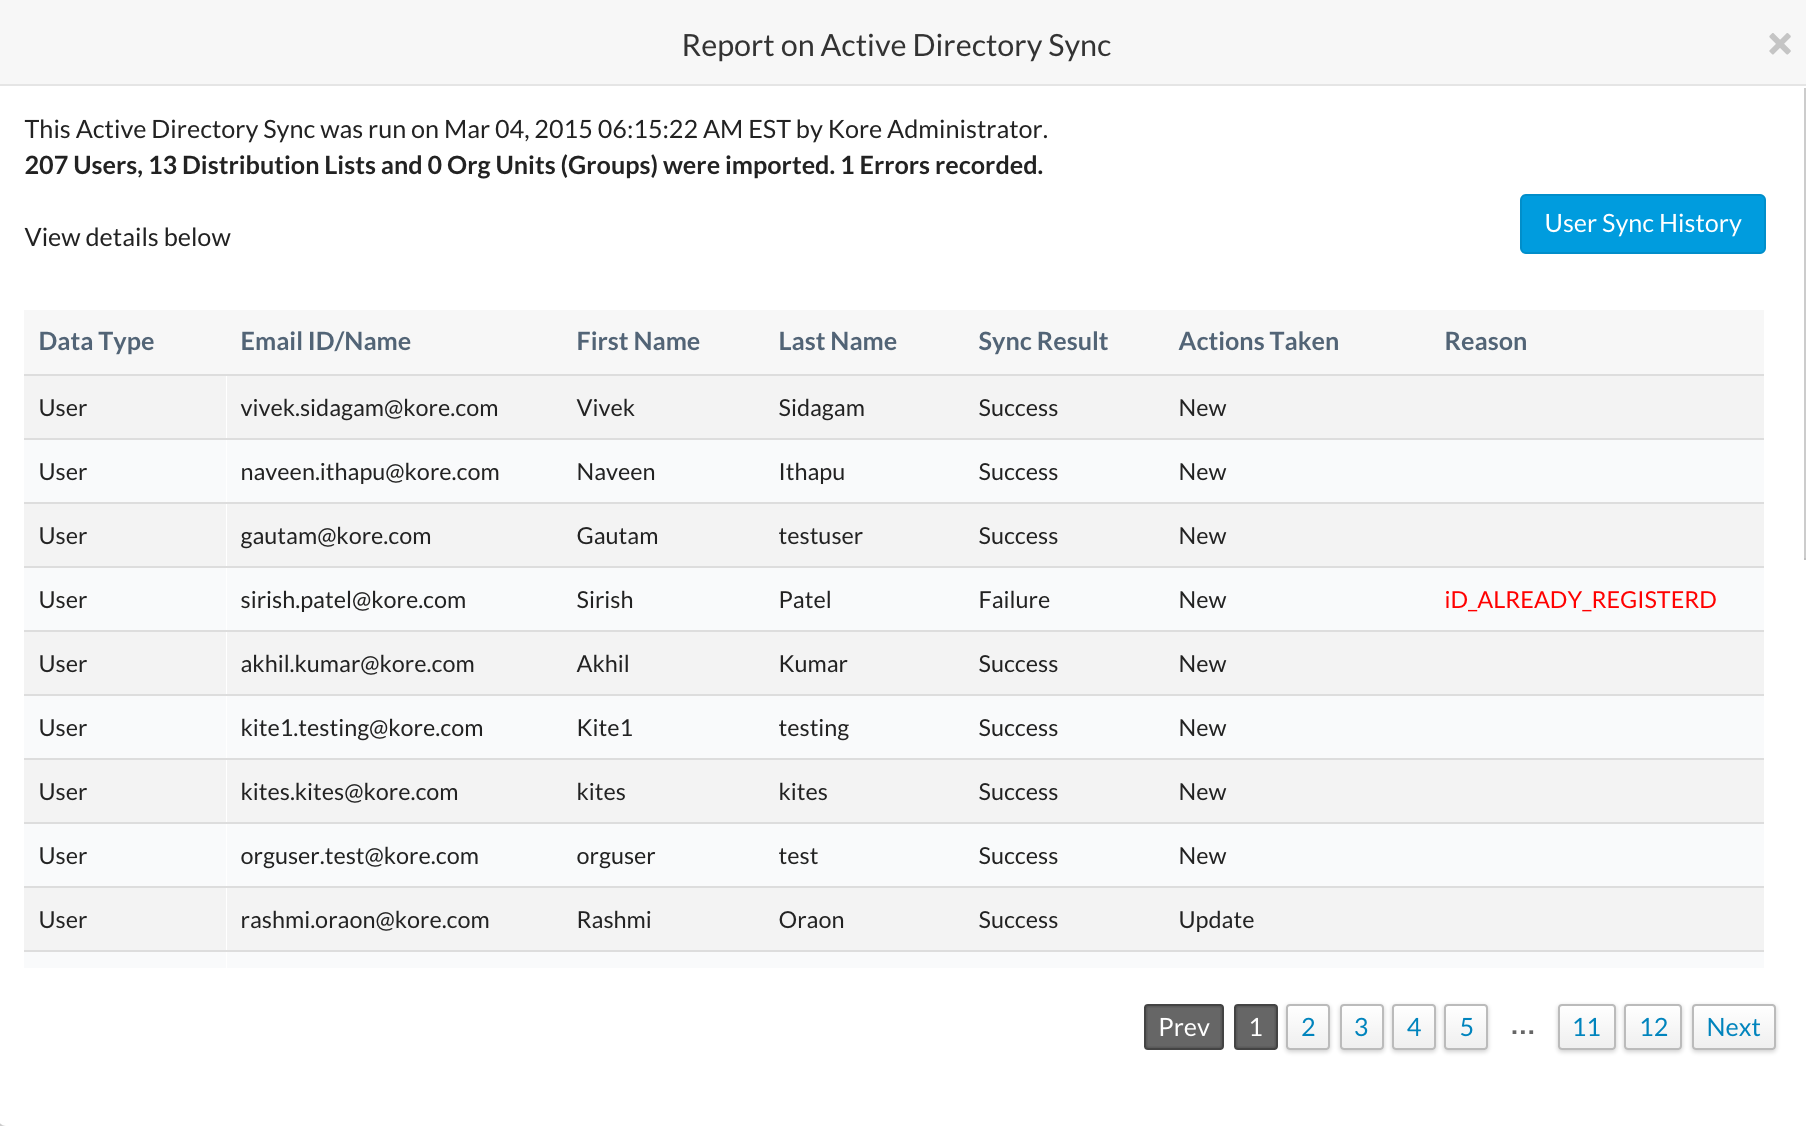
The Report on Active Directory Sync dialog is displayed as shown in the following illustration.
View Report

View History

You can review all historical Active Directory sync operations along with the results of that sync. This topic describes how to access the report and how to retrieve details about the synchronization.

How you access the history for your Active Directory sync runs depends which type of connector you are using. Complete one of the following procedures to access the history results for Kore.ai Active Directory sync.

To view historical reports for Active Directory sync using the cloud-based connector

  • In the Bots Admin Console Enrollment module, on the Directory Sync page, in the Current Settings section, click Sync History as shown in the following illustration.
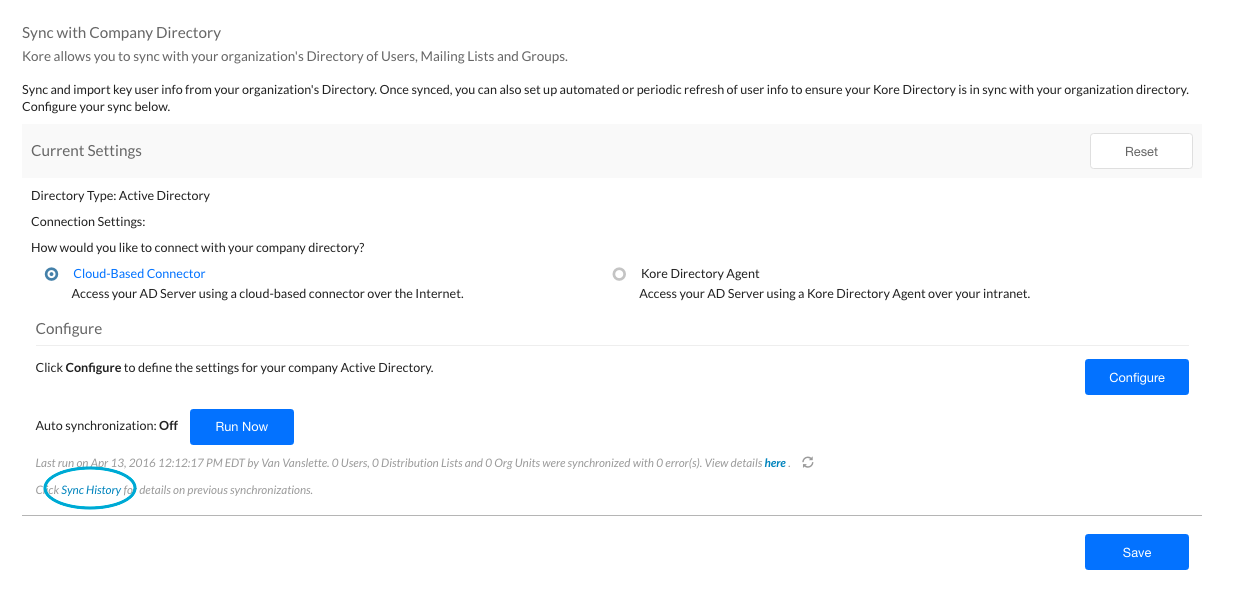
    Cloud Connector Directory Sync Results

Viewing a Report

In the History of Active Directory Synchronization Runs dialog, to view the results of an import, in the Report column for the import that you want to view, click Sync Results.
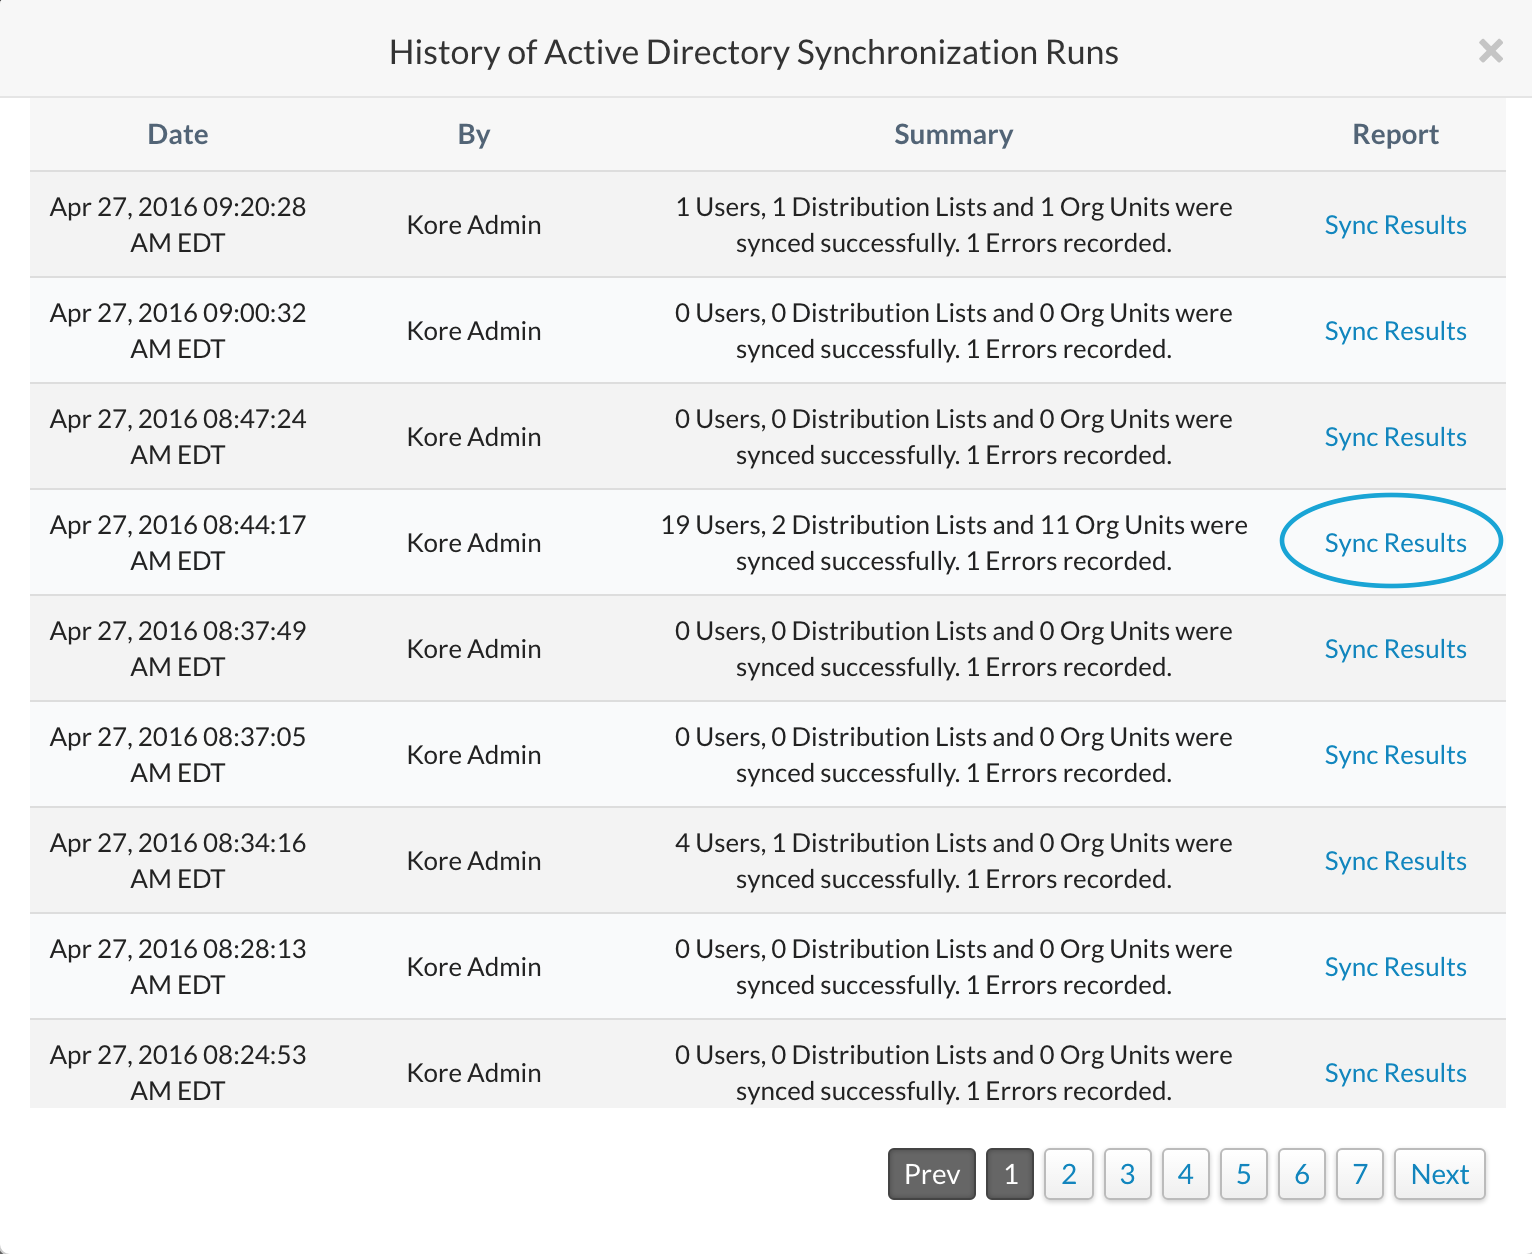
Directory Sync Results Dialog