リリース8.0.0以降、情報タスクはサポートされていません。この機能は今後のリリースでは廃止されます。これらのユースケースを構築するために、ダイアログタスクとデジタルフォームの使用をお勧めします。
情報タスク は、チャットボットがユーザーのためにデータを調べたり、レポートを引き出して使いやすい結果に戻してきたり、拡張されたデータの結果へのリンクを返したりするために使用されます。ユーザーは、配信される情報の具体的なパラメータやフィルター(結果の量など)を特定することができ、ボットは、受信者が簡単にスキャン、処理、再利用できる方法で情報を配信します。例として、エンドユーザーに検索結果、およびその結果を詳細に見るためのリンクを提供するショッピングボットがあるとしましょう。それには、それらのアイテムをショッピングカートのリストに追加する手段も付いています。検索結果を詳細に表示するためのリンクで、検索結果を表示するための情報タスクを定義することができ、さらに、リンクをクリックすると、エンドユーザーがショッピングカートに追加できるアイテムを示すWebページを表示することができます。次の図では、 リレーボットにはいくつかのタスクが定義されており、そのうちの1つは、検索結果にアイテムの表示リンクを表示するのに使用される情報タスクです。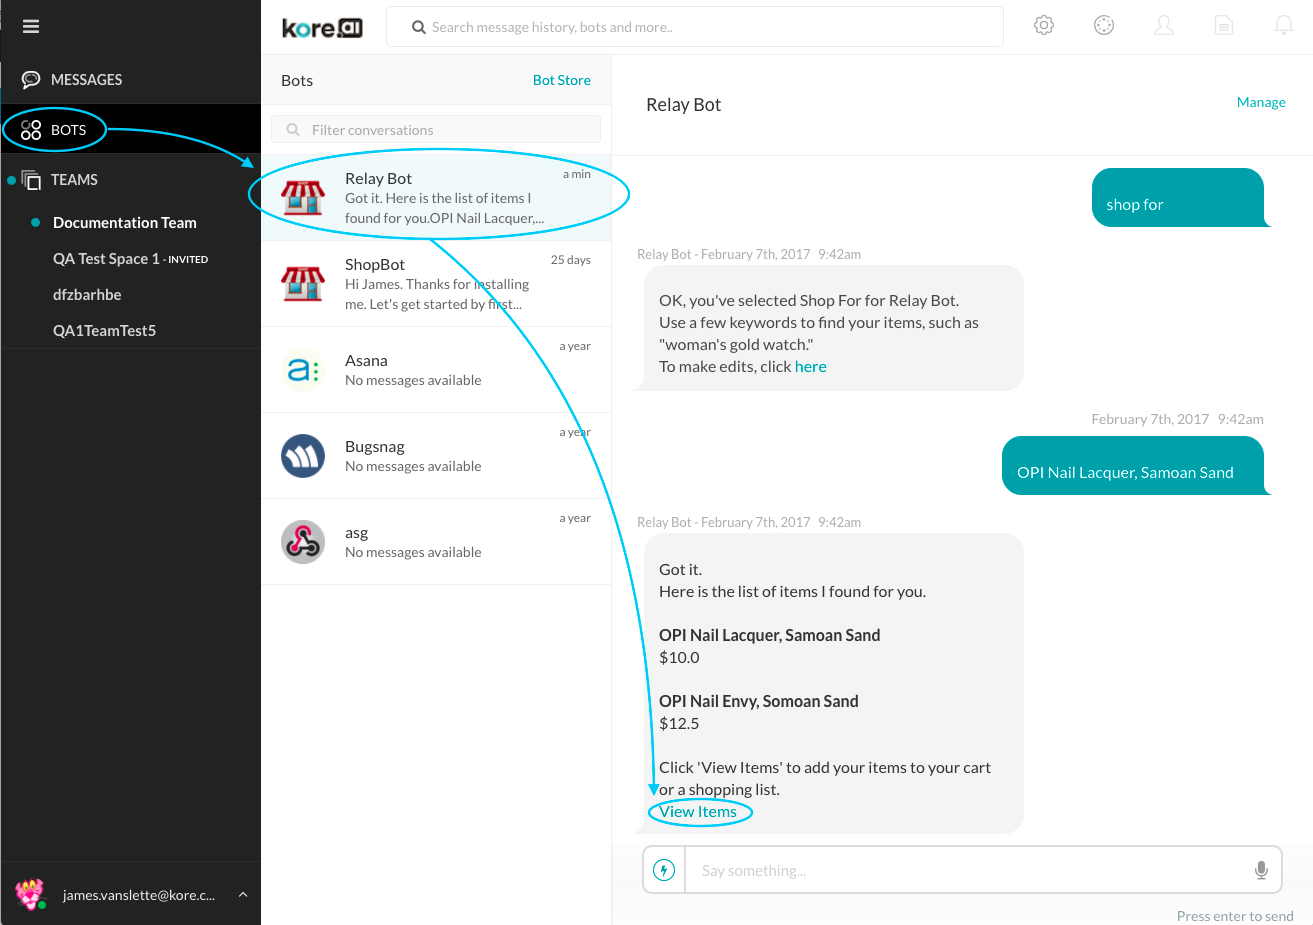 ユーザーがアイテムの表示をクリックすると、新しいタブに情報レポートが表示されます。それには、以下の図のようにショッピングカートに追加できる製品の詳細情報と選択可能な結果が記載されています。
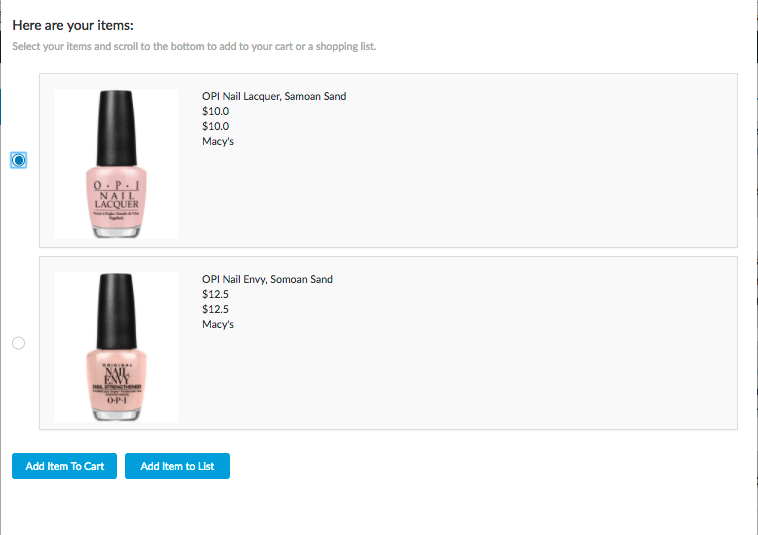
ボットビルダーでは、ボットレスポンスに関して以下のレポートタイプを定義できます。
-
- テーブルレポート – レポートは、可変幅の列があるテーブル形式で表示されます。
- 固定列のテーブルレポート – レポートは固定幅の列があるテーブル形式で表示されます。
- カードレイアウトレポート – レポートは、カードのリストとして、あるいは画像を含む可変フォーマットデータがあるテキストボックスとして表示されます。
- アクション付きカードレイアウトレポート – レポートは、カードのリスト、もしくは画像を含む可変フォーマット化データが入ったテキストボックスとして表示されます。さらに、カートに追加などのアクションタスクをレポートに関連付けるオプションも付いています。
- レポート別にグループ化されたカードレイアウト – レポートは、カードのリスト、もしくは日付、サイズ、位置などのパラメータキーでグループ化できる可変フォーマット化データが入ったテキストボックスとして表示されます。カードレポートには、画像のほかに、「カートに追加」などのアクションタスクをレポートに関連付けるオプションが含まれています。
- アクション付きショッピングカートレイアウトレポート – レポートは、ショッピングカートのリスト、または画像を含む可変フォーマット化データが入ったテキストボックスとして表示され、さらに カートに追加などのアクションタスクをレポートに関連付けるオプションも付いています。
- 天気情報レポート – このレポートは、日付、曜日、予報期間ごとに天気情報をシリアルデータ文字列で表示するために特別設計されています。
その他の例:
- 利用明細を提示する
- ロイヤリティポイントを表示する
- 人の情報を検索する
- 未払いアイテムの概要表示を手に入れる
- インベントリのリストを引き出す
- チームステータス情報を取得する
- 重要情報を更新する
処理
情報タスクの定義を完了するために必要な手順は、4つの基本ステップで構成されています。
ステップ 1:一般設定
第1ステップは、タスク名、接続モード、説明、さらに、NLP除外ワード、検索キーワード、エラーメッセージ、タスク確認メッセージ、マッピング制限などその他の高度な設定、およびKore.aiボットストアの設定など、タスクをエンドユーザーに表示する方法を定義することです。以下の手順で、情報タスクの一般的な設定を行います。
- 情報タスクを作成したいボットを開きます。
- ボットのサイドナビゲーションパネルをポイントし、ボットタスクをクリックします。
- ボットタスクのページで、情報タスクタブをポイントし、[プラス]アイコンをクリックします。
- タスクの名前を入力します。この名前は表示名を兼ねています。ボットストアでは、タスクの表示名を使用しています。必要に応じて表示名を変更することができます。情報タスクの作成ダイアログが開きます。
- タスクに必要な以下の情報を入力し、作成して続行をクリックします。

フィールド名 説明 タスク名 アプリケーションとエンドユーザーチャネルのあらゆる場所に表示されるタスクの名前。 表示名 Kore.aiボットマーケットプレースで表示されるタスクの名前。変更しない限り、タスク名と同じになります。 接続タイプ 情報タスクの接続タイプは常にWebサービスです。Webサービスは、エンドユーザーの資格情報を使用してポーリングするときに、Kore.aiにデータを送信します。この設定は、情報タスクのための読み取り専用です。 接続モード これは、Webサービスとしてのタスクの通信プロトコル接続タイプです。Webサービスは、エンドユーザーアカウントのログイン資格情報を使用してKore.aiからポーリングされると、Kore.aiにデータを送信します。 - REST – タスクはプロトコルに依存しないREST API接続を使用してメッセージを交換し、WebサービスのCRUD操作を処理します。
- SOAP – タスクは、メッセージ交換のためにXMLプロトコルに基づいてSOAP API接続を使用します。
詳細説明 情報タスクの長文の説明文です。
高度な設定
タスクの詳細設定を行うには、セクションを展開して関連する詳細を入力します。 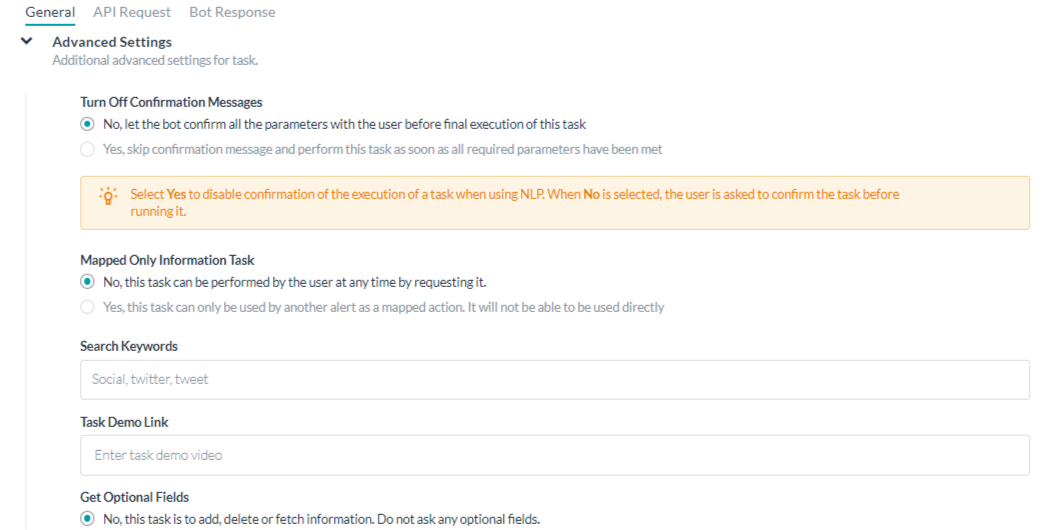
| フィールド名 | 説明 |
|---|---|
| 確認メッセージを無効にする | NLP の使用時にタスクの実行の確認を無効にするには、はいを選択します。 |
| マッピング済みのみのアクションタスク | フロー内の他のタスクからマッピングされた場合、このアクションタスクをエンドユーザーにのみ表示するように選択します。いいえを選択した場合、エンドユーザーが情報タスクを検索したときに、その情報タスクは表示されません。 |
| 検索キーワード | エンドユーザーがこのタスクをKore.aiボットストアで検索するために使用できる1つ以上の検索ワードを指定します。 |
| タスクのデモ リンク | www.youtube.com リンクを入力すると、ボットストアでタスク名の横に[デモ]アイコンが表示されます。以下の図は、タスクデモリンクによって定義されたボットタスクを示しています。  |
| WSDLファイルへアクセスするためには、認証が必要です(SOAPリクエストにのみ適用)。 | SOAPリクエストのWSDLにアクセスするためにWebサービスの認証が必要な場合は、はいを選択して認証を使用します。はいを選択すると、APIリクエストに定義された認証 がWSDLへのアクセスに使用されます。この設定は、タスクの接続モードがSOAPに設定されている場合にのみ有効です。 |
| オプションフィールドの取得 | はいを選択すると、エンドユーザーは利用可能なオプションパラメータのうち少なくとも1つを選択して入力する必要があります。 |
| 除外ワード | タスク名に除外するワードを1つ以上入力し、各ワードの後でEnterキーを押します。除外するワードのリストは、ユーザーの入力を解釈する前にボットプラットフォームによって処理されます。つまり、多くのタスクに当てはまるけれど、どのタスクかを特定するのには役立たないワードをフィルタリングすることによって、ボットはユーザー入力に素早く反応し、正しいタスクを提供することができるのです。例として、ユーザーが「今日の天気予報を手に入れたい」と入力したとします。ボットプラットフォームのインタプリターは、正しいアクションタスクをユーザーに返すために、天気、予報、今日という3つのワードを認識するだけでいいのです。残りのワードは除外していいのです。Kore.aiボットのインタプリターには、一般的な除外ワードがすでに定義されているので、私、あなた、欲しい、手に入れるなどの言葉を除外ワードとして定義する必要はありません。もし、たとえばあなたの会社名のように、あなたのボットが多くのあるいはすべてのタスクに同じワードを使っている場合、その会社名を除外するワードとして追加することができます。 |
| エラー メッセージ | ボット用のカスタムHTTPステータスコードおよびエラーメッセージを編集または追加します。詳細は、エラーメッセージのカスタマイズをご覧ください。 |
ステップ 2:認証の設定
タスクに必要な場合、基本認証、OAuth、API Keyなどの認証を定義します。ボットのアクションタスクによっては、アクションタスクを開始するために、ユーザーに対する認証方法を定義する必要があることもあります。例として、Twitter には、Webサービスを利用するアクションタスクがありますが、その際、エンドユーザーは、通常、ログインユーザー名とパスワードで認証を行い、Kore.aiはアクションタスクを実行する前にエンドユーザーのアカウントにアクセスしてデータを取得できるようになっています。認証プロファイルを定義するか、あるいは既存のものを利用することができます。すべての認証プロファイルは、タスクレベルで作成したものであれ、ボットレベルで作成したものであれ、すべてのボットタスクで使用することができます。
- タスクの認証の定義を始めるには、APIリクエストタブから 認証セクションの展開
 アイコンをクリックします。
 - このタスクを事前に認証を定義していた場合は、認証プロバイダドロップダウンリストで認証を選択することができます。
- タスクが認証を必要としない場合は、認証プロバイダとしてなしを選択することができます。
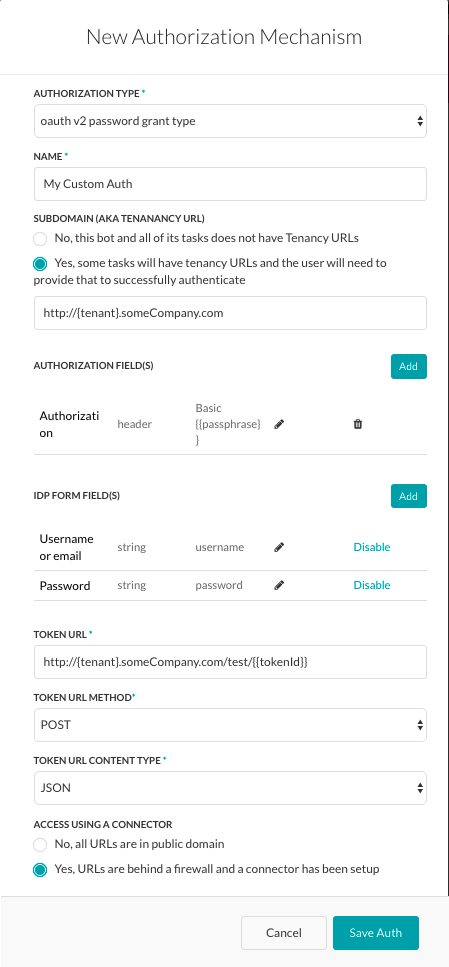
- 新しい認証プロバイダを定義するには、新規作成をクリックして、新しい認証メカニズムダイアログを表示します。
- ダイアログで、認証タイプのドロップダウンリストから、ボットが使用する認証タイプを選択します。認証タイプは次のいずれかを選択することができます。
- 基本認証 – ユーザー名とパスワードの情報を収集するための標準プロトコル。Kore.aiは、エンドユーザーの情報を保護するために、基本認証と組み合わせてSSL暗号を使用しています。設定の詳細は、以下のリンクをクリックします。以下の図は、タスクで基本認証を有効にするために定義する必要がある基本認証 フィールドの例です。
 基本認証を定義するには、認証タイプフィールドで基本認証 を選択します。次に、ボットビルダーのユーザーインターフェースに表示される認証の名前を特定します。
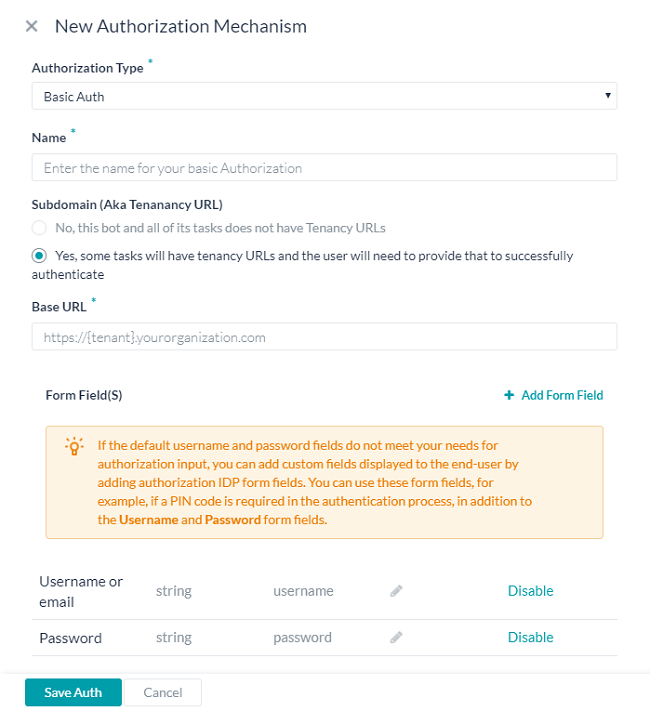
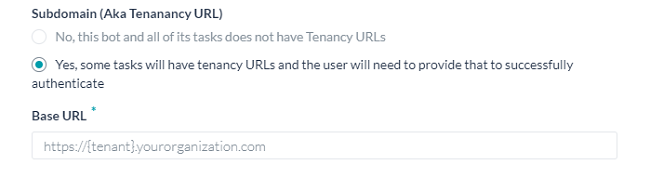
テナントの定義
必要に応じて、Webアプリケーションやユーザーインターフェースの基本URLにテナント名を使用する場合は、サブドメインセクションではいを選択します。例として、koreは、www.kore.someCompany.comとしてテナントを使用したWebサービスのテナント組織です。下記の設定の例では、テナンシーURLには{tenant}組織のプレースホルダーが含まれます。
[フォーム]フィールドの追加
デフォルトのユーザー名とパスワードのフィールドがニーズを満たしていない場合、認証フォームのフィールドを追加することで、エンドユーザーに表示される新しいフィールドを追加することができます。認証フォームにフィールドを追加するには + フォームフィールドの追加をクリックします。以下の図は、認証ダイアログへの[パスワード]フィールドを追加するための定義の一例です。
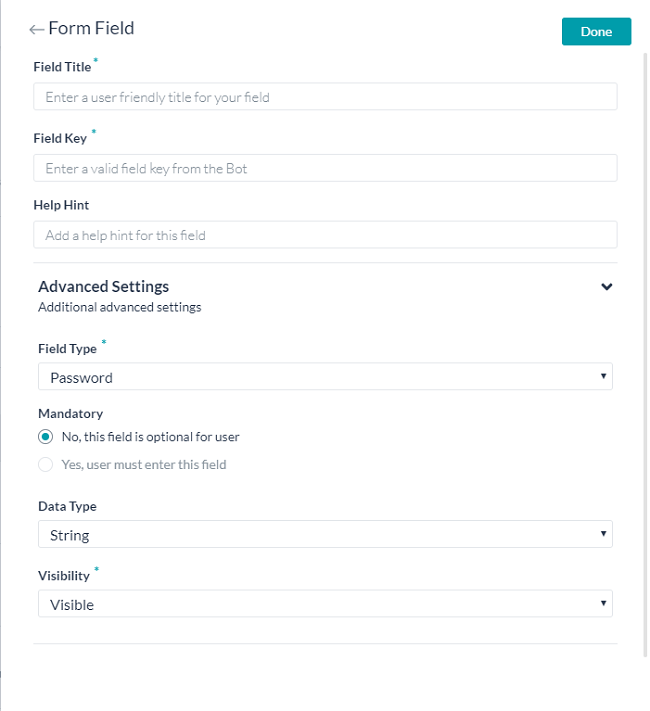 以下のテーブルでは、認証IDPフォームのフィールドを定義するために使用されるフィールドについて説明しています。
フィールド名 説明 フィールドタイトル 認証ダイアログで、エンドユーザーに表示されるフィールドの名前を指定します。 フィールドキー この値は認証サービスにエンドユーザーが入力する値を示します。 ヘルプのヒント フィールドに表示されるヘルプ文字はフィールドに入力すべきものを説明しています。 フィールドタイプ 高度なオプションを選択した場合、エンドユーザーインターフェイスに表示されるフィールドのタイプを指定して、フィールドキー値(以下のいずれか)として割り当てられたユーザー入力を収集します。 - テキストボックス
- パスワード
必須 高度なオプションを選択した場合、エンドユーザーはこのフィールドを定義して認証を完了しなければならないかどうかを選択します。 データタイプ 高度なオプションを選択した場合、エンドユーザーからの入力として想定するデータタイプを指定してください。例:文字列。 可視性 高度なオプションを選択した場合、[認証]フィールドを表示、非表示、または読み取り専用のいずれにするかを指定します。 [認証]フィールドの追加
デフォルトでは、[認証]フィールドとはタスクリクエストのメッセージのヘッダーの一部として設定されたものです。タスクリクエストで追加の[認証]フィールドが必要な場合や、想定される認証がヘッダーに含まれていない場合(たとえば社会保障番号やPINなど)、+ 認証フィールドの追加をクリックして、次の図に示されるようにフィールドを定義します。
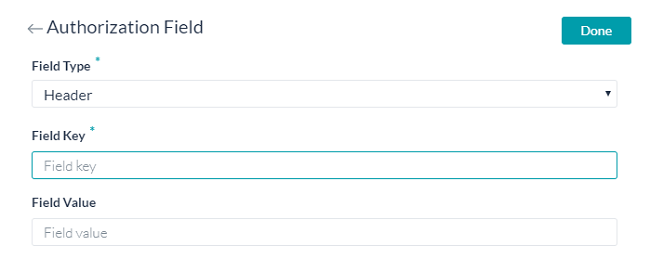 フィールドタイプフィールドで、必要なタスクリクエストメッセージの位置および[認証]フィールドのタイプによっては、以下のうちの1つを選択することができます。
- ヘッダー – ボットは、[認証]フィールドをリクエストのヘッダーの一部として想定しています。
- ペイロード – ボットは、[認証]フィールドをリクエストの本文内容の一部と想定しています。
- クエリ文字列 – ボットは、[認証]フィールドをリクエストの本文内のクエリと想定しています。
- パスパラメータ―ボットは、[認証]フィールドをURLパスリクエストの一部として想定しています。
フィールドキーのフィールドに、選択済みのフィールドタイプのフィールド名を入力してください。フィールド値フィールドに指定したフィールドキーの値を入力してください。完了をクリックします。新しい[認証]フィールドは、認証フィールドセクションに追加されました。[認証]フィールドを追加する場合、認証フィールドセクションで追加をクリックしてください。必要に応じて、認証チェック URLフィールドで、認証メカニズムによってタスクを展開する前に、ボットビルダーから認証設定をテストするために使用できるURLを定義します。[ダイナミック]フィールド、[パスパラメータ]フィールド、[クエリ]フィールドなどを使用して、テストURLを定義することができます。たとえば、https://kore.someCompany.com/sap/opu/odata/sap/{{authfield1}}/?$format=json コネクタを使用したアクセス セクションでは、 はいを選択して、Kore.aiコネクタエージェントを使用したKore.ai ボットのアクセスを有効にします。ご使用のドメインが定義済みの有効なKore.aiコネクタではない場合、警告メッセージが表示され、ボットの管理者コンソールのシステム管理者に連絡します。詳細については、ボット管理者コンソールのドキュメントのKore.aiコネクタの使用をご覧ください。保存をクリックして認証設定を保存し、新規認証メカニズムのダイアログを閉じます。
認証のテスト – 基本認証
認証を保存した後、新しい認証タイプに認証チェックURLを定義していた場合は、タスクの残りのステップの開発を続ける前に、認証のテストをクリックする際に、認証タブで認証の定義をテストすることができます。
 認証のテストをクリックすると、認証のテスト ダイアログが表示され、下図のように、認証チェックURLセクションで指定したURLが表示されます。
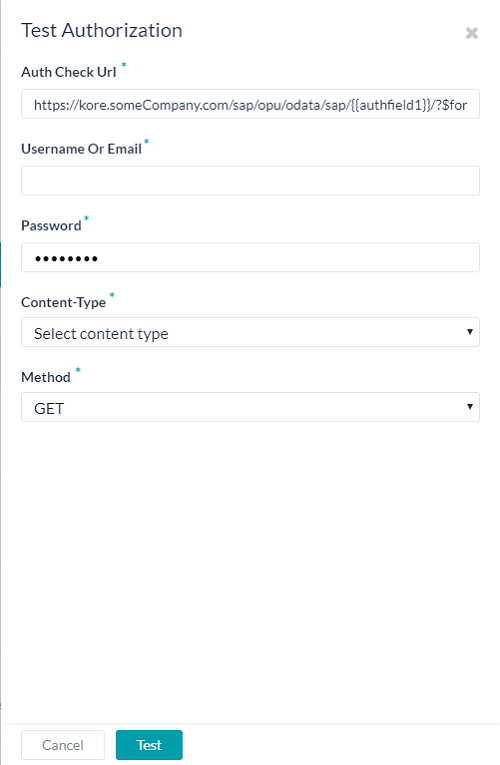 テスト認証の設定―基本認証
- 認証チェックURLフィールドに、実証やURLをテスト認証設定に入力してください。
- ボットはサブドメインを使用する場合、テンナンシーフィールドが表示されるので、必ずテナントを指定してください。
- Webサービスのユーザー名とパスワードを入力します。
- URL として求めるコンテンツ タイプは、コンテンツ タイプフィールドで選択します。
- URLをテストする場合、 メソド フィールドは読み取り専用で、GETに設定されています。
- テストをクリックして、認証テストを開始します。
認証の検証が完了すると、認証のテストダイアログが閉じられ、下図のように 認証のテストボタンのすぐ右に、検証の成功・失敗の結果が表示されます。
 認証失敗の場合、下記の図のように、認証テスト失敗のメッセージはヘッダーおよび応答のタブとともに表示されます。
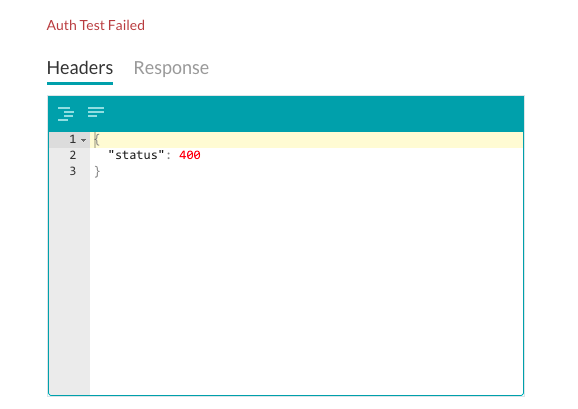
仕組み – 基本認証
タスクに基本認証を使用する場合、下記の図のように、Kore.aiアプリケーションは自動的に、ログイン資格情報のユーザーがWebアプリケーションやWebサービスへアクセスするように指示します。
 エンドユーザーが認証された後、設定は、以下のネーミング構文を使用して保存されます。
{{ 名 }} {{ 姓 }} {{ ボット名 }} {{ アカウント # }} {{ シーケンス# }}例:ジョン・スミスのTwitterアカウント#1。Kore.aiアプリケーションは、このアカウントを使用して、将来のすべてのタスクリクエストに対して、WebアプリケーションまたはWebサービスにアクセスすることができます。その他、エンドユーザーはアカウントを他のタスクに同じボットで再使用することができます。
- OAuth v2 password grant type – 非標準のWebサービス認証タイプのカスタム認証タイプを定義します。設定の詳細は以下のリンクをクリックしてください。oAuth v2パスワード許可を使用したセットアップ以下の図は、タスク用にカスタマイズされた認証を有効にするために定義しなければならない oAuth v2パスワード許可認証タイプのフィールドの例です。
 カスタム認証を定義するには、認証タイプのフィールドで oAuth v2パスワード許可 を選択します。次に、ボットビルダーのユーザーインターフェースに表示される認証の名前を特定します。
テナントの定義
必要に応じて、Webアプリケーションやユーザーインターフェースの基本URLにテナント名を使用する場合は、サブドメインセクションではいを選択します。例として、koreは、www.kore.someCompany.comとしてテナントを使用したWebサービスのテナント組織です。下記の設定の例では、テナンシーURLには{tenant}組織のプレースホルダーが含まれます。
フォーム フィールドの追加
デフォルトのユーザー名とパスワードのフィールドがニーズを満たしていない場合、認証フォームのフィールドを追加することで、エンドユーザーに表示される新しいフィールドを追加することができます。認証フォームにフィールドを追加するには + フォームフィールドの追加をクリックします。以下の図は、認証ダイアログへの[パスワード ]フィールドを追加するための定義の一例です。
以下のテーブルでは、認証IDPフォームのフィールドを定義するために使用されるフィールドについて説明しています。フィールド名 説明 フィールド タイトル 認証ダイアログで、エンドユーザーに表示されるフィールドの名前を指定します。 フィールドキー この値は認証サービスにエンドユーザーが入力する値を示します。 ヘルプのヒント フィールドに表示されるヘルプ文字はフィールドに入力すべきものを説明しています。 フィールドタイプ 高度なオプションを選択した場合、エンドユーザーインターフェイスに表示されるフィールドのタイプを指定して、フィールドキー値(以下のいずれか)として割り当てられたユーザー入力を収集します。 - テキストボックス
- パスワード
必須 高度なオプションを選択した場合、エンドユーザーはこのフィールドを定義して認証を完了しなければならないかどうかを選択します。 データタイプ 高度なオプションを選択した場合、エンドユーザーからの入力として想定するデータタイプを指定してください。例:文字列。 可視性 高度なオプションを選択した場合、[認証]フィールドを表示、非表示、または読み取り専用のいずれにするかを指定します。 [認証]フィールドの追加
デフォルトでは、[認証]フィールドとはタスクリクエストのメッセージのヘッダーの一部として設定されたものです。タスクリクエストで追加の[認証]フィールドが必要な場合や、想定される認証がヘッダーに含まれていない場合(たとえば社会保障番号やPINなど)、+ 認証フィールドの追加をクリックして、次の図に示されるようにフィールドを定義します。
フィールドタイプフィールドで、必要なタスクリクエストメッセージの位置および[認証]フィールドのタイプによっては、以下のうちの1つを選択することができます。- ヘッダー – ボットは、[認証]フィールドをリクエストのヘッダーの一部として想定しています。
- ペイロード – ボットは、[認証]フィールドをリクエストの本文内容の一部と想定しています。
- クエリ文字列 – ボットは、[認証]フィールドをリクエストの本文内のクエリと想定しています。
- パスパラメータ―ボットは、[認証]フィールドをURLパスリクエストの一部として想定しています。
フィールドキーのフィールドに、選択済みのフィールドタイプのフィールド名を入力してください。フィールド値フィールドに指定したフィールドキーの値を入力してください。完了をクリックします。新しい[認証]フィールドは、認証フィールドセクションに追加されました。[認証]フィールドを追加する場合、認証フィールドセクションで追加をクリックしてください。
トークンURLの定義
トークンURLフィールドで、認証メカニズムによってタスクを展開する前に、ボットビルダーから認証設定をテストするために使用できるURLを定義します。ダイナミックフィールド、パスパラメータフィールド、クエリフィールドなどを使用して、http://{tenant}.someCompany.com/test/{{tokenId}}のようにテストURLを定義することができます。トークンURLメソッドフィールドで、トークンURLのHTTPリクエストメソッドタイプを選択します。PUT、POST、PATCH、DELETE、GETのいずれか。トークンURLコンテンツタイプフィールドで、 トークンURLから想定されるコンテンツタイプを選択します。以下から1つ:JSON、RSS、XML、URL符号化済のJSON、CSV、文字、ツイッター 符号化済の JSON、マルチパート/フォームデータ、マルチパート/関連、やOracle ADF。コネクタでアクセスのセクションで、はいを選択するとKore.aiコネクタエイジェントでKore.aiボットへのアクセスをできるようにします。ご使用のドメインが定義済みの有効なKore.aiコネクタではない場合、警告メッセージが表示され、ボットの管理者コンソールのシステム管理者に連絡します。詳細については、ボット管理者コンソールのドキュメントのKore.aiコネクタの使用をご覧ください。認証を保存をクリックして認証設定を保存し、新規認証メカニズムのダイアログを閉じます。
認証テスト
認証を保存した後、新しい認証タイプに認証URLを定義していた場合は、タスクの残りのステップの開発を続ける前に、認証のテストをクリックする際に、認証ページで認証の定義をテストすることができます。
認証のテストをクリックすると、認証のテスト ダイアログが表示され、下図のように、認証チェックURLセクションで指定したURLが表示されます。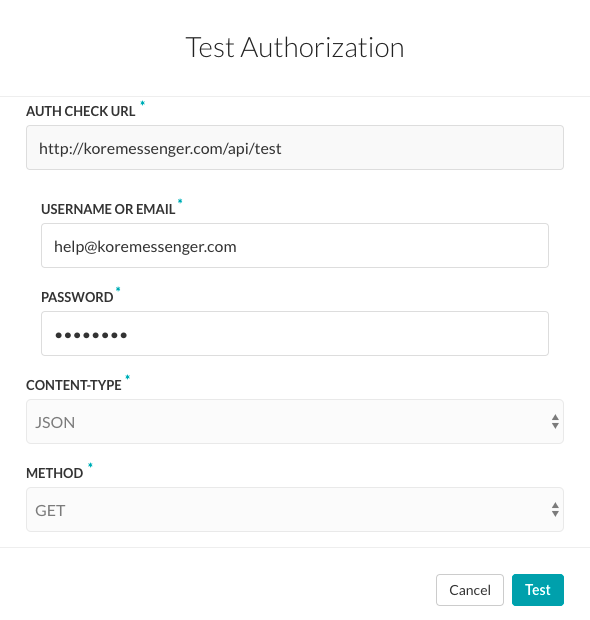 テストをクリックして、認証テストを開始します。認証の検証が完了すると、次の図のようにテスト認証のダイアログが閉じられ、成功または失敗の検証結果がテスト認証ボタンの右横に表示されます。認証失敗の場合、下記の図のように、認証テスト失敗のメッセージはヘッダーおよび応答のタブとともに表示されます。
 - OAuth v2クライアントク資格情報
- OAuth v1 – WebアプリケーションやWebサービスがAPIを使用して保護されたリソースにアクセスできるようにするもので、エンドユーザーがKore.aiにログオン資格情報を開示する必要はありません。設定の詳細は以下のリンクをクリックしてください。OAuth v1を使用した認証セットアップOAuthは、Web、モバイル、デスクトップアプリケーションから、シンプルで標準的な方法で安全な認証を可能にするオープンプロトコルです。OAuthを使用するには、まずWebアプリケーションのアカウントを登録する必要があります。それは、認証メカニズムの設定を行うには、そのアプリケーションのログイン資格情報が必要になるからです。
OAuth v1の仕組み
- Kore.aiアプリケーションは、Webアプリケーションから未認証のリクエストトークンを取得します。Kore.aiアプリケーションはユーザーをWebアプリケーションのロクインダイアログへリダイレクトします。
- ユーザーはリクエストトークンを認証してそのアカウントと連結します。Webアプリケーションは、ユーザーをKore.aiアプリケーションにリダイレクトします。
- Kore.aiアプリケーションは、リクエストトークンをアクセストークンと交換します。
- アクセストークンによって、Kore.aiアプリケーションはユーザーに代わってプロバイダの保護されたリソースにアクセスすることができます。
以下の図は、oAuth v1認証タイプのフィールドの一例で、タスクのためにカスタマイズした認証を有効にするために定義する必要があります。
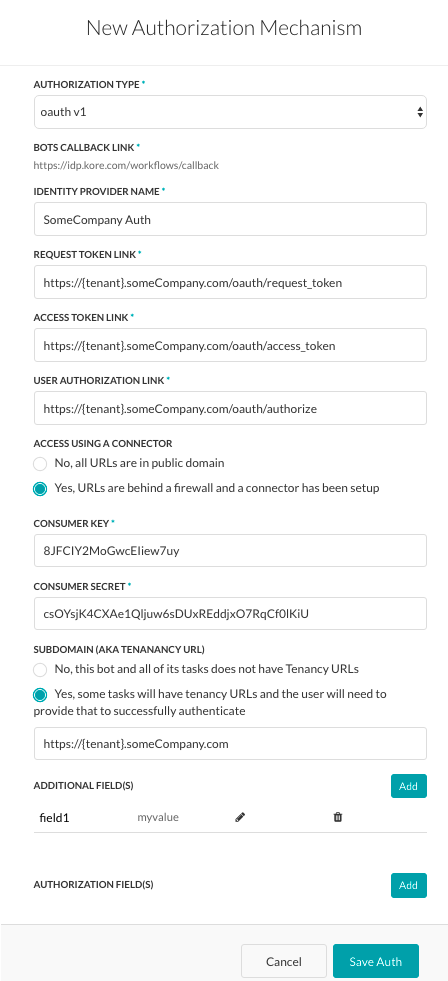 oAuth v1を定義するには、以下のテーブルに記載されているフィールドを定義します。
フィールド名 説明 認証タイプ oAuth v1に設定します。 コールバック URL エンドユーザーの認証が完了した後、エンドユーザーをリダイレクトするために、WebアプリケーションまたはWebサービスが使用するURL。この値(https://idp.kore.ai/workflows/callback/)は、oAuth v1の設定を定義する際に、Kore.aiアプリケーションによって読み取り専用の値として提供されます。 アイデンティティプロバイダ名 WebアプリケーションやWebサービスの名前、例:Twitter。このフィールドは必須です。 コンシューマキー Kore.aiアプリケーションの識別情報としてWebアプリケーションに提供された値です。このフィールドは必須です。 コンシューマシックレット Kore.aiアプリケーションが コンシューマーキーの所有権を確立するために提供する秘密の値。このフィールドは必須です。 リクエストトークンリンク Kore.ai アプリケーションが未認証のリクエストトークンを取得するために使用するURL。リクエストトークンとはKore.aiアプリケーションがアクセストークンを取得ためのエンドユーザーからの認証を取得ための値。例:https://{tenant}.someCompany.com/oauth/request_token。エンドユーザーの認証の後、Kore.aiアプリケーションからアクセストークンを要求することができます。このフィールドは必須です。 アクセストークンリンク エンドユーザーの認証済みリクエストトークンをアクセストークンと交換するために使用されるURL。アクセストークンとは、Kore.aiアプリケーションが、エンドユーザーのログオン資格情報を使用する代わりに、エンドユーザーのためにWebアプリケーションやWebサービスへのアクセス権を取得するために使用する値です。例:、https://{tenant}.someCompany.com/oauth/access_token。このフィールドは必須です。 ユーザー認証リンク アクセストークンを使用してWebアプリケーションまたはWebサービスにアクセスするために、Kore.aiアプリケーションのエンドユーザー認証を取得するために使用されるURL。例:https://{tenant}.someCompany.com/oauth/authorize。このフィールドは必須です。 コネクタを使用してアクセス 「はい」を選択し、Kore.aiコネクタエージェントを使用してKore.aiボットにアクセスできるようにします。このオプションは、Kore.ai コネクタエージェントが企業の社内ネットワークで構成、有効化されている場合に表示されます。詳細については、Kore.ai Connectorの使用をご覧ください。 テナントの定義
必要に応じて、Webアプリケーションやユーザーインターフェースの基本URLにテナント名を使用する場合は、サブドメインセクションではいを選択します。例として、koreは、www.kore.someCompany.comとしてテナントを使用したWebサービスのテナント組織です。下記の設定の例では、テナンシーURLには{tenant}組織のプレースホルダーが含まれます。
フィールドの追加
「+ 追加フィールドの追加」 をクリックして、下図のように、追加フィールドダイアログを開き、必要に応じて追加の認証入力フィールドを表す1つ以上のキー/値のペアを入力します。
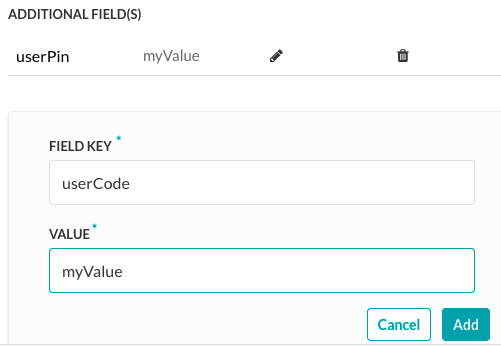 以下のフィールドを指定します。
- フィールド キー – 認証に指定するカスタムフィールド名です。
- フィールド値 – 認証のために指定するカスタムフィールドの値です。
追加をクリックして追加のフィールドを保存します。追加のフィールドを追加する場合、認証フィールドセクションの追加をクリックしてください。
[認証]フィールドの追加
デフォルトでは、[認証]フィールドとはタスクリクエストのメッセージのヘッダーの一部として設定されたものです。タスクリクエストで追加の[認証]フィールドが必要な場合や、想定される認証がヘッダーに含まれていない場合(たとえば社会保障番号やPINなど)、+ 認証フィールドの追加をクリックして、次の図に示されるようにフィールドを定義します。
フィールドタイプフィールドで、必要なタスクリクエストメッセージの位置および[認証]フィールドのタイプによっては、以下のうちの1つを選択することができます。- ヘッダー – ボットは、[認証]フィールドをリクエストのヘッダーの一部として想定しています。
- ペイロード – ボットは、[認証]フィールドをリクエストの本文内容の一部と想定しています。
- クエリ文字列 – ボットは、[認証]フィールドをリクエストの本文内のクエリと想定しています。
- パスパラメータ―ボットは、[認証]フィールドをURLパスリクエストの一部として想定しています。
フィールドキーのフィールドに、選択済みのフィールドタイプのフィールド名を入力してください。フィールド値フィールドに指定したフィールドキーの値を入力してください。追加をクリックします。新しい認証フィールドは、認証フィールドセクションに追加されました。[認証]フィールドを追加する場合、認証フィールドセクションで追加をクリックしてください。
認証テスト
認証を保存した後、タスクの残りのステップの開発を続ける前に、認証のテストをクリックすると、 認証ページで認証の定義をテストすることができます。
認証のテストをクリックすると、認証トークンのURLと コンシューマキーおよび コンシューマトークンを使用して、テストが実行されます。テナントが定義されていた場合は、下図のようなテスト認証ダイアログが表示されます。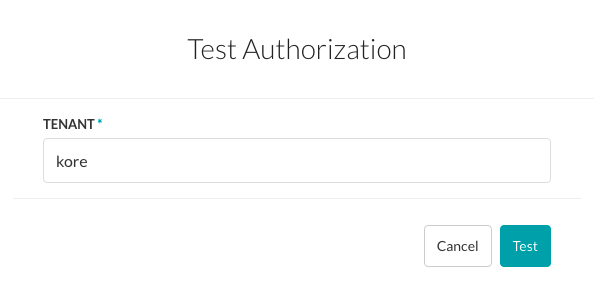 テストをクリックして、認証テストを開始します。認証の検証が完了すると、次の図のようにテスト認証のダイアログが閉じられ、成功または失敗の検証結果がテスト認証ボタンの右横に表示されます。認証失敗の場合、下記の図のように、認証テスト失敗のメッセージはヘッダーおよび応答のタブとともに表示されます。
 - OAuth v2 – OAuthプロトコルの最新版で、WebアプリケーションやWebサービスの特定の認証フローに焦点を当てています。設定の詳細は以下のリンクをクリックしてください。OAuth v2を使用した認証セットアップOauth v2は、Web、モバイル、デスクトップアプリケーションから、シンプルで標準的な方法で安全な認証を可能にするオープンプロトコルです。OAuth v2を使用するには、まずWebアプリケーションのアカウントを登録する必要があります。それは、認証メカニズムの設定を行うには、そのアプリケーションのログイン資格情報が必要になるからです。
oAuth v2の仕組み
- Kore.aiアプリケーションはユーザーをWebアプリケーションのロクインダイアログへリダイレクトします。
- ユーザーは認証します。
- Webアプリケーションは、アクセストークンでユーザーをKore.aiアプリケーションにリダイレクトします。
- Kore.aiアプリケーションはアクセストークンを検証します。
- アクセストークンによって、Kore.aiアプリケーションはユーザーに代わってプロバイダの保護されたリソースにアクセスすることができます。
以下の図はoAuth v2認証タイプを定義するためのフィールドを表示します。
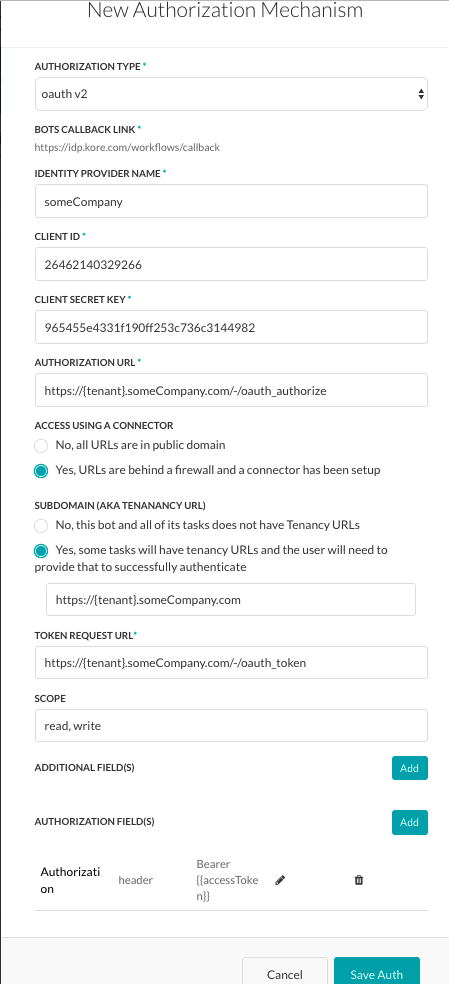 oAuth v2を設定するには、以下のテーブルに記載されているフィールドを定義します。
フィールド名 説明 認証タイプ oAuth v2に設定します。 コールバック URL エンドユーザーの認証が完了した後、エンドユーザーをリダイレクトするために、WebアプリケーションまたはWebサービスが使用するURL。この値(https://idp.kore.ai/workflows/callback/)は、oAuth v1の設定を定義する際に、Kore.aiアプリケーションによって読み取り専用の値として提供されます。 アイデンティティプロバイダ名 WebアプリケーションやWebサービスの名前、例:Asana。このフィールドは必須です。 クライアント ID Kore.ai クライアントの IDです。 クライアントシックレットキー Webアプリケーションに対して、クライアントIDに基づくKore.aiアプリケーションの認証として提供される値。 認証 URL アクセストークンを使用してWebアプリケーションまたはWebサービスにアクセスするために、Kore.aiアプリケーションのエンドユーザー認証を取得するために使用されるURL。このフィールドは必須です。 コネクタを使用してアクセス 「はい」を選択し、Kore.aiコネクタエージェントを使用してKore.aiボットにアクセスできるようにします。このオプションは、Kore.ai コネクタ エージェントが企業の社内ネットワークで構成、有効化されている場合に表示されます。詳細については、Kore.ai Connectorの使用をご覧ください。 認証 URL Kore.ai アプリケーションが未認証のリクエストトークンを取得するために使用するURL。リクエストトークンとはKore.aiアプリケーションがアクセストークンを取得ためのエンドユーザーからの認証を取得ための値。エンドユーザーの認証の後、Kore.aiアプリケーションからアクセストークンを要求することができます。このフィールドは必須です。 テナントの定義
必要に応じて、Webアプリケーションやユーザーインターフェースの基本URLにテナント名を使用する場合は、サブドメインセクションではいを選択します。例として、koreは、www.kore.someCompany.comとしてテナントを使用したWebサービスのテナント組織です。下記の設定の例では、テナンシーURLには{tenant}組織のプレースホルダーが含まれます。
フィールドの追加
「+ 追加フィールドの追加」 をクリックして、下図のように、追加フィールドダイアログを開き、必要に応じて追加の認証入力フィールドを表す1つ以上のキー/値のペアを入力します。
以下のフィールドを指定します。- フィールド キー – 認証に指定するカスタム フィールド名です。
- 値 – カスタムフィールドの認証に指定する値です。
追加をクリックして追加のフィールドを保存します。追加のフィールドを追加する場合、認証フィールドセクションの追加をクリックしてください。
[認証]フィールドの追加
デフォルトでは、[認証]フィールドとはタスクリクエストのメッセージのヘッダーの一部として設定されたものです。タスクリクエストで追加の[認証]フィールドが必要な場合や、想定される認証がヘッダーに含まれていない場合(たとえば社会保障番号やPINなど)、+ [認証]フィールドの追加をクリックして、次の図に示されるようにフィールドを定義します。
フィールドタイプフィールドで、必要なタスクリクエストメッセージの位置および[認証]フィールドのタイプによっては、以下のうちの1つを選択することができます。- ヘッダー – ボットは、[認証]フィールドをリクエストのヘッダーの一部として想定しています。
- ペイロード – ボットは、[認証]フィールドをリクエストの本文内容の一部と想定しています。
- クエリ文字列 – ボットは、[認証]フィールドをリクエストの本文内のクエリと想定しています。
- パスパラメータ―ボットは、[認証]フィールドをURLパスリクエストの一部として想定しています。
フィールドキーのフィールドに、選択済みのフィールドタイプのフィールド名を入力してください。フィールド値フィールドに指定したフィールドキーの値を入力してください。追加をクリックします。新しい[認証]フィールドは、[認証]フィールドセクションに追加されました。[認証]フィールドを追加する場合、認証フィールドセクションで追加をクリックしてください。
認証テスト
認証を保存した後、タスクの残りのステップの開発を続ける前に、認証のテストをクリックすると、 認証ページで認証の定義をテストすることができます。
認証のテストをクリックすると、認証トークンURLおよび クライアントIDおよびコンシューマトークンを使用して、テストが実行されます。テナントが定義されていた場合は、下図のようなテスト認証ダイアログが表示されます。 テストをクリックして、認証テストを開始します。認証の検証が完了すると、次の図のようにテスト認証のダイアログが閉じられ、成功または失敗の検証結果がテスト認証ボタンの右横に表示されます。認証失敗の場合、下記の図のように、認証テスト失敗のメッセージはヘッダーおよび応答のタブとともに表示されます。 - APIキー – WebアプリケーションまたはWebサービスによって生成または提供される識別および認証トークン。受信するアプリケーションリクエストを識別するために使用され、ケースによっては安全なアクセスのための認証も提供します。設定の詳細は以下のリンクをクリックしてください。APIキーを使用したセットアップAPIキーは、識別のための一意の識別子と秘密のトークンの両方として機能し、関連するAPIに対する一連のアクセス権を提供するための認証も可能です。エンドユーザーに対して、アクセスのためにユーザー名とパスワードの両方を指示するのではなく、タスク設定時にユーザーに API キーのみを指示します。APIキー認証 タイプを使用するには、まずWebアプリケーションにアカウントを登録し、そのアプリケーション用のAPIキーを生成して、Kore.ai認証メカニズムの設定を行う必要があります。以下の図に、APIキー認証タイプで定義するフィールドを示します。
![[認証]タブ - APIキーダイアログ](/wp-content/uploads/DIYAPIKey-1.png) APIキー認証を定義するには、 認証タイプ フィールドで APIキー を選択します。次に、ボットビルダーのユーザーインターフェースに表示される認証の名前を特定します。
APIキー認証を定義するには、 認証タイプ フィールドで APIキー を選択します。次に、ボットビルダーのユーザーインターフェースに表示される認証の名前を特定します。
テナントの定義
必要に応じて、Webアプリケーションやユーザーインターフェースの基本URLにテナント名を使用する場合は、サブドメインセクションではいを選択します。例として、koreは、www.kore.someCompany.comとしてテナントを使用したWebサービスのテナント組織です。下記の設定の例では、テナンシーURLには{tenant}組織のプレースホルダーが含まれます。
認証フォームへの[フォーム]フィールドの追加
デフォルトのユーザー名とパスワードのフィールドがニーズを満たしていない場合、認証フォームのフィールドを追加することで、エンドユーザーに表示される新しいフィールドを追加することができます。認証フォームにフィールドを追加するには + [フォーム]フィールドの追加をクリックします。以下の図は、認証ダイアログへの[パスワード] フィールドを追加するための定義の一例です。
以下のテーブルでは、認証IDPフォームのフィールドを定義するために使用されるフィールドについて説明しています。フィールド名 説明 フィールド タイトル 認証ダイアログで、エンドユーザーに表示されるフィールドの名前を指定します。 フィールドキー この値は認証サービスにエンドユーザーが入力する値を示します。 ヘルプのヒント フィールドに表示されるヘルプ文字はフィールドに入力すべきものを説明しています。 フィールドタイプ 高度なオプションを選択した場合、エンドユーザーインターフェイスに表示されるフィールドのタイプを指定して、フィールドキー値(以下のいずれか)として割り当てられたユーザー入力を収集します。 - テキストボックス
- パスワード
必須 高度なオプションを選択した場合、エンドユーザーはこのフィールドを定義して認証を完了しなければならないかどうかを選択します。 データタイプ 高度なオプションを選択した場合、エンドユーザーからの入力として想定するデータタイプを指定してください。例:文字列。 可視性 高度なオプションを選択した場合、[認証]フィールドを表示、非表示、または読み取り専用のいずれにするかを指定します。 [認証]フィールドの追加
デフォルトでは、[認証]フィールドとはタスクリクエストのメッセージのヘッダーの一部として設定されたものです。タスクリクエストで追加の[認証]フィールドが必要な場合や、想定される認証がヘッダーに含まれていない場合(たとえば社会保障番号やPINなど)、+ 認証フィールドの追加をクリックして、次の図に示されるようにフィールドを定義します。
フィールドタイプフィールドで、必要なタスクリクエストメッセージの位置および[認証]フィールドのタイプによっては、以下のうちの1つを選択することができます。- ヘッダー – ボットは、[認証]フィールドをリクエストのヘッダーの一部として想定しています。
- ペイロード – ボットは、[認証]フィールドをリクエストの本文内容の一部と想定しています。
- クエリ文字列 – ボットは、[認証]フィールドをリクエストの本文内のクエリと想定しています。
- パスパラメータ―ボットは、[認証]フィールドをURLパスリクエストの一部として想定しています。
フィールドキーのフィールドに、選択済みのフィールドタイプのフィールド名を入力してください。フィールド値フィールドに指定したフィールドキーの値を入力してください。追加をクリックします。新しい[認証]フィールドは、認証フィールドセクションに追加されました。[認証]フィールドを追加する場合、認証フィールドセクションで追加をクリックしてください。
認証のテスト – APIキー
認証を保存した後、新しい認証タイプに認証チェックURLを定義していた場合は、タスクの残りのステップの開発を続ける前に、認証のテストをクリックする際に、認証タブで認証の定義をテストすることができます。
認証のテストをクリックすると、認証のテスト ダイアログが表示され、下図のように、認証チェックURLセクションで指定したURLが表示されます。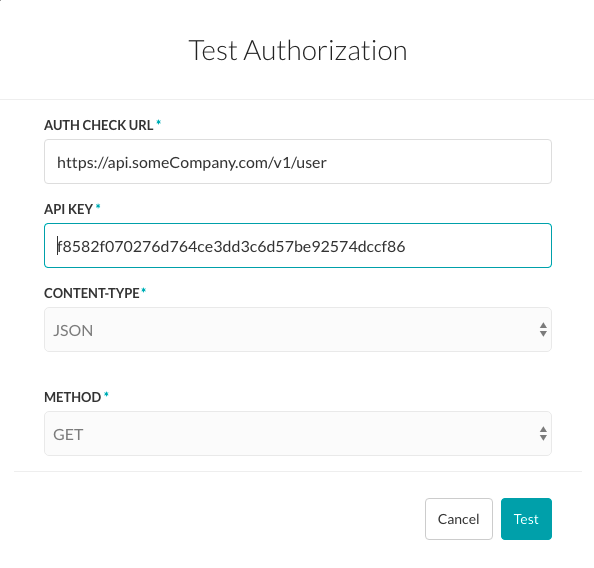 認証のテスト – APIキーを設定するには
- 認証チェックURLフィールドに、実証やURLをテスト認証設定に入力してください。
- ボットはサブドメインを使用する場合、テンナンシーフィールドが表示されるので、必ずテナントを指定してください。
- API キーフィールドでアプリケーションの API キーを入力します。
- URL として求めるコンテンツ タイプは、コンテンツ タイプフィールドで選択します。
- URLをテストする場合、 メソド フィールドは読み取り専用で、GETに設定されています。
- テストをクリックして、認証テストを開始します。
認証の検証が完了すると、次の図のようにテスト認証のダイアログが閉じられ、成功または失敗の検証結果がテスト認証ボタンの右横に表示されます。認証失敗の場合、下記の図のように、認証テスト失敗のメッセージはヘッダーおよび応答のタブとともに表示されます。
- 基本認証 – ユーザー名とパスワードの情報を収集するための標準プロトコル。Kore.aiは、エンドユーザーの情報を保護するために、基本認証と組み合わせてSSL暗号を使用しています。設定の詳細は、以下のリンクをクリックします。
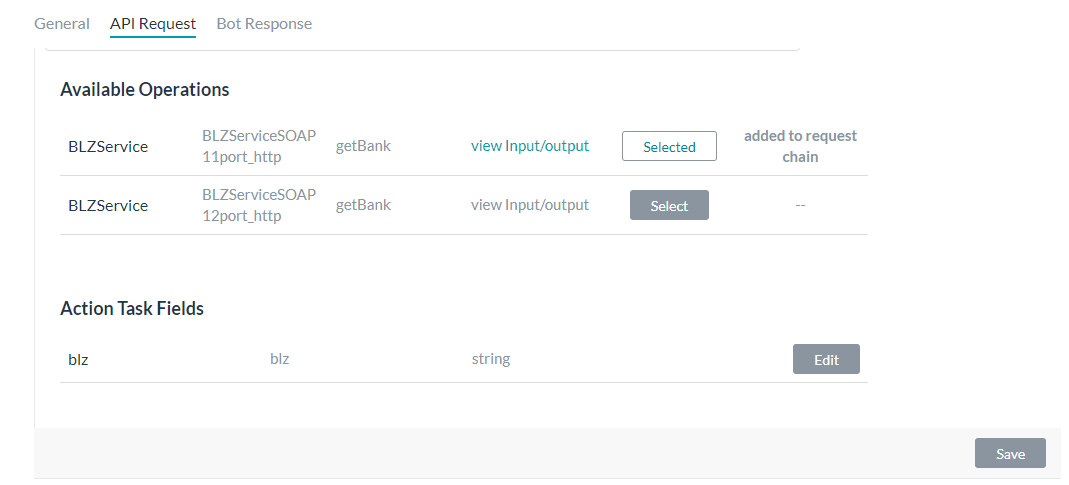
ステップ 3:APIリクエスト
タスクで必要があれば、リクエストオブジェクトを定義して、たとえば、エンドユーザーがタスクを完了するために選択する動的ドロップダウンの選択肢を提供することができます。情報タスクのAPIリクエストタブでは、APIパラメータ、オプションのAPIタスク初期化、APIリクエスト のプリプロセッサまたはポストプロセッサ、およびAPIリクエストを定義することができます。また、APIリクエストの ペイロードから想定される 応答サンプルも追加する必要があります。
また、SOAPを使用した情報タスクリクエストを設定することもできます。その場合は、WSDL URLおよびコネクタを設定する必要があります。
API Request - Rest
一般タブでボットのアクションタスクを記述し、オプションとしてAPI リクエストタブで認証要件を定義した後、タスクのためにボットのWebサイト、システム、またはWebアプリケーションからデータを要求するAPIリクエストの設定を開始する準備ができています。このトピックでは、API(REST)リクエストを設定する方法について説明します。API(SOAP)リクエストについては、以下をご覧ください。APIリクエストの設定(REST)
接続モードがRESTに設定されているアクションタスクのリクエストでは、以下のように定義する必要があります。 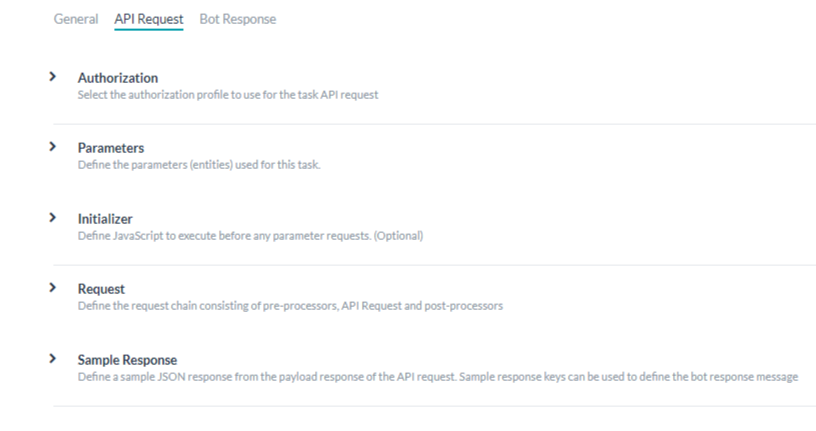
Defining Parameters
- 認証 – アクションタスクに必要な場合、APIにアクセスするための認証を定義する必要があります。例:基本認証、OAuth、API Keyなどの使用。詳細は、上記の認証の設定をご覧ください。
- パラメータ – APIリクエストの処理に使用される1つ以上のパラメータを定義します。例:ユーザープロンプトからの入力、選択肢リストからのエンドユーザーによる選択、URLなど。詳細は、以下のアクションタスクのパラメータを定義するをご覧ください。
- イニシャライザ(オプション) – 実行するカスタムJavaScriptを指定したり、Webサービスでコードの実行が必要な場合にタスクインスタンスを作成する前にセッション変数を設定したり、APIリクエストを実行する前にユーザーコンテキストの詳細を変更したりすることができます。詳細は、以下の「 イニシャライザの定義をご覧ください。
- リクエスト – WebサービスへのAPIコールを行うこと、ボットへのURLとパスを使用してアクションタスクを開始すること、およびWebサービスからボットプラットフォームへのデータペイロードの配信を開始することなどに使用されるリクエストチェーンを定義します。リクエストチェーンは、プリプロセッサ、APIリクエスト、およびポストプロセッサから成ります。詳細は、以下の「 リクエストチェーンの定義をご覧ください。
- 応答サンプル – アクションタスクのペイロードで受け取ることが想定されるキー/値のペアを定義します。ボットユーザーに表示するデータを処理するために、提供されたキーがドロップダウンの選択肢として利用できます。詳細は、以下の応答サンプルの追加をご覧ください。
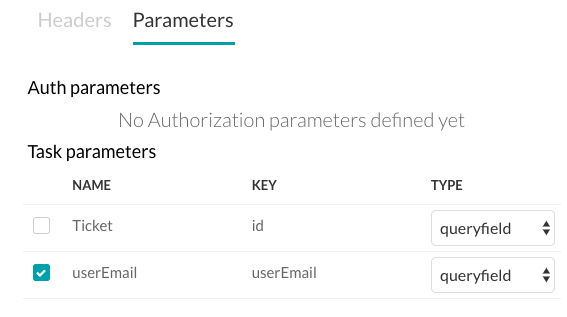
以下の手順で、APIリクエスト(REST)のパラメータを定義します。
- パラメータのセクションをクリックして、次に追加をクリックします。 タスクパラメータの設定ダイアログが開きます。
- ご選択の次第、下記のテーブルの説明の通りに関連のフィールド値を入力してください。
フィールド名 説明 タスク パラメーターのタイプ 次のうちの 1 つを指定します。 - ペイロード パラメーター – POST、PUT、GET、DELETE などの HTTP メソッドによるフィールド タイプでペイロード データを示します。例:
{ "taskId":"{payloadfield2}", "message":"{payloadfield1}" } - クエリパラメータ – このフィールドタイプは、URLパスの一部またはURL内のクエリとして使用されます。例:
http://app.asana.com/api/workspaces/{queryfield1}/project/{queryfield2}?userId={queryfield3}
パラメータ名 ユーザーに表示されるタスク入力フィールドのタイトル(例: アカウントを選ぶ プロンプトメッセージ パラメータ名の下に表示されるヘルプの説明。例:どちらのアカウントにアクセスしたいですか? パラメータキー 収集したいエンドユーザーの入力値を表すタスクキー(例: accountType)。 必要エンティティのタイプ 入力パラメータはエンティティに関連付けられ、エンティティタイプを選択することができます。 - 添付ファイル
- 都市
- 国
- 会社
- 通貨
- 日付
- メール
- ラベル
- 場所
- メッセージ
- 名前
- 数字
- パーセント
- 電話番号
- 文字列
エンティティタイプの詳細は、こちらをクリックしてください。選択されたエンティティタイプに基づいて、残りのパラメータが設定されていますが、これを変更することができます。
パラメータタイプ キーの値に割り当てるリクエストオブジェクト用のユーザー入力を収集するためにエンドユーザーインターフェースに表示されるタスク入力フィールドのタイプを指定します。デフォルト設定はテキストボックスですが、以下のいずれか1つをカスタマイズできます。 - 日付 – フォーマットフィールドが表示され、エンドユーザーが自分のアカウントにタスクが設定される際に定義する日付フォーマットの構文を選択できます。日付フォーマット選択のドロップダウン リストから、次のうちの1つを選択します。
- dd-MM-YYYY – 例:16-05-1999
- MM-dd-YYYY – 例:05-16-1999
- dd-MM-YY – 例:16-05-99
- YYYY-MM-dd – 例:1999-05-16
- URL – 正しい URL 構文のためのフィールド検証を含む、エンドユーザーによる URL 入力用のテキスト ボックスを表示します。プレースホルダーフィールドには、テキストボックスに表示されるヘルプヒントを入力します。例:こちらにWebサイトのURLを入力してください。
- テキストボックス―エンドユーザーにタスクの入力フィールドとして文字を入力するためのテキストボックスを表示します(通常は数語程度)。プレースホルダーフィールドには、テキストフィールドに表示されるヘルプヒントを入力します。例:刺しゅうしたい名前のタイプ。
- 静的ドロップダウン – エンドユーザーに選択肢のドロップダウン リストを表示します。オプションの追加をクリックして以下のパラメータでエンドユーザーに表示するアイテムのリストの追加を始まります:
- オプション名 – エンドユーザーに表示されるオプションの名前です。
- オプション値―アプリケーションに返すオプション名という値と示します。
- デフォルト値 – 1つ以上のオプションが定義されている場合、オプションのデフォルト値を選択します。
- 検索可能 – エンドユーザーがこのフィールドにテキストを入力するときに、ダイナミック検索と表示を有効にするか、あるいは一致がない場合に、フリーフォームのエントリを許可するかを選択します。
保存をクリックします。アイテムを追加する場合、オプションを追加をもう一度クリックします。オプションのアクション列において、オプションを編集または削除します。
- 動的ドロップダウン – ボット用のURLからの応答に基づいて、実行時に動的に生成されるドロップダウンリストを表示します。例:JIRAタスク通知用のプロジェクトリスト。以下の動的に配置されるドロップダウンのプロパティを定義します。
- エンドポイントURL – ボットのエンドポイントURL。例:https://app.asana.com/api/1.0/workspaces。
- エンドポイントのコンテンツタイプ – 指定されたエンドポイントURLから想定されるコンテンツタイプ。以下から1つ:JSON、RSS、XML、URLエンコードのJSON、CCV、文字、またはTwitter エンコードのJSON。
- エンドポイントメソッド – 以下のうちの1つ:
- GET – [タスク]フィールドのHTTPリクエストGETメソッドを指定します。
- POST – [タスク]フィールドのHTTPリクエストPOSTメソッドを指定します。
- 応答パス – 希望するドロップダウンリスト値を含む応答内のパス。例:データ。
- ラベルキー – ドロップダウンオプションのラベルのキー。例:名前。
- オプションの値キー – ドロップダウンオプションの値のキー。例:ID。
- ペイロードフィールドの追加 – クリックすると、動的ドロップダウンのオプションとして、応答ペイロードから1つ以上のフィールドが追加されます。各ペイロードフィルドについて、ペイロードフィールドのキーとペイロードフィールドの値を入力し、保存をクリックします。アクション列でペイロードフィールドを編集または削除します。
- 検索可能 – エンドユーザーがこのフィールドにテキストを入力するときに、ダイナミック検索と表示を有効にするか、あるいは一致がない場合に、フリーフォームのエントリを許可するかを選択します。
- Textarea – エンドユーザーがタスク入力としてテキスト(通常は数センテンス)を入力するためのテキストエリアボックスを表示します。プレースホルダーフィールドに、テキストボックス内でエンドユーザーに対して表示するヘルプヒントを入力します。
- 先行入力 – タスクに定義されたURLからの応答を基にした検索結果に一致する3つ以上の文字をユーザーが入力すると、実行時のエンドユーザーに対して動的に配置されたドロップダウンリストの選択肢が表示されます。例:JIRAのタスク通知メッセージのプロジェクトリスト。以下の動的に配置されるドロップダウンへのプロパティを定義します。
- エンドポイントURL – ボットのエンドポイントURL。例:https://app.asana.com/api/1.0/workspaces。
- エンドポイントのコンテンツタイプ – 指定されたエンドポイントURLから想定されるコンテンツタイプ。以下から1つ:JSON、RSS、XML、URL エンコードされた JSON、CCV、テキスト、Twitter エンコードされた JSON、Multipart/Form-data または Multipart/Related。
- エンドポイントメソッド – 以下のうちの1つ:
- GET – [タスク]フィールドのHTTPリクエストGETメソッドを指定します。
- POST – [タスク]フィールドのHTTPリクエストPOSTメソッドを指定します。
- 応答パス – 希望するドロップダウンリスト値を含む応答内のパス。例:データ。
- ラベルキー – ドロップダウンオプションのラベルのキー。例:名前。
- オプションの値キー – ドロップダウンオプションの値のキー。例:ID。
- ペイロードフィールドの追加 先行入力フィールドのオプションとして、 応答ペイロードから 1 つ以上のフィールドをクリックして追加します。各先行入力のフィールドオプションについて、ペイロードフィールドのキーとペイロードフィールドの値を入力し、保存をクリックします。アクション列でペイロードフィールドを編集または削除します。
- 編集可能―先行入力の検索結果が一致しない場合のオプションとして、エンドユーザーがフィールドに自由にテキストを入力できるようにします。
- メール – エンドユーザーがメールアドレスを入力するためのテキストボックスを表示します。プレースホルダーフィールドに、エンドユーザーに表示するヘルプヒントをテキストボックス内に入力します。
- 日付と時間 – エンドユーザーが日付と時間を入力するためのテキストボックスを表示します。フォーマットフィールドに、エンドユーザーに表示される日付のテキストボックスに、想定する日付や時間のフォーマットを入力します。日付フォーマットの選択 のドロップダウンリストで、日付と時間のフォーマットを選択します。
- タイムゾーン―操作システムの設定に基づくタイムゾーンのドロップダウンリストを表示します。
- 位置―エンドユーザーが地理的位置を入力するためのテキストボックスを表示します。例:Orlando, FLまたは32801。
- ネスト化フォーム – 親入力フィールドの下に、エンドユーザーの入力フィールドをネスト化形式で表示します。ネストされたフォーム入力フィールドには、次のフィールドを指定します。
- 配列要素型 – 親となる入力フォーム要素のデータ型を選択します。
- ネスト化フォームフィールドの追加 – 1 つ以上のネスト化フォーム フィールドをクリックして追加します。
- ファイル アップロード – アップロードするファイルの検索や選択ができるエンドユーザー制御を表示します。クリックして、ファイルアップロードペイロード キーを入力します。ファイルアップロードペイロードキーが定義されている場合、ファイルアップロードペイロードフィールド値のドロップダウンリストで以下のうちから1つ選択してください。
- ファイル名
- ファイルサイズ
- ファイルコンテンツタイプ
データタイプ ユーザー入力タイプのうちの 1 つを選択します。 - 文字列 – ユーザーは任意の一連の数字、文字や特殊文字を入力することができます。
- 数字 – ユーザーは数字を入力することができます。特殊文字は使用できません。
- ブール値 – ユーザーは true または false のブール値を入力できます。
- メール – ユーザーは有効なメール アドレスを入力できます。
- オブジェクト – ボットからのデータは、JSONオブジェクトとして受信できます。例:次のように定義された位置の詳細として、 “location” : { “lat” : 17.4374614, “lng” : 78.4482878 } ここで、リクエストチェーンやタスクリクエストのプロパティを、 location.latおよびlocation.lngと表記します。
- 配列 – ユーザーは、カンマで区切った値のリストをボットに渡すことができます。例として、グーグルカレンダーでは、複数の参加者のデータのパスは: “attendees”: [“user1”, “user2”, “user3”] 選択した場合、エンドユーザーの入力の配列のタイプを以下のいずれかに指定します。
- 文字列
- 数字
- ブール値
- メール
- 配列
- 日付
- 日付―ユーザーは完全な日付を入力するか、日付の選択肢から選択することができます。
必須 タスク設定の構成を保存するために、エンドユーザーがこの設定を定義する必要があるかどうかを選択します。 - ペイロード パラメーター – POST、PUT、GET、DELETE などの HTTP メソッドによるフィールド タイプでペイロード データを示します。例:
- [詳細設定] タブをクリックして、タスク フィールドの追加のオプション設定を定義します。
| フィールド名 | 説明 |
|---|---|
| 可視性 | タスクの入力フィールドをエンドユーザーから見えるようにするか、見えないようにするかを指定します。可視性フィールドはカスタム設定することもできます。ここでは、データはユーザーから取得されますが、クエリパラメータやペイロードフィールドとしては使用されません。例として、JIRAボットの場合、以下のように@mentionタグを使用してチケットにコメントを投稿します。「@Mike、こちらの問題について調べてください」 JIRA APIで「コメントを投稿する」には1つのクエリフィールドおよび1つのペイロードフィールドが必須です:
可視性フィールドをカスタムに設定すると、JIRA APIを使用して |
| キーの置き換え | Kore.ai によるキーの転置を無効にするかどうかを選択します。デフォルトでは、Kore.aiはキーと値のペアを転置します。たとえば、”parameter”:”value” はKore.aiによって “parameter:{value:”actualValue”} に転置されます。選択すると、キーは置換されません。 |
| セッションから取得 | 選択すると、このフィールドのユーザー入力値をセッション変数として格納します。選択すると、[セッションからのフィールド値] のフィールドを表示します。既存の変数や [新規のセッション変数を追加] を選択して新規の変数を定義します。新規のセッション変数を作成するには、変数のスコープを選択し、変数を格納するキーを定義する必要があります。[スコープ] フィールドでは、次のうちの 1 つを選択します。
|
- タスクリクエストのパラメータを保存して別のパラメータを追加する場合は、 追加して続行を、タスクリクエストのパラメーターを保存してダイアログを閉じる場合は追加して終了をクリックします。複数のパラメータを、ボットユーザーが入力を提供する順番で整理する必要があります。
 と
と アイコンを使用してパラメータを移動します。
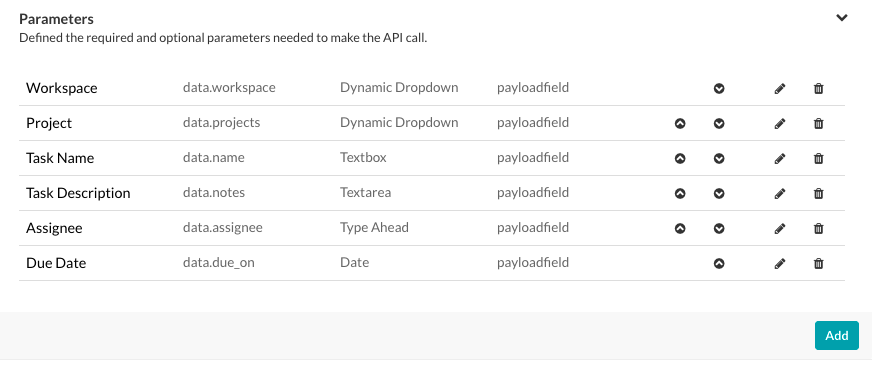
タスクを実行するには、Kore.aiのセッション固有の変数を使用して、タスクを実行する前にセッションから値を入力したり、取得したりする必要があるかもしれません。詳細については、タスクでのセッション変数とコンテキスト変数の使用を参照してください。Webサービスの中には、APIリクエストを実行する前に、実行済みのコード、セッション変数、あるいはユーザーのコンテキスト詳細の変更を必要とするものがあります。例として、Webサービスでは、第1ステップとしてユーザーのログイン、第2ステップとしてパートナーの認証という2つの要素によるユーザー認証が必要となる場合があります。この2つのステップを検証した後、アクセストークンが付与され、そのWebサービスへの後続のAPIコールのヘッダーに使用されます。イニシャライザーを使用すれば、パートナー認証の完成、そしてユーザーの認証への応答からのアクセストークンを取り戻すことができます。アクセストークンはカスタムセッション変数、そして後続のAPIコールのヘッダーとしての貯蔵が可能です。
Defining the Request Chainタスクイニシャライザの定義
タスクの初期化子を設定する場合、初期化子タブをクリックしてください。JavaScriptエディターが開き、必要なコードを書くことができます。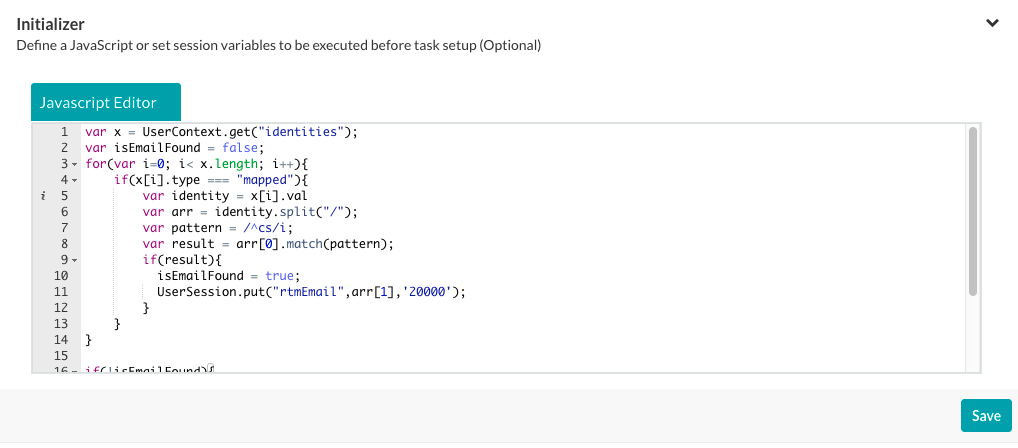 JavaScriptエディターで、以下のようにキーとスコープを定義します。
- EnterpriseContext – 企業の中のあらゆるボットとあらゆるユーザーが使用できるキー/値ペア。例として、GitHubボットの場合、ユーザーは1つ以上の企業リポジトリにアクセスする必要がます。イニシャライザでは、以下のJavaScriptコードでリポジトリデータをGitrepository(エンタープライズコンテキスト)として保持することができます。
var userRepository = { "title": _labels_[repository], "value": repository }; EnterpriseContext.put('Gitrepository', userRepository, 200000); - BotContext – この特定ボットのあらゆるユーザーが利用できるキー/値のペアです。例として、ユーザー所在地を拠点にしたセッションにおいて、金融取引用にデフォルトの通貨を設定することができます。イニシャライザでは、以下のJavaScriptコードによって、デフォルトの通貨データを通貨(ボットコンテキスト)として存続させることができます。
var defaultCurrency = { TODO Custom JavaScript for location-based currency } BotContext.put('currency', defaultCurrency, 200000); - UserContext – 企業の全ボットおよび全ユーザーが使用可能なキー/値ペアです。これらのキーは読み取り専用で、ユーザー データとしてシステムが提供します。
- _id – Kore.aiユーザーのIDです。
- emailId – ユーザーIDと関連するメールアドレスです。
- lastName – ユーザーの姓です。
- firstName – ユーザーの名です。
- profImage – ユーザーの画像やアバター ファイル名です。
- profColour – ユーザーアカウントの色です。
- activationStatus – ユーザーのアカウントステータスです。
- title – ユーザーのタイトルです。(定義されている場合)
- orgId – ユーザーアカウントの組織IDです(定義されている場合)。
- UserSession – 企業内のすべてのボットに対して、特定ユーザーが利用できるキー/値のペアを定義します。例として、商取引、輸送、宅配便サービスのためのユーザーの自宅住所など、ユーザーの位置を保存して全ボットにも利用できるようにしたい場合もあります。イニシャライザでは、以下のJavaScriptコードによって、デフォルトの位置データをHomeLocation (UserSession)として存続させることができます。
var location = { "title": labels[location], "value": { "latitude": location.latitude, "longitude": request.location.longitude } }; UserSession.put('HomeLocation', location, '20000'); - BotUserSession – 特定のユーザーの入力に基づいて、特定のボットに使用できるキー・値のペアを定義します。例として、 複数のボットタスクにとってユーザー位置を存続させたい場合もあります。旅行ボットの場合、ユーザーは同じ自宅と目的地の住所に基づいてフライトとホテルを予約できる場合があります。イニシャライザでは、以下のJavaScriptコードによって、デフォルトの自宅と宛先のデータを、HomeLocation(BotUserSession )およびDestinationLocation(BotUserSession )として存続させることができます。
var homelocation = {
 "title": labels[request.sourceLocation],
 "value": {
 "latitude": request.sourceLocation.latitude,
 "longitude": request.sourceLocation.longitude
 }
};
BotUserSession.put('HomeLocation', homelocation, '20000');
var destlocation = {
 "title": labels[request.destLocation],
 "value": {
 "latitude": request.destLocation.latitude,
 "longitude": request.destLocation.longitude
 }
};
BotUserSession.put('DestinationLocation', destlocation, '20000’);
GETとPUT構文
以下のコードの例は、各コンテキストタイプのキー値ペアをGETまたはPUTする構文を表示します。
"EnterpriseContext" : { "get" : function(key){...},//get the specified key "put" : function(key, value, ttl){...}//put the value at the key for the specified ttl, ttl is in minutes }, "BotContext" : { "get" : function(key){...},//get the specified key "put" : function(key, value, ttl){...}//put the value at the key for the specified ttl, ttl is in minutes }, "UserContext" : { "get" : function(key){...},//get the specified key }, "UserSession" : { "get" : function(key){...},//get the specified key "put" : function(key, value, ttl){...}//put the value at the key for the specified ttl, ttl is in minutes }, "BotUserSession" : { "get" : function(key){...},//get the specified key "put" : function(key, value, ttl){...}//put the value at the key for the specified ttl, ttl is in minutes }
例:
BotContext.put("topicSessionVariable","music",2000); UserSession.put("firstName","Mary",20000); UserContext.get("firstName");
Exception Syntax
また、タスクを設定する前に、認証失敗などのエラーを捕捉するためのカスタムエラーメッセージを定義することもできます。例外をキャプチャした場合、タスクの設置は中止します。以下の構文を使用して例外を外します。
{ "exceptions": { "message": " Error Message" } }
例:
var ex ={}; var exceptions={}; exceptions.message ='You can not proceed further with out valid permissions'; ex.exceptions = exceptions; print(JSON.stringify(ex)); //print is mandatory.
イニシャライザセクションでは、セッションキーまたはその他のセッション変数を使用することができますが、値を設定またはアクセスすることはできません。例:
var name = UserContext.get("firstName")+UserContext.get("lastName"); UserSession.put("fullName") = name;
先行コードの例では、タスクの詳細設定セクションのセッションから取得フィールドで定義されたタスクのパラメータを使用して、値をセッションに入力します。キーは、カスタム定義されたUserSessionコンテキスト変数のfullNameとして定義されます。
タスク初期化子の例
以下のコードは、タスクの初期化子でAPIリクエストに変数を先行発生するユーザーIDおよびメールのデータを取得する例です。
var x = UserContext.get("identities"); var isEmailFound = false; for (var i = 0; i < x.length; i++) { if (x[i].type === "mapped") { var identity = x[i].val var arr = identity.split("/"); var pattern = /^cs/i; var result = arr[0].match(pattern); if (result) { isEmailFound = true; UserSession.put("rtmEmail", arr[1], '20000'); } } } if (!isEmailFound) { for (var j = 0; j < x.length; j++) { if (x[j].type === "email") { UserSession.put("rtmEmail", x[j].val, '20000'); } } }
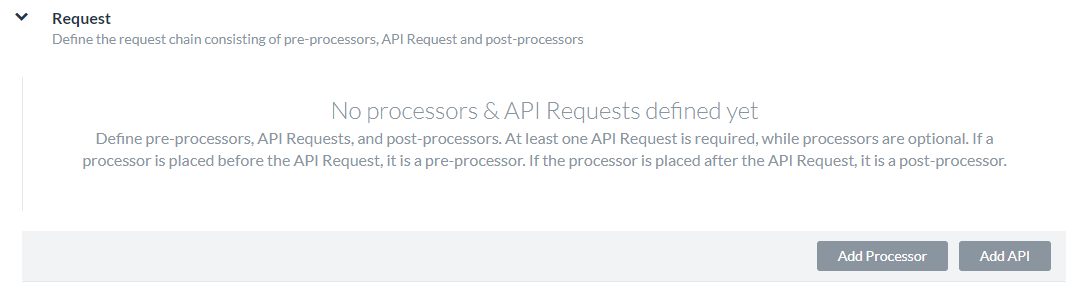
「APIリクエスト」タブの「リクエスト」セクションでは、プリプロセッサ、APIリクエスト、ポストプロセッサで構成されるAPIリクエストチェーンを定義することができます。少なくとも1つのAPIリクエストが必要ですが、プロセッサはオプションです。
Adding the Response SampleAPIリクエスト
あらゆるタスクにも、APIリクエストを定義してからWebサービスへのコールでタスクを開始することができます。少なくとも各タスクに1点のAPIリクエストが必須です。各APIリクエストについては、必ず1つ以上のリクエストURLs、およびWebサービスからのデータペイロード転送を開始するためのタスクへのパスを追加する必要があります。
APIリクエストの設定
- APIリクエストタブで、リクエストタブを展開し、APIの追加をクリックします。
- 以下の手順の説明に従って、APIの追加ダイアログのフィールドの値を指定します。
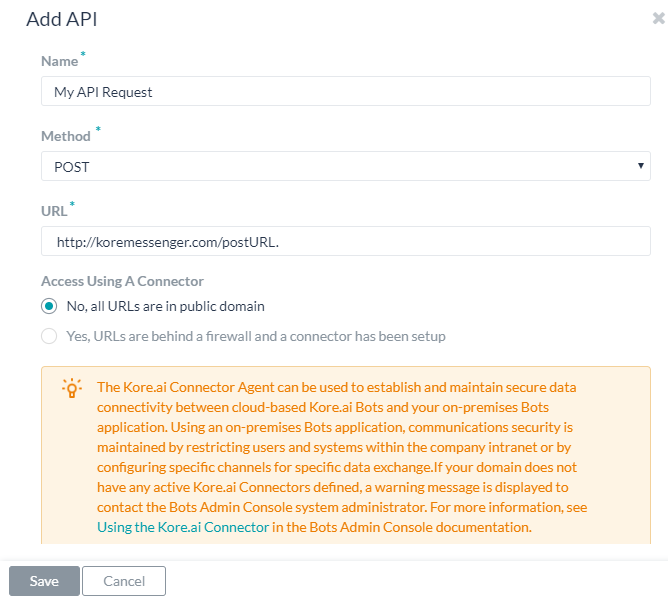
- 名前フィールドに、たとえばマイAPIリクエストのように、APIリクエストの名前を入力します。
- メソッドドロップダウンリストで、タスクに使用するHTTPメソッドを選択します。以下から1つ:
- POST―顧客情報やファイルのアップロード、HTMLフォームの使用など、サーバーにデータを送信するために使用します。
- PUT– ターゲットリソースのコンテンツを、送信されてきたコンテンツに置き換えます。
- PATCH – 送信されてきたコンテンツに、既存のターゲットリソースのコンテンツを追加します。
- DELETE―既存のターゲットリソースのコンテンツを削除します。
- GET―既存のターゲットリソースのコンテンツを返します。
- URLフィールドには、ボットタスクのレスポンスを処理するためのURLを指定します。例:http://koremessenger.com/postURL。次の例のように、URLにセッション変数を使用することもできます。
https://mySite.crm.ondemand.com/sap/c4c/odata/v1/c4codata/ServiceRequestCollection?$filter=ID eq '{id}' and ReporterEmail eq '{userEmail}'&$expand=ServiceRequestHistoricalVersion,ServiceRequestDescriptionメモ:URLによっては、 エンド パラメータとスタート パラメーターにKore.ai独自のパラメーター値を使用したいこともあります。Kore.aiのパラメータ値の詳細については、ボットの追加にあるボット固有のドキュメントをご参照ください。 - コネクタを使用したアクセスフィールドで、はいを選択し、Kore.aiコネクタエージェントを使用してKore.ai ボットへのアクセスを有効にします。このオプションは、Kore.ai コネクタ エージェントが企業の社内ネットワークで構成、有効化されている場合に表示されます。詳細については、Kore.ai Connectorの使用をご覧ください。
- ヘッダータブのコンテンツタイプフィールドで、サンプル応答データに以下のサポートされているデータタイプのいずれかを選択します。
- JSON – JavaScriptオブジェクトノテーションは、人間が読めるテキストを使用して、データオブジェクトを属性と値のペアとして送信するオープンスタンダードなフォーマットです。Kore.aiサーバーとボットWebアプリケーションとの間のデータ転送には、JSONを使用することができます。
- RSS – リッチサイトサマリーあるいはリアリーシンプルシンジケーションは、ブログエントリ、ニュースヘッドライン、音声、ビデオなど、頻繁に更新される情報を公開するために使用される標準化されたフォーマットの一種です。
- XML – 拡張可能なマークアップ言語は、人間が読むことも、機械が読むこともできる形式でドキュメントをエンコードするための一連のルールを定義するマークアップ言語です。WebサービスがXMLデータを処理するのに、XMLスキーマがよく使用されます。
- URL エンコードされたJSON – 予約文字のためにJSON のエンコードを使用するURL。
- CSV – カンマ区切りの値のリスト。
- 文字―テキストベースのキー値ペア。
- Twitter エンコードされた JSON – 予約文字のためにJSONのエンコードを使用したTwitterのURL。
- マルチパート/フォームデータ – ユーザーがフォームからファイルをアップロードできるようにしたい場合に、HTTP POSTリクエストメソッドでファイルを送信するためのエンコーディングタイプ。
- マルチパート/関連品 – 同じ情報を、他のフォームの他のボディパーツで表示する場合に使用。ボディ パーツは複雑度の高い順に並べられています。
- Oracle ADF – Oracle Application Development Framework に使用します。
- [認証ヘッダー] セクションで、次の図に示すようにヘッダーのキーを有効化または無効化します。
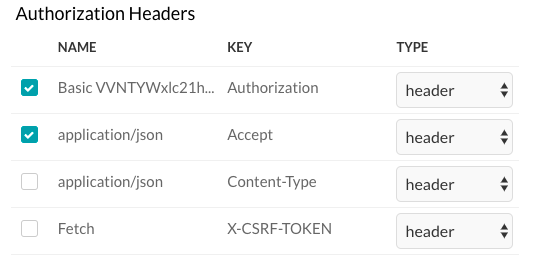
- パラメータ タブでは、下図のように 認証パラメータやヘッダーに含めるパラメータを選択またはクリアします。
- 保存をクリックしてAPIリクエストの設定を保存して閉めます。
プロセッサ
プロセッサでJavaScriptを使用してWebサービスへのAPIリクエストの前、途中、または後で、ユーザーセッションで収集されたマルチデータを操作することができます。プロセッサをAPIリクエストの前に定義して取り付ける場合、それはプリプロセッサーになります。プリプロセッサーはAPIリクエストの実行の前にセッションの変数から入力のパラメータと値の管理を可能にします。そのプロセッサはAPIリクエストの後に順次取り付けられた場合、ポストプロセッサとなります。ポストプロセッサを使用して、APIリクエストからペイロード応答キーにアクセスできます。キーにアクセスするには、以下のいずれかのポストプロセッサタイプを使用します。
- 解決:キーにアクセスするには、次のいずれかのポストプロセッサタイプを使用します。
- 展開 – ペイロードにあるデータ文字列を分ける。
- 抽出 – 複数のオブジェクトを持つペイロードにおいて、特定のオブジェクトへのパスを指定する。
- 割り当て – ペイロード応答の変数名を指定する。
プリプロセッサ
APIリクエストが実行される前に、プリプロセッサを使用して、セッション変数とパラメータでリクエストパラメータを管理することができます。プリプロセッサを定義する際には、処理のタイプをカスタム に設定し、表示されるJavaScriptエディターにコードを入力する必要があります。プリプロセッサは、カスタムタイプのみとなります。
プリプロセッサの追加
- APIリクエストページで、リクエストタブを展開し、プロセッサを追加をクリックします。
- 名前フィールドにプロセッサの名前を入力します。
- プロセッサのタイプドロップダウンリストで、プリプロセッサにカスタムを選択する必要があります。
- 必要に応じて、以下の構文でリクエストパラメータを操作するコードを追加します。
{ "fields": { "payloadFields": { // to set value to a payload field "key1": "value1", // Payload fields are not applicable for Alert tasks."key2": "value2"....}, "headerFields": { // to set value to a header field "key1": "value1", "key2": "value2"....}, "pathFields": { // to set value to a path field or query field."key1": "value1", "key2": "value2"....} } }例として、次のコードスニペットは、APIオブジェクトのパスフィールドまたはクエリフィールドを設定するために使用できます。
var fields= {}; var pathFields = {}; pathFields.fullName = UserContext.get("firstName")+UserContext.get("lastName") fields.pathFields = pathFields; var finalObject = {}; finalObject.fields = fields; print(JSON.stringify(finalObject));当該コードに、
firstNameおよびlastNameがセッション変数として保存されていてJohnおよびSmithがそれぞれに対応している場合、プリプロセッサからの JSON ペイロード応答は次のようになります。{ fields: { "pathFields": { "key": "fullName", "value": "John Smith" } } }下記のキー値ペアーの例では、実のAPIリクエストコールの先に変数はセッション変数に設定されます。
var fields = {}; var pathFields = {}; var UserEmailID = UserSession.get("rtmEmail"); pathFields.userEmail = UserEmailID; fields.pathFields = pathFields; var finalObject = {}; finalObject.fields = fields; print(JSON.stringify(finalObject)); - 保存 をクリックして、プロセッサの追加ダイアログを保存して閉じます。
APIリクエストの前にリクエストセクションにプロセッサが配置されている場合、そのプロセッサはプリプロセッサと見なされます。API リクエストの後ろにプロセッサを設置した場合、そのプロセッサはポストプロセッサと見なされます。
ポストプロセッサの追加
ご使用のWebサービスから1点以上のAPIリクエストで、Kore.aiポストプロセッサを使用してお望みのデータペイロードを取得することもあります。
カスタムポストプロセッサの定義
カスタムポストプロセッサを作成したい場合、以下の構文を使用して前のAPIリクエストの応答キーにアクセスできます。
payload[0].{ key }
JSON Syntax
{ "payload": { "key1" : "value1", "key2" : "value2" } }
例
var final = {}; var data = payload[0]; //Accessing the response of the previous API object data.title[0] = 'New value for key here'; final.payload = data; // Updating the response of the API object print(JSON.stringify(final)); // This step is mandatory
カスタムプロセッサの場合、前のコードで示されたように、最後の応答を示した先行コードとして印刷してください。そうでなければ、空の応答が返されます。以下の構文を使用します。
print(JSON.stringify( <<object>> ));
標準ポストプロセッサの設定
以下の手順で、標準ポストプロセッサを追加します。
- APIリクエストタブで、リクエストタブを展開し、プロセッサの追加をクリックします。
- Kore.aiは、ポストプロセッサ用のカスタムコードを作成する代わりに、使用できる標準ポストプロセッサのセットを提供します。処理のタイプフィールドに、以下の4つの標準プロセッサのタイプのうちの1つを選択します:
- 解決:1つのペイロード応答の結果を、2つ目のリクエストの入力として使用することができます。例として、プロセッサを追加をクリックして、プロセッサの名前を入力し、プロセッサのタイプを解決に、キーを変数の名前に設定し、最初のAPIリクエストからの変数を使用して投稿URLを定義します。For example, https://app.asana.com/api/1.0/projects/{project_id} that returns the id field in the payload response as:
..."id":80468818418144, <br/> "created_at":"2016-01-14T05:34:35.848Z", "modified_at":"2016-01-20T04:29:52.505Z", "owner":{ "id":73114591129714, "name":"jaganmohan.evuri" }, ...それは次に変数入力として下記のPost URLのように: https://app.asana.com/api/1.0/projects/{id}/tasks?opt_fields=completed,modified_at また、ペイロードレスポンスで想定されるHTML コンテンツタ イプとHTML リクエス トメソッドも指定する必要があります。詳細については、タスクでのセッション変数とコンテキスト変数の使用を参照してください。
- 展開:分けとするデータが含む文字列のペイロードの場合。例として、プロセッサを追加をクリックし、プロセッサの名前を入力し、キーフィールドをデータなどに設定し、プロセッサタイプを展開に設定して、以下のコード例で
data要素の内容を取り込み、配列の各アイテムを抽出します。{ "attribution": null, "tags": [], "type": "image", "location": null, "comments": { "count": 51, "data": [{ "created_time": "1453900980", "text": "43rd", "from": { "username": "kore_hyd", "profile_picture": "https://scontent.cdninstagram.com/t51.2885-19/11906329_960233084022564_1448528159_a.jpg", "id": "2056218675", "full_name": "Kore.ai Hyd" }, "id": "1171728804843572377" }, { "created_time": "1453901222", "text": "44th", "from": { "username": "kore_hyd", "profile_picture": "https://scontent.cdninstagram.com/t51.2885-19/11906329_960233084022564_1448528159_a.jpg", "id": "2056218675", "full_name": "Kore.ai Hyd" }, "id": "1171730841379491107" }, { "created_time": "1453901997", "text": "45th", "from": { "username": "kore_hyd", "profile_picture": "https://scontent.cdninstagram.com/t51.2885-19/11906329_960233084022564_1448528159_a.jpg", "id": "2056218675", "full_name": "Kore.ai Hyd" }, "id": "1171737339782450909" }, { "created_time": "1453902304", "text": "46th and 47th", "from": { "username": "kore_hyd", "profile_picture": "https://scontent.cdninstagram.com/t51.2885-19/11906329_960233084022564_1448528159_a.jpg", "id": "2056218675", "full_name": "Kore.ai Hyd" }, "id": "1171739915923967873" }, { "created_time": "1453902638", "text": "48th", "from": { "username": "kore_hyd", "profile_picture": "https://scontent.cdninstagram.com/t51.2885-19/11906329_960233084022564_1448528159_a.jpg", "id": "2056218675", "full_name": "Kore.ai Hyd" }, "id": "1171742713994497101" }, { "created_time": "1453964684", "text": "49th", "from": { "username": "venkataphani.ailavarapu", "profile_picture": "https://scontent.cdninstagram.com/t51.2885-19/11906329_960233084022564_1448528159_a.jpg", "id": "2679234818", "full_name": "Phani" }, "id": "1172263199715314941" }, { "created_time": "1453964710", "text": "50th", "from": { "username": "kore_hyd", "profile_picture": "https://scontent.cdninstagram.com/t51.2885-19/11906329_960233084022564_1448528159_a.jpg", "id": "2056218675", "full_name": "Kore.ai Hyd" }, "id": "1172263415747136776" }, { "created_time": "1453964717", "text": "51st", "from": { "username": "kore_hyd", "profile_picture": "https://scontent.cdninstagram.com/t51.2885-19/11906329_960233084022564_1448528159_a.jpg", "id": "2056218675", "full_name": "Kore.ai Hyd" }, "id": "1172263474056350986" }] ... - 抽出:複数オブジェクトが含むペイロードの場合、特定のオブジェクトにパスを指定することができます。例として、プロセッサの追加をクリックし、プロセッサの名前を入力し、キーフィールドを
dataに設定し、抽出する処理のタイプを選択して、次のペイロード応答でオブジェクトデータを使用します。{ "user": { "full_name": "Kore.ai Hyd", "id": "2056218675", "profile_picture": "https://instagramimages-a.akamaihd.net/profiles/anonymousUser.jpg", "username": "kore_hyd" }, ...}, "likes": { "data": [{ "full_name": "kstream002", "id": "2100724876", "profile_picture": "https://instagramimages-a.akamaihd.net/profiles/anonymousUser.jpg", "username": "kstream002" } }, ...} - 割り当て:割り当て プロセッサを使用すると、ペイロードにペイロード応答データのキーが含まれていない場合など、必要に応じて、ペイロード応答の変数名を指定することができます。例として、処理のタイプを割り当てに設定し、アウトプット変数フィールドで、たとえば、次のようなペイロードに対して、3つのオブジェクトの配列であるアウトプット変数を定義することができます。
[ { "Cost": "$0.00", "Desc1": "$150 bonus after $500 of purchases in the first 3 months from account opening.", "Desc2": "Earn unlimited cash back Earn unlimited 1.5% cash back on every purchase – it's automatic.Redeem for cash back – any amount, any time.", "Keywords": "weekend dining,online,groceries,fuel,rewards,rebate,365,allaround", "OfferName": "Freedom Unlimited", "OfferType": "CreditCard", "Status": "1", "imageURL": "http://www.psdgraphics.com/file/credit-card.jpg", "id": "5b5195e264bbd800" }, { "Cost": "$95.00", "Desc1": "Pay 0 balance transfer fee when you transfer a balance during the first 60 days.", "Desc2": "Jumpstart your financial fitness Get an introductory fee for balance transfers, save on interest†, and get your free monthly credit score.", "Keywords": "privileges,rebate,health,wellness,great eastern,insurance,policy,installments,split,cashflo", "OfferName": "Premium Plus", "OfferType": "CreditCard", "Status": "1", "imageURL": "http://i.imgur.com/rMOXYql.jpg", "id": "5caf2155873f89c8" }, { "Cost": "$10.00", "Desc1": "Pay 0 balance transfer fee when you transfer a balance during the first 60 days.", "Desc2": "Jumpstart your financial fitness Get an introductory fee for balance transfers, save on interest†, and get your free monthly credit score.", "Keywords": "privileges,rebate,health,wellness,great eastern,insurance,policy,installments,split,cashflo", "OfferName": "Frequent Flyer", "OfferType": "CreditCard", "Status": "1", "imageURL": "http://www.moneychoice.org/wp-content/uploads/2016/01/credit-card-calculator-image.png.jpeg", "id": "c0b05bc3062658ee" } ]アウトプット変数フィールドには、たとえば、配列を表す変数を
offersのように指定します。もしUXプレビュー機能を使用した場合、Kore.ai からの応答は以下の通りです。{ "response": { "offers": [ { "Cost": "$0.00", "Desc1": "$150 bonus after $500 of purchases in the first 3 months from account opening.", "Desc2": "Earn unlimited cash back Earn unlimited 1.5% cash back on every purchase – it's automatic.Redeem for cash back – any amount, any time.", "Keywords": "weekend dining,online,groceries,fuel,rewards,rebate,365,allaround", "OfferName": "Freedom Unlimited", "OfferType": "CreditCard", "Status": "1", "imageURL": "http://www.psdgraphics.com/file/credit-card.jpg", "id": "5b5195e264bbd800" }, { "Cost": "$95.00", "Desc1": "Pay 0 balance transfer fee when you transfer a balance during the first 60 days.", "Desc2": "Jumpstart your financial fitness Get an introductory fee for balance transfers, save on interest†, and get your free monthly credit score.", "Keywords": "privileges,rebate,health,wellness,great eastern,insurance,policy,installments,split,cashflo", "OfferName": "Premium Plus", "OfferType": "CreditCard", "Status": "1", "imageURL": "http://vignette3.wikia.nocookie.net/objectmayhem/images/5/52/Credit_card.png/revision/latest?cb=20130629150408", "id": "5caf2155873f89c8" } ] } }アウトプット変数が
offersに設定されていると、ボットビルダーでresponse.offersとして、たとえば、以下のようにタスク応答オブジェクトで使用することができます。print(JSON.stringify(response)); var data = response.offers for (i = 0; i < data.length; i++) { print('<a href="' + data[i].imageURL + '" target="_blank">' + data[i].OfferName + '</a><br>'); print(data[i].Desc1) print('<br>'); print('<br>'); print('Cost: ' + data[i].Cost) print('<br>'); if (i < data.length - 1) { print('<br>'); print('<br>'); } }
- 解決:1つのペイロード応答の結果を、2つ目のリクエストの入力として使用することができます。例として、プロセッサを追加をクリックして、プロセッサの名前を入力し、プロセッサのタイプを解決に、キーを変数の名前に設定し、最初のAPIリクエストからの変数を使用して投稿URLを定義します。For example, https://app.asana.com/api/1.0/projects/{project_id} that returns the id field in the payload response as:
- 追加をクリックしてAPIリクエストを保存してから別のAPIリクエストを作成するか、追加と終了をクリックしてAPIリクエストを保存してからダイアログをクローズ閉じます。
複数のAPIリクエストの場合、リクエストをシーケンシャルの並べで並べ直してから全体のデータ応答を取得するようにしてください。例として、ワークスペースのリストを依頼し、次にプロジェクトのリストを依頼し、最後にユーザーのリストを依頼する必要があるかもしれません。繰り上げ ![]() アイコンと繰り下げ
アイコンと繰り下げ ![]() アイコンを使用して、APIリクエストの順番を入れ替えます。
アイコンを使用して、APIリクエストの順番を入れ替えます。
メモ:APIリクエストを削除した場合、確認ダイアログは表示されません。続行または保存をクリックすると、削除操作は永続的に行われ、元に戻すことはできません。
応答サンプルセクションでは、タスクのペイロードで受信することが想定されるキーと値のペアのサンプルを入力または貼り付けることができます。応答サンプルを定義すると、応答サンプルセクションで指定したキーが、アウトプットデータを処理するために、ドロップダウンの選択肢として利用できます。
サンプル応答の追加
- API リクエストタブで、サンプル応答セクションを展開します。
- JSON応答のペイロードのキーと値の組み合わせを含む応答サンプルを入力します。以下のいずれかを実行します。
- 次の図のように、応答のビューをインデント付きのJSON構造としてフォーマットするには、フォーマット済み
 アイコンをクリックします。
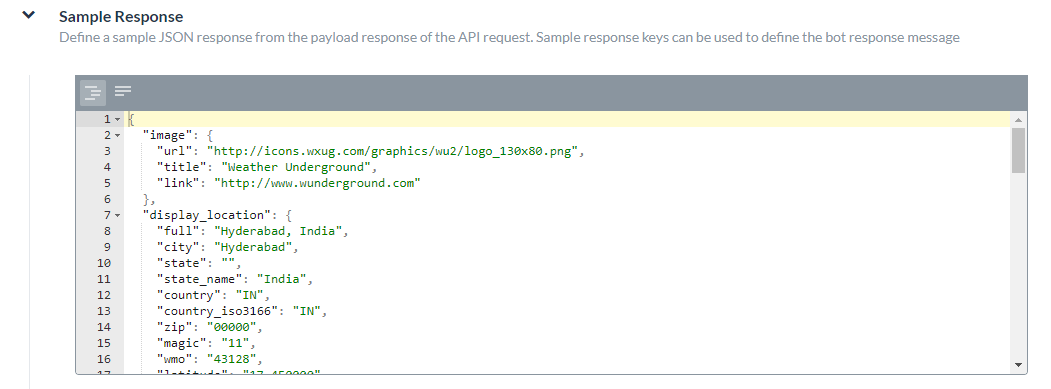
- 応答のビューをシリアルナンバーが付けられたコンパクトなフォームでフォーマット化するには、下図のとおりに、フォーマット化されていない
 アイコンをクリックします。
- 次の図のように、応答のビューをインデント付きのJSON構造としてフォーマットするには、フォーマット済み
API Request - SOAP
一般タブでボットのアクションタスクを記述し、必要に応じて、API リクエストタブで認証要件を定義した後、タスク用にボットのWebサイト、システム、またはWebアプリケーションからデータを要求するAPIリクエストの設定を開始する準備が整います。このトピックでは、接続モードをSOAPに設定したアクションタスクのリクエストオブジェクトを設定する方法について説明します。Configuring API Request (SOAP)
Access Using a Connector
Kore.aiのアクションタスクのリクエストで、および接続モードがSOAPに設定されている場合、以下のように定義する必要があります。 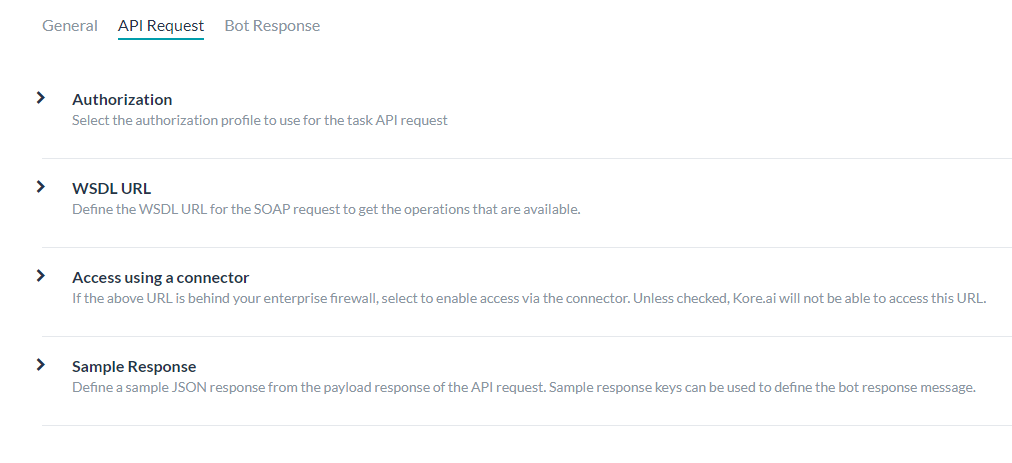
Defining the WSDL URL
- 認証 – アクションタスクに必要な場合、APIにアクセスするための認証を定義する必要があります。たとえば、基本認証、OAuth、またはAPIキーを使用します。詳細は、APIリクエストタブ – 認証設定をご覧ください。
- WSDL URL – WSDLデータを含むURLを定義します。URLを取得すると、WSDLを基にして利用できる操作リストから選択し、ユーザー入力フィールドをカスタマイズすることができます。詳細は、WSDL URLの定義をご覧ください。
- コネクタを使用したアクセス -ボットプラットフォームがオンプレミスでインストールされていて、Kore.aiコネクタのエージェントを使用したい場合に指定します。詳細は、コネクタを使用したアクセスをご覧ください。
- 応答サンプル – アクションタスクのペイロードで受信すると想定されるキー/値のペアを定義します。提供したキー・値のペアは、エンドユーザーに表示するデータの処理用として、ドロップダウンの選択肢として使用できます。詳細は、アクションタスクに応答サンプルを追加をご覧ください。
- API リクエストタブで、WSDL URLセクションを展開します。
- SOAPリクエストのリクエストタスクの設定を開始するには、WSDL URL フィールドにSOAP WSDLのURLを入力します。

- WSDLの説明を手に入れるをクリックします。WSDLにおいて定義されている 使用可能な演算子 のリストが開きます。
- タスクで使用するSOAPリクエストの選択をクリックします。Kore.aiは、ユーザー入力が必要な場合、1つ以上の[アクションタスク]フィールドを自動的に入力します。
[SOAPアクションタスク]フィールドのカスタマイズ
WSDLから使用可能なオペレーション を1つ以上選択した後、Kore.aiが提供するデフォルトの入力フィールドをカスタマイズすることができます。デフォルトの[アクションタスク]フィールドをカスタマイズするには、以下の手順に従います。
- カスタマイズしたいアクションタスクフィールドの編集をクリックします。アクションタスクフィールドのセットアップダイアログが開きます。

- 入力を収集するエンドユーザーフィールドを定義するには、次のテーブルに説明されているように、アクションタスクフィールドのセットアップダイアログでパラメータの値を指定します。
フィールド名 説明 フィールド タイトル エンドユーザーインターフェースに表示されるタスク入力フィールドのタイトル。例: 国。 ヘルプのヒント ヘルプテキストはタスクの下に表示されています。そのタスクは、たとえば「天気を知りたい国の名前を入力する」というタスクを説明するタイトルを設定することです。 フィールドキー 収集するエンドユーザーの入力値を表す、読み取り専用キーです。例:国. フィールドタイプ キーの値に割り当てるリクエストオブジェクト用のユーザー入力を収集するためにエンドユーザーインターフェースに表示されるタスク入力フィールドのタイプを指定します。デフォルト設定はテキストボックスですが、以下のいずれか1つをカスタマイズできます。 - 日付 – フォーマットフィールドが表示され、エンドユーザーが自分のアカウントにタスクが設定される際に定義する日付フォーマットの構文を選択できます。日付フォーマット選択のドロップダウン リストから、次のうちの1つを選択します。
- dd-MM-YYYY – 例:16-05-1999
- MM-dd-YYYY – 例:05-16-1999
- dd-MM-YY – 例:16-05-99
- YYYY-MM-dd – 例:1999-05-16
- URL – 正しい URL 構文のためのフィールド検証を含む、エンドユーザーによる URL 入力用のテキスト ボックスを表示します。プレースホルダーフィールドには、テキストボックスに表示されるヘルプヒントを入力します。例:こちらにWebサイトのURLを入力してください。
- テキストボックス―エンドユーザーにタスクの入力フィールドとして文字を入力するためのテキストボックスを表示します(通常は数語程度)。プレースホルダーフィールドには、テキストフィールドに表示されるヘルプヒントを入力します。例:刺しゅうしたい名前のタイプ。
- 静的ドロップダウン – エンドユーザーに選択肢のドロップダウン リストを表示します。オプションの追加をクリックして以下のパラメータでエンドユーザーに表示するアイテムのリストの追加を始まります:
- オプション名 – エンドユーザーに表示されるオプションの名前です。
- オプション値―アプリケーションに返すオプション名という値と示します。
- デフォルト値 – 1つ以上のオプションが定義されている場合、オプションのデフォルト値を選択します。
- 検索可能 – エンドユーザーがこのフィールドにテキストを入力するときに、ダイナミック検索と表示を有効にするか、あるいは一致がない場合に、フリーフォームのエントリを許可するかを選択します。
保存をクリックします。アイテムを追加する場合、オプションを追加をもう一度クリックします。オプションのアクション列において、オプションを編集または削除します。
- 動的ドロップダウン – ボット用のURLからの応答に基づいて、実行時に動的に生成されるドロップダウンリストを表示します。例:JIRAタスク通知用のプロジェクトリスト。以下の動的に配置されるドロップダウンのプロパティを定義します。
- エンドポイントURL – ボットのエンドポイントURL。例:https://app.asana.com/api/1.0/workspaces。
- エンドポイントのコンテンツタイプ – 指定されたエンドポイントURLから想定されるコンテンツタイプ。以下から1つ:JSON、RSS、XML、URLエンコードのJSON、CCV、文字、またはTwitter エンコードのJSON。
- エンドポイントメソッド – 以下のうちの1つ:
- GET – [タスク]フィールドのHTTPリクエストGETメソッドを指定します。
- POST – [タスク]フィールドのHTTPリクエストPOSTメソッドを指定します。
- 応答パス – 希望するドロップダウンリスト値を含む応答内のパス。例:データ。
- ラベルキー – ドロップダウンオプションのラベルのキー。例:名前。
- オプションの値キー – ドロップダウンオプションの値のキー。例:ID。
- ペイロードフィールドの追加 – クリックすると、動的ドロップダウンのオプションとして、応答ペイロードから1つ以上のフィールドが追加されます。各ペイロードフィルドについて、ペイロードフィールドのキーとペイロードフィールドの値を入力し、保存をクリックします。アクション列でペイロードフィールドを編集または削除します。
- 検索可能 – エンドユーザーがこのフィールドにテキストを入力するときに、ダイナミック検索と表示を有効にするか、あるいは一致がない場合に、フリーフォームのエントリを許可するかを選択します。
- Textarea – エンドユーザーがタスク入力としてテキスト(通常は数センテンス)を入力するためのテキストエリアボックスを表示します。プレースホルダーフィールドに、テキストボックス内でエンドユーザーに対して表示するヘルプヒントを入力します。
- 先行入力 – タスクに定義されたURLからの応答を基にした検索結果に一致する3つ以上の文字をユーザーが入力すると、実行時のエンドユーザーに対して動的に配置されたドロップダウンリストの選択肢が表示されます。例:JIRAのタスク通知メッセージのプロジェクトリスト。以下の動的に配置されるドロップダウンへのプロパティを定義します。
- エンドポイントURL – ボットのエンドポイントURL。例:https://app.asana.com/api/1.0/workspaces。
- エンドポイントのコンテンツタイプ – 指定されたエンドポイントURLから想定されるコンテンツタイプ。以下から1つ:JSON、RSS、XML、URL エンコードされた JSON、CCV、テキスト、Twitter エンコードされた JSON、Multipart/Form-data または Multipart/Related。
- エンドポイントメソッド – 以下のうちの1つ:
- GET – [タスク]フィールドのHTTPリクエストGETメソッドを指定します。
- POST – [タスク]フィールドのHTTPリクエストPOSTメソッドを指定します。
- 応答パス – 希望するドロップダウンリスト値を含む応答内のパス。例:データ。
- ラベルキー – ドロップダウンオプションのラベルのキー。例:名前。
- オプションの値キー – ドロップダウンオプションの値のキー。例:ID。
- ペイロードフィールドの追加 先行入力フィールドのオプションとして、 応答ペイロードから 1 つ以上のフィールドをクリックして追加します。各先行入力のフィールドオプションについて、ペイロードフィールドのキーとペイロードフィールドの値を入力し、保存をクリックします。アクション列でペイロードフィールドを編集または削除します。
- 編集可能―先行入力の検索結果が一致しない場合のオプションとして、エンドユーザーがフィールドに自由にテキストを入力できるようにします。
- メール – エンドユーザーがメールアドレスを入力するためのテキストボックスを表示します。プレースホルダーフィールドに、エンドユーザーに表示するヘルプヒントをテキストボックス内に入力します。
- 日付と時間 – エンドユーザーが日付と時間を入力するためのテキストボックスを表示します。フォーマットフィールドに、エンドユーザーに表示される日付のテキストボックスに、想定する日付や時間のフォーマットを入力します。日付フォーマットの選択 のドロップダウンリストで、日付と時間のフォーマットを選択します。
- タイムゾーン―操作システムの設定に基づくタイムゾーンのドロップダウンリストを表示します。
- 位置―エンドユーザーが地理的位置を入力するためのテキストボックスを表示します。例:Orlando, FLまたは32801。
- ネスト化フォーム – 親入力フィールドの下に、エンドユーザーの入力フィールドをネスト化形式で表示します。ネストされたフォーム入力フィールドには、次のフィールドを指定します。
- 配列要素型 – 親となる入力フォーム要素のデータ型を選択します。
- ネスト化フォームフィールドの追加 – 1 つ以上のネスト化フォーム フィールドをクリックして追加します。
- ファイル アップロード – アップロードするファイルの検索や選択ができるエンドユーザー制御を表示します。クリックして、ファイルアップロードペイロード キーを入力します。ファイルアップロードペイロードキーが定義されている場合、ファイルアップロードペイロードフィールド値のドロップダウンリストで以下のうちから1つ選択してください。
- ファイル名
- ファイルサイズ
- ファイルコンテンツタイプ
データタイプ ユーザー入力タイプのうちの 1 つを選択します。 - 文字列 – ユーザーは任意の一連の数字、文字や特殊文字を入力することができます。
- 数字 – ユーザーは数字を入力することができます。特殊文字は使用できません。
- ブール値 – ユーザーは true または false のブール値を入力できます。
- メール – ユーザーは有効なメール アドレスを入力できます。
- オブジェクト – ボットからのデータは、JSONオブジェクトとして受信できます。例:次のように定義された位置の詳細として、 “location” : { “lat” : 17.4374614, “lng” : 78.4482878 } ここで、リクエストチェーンやタスクリクエストのプロパティを、 location.latおよびlocation.lngと表記します。
- 配列 – ユーザーは、カンマで区切った値のリストをボットに渡すことができます。例として、グーグルカレンダーでは、複数の参加者のデータのパスは: “attendees”: [“user1”, “user2”, “user3”] 選択した場合、エンドユーザーの入力の配列のタイプを以下のいずれかに指定します。
- 文字列
- 数字
- ブール値
- メール
- 配列
- 日付
- 日付―ユーザーは完全な日付を入力するか、日付の選択肢から選択することができます。
プレースホルダ 入力テキストボックスの下に表示されるテキストで、ユーザーがフィールドを定義するのに役立ちます。このフィールドは特定のフィールド タイプに表示されます。 可視性 タスクの入力フィールドをエンドユーザーから見えるようにするか、見えないようにするかを指定します。可視性フィールドはカスタムフィールドに設定することもできます。ここでは、データはユーザーから取得されますが、クエリパラメータやペイロードフィールドとしては使用されません。例として、JIRAボットの場合、以下のように@mentionタグを使用してチケットにコメントを投稿します。「@Mike、こちらの問題について調べてください」 JIRA APIでコメントを投稿するには1つのクエリフィールドおよび1つのペイロードフィールドが必須です: - IDの発行
- コメント
可視性フィールドをカスタムに設定すると、JIRA APIを使用して
@Mikeと呼ばれるユーザーのユーザー情報をキャプチャし、データを取得してcommentフィールドの値に追加することができますが、ペイロードフィールドやクエリフィールドとしては使用できません。可視性フィールドのデフォルト設定は表示です。必須 タスク設定の構成を保存するために、エンドユーザーがこの設定を定義する必要があるかどうかを選択します。 キーの置き換え Kore.ai によるキーの転置を無効にするかどうかを選択します。デフォルト設定では、Kore.ai ははキー/値のペアを置換します。たとえば、 "parameter":"value"は Kore.ai によって"parameter:{value:"actualValue"}に置換されます。このオプションを選択すると、キーはKore.aiによって転置されず、受信した応答として渡されます。 - 日付 – フォーマットフィールドが表示され、エンドユーザーが自分のアカウントにタスクが設定される際に定義する日付フォーマットの構文を選択できます。日付フォーマット選択のドロップダウン リストから、次のうちの1つを選択します。
- 追加して続行をクリックすると、[タスク]フィールドが保存され、別の アクションタスクフィールドが作成されます。あるいは、追加して終了をクリックして、アクションタスクフィールドを保存してからダイアログを閉じます。
タスクにコネクタを使用してアクセスを定義することを始めるには、以下の手順に従います。
Adding A Response Sample- API リクエストのタブから、コネクタでアクセスセクションを開きます。

- コネクタを使用したアクセスフィールドで、はいを選択し、Kore.aiコネクタエージェントを使用してKore.ai ボットへのアクセスを有効にします。このオプションは、Kore.ai コネクタ エージェントが企業の社内ネットワークで構成、有効化されている場合に表示されます。詳細については、Kore.ai Connectorの使用をご覧ください。
応答サンプルセクションでは、タスクのペイロードで受信することが想定されるキー・値のペアのサンプルを入力または貼り付けることができます。応答サンプルを定義すると、応答サンプルセクションで指定したキーが、アウトプットデータを処理するために、ドロップダウンの選択肢として利用できます。
サンプル応答の追加
- API リクエストタブで、サンプル応答セクションを展開します。
- JSON応答のペイロードのキーと値の組み合わせを含む応答サンプルを入力します。以下のいずれかを実行します。
- 次の図のように、応答のビューをインデント付きのJSON構造としてフォーマットするには、フォーマット済み アイコンをクリックします。
- 応答のビューをシリアルナンバーが付けられたコンパクトなフォームでフォーマット化するには、下図のとおりに、フォーマット化されていないアイコンをクリックします。
- 次の図のように、応答のビューをインデント付きのJSON構造としてフォーマットするには、フォーマット済み
ステップ 4:ボットレスポンスの定義
ボットレスポンスは、エンドユーザーにタスクのステータスまたは完了を知らせるメッセージを提供します。タスクのボットレスポンスタブでは、APIリクエストのペイロードからエンドユーザーに表示するメッセージを定義できます。すべてのチャネルのデフォルトレスポンスを定義し、オプションでチャネル固有のメッセージを定義することができます。ボットの通知タスクの一般タブの設定項目を入力して通知タスクのAPI リクエスト チェーンを設定すると、通知タスクの結果をエンドユーザーにどのように表示するかを定義できるようになります。このセクションでは、通知タスクの応答を設定する方法について説明します。警告タスクの応答オブジェクトを定義するには、2つのセクションがあります。
- レポートテンプレートの定義 – 一部のタスクでは、テーブルや連絡先カードなどのテンプレート、または天気予報などの特定のメッセージタイプ用にフォーマットされたテンプレートを使用して、レポートデータをペイロードの応答を表示できるリンクとしてエンドユーザーに表示したい場合があります。
メモ:このセクションは、Webhookアラートタスク、アクションタスク、またはRSSアラートタスクには使用されません。
タスクにリンクを追加して詳細情報やレポートを提供するには、エンドユーザーアプリケーションでテーブル、天気予報、連絡先カードなどのレポートを表示するための リンクと情報を定義します。タスクのレポートテンプレート定義を定義することから始めるには、下図のようにボットレスポンスタブで、(オプション)レポートテンプレート定義セクションの展開アイコンをクリックします。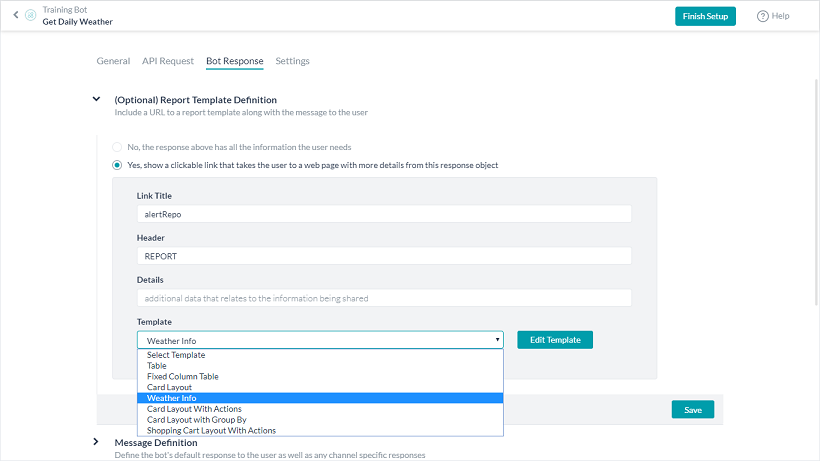 タスクのレポートリンクを有効にするには、はいを選択して、前図のレポートテンプレート定義セクションを表示します。タスクの応答メッセージにリンクを追加すると、ボットのエンドユーザーはそのリンクを選択して、SalesForceボットの販売機会終了に関する値の表などの詳細情報を手に入れることができます。タスク応答メッセージ内に、エンドユーザーが起始のタスク応答メッセージから追加の情報のレポートをリクエストするためのリンクを作成するには、以下のパラメータを定義してください。
- リンクタイトル -タスク投稿でエンドユーザーに表示するリンクテキスト。例:ショッピングカートの表示。
- ヘッダー – レポートがエンドユーザーに表示されたときに表示されるタイトル。例:これらはショッピングカート内のアイテムです。
- 詳細 – ショッピングカートの中身を確認して、注文の準備ができたら続けるをクリックします。このような、レポートの内容を説明するレポートのヘッダー直下に表示するエンドユーザーのヘルプ情報です。
- テンプレート – タスク応答のデータを表示するためのフォーマットテンプレートを以下から1つ選択します。各タイプには、列名、キーマッピング、データ型、およびテンプレート固有のオプションを定義します。
- テーブル – テーブル形式でデータが定義された列に表示されます。テーブルの各マッピングテンプレートは、並べ替え可能、画像で表示、およびリンクで表示に設定することができます。詳細は、テーブルレポートの定義をご覧ください。
- 固定列テーブル – 1つ以上の固定列のテーブル形式でデータが表示されます。固定列テーブルテンプレートの各マッピングは、並べ替え可能、固定列で表示、画像で表示、およびリンクで表示に設定することができます。詳細は、固定列テーブルレポートの定義をご覧ください。
- カード レイアウト – 連絡先カード形式のデータを表示します。カード レイアウトテンプレートの各マッピングは、並べ替え可能、画像で表示、およびリンクで表示に設定することができます。詳細は、カードレイアウトレポートの定義をご覧ください。
- 天気情報 – 天気サービスの応答ペイロードの日付を定義することができます。天気情報テンプレートの各マッピングは、並べ替え可能、画像で表示、およびリンクで表示に設定することができます。詳細は、天気予報レポートの定義をご覧ください。
- アクション付きのカード レイアウト – 各アイテムにマッピングされたタスク リンク付きのアイテムのリストを表示します。詳細は、アクションのカードレイアウトレポートの定義をご覧ください。
- グループ化されたカードレイアウト – 特定のフィールドでグループ化されたアイテムのリストを表示します。詳細は、グループ別のカードレイアウトレポートの定義をご覧ください。
- アクション付きのショッピングカートレイアウト – 各アイテムにマッピングされたタスク リンク付きのアイテムのリストを表示します。詳細は、アクションのショッピングカートレイアウトレポートの定義をご覧ください。
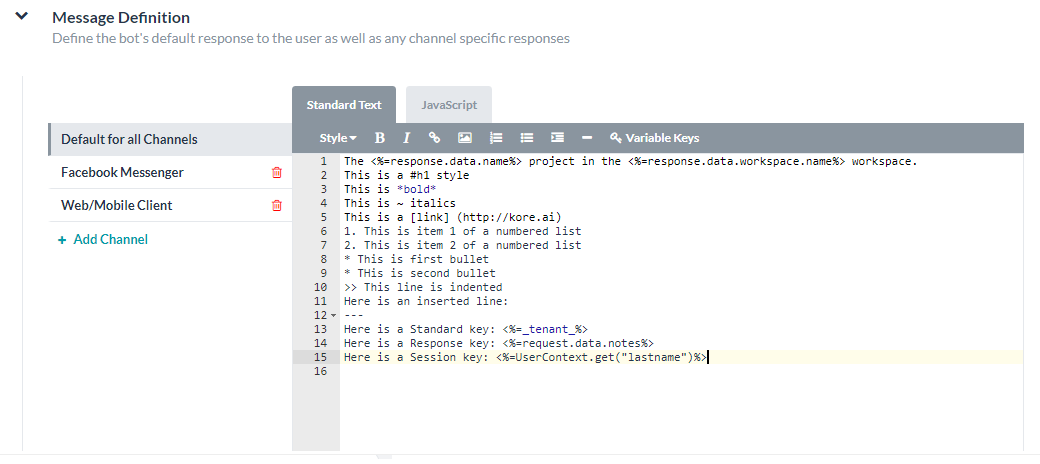
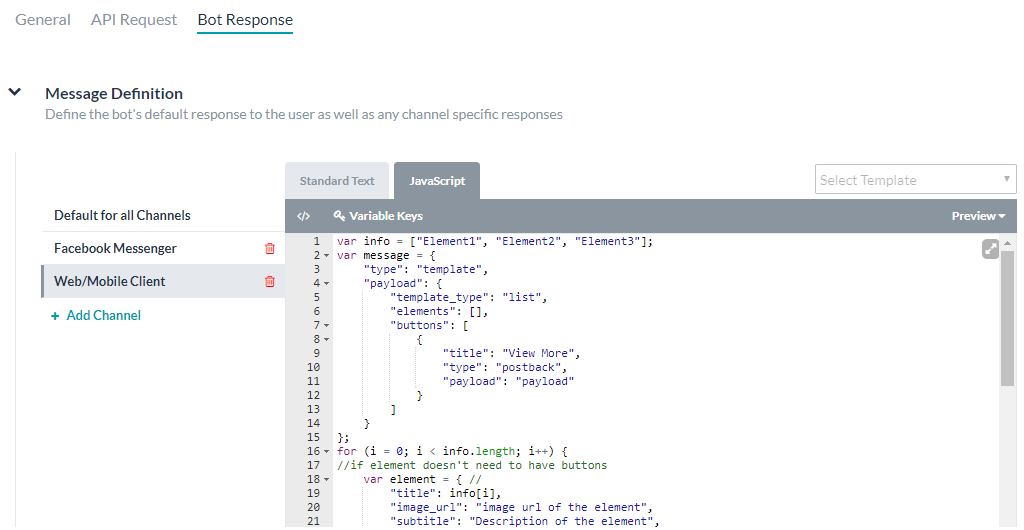
- メッセージの定義 – このセクションでは、Webhookによって送信されたペイロードによって通知が表示された際に、エンドユーザーに表示されるデータの見え方を定義します。Defining Message Definitionタスクに対して、2種類のボットレスポンスを定義することができます。
- 全チャネルのデフォルト: API リクエストと定義済みのプロセッサからのペイロード応答に基づいた全チャネルのデフォルトタイトルとメッセージ応答を作成します。Kore.aiシステム、カスタム変数、応答サンプルに由来する独自の入力および可変キーのセットとともに、応答オブジェクトから混合したデータを作成することができます。メッセージは通常、整形された HTML メッセージとして表示され、リクエスト オブジェクト データからの ID 番号や件名の変数を 1 つ以上含んでいます。
- チャネル固有の応答: Facebook Messenger、Skype、SMS、Web/モバイル SDK など、特定のチャネル用にボット応答メッセージをカスタマイズすることができ、選択したチャネルに事前定義したメッセージ テンプレート (テーブル、リスト、グラフなど) を適用することもできます。
メッセージ定義エディター機能
アクションタスクのエディターを開くには、ボットレスポンス > メッセージ定義へ移動します。メッセージ定義エディターは3つのタブを使用して、以下の機能を提供します。
- 標準文字: 基本エディターの制御およびHTMLのマークアップに介して、変数キーで応答を定義およびフォーマット化ができます。テキストを入力し、太字、斜体、ヘッダースタイル、ハイパーリンク、順序付きリストと順序なしリスト、および行の挿入用のボタンを使用してフォーマット化します。
- JavaScript: エンドユーザーのタスク応答メッセージを処理するカスタム コードを追加して変数を宣言し、変数キーを使用して、サードパーティー アプリケーションと対話できるようにします。
- プレビュー: ボットのユーザーが見るアウトプットメッセージの表示サンプルを、マークアップ付きで表示します。
可変キーの追加
以下の手順に従って変数キーを追加してください:
- 標準テキストモードや JavaScript モードで変数キーを追加するには、変数を追加したい場所にカーソルを合わせて [可変キー] をクリックします。
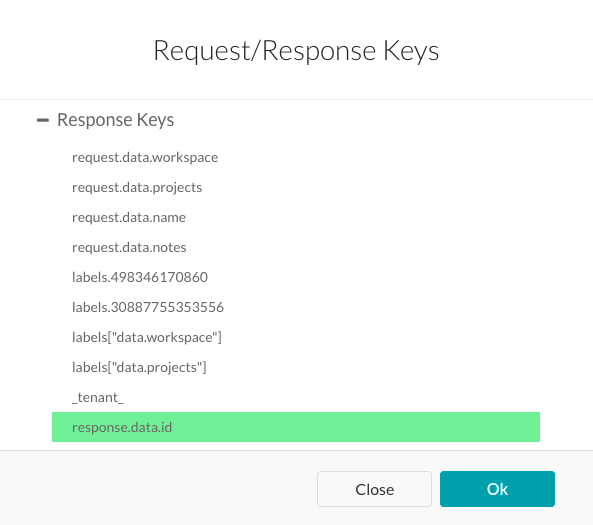
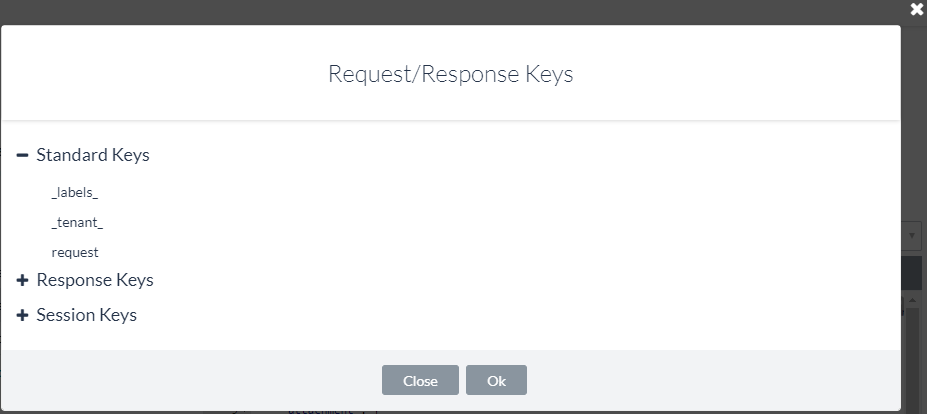
- リクエスト/応答キーダイアログで、挿入したい変数を含むキーノードのタイプを開きます。
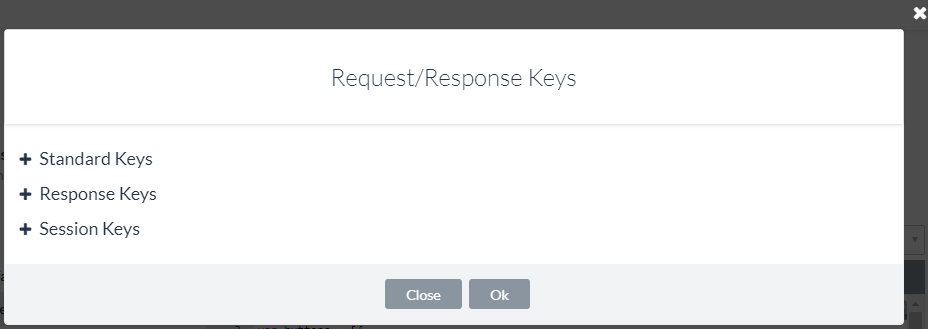
- のような、追加する変数を選択して
response.data.id[OK]をクリックします。
標準キー
標準キーは、以下のような再利用可能なデータ用のKore.ai可変プレースホルダーです。
- _labels_: GUID の代わりにフレンドリラベルを返します。例として、WebサービスAPIからユーザーデータを要求された場合、返されるプロジェクトやワークスペースのIDはGUIDとなります。
_labels_キーを使用して、GUID ではなく、ユーザーフレンドリーのGUID名をエンドユーザーに表示することができます。Kore.aiでは、次の例に示すように、ドロップダウンコントロールが_labels_キー応答を格納します。{ "_labels_": { "15379386734832": "roadlabs.com", "26377329985341": "Test Project", "workspace": "roadlabs.com", "project": "Test Project" }, "_fields_": { "workspace": "15379386734832", "project": "26377329985341" } }応答で
_labels_キーを使用するには、:print('<a href="https://app.asana.com/0/' + workspace.id + '+_labels_[workspace.id]); - _tenant_ – 定義済みのエンタープライズ向けのテナントを返します。例として、 JIRA には、URL が https://koreteam.atlassian.net/browse/BBF-3265 となるよう、テナント koreteam が必要です。以下のように、
_tenant_キーを使用して、タスク応答へのリンクを作成することができます。var title = request.fields.issuetype.name + ' <a href ="https://'+ _tenant_ + '/browse/' + response.key + '" target = "_blank">' + request.fields.summary + '</a> has been created.';
- _fields_ – エンドユーザーが提供する、ペイロードの応答の一部ではないタスク フィールドの入力を返すために使用します。たとえば JIRA タスクでは、エンドユーザーはワークスペース名を入力するように促されます。
_fields_キーを使用して、エンドユーザーの入力を格納します。_fields_["workspace"]
- _last_run – ISO 8601形式を使用して、WebサービスのポールのUTC日付のタイムスタンプを返すために使用されます。例:2016-03-05T12:44:38+00:00。例として、Webサービスリクエストがペイロードレスポンスであらゆるアクティビティを返すととすれば、
_last_runキーを用いて、値の前後に表示される結果をフィルタリングすることができます。_last_run
セッションキー
セッションキーは、単一セッションインスタンスにおけるユーザーデータ用のKore.ai可変プレースホルダーです。
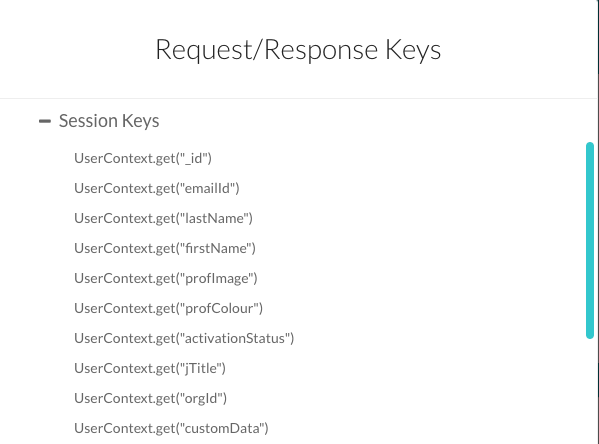
- UserContext.get(“_id”) –Kore.aiのユーザー ID。
- UserContext.get ( “emailId )- ユーザーIDと関連するメールアドレス。
- UserContext.get(“lastName”) –ユーザーの姓。
- UserContext.get(“firstName”) –ユーザーの名。
- UserContext.get(“profImage”) –ユーザーの画像またはアバターのファイル名。
- UserContext.get(“profColor”) –ユーザーのアカウントの色。
- UserContext.get(“activationStatus”) –ユーザーのアカウントステータス。
- UserContext.get(“jTitle”) –ユーザーのタイトル(定義されている場合)。
- UserContext.get(“orgId”) –ユーザーアカウントの組織ID(定義されている場合)。
- UserContext.get(“customData”) – 開発者が定義したカスタム キー。
- UserContext.get(“identities”) – ユーザーの代替ID(定義されている場合) 。
追加のセッションキーはボットタスクの定義そしてそのタスクに使用可能のキーのコンテキストの次第に、使用可能になります。セッションとコンテキストキーについての詳細については、タスクのセッション変数とコンテキスト変数を使用を参照してください。
応答キー
応答キーはAPI応答タブにある応答サンプルのテキストから直接解析されます。応答キーは、定義されているレスポンスサンプルに応じて異なります。
 次のリストは、Asanaタスクで使用できる応答キーの例です。
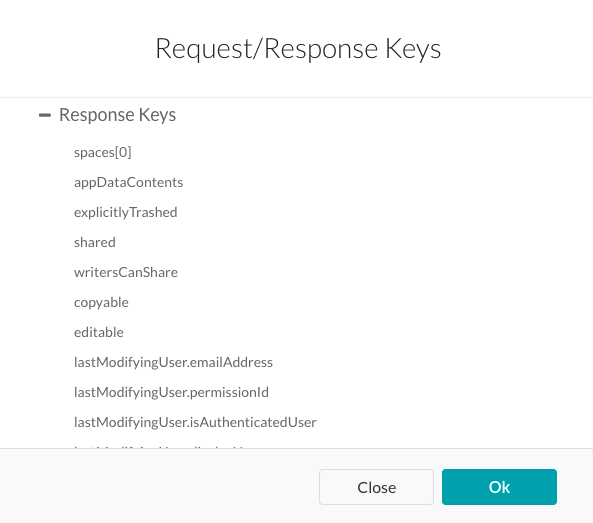
request.data.workspace request.data.projects request.data.name request.data.notes labels.498346170860 labels.30887755353556 labels["data.workspace"] labels["data.projects"] _tenant_ response.data.id response.data.created_at response.data.modified_at response.data.name response.data.notes response.data.completed response.data.assignee_status response.data.completed_at response.data.due_on response.data.due_at response.data.workspace.id response.data.workspace.name response.data.num_hearts response.data.parent response.data.followers[0].id response.data.followers[0].name response.data.hearted response.data.assignee response.data.projects[0].id response.data.projects[0].name response.data.memberships[0].project.id response.data.memberships[0].project.name response.data.memberships[0].section
レポート キー
レポートキーとは、Kore.ai可変プレースホルダーとして、レポートテンプレート定義およびボットレスポンスを使用してユーザーがクリックできるメッセージに追加の情報へのリンクを表示します。
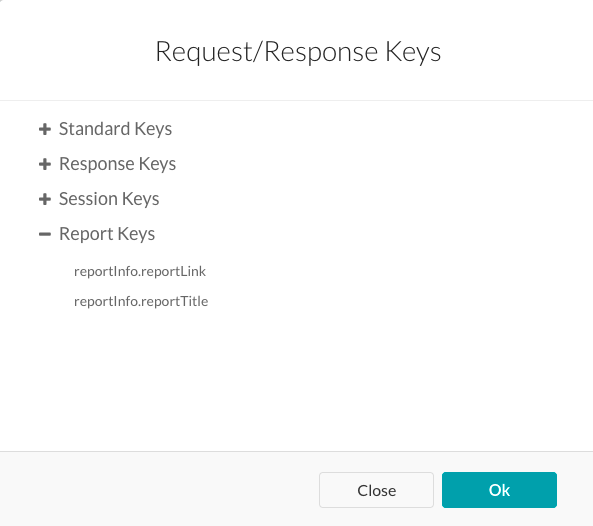
- reportInfo.reportLink – このタスクのレポートテンプレート定義」セクションで定義されたリンク。
- reportInfo.reportTitle – このタスクの レポート テンプレート定義で定義されたタイトル。
応答のプレビュー
メッセージエディターで プレビュー をクリックすると、次のいずれかのオプションを使用して応答のプレビューが生成されます。
- テストとプレビュー – ボットのタスク設定ページを開いてタスク設定と認証を定義し、Asana のようなサードパーティーの Web サービスにより生成された応答のプレビューを表示します。
- サンプル応答でプレビュー – タスクのAPIリクエストタブの応答サンプル セクションで定義されたキーと値のペアで提供されたサンプルデータを使用してプレビューを生成します。
カスタム JavaScript の応答の例
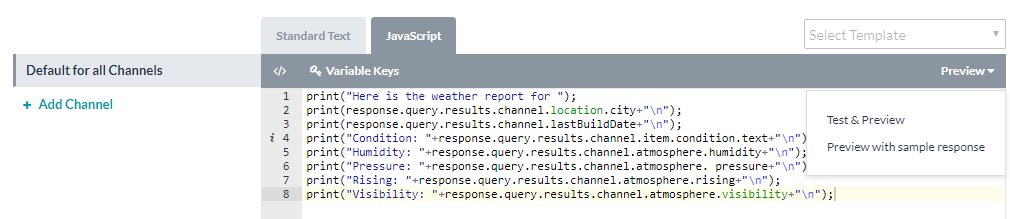
以下の例では、JavaScriptを使用して、タスクの応答メッセージが送信されたときにエンドユーザーにアウトプットメッセージを表示するタイトルを投稿と説明を投稿セクションを定義する応答オブジェクトを示しています。以下の例では、descと書かれた変数は、JSON応答にキャプションの値が定義されている場合にのみ表示されます。
var desc = (caption !== "undefined" ? caption : "")
次の例では、タスクのタイトルを使用したクリック可能なURLが、タスクの応答メッセージに表示されます。
var tasklink = '' + title + '';
この最後の例では、リンク変数は、動画または写真のいずれかのタイプに依存します。タイプに応じて、適切なリンクが表示されます。
var link = ""; switch (type) { case "video": var video = (typeof(video_url) != "undefined") ? video_url : permalink_url; link = '<video controls><source src ="' + video + '" type="video/mp4"></video>'; break; case "photo": link = '<img src="' + image_permalink + '"></img>'; break; }タスクのペイロード応答に基づいて、JavaScript タブでタスク固有の要求を処理するカスタムJavaScriptを作成することができます。
チャネル固有のボットレスポンス
タスク応答メッセージは、応答メッセージが表示されるチャネル、たとえばKore.ai Messengerクライアント、電子メール、テキストメッセージなどに依存している場合があります。デフォルトでは、 すべてのチャネルのデフォルトで設定した応答メッセージがすべてのチャネルに送信されます。ただし、デフォルトの応答ではなく、単一や複数の20以上のサポートチャネルに対して、特定の応答を定義して、そのチャネルのエンドユーザーに表示することができます。
- 特定のチャネルの応答レスポンスメッセージを定義するには + チャネルの追加 をクリックして、チャネルを選択ドロップダウンリストを表示します。
- たとえば、Kore.aiなどのチャネルを選択して、JavaScriptタブでチャネルの応答を設定します 。
 各チャネルでは1つの応答のみ定義できます。以下のJavaScriptの例は、チャネル別にKore.aiのデフォルトフォーマットテンプレートを上書きする方法を表しています。
メモ:以下のキーでデフォルト値に戻します。response.message – デフォルトのメッセージを文字列で返します。response.message.choices – 選択肢や確認メッセージのタイプを配列で返します。
- Slackチャネルの上書き例
var message = {}; var attachments = []; var attachment = { 'text': "Exception occurred during API execution", 'color': '#FFCC00', 'attachment_type': 'default' }; attachments.push(attachment); message.attachments = attachments; print(JSON.stringify(message)); - FaceBookチャネルの上書き例
var message = { text: response.message }; var buttons = []; for (var i = 0; i < response.choices.length; i++) { var choiceItem = response.choices[i]; if (choiceItem.length > 20) { choiceItem = choiceItem.substring( 0, 18) + '..'; } var element = { content_type: 'text', title: choiceItem, payload: choiceItem }; buttons.push(element); } message.quick_replies = buttons; print(JSON.stringify(message)); - メールチャネルの上書き例
var message = {}; var text = response.message + ' <br> '; for (var i = 0; i < response.choices.length; i++) { text = text.concat( '<u> + response.choices[i] + ' < /u> <br>'); } message.text = text; print(JSON.stringify(message)); - SMSチャネルの上書き例
var message = {}; var indexArray = ['a', 'b', 'c', 'd', 'e', 'f', 'g', 'h', 'i', 'j', 'k', 'l', 'm', 'n', 'o', 'p', 'q', 'r', 's', 't', 'u', 'v', 'w', 'x', 'y', 'z' ]; var text = response.message + '\\n'; for (var i = 0; i < response.choices .length; i++) { text = text.concat(indexArray[i] + ') ' + response.choices[ i] + '\\n'); } message.text = text; print(JSON.stringify(message));
릴리스 8.0.0부터는 정보 작업이 더 이상 지원되지 않습니다. 이 기능은 다음 릴리스에서 중단됩니다. 이러한 사용 사례를 구축하려면 대화 작업 및 디지털 양식을 사용하는 것이 좋습니다.
정보 작업은 챗봇이 사용자를 위해 데이터를 조회하거나 보고서를 가져와 사용하기 쉬운 결과나 확장된 데이터에 대한 결과 링크를 반환하는 데 사용됩니다. 사용자는 봇이 정보를 전달하는 데 필요한 특정 매개 변수 또는 필터를 식별하여(결과의 수량) 수신자가 스캔, 처리 및 재사용하기 쉬운 방식으로 정보를 전달할 수 있게 합니다. 예를 들어, 최종 사용자에게 검색 결과와 해당 검색 항목의 자세한 목록을 볼 수 있고 쇼핑 카트에 항목을 추가할 수 있는 링크를 제공하는 쇼핑 봇이 있다고 가정해 보겠습니다. 검색 결과를 자세히 볼 수 있는 링크와 함께 검색 결과를 표시하는 정보 작업을 정의한 다음 링크를 클릭하면 최종 사용자가 쇼핑 카트에 추가할 수 있는 항목을 보여 주는 웹 페이지를 표시할 수 있습니다. 다음 그림에는 릴레이 봇에 몇 가지 작업이 정의되어 있으며 그 중 하나는 검색 결과에 항목 보기 링크를 표시하는 정보 작업입니다. 사용자가 항목 보기를 클릭하면 다음 그림과 같이 자세한 제품 정보와 선택 가능한 결과가 포함된 정보 보고서가 새 탭에 표시되어 항목을 장바구니에 추가할 수 있습니다.
봇 빌더에서 봇 응답에 대해 다음과 같이 보고서 유형을 정의할 수 있습니다.
-
- 테이블 보고서 – 보고서는 가변 너비 열이 있는 테이블 형식으로 표시됩니다.
- 고정 열 테이블 보고서 – 보고서는 고정 너비 열이 있는 테이블 형식으로 표시됩니다.
- 카드 레이아웃 보고서 – 보고서는 카드 목록 또는 이미지를 포함한 가변 형식 데이터가 있는 텍스트 상자로 표시됩니다.
- 조치가 있는 카드 레이아웃 보고서 – 보고서는 카드 목록 또는 이미지를 포함한 가변 형식 데이터가 있는 텍스트 상자와 장바구니에 추가와 같은 조치 작업을 보고서에 연결하는 옵션으로 표시됩니다.
- 그룹별 카드 레이아웃 보고서 – 보고서는 카드 목록, 날짜, 크기 또는 위치와 같은 매개 변수 키로 그룹화할 수 있는 가변 형식 데이터가 있는 텍스트 상자로 표시됩니다. 카드 보고서에는 이미지와 장바구니에 추가와 같은 조치 작업을 보고서에 연결하는 옵션이 포함되어 있습니다.
- 조치가 있는 쇼핑 카트 레이아웃 보고서 – 보고서는 장바구니 옵션 목록 또는 이미지를 포함한 가변 형식 데이터가 있는 텍스트 상자와 장바구니에 추가와 같은 조치 작업을 보고서에 연결하는 옵션으로 표시됩니다.
- 날씨 정보 보고서 – 보고서는 날짜, 요일 또는 예측 기간별로 날씨 정보의 연속 데이터 문자열을 표시하도록 특별히 설계되었습니다.
다른 예시:
- 계정 요약 제공
- 로열티 보상 포인트 표시
- 개인 정보 조회
- 미지불 항목의 요약 보기 가져오기
- 재고 목록 가져오기
- 팀 상태 정보 가져오기
- 중요 정보 업데이트
프로세스
정보 작업을 정의하기 위해 완료해야 하는 단계는 네 가지 기본 단계로 구성됩니다.
1단계: 일반 설정
첫 번째 단계는 작업 이름, 연결 모드, 설명과 NLP 무시 단어, 검색 키워드, 오류 메시지, 작업 확인 메시지, 매핑 제한 및 Kore.ai 봇 스토어 설정 등 기타 고급 설정과 같은 작업이 최종 사용자에게 표시되는 방식을 정의하는 것입니다. 정보 작업에 대한 일반 설정을 설정하려면 다음 단계를 따르세요.
- 정보 작업을 생성하려는 봇을 엽니다.
- 봇의 측면 탐색 패널 위로 마우스를 가져간 다음 봇 작업을 클릭합니다.
- 봇 작업 페이지에서 정보 작업 탭으로 마우스를 이동하고 + 아이콘을 클릭합니다.
- 작업의 이름을 입력합니다. 이는 표시 이름으로도 사용됩니다. 봇 스토어는 작업의 표시 이름을 사용합니다. 필요한 경우 표시 이름을 변경할 수 있습니다. 정보 생성 작업 대화 상자가 열립니다.
- 작업에 필요한 다음 세부 정보를 입력한 다음 생성 및 진행을 클릭합니다.
필드 이름 설명 작업 이름 애플리케이션 및 최종 사용자 채널의 모든 곳에 표시되는 작업의 이름입니다. 표시 이름 Kore.ai Bot 마켓플레이스에 표시되는 작업의 이름입니다. 변경하지 않는 경우 작업 이름과 동일합니다. 연결 유형 정보 작업의 연결 유형은 항상 웹 서비스입니다. 웹 서비스는 폴링할 때 최종 사용자 로그인 자격 증명을 사용하여 Kore.ai로 데이터를 전송합니다. 이 설정은 정보 작업에서 읽기 전용입니다. 연결 모드 작업을 위한 웹 서비스형 통신 프로토콜 연결 유형입니다. 웹 서비스는 Kore.ai가 폴링할 때 최종 사용자 로그인 자격 증명을 사용하여 Kore.ai로 데이터를 전송합니다. - REST – 이 작업은 프로토콜에 독립적인 REST API 연결을 사용하여 메시지를 교환하고 웹 서비스의 CRUD 작업을 처리합니다.
- SOAP – 이 작업은 메시지 교환을 위해 XML 프로토콜을 기반의 SOAP API 연결을 사용합니다.
긴 설명 정보 작업에 대한 긴 설명입니다.
고급 설정
작업의 고급 설정을 설정하려면 섹션을 확장하고 관련 세부 정보를 입력합니다.
| 필드 이름 | 설명 |
|---|---|
| 확인 메시지 끄기 | NLP 사용 시 작업 실행 확인을 사용하지 않으려면 예를 선택합니다. |
| 조치 작업 전용 매핑 | 다른 작업에서 흐름이 매핑된 경우에만 이 조치 작업을 최종 사용자에게 표시하려면 선택합니다. 예를 선택하는 경우 정보 작업에 대한 최종 사용자 검색에서 정보 작업이 표시되지 않습니다. |
| 검색 키워드 | 최종 사용자가 Kore.ai 봇 스토어에서 이 작업을 찾는 데 사용할 수 있는 검색어를 하나 이상 지정합니다. |
| 작업 데모 링크 | www.youtube.com를 입력하여 봇 스토어에 표시된 작업 옆에 있는 작업 데모 아이콘을 표시합니다. 다음 그림은 작업 데모 링크로 정의된 봇 작업을 보여줍니다. |
| WSDL 파일 액세스를 위한 권한 부여는 필수입니다(SOAP 요청에만 적용함) | SOAP 요청에 대한 WSDL에 액세스하기 위해 웹 서비스 권한 부여가 필요한 경우 인증을 사용하려면 예를 선택합니다. API 요청에 대해 정의한 인증을 WSDL에 액세스하는 데 사용하려면 예를 선택합니다. 이 설정은 작업 연결 모드가 SOAP로 설정된 경우에만 사용할 수 있습니다. |
| 선택적 필드 얻기 | 최종 사용자가 사용 가능한 선택적 매개 변수 중 하나 이상을 선택하고 입력하도록 요청하려면 예를 선택합니다. |
| 무시 단어 | 작업 이름에 무시할 단어를 하나 이상 입력한 다음 각 단어 뒤에 Enter 키를 누릅니다. 무시할 단어 목록은 봇 플랫폼이 사용자 입력을 해석하기 전에 처리됩니다. 즉, 많은 작업에 적용되지만 어떤 작업을 식별하는 데는 도움이 되지 않는 단어를 필터링하여 봇은 사용자 입력에 빠르게 반응하고 올바른 작업을 제공할 수 있습니다. 예: 사용자는 오늘의 일기예보를 확인하고 싶습니다를 입력할 수 있습니다. 사용자에게 올바른 작업을 반환하려면 봇 플랫폼 인터프리터는 날씨, 예보 및 오늘의 세 단어만 인식하면 됩니다. 나머지 단어는 무시할 수 있습니다. Kore.ai 봇 인터프리터는 일반적인 무시 단어를 이미 정의하고 있으므로 나, 너, 원하다, 얻다 등과 같은 단어는 무시 단어로 정의할 필요가 없습니다. 봇이 많은 작업 또는 모든 작업에서 동일한 단어(예: 회사 이름)를 사용하는 경우 회사 이름을 무시 단어로 추가할 수 있습니다. |
| 오류 메시지 | 봇에 대한 사용자 정의 HTTP 상태 코드 및 오류 메시지를 편집 또는 추가합니다. 자세한 내용은 사용자 정의 오류 메시지를 참조하세요. |
2단계: 인증 설정
작업에 필요한 경우 기본 권한 부여, OAuth 또는 API 키와 같은 인증을 정의해야 합니다. 봇 조치 작업에 따라 조치 작업을 시작하기 위해 사용자를 인증하는 방법을 정의해야 할 수 있습니다. 예를 들어, 트위터는 일반적으로 로그인 사용자 이름과 암호로 최종 사용자가 인증해야 하는 웹 서비스를 사용하여 조치 작업을 수행할 수 있으므로 조치 작업을 실행하기 전에 Kore.ai가 최종 사용자 계정에 액세스하여 데이터에 액세스할 수 있도록 허용합니다. 권한 부여 프로필을 정의하거나 기존 프로필을 사용할 수 있습니다. 작업 수준이나 봇 수준에서 생성하는 것에 관계없이 모든 봇 작업에서 모든 권한 부여 프로필을 사용할 수 있습니다.
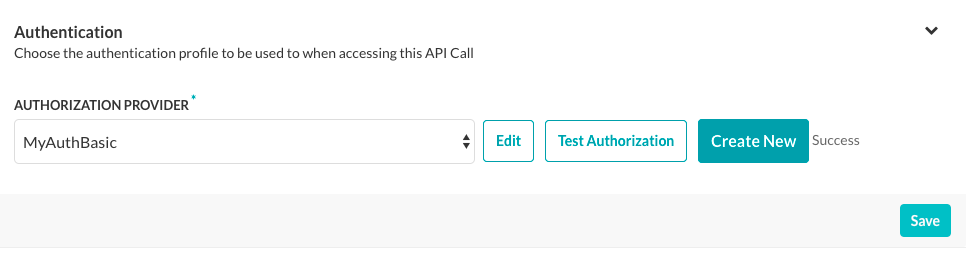
- API 요청 탭에서 권한 부여 정의를 시작하려면 권한 부여 섹션에서 확장 아이콘을 클릭합니다.
- 이 작업에 필요한 인증을 이미 정의한 경우 권한 부여 공급자 드롭다운 목록에서 선택할 수 있습니다.
- 작업에 인증이 필요하지 않은 경우 권한 부여 공급자로 없음을 선택할 수 있습니다.
- 새 권한 부여 공급자를 정의하려면 새로 만들기를 클릭하여 새 권한 부여 메커니즘 대화 상자를 표시합니다.
- 대화 상자의 권한 부여 유형 드롭다운 목록에서 봇이 사용하는 권한 부여 유형을 선택합니다. 다음 권한 부여 유형 중 하나를 선택할 수 있습니다.
- 기본 인증 – 사용자 이름 및 암호 정보를 수집하는 표준 프로토콜입니다. Kore.ai는 기본 인증과 함께 SSL 암호화를 사용하여 최종 사용자 정보를 보호합니다. 설정 세부 정보를 보려면 아래 링크를 클릭하세요. "Setting다음 그림은 작업을 위한 기본 권한 부여를 사용하기 위해 정의해야 하는 기본 인증 필드의 예입니다.기본 권한 부여를 정의하려면 권한 부여 유형 필드에서 기본 인증을 선택합니다. 그런 다음 봇 빌더 사용자 인터페이스에 표시할 권한 부여의 이름을 지정합니다.
테넌시 정의
필요한 경우 하위 도메인 섹션에서 웹 애플리케이션 또는 사용자 인터페이스의 기본 URL이 URL의 테넌트 이름을 사용하는 경우 예를 선택합니다. 예: kore는 테넌트를 www.kore.someCompany.com.으로 사용하는 웹 서비스의 테넌트 조직입니다. 다음 예시 설정에서 테넌시 URL은 {tenant} 조직 플레이스 홀더를 포함합니다.
양식 필드 추가
기본 사용자 이름과 암호 필드가 요구 사항을 충족하지 않는 경우 권한 부여 양식 필드를 추가하여 최종 사용자에게 표시할 새 필드를 추가할 수 있습니다. 권한 부여 양식에 필드를 추가하려면 + 양식 필드 추가를 클릭합니다. 다음 그림은 권한 부여 대화 상자에 암호 필드를 추가하는 정의의 예입니다.
다음 표에서는 권한 부여 IDP 양식 필드를 정의하는 데 사용되는 필드를 설명합니다.필드 이름 설명 필드 제목 인증 대화 상자에서 최종 사용자에게 표시되는 필드 이름을 지정합니다. 필드 키 이 값은 인증 서비스에 대한 최종 사용자 입력을 나타냅니다. 도움말 힌트 필드에 표시되는 도움말 텍스트로서 필드에 입력해야 하는 내용을 설명합니다. 필드 유형 고급 옵션을 선택한 경우 최종 사용자 인터페이스에서 표시되는 필드의 유형을 지정하여 다음 중 하나의 필드 키 값으로 할당된 사용자 입력을 수집합니다. - 텍스트 상자
- 암호
필수 고급 옵션을 선택한 경우 최종 사용자가 인증을 완료하려면 이 필드를 정의해야 하는지 여부를 선택합니다. 데이터 유형 고급 옵션을 선택한 경우 최종 사용자의 입력으로 예상되는 데이터 유형(예: 문자열)을 지정합니다. 가시성 고급 옵션을 선택한 경우 인증 필드의 속성을 표시, 숨김 또는 읽기 전용으로 표시할 지 여부를 지정합니다. 권한 부여 필드 추가
기본적으로 권한 부여 필드는 작업 요청 메시지의 헤더 일부로 구성됩니다. 작업 요청에 추가 권한 부여 필드가 필요하거나 예상되는 권한 부여(예: 사회 보장 번호 또는 PIN)가 헤더의 일부가 아닌 경우 + 권한 부여 필드 추가를 클릭한 후 다음 그림과 같이 필드를 정의합니다.
필드 유형 필드에서 작업 요청 메시지 및 필요한 권한 부여 필드 유형에서 위치에 따라 다음 중 하나를 선택할 수 있습니다.- 헤더 – 봇은 권한 부여 필드를 요청 헤더의 일부로 권한 부여 필드를 예상합니다.
- 페이로드 – 봇은 요청 본문의 내용 일부로 권한 부여 필드를 예상합니다
- 쿼리 문자열 – 봇은 요청 본문에서 권한 부여 필드를 쿼리로 예상합니다.
- 경로 매개 변수 – 봇은 권한 부여 필드를 요청의 URL 경로의 일부로 예상합니다.
필드 키 필드에서 선택한 필드 유형에 대한 필드 이름을 입력합니다. 필드 값 필드에 지정된 필드 키의 값을 입력합니다. 완료를 클릭합니다. 새 권한 부여 필드가 권한 부여 필드 섹션에 추가됩니다. 추가 인증 권한 필드를 추가하려면권한 부여 필드 섹션에서 추가를 클릭합니다. 권한 부여 확인 URL 필드에서 권한 부여 메커니즘으로 작업을 배포하기 전에 봇 빌더에서 인증 설정 테스트에 사용할 수 있는 URL을 선택적으로 정의하세요. 동적 필드와 경로 매개 변수 필드, 쿼리 필드 등을 사용하여 URL 테스트를 정의할 수 있습니다. 예: https://kore.someCompany.com/sap/opu/odata/sap/{{authfield1}}/?$format=json 커넥터를 사용한 액세스 섹션에서 Kore.ai 커넥터 에이전트를 사용하여 Kore.ai 봇의 액세스를 활성화하려면 예를 선택합니다.다. 도메인에 활성 Kore.ai 커넥터가 정의되지 않은 경우 봇 관리자 콘솔 시스템 관리자에게 문의하라는 경고 메시지가 표시됩니다. 자세한 내용은 봇 관리 콘솔 설명서에서 Kore.ai 커넥터 사용을 참조하세요. 저장을 클릭하여 권한 부여 설정을 저장하고 새 권한 부여 메커니즘 대화 상자를 닫습니다.
권한 부여 테스트 – 기본 인증
인증을 저장한 후 새 권한 부여 유형의 권한 부여 확인 URL을 정의한 경우 권한 부여 테스트를 클릭하여 권한 부여 탭에서 권한 부여 정의를 테스트하고 작업의 나머지 단계 개발을 계속 진행할 수 있습니다.
권한 부여 테스트를 클릭하면 권한 부여 테스트 대화 상자가 표시되고 다음 그림과 같이 권한 부여 확인 URL 섹션에서 지정한 URL로 채워집니다. 기본 인증을 사용한 권한 부여 테스트 설정 방법- 권한 부여 확인 URL 필드에서 인증 설정을 테스트하려는 URL을 확인하거나 입력합니다.
- 봇이 하위 도메인을 사용하는 경우 테넌시 필드가 표시되고 테넌트를 지정해야 합니다.
- 웹 서비스의 사용자 이름 및 암호를 입력합니다.
- Content-Type 필드에서 URL에 예상되는 콘텐츠 유형을 선택합니다.
- URL을 테스트하려는 경우 메소드 필드는 읽기 전용이며 GET으로 설정됩니다.
- 테스트를 클릭하여 권한 부여 테스트를 시작합니다.
인증 유효성 검증이 완료되면 권한 부여 테스트 대화 상자가 닫히고 성공 또는 실패 검증 결과가 다음 그림과 같이 권한 부여 테스트 버튼 바로 오른쪽에 표시됩니다.
권한 부여가 실패하면 다음 그림과 같이 헤더 및 응답 탭과 함께 권한 부여 테스트 실패 메시지가 표시됩니다. 작동 원리 – 기본 인증
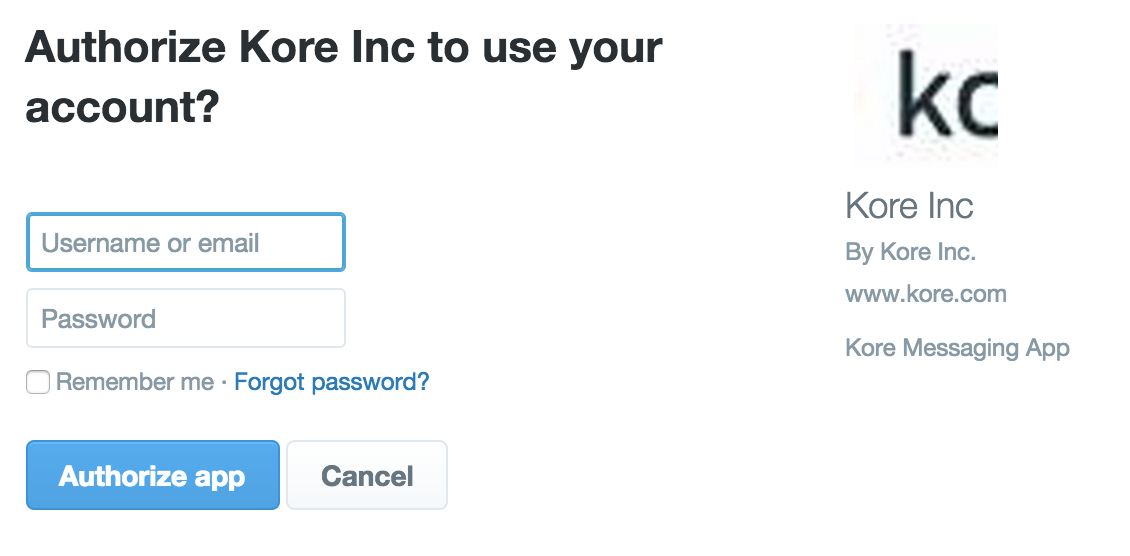
작업에 기본 권한 부여가 사용될 때 Kore.ai 애플리케이션은 다음 그림과 같이 사용자에게 웹 애플리케이션 또는 웹 서비스에 액세스하려면 로그인 자격 증명을 입력하라는 메시지를 자동으로 표시합니다.
최종 사용자에게 권한이 부여된 후 설정은 다음 명명 구문을 사용하여 저장됩니다.{{ First Name }} {{ Last Name }} {{ Bot Name }} {{ Account # }} {{ Sequence # }}예: John Smith's Twitter Account #1. Kore.ai 애플리케이션은 이 계정을 사용하여 향후 모든 작업 요청을 위해 웹 애플리케이션 또는 웹 서비스에 액세스할 수 있습니다. 또한 최종 사용자는 동일한 봇의 다른 작업을 위해 계정을 재사용할 수 있습니다.
- OAuth v2 password grant type – 비표준 웹 서비스 권한 부여 유형의 사용자 정의 권한 부여 유형을 정의합니다. 설정 세부 정보를 보려면 아래 링크를 클릭하세요. "Setting다음 그림은 작업을 위한 사용자 정의 권한 부여를 사용하기 위해 정의해야 하는 oAuth v2 password grant 권한 부여 유형 필드의 예입니다.사용자 정의 권한 부여를 정의하려면 권한 부여 유형 필드에서 oAuth v2 password grant를 선택합니다. 그런 다음 봇 빌더 사용자 인터페이스에 표시할 권한 부여의 이름을 지정합니다.
테넌시 정의
필요한 경우 하위 도메인 섹션에서 웹 애플리케이션 또는 사용자 인터페이스의 기본 URL이 URL의 테넌트 이름을 사용하는 경우 예를 선택합니다. 예: kore는 테넌트를 www.kore.someCompany.com.으로 사용하는 웹 서비스의 테넌트 조직입니다. 다음 예시 설정에서 테넌시 URL은 {tenant} 조직 플레이스 홀더를 포함합니다.
양식 필드 추가
기본 사용자 이름과 암호 필드가 요구 사항을 충족하지 않는 경우 권한 부여 양식 필드를 추가하여 최종 사용자에게 표시할 새 필드를 추가할 수 있습니다. 권한 부여 양식에 필드를 추가하려면 + 양식 필드 추가를 클릭합니다. 다음 그림은 권한 부여 대화 상자에 암호 필드를 추가하는 정의의 예입니다.
다음 표에서는 권한 부여 IDP 양식 필드를 정의하는 데 사용되는 필드를 설명합니다.필드 이름 설명 필드 제목 인증 대화 상자에서 최종 사용자에게 표시되는 필드 이름을 지정합니다. 필드 키 이 값은 인증 서비스에 대한 최종 사용자 입력을 나타냅니다. 도움말 힌트 필드에 표시되는 도움말 텍스트로서 필드에 입력해야 하는 내용을 설명합니다. 필드 유형 고급 옵션을 선택한 경우 최종 사용자 인터페이스에서 표시되는 필드의 유형을 지정하여 다음 중 하나의 필드 키 값으로 할당된 사용자 입력을 수집합니다. - 텍스트 상자
- 암호
필수 고급 옵션을 선택한 경우 최종 사용자가 인증을 완료하려면 이 필드를 정의해야 하는지 여부를 선택합니다. 데이터 유형 고급 옵션을 선택한 경우 최종 사용자의 입력으로 예상되는 데이터 유형(예: 문자열)을 지정합니다. 가시성 고급 옵션을 선택한 경우 인증 필드의 속성을 표시, 숨김 또는 읽기 전용으로 표시할 지 여부를 지정합니다. 권한 부여 필드 추가
기본적으로 권한 부여 필드는 작업 요청 메시지의 헤더 일부로 구성됩니다. 작업 요청에 추가 권한 부여 필드가 필요하거나 예상되는 권한 부여(예: 사회 보장 번호 또는 PIN)가 헤더의 일부가 아닌 경우 + 권한 부여 필드 추가를 클릭한 후 다음 그림과 같이 필드를 정의합니다.
필드 유형 필드에서 작업 요청 메시지 및 필요한 권한 부여 필드 유형에서 위치에 따라 다음 중 하나를 선택할 수 있습니다.- 헤더 – 봇은 권한 부여 필드를 요청 헤더의 일부로 권한 부여 필드를 예상합니다.
- 페이로드 – 봇은 요청 본문의 내용 일부로 권한 부여 필드를 예상합니다.
- 쿼리 문자열 – 봇은 요청 본문에서 권한 부여 필드를 쿼리로 예상합니다.
- 경로 매개 변수 – 봇은 권한 부여 필드를 요청의 URL 경로의 일부로 예상합니다.
필드 키 필드에서 선택한 필드 유형에 대한 필드 이름을 입력합니다. 필드 값 필드에 지정된 필드 키의 값을 입력합니다. 완료를 클릭합니다. 새 권한 부여 필드가 권한 부여 필드 섹션에 추가됩니다. 추가 인증 권한 필드를 추가하려면권한 부여 필드 섹션에서 추가를 클릭합니다.
토큰 URL 정의
토큰URL 필드에서 권한 부여 메커니즘으로 작업을 배포하기 전에 봇 빌더에서 인증 설정 테스트에 사용할 수 있는 URL을 선택적으로 정의하세요. 동적 필드와 경로 매개 변수 필드, 쿼리 필드 등을 사용하여 URL 테스트를 정의할 수 있습니다. 예: http://{tenant}.someCompany.com/test/{{tokenId}} 토큰 URL 메소드 필드에서 Token URL에 대한 HTTP 요청 메소드 유형을 선택합니다. PUT, POST, PATCH, DELETE, and GET 중 하나입니다. 토큰 URL 콘텐츠 유형 필드의 토큰 URL에서 예상되는 콘텐츠 유형을 선택합니다. 다음 중 하나입니다. JSON, RSS, XML, URL Encoded JSON, CSV, Text, Twitter Encoded JSON, Multipart/Form-data,Multipart/Related 또는 Oracle ADF. 커넥터를 사용한 액세스 섹션에서 Kore.ai 커넥터 에이전트를 사용하여 Kore.ai 봇의 액세스를 활성화하려면 예를 선택합니다. 도메인에 활성 Kore.ai 커넥터가 정의되지 않은 경우 봇 관리자 콘솔 시스템 관리자에게 문의하라는 경고 메시지가 표시됩니다. 자세한 내용은 봇 관리 콘솔 설명서에서 Kore.ai 커넥터 사용을 참조하세요. 권한 부여 저장을 클릭하여 권한 부여 설정을 저장하고 새 권한 부여 메커니즘 대화 상자를 닫습니다.
권한 부여 테스트
인증을 저장한 후 새 권한 부여 유형의 권한 부여 URL을 정의한 경우 권한 부여 테스트를 클릭하여 권한 부여 페이지에서 권한 부여 정의를 테스트하고 작업의 나머지 단계 개발을 계속 진행할 수 있습니다.
권한 부여 테스트를 클릭하면 권한 부여 테스트 대화 상자가 표시되고 다음 그림과 같이 권한 부여 확인 URL 섹션에서 지정한 URL로 채워집니다. 테스트를 클릭하여 권한 부여 테스트를 시작합니다. 인증 유효성 검증이 완료되면 권한 부여 테스트 대화 상자가 닫히고 성공 또는 실패 검증 결과가 권한 부여 테스트 버튼 바로 오른쪽에 표시됩니다. 권한 부여가 실패하면 다음 그림과 같이 헤더 및 응답 탭과 함께 권한 부여 테스트 실패 메시지가 표시됩니다. - OAuth v2 클라이언트 자격 증명 –
- OAuth v1 – 최종 사용자가 로그온 자격 증명을 Kore.ai에 공개하지 않고도 웹 애플리케이션 또는 웹 서비스는 API를 사용하여 보호된 리소스에 액세스할 수 있습니다. 설정 세부 정보를 보려면 아래 링크를 클릭하세요. "SettingOAuth는 웹, 모바일, 데스크톱 애플리케이션에서 간단하고 표준적인 방법으로 보안 권한 부여 사용이 가능한 개방형 프로토콜입니다. OAuth를 사용하려면 권한 부여 메커니즘에 필요한 설정을 구성하기 위해 애플리케이션에 대한 로그인 자격 증명이 필요하므로 웹 애플리케이션에 계정을 먼저 등록해야 합니다.
OAuth v1 작동 방식
- Kore.ai 애플리케이션은 웹 애플리케이션에서 권한이 없는 요청 토큰을 얻습니다. Kore.ai 애플리케이션은 사용자를 웹 애플리케이션의 로그인 대화 상자로 리디렉션합니다.
- 사용자는 요청 토큰의 권한을 부여하고 자신의 계정과 연결합니다. 웹 애플리케이션은 사용자를 Kore.ai 애플리케이션으로 다시 리디렉션합니다.
- Kore.ai 애플리케이션은 요청 토큰을 액세스 토큰으로 교환합니다.
- 액세스 토큰을 사용하여 Kore.ai 애플리케이션은 사용자를 대신하여 공급자의 보호된 리소스에 액세스할 수 있습니다.
다음 그림은 작업을 위한 사용자 정의 권한 부여 사용을 위해 정의해야 하는 oAuth v1 권한 부여 유형 필드의 예입니다.
oAuth v1을 정의하려면 다음 표에 설명된 필드를 정의하세요.필드 이름 설명 권한 부여 유형 oAuth v1로 설정합니다. 콜백 URL 최종 사용자 권한 부여가 완료된 후 최종 사용자를 리디렉션하기 위해 웹 애플리케이션 또는 웹 서비스가 사용하는 URL입니다. 이 값 https://idp.kore.ai/workflows/callback/은 oAuth v1 설정을 정의할 때 Kore.ai 애플리케이션에서 읽기 전용 값으로 제공합니다. ID 공급자 이름 웹 애플리케이션 또는 웹 서비스 이름(예: Twitter)입니다. 이 필드는 필수입니다. 소비자 키 웹 애플리케이션에 대한 Kore.ai 애플리케이션 식별자로 제공되는 값입니다. 이 필드는 필수입니다. 소비자 시크릿 Kore.ai 애플리케이션이 소비자 키의 소유권을 설정하기 위해 제공하는 시크릿 값입니다. 이 필드는 필수입니다. 요청 토큰 링크 Kore.ai 애플리케이션이 권한이 없는 요청 토큰을 얻기 위해 사용하는 URL입니다. 요청 토큰은 Kore.ai 애플리케이션이 최종 사용자로부터 권한 부여를 받고 액세스 토큰을 얻는 데 사용하는 값입니다. 예: https://{tenant}.someCompany.com/oauth/request_token. 최종 사용자 권한 부여 후 Kore.ai 애플리케이션에서 액세스 토큰을 요청할 수 있습니다. 이 필드는 필수입니다. 액세스 토큰 링크 최종 사용자 권한 부여 요청 토큰을 액세스 토큰으로 교환하는 데 사용되는 URL입니다. 액세스 토큰은 최종 사용자 로그온 자격 증명을 사용하지 않고 Kore.ai 애플리케이션이 최종 사용자를 대신하여 웹 애플리케이션 또는 웹 서비스에 대한 액세스 권한을 얻는 데 사용하는 값입니다. 예: https://{tenant}.someCompany.com/oauth/access_token. 이 필드는 필수입니다. 사용자 권한 부여 링크 Kore.ai 애플리케이션이 액세스 토큰을 사용하여 웹 애플리케이션이나 웹 서비스에 액세스하기 위한 최종 사용자 권한을 획득하는 데 사용되는 URL입니다. 예: https://{tenant}.someCompany.com/oauth/authorize. 이 필드는 필수입니다. 커넥터를 사용한 액세스 Kore.ai 커넥터 에이전트를 사용하여 Kore.ai 봇의 액세스를 사용하도록 설정하려면 예를 선택합니다. 이 옵션은 Kore.ai 커넥터 에이전트가 엔터프라이즈 온프레미스 네트워크에서 설정되어 사용함으로 설정한 경우에만 표시됩니다. 자세한 내용은 Kore.ai 커넥터 사용을 참조하세요. 테넌시 정의
필요한 경우 하위 도메인 섹션에서 웹 애플리케이션 또는 사용자 인터페이스의 기본 URL이 URL의 테넌트 이름을 사용하는 경우 예를 선택합니다. 예: kore는 테넌트를 www.kore.someCompany.com.으로 사용하는 웹 서비스의 테넌트 조직입니다. 다음 예시 설정에서 테넌시 URL은 {tenant} 조직 플레이스 홀더를 포함합니다.
추가 필드 추가
+ 추가 필드를 추가하여 추가 필드 대화 상자를 열고 다음 그림과 같이 필요한 경우 추가 권한 부여 입력 필드를 나타내는 키/값 쌍을 하나 이상 입력합니다.
다음 필드를 지정합니다.- 필드 키 – 권한 부여를 위해 지정할 사용자 정의 필드의 이름입니다.
- 필드 값 – 권한 부여를 위해 지정할 사용자 정의 필드의 값입니다.
추가를 클릭하여 추가 필드를 저장합니다. 추가 필드를 더 추가하려면 추가 필드 섹션에서 추가를 클릭합니다.
권한 부여 필드 추가
기본적으로 권한 부여 필드는 작업 요청 메시지의 헤더 일부로 구성됩니다. 작업 요청에 추가 권한 부여 필드가 필요하거나 예상되는 권한 부여(예: 사회 보장 번호 또는 PIN)가 헤더의 일부가 아닌 경우 + 권한 부여 필드 추가를 클릭한 후 다음 그림과 같이 필드를 정의합니다.
필드 유형 필드에서 작업 요청 메시지 및 필요한 권한 부여 필드 유형에서 위치에 따라 다음 중 하나를 선택할 수 있습니다.- 헤더 – 봇은 권한 부여 필드를 요청 헤더의 일부로 권한 부여 필드를 예상합니다.
- 페이로드 – 봇은 요청 본문의 내용 일부로 권한 부여 필드를 예상합니다.
- 쿼리 문자열 – 봇은 요청 본문에서 권한 부여 필드를 쿼리로 예상합니다.
- 경로 매개 변수 – 봇은 권한 부여 필드를 요청의 URL 경로의 일부로 예상합니다.
필드 키 필드에서 선택한 필드 유형에 대한 필드 이름을 입력합니다. 필드 값 필드에 지정된 필드 키의 값을 입력합니다. 추가를 클릭합니다. 새 권한 부여 필드가 권한 부여 필드 섹션에 추가됩니다. 추가 인증 권한 필드를 추가하려면권한 부여 필드 섹션에서 추가를 클릭합니다.
권한 부여 테스트
권한 부여를 저장한 후 권한 부여 테스트를 클릭하여 권한 부여 페이지에서 권한 부여 정의를 테스트하고 작업의 나머지 단계 개발을 계속 진행할 수 있습니다.
권한 부여 테스트를 클릭하면 인증 토큰 URL, 소비자 키 및 소비자 토큰을 사용하여 테스트가 실행됩니다. 테넌시가 정의된 경우 다음 그림과 같이 권한 부여 테스트 대화 상자가 표시됩니다. 테스트를 클릭하여 권한 부여 테스트를 시작합니다. 인증 유효성 검증이 완료되면 권한 부여 테스트 대화 상자가 닫히고 성공 또는 실패 검증 결과가 권한 부여 테스트 버튼 바로 오른쪽에 표시됩니다. 권한 부여가 실패하면 다음 그림과 같이 헤더 및 응답 탭과 함께 권한 부여 테스트 실패 메시지가 표시됩니다. - OAuth v2 – 웹 애플리케이션 및 웹 서비스의 특정 권한 부여 흐름에 중점을 둔 최신 버전의 OAuth 프로토콜입니다. 설정 세부 정보를 보려면 아래 링크를 클릭하세요. "SettingOAuth v2는 웹, 모바일, 데스크톱 애플리케이션에서 간단하고 표준적인 방법으로 보안 권한 부여 사용이 가능한 새로운 버전의 개방형 프로토콜입니다. OAuth v2를 사용하려면 권한 부여 메커니즘에 필요한 설정을 구성하기 위해 애플리케이션에 대한 로그인 자격 증명이 필요하므로 웹 애플리케이션에 계정을 먼저 등록해야 합니다.
OAuth v2 작동 방식
- Kore.ai 애플리케이션은 사용자를 웹 애플리케이션의 로그인 대화 상자로 리디렉션합니다.
- 사용자가 인증합니다.
- 웹 애플리케이션은 액세스 토큰과 함께 사용자를 Kore.ai 애플리케이션으로 다시 리디렉션합니다.
- Kore.ai 애플리케이션은 액세스 토큰을 확인합니다.
- 액세스 토큰을 사용하여 Kore.ai 애플리케이션은 사용자를 대신하여 공급자의 보호된 리소스에 액세스할 수 있습니다.
다음 그림에서는 oAuth v2 권한 부여 유형을 위해 정의할 필드를 보여줍니다.
oAuth v2을 설정하려면 다음 표에 설명된 필드를 정의하세요.필드 이름 설명 권한 부여 유형 oAuth v2로 설정합니다. 콜백 URL 최종 사용자 권한 부여가 완료된 후 최종 사용자를 리디렉션하기 위해 웹 애플리케이션 또는 웹 서비스가 사용하는 URL입니다. 이 값 https://idp.kore.ai/workflows/callback/은 oAuth v2 설정을 정의할 때 Kore.ai 애플리케이션에서 읽기 전용 값으로 제공합니다. ID 공급자 이름 웹 애플리케이션 또는 웹 서비스 이름(예: Asana)입니다. 이 필드는 필수입니다. 클라이언트 ID Kore.ai 클라이언트의 ID입니다. 클라이언트 시크릿 키 웹 애플리케이션에 대한 클라이언트 ID 기반 Kore.ai 애플리케이션 인증으로 제공되는 값입니다. 권한 부여 URL Kore.ai 애플리케이션이 액세스 토큰을 사용하여 웹 애플리케이션이나 웹 서비스에 액세스하기 위한 최종 사용자 권한을 획득하는 데 사용되는 URL입니다. 이 필드는 필수입니다. 커넥터를 사용한 액세스 Kore.ai 커넥터 에이전트를 사용하여 Kore.ai 봇의 액세스를 사용하도록 설정하려면 예를 선택합니다. 이 옵션은 Kore.ai 커넥터 에이전트가 엔터프라이즈 온프레미스 네트워크에서 설정되어 사용함으로 설정한 경우에만 표시됩니다. 자세한 내용은 Kore.ai 커넥터 사용을 참조하세요. 권한 부여 URL Kore.ai 애플리케이션이 권한이 없는 요청 토큰을 얻기 위해 사용하는 URL입니다. 요청 토큰은 Kore.ai 애플리케이션이 최종 사용자로부터 권한 부여를 받고 액세스 토큰을 얻는 데 사용하는 값입니다. 최종 사용자 권한 부여 후 Kore.ai 애플리케이션에서 액세스 토큰을 요청할 수 있습니다. 이 필드는 필수입니다. 테넌시 정의
필요한 경우 하위 도메인 섹션에서 웹 애플리케이션 또는 사용자 인터페이스의 기본 URL이 URL의 테넌트 이름을 사용하는 경우 예를 선택합니다. 예: kore는 테넌트를 www.kore.someCompany.com.으로 사용하는 웹 서비스의 테넌트 조직입니다. 다음 예시 설정에서 테넌시 URL은 {tenant} 조직 플레이스 홀더를 포함합니다.
추가 필드 추가
+ 추가 필드를 추가하여 추가 필드 대화 상자를 열고 다음 그림과 같이 필요한 경우 추가 권한 부여 입력 필드를 나타내는 키/값 쌍을 하나 이상 입력합니다.
다음 필드를 지정합니다.- 필드 키 – 권한 부여를 위해 지정할 사용자 정의 필드의 이름입니다.
- 값 – 권한 부여를 위해 지정할 사용자 정의 필드의 값입니다.
추가를 클릭하여 추가 필드를 저장합니다. 추가 필드를 더 추가하려면 추가 필드 섹션에서 추가를 클릭합니다.
권한 부여 필드 추가
기본적으로 권한 부여 필드는 작업 요청 메시지의 헤더 일부로 구성됩니다. 작업 요청에 추가 권한 부여 필드가 필요하거나 예상되는 권한 부여(예: 사회 보장 번호 또는 PIN)가 헤더의 일부가 아닌 경우 + 권한 부여 필드 추가를 클릭한 후 다음 그림과 같이 필드를 정의합니다.
필드 유형 필드에서 작업 요청 메시지 및 필요한 권한 부여 필드 유형에서 위치에 따라 다음 중 하나를 선택할 수 있습니다.- 헤더 – 봇은 권한 부여 필드를 요청 헤더의 일부로 권한 부여 필드를 예상합니다.
- 페이로드 – 봇은 요청 본문의 내용 일부로 권한 부여 필드를 예상합니다.
- 쿼리 문자열 – 봇은 요청 본문에서 권한 부여 필드를 쿼리로 예상합니다.
- 경로 매개 변수 – 봇은 권한 부여 필드를 요청의 URL 경로의 일부로 예상합니다.
필드 키 필드에서 선택한 필드 유형에 대한 필드 이름을 입력합니다. 필드 값 필드에 지정된 필드 키의 값을 입력합니다. 추가를 클릭합니다. 새 권한 부여 필드가 권한 부여 필드 섹션에 추가됩니다. 추가 인증 권한 필드를 추가하려면권한 부여 필드 섹션에서 추가를 클릭합니다.
권한 부여 테스트
권한 부여를 저장한 후 권한 부여 테스트를 클릭하여 권한 부여 페이지에서 권한 부여 정의를 테스트하고 작업의 나머지 단계 개발을 계속 진행할 수 있습니다.
권한 부여 테스트를 클릭하면 인증 토큰 URL, 클라이언트 ID 및 클라이언트 시크릿 키를 사용하여 테스트가 실행됩니다. 테넌시가 정의된 경우 다음 그림과 같이 권한 부여 테스트 대화 상자가 표시됩니다. 테스트를 클릭하여 권한 부여 테스트를 시작합니다. 인증 유효성 검증이 완료되면 권한 부여 테스트 대화 상자가 닫히고 성공 또는 실패 검증 결과가 권한 부여 테스트 버튼 바로 오른쪽에 표시됩니다. 권한 부여가 실패하면 다음 그림과 같이 헤더 및 응답 탭과 함께 권한 부여 테스트 실패 메시지가 표시됩니다. - API 키 – 웹 애플리케이션 또는 웹 서비스가 생성하거나 제공하는 식별 및 권한 부여 토큰으로서 수신 애플리케이션 요청을 식별하고 경우에 따라 보안 액세스에 필요한 인증을 제공하는 데 사용합니다. 설정 세부 정보를 보려면 아래 링크를 클릭하세요. "SettingAPI 키는 식별 및 인증을 위한 고유 식별자 및 시크릿 토큰 역할을 하여 연결된 API에 대한 일련의 액세스 권한을 제공할 수 있습니다. 최종 사용자에게 액세스를 위한 사용자 이름 및 암호를 묻는 대신 작업을 설정할 때 API 키만 묻는 메시지가 표시됩니다. API 키 권한 부여 유형을 사용하려면 먼저 애플리케이션에 계정을 등록한 다음 애플리케이션의 API키를 생성하여 Kore.ai 권한 부여 메커니즘을 위한 설정을 구성합니다.다음 그림에서는 API 키 권한 부여 유형을 위해 정의할 필드를 보여줍니다.API 키 권한 부여를 정의하려면 권한 부여 유형 필드에서 API 키를 선택합니다. 그런 다음 봇 빌더 사용자 인터페이스에 표시할 권한 부여의 이름을 지정합니다.
테넌시 정의
필요한 경우 하위 도메인 섹션에서 웹 애플리케이션 또는 사용자 인터페이스의 기본 URL이 URL의 테넌트 이름을 사용하는 경우 예를 선택합니다. 예: kore는 테넌트를 www.kore.someCompany.com.으로 사용하는 웹 서비스의 테넌트 조직입니다. 다음 예시 설정에서 테넌시 URL은 {tenant} 조직 플레이스 홀더를 포함합니다.
권한 부여 양식에 양식 필드 추가
기본 사용자 이름과 암호 필드가 요구 사항을 충족하지 않는 경우 권한 부여 양식 필드를 추가하여 최종 사용자에게 표시할 새 필드를 추가할 수 있습니다. 권한 부여 양식에 필드를 추가하려면 + 양식 필드 추가를 클릭합니다. 다음 그림은 권한 부여 대화 상자에 암호 필드를 추가하는 정의의 예입니다.
다음 표에서는 권한 부여 IDP 양식 필드를 정의하는 데 사용되는 필드를 설명합니다.필드 이름 설명 필드 제목 인증 대화 상자에서 최종 사용자에게 표시되는 필드 이름을 지정합니다. 필드 키 이 값은 인증 서비스에 대한 최종 사용자 입력을 나타냅니다. 도움말 힌트 필드에 표시되는 도움말 텍스트로서 필드에 입력해야 하는 내용을 설명합니다. 필드 유형 고급 옵션을 선택한 경우 최종 사용자 인터페이스에서 표시되는 필드의 유형을 지정하여 다음 중 하나의 필드 키 값으로 할당된 사용자 입력을 수집합니다. - 텍스트 상자
- 암호
필수 고급 옵션을 선택한 경우 최종 사용자가 인증을 완료하려면 이 필드를 정의해야 하는지 여부를 선택합니다. 데이터 유형 고급 옵션을 선택한 경우 최종 사용자의 입력으로 예상되는 데이터 유형(예: 문자열)을 지정합니다. 가시성 고급 옵션을 선택한 경우 인증 필드의 속성을 표시, 숨김 또는 읽기 전용으로 표시할 지 여부를 지정합니다. 권한 부여 필드 추가
기본적으로 권한 부여 필드는 작업 요청 메시지의 헤더 일부로 구성됩니다. 작업 요청에 추가 권한 부여 필드가 필요하거나 예상되는 권한 부여(예: 사회 보장 번호 또는 PIN)가 헤더의 일부가 아닌 경우 + 권한 부여 필드 추가를 클릭한 후 다음 그림과 같이 필드를 정의합니다.
필드 유형 필드에서 작업 요청 메시지 및 필요한 권한 부여 필드 유형에서 위치에 따라 다음 중 하나를 선택할 수 있습니다.- 헤더 – 봇은 권한 부여 필드를 요청 헤더의 일부로 권한 부여 필드를 예상합니다.
- 페이로드 – 봇은 요청 본문의 내용 일부로 권한 부여 필드를 예상합니다.
- 쿼리 문자열 – 봇은 요청 본문에서 권한 부여 필드를 쿼리로 예상합니다.
- 경로 매개 변수 – 봇은 권한 부여 필드를 요청의 URL 경로의 일부로 예상합니다.
필드 키 필드에서 선택한 필드 유형에 대한 필드 이름을 입력합니다. 필드 값 필드에 지정된 필드 키의 값을 입력합니다. 추가를 클릭합니다. 새 권한 부여 필드가 권한 부여 필드 섹션에 추가됩니다. 추가 인증 권한 필드를 추가하려면권한 부여 필드 섹션에서 추가를 클릭합니다.
API 키를 사용한 권한 부여 테스트
인증을 저장한 후 새 권한 부여 유형의 권한 부여 확인 URL을 정의한 경우 권한 부여 테스트를 클릭하여 인증 탭에서 권한 부여 정의를 테스트하고 작업의 나머지 단계 개발을 계속 진행할 수 있습니다.
권한 부여 테스트를 클릭하면 권한 부여 테스트 대화 상자가 표시되고 다음 그림과 같이 권한 부여 확인 URL 섹션에서 지정한 URL로 채워집니다. API 키를 사용한 권한 부여 테스트 설정 방법- 권한 부여 확인 URL 필드에서 인증 설정을 테스트하려는 URL을 확인하거나 입력합니다.
- 봇이 하위 도메인을 사용하는 경우 테넌시 필드가 표시되고 테넌트를 지정해야 합니다.
- API 키 필드에 애플리케이션의 API 키를 입력합니다.
- Content-Type 필드에서 URL에 예상되는 콘텐츠 유형을 선택합니다.
- URL을 테스트하려는 경우 메소드 필드는 읽기 전용이며 GET으로 설정됩니다.
- 테스트를 클릭하여 권한 부여 테스트를 시작합니다.
인증 유효성 검증이 완료되면 권한 부여 테스트 대화 상자가 닫히고 성공 또는 실패 검증 결과가 권한 부여 테스트 버튼 바로 오른쪽에 표시됩니다. 권한 부여가 실패하면 다음 그림과 같이 헤더 및 응답 탭과 함께 권한 부여 테스트 실패 메시지가 표시됩니다.
- 기본 인증 – 사용자 이름 및 암호 정보를 수집하는 표준 프로토콜입니다. Kore.ai는 기본 인증과 함께 SSL 암호화를 사용하여 최종 사용자 정보를 보호합니다. 설정 세부 정보를 보려면 아래 링크를 클릭하세요. "Setting
3단계: API 요청
작업에 필요한 경우 최종 사용자가 작업을 완료하기 위해 선택할 수 있는 동적 드롭다운 선택 항목을 제공하는 등의 요청 개체를 정의할 수 있습니다. 정보 작업 API 요청 탭에서 API 매개 변수, 선택적 API 작업 이니셜라이저, API 요청 전처리기 또는 API 요청 후처리기 및 API 요청을 정의할 수 있습니다. 또한 API 요청 페이로드에서 예상되는 응답 샘플을 추가해야 합니다.
WSDL URL과 커넥터를 구성하려면 SOAP를 사용하여 정보 작업 요청을 설정할 수도 있습니다.
"API
봇 조치 작업을 설명하고 나면 일반적인 탭에서 선택적으로 인증 요구 사항을 정의합니다. API 요청 탭에서 작업을 위해 Bot 웹 사이트, 시스템 또는 웹 애플리케이션에서 데이터를 요청하는 API 요청 구성을 시작할 수 있습니다. 이 항목에서는 API(REST) 요청을 설정하는 방법을 설명합니다. API(SOAP) 요청은 아래에서 확인하세요. "Configuring
조치 작업 요청 및 연결 모드가 REST로 설정된 경우 다음과 같이 정의해야 합니다.
"Defining
- 권한 부여 – 조치 작업에 필요한 경우 API에 액세스하기 위해 권한 부여를 정의해야 합니다. 예를 들어, 기본 권한 부여, OAuth 또는 API 키를 사용합니다. 자세한 내용은 아래 권한 부여 설정 섹션을 참조하세요.
- 매개 변수 – API 요청을 처리하는 데 사용되는 하나 이상의 매개 변수를 정의합니다. 예: 사용자 프롬프트의 입력, 선택 항목에서 최종 사용자가 선택한 항목, URL 등. 자세한 내용은 아래 조치 작업에 대한 매개 변수 정의하기를 참조하세요.
- 이니셜라이저(옵션) – 웹 서비스가 코드를 실행할 때 또는 세션 변수가 설정될 때, API 요청이 실행되기 전에 사용자 컨텍스트 세부 정보를 수정할 때 작업 인스턴스를 생성하기 전에 실행할 사용자 정의 JavaScript를 지정하거나 세션 변수를 설정합니다. 자세한 내용은 아래 이니셜라이저 정의하기를 참조하세요.
- 요청 – 봇에 대한 URL과 경로를 사용하여 웹 서비스에 API 호출을 수행해 조치 작업을 시작하고 웹 서비스에서 봇 플랫폼으로 데이터 페이로드 전달을 시작하는 데 사용되는 요청 체인을 정의합니다. 요청 체인은 전처리기, API 요청 및 후처리기로 구성됩니다. 자세한 내용은 아래 요청 체인 정의하기를 참조하세요.
- 응답 샘플 – 조치 작업 페이로드에서 수신할 것으로 예상되는 키/값 쌍을 정의합니다. 입력한 키는 봇 사용자에게 표시할 데이터를 처리하기 위해 드롭다운 선택 항목으로 사용할 수 있습니다. 자세한 내용은 아래 응답 샘플 추가를 참조하세요.
API 요청(REST) 매개 변수를 정의하려면 다음 단계를 따르세요.
"Defining- 매개 변수 섹션을 클릭한 다음 추가를 클릭합니다. 작업 매개 변수 설정 대화 상자가 열립니다.
- 선택에 따라 다음 표에 설명된 대로 관련 필드 값을 입력합니다.
필드 이름 설명 작업 매개 변수 유형 다음 중 하나를 지정합니다. - 페이로드 매개 변수 – 이 필드 유형을 사용하여 POST, PUT, GET, DELETE 등 HTTP 메소드의 페이로드 데이터를 나타냅니다. 예:
{ "taskId":"{payloadfield2}", "message":"{payloadfield1}" } - 쿼리 매개 변수 – 이 필드는 URL 경로 또는 URL 내의 쿼리의 일부로 사용됩니다. 예:
http://app.asana.com/api/workspaces/{queryfield1}/project/{queryfield2}?userId={queryfield3}
매개 변수 이름 사용자에게 표시되는 작업 입력 필드의 제목입니다. 예: 계정 선택 프롬프트 메시지 매개 변수 이름 아래에 표시되는 도움말 설명입니다. 예: 어떤 계정에 액세스하시겠습니까? 매개 변수 키 수집하려는 최종 사용자 입력 값을 나타내는 키입니다. 예: accountType. 엔티티 유형 입력 매개 변수가 엔티티와 연결되며 다음 중에서 엔티티 유형을 선택할 수 있습니다. - 첨부
- 도시
- 국가
- 회사
- 통화
- 날짜
- 이메일
- 레이블
- 위치
- 메시지
- 이름
- 숫자
- 퍼센트
- 전화번호
- 문자열
엔티티 유형에 대한 자세한 내용은 여기를 클릭하세요. 선택한 엔티티 유형에 따라 나머지 매개 변수가 설정되어 동일하게 수정할 수 있습니다.
매개 변수 유형 키 값에 할당할 요청 개체의 사용자 입력 수집을 위해 최종 사용자 인터페이스에 표시되는 작업 입력 필드의 유형을 지정합니다. 기본 설정은 텍스트 상자이지만 다음 중 하나에 맞게 사용자 정의할 수 있습니다. - 날짜 – 작업을 계정에 설정할 때 최종 사용자가 정의할 날짜 형식 구문을 선택할 수 있는 형식 필드를 표시합니다. 날짜 형식 선택 드롭다운 목록에서 다음 중 하나를 선택합니다.
- dd-MM-YYYY – 예: 16-05-1999
- MM-dd-YYYY – 예: 05-16-1999
- dd-MM-YY – 예: 16-05-99
- YYYY-MM-dd – 예: 1999-05-16
- URL – 올바른 URL 구문을 위한 필드 유효성 검사를 포함하여 최종 사용자가 URL을 입력할 수 있는 텍스트 상자를 표시합니다. 플레이스 홀더 필드에 텍스트 상자에 표시되는 도움말 힌트를 입력합니다. 예: 여기에 웹 사이트의 URL 입력.
- 텍스트 상자 – 최종 사용자가 작업 입력 필드로 텍스트를 입력하기 위한 텍스트 상자를 표시합니다. 일반적으로 몇 단어입니다. 플레이스 홀더 필드에 텍스트 상자에 표시되는 도움말 힌트를 입력합니다. 예: 여기에 웹 사이트의 URL 입력.
- 정적 드롭다운 – 최종 사용자에 대한 드롭다운 선택 목록을 표시합니다. 옵션 추가를 클릭하여 다음 매개 변수를 사용하여 최종 사용자에게 표시할 항목 목록을 추가합니다.
- 옵션 이름 – 최종 사용자에게 표시되는 옵션의 이름입니다.
- 옵션 값 – 애플리케이션에 반환된 옵션 이름을 나타내는 값입니다.
- 기본값 – 하나 이상의 옵션이 정의된 경우 옵션의 기본값을 선택합니다.
- 검색 가능 – 최종 사용자가 이 필드에 텍스트를 입력할 때 동적 검색 및 표시를 사용함으로 설정하거나 일치 항목이 없는 경우 자유 양식 입력을 허용하려면 선택합니다.
저장을 클릭합니다. 추가 항목을 추가하려면 옵션 추가를 다시 클릭합니다. 옵션의 조치 열에서 옵션을 편집하거나 삭제합니다.
- 동적 드롭다운 – 봇의 URL 응답에 따라 실행 시 동적으로 채워진 드롭다운 목록을 표시합니다. 예: JIRA 작업 알림용 프로젝트 목록. 동적으로 채워진 드롭다운에 대해 다음 속성을 정의합니다.
- 엔드포인트 URL – 봇 엔드포인트 URL(예: https://app.asana.com/api/1.0/workspaces.
- 엔드포인트 콘텐츠 유형 – 지정된 엔드포인트 URL에서 예상되는 컨텐츠 유형입니다. 다음 중 하나입니다. JSON, RSS, XML, URL Encoded JSON, CCV, Text 또는 Twitter 인코딩된 JSON.
- 엔드포인트 메소드 – 다음 중 하나입니다.
- GET – 작업 필드의 HTTP 요청 GET 메소드를 지정합니다.
- POST – 작업 필드의 HTTP 요청 POST 메소드를 지정합니다.
- 응답 경로 – 원하는 드롭다운 목록 값이 포함된 응답의 경로입니다. 예: data.
- 라벨 키 – 드롭다운 옵션의 라벨 키입니다. 예: name.
- 옵션 값 키 – 드롭다운 옵션의 값의 키입니다. 예: id.
- 페이로드 필드 추가 – 동적 드롭다운에 대한 옵션으로 응답 페이로드에서 하나 이상의 필드를 추가하려면 클릭합니다. 각 페이로드 필드에서 페이로드 필드 키 및 페이로드 필드 값을 입력한 다음 저장을 클릭합니다. 조치 열에서 페이로드 필드를 편집하거나 삭제합니다.
- 검색 가능 – 최종 사용자가 이 필드에 텍스트를 입력할 때 동적 검색 및 표시를 사용함으로 설정하거나 일치 항목이 없는 경우 자유 양식 입력을 허용하려면 선택합니다.
- 텍스트 영역 – 최종 사용자가 작업 입력으로 텍스트를 입력하기 위한 텍스트 영역을 표시합니다. 일반적으로 몇 문장입니다. 플레이스 홀더 필드에서 텍스트 영역 내부에 표시되는 도움말 힌트를 입력합니다.
- 타입 어헤드 – 작업에 정의된 URL 응답에 따라 사용자가 검색 결과와 일치하는 3개 이상의 문자를 입력할 때 실행 시 동적으로 채워진 드롭다운 선택 목록을 최종 사용자에게 표시합니다. 예: JIRA 작업 알림 메시지의 프로젝트 목록. 동적으로 채워진 드롭다운에 대해 다음 속성을 정의합니다.
- 엔드포인트 URL – 봇 엔드포인트 URL(예: https://app.asana.com/api/1.0/workspaces.
- 엔드포인트 콘텐츠 유형 – 지정된 엔드포인트 URL에서 예상되는 컨텐츠 유형입니다. 다음 중 하나입니다. JSON, RSS, XML, URL Encoded JSON, CCV, Text, Twitter Encoded JSON, Multipart/Form-data 또는 Multipart/Related.
- 엔드포인트 메소드 – 다음 중 하나입니다.
- GET – 작업 필드의 HTTP 요청 GET 메소드를 지정합니다.
- POST – 작업 필드의 HTTP 요청 POST 메소드를 지정합니다.
- 응답 경로 – 원하는 드롭다운 목록 값이 포함된 응답의 경로입니다. 예: data.
- 라벨 키 – 드롭다운 옵션의 라벨 키입니다. 예: name.
- 옵션 값 키 – 드롭다운 옵션의 값의 키입니다. 예: id.
- 페이로드 필드 추가 – 타입 어헤드 필드에 대한 옵션으로 응답 페이로드에서 하나 이상의 필드를 추가하려면 클릭합니다. 각 타입 어헤드 옵션에서 페이로드 필드 키 및 페이로드 필드 값을 입력한 다음 저장을 클릭합니다. 조치 열에서 페이로드 필드를 편집하거나 삭제합니다.
- 편집 가능 – 타입 어헤드 검색 결과가 일치하지 않을 때 사용자가 필드에서 텍스트를 자유롭게 입력할 수 있습니다.
- 이메일 – 최종 사용자가 이메일 주소를 입력할 수 있는 텍스트 상자를 표시합니다. 플레이스 홀더 필드에서 텍스트 상자 내부에 최종 사용자에게 표시되는 도움말 힌트를 입력합니다.
- 날짜 및 시간 – 최종 사용자가 시간과 함께 날짜를 입력할 수 있는 텍스트 상자를 표시합니다. 형식 필드에서 날짜 텍스트 상자에 최종 사용자에게 표시할 예상되는 날짜 또는 시간 형식을 입력합니다. 날짜 형식 선택 드롭다운 목록에서 시간 형식의 날짜를 선택합니다.
- 시간대 – 운영 체제 설정에 따른 시간대 드롭다운 목록을 표시합니다.
- 위치 – 최종 사용자가 지리적 위치를 입력할 수 있는 텍스트 상자를 표시합니다. 예: Orlando, FL 또는 32801.
- 중첩된 양식 – 상위 입력 필드 아래에 중첩된 형식으로 최종 사용자 입력 필드를 표시합니다. 중첩된 양식 입력 필드에 대해 다음 필드를 지정합니다.
- 배열 요소 유형 – 상위 입력 양식 요소의 데이터 유형을 선택합니다.
- 중첩 양식 필드 추가 – 하나 이상의 중첩된 양식 필드를 추가하려면 클릭합니다.
- 파일 업로드 – 검색할 최종 사용자 컨트롤을 표시하고 업로드할 파일을 선택합니다. 클릭되면 파일 업로드 페이로드 키를 입력합니다. 파일 업로드 페이로드 키가 정의된 경우 파일 업로드 페이로드 필드 값 드롭다운 목록에서 다음 유형 중 하나를 선택합니다.
- 파일 이름
- 파일 크기
- 파일 콘텐츠 유형
데이터 유형 다음 사용자 입력 유형 중 하나를 선택합니다. - 문자열 – 사용자는 연속된 숫자, 문자 또는 특수 문자를 입력할 수 있습니다.
- 숫자 – 사용자는 숫자를 입력할 수 있습니다. 특수 문자는 허용되지 않습니다.
- 불리언 – 사용자는 true 또는 false의 부울 값을 입력할 수 있습니다.
- 이메일 – 사용자는 유효한 이메일 주소를 입력할 수 있습니다.
- 개체 – 봇의 데이터는 JSON 개체로 수신할 수 있습니다. 예: 다음과 같이 정의된 위치 세부 정보: "location" : { "lat" : 17.4374614, "lng" : 78.4482878 } 요청 체인 또는 작업 요청에서 속성을 location.lat 및 location.lng로 참조할 수 있습니다.
- Array – 사용자는 쉼표로 구분된 값 목록을 봇에 전달할 수 있습니다. 예: 구글 캘린더에서 데이터가 있는 여러 참석자는 다음과 같이 전달할 수 있습니다. "attendees": ["user1", "user2", "user3"]선택되면 사용자 입력 배열의 유형을 다음 중 하나로 지정합니다.
- 문자열
- 숫자
- 불리언
- 이메일
- 배열
- 날짜
- 날짜 – 사용자는 전체 날짜를 입력하거나 날짜 선택기에서 날짜를 선택할 수 있습니다.
필수 최종 사용자가 이 설정을 정의하여 작업 설정 구성을 저장하려는 경우 선택합니다. - 페이로드 매개 변수 – 이 필드 유형을 사용하여 POST, PUT, GET, DELETE 등 HTTP 메소드의 페이로드 데이터를 나타냅니다. 예:
- 고급 설정 탭을 클릭하여 작업 필드의 추가 옵션 설정을 정의합니다.
| 필드 이름 | 설명 |
|---|---|
| 가시성 | 작업 입력 필드를 최종 사용자에게 표시할지 숨길지 여부를 지정합니다. 가시성 필드는 사용자 정의로 설정할 수도 있으며 데이터는 사용자로부터 캡처되지만 쿼리 매개 변수 또는 페이로드 필드로 사용되지 않습니다. 예: JIRA 봇을 사용하는 경우 아래와 같이 @mention 태그를 사용하여 티켓에 의견을 게시합니다. "@Mike, 이 문제를 살펴보세요"'의견 게시'를 위한 JIRA API는 다음과 같이 하나의 쿼리 필드와 하나의 페이로드 필드가 필요합니다.
가시성 필드를 사용자 정의로 설정하면 페이로드 필드 또는 쿼리 필드로 사용하지 않고 |
| 키 전치 해제 | Kore.ai의 키 전치를 비활성화하려면 선택하세요. 기본적으로 Kore.ai는 키/값 쌍을 전치합니다. 예: Kore.ai는 "parameter":"value"를 "parameter:{value:"actualValue"}로 전치합니다. 선택되면 키는 전치되지 않습니다. |
| 세션에서 가져오기 | 이 필드의 사용자 입력 값을 세션 변수로 저장하려면 선택합니다. 선택되면 세션의 필드 값 필드가 표시됩니다. 기존 변수를 선택하거나 새 세션 변수 추가를 선택하여 새 변수를 정의합니다. 새 세션 변수를 생성하려면 변수의 범위를 선택하고 변수를 저장할 키를 정의해야 합니다. 범위 필드에서 다음 중 하나를 선택합니다.
|
- 추가 및 계속을 클릭하여 작업 요청의 매개 변수를 저장하고 다른 매개 변수를 추가하거나 추가 및 종료를 클릭하여 작업 요청의 매개 변수를 저장하고 대화 상자를 닫습니다. 봇 사용자가 입력을 제공해야 하는 순서대로 여러 매개 변수를 구성해야 합니다. 및 아이콘을 사용하여 매개 변수를 이동합니다.
작업을 실행하려면 Kore.ai 세션별 변수를 사용하여 작업을 실행하기 전에 세션에 값을 입력하거나 가져와야 할 수 있습니다. 자세한 내용은 작업에서 세션 변수 및 컨텍스트 변수 사용하기를 참조하세요. 일부 웹 서비스는 API 요청을 실행하기 전에 실행된 코드, 세션 변수 또는 사용자 컨텍스트 세부 정보 수정이 필요합니다. 예: 웹 서비스는 2단계 사용자 권한 부여가 필요할 수 있습니다. 첫 번째 단계는 사용자 로그인이며 두 번째 단계는 파트너 권한 부여입니다. 이 두 단계를 모두 검증한 후 액세스 토큰이 부여되며 해당 웹 서비스에 대한 후속 API 호출 헤더에 사용됩니다. 이니셜라이저를 사용하여 파트너 권한 부여를 완료하고 사용자 인증에서 액세스 토큰을 검색할 수 있습니다. 액세스 토큰은 사용자 정의 세션 변수로 저장할 수 있고 후속 API 호출을 위한 헤더로 설정할 수 있습니다.
"Defining작업 이니셜라이저 정의
작업 이니셜라이저를 설정하려면 이니셜라이저 탭을 클릭하세요. 필요한 코드를 작성할 수 있는 JavaScript 편집기가 열립니다. JavaScript 편집기에서 다음과 같이 키 및 범위를 정의합니다.
- EnterpriseContext – 엔터프라이즈 내 모든 봇과 사용자가 사용할 수 있는 키-값 쌍입니다. 예: GitHub 봇의 경우 사용자는 하나 이상의 엔터프라이즈 저장소에 액세스해야 합니다. 이니셜라이저에서 다음 JavaScript 코드를 사용하여 저장소 데이터를 Gitrepository (엔터프라이즈 컨텍스트)로 유지할 수 있습니다.
var userRepository = { "title": _labels_[repository], "value": repository }; EnterpriseContext.put('Gitrepository', userRepository, 200000); - BotContext – 특정 봇의 모든 사용자가 사용할 수 있는 키-값 쌍입니다. 예: 사용자의 위치에 따라 세션에서 금융 거래를 위한 기본 통화를 설정할 수 있습니다. 이니셜라이저에서 다음 JavaScript 코드를 사용하여 기본 통화 데이터를 currency (봇 컨텍스트)로 유지할 수 있습니다.
var defaultCurrency = { TODO 위치 기반 통화에 대한 JavaScript를 사용자 정의 } BotContext.put('currency', defaultCurrency, 200000); - UserContext – 사용자의 모든 봇이 사용할 수 있는 키-값 쌍입니다. 이 키는 읽기 전용이며 시스템에서 다음과 같은 사용자 데이터로 제공됩니다.
- _id – Kore.ai 사용자 ID입니다.
- emailId – userId에 연결된 이메일 주소입니다.
- lastName – 사용자의 성입니다.
- firstName – 사용자의 이름입니다.
- profImage – 사용자의 이미지 또는 아바타 파일 이름입니다.
- profColour – 사용자의 계정 색상입니다.
- activationStatus – 사용자의 계정 상태입니다.
- title – 정의된 경우 사용자의 직함입니다.
- orgId – 정의된 경우 사용자 계정의 조직 ID입니다.
- UserSession – 엔터프라이즈 내 모든 봇의 특정 사용자가 사용할 수 있는 키-값 쌍을 정의합니다. 예: 상거래, 운송 및 가정 배달 서비스를 위한 사용자 집 주소와 같이 사용자 위치를 저장하여 모든 봇이 사용할 수 있도록 해야 합니다. 이니셜라이저에서 다음 JavaScript 코드를 사용하여 기본 위치 데이터를 HomeLocation (사용자 세션)으로 유지할 수 있습니다.
var location = { "title": labels[location], "value": { "latitude": location.latitude, "longitude": request.location.longitude } }; UserSession.put('HomeLocation', location, '20000'); - BotUserSession – 같은 특정 사용자의 입력을 기반으로 특정 봇이 사용 가능한 키-값 쌍을 정의합니다. 예: 하나 이상의 봇 작업에 대해 사용자 위치를 유지해야 합니다. 여행 봇의 경우 같은 집 주소와 목적지 주소를 기준으로 항공편과 호텔을 예약할 수 있습니다. 이니셜라이저에서 다음 JavaScript 코드를 사용하여 기본 집 및 목적지 데이터를 HomeLocation (봇 사용자 세션) 및 DestinationLocation (봇 사용자 세션)으로 유지할 수 있습니다.
var homelocation = { "title": labels[request.sourceLocation], "value": { "latitude": request.sourceLocation.latitude, "longitude": request.sourceLocation.longitude } }; BotUserSession.put('HomeLocation', homelocation, '20000'); var destlocation = { "title": labels[request.destLocation], "value": { "latitude": request.destLocation.latitude, "longitude": request.destLocation.longitude } }; BotUserSession.put('DestinationLocation', destlocation, '20000’);
GET 및 PUT 구문
다음 코드 예시에서는 각 컨텍스트 유형에 따라 키-값 쌍을 GET 또는 PUT하는 구문을 보여줍니다.
"EnterpriseContext" : { "get" : function(key){...},//지정된 키 획득 key "put" : function(key, value, ttl){...} //특정 ttl에 대한 값을 키에 입력합니다. ttl은 분 단위입니다. }, "BotContext" : { "get" : function(key){...},//지정된 키 획득 key "put" : function(key, value, ttl){...} //특정 ttl에 대한 값을 키에 입력합니다. ttl은 분 단위입니다. }, "UserContext" : { "get" : function(key){...},//지정된 키 획득 }, "UserSession" : { "get" : function(key){...},//지정된 키 획득 key "put" : function(key, value, ttl){...} //특정 ttl에 대한 값을 키에 입력합니다. ttl은 분 단위입니다. }, "BotUserSession" : { "get" : function(key){...},//지정된 키 획득 key "put" : function(key, value, ttl){...} //특정 ttl에 대한 값을 키에 입력합니다. ttl은 분 단위입니다. }
예:
BotContext.put("topicSessionVariable","music",2000); UserSession.put("firstName","Mary",20000); UserContext.get("firstName");
예외 구문
인증 실패와 같은 작업 설정 전에 오류를 캡처하도록 사용자 정의 오류 메시지를 정의할 수도 있습니다. 예외가 캡처된 경우 작업 설정이 중지됩니다. 다음 구문을 사용하여 예외를 발생시킵니다.
{ "exceptions": { "message": " 오류 메시지" } }
예,
var ex ={}; var exceptions={}; exceptions.message ='유효한 권한 없이 계속 할 수 없습니다'; ex.exceptions = exceptions; print(JSON.stringify(ex)); //출력은 필수입니다.
이니셜라이저 섹션에서는 세션 키 또는 기타 세션 값을 설정할 수 있지만 값을 설정하거나 액세스할 수는 없습니다. 예,
var name = UserContext.get("firstName")+UserContext.get("lastName"); UserSession.put("fullName") = name;
앞의 코드 예시에서는 작업의 고급 설정 섹션에서 세션에서 가져오기 필드로 정의된 작업 매개 변수를 사용하여 세션에 값을 입력합니다. 키는 사용자 정의된 UserSession 컨텍스트 변수에 대해 fullName으로 정의됩니다.
작업 이니셜라이저 예시
다음 코드는 API 요청에서 변수를 미리 채우는 사용자 ID 및 이메일 데이터를 얻기 위한 작업 이니셜라이저의 예입니다.
var x = UserContext.get("identities"); var isEmailFound = false; for (var i = 0; i < x.length; i++) { if (x[i].type === "mapped") { var identity = x[i].val var arr = identity.split("/"); var pattern = /^cs/i; var result = arr[0].match(pattern); if (result) { isEmailFound = true; UserSession.put("rtmEmail", arr[1], '20000'); } } } if (!isEmailFound) { for (var j = 0; j < x.length; j++) { if (x[j].type === "email") { UserSession.put("rtmEmail", x[j].val, '20000'); } } }
API 요청 탭의 요청 섹션에서 전처리기, API 요청, 후처리기로 구성된 API 요청 체인을 정의할 수 있습니다. 처리기는 선택이지만 API 요청은 하나 이상 필요합니다.
"AddingAPI 요청
모든 작업에 대해 작업을 시작하려면 웹 서비스 호출을 위한 API 요청을 정의해야 합니다. 각 작업을 위해 최소한 하나의 API 요청은 필요합니다. 각 API 요청에 대해 웹 서비스에서 데이터 페이로드 전달을 시작하려면 하나 이상의 요청 URL 및 경로를 추가해야 합니다.
API 요청 설정하기
- API 요청 탭에서 요청 탭을 확장한 다음 API 추가를 클릭합니다.
- 다음 절차에 설명된 대로 API 추가 대회 상자에 필드 값을 지정합니다.
- 이름 필드에 API 요청의 이름을 입력합니다. 예: 내 API 요청.
- 메소드 드롭다운 목록에서 작업에 사용되는 HTTP 메소드를 입력합니다. 다음 중 하나입니다.
- POST – HTML 양식을 사용하여 고객 정보, 파일 업로드 등 서버에 데이터를 전송하는 데 사용됩니다.
- PUT – 대상 리소스의 내용을 전송된 내용으로 대체합니다.
- PATCH – 기존 대상 리소스의 내용에 전송된 내용을 추가합니다.
- DELETE – 기존 대상 리소스의 내용을 삭제합니다.
- GET – 기존 대상 리소스의 내용을 반환합니다.
- URL 필드에서 프로세스에 대한 봇 작업 응답의 URL(예: http://koremessenger.com/postURL)을 지정합니다. 다음 예시와 같이 URL에서 세션 변수를 사용할 수도 있습니다.
https://mySite.crm.ondemand.com/sap/c4c/odata/v1/c4codata/ServiceRequestCollection?$filter=ID eq '{id}' and ReporterEmail eq '{userEmail}'&$expand=ServiceRequestHistoricalVersion,ServiceRequestDescription참고 사항: 일부 URL에서는 끝과 시작 매개 변수에 전용 Kore.ai 매개 변수 값을 사용할 수 있습니다. Kore.ai 매개 변수 값에 대한 자세한 내용은 봇 추가하기의 봇 관련 설명서를 참조하세요. - 커넥터를 사용한 액세스 필드에서 Kore.ai 커넥터 에이전트를 사용하여 Kore.ai 봇의 액세스를 활성화하려면 예를 선택합니다. 이 옵션은 Kore.ai 커넥터 에이전트가 엔터프라이즈 온프레미스 네트워크에서 설정되어 사용함으로 설정한 경우에만 표시됩니다. 자세한 내용은 Kore.ai 커넥터 사용을 참조하세요.
- 헤더 탭의 콘텐츠 유형 필드에서 샘플 응답 데이터에 대해 지원되는 다음 데이터 유형 중 하나를 선택합니다.
- JSON – JavaScript Object Notation은 사람이 읽을 수 있는 텍스트를 사용하여 데이터 개체를 속성-값 쌍으로 전송하는 개방형 표준 포맷입니다. JSON을 사용하여 Kore.ai 서버와 봇 웹 애플리케이션 간에 데이터를 전송할 수 있습니다.
- RSS – Rich Site Summary 또는 Really Simple Syndication은 블로그 항목, 뉴스 헤드라인, 음성 및 동영상과 같이 자주 업데이트 되는 정보를 게시하는 데 사용되는 표준화된 형식 집합입니다.
- XML – Extensible Markup Language는 사람이 읽을 수 있고 기계가 읽을 수 있는 형식으로 문서를 인코딩하기 위한 규칙 집합을 정의한 마크업 언어입니다. 웹 서비스는 종종 XML 스키마를 사용하여 XML 데이터를 처리합니다.
- URL 인코딩된 JSON – 예약된 문자에 대해 JSON 인코딩을 사용한 URL입니다.
- CSV – 쉼표로 구분된 값 목록입니다.
- Text – 텍스트 기반 키-값 쌍입니다.
- Twitter 인코딩된 JSON – 예약된 문자에 대해 JSON 인코딩을 사용한 Twitter의 URL입니다.
- Multipart/Form-data – 사용자가 양식에서 파일을 업로드할 수 있도록 하는 경우 HTTP POST 요청 메소드를 통해 파일을 전송하는 인코딩 유형입니다.
- Multipart/Related – 같은 정보를 다른 본문 파트에 다른 형태로 표시할 때 사용됩니다. 본문 파트는 복잡도가 높은 순으로 정렬됩니다.
- Oracle ADF – Oracle Application Development Framework용 입니다.
- 권한 부여 헤더 섹션에서 키를 선택하거나 선택 취소하여 다음 그림과 같이 헤더의 키를 사용하거나 비활성화합니다.
- 다음 그림과 같이 매개 변수 탭에서 헤더에 포함할 권한 부여 매개 변수 또는 매개 변수를 선택하거나 선택 취소합니다.
- 저장을 클릭하여 저장하고 API 요청 설정을 닫습니다.
처리기
처리기를 사용하면 JavaScript를 사용하여 웹 서비스에 API 요청 전, 요청 중, 요청 후 사용자 세션에서 수집된 데이터를 수정할 수 있습니다. API 요청 전 처리기를 정의하고 배치하는 경우 전처리기입니다. 전처리기를 사용하면 API 요청이 수행되기 전 세션 변수에서 입력 매개 변수와 값을 관리할 수 있습니다.. 처리기가 API 요청 후 순차적으로 배치된 경우 후처리기입니다. 후처리기를 사용하여 API 요청에서 페이로드 응답 키에 액세스할 수 있습니다. 키에 액세스하려면 다음 후처리기 유형 중 하나를 사용하세요.
- Resolve: 두 번째 요청에 대한 입력으로 하나의 페이로드 응답의 결과를 사용합니다.
- Spread – 페이로드에서 데이터 배열을 분리합니다.
- Extract – 여러 개체가 있는 페이로드의 특정 개체의 경로를 지정합니다.
- Assign – 페이로드 응답의 변수 이름을 지정합니다.
전처리기
세션 변수 및 매개 변수를 사용하여 API 요청을 실행하기 전에 전처리기를 사용해 요청 매개 변수를 관리할 수 있습니다. 전처리기를 정의할 때 처리 유형을 사용자 정의로 설정한 다음 표시되는 JavaScript 편집기에 코드를 입력해야 합니다. 전처리기는 사용자 정의 유형만 될 수 있습니다.
전처리기 추가하기
- API 요청 페이지에서 요청 탭을 확장한 다음 처리기 추가를 클릭합니다.
- 이름 필드에 처리기의 이름을 입력합니다.
- 처리 유형 드롭다운 목록에서 전처리기에 대해 사용자 정의를 선택합니다.
- 다음 구문을 사용하여 필요에 따라 요청 매개 변수를 수정하기 위한 코드를 추가합니다.
{ "fields": { "payloadFields": { // 페이로드 필드에 대한 값 설정 "key1": "value1", // 페이로드 필드는 경고 작업에 적용할 수 없습니다. "key2": "value2".... }, "headerFields": { // 헤더 필드에 대한 값 설정 "key1": "value1", "key2": "value2".... }, "pathFields": { // 경로 필드 또는 쿼리 필드에 대한 값을 설정합니다. "key1": "value1", "key2": "value2".... } } }예: 다음 코드 조각을 사용하여 API 개체의 경로 필드 또는 쿼리 필드를 설정할 수 있습니다.
var fields= {}; var pathFields = {}; pathFields.fullName = UserContext.get("firstName")+UserContext.get("lastName") fields.pathFields = pathFields; var finalObject = {}; finalObject.fields = fields; print(JSON.stringify(finalObject));이전 코드에서
firstName및lastName이 세션 변수로John및Smith로 각각 저장된 경우 전처리기의 JSON 응답 페이로드는 다음과 같습니다.{ fields: { "pathFields": { "key": "fullName", "value": "John Smith" } } }다음 전처리기 예시에서는 실제 API 요청 호출 전에 변수를 세션 변수로 설정합니다.
var fields = {}; var pathFields = {}; var UserEmailID = UserSession.get("rtmEmail"); pathFields.userEmail = UserEmailID; fields.pathFields = pathFields; var finalObject = {}; finalObject.fields = fields; print(JSON.stringify(finalObject)); - 저장을 클릭하여 저장하고 처리기 추가 대화 상자를 닫습니다.
API 요청 전에 처리기를 요청 섹션에 배치하면 처리기는 전처리기로 간주됩니다. API 요청 후에 처리기를 배치하면 처리기는 후처리기로 간주됩니다.
후처리기 추가하기
Kore.ai 후처리기를 사용하여 웹 서비스에서 원하는 데이터 페이로드를 가져오려면 하나 이상의 API 요청이 필요합니다.
사용자 정의 후처리기 정의
사용자 정의 후처리기를 생성하려는 경우 다음 구문을 사용하여 이전 API 요청의 응답 키에 액세스할 수 있습니다"
payload[0].{ key }
JSON 구문
{ "payload": { "key1" : "value1", "key2" : "value2" } }
예
var final = {}; var data = payload[0]; //이전 API 개체의 응답을 액세스 data.title[0] = '키의 새 값을 여기에 입력'; final.payload = data; // API 개체의 응답을 업데이트 print(JSON.stringify(final)); // 이 단계는 필수입니다
사용자 정의 처리기의 경우 이전 코드와 같이 최종 응답을 출력해야 합니다. 그렇지 않으면 빈 응답이 반환됩니다. 다음 구문을 사용합니다.
print(JSON.stringify( <<object>> ));
표준 후처리기 설정
표준 후처리기를 추가하려면 다음 단계를 따릅니다.
- API 요청 탭에서 요청 탭을 확장한 다음 처리기 추가를 클릭합니다.
- 또한 Kore.ai는 후처리기를 위한 사용자 정의 코드를 생성하는 대신 사용할 수 있는 일련의 표준 후처리기를 제공합니다. 처리 유형 필드에서 다음 네 가지 표준 처리기 유형 중 하나를 선택합니다.
- Resolve: 두 번째 요청에 대한 입력으로 하나의 페이로드 응답의 결과를 사용합니다. 예: 처리기 추가를 클릭하고 처리기의 이름을 입력하고 처리 유형을 resolve로 설정하고 키를 변수의 이름으로 설정한 다음 첫 번째 API 요청의 변수를 사용하여 Post URL을 정의합니다. 예: https://app.asana.com/api/1.0/projects/{project_id}는 페이로드 응답에서 다음과 같이 id 필드를 반환합니다.
... "id":80468818418144, <br/> "created_at":"2016-01-14T05:34:35.848Z", "modified_at":"2016-01-20T04:29:52.505Z", "owner":{ "id":73114591129714, "name":"jaganmohan.evuri" }, ...그 이후 다음과 같이 변수 입력으로 사용됩니다 Post URL: https://app.asana.com/api/1.0/projects/{id}/tasks?opt_fields=completed,modified_at 페이로드 응답에서 예상되는 HTML 콘텐츠 유형 및 HTML 요청 메소드를 지정해야 합니다. 자세한 내용은 작업에서 세션 변수 및 컨텍스트 변수 사용하기를 참조하세요.
- Spread: 분리해야 하는 데이터 배열이 포함된 페이로드입니다. 예: 처리기 추가를 클릭하고 처리기의 이름을 입력하고 키 필드를 데이터로 설정하고 처리 유형을 spread로 설정하여 다음 코드 예제에서
data요소의 내용을 캡처하여 배열의 각 항목을 추출합니다.{ "attribution": null, "tags": [], "type": "image", "location": null, "comments": { "count": 51, "data": [{ "created_time": "1453900980", "text": "43rd", "from": { "username": "kore_hyd", "profile_picture": "https://scontent.cdninstagram.com/t51.2885-19/11906329_960233084022564_1448528159_a.jpg", "id": "2056218675", "full_name": "Kore.ai Hyd" }, "id": "1171728804843572377" }, { "created_time": "1453901222", "text": "44th", "from": { "username": "kore_hyd", "profile_picture": "https://scontent.cdninstagram.com/t51.2885-19/11906329_960233084022564_1448528159_a.jpg", "id": "2056218675", "full_name": "Kore.ai Hyd" }, "id": "1171730841379491107" }, { "created_time": "1453901997", "text": "45th", "from": { "username": "kore_hyd", "profile_picture": "https://scontent.cdninstagram.com/t51.2885-19/11906329_960233084022564_1448528159_a.jpg", "id": "2056218675", "full_name": "Kore.ai Hyd" }, "id": "1171737339782450909" }, { "created_time": "1453902304", "text": "46th and 47th", "from": { "username": "kore_hyd", "profile_picture": "https://scontent.cdninstagram.com/t51.2885-19/11906329_960233084022564_1448528159_a.jpg", "id": "2056218675", "full_name": "Kore.ai Hyd" }, "id": "1171739915923967873" }, { "created_time": "1453902638", "text": "48th", "from": { "username": "kore_hyd", "profile_picture": "https://scontent.cdninstagram.com/t51.2885-19/11906329_960233084022564_1448528159_a.jpg", "id": "2056218675", "full_name": "Kore.ai Hyd" }, "id": "1171742713994497101" }, { "created_time": "1453964684", "text": "49th", "from": { "username": "venkataphani.ailavarapu", "profile_picture": "https://scontent.cdninstagram.com/t51.2885-19/11906329_960233084022564_1448528159_a.jpg", "id": "2679234818", "full_name": "Phani" }, "id": "1172263199715314941" }, { "created_time": "1453964710", "text": "50th", "from": { "username": "kore_hyd", "profile_picture": "https://scontent.cdninstagram.com/t51.2885-19/11906329_960233084022564_1448528159_a.jpg", "id": "2056218675", "full_name": "Kore.ai Hyd" }, "id": "1172263415747136776" }, { "created_time": "1453964717", "text": "51st", "from": { "username": "kore_hyd", "profile_picture": "https://scontent.cdninstagram.com/t51.2885-19/11906329_960233084022564_1448528159_a.jpg", "id": "2056218675", "full_name": "Kore.ai Hyd" }, "id": "1172263474056350986" }] ... - Extract: 여러 개체가 포함된 페이로드의 경우 특정 개체에 대한 경로를 지정할 수 있습니다. 예: 처리기 추가를 클릭하고 처리기의 이름을 입력하고 키 필드를
data로 설정한 다음 처리 유형을 extract로 설정하여 다음 페이로드 응답에서 개체 데이터를 사용합니다.{ "user": { "full_name": "Kore.ai Hyd", "id": "2056218675", "profile_picture": "https://instagramimages-a.akamaihd.net/profiles/anonymousUser.jpg", "username": "kore_hyd" }, ... }, "likes": { "data": [{ "full_name": "kstream002", "id": "2100724876", "profile_picture": "https://instagramimages-a.akamaihd.net/profiles/anonymousUser.jpg", "username": "kstream002" } }, ... } - Assign: Assign 처리기를 사용하여 필요한 경우 페이로드 응답의 변수 이름을 지정할 수 있습니다. 예: 페이로드에 페이로드 응답 데이터의 키가 포함되지 않은 경우. 예: 처리 유형을 assign으로 설정한 다음 출력 변수 필드에서 세 개의 개체 배열로 구성된 다음 페이로드의 출력 변수를 정의할 수 있습니다.
[ { "Cost": "$0.00", "Desc1": "계좌 개설 후 처음 3개월 간 500달러를 구매 시 150달러의 보너스. ", "Desc2": "무제한 캐시백을 얻기 구매 시마다 1.5%의 무제한 캐시백 얻기 자동입니다. 언제든지 원하는 금액의 캐시백으로 상환하세요. ", "Keywords": "주말 외식,온라인,식료품,연료,리워드,리베이트,365,여기저기", "OfferName": "Freedom Unlimited", "OfferType": "CreditCard", "Status": "1", "imageURL": "http://www.psdgraphics.com/file/credit-card.jpg", "id": "5b5195e264bbd800" }, { "Cost": "$95.00", "Desc1": "처음 60일 간 잔액을 이체할 때 잔액 송금 수수료는 0입니다.", "Desc2": "재무 건전성을 높이세요 잔액 송금을 위한 소개 수수료를 얻고 이자를 절약하고 매월 무료 신용 점수를 받으세요.", "Keywords": "권한,리베이트,건강,웰니스,그레이트 이스턴,보험,정책,할부,분할,현금 유동성", "OfferName": "Premium Plus", "OfferType": "CreditCard", "Status": "1", "imageURL": "http://i.imgur.com/rMOXYql.jpg", "id": "5caf2155873f89c8" }, { "Cost": "$10.00", "Desc1": "처음 60일 간 잔액을 이체할 때 잔액 송금 수수료는 0입니다.", "Desc2": "재무 건전성을 높이세요 잔액 송금을 위한 소개 수수료를 얻고 이자를 절약하고 매월 무료 신용 점수를 받으세요.", "Keywords": "권한,리베이트,건강,웰니스,그레이트 이스턴,보험,정책,할부,분할,현금 유동성", "OfferName": "Frequent Flyer", "OfferType": "CreditCard", "Status": "1", "imageURL": "http://www.moneychoice.org/wp-content/uploads/2016/01/credit-card-calculator-image.png.jpeg", "id": "c0b05bc3062658ee" } ]출력 변수 필드에서 배열을 나타낼 변수를
offers로 지정합니다. UX 미리 보기 기능을 사용한 경우 Kore.ai의 응답은 다음과 같습니다.{ "response": { "offers": [ { "Cost": "$0.00", "Desc1": "계좌 개설 후 처음 3개월 간 500달러를 구매 시 150달러의 보너스. ", "Desc2": "무제한 캐시백을 얻기 구매 시마다 1.5%의 무제한 캐시백 얻기 자동입니다. 언제든지 원하는 금액의 캐시백으로 상환하세요. ", "Keywords": "주말 외식,온라인,식료품,연료,리워드,리베이트,365,여기저기", "OfferName": "Freedom Unlimited", "OfferType": "CreditCard", "Status": "1", "imageURL": "http://www.psdgraphics.com/file/credit-card.jpg", "id": "5b5195e264bbd800" }, { "Cost": "$95.00", "Desc1": "처음 60일 간 잔액을 이체할 때 잔액 송금 수수료는 0입니다.", "Desc2": "재무 건전성을 높이세요 잔액 송금을 위한 소개 수수료를 얻고 이자를 절약하고 매월 무료 신용 점수를 받으세요.", "Keywords": "권한,리베이트,건강,웰니스,그레이트 이스턴,보험,정책,할부,분할,현금 유동성", "OfferName": "Premium Plus", "OfferType": “CreditCard", "Status": "1", "imageURL": "http://vignette3.wikia.nocookie.net/objectmayhem/images/5/52/Credit_card.png/revision/latest?cb=20130629150408", "id": "5caf2155873f89c8" } ] } }출력 변수를
offers로 설정하면 봇 빌더에서 변수를 다음과 같은 작업 응답 개체에서response.offers로 사용할 수 있습니다.print(JSON.stringify(response)); var data = response.offers for (i = 0; i < data.length; i++) { print('<a href="' + data[i].imageURL + '" target="_blank">' + data[i].OfferName + '</a><br>'); print(data[i].Desc1) print('<br>'); print('<br>'); print('비용: ' + data[i].Cost) print('<br>'); if (i < data.length - 1) { print('<br>'); print('<br>'); } }
- Resolve: 두 번째 요청에 대한 입력으로 하나의 페이로드 응답의 결과를 사용합니다. 예: 처리기 추가를 클릭하고 처리기의 이름을 입력하고 처리 유형을 resolve로 설정하고 키를 변수의 이름으로 설정한 다음 첫 번째 API 요청의 변수를 사용하여 Post URL을 정의합니다. 예: https://app.asana.com/api/1.0/projects/{project_id}는 페이로드 응답에서 다음과 같이 id 필드를 반환합니다.
- 추가를 클릭하여 API 요청을 저장한 다음 다른 요청을 생성하거나 추가 및 종료를 클릭하여 API 요청을 저장하고 대화 상자를 닫습니다.
여러 API 요청의 경우 전체 데이터 응답을 얻는 데 필요한 요청을 순차적으로 순서를 정렬해야 합니다. 예: 작업 영역 목록, 프로젝트 목록, 마지막으로 사용자 목록을 요청해야 합니다. 위로 이동 ![]() 아이콘과 아래로 이동
아이콘과 아래로 이동 ![]() 아이콘을 사용하여 API 요청을 재정렬합니다.
아이콘을 사용하여 API 요청을 재정렬합니다.
참고 사항: API 요청을 삭제할 때 확인 대화 상자가 표시되지 않습니다. 계속 또는 저장을 클릭한 경우 삭제 조치는 영구적이므로 취소할 수 없습니다.
응답 샘플 섹션에서 작업 페이로드에서 수신할 것으로 예상되는 키-값 쌍의 예를 입력하거나 붙여넣을 수 있습니다. 응답 샘플을 정의할 때 응답 샘플 섹션에 정의된 키는 출력 데이터를 처리하기 위한 드롭다운 선택 항목으로 사용할 수 있습니다.
샘플 응답 추가하기
- API 요청 탭에서 샘플 응답 섹션을 확장합니다.
- JSON 응답 페이로드의 키-값 쌍을 포함하는 응답 샘플을 입력합니다. 다음 중 하나를 수행합니다.
- 다음 그림과 같이 응답 보기를 들여쓰기가 있는 JSON 구조로 형식을 지정하려면 서식화됨 아이콘을 클릭합니다.
- 다음 그림과 같이 직렬화된 압축 형식으로 응답 보기의 형식을 지정하려면 서식 없음 아이콘을 클릭합니다.
- 다음 그림과 같이 응답 보기를 들여쓰기가 있는 JSON 구조로 형식을 지정하려면 서식화됨
"API
일반 탭에서 봇 조치 작업을 설명하고 필요한 경우 API 요청 탭에서 인증 요구 사항을 정의하고 나면 작업에 필요한 봇 웹사이트, 시스템 또는 웹 애플리케이션에서 데이터를 요청하는 API 요청을 설정할 수 있습니다. 이 항목에서는 연결 모드가 SOAP로 설정된 조치 작업에서 요청 개체를 설정하는 방법을 설명합니다. "Configuring
"Access
Kore.ai의 조치 작업 요청 및 연결 모드가 SOAP로 설정된 경우 다음 사항을 정의해야 합니다.
"Defining
- 권한 부여 – 조치 작업에 필요한 경우 기본 권한 부여, OAuth 또는 API 키를 사용하여 API에 액세스하기 위해 인증을 정의해야 합니다. 자세한 내용은 API 요청 탭 – 권한 부여 설정을 참조하세요.
- WSDL URL – WSDL 데이터를 포함하는 URL을 정의합니다. URL이 검색되면 WSDL 기반으로 사용 가능한 작업 목록에서 선택한 다음 사용자 입력 필드를 사용자 정의할 수 있습니다. 자세한 내용은 WSDL URL 정의를 참조하세요.
- 커넥터를 사용한 액세스 – 봇 플랫폼이 온프레미스에 설치되고 Kore.ai 커넥터 에이전트 사용 여부를 지정하세요. 자세한 내용은 커넥터를 사용한 액세스를 참조하세요.
- 응답 샘플 – 조치 작업 페이로드에서 수신할 것으로 예상되는 키-값 쌍을 정의합니다. 입력한 키 값은 최종 사용자에게 표시할 데이터를 처리하기 위해 드롭다운 선택 항목으로 사용할 수 있습니다. 자세한 내용은 조치 작업에 대한 응답 샘플 추가하기를 참조하세요.
- API 요청 탭에서 WSDL URL 섹션을 확장합니다
- SOAP 요청에 대한 요청 작업 설정을 시작하려면 WSDL URL 필드에 SOAP WSDL을 위한 URL을 입력합니다.
- WSDL 설명 얻기를 클릭합니다. WSDL에 정의된 사용 가능한 연산자 목록이 열립니다.
- 작업에 사용하려는 SOAP 요청을 위해 선택을 클릭합니다. Kore.ai는 사용자 입력에 필요한 경우 하나 이상의 조치 작업 필드를 자동으로 채웁니다.
SOAP 조치 작업 필드 사용자 정의
WSDL에서 하나 이상의 사용 가능한 작업을 선택한 후 Kore.ai에서 제공하는 기본 입력 필드를 사용자 정의할 수 있습니다. 기본 조치 작업 필드를 사용자 정의하려면 다음 단계를 따르세요.
- 사용자 정의할 조치 작업 필드에 대해 편집을 클릭합니다. 조치 작업 필드 설정 대화 상자가 열립니다.
- 작업에 대한 입력 수집을 위해 최종 사용자 필드를 정의하려면 다음 표의 설명에 따라 조치 작업 필드 설정 대화 상자에 매개 변수의 값을 지정합니다.
필드 이름 설명 필드 제목 최종 사용자 인터페이스에 표시되는 작업 입력 필드의 제목입니다. 예: 국가. 도움말 힌트 작업을 설명하는 제목이 설정된 작업 아래에 표시된 도움말 텍스트입니다. 예: 날씨를 확인하려는 국가 이름을 입력하세요. 필드 키 수집하려는 최종 사용자 입력 값을 나타내는 읽기 전용 키입니다. 예: 국가. 필드 유형 키 값에 할당할 요청 개체의 사용자 입력 수집을 위해 최종 사용자 인터페이스에 표시되는 작업 입력 필드의 유형을 지정합니다. 기본 설정은 텍스트 상자이지만 다음 중 하나에 맞게 사용자 정의할 수 있습니다. - 날짜 – 작업을 계정에 설정할 때 최종 사용자가 정의할 날짜 형식 구문을 선택할 수 있는 형식 필드를 표시합니다. 날짜 형식 선택 드롭다운 목록에서 다음 중 하나를 선택합니다.
- dd-MM-YYYY – 예: 16-05-1999
- MM-dd-YYYY – 예: 05-16-1999
- dd-MM-YY – 예: 16-05-99
- YYYY-MM-dd – 예: 1999-05-16
- URL – 올바른 URL 구문을 위한 필드 유효성 검사를 포함하여 최종 사용자가 URL을 입력할 수 있는 텍스트 상자를 표시합니다. 플레이스 홀더 필드에 텍스트 상자에 표시되는 도움말 힌트를 입력합니다. 예: 여기에 웹 사이트의 URL 입력.
- 텍스트 상자 – 최종 사용자가 작업 입력 필드로 텍스트를 입력하기 위한 텍스트 상자를 표시합니다. 일반적으로 몇 단어입니다. 플레이스 홀더 필드에 텍스트 상자에 표시되는 도움말 힌트를 입력합니다. 예: 여기에 웹 사이트의 URL 입력.
- 정적 드롭다운 – 최종 사용자에 대한 드롭다운 선택 목록을 표시합니다. 옵션 추가를 클릭하여 다음 매개 변수를 사용하여 최종 사용자에게 표시할 항목 목록을 추가합니다.
- 옵션 이름 – 최종 사용자에게 표시되는 옵션의 이름입니다.
- 옵션 값 – 애플리케이션에 반환된 옵션 이름을 나타내는 값입니다.
- 기본값 – 하나 이상의 옵션이 정의된 경우 옵션의 기본값을 선택합니다.
- 검색 가능 – 최종 사용자가 이 필드에 텍스트를 입력할 때 동적 검색 및 표시를 사용함으로 설정하거나 일치 항목이 없는 경우 자유 양식 입력을 허용하려면 선택합니다.
저장을 클릭합니다. 추가 항목을 추가하려면 옵션 추가를 다시 클릭합니다. 옵션의 조치 열에서 옵션을 편집하거나 삭제합니다.
- 동적 드롭다운 – 봇의 URL 응답에 따라 실행 시 동적으로 채워진 드롭다운 목록을 표시합니다. 예: JIRA 작업 알림용 프로젝트 목록. 동적으로 채워진 드롭다운에 대해 다음 속성을 정의합니다.
- 엔드포인트 URL – 봇 엔드포인트 URL(예: https://app.asana.com/api/1.0/workspaces.
- 엔드포인트 콘텐츠 유형 – 지정된 엔드포인트 URL에서 예상되는 컨텐츠 유형입니다. 다음 중 하나입니다. JSON, RSS, XML, URL Encoded JSON, CCV, Text 또는 Twitter 인코딩된 JSON.
- 엔드포인트 메소드 – 다음 중 하나입니다.
- GET – 작업 필드의 HTTP 요청 GET 메소드를 지정합니다.
- POST – 작업 필드의 HTTP 요청 POST 메소드를 지정합니다.
- 응답 경로 – 원하는 드롭다운 목록 값이 포함된 응답의 경로입니다. 예: data.
- 라벨 키 – 드롭다운 옵션의 라벨 키입니다. 예: name.
- 옵션 값 키 – 드롭다운 옵션의 값의 키입니다. 예: id.
- 페이로드 필드 추가 – 동적 드롭다운에 대한 옵션으로 응답 페이로드에서 하나 이상의 필드를 추가하려면 클릭합니다. 각 페이로드 필드에서 페이로드 필드 키 및 페이로드 필드 값을 입력한 다음 저장을 클릭합니다. 조치 열에서 페이로드 필드를 편집하거나 삭제합니다.
- 검색 가능 – 최종 사용자가 이 필드에 텍스트를 입력할 때 동적 검색 및 표시를 사용함으로 설정하거나 일치 항목이 없는 경우 자유 양식 입력을 허용하려면 선택합니다.
- 텍스트 영역 – 최종 사용자가 작업 입력으로 텍스트를 입력하기 위한 텍스트 영역을 표시합니다. 일반적으로 몇 문장입니다. 플레이스 홀더 필드에서 텍스트 영역 내부에 표시되는 도움말 힌트를 입력합니다.
- 타입 어헤드 – 작업에 정의된 URL 응답에 따라 사용자가 검색 결과와 일치하는 3개 이상의 문자를 입력할 때 실행 시 동적으로 채워진 드롭다운 선택 목록을 최종 사용자에게 표시합니다. 예: JIRA 작업 알림 메시지의 프로젝트 목록. 동적으로 채워진 드롭다운에 대해 다음 속성을 정의합니다.
- 엔드포인트 URL – 봇 엔드포인트 URL(예: https://app.asana.com/api/1.0/workspaces.
- 엔드포인트 콘텐츠 유형 – 지정된 엔드포인트 URL에서 예상되는 컨텐츠 유형입니다. 다음 중 하나입니다. JSON, RSS, XML, URL Encoded JSON, CCV, Text, Twitter Encoded JSON, Multipart/Form-data 또는 Multipart/Related.
- 엔드포인트 메소드 – 다음 중 하나입니다.
- GET – 작업 필드의 HTTP 요청 GET 메소드를 지정합니다.
- POST – 작업 필드의 HTTP 요청 POST 메소드를 지정합니다.
- 응답 경로 – 원하는 드롭다운 목록 값이 포함된 응답의 경로입니다. 예: data.
- 라벨 키 – 드롭다운 옵션의 라벨 키입니다. 예: name.
- 옵션 값 키 – 드롭다운 옵션의 값의 키입니다. 예: id.
- 페이로드 필드 추가 – 타입 어헤드 필드에 대한 옵션으로 응답 페이로드에서 하나 이상의 필드를 추가하려면 클릭합니다. 각 타입 어헤드 옵션에서 페이로드 필드 키 및 페이로드 필드 값을 입력한 다음 저장을 클릭합니다. 조치 열에서 페이로드 필드를 편집하거나 삭제합니다.
- 편집 가능 – 타입 어헤드 검색 결과가 일치하지 않을 때 사용자가 필드에서 텍스트를 자유롭게 입력할 수 있습니다.
- 이메일 – 최종 사용자가 이메일 주소를 입력할 수 있는 텍스트 상자를 표시합니다. 플레이스 홀더 필드에서 텍스트 상자 내부에 최종 사용자에게 표시되는 도움말 힌트를 입력합니다.
- 날짜 및 시간 – 최종 사용자가 시간과 함께 날짜를 입력할 수 있는 텍스트 상자를 표시합니다. 형식 필드에서 날짜 텍스트 상자에 최종 사용자에게 표시할 예상되는 날짜 또는 시간 형식을 입력합니다. 날짜 형식 선택 드롭다운 목록에서 시간 형식의 날짜를 선택합니다.
- 시간대 – 운영 체제 설정에 따른 시간대 드롭다운 목록을 표시합니다.
- 위치 – 최종 사용자가 지리적 위치를 입력할 수 있는 텍스트 상자를 표시합니다. 예: Orlando, FL 또는 32801.
- 중첩된 양식 – 상위 입력 필드 아래에 중첩된 형식으로 최종 사용자 입력 필드를 표시합니다. 중첩된 양식 입력 필드에 대해 다음 필드를 지정합니다.
- 배열 요소 유형 – 상위 입력 양식 요소의 데이터 유형을 선택합니다.
- 중첩 양식 필드 추가 – 하나 이상의 중첩된 양식 필드를 추가하려면 클릭합니다.
- 파일 업로드 – 검색할 최종 사용자 컨트롤을 표시하고 업로드할 파일을 선택합니다. 클릭되면 파일 업로드 페이로드 키를 입력합니다. 파일 업로드 페이로드 키가 정의된 경우 파일 업로드 페이로드 필드 값 드롭다운 목록에서 다음 유형 중 하나를 선택합니다.
- 파일 이름
- 파일 크기
- 파일 콘텐츠 유형
데이터 유형 다음 사용자 입력 유형 중 하나를 선택합니다. - 문자열 – 사용자는 연속된 숫자, 문자 또는 특수 문자를 입력할 수 있습니다.
- 숫자 – 사용자는 숫자를 입력할 수 있습니다. 특수 문자는 허용되지 않습니다.
- 불리언 – 사용자는 true 또는 false의 부울 값을 입력할 수 있습니다.
- 이메일 – 사용자는 유효한 이메일 주소를 입력할 수 있습니다.
- 개체 – 봇의 데이터는 JSON 개체로 수신할 수 있습니다. 예: 다음과 같이 정의된 위치 세부 정보: "location" : { "lat" : 17.4374614, "lng" : 78.4482878 } 요청 체인 또는 작업 요청에서 속성을 location.lat 및 location.lng로 참조할 수 있습니다.
- Array – 사용자는 쉼표로 구분된 값 목록을 봇에 전달할 수 있습니다. 예: 구글 캘린더에서 데이터가 있는 여러 참석자는 다음과 같이 전달할 수 있습니다. "attendees": ["user1", "user2", "user3"]선택되면 사용자 입력 배열의 유형을 다음 중 하나로 지정합니다.
- 문자열
- 숫자
- 불리언
- 이메일
- 배열
- 날짜
- 날짜 – 사용자는 전체 날짜를 입력하거나 날짜 선택기에서 날짜를 선택할 수 있습니다.
플레이스 홀더 사용자가 필드를 정의하는 데 도움이 되는 입력 텍스트 상자 아래에 표시되는 텍스트입니다. 이 필드는 일부 필드 유형의 경우에만 표시됩니다. 가시성 작업 입력 필드를 최종 사용자에게 표시할지 숨길지 여부를 지정합니다. 가시성 필드는 사용자 정의 필드로 설정할 수도 있으며 데이터는 사용자로부터 캡처되지만 쿼리 매개 변수 또는 페이로드 필드로 사용되지 않습니다. 예: JIRA 봇을 사용하는 경우 아래와 같이 @mention 태그를 사용하여 티켓에 의견을 게시합니다. "@Mike, 이 문제를 살펴보세요" 의견 게시를 위한JIRA API는 다음과 같이 하나의 쿼리 필드와 하나의 페이로드 필드가 필요합니다. - 발급 ID
- 의견
가시성 필드를 사용자 정의로 설정하면 페이로드 필드 또는 쿼리 필드로 사용하지 않고
comment필드 값에 추가할 데이터를 가져오기 위해 JIRA API를 사용하여@Mike로 언급된 사용자의 사용자 정보를 캡처할 수 있습니다. 기본 가시성 필드 설정은 Visible입니다.필수 최종 사용자가 이 설정을 정의하여 작업 설정 구성을 저장하려는 경우 선택합니다. 키 전치 해제 Kore.ai의 키 전치를 비활성화하려면 선택하세요. 기본적으로 Kore.ai는 키/값 쌍을 전치합니다. 예: Kore.ai는 "parameter":"value"를"parameter:{value:"actualValue"}로 전치합니다. 선택되면 키는 Kore.ai에 의해 전치되지 않고 수신된 대로 응답에 전달됩니다. - 날짜 – 작업을 계정에 설정할 때 최종 사용자가 정의할 날짜 형식 구문을 선택할 수 있는 형식 필드를 표시합니다. 날짜 형식 선택 드롭다운 목록에서 다음 중 하나를 선택합니다.
- 추가 및 계속을 클릭하여 작업 필드를 저장하고 다른 조치 작업 필드를 생성합니다. 추가 및 종료를 클릭하여 조치 작업 필드를 저장한 다음 대화 상자를 닫습니다.
작업을 위해 커넥터를 사용한 액세스 정의를 시작하려면 다음 단계를 따르세요.
"Adding- API 요청 탭에서 커넥터를 사용한 액세스 섹션을 확장합니다.
- 커넥터를 사용한 액세스 필드에서 Kore.ai 커넥터 에이전트를 사용하여 Kore.ai 봇의 액세스를 활성화하려면 예를 선택합니다. 이 옵션은 Kore.ai 커넥터 에이전트가 엔터프라이즈 온프레미스 네트워크에서 설정되어 사용함으로 설정한 경우에만 표시됩니다. 자세한 내용은 Kore.ai 커넥터 사용을 참조하세요.
응답 샘플 섹션에서 작업 페이로드에서 수신할 것으로 예상되는 키-값 쌍의 예를 입력하거나 붙여넣을 수 있습니다. 응답 샘플을 정의할 때 응답 샘플 섹션에 정의된 키는 출력 데이터를 처리하기 위한 드롭다운 선택 항목으로 사용할 수 있습니다.
샘플 응답 추가하기
- API 요청 탭에서 샘플 응답 섹션을 확장합니다.
- JSON 응답 페이로드의 키-값 쌍을 포함하는 응답 샘플을 입력합니다. 다음 중 하나를 수행합니다.
- 다음 그림과 같이 응답 보기를 들여쓰기가 있는 JSON 구조로 형식을 지정하려면 서식화됨 아이콘을 클릭합니다.
- 다음 그림과 같이 직렬화된 압축 형식으로 응답 보기의 형식을 지정하려면 서식 없음 아이콘을 클릭합니다.
- 다음 그림과 같이 응답 보기를 들여쓰기가 있는 JSON 구조로 형식을 지정하려면 서식화됨
4단계: 봇 응답 정의
봇 응답은 최종 사용자에게 작업의 상태나 완료를 알리는 메시지를 제공합니다. 작업의 봇 응답 탭에서 API 요청 페이로드에서 최종 사용자에게 표시할 메시지를 정의할 수 있습니다. 모든 채널에 대한 기본 응답을 정의하고 선택적으로 채널별 메시지를 정의할 수 있습니다. 봇 경고 작업 일반 탭 설정을 작성하고 경고 작업 API 요청 체인을 설정한 후 경고 작업 결과를 최종 사용자에게 표시하는 방법을 정의할 준비가 됩니다. 이 섹션에서는 경고 작업 응답 설정 방법을 설명합니다. 경고 작업에 대한 응답 개체를 정의하기 위한 섹션이 두 가지 있습니다.
- 보고서 템플릿 정의 – 일부 작업의 경우 표, 연락처 카드와 같은 템플릿을 사용한 페이로드 응답 또는 날씨 보고서와 같은 특정 메시지 유형을 위한 형식이 지정된 페이로드 응답을 표시할 수 있는 링크로 보고서 데이터를 최종 사용자에게 표시해야 합니다.
참고 사항: 이 섹션은 webhook 경고 작업, 조치 작업 또는 RSS 경고 작업에 사용되지 않습니다.
"Configuring
작업에 링크를 추가하여 추가 정보 또는 보고서를 제공하려면 최종 사용자 애플리케이션에서 보고서에 대해 표시할 링크 및 정보를 표, 날씨 보고서 또는 연락처 카드로 정의할 수 있습니다. 봇 응답 탭에서 작업의 보고서 템플릿 정의를 시작하려면 다음 그림과 같이 (옵션) 보고서 템플릿 정의 섹션에서 확장 아이콘을 클릭합니다. 작업의 보고서 링크를 활성화하려면 이전 그림과 같이 예를 클릭하여 보고서 템플릿 정의 섹션을 표시합니다. 링크를 작업 응답 메시지에 추가할 때 봇의 최종 사용자는 링크를 선택하고 SalesForce 봇에서 마감된 판매 기회에 대한 테이블 값 등 자세한 세부 정보를 얻을 수 있습니다. 다음 매개 변수를 정의하여 최종 사용자가 초기 작업 응답 메시지에 대한 추가 정보 보고서를 요청할 수 있도록 작업 응답 메시지에서 링크를 생성합니다.
- 링크 제목 – 작업 게시물에서 최종 사용자에게 표시할 링크 텍스트입니다. 예: 쇼핑 카트 보기.
- 헤더 – 보고서가 최종 사용자에게 표시될 때 보이는 제목입니다. 예: 쇼핑 카트에 품목이 있습니다.
- 세부 정보 – 보고서의 콘텐츠를 설명하는 헤더 바로 아래에 표시되는 최종 사용자 도움말 정보입니다. 예: 쇼핑 카트 검토 후 주문할 준비가 되면 계속을 클릭하세요.
- 템플릿 – 작업 응답에서 데이터를 표시하는 다음 형식 템플릿 중 하나를 선택합니다. 각 유형에 대해 열 이름, 키 매핑, 데이터 유형 및 템플릿별 옵션을 정의합니다.
- 테이블 – 데이터는 열이 정의된 테이블 형식으로 표시됩니다. 테이블 템플릿의 각 매핑은 정렬 가능 여부, 이미지로 표시 및 링크로 표시로 설정됩니다. 자세한 내용은 테이블 보고서 정의하기를 참조하세요.
- 고정 열 테이블 – 데이터는 하나 이상의 열이 고정된 테이블 형식으로 표시됩니다. 고정 열 테이블 템플릿의 각 매핑은 정렬 가능 여부, 고정된 열, 이미지로 표시 및 링크로 표시로 설정됩니다. 자세한 내용은 고정 열 테이블 보고서 정의하기를 참조하세요.
- 카드 레이아웃 – 데이터는 연락처 카드 형식으로 표시됩니다. 카드 레이아웃 템플릿의 각 매핑은 정렬 가능 여부, 이미지로 표시 및 링크로 표시로 설정됩니다. 자세한 내용은 카드 레이아웃 보고서 정의하기를 참조하세요.
- 날씨 정보 – 날씨 서비스 응답 페이로드의 날짜를 정의할 수 있습니다. 날씨 정보 템플릿의 각 매핑은 정렬 가능 여부, 이미지로 표시 및 링크로 표시로 설정됩니다. 자세한 내용은 날씨 정보 보고서 정의하기를 참조하세요.
- 조치가 있는 카드 레이아웃 – 각 항목에 대해 매핑된 작업 링크가 있는 항목 목록을 표시합니다. 자세한 내용은 조치가 있는 카드 레이아웃 보고서 정의를 참조하세요.
- 그룹별 카드 레이아웃 – 특정 필드로 그룹화된 항목 목록을 표시합니다. 자세한 내용은 카드 레이아웃 그룹별 보고서 정의를 참조하세요.
- 조치가 있는 쇼핑 카트 레이아웃 – 각 항목에 대해 매핑된 작업 링크가 있는 항목 목록을 표시합니다. 자세한 내용은 조치가 있는 쇼핑 카트 레이아웃 보고서 정의를 참조하세요.
- 메시지 정의 – 이 섹션에서는 webhook에서 제공하는 페이로드에 따라 알림이 표시될 때 최종 사용자에게 표시되는 데이터의 룩 앤드 필을 정의합니다. "Defining작업을 위한 두 가지 유형의 봇 응답을 정의할 수 있습니다.
- 모든 채널의 기본값: API 요청 및 정의된 처리기의 페이로드 응답에 따라 모든 채널의 기본 제목과 메시지 응답을 작성합니다. 자신만의 입력, Kore.ai 시스템에서 파생된 변수 키 집합, 사용자 정의 변수, 응답 샘플과 함께 응답 개체에서 데이터 혼합을 생성할 수 있습니다. 메시지는 일반적으로 요청 개체 데이터에서 ID 번호 또는 제목과 같은 변수를 하나 이상 포함하는 올바른 형식의 HTML 메시지로 표시됩니다.
- 채널별 응답: 또한 미리 정의된 메시지 템플릿을 선택된 채널에 적용하고 특정 채널(예: Facebook Messenger, Skype, SMS 또는 웹/모바일 SDK)을 위한 봇 응답 메시지를 사용자 정의할 수 있습니다.
메시지 정의 편집기 기능
조치 작업의 편집기를 열려면 봇 응답 > 메시지 정의로 이동합니다. 메시지 정의 편집기는 다음 기능을 제공하는 세 개의 탭을 사용합니다.
- 표준 텍스트: 기본 편집기 컨트롤 및 HTML 마크업 및 변수 키를 사용하여 응답을 정의하고 형식을 지정합니다. 텍스트를 입력한 다음 굵게, 기울임꼴, 머리글 스타일, 하이퍼링크, 순서 있는 목록 및 순서 없는 목록의 버튼을 사용하고 라인을 삽입하여 형식을 지정합니다.
- 자바스크립트: 사용자 정의 코드를 추가하여 최종 사용자 작업 응답 메시지를 처리하고, 변수를 선언하고, 변수 키를 사용하고, 타사 애플리케이션과 상호 작용할 수 있습니다.
- 미리 보기: 봇 사용자가 확인할 수 있는 마크업으로 렌더링된 출력 메시지의 샘플을 봅니다.
변수 키 추가하기
변수 키를 추가하려면 다음 단계를 따르세요.
- 표준 텍스트 또는 JavaScript 모드를 사용하여 변수 키를 추가하려면 변수를 추가하려는 위치에 커서를 놓고 변수 키를 클릭합니다.
- 요청/응답 키 대화 상자에서 삽입하려는 변수가 포함된 키 노드 유형을 확장합니다.
- 추가하려는 변수(예:
response.data.id)를 선택한 다음 확인을 클릭합니다.
표준 키
표준 키는 재사용 가능한 데이터를 위한 다음 Kore.ai 변수 플레이스 홀더입니다.
- _labels _: GUID 대신 친숙한 레이블을 반환합니다. 예: 웹 서비스 API에서 사용자 데이터를 요청할 때 반환되는 프로젝트 또는 워크스페이스의 ID는 GUID입니다.
_labels_키를 사용하여 GUID 대신 최종 사용자에게 GUID의 친숙한 이름을 알려줄 수 있습니다. Kore.ai에서 드롭다운 컨트롤은_labels_키의 응답을 다음과 같이 저장합니다. 예:{ "_labels_": { "15379386734832": "roadlabs.com", "26377329985341": "Test Project", "workspace": "roadlabs.com", "project": "Test Project" }, "_fields_": { "workspace": "15379386734832", "project": "26377329985341" } }응답에
_labels_키를 사용하는 방법:print('<a href="https://app.asana.com/0/' + workspace.id + '+_labels_[workspace.id]); - _tenant_ – 정의된 경우 엔터프라이즈에 대한 테넌트를 반환합니다. 예: JIRA는 https://koreteam.atlassian.net/browse/BBF-3265에서 koreteam과 같은 URL에 대한 테넌트가 필요합니다.
_tenant_키를 사용하여 다음과 같은 작업 응답에서 링크를 작성할 수 있습니다.var title = request.fields.issuetype.name + ' <a href ="https://' + _tenant_ + '/browse/' + response.key + '" target = "_blank">' + request.fields.summary + '</a>이(가) 생성되었습니다.';
- _fields_ – 페이로드 응답의 일부가 아닌, 사용자가 제공한 작업 필드 입력을 반환하는 데 사용됩니다. 예: JIRA 작업에서 최종 사용자에게 워크스페이스 이름을 입력하라는 메시지가 표시됩니다.
_fields_키를 사용하여 최종 사용자 입력을 다음과 같이 저장할 수 있습니다._fields_["workspace"]
- _last_run – 웹 서비스 풀의 UTC 날짜 타임스탬프를 ISO 8601 형식을 사용하여 반환하는 데 사용됩니다. 예: 2016-03-05T12:44:38+00:00. 예: 웹 서비스 요청이 페이로드 응답에서 모든 활동을 반환하는 경우
_last_run키를 사용하여 다음 값의 앞 또는 뒤에 표시되는 결과를 필터링할 수 있습니다._last_run
세션 키
세션 키는 단일 세션 인스턴스와 관련된 사용자 데이터의 Kore.ai 변수 플레이스 홀더입니다.
- UserContext.get("_id") – Kore.ai 사용자 ID입니다.
- UserContext.get("emailId") – 사용자 ID와 연결된 이메일 주소입니다..
- UserContext.get("lastName") – 사용자의 성입니다.
- UserContext.get("firstName") – 사용자의 이름입니다.
- UserContext.get("profImage") – 사용자의 이미지 또는 아바타 파일 이름입니다.
- UserContext.get("profColor") – 사용자의 계정 색상입니다.
- UserContext.get("activationStatus") – 사용자의 계정 상태입니다.
- UserContext.get("jTitle") – 정의된 경우 사용자의 직함입니다.
- UserContext.get("orgId") – 정의된 경우 사용자 계정의 조직 ID입니다.
- UserContext.get("customData") – 개발자가 정의한 사용자 정의 키입니다.
- UserContext.get("identities") – 정의된 경우 대체 사용자 ID입니다.
봇 작업을 정의하는 방법과 해당 작업에 사용 가능한 키 컨텍스트에 따라 추가 세션키를 사용할 수 있습니다. 세션 키 및 컨텍스트 키에 대한 자세한 내용은 작업에서 세션 변수 및 컨텍스트 변수 사용하기를 참조하세요.
응답 키
응답 키는 API 응답 탭에서 응답 샘플 텍스트에서 직접 구문 분석됩니다. 응답 키는 정의된 응답 샘플에 따라 달라집니다.
다음 목록은 Asana 작업에 사용 가능한 응답 키의 예입니다.request.data.workspace request.data.projects request.data.name request.data.notes labels.498346170860 labels.30887755353556 labels["data.workspace"] labels["data.projects"] _tenant_ response.data.id response.data.created_at response.data.modified_at response.data.name response.data.notes response.data.completed response.data.assignee_status response.data.completed_at response.data.due_on response.data.due_at response.data.workspace.id response.data.workspace.name response.data.num_hearts response.data.parent response.data.followers[0].id response.data.followers[0].name response.data.hearted response.data.assignee response.data.projects[0].id response.data.projects[0].name response.data.memberships[0].project.id response.data.memberships[0].project.name response.data.memberships[0].section
보고서 키
보고서 키는 보고서 템플릿 정의 및 봇 응답에서 사용자가 클릭할 수 있는 메시지에 추가 정보 링크를 표시하는 데 사용할 수 있는 Kore.ai 변수 플레이스 홀더입니다.
- reportInfo.reportLink – 이 작업에 대한 보고서 템플릿 정의 섹션에 정의된 링크입니다.
- reportInfo.reportTitle– 이 작업에 대한 보고서 템플릿 정의에 정의된 제목입니다.
응답 미리 보기
메시지 편집기에서 미리 보기를 클릭하여 다음 옵션 중 하나를 사용하여 응답 미리 보기를 생성합니다.
- 테스트 및 미리 보기 – 봇의 작업 설정 페이지를 열고 작업 설정을 정의하고, 인증한 다음 타사 웹 서비스(예: Asana)를 통해 생성된 응답의 미리 보기를 표시합니다.
- 샘플 응답으로 미리 보기 – 작업의 API 요청 탭의 응답 샘플 섹션에 정의된 키-값 쌍으로 제공된 샘플 데이터를 사용하여 미리 보기를 생성합니다.
사용자 정의 JavaScript 응답 예시
다음 예시에서는 작업 응답 메시지가 전송될 때 출력 메시지를 최종 사용자에게 표시하는 게시물 제목 및 게시물 설명 섹션을 정의하기 위해 JavaScript를 사용한 응답 개체를 표시합니다. 다음 예시에서 desc로 레이블이 표시된 변수는 JSON 응답에 캡션 값이 정의되어 있는 경우에만 표시됩니다.
var desc = (caption !== "undefined" ? caption : "")
다음 예시에서는 작업 제목을 사용하여 클릭 가능한 URL이 작업 응답 메시지에 표시됩니다.
var tasklink = '' + title + '';
이 마지막 예시에서 링크 변수는 유형, 동영상 또는 사진에 따라 다릅니다. 유형에 따라 적절한 링크가 표시됩니다.
var link = ""; switch (type) { case "video": var video = (typeof(video_url) != "undefined") ? video_url : permalink_url; link = '<video controls><source src ="' + video + '" type="video/mp4"></video>'; break; case "photo": link = '<img src="' + image_permalink + '"></img>'; break; }사용자 정의 JavaScript를 생성하여 작업의 페이로드 응답에 따라 JavaScript 탭에서 작업별 요구 사항을 처리할 수 있습니다.
채널별 봇 응답
작업 응답 메시지는 응답 메시지가 표시되는 채널에 따라 다를 수 있습니다. 예: Kore.ai 메신저 클라이언트, 이메일 또는 텍스트 메시지. 기본적으로 모든 채널의 기본값으로 설정된 응답 메시지는 모든 채널에 전송됩니다. 그러나 기본 응답 대신 해당 채널의 최종 사용자에게 표시할 20개 이상의 채널에 특정 응답을 정의할 수 있습니다.
- 특정 채널을 위한 응답 메시지를 정의하려면 + 채널 추가를 클릭하여 채널 선택 드롭다운 목록을 표시합니다.
- 채널(예: Kore.ai)을 선택한 다음 JavaScript 탭에서 해당 채널에 대한 응답을 설정합니다.
각 채널에는 하나의 응답만 정의할 수 있습니다. 다음 JavaScript 예시에서는 Kore.ai 기본 형식 지정 템플릿을 채널별로 재정의하는 방법을 보여 줍니다.참고 사항: 다음 키를 사용하여 기본값을 반환합니다. response.message – 기본 메시지를 문자열로 반환합니다. response.message.choices – 옵션 선택 또는 확인 메시지 유형을 배열로 반환합니다.
- Slack 채널 재정의 예시
var message = {}; var attachments = []; var attachment = { 'text': "API 실행 중 예외가 발생했습니다", 'color': '#FFCC00', 'attachment_type': 'default' }; attachments.push(attachment); message.attachments = attachments; print(JSON.stringify(message)); - FaceBook 채널 재정의 예시
var message = { text: response.message }; var buttons = []; for (var i = 0; i < response.choices.length; i++) { var choiceItem = response.choices[i]; if (choiceItem.length > 20) { choiceItem = choiceItem.substring( 0, 18) + '..'; } var element = { content_type: 'text', title: choiceItem, payload: choiceItem }; buttons.push(element); } message.quick_replies = buttons; print(JSON.stringify(message)); - 이메일 채널 재정의 예시
var message = {}; var text = response.message + ' <br> '; for (var i = 0; i < response.choices.length; i++) { text = text.concat( '<u> + response.choices[i] + ' < /u> <br>'); } message.text = text; print(JSON.stringify(message)); - SMS 채널 재정의 예시
var message = {}; var indexArray = ['a', 'b', 'c', 'd', 'e', 'f', 'g', 'h', 'i', 'j', 'k', 'l', 'm', 'n', 'o', 'p', 'q', 'r', 's', 't', 'u', 'v', 'w', 'x', 'y', 'z' ]; var text = response.message + '\\n'; for (var i = 0; i < response.choices .length; i++) { text = text.concat(indexArray[i] + ') ' + response.choices[ i] + '\\n'); } message.text = text; print(JSON.stringify(message));
Starting Release 8.0.0, Information Tasks are no longer supported. This feature will be discontinued in the upcoming releases. We recommend using the Dialog Tasks and Digital Forms to build these use-cases
Information tasks are used by chatbots to look up data or pull reports for users and return easy-to-consume results or a link to the results for extended data. Users can identify the specific parameters or filters for the information delivered – such as the quantity of results – for bots to deliver information in a way that’s simple for recipients to scan, process, and reuse.
For example, let’s say you have a Shopping Bot that provides search results to an end-user plus a link to view those results in detail with a means to add those items to a shopping cart list. You can define an information task to display the results of the search with a link to view the search results in detail, and then when the link is clicked, display a web page that shows items that end-user can add to the shopping cart.
In the following illustration, the Relay Bot has several tasks defined, one of which is an information task used to display the View Items link in the search results.
When the user clicks View Items, an information report is displayed in a new tab with detailed product information and selectable results that can be added to a shopping cart as shown in the following illustration.
In Bot Builder, you can define the following report types for the bot response:
-
- Table Report – The report is displayed in a table format with variable-width columns.
- Fixed-Column Table Report – The report is displayed in a table format with fixed-width columns.
- Card Layout Report – The report is displayed as a list of cards, or text boxes with variable formatted data, including images.
- Card Layout with Actions Report – The report is displayed as a list of cards, or text boxes with variable formatted data, including images, plus an option to associate action tasks to the report, such as Add to Cart.
- Card Layout with Group By Report – The report is displayed as a list of cards, or text boxes with variable formatted data that can be group by a parameter key, such as date, size, or location. The card report includes images, plus an option to associate action tasks to the report, such as Add to Cart.
- Shopping Cart Layout with Actions – The report is displayed as a list of shopping cart options, or text boxes with variable formatted data, including images, plus an option to associate action tasks to the report, such as Add to Cart.
- Weather Info Report – The report is specifically designed to show a serial data string of weather info by date, the day of the week, or forecast period.
Other Examples:
- Provide account summaries
- Show loyalty reward points
- Look up a person’s information
- Get a summary view of outstanding items
- Pull a list of inventory
- Fetch team status information
- Update critical information
Process
The steps that you need to complete to define an information task consists of four basic steps.
Step 1: General Settings
The first step is to define how the task is displayed to the end-user such as the task name, connection mode, descriptions, and other advanced settings for NLP ignore words, search keywords, error messages, task confirmation messages, mapping restrictions, and Kore.ai Bot Store settings.
Follow these steps to configure the general settings for an Information task:
- Open the bot in which you want to create the Information Task.
- Hover over the side navigation panel of the bot, and click Bot Tasks.
- On the Bot Tasks page, hover over the Information Task tab and click the plus icon.
- Enter a name for the task, which also doubles up as the display name. Bot Store uses the display name of the task. You can change the display name if needed. The Create Information Task dialog opens.
- Enter the following required details for the task, and then click Create & Proceed:
Field Name Description Task Name The name of the task as displayed everywhere in the application and end-user channels. Display Name The name of the task as it gets displayed in the Kore.ai Bot Marketplace. It is the same as the task name unless you want to change it. Connection Type The connection type for Information Tasks is always web service. The web service sends data to Kore.ai when it polls using the end user credentials. This setting is read-only for information tasks. Connection Mode This is the communications protocol connection type for your task as a web service. The web service sends data to Kore.ai when polled by Kore.ai using the end-user account login credentials. - REST – The task uses a REST API connection that is protocol-independent to exchange messages and to handle CRUD operations for web services.
- SOAP – The task uses a SOAP API connection based on XML protocols for message exchange.
Long Description The long description of the information task.
Advanced Settings
To configure the advanced settings for the task, expand the section and enter the relevant details.
| Field Name | Description |
|---|---|
| Turn Off Confirmation Messages | Select Yes to disable confirmation of the execution of a task when using NLP. |
| Mapped Only Action Task | Select to only display this action task to an end-user if mapped from another task in a flow. When Yes is selected, the information task is not visible in an end-user search for information tasks. |
| Search Keywords | Specify one or more search words an end-user can use to help locate this task in the Kore.ai Bot Store. |
| Task Demo Link | Enter a www.youtube.com link to display a demo icon next to the task name in the Bot Store. The following illustration shows a bot task defined with a Task Demo Link. |
| Authorization is required for Accessing the WSDL File (Applies only to SOAP requests) |
Select Yes to use authentication if web service authorization is required to access the WSDL for SOAP requests. When Yes is selected, the Authentication defined for the API request is used to access the WSDL. This setting is only available when the task Connection Mode is set to SOAP. |
| Get Optional Fields | Select Yes to require the end-user to select and then enter at least one of the available optional parameters. |
| Ignore Words | Enter one or more words to ignore for the task name, and then press enter after each word. The list of words to ignore is processed by the Bots Platform before interpreting the user input. This means the Bot can respond faster to user input and provide the correct task by filtering out words that apply to many tasks but do not help to identify which task. For example, a user may input, I want to get the weather forecast for today. To return the correct action task to the user, the Bots Platform interpreter only needs to recognize three words, weather, forecast, and today. The rest of the words can be ignored. The Kore.ai Bots interpreter is already defined with a set of generic ignore words, so words like I, you, want, get, etc., do not need to be defined as ignore words. If your Bot uses the same words for many or all tasks, for example, your company name, you might add your company name as an ignore word. |
| Error Messages | Edit or add custom HTTP Status Codes and error messages for your Bot. For more information, see Customizing Error Messages. |
Step 2: Authentication Settings
If required for your task, you will define the authentication, for example, basic authorization, OAuth, or API Key.
Depending on the Bot action task, you may need to define how a user must be authenticated to initiate the action task. For example, Twitter can have an action task using web services that require an end-user to authenticate, usually with a login username and password, to allow Kore.ai to access the end-user account for data before executing the action task.
You can define an Authorization profile or use an existing one. All authorization profiles, whether you create them at a task level or a bot level, can be used across all bot tasks.
- To get started with defining the Authorization for a task, from the API Request tab, click the Expand icon in the Authorization section.
- If you have previously defined authentication for this task, you can select it in the Authorization Provider drop-down list.
- If your task does not require authentication, you can select None as the Authorization provider.
- To define a new authorization provider, click Create New to display the New Authorization Mechanism dialog.
- In the dialog, from the Authorization Type drop-down list, select the type of authorization used by your Bot. You can choose one of the following types of authorization:
- Basic Auth – A standard protocol to collect username and password information. Kore.ai uses SSL encryption in combination with basic authentication to help secure end-user information. Click on the below link for the configuration details.
Setting Up Authorization using Basic AuthThe following illustration is an example of the Basic Auth fields that you must define to enable basic authorization for your task.To define basic authorization, select Basic Auth in the Authorization Type field. Then specify a Name for the authorization to be displayed in the Bot builder user interface.
Defining Tenancy
If required, in the Subdomain section, select Yes if the base URL for a web application or user interface the uses a tenant name in the URL. For example, kore is the tenant organization for a web service using tenants as www.kore.someCompany.com.
In the following example configuration, the tenancy URL contains the {tenant} organization placeholder.
Adding Form Fields
If the default username and password fields do not meet your needs, you can add new fields displayed to the end-user by adding authorization form fields. To add fields on the authorization form, click + Add Form Field. The following illustration is an example of a definition to add a password field to the authorization dialog.
The following table describes the fields used to define an authorization IDP form field.FIELD NAME DESCRIPTION Field Title Specify the name of the field displayed to the end-user in the authentication dialog. Field Key The value represents the end-user input value to the authenticating service. Help Hint The help text displayed in the field to describe what should be entered into the field. Field Type When Advanced Options is selected, specify the type of field displayed in the end-user interface to collect the user input assigned as the value for the Field Key, one of: - Textbox
- Password
Mandatory When Advanced Options is selected, select if the end-user must define this field to complete authentication. Data Type When Advanced Options is selected, specify the type of data expected as input from the end-user, for example, String. Visibility When Advanced Options is selected, specify if the authentication field should be visible, hidden, or displayed as read-only. Adding Authorization Fields
By default, authorization fields are configured as part of the header of the task request message. If your task request requires additional authorization fields or the expected authorization is not part of the header, for example, social security number or PIN, click + Add Authorization Field and then define the fields as shown in the following illustration.
In the Field Type field, you can select one of the following depending on where in the task request message and the type of authorization fields that are required.- Header – The Bot expects the authorization fields as part of the header of the request.
- Payload – The Bot expects the authorization fields as part of the content of the body of the request.
- Query String – The Bot expects the authorization fields as a query in the body of the request.
- Path Param – The Bot expects the authorization fields as part of the URL path for the request.
In the Field Key field, enter the name of the field for the selected Field Type.
In the Field Value field, enter the value for the Field Key specified.
Click Done. The new authorization field is added in the Authorization Fields section.
To add additional authorization fields, click Add in the Authorization Fields section.
In the Authorization Check URL field, optionally define a URL that can be used to test the authentication settings from Bot Builder before you deploy the task with the authorization mechanism. You can use dynamic fields, path parameter fields, query fields, and so forth, to define the test URL, for example,
https://kore.someCompany.com/sap/opu/odata/sap/{{authfield1}}/?$format=json
In the Access Using a Connector section, select Yes to enable access for Kore.ai Bots using the Kore.ai Connector agent. If your domain does not have any active Kore.ai Connectors defined, a warning message is displayed to contact the Bots Admin Console system administrator. For more information, see Using the Kore.ai Connector in the Bots Admin Console documentation.
Click Save to save the authorization settings and close the New Authorization Mechanism dialog.Testing the Authorization – Basic Auth
After you save the authentication, if you defined an Authorization Check URL for your new authorization type, you can test your authorization definition on the Authorization tab when you click Test Authorization before continuing to develop the remaining steps of your task.
When you click Test Authorization, the Test Authorization dialog is displayed and populated with the URL you specified in the Authorization Check URL section, as shown in the following illustration.
To configure the Test Authorization – Basic Auth- In the Auth Check URL field, verify or enter the URL to test the authentication configuration.
- If your bot uses subdomains, the Tenancy field is displayed and you must specify the tenant.
- Enter your User Name and Password for the web service.
- Select the content type expected for the URL in the Content-Type field.
- For testing the URL, the Method field is read-only and set to GET.
- Click Test to begin the authorization test.
When the validation of authentication is complete, the Test Authorization dialog is closed and the results of the validation, either success or failure, is displayed to the immediate right of the Test Authorization button as shown in the following illustration.
If the authorization fails, the Auth Test Failed message is displayed along with the Headers and Response tabs as shown in the following illustration.
How it all Works – Basic Auth
When basic authorization is used for a task, the Kore.ai application automatically prompts the user for log in credentials to access the web application or web service as shown in the following illustration.
After the end-user is authorized, the settings are saved using the following naming syntax:{{ First Name }} {{ Last Name }} {{ Bot Name }} {{ Account # }} {{ Sequence # }}For example, John Smith’s Twitter Account #1.
The Kore.ai application can access the web application or web service for all future task requests using this account. In addition, the end-user can reuse the account for other tasks for the same Bot.
- OAuth v2 password grant type – Define a custom authorization type for non-standard web service authorization types. Click on the link below for the configuration details.
Setting Up Authorization using oAuth v2 password grant
The following illustration is an example of the oAuth v2 password grant authorization type fields that you must define to enable a customized authorization for your task.To define a custom authorization, select oAuth v2 password grant in the Authorization Type field. Then specify a Name for the authorization to be displayed in the Bot builder user interface.
Defining Tenancy
If required, in the Subdomain section, select Yes if the base URL for a web application or user interface the uses a tenant name in the URL. For example, kore is the tenant organization for a web service using tenants as www.kore.someCompany.com.
In the following example configuration, the tenancy URL contains the {tenant} organization placeholder.
Adding Form Fields
If the default username and password fields do not meet your needs, you can add new fields displayed to the end-user by adding authorization form fields. To add fields on the authorization form, click + Add Form Field. The following illustration is an example of a definition to add a password field to the authorization dialog.
The following table describes the fields used to define an authorization IDP form field.FIELD NAME DESCRIPTION Field Title Specify the name of the field displayed to the end-user in the authentication dialog. Field Key The value represents the end-user input value to the authenticating service. Help Hint The help text displayed in the field to describe what should be entered into the field. Field Type When Advanced Options is selected, specify the type of field displayed in the end-user interface to collect the user input assigned as the value for the Field Key, one of: - Textbox
- Password
Mandatory When Advanced Options is selected, select if the end-user must define this field to complete authentication. Data Type When Advanced Options is selected, specify the type of data expected as input from the end-user, for example, String. Visibility When Advanced Options is selected, specify if the authentication field should be visible, hidden, or displayed as read-only. Adding Authorization Fields
By default, authorization fields are configured as part of the header of the task request message. If your task request requires additional authorization fields or the expected authorization is not part of the header, for example, social security number or PIN, click + Add Authorization Field and then define the fields as shown in the following illustration.
In the Field Type field, you can select one of the following depending on where in the task request message and the type of authorization fields that are required.- Header – The Bot expects the authorization fields as part of the header of the request.
- Payload – The Bot expects the authorization fields as part of the content of the body of the request.
- Query String – The Bot expects the authorization fields as a query in the body of the request.
- Path Param – The Bot expects the authorization fields as part of the URL path for the request.
In the Field Key field, enter the name of the field for the selected Field Type.
In the Field Value field, enter the value for the Field Key specified.
Click Done. The new authorization field is added in the Authorization Fields section.
To add additional authorization fields, click Add in the Authorization Fields section.Defining the Token URL
In the Token URL field, optionally define a URL that can be used to test the authentication settings from Bot Builder before you deploy the task with the authorization mechanism. You can use dynamic fields, path parameter fields, query fields, and so forth, to define the test URL, for example,
http://{tenant}.someCompany.com/test/{{tokenId}}
In the Token URL Method field, select the HTTP request method type for the Token URL. One of PUT, POST, PATCH, DELETE, and GET.
In the Token URL Content Type field, select the content type expected from the Token URL. One of: JSON, RSS, XML, URL Encoded JSON, CSV, Text, Twitter Encoded JSON, Multipart/Form-data,Multipart/Related, or Oracle ADF.
In the Access Using a Connector section, select Yes to enable access for Kore.ai Bots using the Kore.ai Connector agent. If your domain does not have any active Kore.ai Connectors defined, a warning message is displayed to contact the Bots Admin Console system administrator. For more information, see Using the Kore.ai Connector in the Bots Admin Console documentation.
Click Save Auth to save the authorization settings and close the New Authorization Mechanism dialog.Testing the Authorization
After you save the authentication, if you defined an Authorization URL for your new authorization type, you can test your authorization definition on the Authorization page when you click Test Authorization before continuing to develop the remain steps of your task.
When you click Test Authorization, the Test Authorization dialog is displayed and populated with the URL you specified in the Authorization Check URL section, as shown in the following illustration.
Click Test to begin the authorization test. When the validation of authentication is complete, the Test Authorization dialog is closed and the results of the validation, either success or failure, is displayed to the immediate right of the Test Authorization button. If the authorization fails, the Auth Test Failed message is displayed along with the Headers and Response tabs as shown in the following illustration.
- OAuth v2 client credential –
- OAuth v1 – Enables web applications or web services to access protected resources using an API without end-users having to disclose their log on credentials to Kore.ai. Click on the link below for the configuration details.
Setting Up Authorization using OAuth v1
OAuth is an open protocol to allow secure authorization in a simple and standard method from web, mobile, and desktop applications.To use OAuth, you must first register an account with the web application as you will need the log in credentials for that application to configure the settings for the authorization mechanism.How OAuth v1 Works
- The Kore.ai application obtains an unauthorized request token from the web application. The Kore.ai application redirects the user to a login dialog at the web application.
- The user authorizes the request token, associating it with their account. The web application redirects the user back to the Kore.ai application.
- The Kore.ai application exchanges the request token for an access token.
- The access token allows the Kore.ai application to access a protected resource at the provider, on behalf of the user.
The following illustration is an example of the oAuth v1 authorization type fields that you must define to enable a customized authorization for your task.
To define oAuth v1, define the fields described in the following table.FIELD NAME DESCRIPTION Authorization Type Set to oAuth v1. Callback URL The URL used by the web application or web service to redirect the end-user after end-user authorization is complete. This value, https://idp.kore.ai/workflows/callback/, is provided as a read-only value by the Kore.ai application when you define oAuth v1 settings. Identity Provider Name The name of the web application or web service, for example, Twitter. This field is required. Consumer Key The value provided as the Kore.ai application identification to the web application. This field is required. Consumer Secret The secret value provided by the Kore.ai application to establish ownership of the Consumer Key. This field is required. Request Token Link The URL used by the Kore.ai application to obtain an unauthorized request token. A request token is the value used by the Kore.ai application to obtain authorization from the end-user to obtain an access token. For example, https://{tenant}.someCompany.com/oauth/request_token. After end-user authorization, an access token can be requested by the Kore.ai application. This field is required. Access Token Link The URL used to exchange the end-user authorized request token for an access token. The access token is the value used by the Kore.ai application to gain access to the web application or web service on behalf of the end-user, instead of using the end-users log on credentials. For example, https://{tenant}.someCompany.com/oauth/access_token. This field is required. User Authorization Link The URL used to obtain end-user authorization for the Kore.ai application to access the web application or web service using the access token. For example, https://{tenant}.someCompany.com/oauth/authorize. This field is required. Access Using a Connector Select Yes to enable access for Kore.ai Bots using the Kore.ai Connector agent. This option is only visible if a Kore.ai Connector agent is configured and enabled in your enterprise on-premises network. For more information, see Using the Kore.ai Connector. Defining Tenancy
If required, in the Subdomain section, select Yes if the base URL for a web application or user interface the uses a tenant name in the URL. For example, kore is the tenant organization for a web service using tenants as www.kore.someCompany.com.
In the following example configuration, the tenancy URL contains the {tenant} organization placeholder.
Adding Additional Fields
Click + Add Additional Fields to open the Additional Fields dialog, and then enter one or more key/value pairs that represent additional authorization input fields if required as shown in the following illustration.
Specify the following fields:- Field Key – The name of the custom field to specify for authorization.
- Field Value – The value of the custom field to specify for the authorization.
Click Add to save the Additional Field.
To add more Additional Fields, click Add in the Additional Fields section.Adding Authorization Fields
By default, authorization fields are configured as part of the header of the task request message. If your task request requires additional authorization fields or the expected authorization is not part of the header, for example, social security number or PIN, click + Add Authorization Field and then define the fields as shown in the following illustration.
In the Field Type field, you can select one of the following depending on where in the task request message and the type of authorization fields that are required.- Header – The Bot expects the authorization fields as part of the header of the request.
- Payload – The Bot expects the authorization fields as part of the content of the body of the request.
- Query String – The Bot expects the authorization fields as a query in the body of the request.
- Path Param – The Bot expects the authorization fields as part of the URL path for the request.
In the Field Key field, enter the name of the field for the selected Field Type.
In the Field Value field, enter the value for the Field Key specified.
Click Add. The new authorization field is added in the Authorization Fields section.
To add additional authorization fields, click Add in the Authorization Fields section.Testing the Authorization
After you save the authorization, you can test your authorization definition on the Authorization page when you click Test Authorization before continuing to develop the remain steps of your task.
When you click Test Authorization, the test is executed using the authentication token URLs and the Consumer Key and Consumer Token. If the tenancy was defined, the Test Authorization dialog is displayed as shown in the following illustration.
Click Test to begin the authorization test. When the validation of authentication is complete, the Test Authorization dialog is closed and the results of the validation, either success or failure, is displayed to the immediate right of the Test Authorization button. If the authorization fails, the Auth Test Failed message is displayed along with the Headers and Response tabs as shown in the following illustration.
- OAuth v2 – The newest version of OAuth protocol focusing on specific authorization flows for web applications and web services. Click on the link below for the configuration details.
Setting Up Authorization using OAuth v2
OAuth v2 is the new version of the open protocol to allow secure authorization in a simple and standard method from web, mobile, and desktop applications.To use oAuth v2, you must first register an account with the web application as you will need the log in credentials for that application to configure the settings for the Authorization Mechanism.How oAuth v2 Works
- The Kore.ai application redirects the user to a login dialog at the web application.
- The user authenticates.
- The web application redirects the user back to the Kore.ai application with an access token.
- The Kore.ai application validates the access token.
- The access token allows the Kore.ai application to access a protected resource at the provider, on behalf of the user.
The following illustration shows the fields to define for the oAuth v2 Authorization Type.
To configure oAuth v2, define the fields described in the following table.FIELD NAME DESCRIPTION Authorization Type Set to oAuth v2. Callback URL The URL used by the web application or web service to redirect the end-user after end-user authorization is complete. This value, https://idp.kore.ai/workflows/callback/ is provided as a read-only value by the Kore.ai application when you define oAuth v2 settings. Identity Provider Name The name of the web application or web service, for example, Asana. This field is required. Client ID The ID of the Kore.ai client. Client Secret Key The value provided as the Kore.ai application authentication based on the Client ID to the web application. Authorization URL The URL used to obtain end-user authorization for the Kore.ai application to access the web application or web service using the access token. This field is required. Access Using a Connector Select Yes to enable access for Kore.ai Bots using the Kore.ai Connector agent. This option is only visible if a Kore.ai Connector agent is configured and enabled in your enterprise on-premises network. For more information, see Using the Kore.ai Connector. Authorization URL The URL used by the Kore.ai application to obtain an unauthorized request token. A request token is a value used by the Kore.ai application to obtain authorization from the end-user to obtain an access token. After end-user authorization, an access token can be requested by the Kore.ai application. This field is required. Defining Tenancy
If required, in the Subdomain section, select Yes if the base URL for a web application or user interface the uses a tenant name in the URL. For example, kore is the tenant organization for a web service using tenants as www.kore.someCompany.com.
In the following example configuration, the tenancy URL contains the {tenant} organization placeholder.
Adding Additional Fields
Click + Add Additional Fields to open the Additional Fields dialog, and then enter one or more key/value pairs that represent additional authorization input fields if required as shown in the following illustration.
Specify the following fields:- Field Key – The name of the custom field to specify for authorization.
- Value – The value of the custom field to specify for the authorization.
Click Add to save the Additional Field.
To add more Additional Fields, click Add in the Additional Fields section.Adding Authorization Fields
By default, authorization fields are configured as part of the header of the task request message. If your task request requires additional authorization fields or the expected authorization is not part of the header, for example, social security number or PIN, click + Add Authorization Field and then define the fields as shown in the following illustration.
In the Field Type field, you can select one of the following depending on where in the task request message and the type of authorization fields that are required.- Header – The Bot expects the authorization fields as part of the header of the request.
- Payload – The Bot expects the authorization fields as part of the content of the body of the request.
- Query String – The Bot expects the authorization fields as a query in the body of the request.
- Path Param – The Bot expects the authorization fields as part of the URL path for the request.
In the Field Key field, enter the name of the field for the selected Field Type.
In the Field Value field, enter the value for the Field Key specified.
Click Add. The new authorization field is added in the Authorization Fields section.
To add additional authorization fields, click Add in the Authorization Fields section.Testing the Authorization
After you save the authorization, you can test your authorization definition on the Authorization page when you click Test Authorization before continuing to develop the remain steps of your task.
When you click Test Authorization, the test is executed using the authentication token URLs and the Client ID and Client Secret Key. If the tenancy was defined, the Test Authorization dialog is displayed as shown in the following illustration.
Click Test to begin the authorization test. When the validation of authentication is complete, the Test Authorization dialog is closed and the results of the validation, either success or failure, is displayed to the immediate right of the Test Authorization button. If the authorization fails, the Auth Test Failed message is displayed along with the Headers and Response tabs as shown in the following illustration.
- API Key – An identification and authorization token generated or provided by a web application or web service used to identify the incoming application request, and in some cases, also provide authentication for secure access. Click on the link below for the configuration details.
Setting Up Authorization using an API Key
An API key can act as both a unique identifier and a secret token for identification as well as authentication to provide a set of access rights on the associated API. Instead of prompting the end-user for both a username and password for access, the user is prompted only for an API key when configuring the task.To use the API Key Authorization Type, you must first register an account with the web application and then generate an API Key for that application to configure the settings for the Kore.ai authorization mechanism.The following illustration shows the fields to define for the API Key Authorization Type.To define an API key authorization, select API Key in the Authorization Type field. Then specify a Name for the authorization to be displayed in the Bot builder user interface.
Defining Tenancy
If required, in the Subdomain section, select Yes if the base URL for a web application or user interface the uses a tenant name in the URL. For example, kore is the tenant organization for a web service using tenants as www.kore.someCompany.com.
In the following example configuration, the tenancy URL contains the {tenant} organization placeholder.
Adding Form Fields to the Authorization Form
If the default username and password fields do not meet your needs, you can add new fields displayed to the end-user by adding authorization form fields. To add fields on the authorization form, click + Add Form Field. The following illustration is an example of a definition to add a password field to the authorization dialog.
The following table describes the fields used to define an authorization IDP form field.FIELD NAME DESCRIPTION Title of Field Specify the name of the field displayed to the end-user in the authentication dialog. Field Key The value represents the end-user input value to the authenticating service. Help Hint The help text displayed in the field to describe what should be entered into the field. Field Type When Advanced Options is selected, specify the type of field displayed in the end-user interface to collect the user input assigned as the value for the Field Key, one of: - Textbox
- Password
Mandatory When Advanced Options is selected, select if the end-user must define this field to complete authentication. Data Type When Advanced Options is selected, specify the type of data expected as input from the end-user, for example, String. Visibility When Advanced Options is selected, specify if the authentication field should be visible, hidden, or displayed as read-only. Adding Authorization Fields
By default, authorization fields are configured as part of the header of the task request message. If your task request requires additional authorization fields or the expected authorization is not part of the header, for example, social security number or PIN, click + Add Authorization Field and then define the fields as shown in the following illustration.
In the Field Type field, you can select one of the following depending on where in the task request message and the type of authorization fields that are required.- Header – The Bot expects the authorization fields as part of the header of the request.
- Payload – The Bot expects the authorization fields as part of the content of the body of the request.
- Query String – The Bot expects the authorization fields as a query in the body of the request.
- Path Param – The Bot expects the authorization fields as part of the URL path for the request.
In the Field Key field, enter the name of the field for the selected Field Type.
In the Field Value field, enter the value for the Field Key specified.
Click Add. The new authorization field is added in the Authorization Fields section.
To add additional authorization fields, click Add in the Authorization Fields section.Testing the Authorization – API Key
After you save the authentication, if you defined an Authorization Check URL for your new authorization type, you can test your authorization definition on the Authentication tab when you click Test Authorization before continuing to develop the remain steps of your task.
When you click Test Authorization, the Test Authorization dialog is displayed and populated with the URL you specified in the Authorization Check URL section, as shown in the following illustration.
To configure the Test Authorization – API Key- In the Auth Check URL field, verify or enter the URL to test the authentication configuration.
- If your bot uses subdomains, the Tenancy field is displayed and you must specify the tenant.
- Enter the API key for the application in the API Key field.
- Select the content type expected for the URL in the Content-Type field.
- For testing the URL, the Method field is read-only and set to GET.
- Click Test to begin the authorization test.
When the validation of authentication is complete, the Test Authorization dialog is closed and the results of the validation, either success or failure, is displayed to the immediate right of the Test Authorization button. If the authorization fails, the Auth Test Failed message is displayed along with the Headers and Response tabs as shown in the following illustration.
- Basic Auth – A standard protocol to collect username and password information. Kore.ai uses SSL encryption in combination with basic authentication to help secure end-user information. Click on the below link for the configuration details.
Step 3: API Request
If required for your task, you can define a request object to, for example, provide a dynamic drop-down choice for the end-user to select from to complete the task. On the information task API Request tab, you can define API Parameters, optional API task Initializer, API Request pre- or post-processor, and the API Request. You will also need to add a Response Sample expected from your API Request payload.
You can also configure an information task request using SOAP in which case you need to configure the WSDL URL, and Connectors.
API Request - Rest
After you describe the Bot action task on the General tab, and optionally, define authentication requirements on the API Request tab, you are ready to start configuring the API request that asks for data from your Bot website, system, or web application for the task.
This topic describes how to configure an API (REST) Request.
See below for API (SOAP) requests.
Configuring API Request (REST)
For an action task request with the Connection Mode set to REST, you need to define the following:
Defining Parameters
Follow these steps to define an API Request (REST) parameters:
Defining an Initializer
To run a task, you may need to put or get values from a session before executing the task using Kore.ai session-specific variables. For more information, see Using Session and Context Variables in Tasks.
Some web services require executed code, session variables, or modification of user context details before executing an API request. For example, a web service may require two-factor user authorization where the first step is a user login, and the second step is a partner authorization. After validating both these steps, an access token is granted and used in the header of subsequent API calls to that web service. Using the Initializer, you can complete partner authorization and retrieve the access token from the response of the user authentication. The access token can be stored as a custom session variable and set as the header for subsequent API calls.
Defining the Request Chain
In the Request section of the API Request tab, you can define an API request chain consisting of pre-processors, API Requests, and post-processors. At least one API Request is required, while processors are optional.
Adding the Response Sample
In the Response Sample section, you can enter or paste examples of the key-value pairs that you expect to receive in the task payload. When you define the response sample, the keys specified in the Response Sample section are available as drop-down choices for handling the output data.
After you describe the Bot action task on the General tab, and optionally, define authentication requirements on the API Request tab, you are ready to start configuring the API request that asks for data from your Bot website, system, or web application for the task.
This topic describes how to configure an API (REST) Request.
See below for API (SOAP) requests.
Configuring API Request (REST)
For an action task request with the Connection Mode set to REST, you need to define the following:
- Authorization – If required for your action task, you will need to define the authorization to access the API. For example, using basic authorization, OAuth, or API Key. For more information, see above section – Authorization Settings.
- Parameters – Define one or more parameters used to process the API request. Examples: input from user prompts, selection by an end-user from a list of choices, a URL, and more. For more information, see below – Defining Parameters for an Action Task.
- Initializer (Optional) – Specify custom JavaScript to run, set session variables prior to creating a task instance when web services require a code to be executed, set session variables, or modify user context details before an API request is executed. For more information, see below – Defining an Initializer.
- Request – Define a request chain used to make an API call to a web service to initiate the action task using URLs and paths to your Bot and to initiate the delivery of the data payload from the web service to the Bots Platform. The request chain can consist of pre-processors, API request, and post-processors. For more information, see below – Defining the Request Chain.
- Response Sample – Define key/value pairs that you expect to receive in the Action task payload. The keys that you provide are available as drop-down choices for handling the data to display to the bot user. For more information, see below –Adding the Response Sample.
Defining Parameters
Follow these steps to define an API Request (REST) parameters:
- Click the Parameters section, and then click Add. The Set Up Task Parameter dialog opens.
- Depending on your selection, enter the values for the relevant fields as described in the following table.
Field Name Description Type of Task Parameter Specify one of the following: - Payload Parameter – Use this field type to represent payload data for an HTTP method, such as POST, PUT, GET, DELETE, and so forth. For example:
{ "taskId":"{payloadfield2}", "message":"{payloadfield1}" } - Query Parameter – This field type is used as part of a URL path or query within a URL. For example:
http://app.asana.com/api/workspaces/{queryfield1}/project/{queryfield2}?userId={queryfield3}
Parameter Name The title of the task input field displayed to the user, for example, Choose account Prompt Message The help description displayed below the parameter name, for example, Which account would you like to access? Parameter Key The task key that represents the end-user input value that you want to collect, for example, accountType. Entity Type The input parameter will be associated with an Entity and you can choose the Entity Type from: - Attachment
- City
- Country
- Company
- Currency
- Date
- Label
- Location
- Message
- Name
- Number
- Percent
- Phone Number
- String
For more information on Entity Types click here.
Based upon the Entity Type selected the remaining Parameters are set, you can modify the same.Parameter Type Specifies the type of task input field displayed in the end-user interface to collect user input for the request object to assign to the Key value. The default setting is Textbox, but can be customized to any one of the following: - Date – Displays the Format field where you can select the date format syntax for the end-user to define when the task is configured for their account. In the Select Date Format drop-down list, select one of the following:
- dd-MM-YYYY – For example, 16-05-1999
- MM-dd-YYYY – For example, 05-16-1999
- dd-MM-YY – For example, 16-05-99
- YYYY-MM-dd – For example, 1999-05-16
- URL – Displays a text box for the end-user to enter a URL including field validation for a correct URL syntax. In the Placeholder field, enter the help hint displayed in the text box, for example, Enter the URL for the website here.
- Textbox – Displays a text box for the end-user to enter text as the task input field, typically just a few words. In the Placeholder field, enter the help hint displayed in the text field, for example, Type in the name you want to embroider.
- Static Dropdown – Displays a drop-down list of choices to the end-user. Click Add Option to begin adding the list of items to display to the end-user with the following parameters:
- Option Name – The name of the option displayed to the end-user.
- Option Value – The value the represents the Option Name returned to the application.
- Default Value – Select the default value for the option when more than one option is defined.
- Searchable – Select to enable dynamic search and display as the end-user enters text in this field, or if no matches, allow free-form entry.
Click Save. To add additional items, click Add Option again. Edit or remove options in the Actions column for options.
- Dynamic Dropdown – Displays a drop-down list dynamically populated at runtime based on the response from a URL for your Bot, for example, a list of projects for a JIRA task notification. Define the following properties for a dynamically populated dropdown.
- Endpoint URL – The Bot endpoint URL, for example, https://app.asana.com/api/1.0/workspaces.
- Endpoint Content Type – The content type expected from the specified endpoint URL. One of: JSON, RSS, XML, URL Encoded JSON, CCV, Text, or Twitter Encoded JSON.
- Endpoint Method – One of:
- GET – Specifies an HTTP Request GET method for the task field.
- POST – Specifies an HTTP Request POST method for the task field.
- Response Path – The path in the response that contains the desired drop-down list values, for example, data.
- Label Key – The key for the label of the drop-down option, for example, name.
- Option Value Key – The key for the value of the drop-down option, for example, id.
- Add Payload Field – Click to add one or more fields from the response payload as options for the dynamic dropdown. For each payload field, enter the Payload field key and the Payload field value, and then click Save. Edit or delete payload fields in the Actions column.
- Searchable – Select to enable dynamic search and display as the end-user enters text in this field, or if no matches, allow free-form entry.
- Textarea – Displays a text area box for the end-user to enter text as the task input, typically for several sentences. In the Placeholder field, enter the help hint displayed inside the text area.
- Type Ahead – Displays a dynamically populated drop-down list of choices to the end-user at runtime when the user enters three or more characters that match the search results based on the response from the URL defined for the task. For example, a list of projects for a JIRA task notification message. Define the following properties for a dynamically populated drop-down.
- Endpoint URL – The Bot endpoint URL, for example, https://app.asana.com/api/1.0/workspaces.
- Endpoint Content Type – The content type expected from the specified endpoint URL. One of: JSON, RSS, XML, URL Encoded JSON, CCV, Text, Twitter Encoded JSON, Multipart/Form-data, or Multipart/Related.
- Endpoint Method – One of:
- GET – Specifies an HTTP Request GET method for the task field.
- POST – Specifies an HTTP Request POST method for the task field.
- Response Path – The path in the response that contains the desired drop-down list values, for example, data.
- Label Key – The key for the label of the drop-down option, for example, name.
- Option Value Key – The key for the value of the drop-down option, for example, id.
- Add Payload Field – Click to add one or more fields from the response payload as options for the type ahead field. For each type ahead field option, enter the Payload field key and the Payload field value, and then click Save. Edit or delete payload fields in the Actions column.
- Editable – Enables the end-user to enter text free-from in the field as an option when type-ahead search results do not match.
- Email – Displays a text box for the end-user to input an email address. In the Placeholder field, enter the help hint to display to the end-user inside the text box.
- Date & Time – Displays a text box for the end-user to input a date with time. In the Format field, enter the expected date or time format to display to the end-user in the date text box. In the Select Date Format drop-down list, select the date with time format.
- Time Zone – Displays a drop-down list of time zones based on the operating system settings.
- Location – Displays a text box for the end-user to enter a geographical location, for example, Orlando, FL, or 32801.
- Nested Form – Displays end-user input fields in a nested format below the parent input field. Specify the following fields for a nested form input field:
- Array Element Type – Select the data type of the parent input form element.
- Add Nested Form Field – Click to add one or more nested form fields.
- File Upload – Displays end-user control to search for, and select a file to upload. When clicked, enter the File Upload Payload Key. When the File Upload Payload Key is defined, in the File Upload Payload Field Value drop-down list, select one of the following types:
- File Name
- File Size
- File Content Type
Data Type Select one of these user input types: - String – Users can input any sequence of numbers, letters, or special characters.
- Number – Users can input a number. No special characters are allowed.
- Boolean – User can input a Boolean value of true or false.
- Email – User can input a valid email address.
- Object – Data from a Bot can be received as JSON objects, for example, as location details defined as:
“location” : {
“lat” : 17.4374614,
“lng” : 78.4482878
}
where you can refer to the properties in a request chain or task request as location.lat, and location.lng. - Array – Users can pass a comma-separated list of values to the Bot. For example, in Google Calendar, multiple attendees with data can be passed as:
“attendees”: [“user1”, “user2”, “user3”]
When selected, specify the Type for the array of end-user input as one of:- String
- Number
- Boolean
- Array
- Date
- Date – Users can type a complete date or select it from a date picker.
Mandatory Select if the end-user must define this setting to save the task settings configuration. - Payload Parameter – Use this field type to represent payload data for an HTTP method, such as POST, PUT, GET, DELETE, and so forth. For example:
- Click the Advanced Settings tab to define additional optional settings for the task fields.
| Field Name | Description |
|---|---|
| Visibility | Specify if the task input field should be visible or hidden from the end-user. The Visibility field can also be set to Custom where data is captured from the user but not used as a query parameter or payload field. For example, with a JIRA bot, posting a comment on a ticket using an @mention tag as shown below: “@Mike, please look into this issue” The JIRA API to ‘Post a comment’ requires one query field and one payload field as:
With the Visibility field set to Custom, you can capture the user information for the user mentioned as |
| Untranspose the Key | Select to disable key transposition by Kore.ai. By default, Kore.ai transposes a key/value pair, for example, “parameter”:”value” is transposed by Kore.ai to “parameter:{value:”actualValue”}. When selected, keys are not transposed. |
| Fetch from Session | Select to store the user input value for this field as a session variable. When selected, the Field Value from Session field is displayed. Select an existing variable, or select Add New Session Variable to define a new variable. To create a new session variable, you must select the Scope of the variable and define the Key to store the variable. In the Scope field, select one of:
|
- Click Add & Continue to save the parameter for the task request and add another parameter, or click Add & Exit to save the parameter for the task request and close the dialog. You should organize multiple parameters in the order that the bot user should provide inputs. Use the and icons to move the parameters.
Defining an Initializer
To run a task, you may need to put or get values from a session before executing the task using Kore.ai session-specific variables. For more information, see Using Session and Context Variables in Tasks.
Some web services require executed code, session variables, or modification of user context details before executing an API request. For example, a web service may require two-factor user authorization where the first step is a user login, and the second step is a partner authorization. After validating both these steps, an access token is granted and used in the header of subsequent API calls to that web service. Using the Initializer, you can complete partner authorization and retrieve the access token from the response of the user authentication. The access token can be stored as a custom session variable and set as the header for subsequent API calls.
Defining Task Initializer
To configure the task initializer, click the Initializer tab. It opens a JavaScript editor in which you can write the required code.
In the JavaScript editor, define the Key and the Scope as follows:
- EnterpriseContext – A key-value pair available to all bots and all users in an enterprise. For example, for a GitHub bot, a user needs to access one or more enterprise repositories. In the Initializer, you can persist the repository data as Gitrepository (Enterprise Context) with the following JavaScript code:
var userRepository = { "title": _labels_[repository], "value": repository }; EnterpriseContext.put('Gitrepository', userRepository, 200000); - BotContext – A key-value pair available to all users of this specific bot. For example, you may want to set up a default currency for financial transactions in a session based on the user location. In the Initializer, you can persist the default currency data as currency (Bot Context) with the following JavaScript code:
var defaultCurrency = { TODO Custom JavaScript for location-based currency } BotContext.put('currency', defaultCurrency, 200000); - UserContext – A key-value pair available to all bots for a user. These keys are read-only and provided by the system as user data for:
- _id – The Kore.ai userId.
- emailId – The email address associated with the userId.
- lastName – The last name of the user.
- firstName – The first name of the user.
- profImage – The image or avatar filename of the user.
- profColour – The account color for the user.
- activationStatus – The account status of the user.
- title – The title of the user, if defined.
- orgId – The organizational ID of the user account, if defined.
- UserSession – Define a key-value pair available for this specific user for all bots in an enterprise. For example, you may want to store a user location to make it available to all bots, such as a user home address for commerce, transportation, and home delivery services. In the Initializer, you can persist the default location data as HomeLocation (UserSession) with the following JavaScript code:
var location = { "title": labels[location], "value": { "latitude": location.latitude, "longitude": request.location.longitude } }; UserSession.put('HomeLocation', location, '20000'); - BotUserSession – Define a key-value pair available to a specific bot based on a specific user’s inputs. For example, you may want to persist a user location for more than one bot task. For a travel bot, the user may be able to book a flight and a hotel based on the same home and destination addresses. In the Initializer, you can persist the default home and destination data as HomeLocation (BotUserSession) and DestinationLocation (BotUserSession) with the following JavaScript code:
var homelocation = { "title": labels[request.sourceLocation], "value": { "latitude": request.sourceLocation.latitude, "longitude": request.sourceLocation.longitude } }; BotUserSession.put('HomeLocation', homelocation, '20000'); var destlocation = { "title": labels[request.destLocation], "value": { "latitude": request.destLocation.latitude, "longitude": request.destLocation.longitude } }; BotUserSession.put('DestinationLocation', destlocation, '20000’);
GET and PUT Syntax
The following code examples show the syntax to GET or PUT a key-value pair for each context type.
"EnterpriseContext" : {
       "get" : function(key){...},//get the specified key
       "put" : function(key, value, ttl){...} //put the value at the key for the specified ttl, ttl is in minutes
   },
   "BotContext" : {
       "get" : function(key){...},//get the specified key
       "put" : function(key, value, ttl){...} //put the value at the key for the specified ttl, ttl is in minutes
   },
   "UserContext" : {
       "get" : function(key){...},//get the specified key
   },
   "UserSession" : {
       "get" : function(key){...},//get the specified key
       "put" : function(key, value, ttl){...} //put the value at the key for the specified ttl, ttl is in minutes
   },
   "BotUserSession" : {
       "get" : function(key){...},//get the specified key
       "put" : function(key, value, ttl){...} //put the value at the key for the specified ttl, ttl is in minutes
   }
For example:
    BotContext.put("topicSessionVariable","music",2000);
    UserSession.put("firstName","Mary",20000);
    UserContext.get("firstName");
Exception Syntax
You can also define custom error messages to catch errors before setting up a task, for example, authentication failure. If an exception is captured, the task setup is halted. Use the following syntax to throw the exception:
{
    "exceptions": {
        "message": " Error Message"
    }
}
For example,
var ex ={};
var exceptions={};
exceptions.message ='You can not proceed further with out valid permissions';
ex.exceptions = exceptions;
print(JSON.stringify(ex)); //print is mandatory.
In the Initializer section, you can use session Keys, or other session variables, however, you cannot set or access values. For example,
var name = UserContext.get("firstName")+UserContext.get("lastName");
UserSession.put("fullName") = name;
In the preceding code example, you PUT a value into the session using a task Parameter defined with the Fetch from Session field in the Advanced Settings section for the task. The Key is defined as fullName for the custom defined UserSession context variable.
Task Initializer Example
The following code is an example of a Task Initializer to get the user ID and email data to pre-populate variables in the API request.
var x = UserContext.get("identities");
var isEmailFound = false;
for (var i = 0; i < x.length; i++) {
    if (x[i].type === "mapped") {
        var identity = x[i].val
        var arr = identity.split("/");
        var pattern = /^cs/i;
        var result = arr[0].match(pattern);
        if (result) {
            isEmailFound = true;
            UserSession.put("rtmEmail", arr[1], '20000');
        }
    }
}
if (!isEmailFound) {
    for (var j = 0; j < x.length; j++) {
        if (x[j].type === "email") {
            UserSession.put("rtmEmail", x[j].val, '20000');
        }
    }
}
Defining the Request Chain
In the Request section of the API Request tab, you can define an API request chain consisting of pre-processors, API Requests, and post-processors. At least one API Request is required, while processors are optional.
API Request
For any task, you will need to define an API request to make a call to a web service to initiate the task. At least one API request is required for each task. For each API request, you must add one or more request URLs and paths to your task to initiate the delivery of the data payload from the web service.
Configuring the API Request
- On the API Request tab, expand the Request tab, and then click, Add API.
- Specify the values for the fields in the Add API dialog as described in the following procedure.
- In the Name field, enter the name of your API request, for example, My API Request.
- In the Method drop-down list, select the HTTP method used for the task. One of:
- POST – Used to send data to the server such as customer information, file upload, using HTML forms.
- PUT – Replaces the content of the target resource with the content sent.
- PATCH – Appends the content of an existing target resource with the content sent.
- DELETE – Deletes the content of an existing target resource.
- GET – Returns the content of an existing target resource.
- In the URL field, specify the URL for the bot task response to process, for example, http://koremessenger.com/postURL. You can also use session variables in the URL as shown in the following example:
https://mySite.crm.ondemand.com/sap/c4c/odata/v1/c4codata/ServiceRequestCollection?$filter=ID eq '{id}' and ReporterEmail eq '{userEmail}'&$expand=ServiceRequestHistoricalVersion,ServiceRequestDescriptionNote: In some URLs, you may want to use proprietary Kore.ai parameter values for the end and start parameters. For more information about Kore.ai parameter values, see the Bot-specific documentation in Adding Bots. - In the Access Using A Connector field, select Yes to enable access for Kore.ai Bots using the Kore.ai Connector agent. This option is only visible if a Kore.ai Connector agent is configured and enabled in your enterprise on-premises network. For more information, see Using the Kore.ai Connector.
- On the Headers tab, in the Content Type field, select one of the following supported data types for your sample response data.
- JSON – JavaScript Object Notation is an open standard format using human-readable text to transmit data objects as attribute-value pairs. You can use JSON to transmit data between the Kore.ai servers and your Bot web application.
- RSS – Rich Site Summary, or Really Simple Syndication, is family of standardized formats used to publish frequently updated information such as blog entries, news headlines, audio, and video.
- XML – Extensible Markup Language is a markup language that defines a set of rules for encoding documents in a format which is both human-readable and machine-readable. Oftentimes, web services use XML schemas to process the XML data.
- URL Encoded JSON – URLs using JSON encoding for reserved characters.
- CSV – Comma-separated value lists.
- Text – Text-based key-value pairs.
- Twitter Encoded JSON – URLs for Twitter using JSON encoding for reserved characters.
- Multipart/Form-data – An encoding type that allows files to be sent through an HTTP POST request method if you want to allow a user to upload a file from a form.
- Multipart/Related – Used when the same information is presented in different body parts in different forms. The body parts are ordered by increasing complexity.
- Oracle ADF – For Oracle Application Development Framework.
- In the Authorization Headers section, select or clear keys to enable or disable the key for the header as shown in the following illustration.
- On the Parameters tab, select or clear any Auth Parameters or Parameters to include in the header as shown in the following illustration.
- Click Save to save and close the API Request configuration.
Processors
Processors allow you to manipulate data collected in the user session before, during, or after an API request to a web service using JavaScript.
If you define and place a processor before the API Request, it is a pre-processor. Pre-processors allow you to manage input parameters and values from session variables before the API Request is made.
If the processor is sequentially placed after the API Request, it is a post-processor. You can use a post-processor to access payload response keys from the API request. To access keys, use one of the following post-processor types:
- Resolve: To use the results of one payload response as input for a second request.
- Spread – To separate arrays of data in a payload.
- Extract – To specify a path to a specific object in a payload with multiple objects.
- Assign – To specify a variable name for the payload response.
Pre-processors
You can use a pre-processor to manage request parameters before the API Request is executed, using session variables and parameters. When defining a pre-processor, you must set Type of Process to custom and then enter your code in the JavaScript editor displayed. A pre-processor can only be of Type custom.
Adding a Pre-Processor
- On the API Request page, expand the Request tab, and then click Add Processor.
- Enter the name of your processor in the Name field.
- In the Type of Process drop-down list, you must select Custom for a pre-processor.
- Add your code for manipulating the request parameters as needed using the following syntax:
{
    "fields": {
        "payloadFields": { // to set value to a payload field
            "key1": "value1", // Payload fields are not applicable for Alert tasks.
            "key2": "value2"....
        },
        "headerFields": { // to set value to a header field
            "key1": "value1",
            "key2": "value2"....
        },
        "pathFields": { // to set value to a path field or query field.
            "key1": "value1",
            "key2": "value2"....
        }
    }
}
For example, the following code snippet can be used to set the path field or the query field of an API object:
var fields= {};
var pathFields = {};
pathFields.fullName = UserContext.get("firstName")+UserContext.get("lastName")
fields.pathFields = pathFields;
var finalObject = {};
finalObject.fields = fields;
print(JSON.stringify(finalObject));
In the previous code, if
firstNameandlastNameare stored as session variables, asJohnandSmithrespectively, then the JSON response payload from the pre-processor would be:{ fields: { "pathFields": { "key": "fullName", "value": "John Smith" } } }In the following pre-processor example, variables are set with session variables prior to the actual API request call.
var fields = {}; var pathFields = {}; var UserEmailID = UserSession.get("rtmEmail"); pathFields.userEmail = UserEmailID; fields.pathFields = pathFields; var finalObject = {}; finalObject.fields = fields; print(JSON.stringify(finalObject)); - Click Save to save and close the Add Processor dialog.
When a processor is placed in the Request section before the API Request, the processor is considered as a pre-processor. When placed after an API Request, the processor is considered a post-processor.
Adding a Post-Processor
You may need more than one API request to get the desired data payload from your web service, using Kore.ai post-processors.
Defining a Custom Post-Processor
If you want to create a custom post-processor, you could access the response keys of the previous API Request using the following syntax”
payload[0].{ key }
JSON Syntax
{
 "payload":
   {
    "key1" : "value1",
    "key2" : "value2"
   }
}
Example
var final = {};
var data = payload[0]; //Accessing the response of the previous API object
data.title[0] = 'New value for key here';
final.payload = data;  // Updating the response of the API object
print(JSON.stringify(final));  // This step is mandatory
For custom processors, you must print the final response as shown in the preceding code, otherwise, an empty response is returned. Use the following syntax:
print(JSON.stringify( <<object>> ));
Configuring Standard Post Processors
Follow these steps to add a standard post processor:
- On the API Request tab, expand the Request tab, and then click Add Processor.
- Kore.ai also provides a set of standard post-processors that you can use instead of creating custom code for a post-processor. In Type of Process field, select one of the following four types of standard processors:
- Resolve: You can use the results of one payload response as input for a second request. For example, click Add Processor, enter a Name for your processor, set Type of Process to resolve, and Key to the name of the variable, and then define the Post URL using a variable from the first API Request. For example, https://app.asana.com/api/1.0/projects/{project_id} that returns the id field in the payload response as:
 ...
"id":80468818418144, <br/>
"created_at":"2016-01-14T05:34:35.848Z",
"modified_at":"2016-01-20T04:29:52.505Z",
"owner":{
"id":73114591129714,
"name":"jaganmohan.evuri" },
...
that is then used as a variable input as shown in the following Post URL:
https://app.asana.com/api/1.0/projects/{id}/tasks?opt_fields=completed,modified_at
You must also specify the HTML Content Type expected in the payload response as well as the HTML Request method.
For more information, see Using Session and Context Variables in Tasks. - Spread: For payloads that contain arrays of data that you need to separate. For example, click Add Processor, enter a Name for your processor, set the Key field to, for example, data, and Type of Process to spread to capture the content in the
dataelement in the following code example to extract each item of the array.{ "attribution": null, "tags": [], "type": "image", "location": null, "comments": { "count": 51, "data": [{ "created_time": "1453900980", "text": "43rd", "from": { "username": "kore_hyd", "profile_picture": "https://scontent.cdninstagram.com/t51.2885-19/11906329_960233084022564_1448528159_a.jpg", "id": "2056218675", "full_name": "Kore.ai Hyd" }, "id": "1171728804843572377" }, { "created_time": "1453901222", "text": "44th", "from": { "username": "kore_hyd", "profile_picture": "https://scontent.cdninstagram.com/t51.2885-19/11906329_960233084022564_1448528159_a.jpg", "id": "2056218675", "full_name": "Kore.ai Hyd" }, "id": "1171730841379491107" }, { "created_time": "1453901997", "text": "45th", "from": { "username": "kore_hyd", "profile_picture": "https://scontent.cdninstagram.com/t51.2885-19/11906329_960233084022564_1448528159_a.jpg", "id": "2056218675", "full_name": "Kore.ai Hyd" }, "id": "1171737339782450909" }, { "created_time": "1453902304", "text": "46th and 47th", "from": { "username": "kore_hyd", "profile_picture": "https://scontent.cdninstagram.com/t51.2885-19/11906329_960233084022564_1448528159_a.jpg", "id": "2056218675", "full_name": "Kore.ai Hyd" }, "id": "1171739915923967873" }, { "created_time": "1453902638", "text": "48th", "from": { "username": "kore_hyd", "profile_picture": "https://scontent.cdninstagram.com/t51.2885-19/11906329_960233084022564_1448528159_a.jpg", "id": "2056218675", "full_name": "Kore.ai Hyd" }, "id": "1171742713994497101" }, { "created_time": "1453964684", "text": "49th", "from": { "username": "venkataphani.ailavarapu", "profile_picture": "https://scontent.cdninstagram.com/t51.2885-19/11906329_960233084022564_1448528159_a.jpg", "id": "2679234818", "full_name": "Phani" }, "id": "1172263199715314941" }, { "created_time": "1453964710", "text": "50th", "from": { "username": "kore_hyd", "profile_picture": "https://scontent.cdninstagram.com/t51.2885-19/11906329_960233084022564_1448528159_a.jpg", "id": "2056218675", "full_name": "Kore.ai Hyd" }, "id": "1172263415747136776" }, { "created_time": "1453964717", "text": "51st", "from": { "username": "kore_hyd", "profile_picture": "https://scontent.cdninstagram.com/t51.2885-19/11906329_960233084022564_1448528159_a.jpg", "id": "2056218675", "full_name": "Kore.ai Hyd" }, "id": "1172263474056350986" }] ... - Extract: For payloads that contain multiple objects, you can specify a path to the specific object. For example, click Add Processor, enter a Name for your processor, set the Key field to
data, and then Type of Process to extract to use the object data in the following payload response.{ "user": { "full_name": "Kore.ai Hyd", "id": "2056218675", "profile_picture": "https://instagramimages-a.akamaihd.net/profiles/anonymousUser.jpg", "username": "kore_hyd" }, ... }, "likes": { "data": [{ "full_name": "kstream002", "id": "2100724876", "profile_picture": "https://instagramimages-a.akamaihd.net/profiles/anonymousUser.jpg", "username": "kstream002" } }, ... } - Assign: Using the Assign processor, you can specify a variable name for the payload response, if needed, for example, when the payload does not contain a key for the payload response data. For example, set Type of Process to assign, and then in the Output Variable field, you can for example, define an output variable for the following payload that is an array of three objects.
[
  {
    "Cost": "$0.00",
    "Desc1": "$150 bonus after $500 of purchases in the first 3 months from account opening. ",
    "Desc2": "Earn unlimited cash back Earn unlimited 1.5% cash back on every purchase – it's automatic. Redeem for cash back – any amount, any time. ",
    "Keywords": "weekend dining,online,groceries,fuel,rewards,rebate,365,allaround",
    "OfferName": "Freedom Unlimited",
    "OfferType": "CreditCard",
    "Status": "1",
    "imageURL": "http://www.psdgraphics.com/file/credit-card.jpg",
    "id": "5b5195e264bbd800"
  },
  {
    "Cost": "$95.00",
    "Desc1": "Pay 0 balance transfer fee when you transfer a balance during the first 60 days.",
    "Desc2": "Jumpstart your financial fitness Get an introductory fee for balance transfers, save on interest†, and get your free monthly credit score.",
    "Keywords": "privileges,rebate,health,wellness,great eastern,insurance,policy,installments,split,cashflo",
    "OfferName": "Premium Plus",
    "OfferType": "CreditCard",
    "Status": "1",
    "imageURL": "http://i.imgur.com/rMOXYql.jpg",
    "id": "5caf2155873f89c8"
  },
  {
    "Cost": "$10.00",
    "Desc1": "Pay 0 balance transfer fee when you transfer a balance during the first 60 days.",
    "Desc2": "Jumpstart your financial fitness Get an introductory fee for balance transfers, save on interest†, and get your free monthly credit score.",
    "Keywords": "privileges,rebate,health,wellness,great eastern,insurance,policy,installments,split,cashflo",
    "OfferName": "Frequent Flyer",
    "OfferType": "CreditCard",
    "Status": "1",
    "imageURL": "http://www.moneychoice.org/wp-content/uploads/2016/01/credit-card-calculator-image.png.jpeg",
    "id": "c0b05bc3062658ee"
  }
]
In the Output Variable field, specify a variable to represent the array, as
offers, for example. If you used the UX Preview feature, the response from Kore.ai would be:{ "response": { "offers": [ { "Cost": "$0.00", "Desc1": "$150 bonus after $500 of purchases in the first 3 months from account opening. ", "Desc2": "Earn unlimited cash back Earn unlimited 1.5% cash back on every purchase – it's automatic. Redeem for cash back – any amount, any time. ", "Keywords": "weekend dining,online,groceries,fuel,rewards,rebate,365,allaround", "OfferName": "Freedom Unlimited", "OfferType": "CreditCard", "Status": "1", "imageURL": "http://www.psdgraphics.com/file/credit-card.jpg", "id": "5b5195e264bbd800" }, { "Cost": "$95.00", "Desc1": "Pay 0 balance transfer fee when you transfer a balance during the first 60 days.", "Desc2": "Jumpstart your financial fitness Get an introductory fee for balance transfers, save on interest†, and get your free monthly credit score.", "Keywords": "privileges,rebate,health,wellness,great eastern,insurance,policy,installments,split,cashflo", "OfferName": "Premium Plus", "OfferType": "CreditCard", "Status": "1", "imageURL": "http://vignette3.wikia.nocookie.net/objectmayhem/images/5/52/Credit_card.png/revision/latest?cb=20130629150408", "id": "5caf2155873f89c8" } ] } }With the Output Variable set to
offers, you can use the variable asresponse.offersin Bot Builder, for example, in a task response object as follows:print(JSON.stringify(response)); var data = response.offers for (i = 0; i < data.length; i++) { print('<a href="' + data[i].imageURL + '" target="_blank">' + data[i].OfferName + '</a><br>'); print(data[i].Desc1) print('<br>'); print('<br>'); print('Cost: ' + data[i].Cost) print('<br>'); if (i < data.length - 1) { print('<br>'); print('<br>'); } }
- Resolve: You can use the results of one payload response as input for a second request. For example, click Add Processor, enter a Name for your processor, set Type of Process to resolve, and Key to the name of the variable, and then define the Post URL using a variable from the first API Request. For example, https://app.asana.com/api/1.0/projects/{project_id} that returns the id field in the payload response as:
- Click Add to save the API request and then create another, or click Add & Exit to save the API request and close the dialog.
For multiple API requests, you should order the requests in the sequential order needed to get to entire data response. For example, you may need to request a list of workspaces, then a list of projects, and finally, a list of users. Use the Move Up ![]() icon and the Move Down
icon and the Move Down ![]() icon to reorder the API requests.
icon to reorder the API requests.
Note: No confirmation dialog is displayed when deleting an API request. If you click Continue or Save, the delete action is permanent and cannot be undone.
Adding the Response Sample
In the Response Sample section, you can enter or paste examples of the key-value pairs that you expect to receive in the task payload. When you define the response sample, the keys specified in the Response Sample section are available as drop-down choices for handling the output data.
Adding the Sample Response
- On the API Request tab, Expand the Sample Response section.
- Enter your Response Sample that contains the key-value pairs from your JSON response payload. Do one of the following:
- To format the view of the response as a JSON structure with indentation as shown in the following illustration, click the Formatted icon.
- To format the view of the response in serialized compact form as shown in the following illustration, click the Unformatted icon.
- To format the view of the response as a JSON structure with indentation as shown in the following illustration, click the Formatted
API Request - SOAP
After you describe the Bot action task on the General tab, and if required, define authentication requirements on the API Request tab, you are ready to start configuring the API request that asks for data from your Bot website, system, or web application for the task. This topic describes how to configure the request object for an action task with the Connection Mode set to SOAP.
Configuring API Request (SOAP)
For an action task request in Kore.ai and the Connection Mode set to SOAP, you need to define:
Defining the WSDL URL
Access Using a Connector
To get started with defining access using a connector for a task, follow these steps:
Adding a Response Sample
In the Response Sample section, you can enter or paste examples of the key-value pairs that you expect to receive in the task payload. When you define the response sample, the keys specified in the Response Sample section are available as drop-down choices for handling the output data.
After you describe the Bot action task on the General tab, and if required, define authentication requirements on the API Request tab, you are ready to start configuring the API request that asks for data from your Bot website, system, or web application for the task. This topic describes how to configure the request object for an action task with the Connection Mode set to SOAP.
Configuring API Request (SOAP)
For an action task request in Kore.ai and the Connection Mode set to SOAP, you need to define:
- Authorization – If required for your action task, you need to define the authorization to access the API, for example, using basic authorization, OAuth, or API Key. For more information, see API Request Tab – Authorization Settings.
- WSDL URL – Define the URL that contains your WSDL data. When the URL is retrieved, you can choose from a list of available operations based on the WSDL, and then customize the user input fields. For more information, see Defining the WSDL URL.
- Access Using a connector – Specify if your Bots Platform is installed on-premise and if you want to user the Kore.ai Connector agent. For more information, see Access Using a Connector.
- Response Sample – Define key-value pairs that you expect to receive in the Action task payload. The key-value pairs that you provide are available as drop-down choices for handling the data to display to the end-user. For more information, see Adding a Response Sample for an Action Task.
Defining the WSDL URL
- On the API Request tab, expand the WSDL URL section
- To begin the request task configuration for a SOAP request, enter the URL for your SOAP WSDL in the WSDL URL field.
- Click Get WSDL Description. A list of available operators defined in the WSDL opens.
- Click Select for the SOAP request that you want to use for your task. Kore.ai will automatically populate one or more Action Task Fields if necessary for user input.
Customizing SOAP Action Task Fields
You can customize the default input fields provided by Kore.ai after you select one or more of the available operations from your WSDL.
To customize the default Action Task Fields, follow these steps:
- Click Edit for the Action Task Field that you want to customize. The Setup Action Task Field dialog opens.
- To define the end-user fields to collect input, specify the values for the parameters in the Setup Action Task Field dialog as described in the following table.
Field Name Description Field Title The title of the task input field displayed in the end-user interface, for example, Country. Help Hint The help text displayed below the task setting the title to describe the task, for example, Enter the Country Name you want the Weather for. Field Key A read-only key that represents the end-user input value that you want to collect, for example, country. Field Type Specifies the type of task input field displayed in the end-user interface to collect user input for the request object to assign to the Key value. The default setting is Textbox, but can be customized to any one of the following: - Date – Displays the Format field where you can select the date format syntax for the end-user to define when the task is configured for their account. In the Select Date Format drop-down list, select one of the following:
- dd-MM-YYYY – For example, 16-05-1999
- MM-dd-YYYY – For example, 05-16-1999
- dd-MM-YY – For example, 16-05-99
- YYYY-MM-dd – For example, 1999-05-16
- URL – Displays a text box for the end-user to enter a URL including field validation for a correct URL syntax. In the Placeholder field, enter the help hint displayed in the text box, for example, Enter the URL for the website here.
- Textbox – Displays a text box for the end-user to enter text as the task input field, typically just a few words. In the Placeholder field, enter the help hint displayed in the text field, for example, Type in the name you want to embroider.
- Static Dropdown – Displays a drop-down list of choices to the end-user. Click Add Option to begin adding the list of items to display to the end-user with the following parameters:
- Option Name – The name of the option displayed to the end-user.
- Option Value – The value the represents the Option Name returned to the application.
- Default Value – Select the default value for the option when more than one option is defined.
- Searchable – Select to enable dynamic search and display as the end-user enters text in this field, or if no matches, allow free-form entry.
Click Save. To add additional items, click Add Option again. Edit or remove options in the Actions column for options.
- Dynamic Dropdown – Displays a drop-down list dynamically populated at runtime based on the response from a URL for your Bot, for example, a list of projects for a JIRA task notification. Define the following properties for a dynamically populated dropdown.
- Endpoint URL – The Bot endpoint URL, for example, https://app.asana.com/api/1.0/workspaces.
- Endpoint Content Type – The content type expected from the specified endpoint URL. One of: JSON, RSS, XML, URL Encoded JSON, CCV, Text, or Twitter Encoded JSON.
- Endpoint Method – One of:
- GET – Specifies an HTTP Request GET method for the task field.
- POST – Specifies an HTTP Request POST method for the task field.
- Response Path – The path in the response that contains the desired drop-down list values, for example, data.
- Label Key – The key for the label of the drop-down option, for example, name.
- Option Value Key – The key for the value of the drop-down option, for example, id.
- Add Payload Field – Click to add one or more fields from the response payload as options for the dynamic dropdown. For each payload field, enter the Payload field key and the Payload field value, and then click Save. Edit or delete payload fields in the Actions column.
- Searchable – Select to enable dynamic search and display as the end-user enters text in this field, or if no matches, allow free-form entry.
- Textarea – Displays a text area box for the end-user to enter text as the task input, typically for several sentences. In the Placeholder field, enter the help hint displayed inside the text area.
- Type Ahead – Displays a dynamically populated drop-down list of choices to the end-user at runtime when the user enters three or more characters that match the search results based on the response from the URL defined for the task. For example, a list of projects for a JIRA task notification message. Define the following properties for a dynamically populated drop-down.
- Endpoint URL – The Bot endpoint URL, for example, https://app.asana.com/api/1.0/workspaces.
- Endpoint Content Type – The content type expected from the specified endpoint URL. One of: JSON, RSS, XML, URL Encoded JSON, CCV, Text, Twitter Encoded JSON, Multipart/Form-data, or Multipart/Related.
- Endpoint Method – One of:
- GET – Specifies an HTTP Request GET method for the task field.
- POST – Specifies an HTTP Request POST method for the task field.
- Response Path – The path in the response that contains the desired drop-down list values, for example, data.
- Label Key – The key for the label of the drop-down option, for example, name.
- Option Value Key – The key for the value of the drop-down option, for example, id.
- Add Payload Field – Click to add one or more fields from the response payload as options for the type ahead field. For each type ahead field option, enter the Payload field key and the Payload field value, and then click Save. Edit or delete payload fields in the Actions column.
- Editable – Enables the end-user to enter text free-from in the field as an option when type-ahead search results do not match.
- Email – Displays a text box for the end-user to input an email address. In the Placeholder field, enter the help hint to display to the end-user inside the text box.
- Date & Time – Displays a text box for the end-user to input a date with time. In the Format field, enter the expected date or time format to display to the end-user in the date text box. In the Select Date Format drop-down list, select the date with time format.
- Time Zone – Displays a drop-down list of time zones based on the operating system settings.
- Location – Displays a text box for the end-user to enter a geographical location, for example, Orlando, FL, or 32801.
- Nested Form – Displays end-user input fields in a nested format below the parent input field. Specify the following fields for a nested form input field:
- Array Element Type – Select the data type of the parent input form element.
- Add Nested Form Field – Click to add one or more nested form fields.
- File Upload – Displays end-user control to search for, and select a file to upload. When clicked, enter the File Upload Payload Key. When the File Upload Payload Key is defined, in the File Upload Payload Field Value drop-down list, select one of the following types:
- File Name
- File Size
- File Content Type
Data Type Select one of these user input types: - String – Users can input any sequence of numbers, letters, or special characters.
- Number – Users can input a number. No special characters are allowed.
- Boolean – User can input a Boolean value of true or false.
- Email – User can input a valid email address.
- Object – Data from a Bot can be received as JSON objects, for example, as location details defined as:
“location” : {
“lat” : 17.4374614,
“lng” : 78.4482878
}
where you can refer to the properties in a request chain or task request as location.lat, and location.lng. - Array – Users can pass a comma-separated list of values to the Bot. For example, in Google Calendar, multiple attendees with data can be passed as:
“attendees”: [“user1”, “user2”, “user3”]
When selected, specify the Type for the array of end-user input as one of:- String
- Number
- Boolean
- Array
- Date
- Date – Users can type a complete date or select it from a date picker.
Placeholder The text displayed below the input textbox to help the user define the field. This field is only displayed for some Field Types. Visibility Specify if the task input field should be visible or hidden from the end-user.
The Visibility field can also be set to Custom field where data is captured from the user but not used as a query parameter or payload field. For example, with a JIRA bot, posting a comment on a ticket using an @mention tag as shown below:
“@Mike, please look into this issue”
The JIRA API to Post a comment requires one query field and one payload field as:- Issue ID
- Comment
With the Visibility field set to Custom, you can capture the user information for the user mentioned as
@Mikeusing the JIRA API to fetch data to append to thecommentfield value, but not to use as payload field or query field.
The default Visibility field setting is Visible.Mandatory Select if the end-user must define this setting to save the task settings configuration. Untranspose the Key Select to disable key transposition by Kore.ai. By default, Kore.ai transposes a key/value pair, for example, "parameter":"value"is transposed by Kore.ai to"parameter:{value:"actualValue"}. When selected, keys are not transposed by Kore.ai and passed in the response as received. - Date – Displays the Format field where you can select the date format syntax for the end-user to define when the task is configured for their account. In the Select Date Format drop-down list, select one of the following:
- Click Add & Continue to save the task field and create another Action Task Field. Or, click Add & Exit to save the Action Task Field and then close the dialog.
Access Using a Connector
To get started with defining access using a connector for a task, follow these steps:
- On the API Request tab, expand the Access using a connector section.
- In the Access Using A Connector field, select Yes to enable access for Kore.ai Bots using the Kore.ai Connector agent. This option is only visible if a Kore.ai Connector agent is configured and enabled in your enterprise on-premises network. For more information, see Using the Kore.ai Connector.
Adding a Response Sample
In the Response Sample section, you can enter or paste examples of the key-value pairs that you expect to receive in the task payload. When you define the response sample, the keys specified in the Response Sample section are available as drop-down choices for handling the output data.
Adding the Sample Response
- On the API Request tab, Expand the Sample Response section.
- Enter your Response Sample that contains the key-value pairs from your JSON response payload. Do one of the following:
- To format the view of the response as a JSON structure with indentation as shown in the following illustration, click the Formatted icon.
- To format the view of the response in serialized compact form as shown in the following illustration, click the Unformatted icon.
- To format the view of the response as a JSON structure with indentation as shown in the following illustration, click the Formatted
Step 4: Defining the Bot Response
The Bot response provides a message to the end-user to inform the end-user of the status or completion of the task. On the Bot Response tab for a task, you can define the message to display to the end-user from the API request payload. You can define a default response for all channels, and optionally define channel-specific messages.
After you describe your Bot alert task General tab settings and then configure the alert task API request chain, you are ready to define how the alert task results are displayed to the end-user. This section describes how to configure an alert task response.
To define the response object for an alert task, there are two sections:
- Report Template Definition – For some tasks, you may want to display report data to the end-user as a link that can display the payload response using a template, such as a table, contact card, or formatted for a specific message type such as a weather report.
Note: This section is not used for webhook alert tasks, action tasks, or RSS alert tasks.
Configuring the Report Template Definition
To add a link to a task to provide more information or a report, you can define a link and information to display for the report as a table, weather report, or contact card in the end-user application.
To get started with defining the Report Template Definition for a task, on the Bot Response tab, click the Expand icon in the (Optional) Report Template Definition section as shown in the following illustration.
To enable a report link for the task, select Yes to display the Report Template Definition section shown in the previous illustration.
When you add a link to a task response message, the end-user for the Bot has the ability to select the link and get more details, such as a table of values for Closed Sales Opportunities in the SalesForce Bot.
Define the following parameters to create a link in a task response message for the end-user to request a report for additional information from the initial task response message:- Link Title – The link text displayed to the end-user in the task post, for example, View Shopping Cart.
- Header – The title displayed when the report is displayed to the end-user, for example, These are the items in your Shopping Cart.
- Details – End-user help information displayed directly below the Header in the report that describes the content of the report, for example, Review your Shopping Cart, and then click Continue when you are ready to place your order.
- Template – Select one of the following format templates to display the data from the task response. For each type, define the Column Name, Key Mapping, Data Type, and template-specific options.
- Table – Data is presented in a table format with defined columns. Each mapping for the Table template can be set to Is Sortable, Display as an image, and Display it as a link. For more information, see Defining a Table Report.
- Fixed Column Table – Data is presented in a table format with the one or more columns fixed. Each mapping for the Fixed Column Table template can be set to Is Sortable, Column in fixed, Display as an image and Display it as a link. For more information, see Defining a Fixed-Column Table Report.
- Card Layout – Data is presented in a contact card format. Each mapping for the Card Layout template can be set to Is Sortable, Display as an image, and Display it as a link. For more information, see Defining a Card Layout Report.
- Weather Info – Date for a weather service response payload can be defined. Each mapping for the Weather Info template can be set to Is Sortable, Display as an image, and Display it as a link. For more information, see Defining a Weather Info Report.
- Card Layout with Actions – Displays a list of items with a mapped task link for each item. For more information, see Define a Card Layout with Actions Report.
- Card Layout with Group By – Displays a list of items grouped by a specific field. For more information, see Define a Card Layout with Group By Report.
- Shopping Cart Layout with Actions – Displays a list of items with a mapped task link for each item. For more information, see Define a Shopping Cart Layout with Actions Report.
- Message Definition – In this section, you define the look and feel of the data presented to the end-user when the alert is displayed based on the payload delivered by the webhook.
Defining the Message Definition
You can define two kinds of bot responses for a task:- The default for all channels: Author the default title and message response for all channels based on the payload response from the API request and any processors defined. You can create a mixture of data from the response object along with your own inputs, a set of Variable Keys derived from the Kore.ai system, custom variables, and the response sample. The message is displayed as a message, usually as a well-formed HTML message that contains one or more variables, such as the ID number or subject, from the request object data.
- Channel-specific response: You can also customize a Bot response message for specific channels, for example, Facebook Messenger, Skype, SMS, or Web/Mobile SDK, along with applying predefined message templates (tables, lists, graphs, etc.) for selected channels.
Message Definition Editor Features
To open the editor for your Action task, go to Bot Response > Message Definition. The Message Definition editor uses three tabs to offer the following features:
- Standard Text: Use basic editor controls and HTML markup, and variable keys to define and format the response. Enter text, and then format it using buttons for bold, italics, header styles, hyperlinks, ordered and unordered lists, and inserting lines.
- JavaScript: Add custom code to handle the end-user task response message, declare variables, use variable keys, and interact with third-party applications.
- Preview: View a sample of the rendered output message, with markup, as the bot users see it.
Adding Variable Keys
Follow these steps to add variable keys:
- Whether you are using Standard Text or JavaScript mode, to add a variable key, place the cursor where you want to add the variable and then click Variable Keys.
- In the Request/Response Keys dialog, expand the type of key node that contains the variable you want to insert.
- Select the variable that you want to add, for example,
response.data.idand then click Ok,
Standard Keys
Standard Keys are the following Kore.ai variable placeholders for reusable data.
- _labels _: Returns the friendly label in place of a GUID. For example, when user data is requested from a web service API, the ID of a project or workspace returned is a GUID. You can use the
_labels_key to show the user-friendly name of the GUID to the end-user instead of the GUID. In Kore.ai, a drop-down control stores the response for the_labels_key as, for example:{ "_labels_": { "15379386734832": "roadlabs.com", "26377329985341": "Test Project", "workspace": "roadlabs.com", "project": "Test Project" }, "_fields_": { "workspace": "15379386734832", "project": "26377329985341" } }To use the
_labels_key in a response:print('<a href="https://app.asana.com/0/' + workspace.id + '+_labels_[workspace.id]); - _tenant_ – Returns the tenant for the enterprise when defined. For example, JIRA requires a tenant for URLs, such as koreteam, in https://koreteam.atlassian.net/browse/BBF-3265. You can use the
_tenant_key to build a link in a task response such as:var title = request.fields.issuetype.name + ' <a href ="https://' + _tenant_ + '/browse/' + response.key + '" target = "_blank">' + request.fields.summary + '</a> has been created.';
- _fields_ – Used to return a task field input provided by the end-user that is not part of a payload response. For example, in a JIRA task, the end-user is prompted to enter a workspace name. You can use the
_fields_key to store the end-user input as:_fields_["workspace"]
- _last_run – Used to return the UTC date timestamp of a web service poll using ISO 8601 format, for example, 2016-03-05T12:44:38+00:00. For example, if a web service request returns all activity in a payload response, you can use the
_last_runkey to filter results displayed before or after the value for_last_run
Session Keys
Session Keys are Kore.ai variable placeholders for user data specific to a single session instance.
- UserContext.get(“_id”) – The Kore.ai userId.
- UserContext.get(“emailId”) – The email address associated with the userId.
- UserContext.get(“lastName”) – The last name of the user.
- UserContext.get(“firstName”) – The first name of the user.
- UserContext.get(“profImage”) – The image or avatar filename of the user.
- UserContext.get(“profColor”) – The account color for the user.
- UserContext.get(“activationStatus”) – The account status of the user.
- UserContext.get(“jTitle”) – The title of the user, if defined.
- UserContext.get(“orgId”) – The organizational ID of the user account, if defined.
- UserContext.get(“customData”) – A developer defined custom key.
- UserContext.get(“identities”) – Alternate user IDs, if defined.
Additional session keys may be available depending on how the Bot task is defined and the context of keys available for that task. For more information about session and context keys, see Using Session and Context Variables in Tasks.
Response Keys
Response Keys are parsed directly from your Response Sample text in the API Response tab. Response Keys vary depending on the Response Sample defined.
The following list is an example of Response Keys available for an Asana task.request.data.workspace request.data.projects request.data.name request.data.notes labels.498346170860 labels.30887755353556 labels["data.workspace"] labels["data.projects"] _tenant_ response.data.id response.data.created_at response.data.modified_at response.data.name response.data.notes response.data.completed response.data.assignee_status response.data.completed_at response.data.due_on response.data.due_at response.data.workspace.id response.data.workspace.name response.data.num_hearts response.data.parent response.data.followers[0].id response.data.followers[0].name response.data.hearted response.data.assignee response.data.projects[0].id response.data.projects[0].name response.data.memberships[0].project.id response.data.memberships[0].project.name response.data.memberships[0].section
Report Keys
Report Keys are Kore.ai variable placeholders that you can use in Report Template Definitions and Bot Responses to show links for additional information in a message that a user can click.
- reportInfo.reportLink – The link defined in the Report Template Definition section for this task.
- reportInfo.reportTitle – The title defined in the Report Template Definition for this task.
Previewing the Response
On the message editor, click Preview to generate a preview of your response using one of the following options:
- Test & Preview – Opens the task setup page for your Bot to define the task settings, authenticate, and then shows a preview of your response generated through your third-party web service, for example, Asana.
- Preview with sample response – Generates the preview using the sample data provided with the key-value pairs defined in the Response Sample section on the API Request tab for the task.
Examples of Custom JavaScript Response
The following examples show response objects using JavaScript to define the Post Title and Post Description sections that display output messages to the end-user when the task response message is sent.
In the following example, the variable labeled desc is only displayed if the value for the caption is defined in the JSON response.var desc = (caption !== "undefined" ? caption : "")
In the next example, a clickable URL using the task title is displayed in the task response message.
var tasklink = '' + title + '';
In this last example, the link variable depends on the type, either video or photo. Based on the type, the proper link is displayed.
var link = "";
switch (type) {
    case "video":
        var video = (typeof(video_url) != "undefined") ? video_url : permalink_url;
        link = '<video controls><source src ="' + video + '" type="video/mp4"></video>';
        break;
    case "photo":
        link = '<img src="' + image_permalink + '"></img>';
        break;
}
You can create custom JavaScript to handle task-specific requirements on the JavaScript tab based on the payload response for the task.
Channel-Specific Bot Response
A task response message may be dependent on the channel that the response message is displayed in, for example, in the Kore.ai Messenger client, an email, or in a text message. By default, the response message that you configure for Default for all Channels is sent to all channels. However, you can define a specific response for one or more or the 20+ supported channels to display to the end-user in that channel instead of the default response.
- To define the response message for a specific channel, click + Add Channel to display the Choose a Channel drop-down list.
- Select a channel, for example, Kore.ai, and then configure the response for that channel on the JavaScript tab.
Only one response can be defined for each channel. The following JavaScript examples show how you can override the Kore.ai default formatting template by channel.Note: Use the following keys to return default values for:
response.message – Returns the default message as a string.
response.message.choices – Returns the options choice or confirmation message types as an array.- Slack Channel Override Example
var message = {}; var attachments = []; var attachment = { 'text': "Exception occurred during API execution", 'color': '#FFCC00', 'attachment_type': 'default' }; attachments.push(attachment); message.attachments = attachments; print(JSON.stringify(message)); - FaceBook Channel Override Example
var message = { text: response.message }; var buttons = []; for (var i = 0; i < response.choices.length; i++) { var choiceItem = response.choices[i]; if (choiceItem.length > 20) { choiceItem = choiceItem.substring( 0, 18) + '..'; } var element = { content_type: 'text', title: choiceItem, payload: choiceItem }; buttons.push(element); } message.quick_replies = buttons; print(JSON.stringify(message)); - Email Channel Override Example
var message = {}; var text = response.message + ' <br> '; for (var i = 0; i < response.choices.length; i++) { text = text.concat( '<u> + response.choices[i] + ' < /u> <br>'); } message.text = text; print(JSON.stringify(message)); - SMS Channel Override Example
var message = {};
    var indexArray = ['a', 'b', 'c',
        'd', 'e',
        'f', 'g', 'h', 'i', 'j',
        'k', 'l', 'm', 'n', 'o',
        'p', 'q', 'r', 's', 't',
        'u', 'v', 'w', 'x', 'y',
        'z'
    ];
    var text = response.message + '\\n';
    for (var i = 0; i < response.choices
        .length; i++) {
        text = text.concat(indexArray[i] +
            ') ' + response.choices[
                i] + '\\n');
    }
    message.text = text;
    print(JSON.stringify(message));