リリース8.0.0以降、フローはサポートされなくなりました。この機能は今後のリリースでは廃止されます。これらのユースケースを構築するために、ダイアログタスクとデジタルフォームの使用をお勧めします。
ボットビルダープラットフォームでは、ボットタスクを、同じボットや別のボット内の他のボットタスクにマッピングできるユニークな機能があります。例として、コメントの追加またはチケットの割り当てといったタスクを、新しいサービスチケットを作成したときに生じるアラートに対応させることができます。アラートタスク内の詳細なイベントデータは、同じシステムまたは異なるシステムのアクションタスクの入力フィールドを自動入力するのに使用できます。ボットは、アラート内のコンテンツに基づいてユーザーにアクションを提案し、またイベントデータに基づいてアクションの自動実行をサポートしたりすることもできます。フロータスクは、あるタスクからのメッセージ応答を、同じボット、または異なるボットの別の関連タスクにリンクします。アクションタスクからアクションタスク、アラートタスクからアクションタスク、アラートタスクからダイアログタスクまで、異なるボット間でフローを作成することができます。ダイアログタスクを他のダイアログタスクに、またはダイアログタスク内のサブインテントにマッピングするには、条件付き遷移を使用しなければなりません。詳細は、 「ダイアログタスクフローの作成をご参照ください。
フローの仕組み
ボットがユーザーにメッセージを送信する際に、メッセージの右側にある[タスク]アイコンをクリックすると、次の画像のように、タスクにマッピングされたタスクがフローとして表示されます。ユーザーは Tweetタスクを使用してメッセージをツイートしたり、 Share Postタスクを使用してLinked Inアカウントに投稿したりすることができます。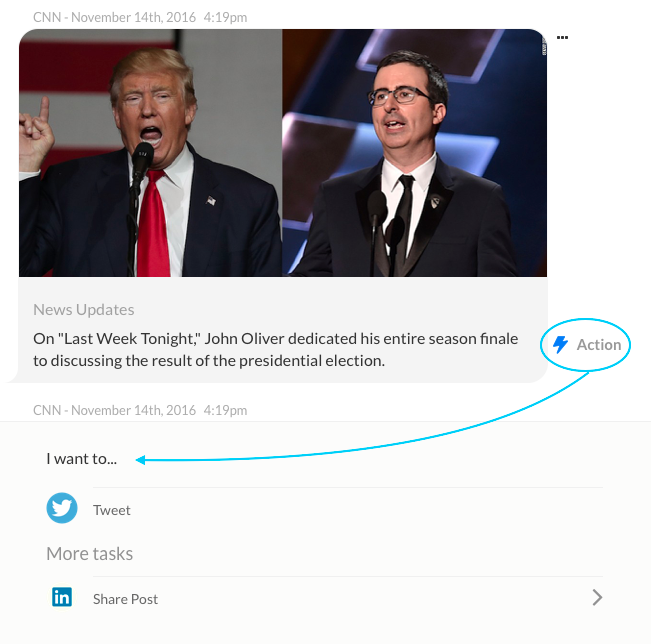 マッピングしたタスクを表示するには、ユーザーはタスクアイコンをクリックし、タスクを選択してから、タスクのパラメータを定義します。最初のタスクのペイロードからパラメータを使用して、次のタスクのフィールドに事前入力することができます。例として、Twitter タスクのペイロードレスポンスでは、新しいフォロワー名がSalesforceのお問い合わせ作成タスクに事前に入力されます。
フローの作成
新しいフローを作成するには、1つの既存ボットと、少なくとも1つの公開済みタスクが必要となります。詳細は、ボットタスクの定義」をご覧ください。以下のステップでフローを作成します:
- フローを作成したいボットを開きます。
- 左側のナビゲーションパネルをポイントして、ボットタスクをクリックします。
- ボットタスクのページで、フロータブをポイントし、プラスのアイコンをクリックします。
- フローの作成ページが開きます。
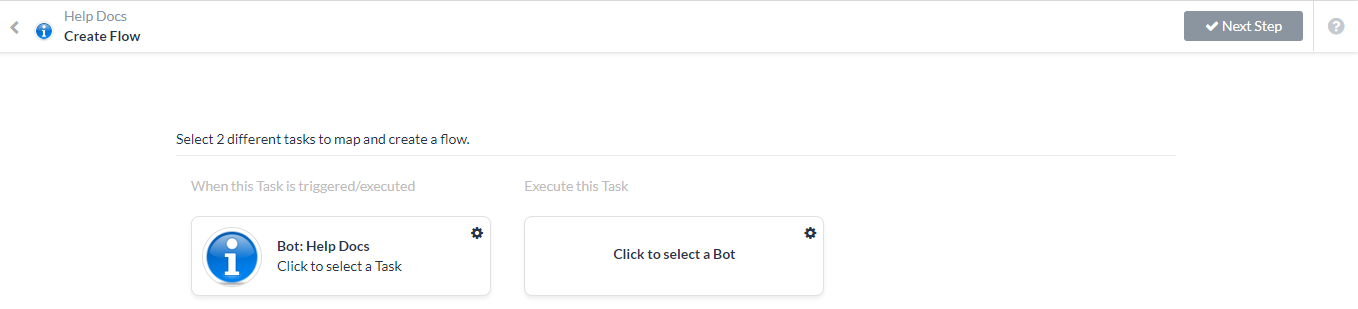
- 左側のこのタスクがトリガー/実行されるときの列でクリックしてタスクを選択をクリックすると、使用できるタスクが表示されます。
メモ:ボット管理者によって公開および承認されたタスクのみが、フローを作成するためのオプションとして表示されています。
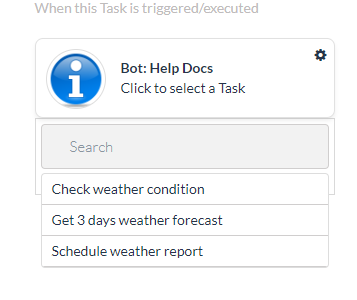
- フローを追加したいタスクを選択します。例: 天気予報のスケジュール。[マッピング]フィールドのリストが表示されます。
- 右側のこのタスクの実行 列でクリックしてボットを選択 をクリックし、たとえばフライト管理などへマッピングするタスク用のボットを選択します。
- 2つ目のボットについては、クリックしてタスクを選択を選択し、ボットのタスクをマッピングしてフィールドマッピングダイアログを表示します。
- 左側のこのタスクがトリガー/実行されるときの列のフィールドを、右側のフィールドセクションにドラッグアンドドロップすると、以下のフィールドが表示されます。
- ラベルのマッピング – エンドユーザーに表示されるフィールドラベルです。
- 値のマッピング – エンドユーザーのためにフィールドに表示される値です。
- テキストエリア拡大アイコンをクリックすると、[マッピング]フィールドがフルサイズのエディターで表示されます。
- あるタスクから次のタスクにパラメータをマッピングした後、表示されている各 フィールドのために、前の図に示されている以下のオプションのいずれかを選択します。
- 編集可能 – マッピングされた値が表示され、エンドユーザーによって編集可能です。
- 非表示 – フィールド はエンドユーザーには表示されません。例として、ユーザーID をボットに渡す必要がある場合がありますが、エンドユーザーにはユーザー名ドロップダウンのみを表示します。
- 読み取り専用 – フィールドおよびマッピングされた値が表示されますが、エンドユーザーは編集できません。例として、Asanaのタスクの割り当てタスクには、タスクIDおよびワークスペースが必要です。これらは、Asanaのタスクの更新アラートタスクからマッピングできますが、エンドユーザーにとっては、タスクを割り当てるためにユーザーを選択するだけなので、読み取り専用となります。
- 次のステップをクリックして、名前のマッピングセクションが表示されます。
- フローに対してこのマッピングを識別するために、ボットビルダーで使用されるマッピングの名前を名前のマッピングフィールドに入力します。オプションで、このタスクを推奨タスクとしてマークするを選択すると、 推奨タスクタブにタスクが表示されます。
- タスクのすべての必須フィールドが定義されている場合は、 フロー自動化の許可オプションが表示されます。選択すると、エンドユーザーはこのタスクを自動的に実行できるようになります。例として、Crashlyticsのアラートメッセージがサーバーダウンを示しているときは、事前定義された[マッピング]フィールドを使用して、すべての必要なフィールドがマッピングされていれば、エンドユーザーの追加入力なしでJIRA チケットを自動的に作成することができます。
- 保存して終了をクリックすると、フローが保存され、フローの作成ページが閉じます。


フローの公開
フローを設定した後に、エンドユーザーがあるタスクから別のタスクへマッピングできるようにするためには、フローを公開する必要があります。フローを公開するには
- フローが入っているボットを開きます。
メモ:ステータスが設定済みに設定されているフローのみが、公開できます。
- 左側のナビゲーションパネルをポイントして、公開をクリックします。
- 公開したいフローの設定
 アイコンをクリックして、公開をクリックします。
「フローが正常に公開されました」というメッセージが表示されると、フローの保存後にタスクをアカウントに追加したすべてのユーザーは、すぐにそのフローを使用できます。フローはいつでも編集することができ、また、ボット管理者が承認してデプロイした公開タスクのためにフローが保存されると、エンドユーザーに対して変更がすぐに適用されます。
릴리스 8.0.0부터는 흐름이 더 이상 지원되지 않습니다. 이 기능은 다음 릴리스에서 중단됩니다. 이러한 사용 사례를 구축하려면 대화 작업 및 디지털 양식을 사용하는 것이 좋습니다.
봇 빌더 플랫폼은 동일한 봇 또는 다른 봇 내에서 봇 작업을 다른 봇 작업에 매핑하는 고유한 기능을 제공합니다. 예를 들어 새 서비스 티켓이 생성될 때 발생하는 알림에 의견 추가 또는 티켓 지정 작업을 매칭시킬 수 있습니다. 경고 작업에 자세히 설명된 이벤트 데이터를 사용하여 동일하거나 다른 시스템에서 조치 작업의 입력 필드를 자동으로 채울 수 있습니다. 또한 봇은 알림에 포함된 콘텐츠를 기반으로 사용자에게 조치를 제안하고 이벤트 데이터를 기반으로 조치의 자동 실행을 지원합니다. 흐름 작업은 메시지 응답을 한 작업에서 동일하거나 다른 봇의 다른 관련된 작업과 연결합니다. 액션 작업에서 액션 작업으로, 알림 작업에서 액션 작업으로, 알림 작업에서 대화 작업으로 서로 다른 봇 간에 흐름을 생성할 수 있습니다. 대화 작업을 다른 대화 작업이나 대화 작업의 하위 인텐트와 매핑하려면 조건부 전환을 사용해야 합니다. 자세한 내용은 대화 작업 흐름 생성을 참조하세요.
흐름 작동 방식
봇이 사용자에게 메시지를 보낼 때 메시지 오른쪽에 있는 작업 아이콘을 클릭하여 다음 이미지와 같이 작업에 매핑된 작업을 흐름으로 표시할 수 있습니다. 사용자는 트윗 작업을 사용하여 메시지를 트윗하거나 게시물 공유 작업을 사용하여 링크드인 계정에 메시지를 게시할 수 있습니다. 매핑된 작업을 보려면 작업 아이콘을 클릭하고 작업을 선택한 다음 작업의 매개 변수를 정의합니다. 첫 번째 작업의 페이로드에 있는 매개 변수를 사용하여 다음 작업의 필드를 미리 채울 수 있습니다. 예를 들어, 트윗 작업 페이로드 응답에서 새 팔로워 이름을 Salesforce 연락처 생성 작업에 미리 채울 수 있습니다.
흐름 생성하기
새 흐름을 생성하려면 기존 봇과 하나 이상의 게시된 작업이 필요합니다. 자세한 내용은 봇 작업 정의하기를 참조하세요. 흐름을 생성하려면 다음 단계를 따르세요.
- 흐름을 생성하려는 봇을 엽니다.
- 왼쪽의 탐색 패널 위로 마우스를 가져간 다음 봇 작업을 클릭합니다.
- 봇 작업 페이지에서 흐름 탭으로 마우스를 이동하고 + 아이콘을 클릭합니다.
- 흐름 생성하기 페이지가 열립니다.
- 왼쪽의 이 작업이 트리거되고 실행되는 경우 열에서 작업을 선택하려면 클릭을 클릭하여 사용 가능한 작업을 표시합니다.
참고 사항: 봇 관리자가 게시하고 승인한 작업만 흐름 생성하기 옵션으로 표시됩니다.
- 흐름을 추가하려는 작업을 선택합니다(예: 날씨 보고서 예약). 매핑을 위한 필드 목록이 표시됩니다.
- 오른쪽의 이 작업 실행 열에서 봇을 클릭하여 선택을 클릭하고 항공편 관리와 같이 매핑할 작업에 대한 봇을 선택합니다.
- 두 번째 봇의 경우 작업을 선택하려면 클릭을 선택하여 봇 작업을 매핑하고 필드 매핑 대화 상자를 표시합니다.
- 왼쪽의 이 작업이 트리거되고 실행되는 경우 열의 필드를 오른쪽의 필드 섹션으로 끌어서 놓으면 다음 필드가 표시됩니다.
- 레이블 매핑 – 최종 사용자에게 표시되는 필드 레이블입니다.
- 값 매핑 – 최종 사용자의 필드에 표시되는 값입니다.
- 텍스트 영역 확장 아이콘을 클릭하여 매핑 필드를 전체 크기 편집기에 표시합니다.
- 한 작업에서 다음 작업으로 매개 변수를 매핑한 후 표시된 각 필드에 대해 이전 그림에 표시된 다음 옵션 중 하나를 선택합니다.
- 편집 가능 – 매핑된 값이 표시되고 최종 사용자가 편집할 수 있습니다.
- 숨김 – 최종 사용자에게 표시되지 않는 필드입니다. 예를 들면, 봇에 사용자 ID를 전달해야 하지만 최종 사용자에게는 사용자 이름 드롭다운만 표시됩니다.
- 읽기 전용 – 필드와 매핑된 값이 표시되지만 최종 사용자가 편집할 수는 없습니다. 예를 들어, Asana에 대한 작업 할당 작업의 경우 Asana 작업 업데이트 경고 작업에 매핑할 수 있는 작업 Id와와 워크스페이스가 필요하지만 최종 사용자는 작업을 할당할 사용자만 선택할 수 있으므로 읽기 전용입니다.
- 다음 단계를 클릭하여 매핑 이름 섹션을 표시합니다.
- 흐름에서 이 매핑을 식별하려면 매핑 이름 필드에서 봇 빌더에 사용된 매핑 이름을 입력합니다. 선택적으로 이 작업을 제안된 작업으로 표시를 선택하여 제안된 작업탭에 작업을 표시합니다.
- 작업의 필수 필드가 모두 정의되면 흐름 자동화 허용 옵션이 표시됩니다. 선택된 경우 최종 사용자가 이 작업을 자동으로 실행할 수 있습니다. 예를 들어 Crashlytics의 알림 메시지가 서버가 중단되었음을 나타내는 경우 모든 필수 필드가 매핑되어 있다면 미리 정의된 매핑된 필드를 사용하여 JIRA 티켓을 추가적인 최종 사용자 입력 없이 자동으로 생성할 수 있습니다.
- 저장 및 종료를 클릭하여 흐름을 저장하고 흐름 생성하기 페이지를 닫습니다.
흐름 게시하기
흐름을 설정한 후에는 흐름을 게시하여 최종 사용자가 한 작업에서 다른 작업으로의 매핑을 사용할 수 있도록 해야 합니다. 흐름을 게시하려면
- 흐름이 포함된 봇을 엽니다.
참고 사항: 상태가 설정됨으로 설정된 흐름만 게시할 수 있습니다.
- 왼쪽의 탐색 패널 위로 마우스를 가져간 다음 게시를 클릭합니다.
- 게시하려는 흐름의 설정 아이콘을 클릭한 다음 게시를 클릭합니다.
흐름이 성공적으로 게시됨 메시지가 표시되고 흐름을 저장할 때 자신의 계정에 해당 작업을 추가한 모든 사용자는 흐름을 즉시 사용할 수 있습니다. 언제든지 흐름을 편집할 수 있으며 봇 관리자가 승인 및 배포한 게시된 작업에 대한 흐름이 저장되면 최종 사용자에게 변경 내용이 즉시 적용됩니다.
Starting Release 8.0.0, Flows are no longer supported. This feature will be discontinued in the upcoming releases. We recommend using the Dialog Tasks and Digital Forms to build these use-cases
Bot Builder Platform offers the unique ability to map bot tasks to other bot tasks within the same or different bot.
For example, you can match an Add a Comment or Assign a Ticket task to an alert that occurs when a new service ticket is created. The event data detailed within alert tasks can be used to auto-populate the input field of Action tasks in the same or different system. Bots also can suggest actions to the user based on the content found within an alert and support the automatic execution of actions based on event data.
Flow tasks link a message response from one task to another related task of the same, or different bot. You can create flows between different Bots from action tasks to action tasks, alert tasks to action tasks, and alert tasks to dialog tasks.
To map dialog tasks to other dialog tasks, or to sub-intents within the dialog task, you must use conditional transitions. For more information, see Creating Dialog Task Flows.
How Flows Work
When a bot sends a message to a user, they can click the task icon located to the right of the message to display the tasks mapped to the task as a flow as shown in the following image. The user can use the Tweet task to tweet the message, or post to their Linked In account using the Share Post task.
To view the mapped tasks, the user can click the Task icon, selects a task, and then define the parameters for the task.
You can use parameters from the first task’s payload to pre-populate fields in the following tasks. For example, in a Twitter task payload response, the New Follower Name can be pre-populated in the Salesforce Create Contact task.
Creating a Flow
To create a new flow, you need an existing bot as well as at least one published task. For more information, see Defining Bot Tasks.
Follow these steps to create a Flow:
- Open the bot in which you want to create a Flow.
- Hover over the left-side navigation panel, and click Bot Tasks.
- On the Bot Tasks page, hover over the Flows tab and click the plus icon.
- The Create Flow page opens.
- In the When this Task is triggered/executed column on the left, click Click to select a Task to display the tasks available.
Note: Only tasks that are published and approved by the Bots Admin are displayed as options to create a flow.
- Select the task that you want to add a flow to, for example, Schedule Weather Report. A list of fields is displayed for mapping.
- In the Execute this Task column on the right, click Click to select a Bot and choose a Bot for the task that you will map to, for example, Flight Management.
- For the second bot, select Click to select a Task to map the bot tasks and display the field mapping dialog.
- Drag-and-drop fields in the When this Task is triggered/executed column on the left to the Field section on the right for the following fields:
- Label Mapping – The field label displayed to the end-user.
- Value Mapping – The value displayed in the field for the end-user.
- Click the expand text area icon to display the mapping fields in a full-size editor.
- After you map a parameter from one task to the next task, select one of the following options shown in the previous illustration for each Field displayed:
- Editable – The mapped value is displayed and editable by the end-user.
- Hidden – The Field is not displayed to the end-user. For example, you may need to pass a User ID to the Bot, but only display the User Name drop-down to the end-user.
- Read Only – The Field and mapped value is displayed, but not editable by the end-user. For example, for the Assign Task task for Asana, you need the Task Id and Workspace, which can be mapped from the Asana Task Updates alert task, but are read-only because the end-user only needs to select which user to assign the task to.
- Click Next Step to display the Mapping Name section.
- Enter the name of the mapping used in Bot Builder in the Mapping Name field to identify this mapping for the flow. Optionally, select Mark this Task as Suggested Task to show the task on the Suggested Tasks tab.
- If all mandatory fields for the task are defined, the Allow flow automation option is displayed.
When selected, the end-user can enable this task to run automatically. For example, when an alert message for Crashlytics indicates a server is down, using the predefined mapped fields, a JIRA ticket can be automatically created without additional end-user input provided all required fields are mapped. - Click Save & Exit to save the flow and close the Create Flow page.
Publishing a Flow
After you configure your flow, you must publish the flow to make the mapping from one task to another available for end-users.
To publish a flow
- Open the bot that contains the Flow.
Note: Only flows with status set to Configured can be published.
- Hover over the left-side navigation panel and click Publish.
- Click the Settings icon for the flow you want to publish, and then click Publish.
The Flow published successfully message is displayed and the flow is immediately available for any users that add the task to their account when the flow is saved. You can edit the flow at any time and changes are applied immediately for end-users when the flow is saved for any published task approved and deployed by the Bots Admin.